Demo application code : Here is a link where you can download the : Demo Application
Table Of Contents
- Introduction
- The Demo App Overview
- Angular.Js Introduction
- The Publisher
- The Angular.js Website
- That's It
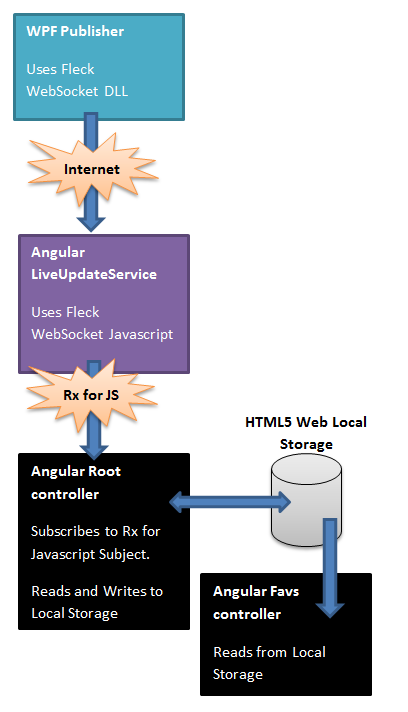
- When on the root page, the Angular.js will listen to messages sent via the WPF publisher over a web socket, which then gets broadcast internally using the Reactive Extensions for JavaScript to anyone interested, which in this article is essentially just the root page.
- The user may also choose to navigate to a favourites page that will display some thumbnail images of their HTML 5 local storage persisted favourites. These thumbnails may be clicked on to show a pretty standard ColorBox (Lightbox etc etc type thing) jQuery plugin.
- The user may also choose to a view static about page, which I simply added to make enough routes to make things more worthwhile when demonstating the routing within Angular.js
- If you find that some of the Publisher.Wpf projects references can not be found, I have included them in a "Lib" folder where you can simply re-reference them from
- You should ensure that the Publisher.Wpf project is run up first and that it is displaying all the images. This can be done by building the Publisher.Wpf project to an EXE and simply finding the EXE in your file system and double clicking it to run (or use Visual Studio to run up an instance in DEBUG)
- You should then run the Angular web site, make sure that you have Index.html set as start page in Visual Studio and then use Visual Studio to run the Angular web site
Introduction
This article is my first one for quite a while, there is a reason for that but I will not bore you all with that. Anyway I have written this article after a little time off. So what does it do, what is this article about?
I decided to spend a bit of time to learn a bit more about a popular web MVC framework by our friends atGoogle called Angular.js, which is a JavaScript MVC framework, which is a bit of departure for me from my usual XAML influenced world. It is however good to try things out to get an appreciation of how you would do things in different languages/environments (my old mentor Fredrik Bornander (AKA the Swede) told me that), so I decided to take Angular.js for a spin.
This article will talk about some of the fundamental ideas behind Angular.js, and shall then focus on the specifics of the demo application that I have created to go along with this article.
Before we get into the actual article I will just breifly (not too techie just yet, though I know you lot will want to see that, and it will come don't worry) talk about what the demo app does in plain terms, so you know how to drive the thing yourself when you download it.
The Demo App Overview
There are 2 parts to the attached demo app
Publisher
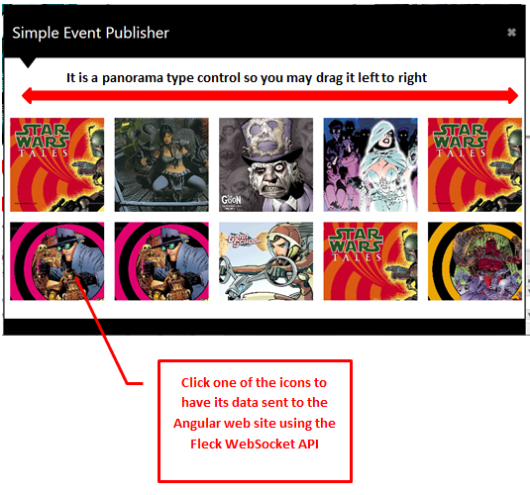
This is a standard WPF project, as such produces a EXE file that can be run. I will not be spending too much time talking about the publisher in this article, as it is not the important part of the article, it is simply a vehicle to demonstrate stuff within the Angular.js web site. Anyway what the the publisher does it to allow user to click a image, when the user clicks an image a message is sent to the Angular.js web site using web sockets (more on this later). In a nutshell that is all the publisher does.
Website
The Angular.js web site, is where the fun stuff happens (at least in my opinion). The Angular.js web site essentially carries out these tasks
The root page will display an image tile for each allowable message received. The image tile may be resized and dragged around thanks to some jQuery UI love. The user may then choose to save the image tile to their favourites, which will cause ALL the information about the image tile to be saved to HTML 5 local storage. This information includes size, position etc etc, so when the user comes back to the root page, their favourites (the ones they saved) should appear exactly as they were before. The user may also decide to remove image tiles from their favourites from the root page.
So in plain terms that is all there is to it, this image may help to solidify what I just stated in words, picture says 1000nd words and all that:
This is what the 2 parts of this articles demo code should look like when they are running correctly:

Click image for larger version
IMPORTANT NOTE:
You should really ensure that you follow these steps to run the demo code successfully
Angular.Js Introduction
In this section I will discuss some of the BASICS of working with Angular.js. This section will be a mixture of my own words, and text lifted directly from the Angular.js web site. I will not be covering everything thatAngular.js does, as that would be more like a book really, and I just do not have that much time. I will however be covering some of the basic Angular.js building blocks, so should you read this article and think "mmm...This Angular stuff intrigues me, where can I learn more", by following the the hyperlinks of course
Apps
Each Angular.js application will at some point need to use a Angular.js ng-app binding within the html, or via some code that does the same job as the declaritive html binding. This code essentialy bootstrapsAngular.js and lets it know what context the application is running in. For example you may have the following code:
<div id="outer">
  <div id="inner" ng-app="myApp">
  	<p>{{name}}</p>
  </div>
  <p>This is not using the angular app, as it is not within the Angular apps scope</p>
</div>
It can be seen that we can tell a particular section of the html to act as an Angular.js application. In this example what this means is that the div with id="inner" WILL have a section of the html (though there is nothing to stop you making the actual Body tag be the angular app) that is considered to be the Angular.jsapplication, and as such will have full access to the Angular.js application features (which we will discuss below).
Whilst the div with the id="outer" WILL NOT be considered to be part of the Angular.js application, and as such WILL NOT have ANY access to the Angular.js application features (which we will discuss below).
Services
Services in Angular.js are much the same as they are in WinForms/WPF or Silverlight. They are little helper classes that may provide functionality that could be used across the application. In strongly typed languages such as C# we would typically make these services implement a particular interface and inject them (via constructor or property injection) into our application code. We would then be able to provide fakes/mocks of these services within our tests, or provide alternative versions if the underlying system changes (for example swapping from Mongo DB to Raven DB storage)
Whilst Angular.js doesn't support interfaces (though you could use TypeScript for that) it does support the injection of real/fakes services into its code. In fact I would say that one of Angular.js main points is it supports IOC out of the box.
Modules
Most applications have a main method which instantiates, wires, and bootstraps the application. Angular apps don't have a main method. Instead modules declaratively specify how an application should be bootstrapped. There are several advantages to this approach:
- The process is more declarative which is easier to understand
- In unit-testing there is no need to load all modules, which may aid in writing unit-tests.
- Additional modules can be loaded in scenario tests, which can override some of the configuration and help end-to-end test the application
- Third party code can be packaged as reusable modules.
- The modules can be loaded in any/parallel order (due to delayed nature of module execution).
http://docs.angularjs.org/guide/module
The recommended approach is to actually split up your modules, such that you may have a structure like this:
- A services module
- A directives module
- A filters module
- Application module(s)
This is how you might define a Angular.js module, the give away is the use of the function "module" thatAngular.js provides
angular.module('xmpl.service', []).
  value('greeter', {
    salutation: 'Hello',
    localize: function(localization) {
      this.salutation = localization.salutation;
    },
    greet: function(name) {
      return this.salutation + ' ' + name + '!';
    }
  }).
  value('user', {
    load: function(name) {
      this.name = name;
    }
  });
Dependency Injection
Angular.js was built with dependency injection (IOC) in mind, as such a lot of the infrastructure may be swapped out for mocked versions, or controllers could be tested using mocked services. Showing how to do this, or how to test Angular.js applications in not in the scope of this article. If you want to know that, visit the Angular.js docs, or get a book. Sorry
Following on from the previous module example, this is what a module might look like that took some dependencies, in this case a module that we just defined above, where we use the 2 values 'greeter' and 'user' which are both functions available within the 'xmpl.service' module. This module could be supplied with a mocked version of the 'xmpl.service' module.
angular.module('xmpl', ['xmpl.service']).
  run(function(greeter, user) {
    // This is effectively part of the main method initialization code
    greeter.localize({
      salutation: 'Bonjour'
    });
    user.load('World');
  })
Routing
Angular.js is primarily a single page application framework, and as such has the concept of view templates that can be applied in response to a certain route being requested.
Routing in Angular.js is actually not that different to routing in things like ASP MVC or even node.js for that matter.
Routing is accomplished by using a prebuild service called $routeProvider, which comes for free as part ofAngular.js. It allows the user to configure their routes using a very simple API, which boils down to these 2 functions
when(path, route)- Where the the
routeobject has the following properties- controller
- template
- templateUrl
- resolve
- redirectTo
- reloadOnSearch
- Where the the
otherwise(params)
Here is a little example
$routeProvider
    .when('/products', {
        templateUrl: 'views/products.html',
        controller: 'ProductsCtrl'
    })
    .when('/about', {
        templateUrl: 'views/about.html'
    })
    .otherwise({ redirectTo: '/products' });;
Views
There is not too much to say about the view. We have all probably come across html before. That is what the views contain. The only difference being that Angular.js views will contain additional (non standard html) bindings that allow the view template to display data from a Angular.js scope object. The scope object would typically come from a controller (though it is not limited to coming from a controller, it could be inherited, or be created via a directive say).
Here is a small example of a view, notice the bindings used in there, such as the use of ng-model and ng-repeat and also the usage of some of Angular.js pre-built fiters, nameley filter and orderBy (Please note I will not be covering filters in this article)
Search: <input ng-model="query">
Sort by:
<select ng-model="orderProp">
  <option value="name">Alphabetical</option>
  <option value="age">Newest</option>
</select>


<ul class="phones">
  <li ng-repeat="phone in phones | filter:query | orderBy:orderProp">
    {{phone.name}}
    <p>{{phone.snippet}}</p>
  </li>
</ul>
Controllers
Controllers are used to define the scope for the views. Scope can be thougt of as the variables and functions that the view may use, say by using a ng-click binding. Here is the controller code that goes with the view template that we just saw.
function PhoneListCtrl($scope) {
  $scope.phones = [
    {"name": "Nexus S",
     "snippet": "Fast just got faster with Nexus S.",
     "age": 0},
    {"name": "Motorola XOOM™ with Wi-Fi",
     "snippet": "The Next, Next Generation tablet.",
     "age": 1},
    {"name": "MOTOROLA XOOM™",
     "snippet": "The Next, Next Generation tablet.",
     "age": 2}
  ];

  $scope.orderProp = 'age';
It can be seen that the controller defines the following 2 scope properties
phones: which is a JSON arrayorderProp: which is a single string value
Scope
Scope is the glue that allows the view and the controllers defined scope object properties/function to bind together. If you have ever done any XAML based tech such as WPF/Silverlight/WinRT you can think of scope as a DataContext. In fact there are quite a few UI frameworks that have a scope like concept. XAML technologies have DataContext which would typically be a ViewModel, whilst another popular MVVM JavaScript library Knockout.js also has the idea of scope, and heirarchical scope, which is accessable in binding(s) within the html using various prebuilt key words.
Angular.js also supports nested/heirarchical scopes, which can get a bit confusing at times. I personally found that one of the best ways to work with Angular.js and its scopes is to install the Batarang Chrome addin, which has a nice way of allowing youto drill into scopes using a scope inspector (kind of like Snoop for WPF or SilverlightSpy for Silverlight)
This diagram may help solidify the concept of view-controller-scope.

Click image for larger version
Directives
Angular.js makes use of a pretty novel concept, which are known as directives. Directives are clever chaps, that actually allow you to create extra attributes, or even new DOM fragments. This is all controlled by applying certain constraints to a directive, such that you may wish to state that a certain directive may only be used as an attribute, or that it can only be used as an element. You can sort of think of directives as custom controls.
Directives also follow the normal Angular.js rules, in that they support dependency injection, and they are also scope aware.
One of the best bits of information I came across when writing this article was this one by Bernardo Castilho : http://www.codeproject.com/Articles/607873/Extending-HTML-with-AngularJS-Directives, I urge you to read that, it is an excellent article, and by the end of it you will totally get directives.
Anyway that concludes the Angular.js basics, it's now on with the actual demo application code walkthrough.
The Publisher
As I have previously stated the publisher is a WPF application (as such it is a runnable EXE), that is not really the main thrust of this article. The main points about the publisher are:
- That is uses the awesome Fleck WebSocket library to talk to the Angular.js web site
- That is has a Win8 type panorama, so you can scroll around using the mouse
Here is what the WPF publisher should look like when it is running:
Now on to the important part, the web socket code.
public class WebSocketInvoker : IWebSocketInvoker
{
    List<IWebSocketConnection> allSockets = new List<IWebSocketConnection>();
    WebSocketServer server = new WebSocketServer("ws://localhost:8181");

    public WebSocketInvoker()
    {
        FleckLog.Level = LogLevel.Debug;
        server.Start(socket =>
        {
            socket.OnOpen = () =>
            {
                Console.WriteLine("Open!");
                allSockets.Add(socket);
            };
            socket.OnClose = () =>
            {
                Console.WriteLine("Close!");
                allSockets.Remove(socket);
            };
            socket.OnMessage = Console.WriteLine;
        });
    }

    public void SendNewMessage(string jsonMessage)
    {
        foreach (var socket in allSockets)
        {
            socket.Send(jsonMessage);
        }
    }
}
This is all there is to that part actually, pretty cool huh (all thanks to the Fleck WebSocket library). Now I realise that there may be some of you out there that are like why didn't you use SignalR, well I could have, but that would have been a pretty different article, for this one I wanted to concentrate purely on the web client side of things, so chose to use a raw web socket, and the Fleck WebSocket library fits that bill perfectly.
In this code the SendNewMessage will be called when a user clicks an image, and the name of the image clicked will be sent via the web socket to the Angular.js web site. The Angular.js web site, has a copy of all the possible images, as I did not want to get into complex POST operations of files, and obviously a web server can't show a local file (which would be a security risk in my (and any others) opinion), so I opted for shared files that the publisher and the Angular.js web site both know about for the purpose of this demo application/article.
The Angular.js Website
This section will discuss the nitty gritty about the attached demo code Angular.js web site. Hopefully if you have got to this point, some of the stuff I mentioned above will begin to make sense when you see some code.
Require.js Usage
Before I starting looking into Angular.js I was looking into using Require.js, which is a module loading framework for JavaScript, which allows you to specify your dependencies and preferred module load order. I wrote about this in another article, which you can read here: Modular Javascript Using Require.Js
I have kind of built apon that a bit more in this article (with a little bit of a kick start with the source code that comes with the Angular.js O'Reilly book : https://github.com/shyamseshadri/angularjs-book)
So that is where you can do more reading around this subject if you want to, but let's crack on and see what the Require.js element of the attached Angular.js website looks like shall we.
It starts with this sort of code in the main Angular.js page (Index.html):
See index.html
<html>
.....

<script data-main="scripts/main"
    src="scripts/vendor/require.js"></script>
</html>
This is standard Require.js code that tells Require.js which is the main bootstrap code file that it should run. It can be seen that this is scripts/main, so let's have a look at that now shall we
See scripts\main.js
// the app/scripts/main.js file, which defines our RequireJS config
require.config({
    paths: {
        angular: 'vendor/angular.min',
        jqueryUI: 'vendor/jquery-ui',
        jqueryColorbox: 'vendor/jquery-colorbox',
        jquery: 'vendor/jquery',
        domReady: 'vendor/domReady',
        reactive: 'vendor/rx'
    },
    shim: {
        angular: {
            deps: ['jquery', 'jqueryUI', 'jqueryColorbox'],
            exports: 'angular'
        },
        jqueryUI: {
            deps: ['jquery']
        },
        jqueryColorbox: {
            deps: ['jquery']
        }
    }
});

require([
  'angular',
  'app',
  'domReady',
  'reactive',
  'services/liveUpdatesService',
  'services/imageService',
  'services/localStorageService',
  'controllers/rootController',
  'controllers/favsController',
  'directives/ngbkFocus',
  'directives/draggable',
  'directives/resizable',
  'directives/tooltip',
  'directives/colorbox'
  // Any individual controller, service, directive or filter file
  // that you add will need to be pulled in here.
],
  function (angular, app, domReady) {
      …….
      …….
      …….
      …….

  }
);
There is quite a bit going on here.It does however boil down to 3 parts
- We configure Require.js with the paths of where the JavaScript files are
- We configure a preferred load order for Require.js by using the Require.js shim. The shim essentially sets up the dependencies for the libraries to load
- We then use Require.js [Require] to tell the Angular.js application what dependencies we would like to be satisfied.
I have also used Require.js to satisfy the demo applications controller requirements. An example of which is as follows:
define(['controllers/controllers',
        'services/imageService',
        'services/utilitiesService',
        'services/localStorageService'],
    function (controllers) {
        controllers.controller('FavsCtrl',
            ['$window',
            '$scope',
            'ImageService',
            'UtilitiesService',
            'LocalStorageService',
    function (
        $window,
        $scope,
        ImageService,
        UtilitiesService,
        LocalStorageService) {

        ......
        ......
        ......
        ......
        ......


    }]);
});
The Main App Setup
See scripts\main.js
Now that you have seen the main bootstrapping code (which is mainly taken up by the Require.jsconfiguration), lets just have a quick look at the actual Angular.js bootstrapping bit.
This is the bit that we discussed right at the start of this article, you know the bit that actual makes the attached code an "Angular.js" application.
That part is as follows:
function (angular, app, domReady) {
    'use strict';
    app.config(['$routeProvider',
    	function ($routeProvider) {
    	....
    	....
    	....
        }]);
    domReady(function () {
        angular.bootstrap(document, ['MyApp']);

        // The following is required if you want AngularJS Scenario tests to work
        $('html').addClass('ng-app: MyApp');
    });
}
This bootstrapping does 2 things:
- It sets up the available valid routes, which we will be looking at next
- It relies on a special Angular.js addin called "DomReady" which works much the same way as jQueryand its
ready()event. After the dom is ready the "HTML" element is attributed up to make it act as the Angular.js application.
There is also the question of where the "MyApp" module comes from. Who creates that prior to it being bootstrapped here?
The answer to that is that is lives in its own file "app.js" which looks like this
See scripts\app.js
// The app/scripts/app.js file, which defines our AngularJS app
define(['angular', 'controllers/controllers', 'services/services', 'filters/filters', 'directives/directives'], function (angular) {
  return angular.module('MyApp', ['controllers', 'services', 'filters', 'directives']);
});
The Routing
See scripts\main.js
For the demo application there are 3 valid routes Root/Favs/About. Each of these is configured using the standard Angular.js $routeProvider service, where all the set up code is done within the boostrapping filemain.js.
unction ($routeProvider) {
    $routeProvider
        .when('/', {
            templateUrl: 'views/root.html',
            controller: 'RootCtrl'
        })
        .when('/favs', {
            templateUrl: 'views/favs.html',
            controller: 'FavsCtrl'
        })
        .when('/about', {
            templateUrl: 'views/about.html'
        }).otherwise({ redirectTo: '/' });;
}
I think it is pretty obvious from that there are 3 routes as stated above and how they are configured. So I wil not say any more on that.
The Root Page
This is the most complex page within the demo web site I have put together, as it brings in lots of different things together.
So what does this page do exactly?
The idea is that there is a service called "LiveUpdatesService" that listens to the client end of the Web Socket that the WPF publisher is pushing data out on. The LiveUpdatesService uses the reactive extensions for JavaScript to provide a stream of data that may be subscribed to.
The root page will subscribe to this pulished stream, and every time it sees a new entry it will add a newjQuery UI Draggable/Resizable UI element, providing it has not already got an element with the same image name shown.
It also allows the user to save the images to HTML 5 local storage and to remove them from local storage too. If there are items aready within local storage theirs details are used as the initial start state for the Root page. I have to say this looks cool, as all the information is persisted, so it remembers the sizes, locations, ZIndex, so it comes back exactly how you saved it.
So in general terms that is what the root page does.
This is what the root page looks like

Click image for larger version
So that is what it looks like, want to see some code?
LiveUpdatesService
This is the service that listens for the incoming data from the publisher web socket, and also pushes the newly recieved web socket data out, via a reactive extensions for JavaScript Subject object. Here is the code for the service:
define(['services/services'],
  function (services) {
      services.factory('LiveUpdatesService', ['$window',
      function (win) {

          var subject = new Rx.Subject();

          if ("WebSocket" in window) {

              // create a new websocket and connect
              var ws = new WebSocket('ws://localhost:8181/publisher', 'my-protocol');

              // when data is comming from the server, this metod is called
              ws.onmessage = function (evt) {
                  subject.onNext(evt.data);
              };

              // when the connection is established, this method is called
              ws.onopen = function () {
                  win.alert('Websocket connection opened');
              };

              //// when the connection is closed, this method is called
              ws.onclose = function () {
                  subject.onError('Websocket connection closed, perhaps you need to restart the Publisher, and refresh web site');
              };
          }

          return {

              publishEvent: function (value) {
                  subject.onNext(value);
              },
              eventsStream: function () {
                  return subject.asObservable();
              }
          };
      }]);
  });
And here is the root controller code that make use of the reactive extension Subjects stream, where we first check to see whether we have seen an item with the same name before, and if we have simply show a message to the user (note that we DO NOT use window directly, but rather use a $window angular service (which may be more easily mocked)).
If we have not seen the image name before, a new item is created using the ImageService which we position randomly
LiveUpdatesService.eventsStream().subscribe(
    function (data) {
        if ($location.path() == '/') {
            var idx = $scope.imageitems.propertyBasedIndexOf('name', data);
            if (idx >= 0) {
                $window.alert('An item with that name has already been added');
            } else {
                var randomLeft = UtilitiesService.getRandomInt(10, 600);
                var randomTop = UtilitiesService.getRandomInt(10, 400);
                var randomWidth = UtilitiesService.getRandomInt(100, 300);
                var randomHeight = UtilitiesService.getRandomInt(100, 300);

                $scope.imageitems.push(ImageService.createImageItem(
                    data, randomLeft, randomTop, randomWidth, randomHeight, false));
                $scope.$apply();
            }

        }
    },
    function (error) {
        $window.alert(error);
    });
LocalStorageService
This service is responsible for persisting/fetching data items from HTML 5 local storage. I think this code is pretty self explanatory, so I will leave it at that:
define(['services/services'],
  function (services) {
      services.factory('LocalStorageService', [
        function () {

            return {

                isSupported: function () {
                    try {
                        return 'localStorage' in window && window['localStorage'] !== null;
                    } catch (e) {
                        return false;
                    }
                },

                save: function (key, value) {
                    localStorage[key] = JSON.stringify(value);
                },

                fetch: function (key) {
                    return localStorage[key];
                },

                parse: function(value) {
                    return JSON.parse(value);
                },

                clear: function (key) {
                    localStorage.removeItem(key);
                }
            };
        }]);
  });
ImageService
This service simply aids in the creation of ImageItem objects for the Root page and FavItem objects for the Favs page.
function ImageItem(name, left, top, width, height, isFavourite) {

    var self = this;
    self.name = name;
    self.left = left;
    self.top = top;
    self.width = width;
    self.height = height;
    self.isFavourite = isFavourite;

    self.styleProps = function () {
        return {
            left: self.left + 'px',
            top: self.top + 'px',
            width: self.width + 'px',
            height: self.height + 'px',
            position: 'absolute'
        };
    };
    return self;
};


function FavImageItem(name) {

    var self = this;
    self.name = name;
    return self;
};

define(['services/services'],
  function (services) {
      services.factory('ImageService', [
        function () {
            return {
                createImageItem: function (name, left, top, width, height, isFavourite) {
                    return new ImageItem(name, left, top, width, height, isFavourite);
                },
                createFavImageItem: function (name) {
                    return new FavImageItem(name);
                }
            };
        }]);
  });
One important thing to note is how the dynamic CSS is done in Angular.js. To achieve dynamic CSS that is updated when objects change you need to provide a function to call, which is what you can see here in thestyleProps() function:
self.styleProps = function () {
    return {
        left: self.left + 'px',
        top: self.top + 'px',
        width: self.width + 'px',
        height: self.height + 'px',
        position: 'absolute'
    };
};
The markup that uses this as follows, which means when ever an update is done on the JSON object the CSS is updated too, and the html reflects this. This was not that easy to find out, so make sure you read this bit a few times, solidify that knowledge, wedge it in there good and hard
ng-style="imageitems[$index].styleProps()"
UtilitiesService
This service provides the following functions:
- Adds a
propertyBasedIndexOf()to arrays, which allows an array to be searched for a particular item property where the index will be returned getRandomInt(): which is used to get a random x/y point to place new image items at the 1st time they are showndelayedAlert(): shows an alert after some delay time
Here is the code:
define(['services/services'],
  function (services) {
      services.factory('UtilitiesService', [
        function () {

            var initialised = false;

            return {

                addArrayHelperMethods: function () {
                    if (!initialised) {
                        initialised = true;
                        Array.prototype.propertyBasedIndexOf = function arrayObjectIndexOf(property, value) {
                            for (var i = 0, len = this.length; i < len; i++) {
                                if (this[i][property] === value) return i;
                            }
                            return -1;
                        };
                    }
                },

                getRandomInt: function (min, max) {
                    return Math.floor(Math.random() * (max - min + 1)) + min;
                },

                delayedAlert: function(message) {
                    setTimeout(function () {
                        $window.alert(message);
                    }, 1000);
                }
            };
        }]);
  });
Draggable Directive
To achieve the dragging I already knew I had to use the jQuery UI library, but when working with Angular.js, there is a definate Angular.js way, and littering your controller code with DOM changing jQuery code is most certainly NOT the Angular.js way. So what option does that leave us. Well that is really whereAngular.js directives fit, they are designed to replace and enhance the DOM, that is what directives do best.
So anytime you need to alter the DOM directly (not through scope changes) you should be thinking about using Angular.js directives.
So all that said, it turs out to be a simple matter to create a small jQuery UI Angular.js directive, which can be seen in the <table....draggable resizable>....</table> table tags in the markup.
Here is the draggable directives code, where you can see that this is restricted to attribute usage, and simply delegates the work to the actual jQuery UI (which was referenced as a requirement within theRequire.js configuration, so we know its loaded ok, otherwise the Angular.js would not have started, as it has jQuery UI as a dependency within the Require.js configurtion).
One thing worth mentioning here is that once the drag has finished I wanted to inform the controller of the new position values, such that they could be reflected in the styling. Now since the positioning is done outside of an Angular.js controllers scope (as it is done via the inbuilt jQuery UI code), we need to get thedraggable directive to update the controller scope, such that it knows something outside of it has changed one of its variables. Luckily the jQuery UI draggable widget provides a nice callback that we can make use of, which we use and then tell the Angular.js controller's scope that something has changed, this is done using the Angular.js $scope.apply() which is used for this purpose
define(['directives/directives'], function (directives) {
    directives.directive('draggable', ['$rootScope', function ($rootScope) {
        return {
            restrict: 'A',
            //may need the model to be passed in here so we can apply changes to its left/top positions
            link: function (scope, element, attrs) {

                element.draggable(
                  {
                      stop: function (event, ui) {
                          scope.$apply(function() {
                              scope.updatePosition(
                                  scope.imageitem.name,
                                  {
                                      left: ui.position.left,
                                      top: ui.position.top
                                  }
                              );
                          });
                      }
                  });
            }
        };
    }]);
});
Where this is the controller code that gets called when the directive calls into the controller's scope
// NOTE: $scope.$apply is called by the draggable directive
$scope.updatePosition = function (name, pos) {
    var idx = $scope.imageitems.propertyBasedIndexOf('name', name);
    var foundItem = $scope.imageitems[idx];
    foundItem.left = pos.left;
    foundItem.top = pos.top;
};
Resizable Directive
The resizable directive works much the same as the draggable directive, it is another jQuery UI basedAngular.js directive. Here is its code:
define(['directives/directives'], function (directives) {
    directives.directive('resizable', ['$rootScope', function ($rootScope) {
        return {
            restrict: 'A',
            //may need the model to be passed in here so we can apply changes to its left/top positions
            link: function (scope, element, attrs) {

                element.resizable(
                  {
                      maxHeight: 200,
                      minHeight: 100,
                      //aspectRatio: 16 / 9,
                      stop: function (event, ui) {
                          scope.$apply(function () {
                              scope.updateScale(
                                  scope.imageitem.name,
                                  {
                                      top: ui.position.top,
                                      left: ui.position.left
                                  },
                                  {
                                      width: ui.size.width,
                                      height: ui.size.height
                                  }
                              );
                          });
                      }
                  });
            }
        };
    }]);
});
As before since we are changing things (the scale of a UI element) outside the knowledge of the Angular.jscontroller, we need to get the directive to update the controller scope, here is the relevant code:
// NOTE: $scope.$apply is called by the resizable directive
$scope.updateScale = function (name, pos, size) {
    var idx = $scope.imageitems.propertyBasedIndexOf('name', name);
    var foundItem = $scope.imageitems[idx];
    foundItem.left = pos.left;
    foundItem.top = pos.top;
    foundItem.width = size.width;
    foundItem.height = size.height;
};
Root Controller
Some of the internals of the root controller have already been covered, so I will remove the internal code from the functions we have already covered, which really just leaves this controller code:
define(['controllers/controllers',
        'services/liveUpdatesService',
        'services/utilitiesService',
        'services/imageService',
        'services/localStorageService'],
    function (controllers) {
        controllers.controller('RootCtrl',
            ['$window',
                '$scope',
                '$location',
                'LiveUpdatesService',
                'UtilitiesService',
                'ImageService',
                'LocalStorageService',
    function (
        $window,
        $scope,
        $location,
        LiveUpdatesService,
        UtilitiesService,
        ImageService,
        LocalStorageService) {

        $scope.imageitems = [];
        $scope.imageItemsStorageKey = 'imageItemsKey';

        //load existing items from local storage which looks cool, as they show up in their persisted
        //positions again...Cool
        if (LocalStorageService.isSupported()) {
            var currentFavs = LocalStorageService.fetch($scope.imageItemsStorageKey);
            if (currentFavs != undefined) {
                currentFavs = JSON.parse(currentFavs);
                for (var i = 0; i < currentFavs.length; i++) {
                    var favItem = currentFavs[i];

                    $scope.imageitems.push(ImageService.createImageItem(
                            favItem.name, favItem.left, favItem.top, favItem.width, favItem.height, true));
                }
            }
        }


        UtilitiesService.addArrayHelperMethods();

        LiveUpdatesService.eventsStream().subscribe(
	            .....
        	    .....
	            .....

		);


        $scope.addToFavourites = function (index) {
            if (!LocalStorageService.isSupported()) {
                $window.alert('Local storage is not supported by your browser, so saving favourites isn\'t possible');
            } else {
                var currentStoredFavsForAdd = LocalStorageService.fetch($scope.imageItemsStorageKey);
                if (currentStoredFavsForAdd == undefined) {
                    currentStoredFavsForAdd = [];
                } else {
                    currentStoredFavsForAdd = JSON.parse(currentStoredFavsForAdd);
                }

                var scopeImageItem = $scope.imageitems[index];
                var favsIdx = currentStoredFavsForAdd.propertyBasedIndexOf('name', scopeImageItem.name);
                if (favsIdx >= 0) {
                    $window.alert('An item with that name is already in your favourites.');
                    return;
                }

                $scope.imageitems[index].isFavourite = true;
                currentStoredFavsForAdd.push(scopeImageItem);
                LocalStorageService.save($scope.imageItemsStorageKey, currentStoredFavsForAdd);
                $window.alert('Saved to favourites');

            }
        };


        $scope.removeFromFavourites = function (index) {
            if (!LocalStorageService.isSupported()) {
                $window.alert('Local storage is not supported by your browser, so removing from favourites isn\'t possible');
            } else {

                var currentStoredFavsForRemoval = LocalStorageService.fetch($scope.imageItemsStorageKey);
                if (currentStoredFavsForRemoval == undefined) {
                    return;
                } else {
                    currentStoredFavsForRemoval = JSON.parse(currentStoredFavsForRemoval);
                }


                var scopeImageItem = $scope.imageitems[index];

                var favsIdx = currentStoredFavsForRemoval.propertyBasedIndexOf('name', scopeImageItem.name);
                $scope.imageitems.splice(index, 1);

                if (favsIdx >= 0) {
                    currentStoredFavsForRemoval.splice(favsIdx, 1);
                    LocalStorageService.save($scope.imageItemsStorageKey, currentStoredFavsForRemoval);
                }
                $window.alert('Item removed from favourites');
            }
        };

        // NOTE: $scope.$apply is called by the draggable directive
        $scope.updatePosition = function (name, pos) {
            .....
            .....
            .....
        };

        // NOTE: $scope.$apply is called by the resizable directive
        $scope.updateScale = function (name, pos, size) {
            .....
            .....
            .....
        };
    }]);
});
It can be seen that most of the root controller's code has already been covered, so what is left to discuss?
Essentially the code that is left does the the following:
- Allows the user to call the
addToFavouritesfunction (which will add it to HTML 5 local storage) by using a button in the image tile UI - Allows the user to call the
removeFromFavouritesfunction (which will remove it from the UI and also from HTML 5 local storage) by using a button in the image tile UI - Will read all items and their persisted state from HTML 5 local storage when the page is first rendered, which will cause all the persisted favourite items to appear exactly as they were when the user saved them to local storage
Root View
The view is the easy part, since most of the real work has been done by the various services and the controller. Here is the root view markup:
<div ng-repeat="imageitem in imageitems">
    <table draggable resizable class="imageHolder, imageDropShadow"
           ng-style="imageitems[$index].styleProps()">
        <tr>
            <td class="imageHeader">  {{imageitem.name}}</td>
        </tr>
        <tr>
            <td align="center">
                <img ng-src="http://www.codeproject.com/app/images/{{imageitem.name}}" class="imageCell" />
            </td>
        </tr>
        <tr>
            <td align="center">
                <img src="http://www.codeproject.com/app/images/favIcon.png" width="25%" class="favIcon"
                    tooltip href="" title="Save To Favourites"
                    ng-click="addToFavourites($index)" />
                <img src="http://www.codeproject.com/app/images/favDelete.png" width="25%" class="favIcon"
                    title="Remove From Favourites" tooltip
                    ng-click="removeFromFavourites($index)" ng-show="imageitems[$index].isFavourite" />
            </td>
        </tr>
    </table>
</div>
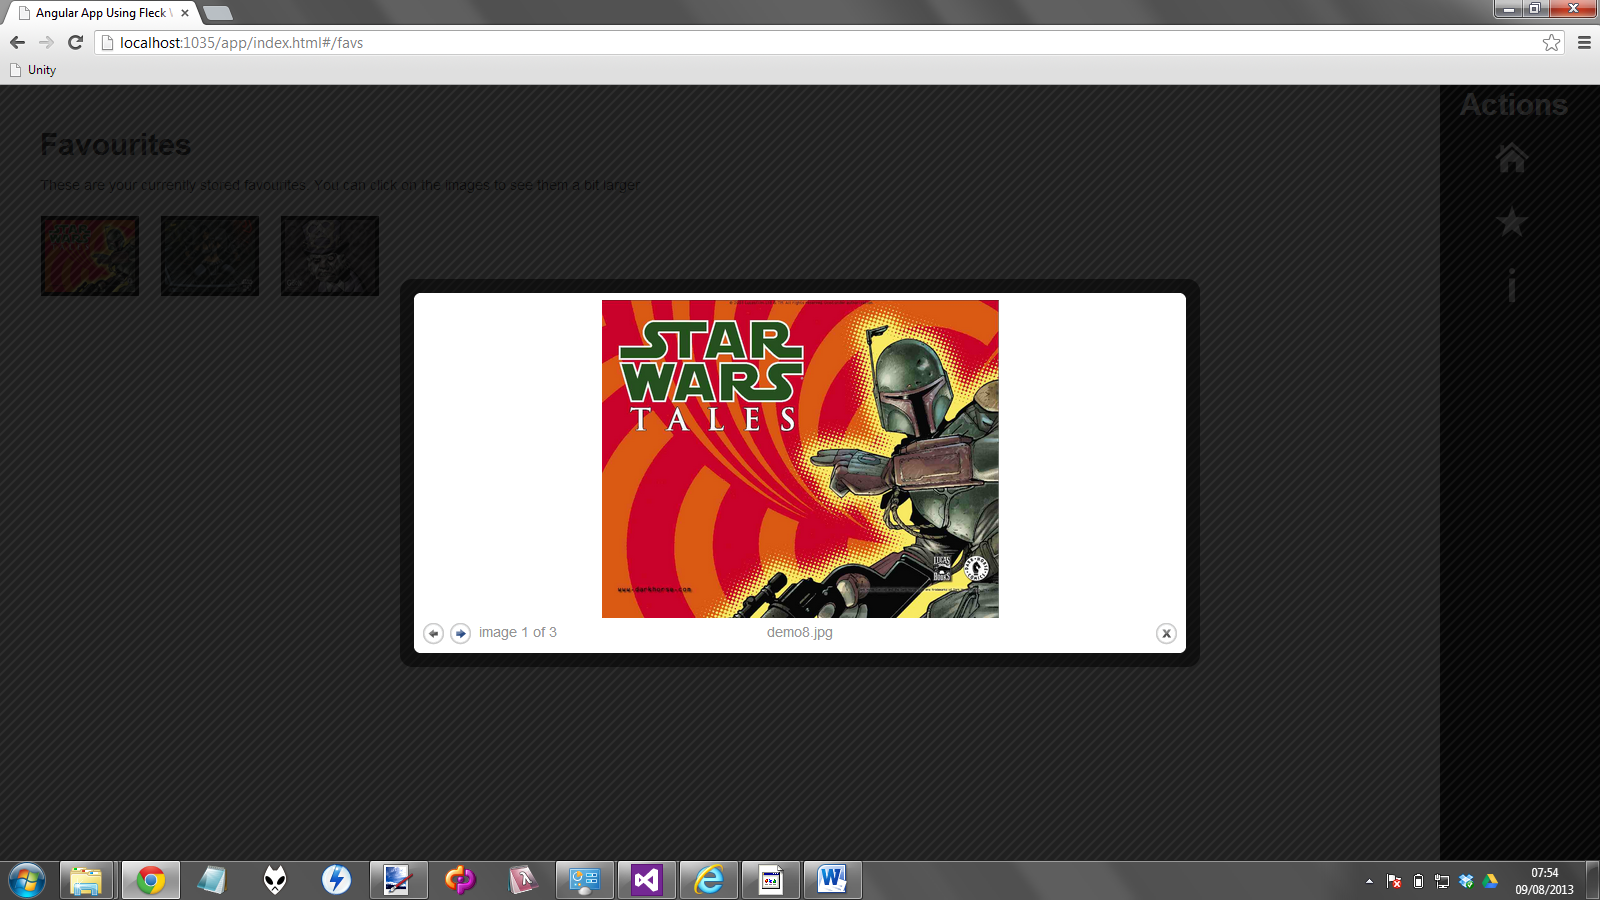
The Favourites Page
Though not as complex as the Root page and its controller the favourites is the 2nd most complicated page, so probably justifies a bit of an explanation, before we dive head long in to its code.
So what does this page do exactly?
The idea is that there will be a set (which could be an empty set) of image data which is stored against a certain key in HTML 5 local storage. When the favourites view is requested this HTML 5 locally stored data will be examined, and for all items found a smal thumbnail will be rendered. The user may also click on any of the thumbnails to launch a ColorBox jQuery plugin.
This is what the favourites page looks like with some items saved within the local storage.

Click image for larger version
And this is what it would look like when you have clicked one of the thumnbails
So how does this page work. Well one of the hard parts was something that you would all probably think was a very trivial thing to do. So in local storage we have a 1 dimensional JSON stringified array, and I wanted to turn that into a 2 dimensional table layout that I could use with Angular.js ng-repeat binding.
Favs Controller
Let's look at the controller first.
define(['controllers/controllers',
        'services/imageService',
        'services/utilitiesService',
        'services/localStorageService'],
    function (controllers) {
        controllers.controller('FavsCtrl',
            ['$window',
            '$scope',
            'ImageService',
            'UtilitiesService',
            'LocalStorageService',
    function (
        $window,
        $scope,
        ImageService,
        UtilitiesService,
        LocalStorageService) {

        $scope.imageItemsStorageKey = 'imageItemsKey';
        $scope.favImageItems = [];
        $scope.columnCount = 5;
        $scope.favText = '';
        $scope.shouldAlert = false;

        $scope.tableItems = [];
        while ($scope.tableItems.push([]) < $scope.columnCount);

        if (!LocalStorageService.isSupported()) {
            $scope.favText = 'Local storage is not supported by your browser, so viewing favourites isn\'t possible';
            $scope.shouldAlert = true;
        } else {

            var currentStoredFavs = LocalStorageService.fetch($scope.imageItemsStorageKey);
            var currentFavs = [];
            if (currentStoredFavs != undefined) {
                currentFavs = JSON.parse(currentStoredFavs);
            }

            if (currentFavs.length == 0) {
                $scope.favText = 'There are no favourites stored at the moment';
                $scope.shouldAlert = true;
            } else {
                var maxRows = Math.ceil(currentFavs.length / $scope.columnCount);
                $scope.favText = 'These are your currently stored favourites. You can click on the images to see them a bit larger';
                if (currentFavs.length < $scope.columnCount) {
                    $scope.tableItems[0] = [];
                    for (var i = 0; i < currentFavs.length; i++) {
                        $scope.tableItems[0].push(ImageService.createFavImageItem(currentFavs[i].name));
                    }
                } else {
                    var originalIndexCounter = 0;
                    for (var r = 0; r < maxRows; r++) {
                        for (var c = 0; c < $scope.columnCount; c++) {
                            if (originalIndexCounter < currentFavs.length) {
                                $scope.tableItems[r][c] =
                                    ImageService.createFavImageItem(currentFavs[originalIndexCounter].name);
                                originalIndexCounter++;
                            }
                        }
                    }
                }
            }
            if ($scope.shouldAlert) {
                UtilitiesService.delayedAlert($scope.favText);
            }
        }
    }]);
});
It can be seen that the bulk of the work here is getting the data from HTML 5 local storage, and translating it from a string representation into a JSON 1 dimensional array, and then into a 2 dimenionsal stucture that can be used to bind against within the markup.
There are a few other things of note here:
- We use the Angular.js
$windowrather than "window" to allow the$windowservice to be replaced by a mock - We make use of the
LocalStorageServicethat we saw earlier - We make use of the
UtilitiesServicethat we saw earlier - We make use of the
ImageServicethat we saw earlier
Favs View
With all the grunt work done in the controller, the view markup is pretty tiny:
<div class="infoPageContainer">
    <h2>Favourites</h2>

    <p>{{favText}}</p>


    <table id="favsTable">
        <tr ng-repeat="row in tableItems">
            <td ng-repeat="cell in row">
                <a colorbox title="{{cell.name}}"
                    ng-href="http://www.codeproject.com/app/images/{{cell.name}}">
                    <img ng-src="http://www.codeproject.com/app/images/{{cell.name}}" class="favSmallIcon" />
                </a>
            </td>
        </tr>
    </table>
</div>
Notice that neat nested ng-repeat, that is how easy it is to do a table layout in Angular.js once you have the correct structure in your scope to iterate over
ColorBox Directive
The final piece in the puzzle is how to make these items into a jQuery ColorBox. Knowing what we know now, we should be able to realise that the answer to this lies in the use of yet another directive.
Yes you guessed it a colorbox directive, which can be seen in the <a....colorbox>....</a> anchor tags in the markup.
Here is the colorbox directives code, where you can see that this is restricted to attribute usage, and simply delegates the work to the actual jQuery ColorBox (which was referenced as a requirement within theRequire.js configuration, so we know its loaded ok, otherwise the Angular.js would not have started)
define(['directives/directives'], function (directives) {
    directives.directive('colorbox', ['$rootScope', function ($rootScope) {
        return {
            restrict: 'A',
            //may need the model to be passed in here so we can apply changes to its left/top positions
            link: function (scope, element, attrs) {
                $(element).colorbox({ rel: 'group3', transition: "elastic", width: "50%", height: "50%" });
            }
        };
    }]);
});
The About Page
The about page is just static text, so nothing groovy here really. I added this page just so there was enough routes in the demo app to make it more full featured I suppose. For completeness here is the screen shots of what the about page looks like

Click image for larger version
