Printing with Flex: Chapter 11 - Enterprise Development with Flex
by Yakov Fain, Anatole Tartakovsky, Victor Rasputnis
This excerpt is from Enterprise Development with Flex. If you want to use Adobe Flex to build production-quality Rich Internet Applications for the enterprise, this groundbreaking book shows you exactly what's required. You'll learn efficient techniques and best practices, and compare several frameworks and tools available for RIA development -- well beyond anything you'll find in Flex tutorials and product documentation. Through many practical examples, the authors impart their considerable experience to help you overcome challenges during your project's life cycle.

Measuring programming progress by lines of code is like measuring aircraft building progress by weight.
--Bill Gates
In general, the process of printing from web applications works a little differently compared to printing from the desktop. Web applications have good reason for not allowing direct access to a user’s printer: malicious websites could immediately start printing their fliers on your home or corporate printer, offering you anything from pizza delivery to adult entertainment. That’s why you can’t write a program in JavaScript that would automatically detect all available printers and send them print jobs. That’s why the user is forced to manually select the printer via the web browser’s pop-up dialog window.
Existing Flash Player bugs add more issues for Flex developers; for example, the Print dialog might not report all features of the available printer, and setting such parameters as tray selection or paper size might not be possible. To put it simply, you may not have complete control over the user’s printer from an application running in Flash Player. You may need to adjust your reports to standard printer settings.
Note
Adobe had a product called FlashPaper that tried to mitigate these limitations by adding ActionScript 2 objects to a special control with complete access to the printer. In 2008, however, Adobe discontinued FlashPaper, apparently promoting printing PDF documents using Acrobat instead.
The process of printing from Flash Player consists of starting a single-threaded print job and adding dynamically created pages to it (i.e., the data that comes from a database). Unfortunately, Flash Player’s virtual machine AVM2 ActionScript timeout is 15 seconds. Accordingly, for both Flex and AIR, the interval between the following commands shouldn’t be more than 15 seconds:
-
PrintJob.start()and the firstPrintJob.addPage() -
PrintJob.addPage()and the nextPrintJob.addPage() -
PrintJob.addPage()andPrintJob.send()
If, at each of these commands, printing the specified page always completed in 15 seconds or less, your application will be able to print a multipage document, although somewhat slowly. If any of the intervals spans more than 15 seconds, however, your print job will receive a runtime exception, which turns direct printing from Flash Player into an unpleasant experience, if application developers don’t handle exceptions properly. Plus, if the internal thread that started the print job failed, it may be automatically closed and unable to be recovered properly.
Note
You can read more about handling printing errors in the Adobe document “Flash Player and Air tasks and system printing”.
You may think that setTimeout() can help break the 15-second barrier for printing, but it can’t. Printing has to be handled by the same internal AVM2 thread (apparently a bug), and with setTimeout(), you are in fact spawning a new one. The issue with printing long documents is demonstrated in Example 11.1, “PrintTimeout.mxml—an illustration of printing failure”. The PrintJob starts and the method finishPrinting() is called in the same thread and works fine. If you instead comment out the call to finishPrinting() and uncomment the method setTimeout(), this printing job will fail: the addPage() will throw an exception, because it runs in a thread different than PrintJob.
Imagine that a timeout was initiated not by calling the function setTimeout(), but rather by Flash Player during printing of a multipage document because one of the addPage() calls took longer than 15 seconds. In this case, addPage() would be called on a different internal thread than PrintJob.start() and the addPage() operation would fail, even though Flash Player should’ve known how to process a such situation properly.
Example 11.1. PrintTimeout.mxml—an illustration of printing failure
<?xml version="1.0" encoding="utf-8"?>
<mx:WindowedApplication xmlns:mx="http://www.adobe.com/2006/mxml"
layout="vertical">
   <mx:Button label="Print Me" click="printMe()"/>
   <mx:Script>
      <![CDATA[

         private function printMe() :void {
            var pj:PrintJob = new PrintJob();
            pj.start();

   //           setTimeout(function() :void { finishPrinting(pj);}, 1);

                   finishPrinting(pj);
         }

         private function finishPrinting(pj:PrintJob): void {
            pj.addPage(this);
            pj.send();
         }
      ]]>
   </mx:Script>
</mx:WindowedApplication>
Example 11.1, “PrintTimeout.mxml—an illustration of printing failure” just prints itself, addPage(this), but if it had to print, say, a slow-rendered DataGrid with a couple of thousand rows, the chances are high that such a program would time out before the printing job was finished.
There is a bigger problem than the technical restrictions mentioned so far, and it is in the very approach to printing via the PrintJob API. The process of programming reports in ActionScript comes down to creating snapshots of components displayed on the users’ monitors and sending them to the printer. Because screen resolution differs from printer resolution, however, application developers pursing this method need to create separate layouts just for printing, which is time-consuming and challenging.
That’s why you should consider creating and printing your reports as PDF files. Besides, it neatly reinforces this book’s philosophy: minimize the amount of code that business application developers have to write. In this chapter, you’ll learn how to create XDP-enabled Flex components that will allow application developers to generate PDF documents on the client side with minimal coding.
PDF generation is supported by Adobe LiveCycle and LCDS, as well as other server-side products. Suppose that you have a Flex or AIR window with a number of UI controls, and you want to create a PDF out of it. One option is to create a snapshot of the Flex component or container using the class mx.graphics.ImageSnapshot and its function captureImage(), which can scale the image to a specific resolution and encode it into a specified image format. You can send an instance of this class via RemoteObject to the server with LCDS installed. LCDS then creates a PDF document (or merges it with a PDF form) and includes the new image received from the client.
The problem with this approach is that the resulting PDF will not be searchable. For instance, if a Flex Panel has text fields, you won’t be able to find the text of these fields in Acrobat Reader if the Panel is embedded as a bitmap.
Such PDFs have limitations on resolution as well (to create a PDF with resolution 300 dpi, you’d need to create a multimegabyte image). Also, printed materials often use different CSS and metrics from the screen ones. You don’t want to print, say, a background gradient that looks fine on the monitor, but bad on paper.
To embed forms into PDF documents, Adobe uses the XDP format. If you purchase an LCDS license, you’ll have the option to use it. You can design forms in Acrobat Designer and export the data from your Flex view, and LCDS will merge the data and the form on the server. On the Java side, LCDS adds several JARs in the lib directory of your web application, which makes the XFAHelper Java class available for your server-side PDF generation.
After generating the PDF, the server-side program can be:
-
Placed as a
ByteArrayinHTTPSessionobject -
Saved as a file on the server for future use
-
Streamed back to the client marked as a MIME type
application/pdf -
Saved in a DBMS field as a binary large object (BLOB)
Depending on the business requirements, the server-side PDF generation might not be feasible. You might have just disconnected the AIR application, or the server software may not have any of the technologies supporting PDF creation installed. If the Flex UI is truly dynamic, that might change the number of displayed components based on some business criteria; developing an additional UI in Acrobat Designer just for printing can in these ways become either impossible or time-consuming. The LCDS Developer Guide describes this process in the document called “Using the PDF Generation Feature”.
Note
Adobe has published an article describing the process of creating PDF documents using templates.
In general, for server-side PDF generation from Adobe Flex applications, you have to do the following:
-
Use Adobe LiveCycle Designer ES, which provides tools for creating interactive forms and personalized documents (see http://www.adobe.com/products/livecycle/designer/). This software comes with Acrobat Professional or can be purchased separately, and is well documented, but it requires someone to create the XDP form and the data model and establish a process of synchronizing the Flex application with the server-side LiveCycle.
-
Initiate the server-side PDF generation from your Flex application seamlessly.
Although this process provides guaranteed quality and predictable results, it also requires the double effort of developing XDP forms for printing and Flex forms for displaying. Besides, LiveCycle Designer is another piece of software that application developers in your organization may not be familiar with.
LCDS generation with merging data and forms produces good printing quality with LCDS. The Flex client sends data as XML to the server along with the name of the form file (template) to be used for merging, as shown in Example 11.2, “Class FormRenderer.as”. In this case, the LCDS layer just needs to process it with the XDPXFAHelper class and return it as a PDF stream to the browser for displaying.
The ActionScript class FormRenderer sends generated XDP to the server and opens a web browser’s window to display the PDF when it arrives from the server.
Example 11.2. Class FormRenderer.as
import flash.net.*;
import flash.utils.ByteArray;

public class FormRenderer {
 public static function openPdf(xdp:String, target:String="_blank"):void{
   var req:URLRequest = new URLRequest("/createPDF.jsp");
   req.method = URLRequestMethod.POST;

   var ba :ByteArray = new ByteArray();;
   ba.writeMultiByte(xdp, "iso-8859-1");
   ba.compress();
   ba.position = 0;
   req.data = ba;
   navigateToURL(req, target);
 }
}
You also need an XDP file with the data and presentation. If you don’t have LiveCycle Designer, you can make the XDP file programmatically, ensuring that it matches the printer’s paper size and corporate stationery. XDP documents are XML objects, which are easily processed in Flex using E4X syntax, for example:
-
Declare a variable of type XML, and initialize it with the required XDP template deployed on the server. A fragment of the XDP template may look like this:
<?xml version="1.0" encoding="UTF-8"?> <?xfa generator="AdobeLiveCycleDesigner_V8.0" APIVersion="2.5.6290.0"?> <xdp:xdp xmlns:xdp="http://ns.adobe.com/xdp/" timeStamp="2007-01-25T10:40:38Z" uuid="784f469b-2fd0-4555-a905-6a2d173d0ee1"> <template xmlns="http://www.xfa.org/schema/xfa-template/2.5/"> <subform name="form1" layout="tb" restoreState="auto" locale="en_US"> <pageSet> <pageArea name="Page1" id="Page1"> <contentArea x="0.25in" y="0.25in" w="8in" h="10.5in"/> <medium stock="letter" short="8.5in" long="11in"/> <?templateDesigner expand 1?></pageArea> <?templateDesigner expand 1?></pageSet> <subform w="8in" h="10.5in" name="YourPageAttachedHere"/> <proto/> <desc> <text name="version">8.0.1291.1.339988.308172</text> </desc> </subform> </template> -
Select a Flex UI container or component that you are going to print (a
Panel, aDataGrid, and so on). -
Query the object from step 2, get its XDP attributes and children, and create the XML preparing this object for printing. Attach the XML to the template as a page.
Because original Flex components don’t know how to represent themselves in the XDP format, you’ll need to teach them to do so. This becomes the next task in enhancing Flex components.
For example, each UI component can implement some interface (e.g., IXdpObject with the only getter, xmlContent()) that allows it to return its own XDP content or, in the case of containers, to traverse the list of its child components for their XDP content. For example, a new panel component (PanelXdp) may have the following structure:
public class PanelXdp extends Panel implements IXdpObject{
    public function get xmlContent():Object{
       // The code to return representation of the panel
       // in the XDP format goes here
    }
}
Repeat the process of attaching XML to the XDP template using E4X until all print pages are ready. This method of printing from Flex requires less effort for reporting and creation of dynamic layouts. It might also provide better printing quality and searchability within the printed document.
Example 11.3, “Render.jsp” is the server-side part written as a Java ServerSide Page. It uncompresses the XDP stream received from the client, creates the PDF using XDPXFAHelper, turns it into an array of bytes, and sends it back to the client as the MIME type "application/pdf".
Example 11.3. Render.jsp
<%@ page language="java"
   import="java.io.*,
   java.util.*,
   javax.xml.parsers.*,
   org.w3c.dom.Document,
   flex.messaging.*,
   flex.acrobat.pdf.XDPXFAHelper,
   flex.messaging.util.UUIDUtils,
   org.w3c.dom.Document
   "
%><%!
private static void _log(Object o){
   System.out.println(""+o);
}
private String getParam(HttpServletRequest request, String name, String defVal)
throws Exception{
       String val = request.getParameter(name);
     return (val!=null && val.length()>0)?val:defVal;
}
private String getParam(HttpServletRequest request, String name) throws Exception{
   return getParam(request, name, null);
}
private void processRenderRequest(HttpServletRequest request,
                        HttpServletResponse response) throws Exception{

   String data      = getParam(request, "document");
   String template = getParam(request, "template"); // Security hole, check path
   _log("template="+template);
   _log("data="+data);
   template = FlexContext.getServletContext().getRealPath(template);
   _log("template real="+template);

       // You must have LCDS license to use XDPXFAHelper
   XDPXFAHelper helper = new XDPXFAHelper();
   helper.open(template);
   // Import XFA dataset
   if( data!=null ){
      _log("data.length="+data.length());
      ByteArrayInputStream bais = new
                        ByteArrayInputStream(data.getBytes("UTF-8"));
      DocumentBuilderFactory builderFactory =
                                    DocumentBuilderFactory.newInstance();
      DocumentBuilder builder =
                                    builderFactory.newDocumentBuilder();
      Document dataset = builder.parse(bais);
      helper.importDataset(dataset);
   } else
      _log("data="+null);

   byte[] content = helper.saveToByteArray();
   _log("content="+content);
   helper.close();
   ServletOutputStream out3 = response.getOutputStream();
   response.setContentType("application/pdf");
   response.setContentLength(content.length);
   out3.write(content);
}
%><%
_log("");
_log("--------------------------------------------");
_log("render.jsp");
processRenderRequest(request, response);
%>
Note
The WebORB PDF Generator from Midnight Coders allows you to either create XML printing templates on the server or generate them in Flex clients. To use this solution, you have to install the WebORB Server. For more details, visit http://www.themidnightcoders.com/products/pdf-generator/overview.html.
Now we’ll take a look at how to generate a PDF on the Flex side.
AlivePDF is an open source library for generating PDFs in ActionScript on the client side. It’s offered under the MIT license at http://alivepdf.org; download AlivePDF.swc and link it to your Flex Builder project. One of the classes included in AlivePDF.swc is called PDF.
Note
Unless you are developing an AIR application or deploying it for Flash Player 10 (see the next note), even client-generated PDF content has to be sent to a server that will just bounce it back (see Example 11.20, “PDFServlet.java”) to have the web browser open the Acrobat Reader plug-in.
The process of generating PDFs in AlivePDF starts with instantiation of the PDF class, specifying the print orientation, units of measurement, and the paper size. Then you create and add pages to the instance of the PDF object, and finally you call the function savePdf() to turn these pages into a ByteArray and save them to the PDF file on your filesystem if you use Adobe AIR. If this is a web application written in Flex, the same savePdf() function sends the ByteArray to the server with the deployed script create.php (supplied by alivepdf.org), which will return this array of bytes to your web browser as a PDF document.
Note
Starting from Flash Player 10, the FileReference class allows you to save files locally. Its function save() opens the pop-up window, allowing the user to specify the filename for saving the data. In our example, this eliminates the need for a round trip to the server that does nothing but bounce this array of bytes. Keep in mind, though, that after saving the PDF this way, the user will need to complete an extra step to open the file with Acrobat Reader or any other program.
Example 11.4, “Basic printing with AlivePDF: test1.mxml” shows the process of preparing and saving a PDF file with AlivePDF.
Example 11.4. Basic printing with AlivePDF: test1.mxml
<?xml version="1.0" encoding="utf-8"?>
<mx:WindowedApplication xmlns:mx="http://www.adobe.com/2006/mxml"
layout="vertical" horizontalAlign="center" verticalAlign="middle">
<mx:Button label="Hello World!!!" click="hw()"/>
<mx:Script><![CDATA[
import org.alivepdf.fonts.Style;
import org.alivepdf.fonts.FontFamily;
import org.alivepdf.saving.Method;
import org.alivepdf.layout.Size;
import org.alivepdf.layout.Unit;
import org.alivepdf.layout.Orientation;
import org.alivepdf.pdf.PDF;
private function hw():void{
var p:PDF = new PDF(Orientation.PORTRAIT, Unit.MM, Size.A4);
p.addPage();
p.setFont(FontFamily.ARIAL, Style.NORMAL, 12);
p.addText("10x10", 10, 10);
p.addText("100x100", 100, 100);
p.addMultiCell(50, 8, "Hello World2");
savePdf(p, "hw.pdf");
}
private function savePdf(p:PDF, fileName:String):void{
var ba:ByteArray = p.save(Method.LOCAL);
var fs:FileStream = new FileStream();
var f:File = File.desktopDirectory.resolvePath(fileName);
fs.open(f, FileMode.WRITE);
try{
fs.writeBytes(ba);
} catch (e:*){}
fs.close();
}
]]></mx:Script>
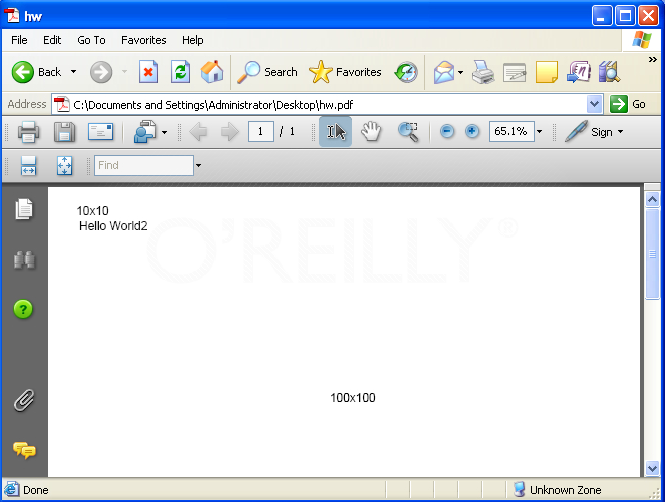
</mx:WindowedApplication>After you click the button Hello World!!! (see the example code), a file called hw.pdf is created in the AIR desktop directory (see Chapter 9, Working with Adobe AIR for details). For example, Figure 11.1, “Sample output of the AlivePDF program” shows our hw.pdf file, which was saved in the directory C:\Documents and Settings\Administrator\Desktop.
The goal here was to give you a taste of the process of preparing the document with AlivePDF. To investigate the complete set of AlivePDF’s APIs, visit http://AlivePDF.org.
AlivePDF does a good job of creating objects and assembling them into pages, which are then converted into a PDF format. But it still requires you to prepare (in addition to the screen version) a second copy of the UI to be printed. It’s not what-you-see-is-what-you-get (WYSIWYG) programming. This process requires manual allocation and measurements of each object in the PDF-to-be.
Note
The blog http://alivepdf.bytearray.org is yet another good source of up-to-date information regarding AlivePDF.
What can be done to improve this process? We still want to use AlivePDF’s printing engine, but we don’t want to manually write the code specifying styles and measurements as we did in Example 11.4, “Basic printing with AlivePDF: test1.mxml”. In this section, you’ll see how to create components and containers that are smart enough to present themselves as PDF or XDP objects.
Note
All examples from this section are located in the Flex Builder project called clientPdfAir (which comes with this chapter; see the Preface for information on obtaining the sample code) and are self-contained AIR applications. alivePDF.swc has to be present in the build path of the project.
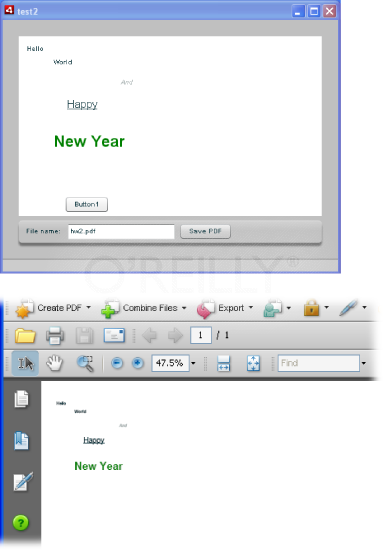
The program test2.mxml in Example 11.5, “Printing with AlivePDF from an AIR application” illustrates Flex-to-PDF-object conversion, a big difference compared to test1.mxml. It uses the ActionScript class AlivePdfPrinter, which is included with the code samples of this chapter. Its addObject() method converts a given Flex object to corresponding PDF snippets, one at a time. You don’t need to worry about the sizes, locations, fonts, or styles of these objects. This is WYSIWYG. Flash Player is a rendering engine here.
Example 11.5. Printing with AlivePDF from an AIR application
<?xml version="1.0" encoding="utf-8"?>
    <mx:WindowedApplication xmlns:mx="http://www.adobe.com/2006/mxml"
     xmlns:printer="com.farata.printing.pdf.client.*"
   layout="vertical" >
   <mx:Style source="main.css"/>
   <mx:Canvas width="100%" height="100%" backgroundColor="white">
     <mx:Label id="lbl1" text="Hello" x="10" y="10"/>
     <mx:Label id="lbl2" text="World" x="50" y="30" fontWeight="bold"/>
          <mx:Label id="lbl3" text="And" x="150" y="60" fontStyle="italic"
                                                        enabled="false"/>
     <mx:Label id="lbl4" text="Happy" x="70" y="90" fontSize="16"
                                         textDecoration="underline"/>
         <mx:Label id="lbl5" text="New Year" x="50" y="140" fontSize="24"
                                        fontWeight="bold" color="green"/>
     <mx:Button id="btn1" label="Button1" x="70" y="240"/>
   </mx:Canvas>

 <mx:ApplicationControlBar width="100%">
   <mx:Label text="File name:"/>
   <mx:TextInput id="txtFileName" text="hw2.pdf"/>
   <mx:Button label="Save PDF" click="printPdf()"/>
     </mx:ApplicationControlBar>

   <printer:AlivePdfPrinter id="prn" printComplete="viewPdf()"/>
<mx:Script><![CDATA[

  import flash.net.URLRequest;

  private var file:File;

  private function printPDF():void{

   prn.addObject(lbl1);
   prn.addObject(lbl2);
   prn.addObject(lbl3);
   prn.addObject(lbl4);
   prn.addObject(lbl5);
   prn.addObject(btn1);

   file = prn.printToFile (txtFileName.text);
 }

 private function viewPdf():void{
   var req:URLRequest = new URLRequest(file.url);
   navigateToURL(req, "_blank");
}

]]></mx:Script>

</mx:WindowedApplication>
The code in Example 11.5, “Printing with AlivePDF from an AIR application” produces the screen as it’s shown in the AIR runtime, on the left in Figure 11.2, “The results of printing with enhanced AlivePDF”. On the right side, you can see the hw2.swf file produced by this program and shown in Adobe Acrobat. The fonts in the Acrobat Reader image look smaller because of the small zoom percentage.
The listings that follow do not include the entire source code of the class AlivePdfPrinter; that comes with the source code of this chapter’s samples. The idea is to have a set of components that can expose their information in a form suitable for printing. The method AlivePdfPrinter.addObject(o) calls locateExtension(), which instantiates the appropriate object that can present itself in a form suitable for AlivePDF (Example 11.6, “The method AlivePdfPrinter.locateExtension()”).
Example 11.6. The method AlivePdfPrinter.locateExtension()
private static function locateExtension(o:*):IPdfPrinterExtension{
  if( o is Label )
   return new LabelPdfExtension(/*o*/);
  if( o is PdfPrintDataGrid )
   return new PdfPrintDataGridPdfExtension(/*o*/);
  if( o is DataGrid )
   return new DataGridPdfExtension(/*o*/);
  if( o is Container )
   return new ContainerPdfExtension(/*o*/);
  if( o is UIComponent )
   return new UIComponentPdfExtension(/*o*/);
 return null;
}
After identifying the type of the object to be printed, the object exposes its font and style information that’s being passed to the AlivePDF’s PDF object for printing. Example 11.7, “The addObject() method in the LabelPdfExtension class” shows the function addObject() from the ActionScript class com.farata.printing.pdf.client.extensions.LabelPdfExtension.
Example 11.7. The addObject() method in the LabelPdfExtension class
public function addObject(o:*, printer:IAlivePdfPrinter):void{
 var pdf:PDF = printer.pdf;
   var c:Label = Label(o);
   if( c==null ) return;
   if( !c.visible )
      return;

   var fontFamily:String = c.getStyle("fontFamily");
   if( fontFamily==null )
      fontFamily = FontFamily.ARIAL;

   var style:String = "";

   if( c.getStyle("fontWeight")=="bold" )
       style += "B";

   if( c.getStyle("fontStyle")=="italic" )
      style += "I";
   if( c.getStyle("textDecoration")=="underline" )
        style += "U";

   var size:int = c.getStyle("fontSize");
   var color:Color = new RGBColor(c.getStyle(c.enabled?"color":"disabledColor"));

   allocateSpace(c, printer);

   pdf.textStyle(color/*, alpha*/);
   pdf.setFont(fontFamily, style, pxToPt(size));

   var ptText:PPoint = mapPoint(c, printer);
   ptText.y.px += c.height;

   pdf.addText(c.text, ptText.x.pt, ptText.y.pt);

 }
Example 11.7, “The addObject() method in the LabelPdfExtension class”’s code gets the styles, font, and text from the Flex Label object and initializes appropriate properties of the PDF object per the requirements of the AlivePDF library.
The sample code of this chapter as well as the clear.swc library has several similar extensions for a number of Flex components (see com.farata.printing.swc), and you can keep adding more objects to your own business framework of PDF-ready components.
These extensions are not subclasses of corresponding Flex components, but rather utility classes that know how to present the content of components to AlivePDF.
Note
While writing the method addObjects() for your components, keep in mind that measurements in Flash Player are in pixels and you may need to convert them into other units required by the AlivePDF API.
If you’d like to see what’s inside the generated hw2.pdf file, just open it with any text editor; you’ll see something like Example 11.8, “A fragment of the h2.pdf content” (which is just a fragment of the file).
Example 11.8. A fragment of the h2.pdf content
%PDF-1.4
1 0 obj
<</Type /Pages
/Kids [3 0 R
]
/Count 1
>>
endobj
3 0 obj
<</Type /Page
/Parent 1 0 R
/MediaBox [0 0 595.28 841.89]
/Resources 2 0 R
/Rotate 0
/Dur 3
/Contents 4 0 R>>
endobj
4 0 obj
<</Length 780>>
stream
2 J
0.57 w
0 Tr
/GS0 gs
0 Tw 0 Tc 100 Tz 0 TL
BT /F1 7.00 Tf ET
q 0.043137254901960784 0.2 0.23529411764705882 rg BT 25.50 802.14 Td (Hello) Tj ET
Q
0 Tr
/GS1 gs
0 Tw 0 Tc 100 Tz 0 TL
BT /F2 7.00 Tf ET
q 0.043137254901960784 0.2 0.23529411764705882 rg BT 55.50 787.89 Td (World) Tj ET
Q
0 Tr
/GS2 gs
0 Tw 0 Tc 100 Tz 0 TL
BT /F3 7.00 Tf ET
q 0.6666666666666666 0.7019607843137254 0.7019607843137254 rg BT 130.50 764.64 Td
(And) Tj ET Q
0 Tr
/GS3 gs
0 Tw 0 Tc 100 Tz 0 TL
BT /F1 12.00 Tf ET
q 0.043137254901960784 0.2 0.23529411764705882 rg BT 70.50 738.39 Td (Happy) Tj ET
70.50 737.19 34.68 0.60 re f Q
0 Tr
/GS4 gs
0 Tw 0 Tc 100 Tz 0 TL
BT /F2 18.00 Tf ET
q 0 0.5019607843137255 0 rg BT 55.50 692.64 Td (New Year) Tj ET Q
/GS5 gs
q 47.25 0 0 16.50 52.50 645.39 cm
/I1 Do Q
endstream
endobj
5 0 obj
<</Type /ExtGState
/SA true
/CA 1
/n 5
/BM /Normal
/ca 1
>>
endobj
...
15 0 obj
<<
/Producer (Alive PDF 0.1.4.6)
/CreationDate (D:200905152226)
>>
endobj
16 0 obj
<<
/Type /Catalog
/Pages 1 0 R
/OpenAction [3 0 R /FitH null]
/PageLayout /SinglePage
>>
endobj
xref
...
trailer
<<
/Size 17
/Root 16 0 R
/Info 15 0 R
>>
startxref
2467
%%EOF
Note
After this chapter was written, a new open source library called purePDF became available. It's an ActionScript port of a popular Java library called iText. You can download purePDF at http://code.google.com/p/purepdf/.
All these extensions for Flex controls are great, but there is another issue to tackle: Flex views often use containers. For example, you need to be able to generate a PDF for a DataGrid in two formats. This object should be similar to mx.printing.PrintDataGrid, but it should support PDF printing rather than working with PrintJob. It should support pagination, headers, and footers; this is a must for printing multipage documents.
Or imagine a TabNavigator container from which you need to print the content of each tab as a separate multipage PDF. The goal is to have a container that can iterate its children and tell each of them, “Hey, kiddo, print yourself.” When this mission is accomplished, just implement the same behavior to allow containers (and components) to expose themselves in the XDP format, too.
Sample extensions for the most complex Flex components, such as DataGrid, DataGridItemRenderer, and Canvas, are supplied as code samples for this chapter. Use them as a guide for the creation of your own printing extensions.
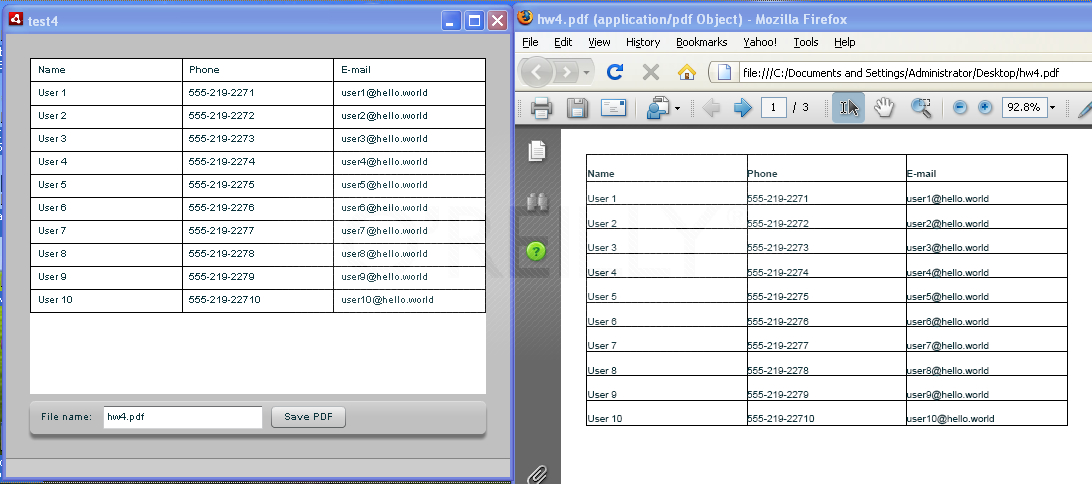
For example, the application test4.mxml includes the PdfPrintDataGrid component from clear.swc and outputs the data grid to the file hw4.pdf, as shown in Figure 11.3, “Running test4.mxml (left) generates PDF hw4 (right)” and Example 11.9, “An AIR application to print a data grid to a PDF file”.
Example 11.9. An AIR application to print a data grid to a PDF file
<?xml version="1.0" encoding="utf-8"?>
<mx:WindowedApplication xmlns:mx="http://www.adobe.com/2006/mxml"
  xmlns:printer="com.farata.printing.pdf.client.*"
  layout="vertical"
  creationComplete="onCreationComplete(event)" >

   <mx:DataGrid id="dg" x="0" y="0"
   width="100%" height="100%" >

    <mx:columns>
      <mx:DataGridColumn dataField="name" headerText="Name"/>
      <mx:DataGridColumn dataField="phone" headerText="Phone"/>
      <mx:DataGridColumn dataField="email" headerText="E-mail"/>
    </mx:columns>
   </mx:DataGrid>

   <mx:ApplicationControlBar width="100%">
    <mx:Label text="File name:"/>
    <mx:TextInput id="txtFileName" text="hw4.pdf"/>
     <mx:Button label="Save PDF" click="doSavePdf()"/>
   </mx:ApplicationControlBar>

   <printer:AlivePdfPrinter id="prn" printComplete="viewPdf()"/>

<mx:Script><![CDATA[

import flash.net.URLRequest;
private var file:File;

private function onCreationComplete(evt:*):void{

   var array:Array = [];

   for(var i:int=1; i<=30; i++){
       var obj:Object = new Object();
      obj.name   = "User " +i;
      obj.phone  = "555-219-227"+i;
      obj.email  = "user"+i+"@hello.world";
      obj.active = (i % 2 ) == 1;
      array.push(obj);

   }
   dg.dataProvider = array;
}
private function printPdf():void{

   prn.addObject(dg);
   file = prn.printToFile(txtFileName.text);
}

private function viewPdf():void{
   var req:URLRequest = new URLRequest(file.url);
   navigateToURL(req, "_blank");
}

]]></mx:Script>
</mx:WindowedApplication>
The line:
prn.addObject(dg);
results in invoking the code from Example 11.6, “The method AlivePdfPrinter.locateExtension()”, and the DataGridPdfExtension class shown in Example 11.10, “Class DataGridPdfExtension” is engaged.
Example 11.10. Class DataGridPdfExtension
package com.farata.printing.pdf.client.extensions{

   import com.farata.printing.PdfPrintDataGrid;

   import com.farata.printing.pdf.client.IAlivePdfPrinter;
   import mx.controls.DataGrid;

   public class DataGridPdfExtension extends BasePdfExtension{

    override public function addObject(o:*, printer:IAlivePdfPrinter):void{

     var c:DataGrid = o as DataGrid;
      var p:PdfPrintDataGrid = new PdfPrintDataGrid();
      p.x = c.x;
       p.y = c.y;
     p.width = c.width;
     p.height = c.height;
     p.columns = c.columns;
     p.dataProvider = c.dataProvider;

      c.parent.addChild(p);
     printer.addObject(p);
     c.parent.removeChild(p);
   }

 }
}
If in Example 11.6, “The method AlivePdfPrinter.locateExtension()” all components were located inside, say, Canvas, and the printing extensions for this container were ready, this code sample would become even shorter—something like this:
prn.addObject(myCanvas);
The myCanvas component would’ve taken care of its kids.
The good news is that you don’t have to write printing extensions to all components. The code in Example 11.6, “The method AlivePdfPrinter.locateExtension()” checks to see whether the component is an instance of Label, DataGrid, or Container.
Part of the sample code in the test3.mxml application has a canvas:
<mx:Canvas id="canvas" width="100%" height="100%"
      backgroundColor="white">

   <mx:Label id="lbl1" text="Hello" x="100" y="10"/>
    <mx:Label id="lbl2" text="World" x="50" y="30" fontWeight="bold"/>
    <mx:Label id="lbl3" text="And" x="150" y="60" fontStyle="italic"
              enabled="false"/>
    <mx:Label id="lbl4" text="Happy" x="90" y="90" fontSize="16"
                                      textDecoration="underline"/>
   <mx:Label id="lbl5" text="New Year" x="80" y="140" fontSize="24"
     fontWeight="bold" color="green"/>
   <mx:Button id="btn1" label="Button1" x="1" y="1"/>
    <mx:Button id="btn2" label="Button2" x="10" y="100"/>

    <mx:HBox x="250" y="130" borderThickness="3" borderColor="blue"
       borderStyle="solid"   backgroundColor="yellow">
      <mx:Label text="Inside HBox" color="gray"/>
   </mx:HBox>
</mx:Canvas>
The code to print this Canvas is pretty simple: just pass a reference to the class AlivePdfPrinter, and it’ll figure out how to print its child components:
private function printPdf():void{
   prn.addObject(canvas);
   file = prn.printToFile(txtFileName.text);
}
The function addObject() tries to locate an extension class for Canvas as shown in Example 11.6, “The method AlivePdfPrinter.locateExtension()”, and will use the ContainerPdfExtension, because Canvas is a Container. Should you want to provide some functionality specific to Canvas, you need to create CanvasPdfExtension and modify the code in Example 11.6, “The method AlivePdfPrinter.locateExtension()” accordingly.
A fragment of ContainerPdfExtension is shown in Example 11.11, “The main part of ContainerPdfExtension”.
Example 11.11. The main part of ContainerPdfExtension
package com.farata.printing.pdf.client.extensions{
 public class ContainerPdfExtension extends BasePdfExtension{

   private static var s_offsetLock:int = 0;

   override public function addObject(o:*, printer:IAlivePdfPrinter):void{

    s_offsetLock++;
    var c:Container = Container(o);
    setOffset(c, printer);
    allocateSpace(c, printer);
    drawBackgroundAndBorder(c, printer);

     var len:int = c.numChildren;
    for(var i:int=0; i<len; i++){
      var ch:DisplayObject = c.getChildAt(i);
      printer.addObject(ch);
    }

    s_offsetLock--;
    }

   private  function setOffset(o:Container, printer:IAlivePdfPrinter):void{
     if( s_offsetLock==1 ) {
      var ptLocal:Point = new Point(o.x, o.y);
        var ptGlobal:Point = o.parent.localToGlobal(ptLocal);
        printer.lastOffset.x.px = ptGlobal.x;
        printer.lastOffset.y.px = ptGlobal.y;
     }
    }
 }

}
All other components that the code in Example 11.6, “The method AlivePdfPrinter.locateExtension()” won’t recognize will be printed as prescribed in the UIComponentPdfExtension as a snapshot of an image (Example 11.12, “Printing a Flex object as an image”).
Example 11.12. Printing a Flex object as an image
public function addObject(o:*, printer:IAlivePdfPrinter):void{

   if( !o.visible ) return;
   var c:UIComponent = o;
   var pdf:PDF = printer.pdf;
   var rc:PRectangle = new PRectangle();
   rc.left.px = c.x;

   rc.top.px = c.y;
   rc.right.px = rc.left.px+c.width;
   rc.bottom.px = rc.top.px+c.height;

   printer.allocateSpace(rc);
   pdf.addImage(c, rc.left.pt, rc.top.pt, rc.right.pt-rc.left.pt,
   rc.bottom.pt-rc.top.pt);
}
Of course, it’s better not to use a bitmap but instead a PDF representation specific to a component, which will allow Acrobat Reader to recognize its text content and generate searchable documents rather than bitmaps.
In this section, you’ll learn how to enhance standard Flex UI components so that they can properly present themselves for rendering as PDF-friendly objects in the XML-based XDP format.
The ActionScript code snippet in Example 11.13, “Representing a CheckBox as an XDP checkButton” shows how you can present a checkbox as an element of the PDF form in XDP format (in XDP, a checkbox is called checkButton).
We’ll introduce a new interface, IXdpObject, and each of our enhanced UI components will implement it to return properly prepared XML to represent itself. This will allow you to turn the entire Flex view into a searchable PDF.
Example 11.13, “Representing a CheckBox as an XDP checkButton” is an example of implementing the getter xdpContent() defined in the IXdpObject interface to produce a CheckBox in the XDP format.
Example 11.13. Representing a CheckBox as an XDP checkButton
// IXdpObject interface implementation
public  function get xdpContent():Object {
 var o:XML =
      <field  x={convert(x)} w={convert(width)} h={convert(height)}>
   <ui>
     <checkButton  allowNeutral="1">
       <border>
         <edge stroke="lowered"/>
         <fill/>
       </border>
      </checkButton>
   </ui>
   <value>
     <text>{value}</text>
   </value>
   <para vAlign="middle" hAlign="center"/>

   <items>
     <text>{onValue}</text>
     <text>{offValue}</text>
     <text></text>
   </items>
   <caption placement="bottom"/>
   </field>;

 return o;
}

private function convert(value:Number) : String {
   return  XdpUtil.px2pt(value) + "pt";
}
This code snippet includes a getter, xdpContent, that returns the representation of our CheckBox in XDP format. It uses a helper function, convert(), to convert the value from pixels to points.
Note
Note that this code uses binding to insert the onValue and offValue variables that were introduced in Chapter , Building an Enterprise Framework in Example 55, “CheckBox with value and text properties”.
To generate a PDF for a particular Flex view, you need to loop through its children (every UI control of each container) and get each one’s xdpContent. If it’s not null, add its value (XDP) to the output file. If it does not have xdpConent, just get an image snapshot of this child and add it to the output file.
At the end of this process, you’ll get a mix of images and XDP content. If this is a Flex application, send this content to the server-side Java Servlet, which will sandwich it between the PDF header and footer. Voilà! Your PDF file is ready.
Obsessed with the mantra “Developers must write less code,” we at Farata have already created a number of classes in the package com.farata.printing that allows Flex components to expose themselves in a form of XDP.
The sample application shown in Example 11.14, “Saving data in XDP format: test_xdp2.mxml” is a rewrite of Example 11.5, “Printing with AlivePDF from an AIR application”. It’ll produce the same output as in Figure 11.2, “The results of printing with enhanced AlivePDF”, but this time the document will be encoded in the XDP format.
Example 11.14. Saving data in XDP format: test_xdp2.mxml
<?xml version="1.0" encoding="utf-8"?>

<mx:WindowedApplication xmlns:mx="http://www.adobe.com/2006/mxml"
 xmlns:local="*"
 xmlns:printer="com.farata.printing.pdf.client.*" layout="vertical">

   <mx:Style source="main.css"/>
   <mx:Canvas id="canvas" width="100%" height="100%"
      backgroundColor="white">
      <mx:Label id="lbl1" text="Hello" x="10" y="10"/>
      <mx:Label id="lbl2" text="World" x="50" y="30"
         fontWeight="bold"/>
           <mx:Label id="lbl3" text="And" x="150" y="60"
          fontStyle="italic" enabled="false"/>

      <mx:Label id="lbl4" text="Happy" x="70" y="90" fontSize="16"
              textDecoration="underline"/>
      <mx:Label id="lbl5" text="New Year" x="50" y="140" fontSize="24"
              fontWeight="bold" color="green"/>
      <mx:Button id="btn1" label="Button1" x="70" y="240"/>
   </mx:Canvas>

    <mx:ApplicationControlBar width="100%">
    <mx:Label text="File name:"/>
     <mx:TextInput id="txtFileName" text="hw2.pdf"/>
    <mx:Button label="Save PDF" click="savePdf()"/>
   </mx:ApplicationControlBar>

   <mx:Script>
      <![CDATA[
      import com.farata.printing.PrintOptions;
        import com.farata.printing.pdf.xdp.XdpDocument;
        import com.farata.printing.pdf.buffered.PDFHelper;

     private function savePdf():void{
      saveToFile(txtFileName.text, createXdpContent());
      }

     private function createXdpContent ():ByteArray{

      var xdpDocument:XdpDocument=new XdpDocument();
      xdpDocument.init(new PrintOptions());
      var pdf:PDFHelper=new PDFHelper(xdpDocument);

      pdf.createPDFPrologue();
      pdf.createPage(canvas, PDFHelper.TYPE_PAGE);
      pdf.createPDFEpilogue();

        return pdf.pdfContent;
   }

   private function saveToFile (file:String, ba:ByteArray):void{

      var fs:FileStream=new FileStream();
      var f:File=File.desktopDirectory.resolvePath(file);
      fs.open(f, FileMode.WRITE);

      try {
        fs.writeBytes(ba);
      } catch(e:*){
             // Process I/O errors here
       }
        fs.close();
   }

      ]]>
   </mx:Script>
</mx:WindowedApplication>
When you open the generated file h2.pdf in a text editor, notice that it looks different than the file shown in Example 11.8, “A fragment of the h2.pdf content”. The small PDF header and the trailer are there, but the main content of this file is in XDP format, as shown in Example 11.15, “A fragment of the h2.pdf content in XDP format”.
Example 11.15. A fragment of the h2.pdf content in XDP format
 %PDF-1.7
1 0 obj
<</Type /Catalog /StructTreeRoot 9 0 R /MarkInfo <</Marked true>> /Pages 15 0 R
/AcroForm 16 0 R /NeedsRendering true>>
endobj
2 0 obj
<</Type /Page /MediaBox [0 0 612 792] /Resources 5 0 R /Contents 4 0 R
/StructParent 0 /StructParents 0 /Parent 15 0 R>>
endobj
4 0 obj
<</Length 298>>
stream
BT
/Content <</MCID 0>> BDC
0.0 0.0 0.0 rg
/RelativeColorimetric ri
/T1_0 1.0 Tf
10.0 0.0 0.0 10.0 72.0 720.0 Tm
(Warning: This form is not supported at all with the current version of Acrobat or
Adobe Reader.) Tj
0.0 -1.8 Td
(Upgrade to the latest version for full support.) Tj
0.0 -1.8 Td
EMC
ET
endstream
endobj
5 0 obj
<</Font 8 0 R /ProcSet [/PDF /Text]>>
endobj
6 0 obj
<</Type /Encoding /BaseEncoding /WinAnsiEncoding>>
endobj
7 0 obj
<</Type /Font /Subtype /Type1 /BaseFont /Helvetica /Encoding 6 0 R>>
endobj
8 0 obj
<</T1_0 7 0 R>>
endobj
9 0 obj
<</Type /StructTreeRoot /K 10 0 R /ParentTree 13 0 R /ParentTreeNextKey 1 /RoleMap
14 0 R>>
endobj
10 0 obj
<</S /Document /P 9 0 R /K 11 0 R>>
endobj
11 0 obj
<</S /Div /P 10 0 R /K 12 0 R>>
endobj
12 0 obj
<</S /P /P 11 0 R /Pg 2 0 R /K 0>>
endobj
13 0 obj
<</Nums [0 [12 0 R]]>>
endobj
14 0 obj
<</Field /Div /Subform /Sect /Page /Part /Draw /Div>>
endobj
15 0 obj
<</Type /Pages /Kids [2 0 R] /Count 1>>
endobj
16 0 obj
<</Fields [] /XFA 17 0 R>>
endobj
17 0 obj
<< /Length 18 0 R >>
stream
<xdp:xdp xmlns:xdp="http://ns.adobe.com/xdp/">
  <template xmlns="http://www.xfa.org/schema/xfa-template/2.5/">
    <subform name="doc1" layout="tb" restoreState="auto" locale="en_US">
      <proto/>
      <desc>
        <text name="version">8.0.1291.1.339988.308172</text>
      </desc>
      <pageSet>
        <pageArea name="Page1" id="Page1">
          <contentArea x="8.47mm" y="8.47mm" w="262.43mm" h="198.94mm"/>
          <medium stock="custom" short="215.87mm" long="279.37mm"
                                              orientation="landscape"/>
        </pageArea>
      </pageSet>
    <subform layout="tb" name="Subform1">
  <subform name="Container1" x="6.35mm" y="6.35mm" w="119.58mm" h="70.9mm">
    <draw x="7.5pt" y="7.5pt" w="22.5pt" h="14.25pt">
      <ui>
        <textEdit hScrollPolicy="off" multiLine="0" vScrollPolicy="off"/>
      </ui>
      <value>
        <text>Hello</text>
      </value>
      <para hAlign="left"/>
      <font typeface="Arial" size="7.5pt" weight="normal" posture="normal"
                   underline="0">
        <fill>
          <color value="11,51,60"/>
        </fill>
      </font>
      <border>
        <edge presence="hidden"/>
        <edge presence="hidden"/>
        <edge presence="hidden"/>
        <edge presence="hidden"/>
      </border>
    </draw>
    <draw x="37.5pt" y="22.5pt" w="24.75pt" h="13.5pt">
      <ui>
        <textEdit hScrollPolicy="off" multiLine="0" vScrollPolicy="off"/>
      </ui>
      <value>
        <text>World</text>
      </value>
      <para hAlign="left"/>
      <font typeface="Arial" size="7.5pt" weight="bold" posture="normal"
                                                          underline="0">
        <fill>
          <color value="11,51,60"/>
        </fill>
      </font>
      <border>
        <edge presence="hidden"/>
        <edge presence="hidden"/>
        <edge presence="hidden"/>
        <edge presence="hidden"/>
      </border>
    </draw>
    <draw x="112.5pt" y="45pt" w="18pt" h="14.25pt">
      <ui>
        <textEdit hScrollPolicy="off" multiLine="0" vScrollPolicy="off"/>
      </ui>
      <value>
        <text>And</text>
      </value>
      <para hAlign="left"/>
      <font typeface="Arial" size="7.5pt" weight="normal" posture="italic"
                                                 underline="0">
        <fill>
          <color value="11,51,60"/>
        </fill>
      </font>
      <border>
        <edge presence="hidden"/>
        <edge presence="hidden"/>
        <edge presence="hidden"/>
        <edge presence="hidden"/>
      </border>
    </draw>
    <draw x="52.5pt" y="67.5pt" w="37.5pt" h="18pt">
      <ui>
        <textEdit hScrollPolicy="off" multiLine="0" vScrollPolicy="off"/>
      </ui>
      <value>
        <text>Happy</text>
      </value>
      <para hAlign="left"/>
      <font typeface="Arial" size="12pt" weight="normal" posture="normal"
                                              underline="1">
        <fill>
          <color value="11,51,60"/>
        </fill>
      </font>
      <border>
        <edge presence="hidden"/>
        <edge presence="hidden"/>
        <edge presence="hidden"/>
        <edge presence="hidden"/>
      </border>
    </draw>
    <draw x="37.5pt" y="105pt" w="83.25pt" h="26.25pt">
      <ui>
        <textEdit hScrollPolicy="off" multiLine="0" vScrollPolicy="off"/>
      </ui>
      <value>
        <text>New Year</text>
      </value>
      <para hAlign="left"/>
      <font typeface="Arial" size="18pt" weight="bold" posture="normal"
underline="0">
        <fill>
          <color value="0,128,0"/>
        </fill>
      </font>
      <border>
        <edge presence="hidden"/>
        <edge presence="hidden"/>
        <edge presence="hidden"/>
        <edge presence="hidden"/>
      </border>
    </draw>
    <draw x="18.52mm" y="63.49mm" w="16.67mm" h="5.82mm">
      <ui>
        <imageEdit/>
      </ui>
      <value>
        <image
contentType="image/png">iVBORw0KGgoAAAANSUhEUgAAAD8AAAAWCAYAAAB3/EQhAAABqElE
QVR42uWYTUsCURSGz76f07bfEtS2UkioqAgJKaMPERISQkJCqIggF2VItAsRi/5AhS11/BpH8YuT
rysb7jj35m7uhQfuOXPmnPvALGaGeLgaDZNz+cKIh6esZ4Ff4f1j5ItFvV6Ps88v/Pn1zeWywV5e
8IMnfOFNr7k85wtvPBgMtAG+8Kbr2zvu9/vaAW9KXd2MHgHdgDclL1Pc7Xa1A96UuEhyp9PRDnhT
/DzB7XZbmZnZuT/I1Iv20zBNH3hT7CzOlmUpg8GT4kn1brWy86fpA2+Knsa42Wwqg8GiWJR3QlTj
dJ/MLBXgTceRKJumqYz9cON5e509r1ovip1yssCbwodHw9e9hjIYLIpl8k57mT5uOVngTaH9MNfr
dWUwWBTL5J32Mn3ccrLAm4K7Ia7VasrYH3u3a057e/14zt5TdIb/nB3Am7Z3glytVrUD3rSxucWV
SkU74E2BtXUt5eFN/tUAG4ahHfCmpRXf8CO/rB3wpuOTCN+n01qJwxfeVCz+8LLPz4+ZDJdKJc8D
T/jCm/Bvy2q1eC98wPMLi54HnvDF+gUhlFFaqhacWgAAAABJRU5ErkJggg==</image>
      </value>
    </draw>
  </subform>
</subform></subform>
</template>

...

</xdp:xdp>
endstream
endobj
18 o obj

endobj
xref
0 19
0000000000 65535 f
0000000016 00000 n
0000000151 00000 n
0000000000 65535 f
0000000287 00000 n
0000000635 00000 n
0000000688 00000 n
0000000754 00000 n
0000000838 00000 n
0000000869 00000 n
0000000976 00000 n
0000001028 00000 n
0000001076 00000 n
0000001127 00000 n
0000001166 00000 n
0000001236 00000 n
0000001292 00000 n
0000001335 00000 n
trailer
<</Root 1 0 R  /Size 19>>
startxref
%%EOF
Note
The file templates/generic.xdp in com.farata.printing contains the generic template for XDP generation used for generation of h2.pdf and all other XDP samples from this chapter.
As you can see from Example 11.15, “A fragment of the h2.pdf content in XDP format”, the values of the text fields (Hello, World, etc.) are represented as XML text fields, which makes this PDF searchable. Note that the binary image is also presented in the encoded form as one of the XML elements.
Note
If you are developing not AIR but Flex applications, the client-side code can generate the entire XML portion of the Flex view components and send this XML to the server, where, say, Java Servlet puts it between the required PDF header and trailer and returns the entire document back to the web browser for printing.
The entire process of generation of this PDF in the XDP format is done by the following code from Example 11.14, “Saving data in XDP format: test_xdp2.mxml”:
var xdpDocument:XdpDocument=new XdpDocument();
xdpDocument.init(new PrintOptions());
var pdf:PDFHelper=new PDFHelper(xdpDocument);

pdf.createPDFPrologue();

pdf.createPage(canvas, PDFHelper.TYPE_PAGE);

pdf.createPDFEpilogue();
This code uses the helper components XdpDocument, PrintOptions, and PDFHelper, which are located in com.farata.printing.swc. The class PrintOptions is just a holder of such page parameters as orientation, margins, page size, and the like.
The MXML component XdpDocument implements a generic getter xdpContent, introduced in the beginning of this section. The source code of XDPDocument.mxml and a fragment of PDFHelper.as are shown in Examples 11.16 and 11.17, respectively. But these constitute just the tip of the iceberg, as they use uses dozens of supporting classes in the process of creation of the XDP content.
The good news is that unless the XDP format changes, you don’t need to learn all the nitty-gritty details, as we already did that tedious work of ensuring that the document is generated as required by the XDP specifications.
Example 11.16. Component XDPDocument.mxml
<?xml version="1.0" encoding="utf-8"?>

<xdp:XdpBaseObject
     xmlns:mx="http://www.adobe.com/2006/mxml"
     xmlns:xdp="com.farata.printing.pdf.xdp.*">

    <mx:XML id="xmlGen" source="/templates/generic.xdp"/>

<mx:Script><![CDATA[

import mx.core.UIComponent;

import com.farata.printing.pdf.buffered.PDFHelper;
    import com.farata.printing.geom.PNumber;
import mx.core.Container;
import com.farata.printing.geom.PSize;
import com.farata.printing.PrintOptions;
import com.farata.printing.geom.PRectangle;
import com.farata.printing.PaperSize;

public static var ns_xdp     : Namespace = new
Namespace("http://ns.adobe.com/xdp/");

public static var ns_xfat25  : Namespace = new Namespace(
                                          "http://www.xfa.org/schema/xfa-template/2.5/");

public static var ns_xci10   : Namespace = new
Namespace("http://www.xfa.org/schema/xci/1.0/");

public static var ns_xfals21 : Namespace = new
Namespace("http://www.xfa.org/schema/xfa-locale-set/2.1/");

public var paperSize   : PaperSize;
    public var margins     : PRectangle;
public var pageSize    : PSize;
public var orientation : String;
public var header:UIComponent;
public var footer:UIComponent;

public function get pages():Array{
   return children;
}

public override function get xdpContent():Object{

   var x:Object = xmlGen.copy();
   var f:Object = x..ns_xfat25::subform.(@name=="doc1")[0];
   var p:XML = <pageSet>
       <pageArea name="Page1" id="Page1">
      </pageArea>
   </pageSet>;

   var contentAreaX:Number = margins.left.px;
   var contentAreaY:Number = margins.top.px;
   var contentAreaH:Number = pageSize.height.px;
   var contentAreaW:Number = pageSize.width.px;

   if (header){
      var xdpHeader:XdpPage = new XdpPage();
      PDFHelper.createXdpPage(xdpHeader, header);

      xdpHeader.x = margins.left;
      xdpHeader.y = margins.top;
      contentAreaY = contentAreaY + header.height;
      contentAreaH = contentAreaH - header.height;

      p.pageArea.appendChild(xdpHeader.xdpContent);
   }


   if (footer){
      var xdpFooter:XdpContainer = new XdpContainer();
      PDFHelper.createXdpPage(xdpFooter, footer);
      xdpFooter.x = margins.left;
      var y:Number = pageSize.height.px + margins.top.px - footer.height;
      xdpFooter.y = new PNumber(y, PNumber.UNIT_PX);
      contentAreaH = contentAreaH - footer.height;

      p.pageArea.appendChild(xdpFooter.xdpContent);
   }

   p.pageArea.contentArea.@x = _pos(new PNumber(contentAreaX, PNumber.UNIT_PX));
   p.pageArea.contentArea.@y = _pos(new PNumber(contentAreaY, PNumber.UNIT_PX));
   p.pageArea.contentArea.@w = _pos(new PNumber(contentAreaW, PNumber.UNIT_PX));
   p.pageArea.contentArea.@h = _pos(new PNumber(contentAreaH, PNumber.UNIT_PX));

   p.pageArea.medium.@stock = "custom";
   p.pageArea.medium.@short = _pos(paperSize.width);
   p.pageArea.medium.@long  = _pos(paperSize.height);

   if( orientation==PrintOptions.ORIENTATION_LANDSCAPE )
      p.pageArea.medium.@orientation = "landscape";

   p.setNamespace(ns_xfat25);
   f.appendChild(p);
   f = applyStdData(f);

   return x;
}

public function addPage(p:XdpPage):void{

   addChild(p);
   p.pageNumber = pages.length;
   p.w = pageSize.width;
   p.h = pageSize.height;
}

public function init(opt:PrintOptions):void{

   paperSize = opt.paperSize.copy();
   margins = opt.margins.copy();

   pageSize = opt.pageSize;
   orientation = opt.orientation;
}
]]></mx:Script>

</xdp:XdpBaseObject>
The ActionScript class PDFHelper has about 300 lines of code; you can see some fragments of it in Example 11.17, “Fragments of PDFHelper.as”. We don’t provide code explanations here, as teaching the internals of the XDP protocol is not the goal of this chapter.
Example 11.17. Fragments of PDFHelper.as
package com.farata.printing.pdf.buffered{

   public class PDFHelper{


       private static var prefix : Array =[["\%PDF-1.7"+ "\n"," 65535 f"],
         ["1 0 obj"+"\n"+
         "<</Type /Catalog /StructTreeRoot 9 0 R /MarkInfo <</Marked true>> /Pages
15 0 R /AcroForm 16 0 R /NeedsRendering true>>"+"\n"+
         "endobj"+"\n", " 00000 n"],
         ["2 0 obj"+"\n"+
         "<</Type /Page /MediaBox [0 0 612 792] /Resources 5 0 R /Contents 4 0 R
/StructParent 0 /StructParents 0 /Parent 15 0 R>>"+"\n"+
         "endobj"+"\n", " 00000 n"],
         [""," 65535 f"],
         ["4 0 obj"+"\n"+
         "<</Length 298>>"+"\n"+
         "stream"+"\n"+
         "BT"+"\n"+
         "/Content <</MCID 0>> BDC"+"\n"+
         "0.0 0.0 0.0 rg"+"\n"+
         "/RelativeColorimetric ri"+"\n"+
         "/T1_0 1.0 Tf"+"\n"+
         "10.0 0.0 0.0 10.0 72.0 720.0 Tm"+"\n"+
         "(Warning: This form is not supported at all with the current version of
Acrobat or Adobe Reader.) Tj"+"\n"+
         "0.0 -1.8 Td"+"\n"+
         "(Upgrade to the latest version for full support.) Tj"+"\n"+
         "0.0 -1.8 Td"+"\n"+
         "EMC"+"\n"+
         "ET"+"\n"+
         "endstream"+"\n"+
         "endobj"+"\n", " 00000 n"],
         ["5 0 obj"+"\n"+
         "<</Font 8 0 R /ProcSet [/PDF /Text]>>"+"\n"+
         "endobj"+"\n", " 00000 n"],
         ["6 0 obj"+"\n"+
         "<</Type /Encoding /BaseEncoding /WinAnsiEncoding>>"+"\n"+
         "endobj"+"\n"," 00000 n"],
         ["7 0 obj"+"\n"+
         "<</Type /Font /Subtype /Type1 /BaseFont /Helvetica /Encoding 6 0
R>>"+"\n"+
         "endobj"+"\n"," 00000 n"],
...

      private var ba:ByteArray = new ByteArray();
      public var xdpDocument:XdpDocument;

      public function PDFHelper(xdpDocument:XdpDocument) {
         this.xdpDocument = xdpDocument;
      }

      public function get pdfContent():ByteArray{
          return ba;
       }

      public function createPDFPrologue():void{
         //write pdf document prefix
         var xref:String ="";

         for (var i:int = 0; i < prefix.length; i++) {
            ba.writeMultiByte( prefix[i][0], "iso-8859-1");
            var str:String = padZeroes(ba.length, 10);
            xref = xref.concat(str + prefix[i][1] + " \n");
         }

         var s:String = xdpDocument.xdpContent.toString();
         s = s.substr(0, s.lastIndexOf("</subform>"));
         ba.writeMultiByte( s, "iso-8859-1");
       }
      public function createPage(obj:Object, type:int):void{
         var page:XdpPage = new XdpPage();
         createXdpPage(page, obj, type);
         ba.writeMultiByte(String(page.xdpContent), "iso-8859-1");
      }

     public function createPDFEpilogue():void{
         var xx:XML = xdpDocument.xdpContent as XML;
         ba.writeMultiByte( "</subform>"+"\r"+"</template>"+"\r", "iso-8859-1");
         ba.writeMultiByte( xx..ns_xci10::config[0].toString().replace("
xmlns:xdp=\"http://ns.adobe.com/xdp/\"", "")+"\r", "iso-8859-1");
         ba.writeMultiByte( xx..ns_xfals21::localeSet[0].toString().replace("
xmlns:xdp=\"http://ns.adobe.com/xdp/\"", "")+"\r", "iso-8859-1");
         ba.writeMultiByte( "</xdp:xdp>"+"\r", "iso-8859-1");
         ba.writeMultiByte( "endstream"+"\r", "iso-8859-1");
         ba.writeMultiByte( "endobj"+"\r", "iso-8859-1");
         ba.writeMultiByte("18 o obj " +"\n" + /*streamLength + */"\n" +
"endobj"+"\n",  "iso-8859-1");

         //the footer for the pdf document
          var end:String = "xref"+"\n"+ "0 " + 19 +"\n";
         var closing:String = end +
               "0000000000 65535 f"+"\r"+
               "0000000016 00000 n"+"\r"+
...
              "trailer"+"\n"+
               "<</Root 1 0 R  /Size " + 19 +">>"+"\n"+
               "startxref"+"\n"+
               "%%EOF"+"\n";
         ba.writeMultiByte(closing , "iso-8859-1");
       }

      public static function createXdpPage(root:XdpPage, obj:Object,
                type:int = 1):void{

         obj = resolveXdp(obj);
         if (obj is Container){

            var c:Container=obj as Container;
            var count:int=c.numChildren;
            if (type == TYPE_LIST) {
               var page:XdpPage = new XdpPage();
            } else {
               page = new XdpContainer();
            }

            page.x = new PNumber(c.x, PNumber.UNIT_PX);
            page.y = new PNumber(c.y, PNumber.UNIT_PX);
            page.h = new PNumber(c.height, PNumber.UNIT_PX);
            page.w = new PNumber(c.width, PNumber.UNIT_PX);

            root.addChild(page);

            if (obj is FormItem){
               var formItemLabel:Label = (obj as FormItem).itemLabel;
               createXdpPage(page, formItemLabel);
            }

            for(var i:int=0; i < count; i++){

               createXdpPage(page, c.getChildAt(i));
            }
         } else if (obj is IXdpObject){

            root.addChild(obj as IXdpObject);
         } else if (obj is UIComponent){

            var uiComp:UIComponent = obj as UIComponent;
            var xdp:XdpBaseObject = XdpImage.grab(uiComp);
            xdp.x = new PNumber(uiComp.x, PNumber.UNIT_PX);
            xdp.y = new PNumber(uiComp.y, PNumber.UNIT_PX);

            // set the width and hight of UIComponent (i.e. image)
            // for proper image scaling and conversion of pixels
            xdp.w = new PNumber(uiComp.width, PNumber.UNIT_PX);
            xdp.h = new PNumber(uiComp.height, PNumber.UNIT_PX);
            root.addChild(xdp);
         }
      }

}
Note
The code in Examples 11.16 and 11.17 is for illustration purposes only, because detailed coverage of the XDP generation is out of the scope of this book. Complete source code of com.farata.printing.swc, however, is available in the CVS repository of the Clear Toolkit project at SourceForge.
Example 11.18, “AIR application test4_xdp.mxml” shows the source code of test4_xdp.mxml, the modified version of text4.mxml, but this code generates a PDF in XDP format. The Flex window and PDF look the same as in Figure 11.3, “Running test4.mxml (left) generates PDF hw4 (right)”.
Example 11.18. AIR application test4_xdp.mxml
<?xml version="1.0" encoding="utf-8"?>

<mx:WindowedApplication xmlns:mx="http://www.adobe.com/2006/mxml" layout="vertical"
creationComplete="onCreationComplete(event)">

   <mx:Style source="main.css"/>

   <mx:DataGrid id="dg" x="0" y="0" width="100%" height="100%">
       <mx:columns>
      <mx:DataGridColumn dataField="name" headerText="Name"/>
      <mx:DataGridColumn dataField="phone" headerText="Phone"/>
      <mx:DataGridColumn dataField="email" headerText="E-mail"/>
      </mx:columns>

        </mx:DataGrid>
   <mx:ApplicationControlBar width="100%">
     <mx:Label text="File name:"/>
     <mx:TextInput id="txtFileName" text="hw4.pdf"/>
     <mx:Button label="Save PDF" click="savePdf()"/>
   </mx:ApplicationControlBar>

   <mx:Script>
      <![CDATA[
      import com.farata.printing.PrintOptions;
      import com.farata.printing.pdf.xdp.XdpDocument;
      import com.farata.printing.pdf.buffered.PDFHelper;

      private function doSavePdf():void{
         saveToFile(txtFileName.text , createXdpContent());
      }
      private function createXdpContent():ByteArray {

         var xdpDocument:XdpDocument=new XdpDocument();
         xdpDocument.init(new PrintOptions());
         var pdf:PDFHelper=new PDFHelper(xdpDocument);

         pdf.createPDFPrologue();
         pdf.createPage(canvas, PDFHelper.TYPE_LIST);
         pdf.createPDFEpilogue();

         return  pdf.pdfContent;
      }

      private function saveToFile(file:String, ba:ByteArray):void{

         var fs:FileStream=new FileStream();
         var f:File=File.desktopDirectory.resolvePath(file);

         fs.open(f, FileMode.WRITE);
         try{
            fs.writeBytes(ba);
         }catch(e:*){
                     // Error processing goes here
         }

         fs.close();
      }

      private function onCreationComplete(evt:*):void{

      var array:Array=[];
      for(var i:int=1; i <= 300; i++){

         var obj:Object=new Object();
         obj.name="User " + i;
         obj.phone="555-219-227" + i;
           obj.email="user" + i + "@hello.world";
           obj.active=(i % 2) == 1;

         array.push(obj);
           }

      dg.dataProvider=arrat;
     }

   ]]>
   </mx:Script>
</mx:WindowedApplication>
Note
We decided to keep the name of the code sample as test4_xdp.mxml, and you can find all other samples (test1 to test5) in the Flash Builder project clientPdfAir.
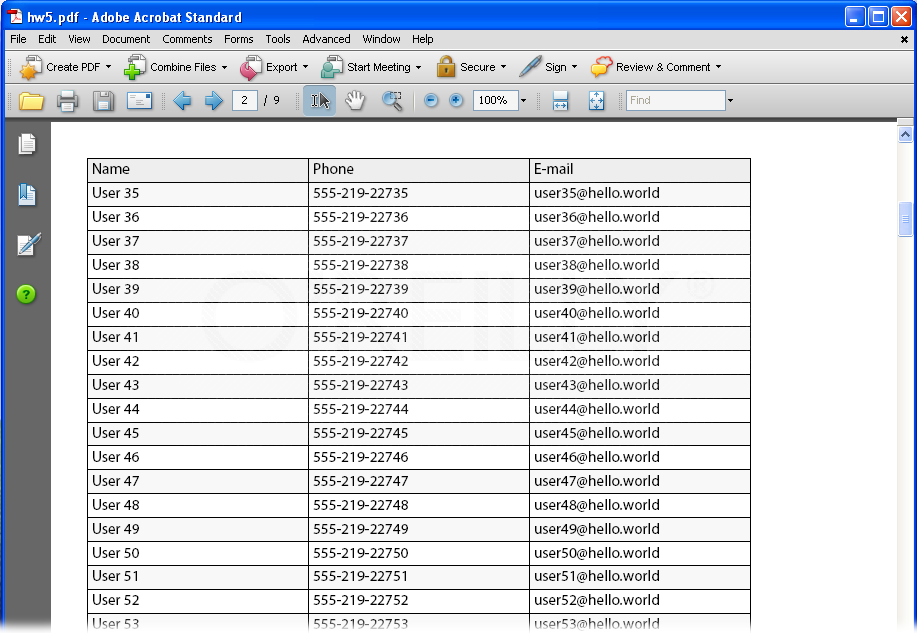
The previous example illustrates the printing of 300 rows of data to demonstrate that the pagination works properly and each page in the PDF file shows the header of the DataGrid (Figure 11.4, “The second page of the generated PDF hw5.pdf”).
In Chapter 9, Working with Adobe AIR, you learned how to create an occasionally connected AIR application. In this section, you’ll modify it a little bit, armed with new knowledge and printing components. That’s right, the Acme Pharm dispatcher should be able to print visitation data for all salespeople.
On the other hand, each salesperson will be able to print the data about his visits to medical offices without the need to be connected to the server.
You’ll take care of the dispatcher’s needs first. As you might remember from Chapter 9, Working with Adobe AIR, VisitSchedules.mxml is a web application written in Flex. This means that you won’t be able to save a generated PDF file on the client’s filesystem and will need to send it to the server, which will just bounce it back so that the web browser will recognize it as a PDF and do the rest.
The source code of this version of PharmaSales is located in two Flex Builder projects, air.offline.demo.print and air.offline.demo.web.print. You’ll need to start with the latter (don’t forget to start MySQL Server and the servlet container first; the example uses Apache Tomcat). Your web browser should show you the view, similar to that shown in Figure 11.5, “Running VisitSchedules.mxml”.
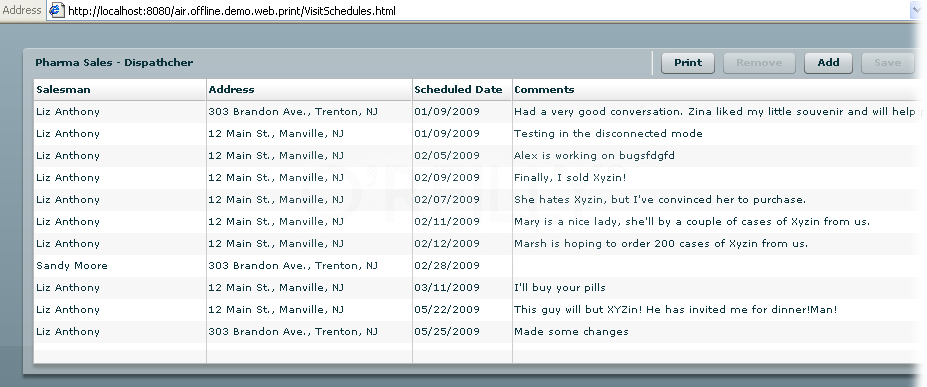
Click the Print button and Figure 11.6, “Generated PDF from VisitSchedules.mxml”’s PDF will show up.
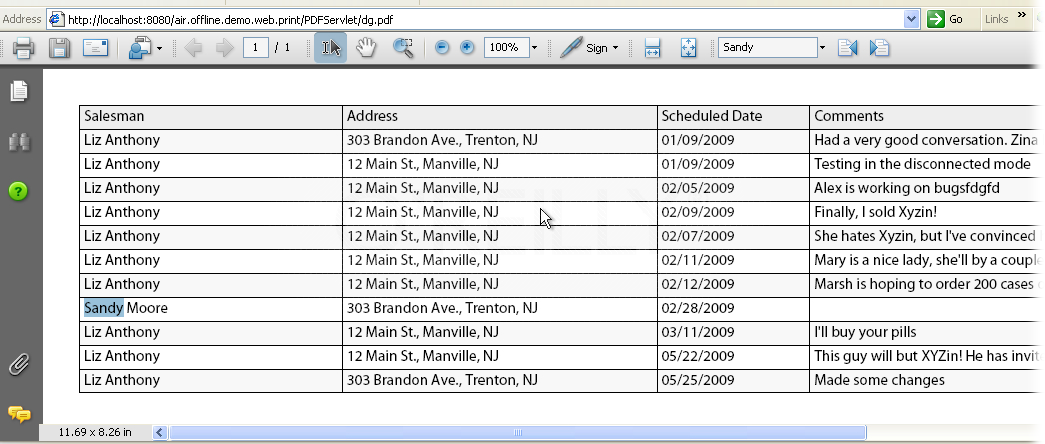
The PDF has been generated, and for illustration purposes, we performed a search for the word “Sandy,” which was successfully found.
The web browser reports that the PDF came from the following URL:
| http://localhost:8080/air.offline.demo.web.print/PDFServlet/dg.pdf |
You’ll see the code of this Java servlet, PDFServlet, in a little bit, but in the meantime, take a peek at the Flex code fragment in VisitSchedules.mxml (Example 11.19, “Flex code fragment for PDF generation”), which is invoked by clicking the Print button.
Example 11.19. Flex code fragment for PDF generation
<mx:Button click="openPDF(dg)" label="Print"/>
[Bindable]


   public var collection:DataCollection;

   private function openPDF(uiObject:Object):void{

      var xdpDocument:XdpDocument=new XdpDocument();
      var options:PrintOptions=new PrintOptions();
      options.paperSize=PaperSize.A4;
      options.orientation=PrintOptions.ORIENTATION_LANDSCAPE;

      xdpDocument.init(options);
      var pdf:PDFHelper=new PDFHelper(xdpDocument);

      pdf.createPDFPrologue();
      pdf.createPage(uiObject, PDFHelper.TYPE_LIST);
      pdf.createPDFEpilogue();

      sendToServer(uiObject.id + ".pdf", pdf.pdfContent);
   }


   private function sendToServer(file:String, ba:ByteArray):void{

      var req:URLRequest = new URLRequest("PDFServlet/"+file);
      req.method = URLRequestMethod.POST;

      ba.compress();

      req.data = ba;

      navigateToURL(req, "_blank");
   }
The function openPDF() looks similar to savePdf() from Example 11.18, “AIR application test4_xdp.mxml”. It’ll generate a PDF in the XDP format for the DataGrid container. At this point, the generated PDF is located in memory in the ByteArray object in pdf.pdfContent.
Next, the function sendToServer() compresses this ByteArray and sends it to the Java servlet,PDFServlet, deployed on the server. The source code of PDFServlet (Example 11.20, “PDFServlet.java”) is located in the folder src/com/Farata/demo/pdf in the Flex Builder project air.offline.demo.web.print.
Example 11.20. PDFServlet.java
package com.farata.demo.pdf;

import java.io.IOException;
import java.io.InputStream;
import java.nio.ByteBuffer;
import java.nio.channels.Channels;
import java.nio.channels.ReadableByteChannel;
import java.util.zip.InflaterInputStream;
import javax.servlet.ServletException;
import javax.servlet.ServletInputStream;
import javax.servlet.http.HttpServletRequest;
import javax.servlet.http.HttpServletResponse;

public class PDFServlet extends javax.servlet.http.HttpServlet
                              implements javax.servlet.Servlet {

   static final long serialVersionUID = 1L;

   // The size of the reading block
   private static final int READ_BLOCK = 8192;

    public PDFServlet() {
      super();
   }

   protected void doPost(HttpServletRequest req, HttpServletResponse resp)
         throws ServletException, IOException {

      ServletInputStream in = req.getInputStream();
      InflaterInputStream iin = new InflaterInputStream(in);

      byte[] content = readAllFromInputStream(iin);

      resp.setContentType("application/pdf");
      resp.flushBuffer();

      resp.getOutputStream().write(content);
      resp.getOutputStream().close();
   }

   private byte[] readAllFromInputStream(InputStream is) throws IOException {

      // create channel for input stream
      ReadableByteChannel bc = Channels.newChannel(is);

      ByteBuffer bb = ByteBuffer.allocate(READ_BLOCK);

      while (bc.read(bb) != -1) {
         // get new buffer for read
         bb = resizeBuffer(bb);
      }

      bb.flip();

      return bb.array();
   }

   private ByteBuffer resizeBuffer(ByteBuffer in) {
      ByteBuffer result = in;

      if (in.remaining() < READ_BLOCK) {
         // create new buffer
         result = ByteBuffer.allocate(in.capacity() * 2);

         // set limit to current position in buffer and set position to zero.
         in.flip();

         // store the content of original buffer to new buffer
         result.put(in);
      }

      return result;

   }
}
In short, this Java servlet echoes received PDF content from the client, assigns to it the MIME type "application/pdf", and sends it right back without doing any other processing.
Start reading this code from the method doPost(), which opens an input stream pointing at the request object (HTTPRequest) that arrived from the browser. Because the arrived content has been compressed by the client, the servlet inflates it first and writes it right back to the response object (HTTPResponse).
All manipulations with buffering in the code above are done for I/O efficiency.
The main takeaway here is that the server-side code didn’t modify the received PDF object, but just sent it back as PDF content. Now it’s the web browser’s responsibility to engage its Acrobat Reader plug-in to display the document.
Now consider the AIR application that salespeople use on a daily basis, either in connected or in disconnected mode. In this case, the generated PDF won’t even go to the server side, but it will be saved in the file on the local disk.
You still want to print the list of visits for a particular salesperson as a grid, but to make this report a little fancier, the program should add the name of the salesperson as a header and the logo of Acme Pharm in the footer’s area of the report.
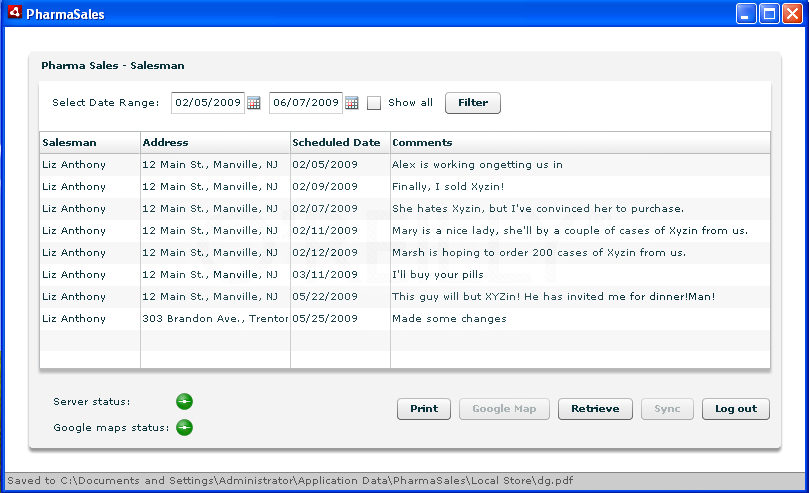
After running the application PharmaSales.mxml from the air.offline.demo.print project filtering the data for visits done by Liz Anthony from February 5 to June 7 in 2009, click the Print button. The filtered data will be saved in the file dg.pdf at the local storage directory. Exact file location is displayed in the status bar, as shown in Figure 11.7, “After clicking the buttons Filter and Print”.
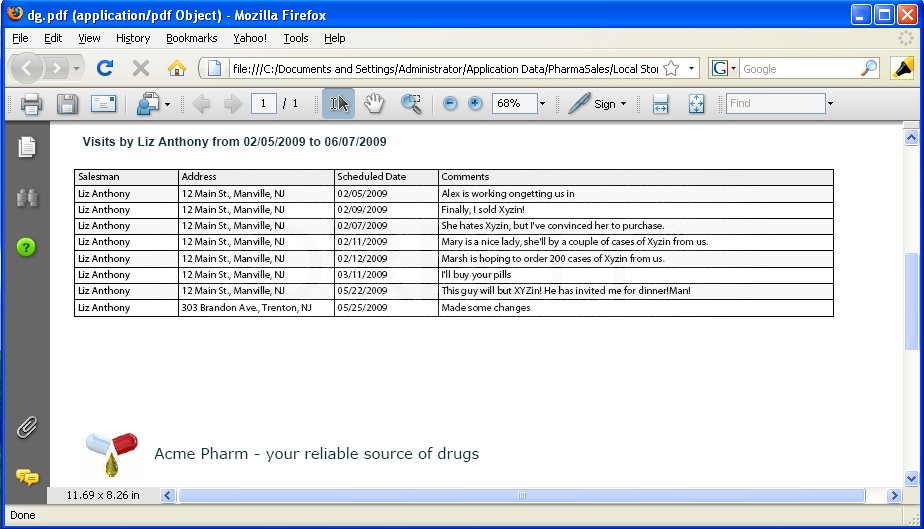
After the PDF file is created, this AIR application automatically starts the web browser and opens dg.pdf. Figure 11.8, “A generated local file with header and footer: dg.pdf” shows how it looks for the sample data.
The header of dg.pdf shows the date range and the footer—the logo of the company and some arbitrary text. The header and the footer will be repeated on each page in case of multipage printing.
The header component looks like Example 11.21, “Header.mxml”.
Example 11.21. Header.mxml
<?xml version="1.0" encoding="utf-8"?>

 <mx:Canvas xmlns:mx="http://www.adobe.com/2006/mxml" width="594" height="56">

  <mx:Label id="headerLabel" x="10" y="13" text="Visits by Liz Anthony for the
   period from 02/05/09 to 06/07/09" width="565" height="27" fontSize="16"
   fontFamily="Arial" fontWeight="bold"/>

 </mx:Canvas>
The footer components are shown in Example 11.22, “Footer.mxml”.
Example 11.22. Footer.mxml
<?xml version="1.0" encoding="utf-8"?>

<mx:Canvas xmlns:mx="http://www.adobe.com/2006/mxml" width="556" height="78"
   xmlns:ns1="com.farata.controls.*">

 <ns1:Image source="@Embed(source='assets/pharma_small.jpg')" x="10" y="10"
  width="75" height="57"/>

 <ns1:Label x="100" y="27" width="446" height="34" text="Acme Pharma - your
  reliable source of drugs" fontSize="19"/>

</mx:Canvas>
Example 11.23, “Code fragment for printing a data grid with visits from PharmaSales.mxml” is a code fragment from the PharmaSales.mxml application. It illustrates what’s happening when the user clicks on the Print button.
Example 11.23. Code fragment for printing a data grid with visits from PharmaSales.mxml
<mx:Canvas height="100%" width="100%">
   <mx:Panel title="Pharma Sales - Salesman" width="100%" height="100%">
     <mx:ControlBar>
      <mx:Label text="Select Date Range:"/>
         <mx:DateField id="dateRangeFrom"
                 enabled="{!showAll.selected}"/>
       <mx:DateField id="dateRangeTo"
                 enabled="{!showAll.selected}"/>
       <mx:CheckBox id="showAll" label="Show all"/>
       <mx:Button label="Filter" click="doFilter()"/>
   </mx:ControlBar>

   <fx:DataGrid toolTip="Double click for details" doubleClick="onDoubleClick()"
       doubleClickEnabled="true" horizontalScrollPolicy="auto" width="100%"
       id="dg" dataProvider="{visitDataCollection}" editable="true" height="100%">
...

   <mx:Button click="openVisitDataCollectionPDF(dg)" label="Print"/>

</mx:Canvas>

   <mx:Script>
      <![CDATA[

      import com.farata.printing.PaperSize;
      import com.farata.printing.PrintOptions;
      import com.farata.printing.pdf.xdp.XdpDocument;
      import com.farata.printing.pdf.buffered.PDFHelper;

   private function openVisitDataCollectionPDF(uiObject:Object):void{

            var xdpDocument:XdpDocument=new XdpDocument();
            var options:PrintOptions=new PrintOptions();
            options.paperSize=PaperSize.A4;
            options.orientation=PrintOptions.ORIENTATION_LANDSCAPE;
            xdpDocument.init(options);

            //Create header text dynamically

      var text:String="";

      var df:DateFormatter=new DateFormatter();
      if (showAll.selected || (!dateRangeFrom.selectedDate &&
                                 !dateRangeTo.selectedDate)){
         text="All visits by " + username.text;
      } else if (!dateRangeFrom.selectedDate && dateRangeTo.selectedDate){
         text="Visits by " + username.text + " to " +
                   df.format(dateRangeTo.selectedDate);
      } else if (dateRangeFrom.selectedDate && !dateRangeTo.selectedDate){
             text="Visits by " + username.text + " from " +
                   df.format(dateRangeFrom.selectedDate);
      } else {
           text="Visits by " + username.text + " from " +
                   df.format(dateRangeFrom.selectedDate) + " to " +
                   df.format(dateRangeTo.selectedDate);
         }

        var header:Header=new Header();
      header.initialize();
        header.headerLabel.text=text;

      xdpDocument.header=header;
      xdpDocument.footer=new Footer();
      xdpDocument.footer.initialize();

      var pdf:PDFHelper=new PDFHelper(xdpDocument);

      pdf.createPDFPrologue();

      pdf.createPage(uiObject, PDFHelper.TYPE_LIST);

      pdf.createPDFEpilogue();

      savePDF(uiObject.id + ".pdf", pdf.pdfContent);
   }

   private function savePDF(file:String, ba:ByteArray):void {

      var fs:FileStream=new FileStream();
      var f:File=File.applicationStorageDirectory.resolvePath(file);

        try{
        fs.open(f, FileMode.WRITE);
        fs.writeBytes(ba);

           var req:URLRequest=new URLRequest(f.url);
        navigateToURL(req, "_blank");
        status="Saved to " + f.nativePath;

      } catch(e:*){
         status=e.message;
        } finally {
         fs.close();
       }

   }
   ]]>

   </mx:Script>

</mx:WindowedApplication>
The Visit Details window now has the Print button, too, as you can see in Figure 11.9, “Visit Details with the Print button”.
The produced PDF file looks like Figure 11.10, “The generated PDF file details_panel.pdf”.
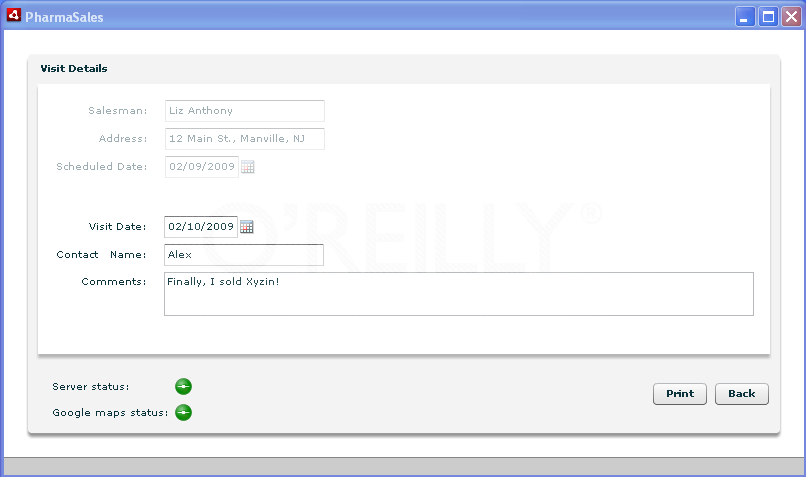

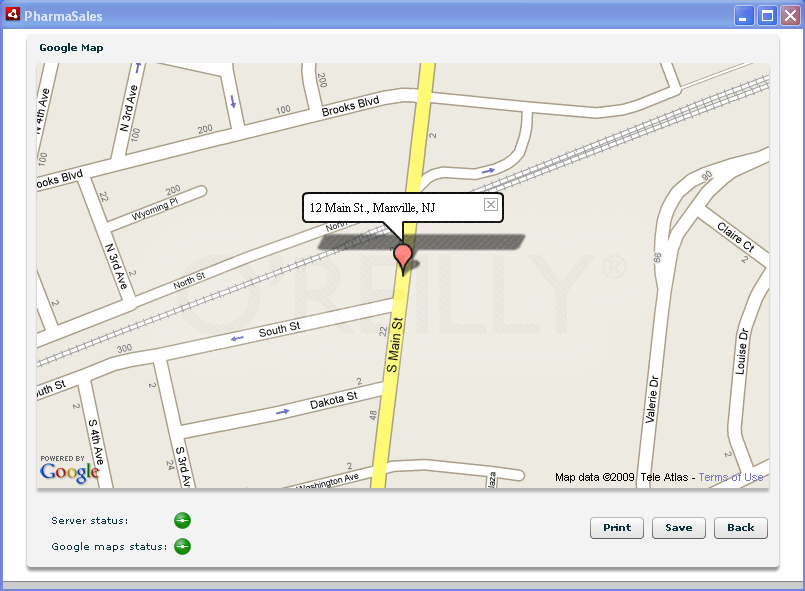
There is no reason why a Flex window with Google Maps can’t have the Print button, as shown in Figure 11.11, “A Google Maps window with the Print button”.
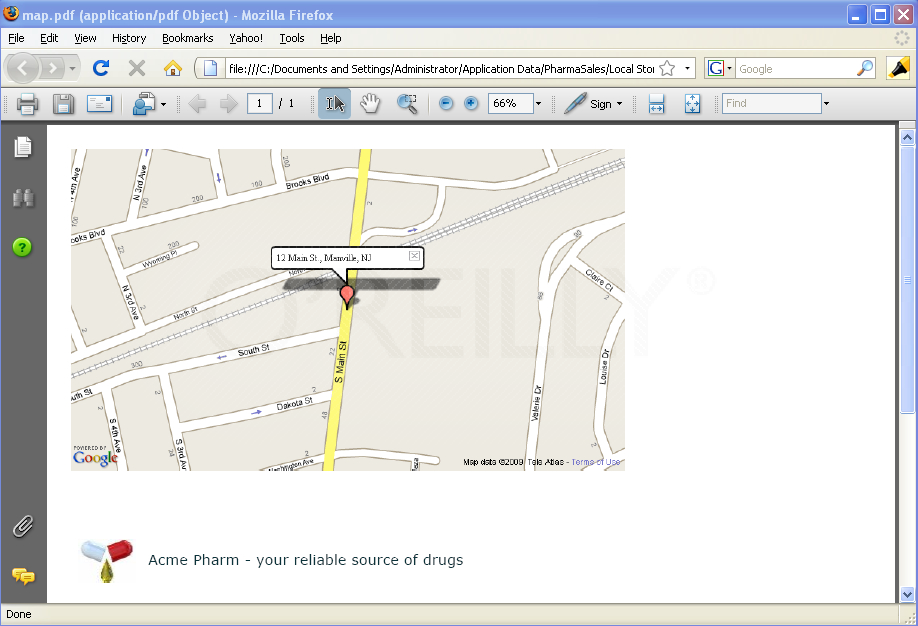
The generated PDF with the map is shown in Figure 11.12, “A Google map in a generated PDF”.
The PDF files for both the Visit Details and map windows are generated by similar functions, as shown in Example 11.24, “Functions for generation of Visit Details and map PDFs”.
Example 11.24. Functions for generation of Visit Details and map PDFs
private function openVisitPDF(uiObject:Object):void{

   var xdpDocument:XdpDocument=new XdpDocument();

     var options:PrintOptions=new PrintOptions();
   options.paperSize=PaperSize.A4;
   options.orientation=PrintOptions.ORIENTATION_LANDSCAPE;

   xdpDocument.init(options);
   xdpDocument.footer=new Footer();
   xdpDocument.footer.initialize();

   var pdf:PDFHelper=new PDFHelper(xdpDocument);
   pdf.createPDFPrologue();
   pdf.createPage(uiObject, PDFHelper.TYPE_PAGE);
   pdf.createPDFEpilogue();

   savePDF(uiObject.id + ".pdf", pdf.pdfContent);
}


private function openGoogleMapPDF(uiObject:Object):void{

   var xdpDocument:XdpDocument=new XdpDocument();

   var options:PrintOptions=new PrintOptions();
   options.paperSize=PaperSize.A4;
   options.orientation=PrintOptions.ORIENTATION_LANDSCAPE;

   xdpDocument.init(options);
   xdpDocument.footer=new Footer();
   xdpDocument.footer.initialize();

   var pdf:PDFHelper=new PDFHelper(xdpDocument);

   pdf.createPDFPrologue();
   pdf.createPage(uiObject, PDFHelper.TYPE_PAGE);
   pdf.createPDFEpilogue();

   savePDF(uiObject.id + ".pdf", pdf.pdfContent);
}
If you want to make more professional-looking reports with such features as adding formulas, creating totals and subtotals, exporting to Microsoft Excel, and charting, consider using the ClearBI reporter that will be included in a future version of the Clear Toolkit framework. To run these reports, end users don’t need anything but Flash Player–enabled web browsers.
Flex developers use ClearBI’s Designer (an AIR application) to create custom reports that can either be saved on the local drives or published in a DBMS.
More advanced business users can customize their reports right inside the web browser. For example, Figure 11.13, “A sample report with grouping” depicts a report with grouping by state, and departments with calculated totals and subtotals.
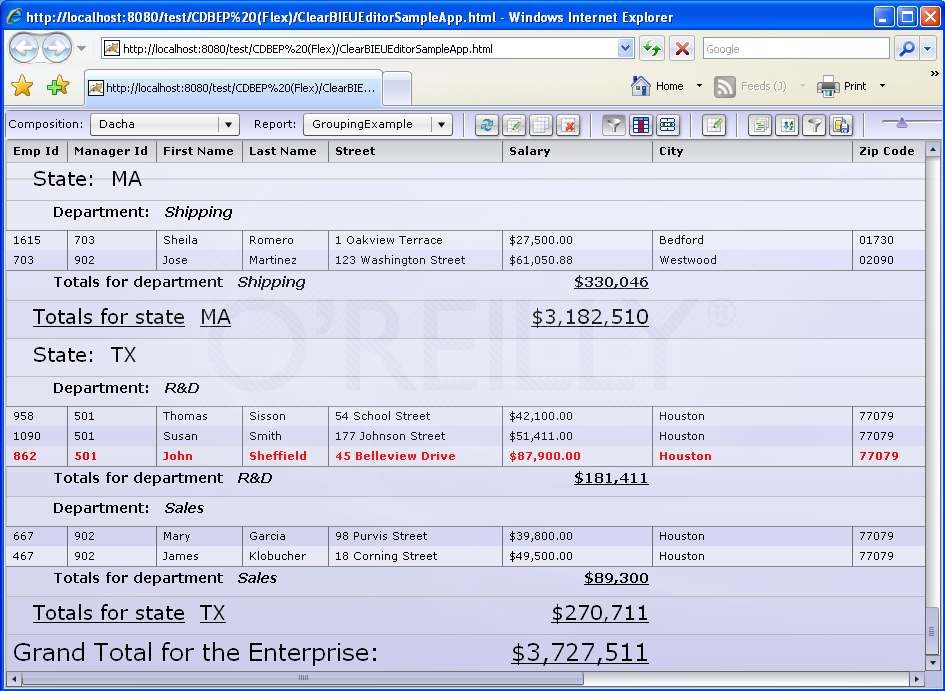
When the user directs a web browser to a deployed ClearBI report player application (a SWF file; it’ll arrive with an extra toolbar—see the toolbar below the address bar in Figure 11.13, “A sample report with grouping”) that allows users to zoom in, export to Microsoft Excel, generate PDFs, and open a Designer view that allows you to create charts, grouping, filters, sorting, and format masks; compute fields; and introduce formulas. Figure 11.14, “ClearBI Designer” depicts a Designer view with a formula, converting department codes into titles.
ClearBI Designer can be invoked either by the user inside the web browser, or by any junior developer as a standalone AIR application (no knowledge of Flex is required).
ClearBI supports user roles and hierarchies to specify who can access specific reports.
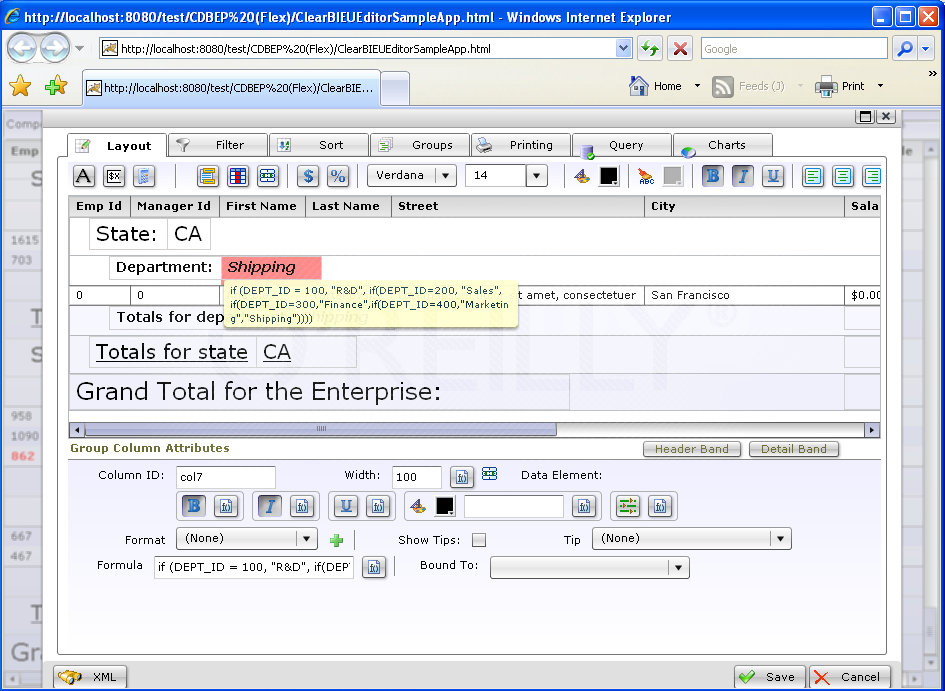
In this chapter, you’ve learned how to extend Flex components to give them PDF generation capabilities. We encourage you to experiment in this area so you can be in full control of your own set of printable controls that reflect all printing needs of your enterprise. On the other hand, we offer you our version of such components, which are included in Clear Toolkit components—ready to use.
The principle of PDF generation on the client described in this chapter has several advantages:
-
You don’t have to create separate templates for further merging with data—everything is happening at the component level.
-
Pagination of the long documents is also taken care of by the client-side code.
-
Produced documents are fully searchable.
-
If you sent editable components from Flex (e.g., a
DataGrid), they will remain editable in the PDF document, too.
All source code for the examples used in this chapter is located under the Flex Builder projects air.offline.demo.print, air.offline.demo.web.print, PrintingSamples, and clientPdfAir. We’ve also included for your convenience the source code of the package com.farata.printing, which is a part of clear.swc. But to get the up-to-date version of the code of all components included in this library, visit the SourceForge repository of the Clear Toolkit framework at https://sourceforge.net/projects/cleartoolkit/.
Wouldn’t you agree that with our smart Flex components, the task of printing becomes almost trivial?
If you enjoyed this excerpt, buy a copy of Enterprise Development with Flex.
