Scheduling 서비스는 어플리케이션 서버 내에서 주기적으로 발생하거나 반복적으로 발생하는 작업을 지원하는 기능으로서 유닉스의 크론(Cron) 명령어와 유사한 기능을 제공한다. 실행환경 Scheduling 서비스는 오픈소스 소프트웨어로 Quartz 스케쥴러를 사용한다. 본 장에서는 Quartz 스케쥴러의 기본 개념을 살펴본 후, IoC 서비스를 제공하는 Spring과 Quartz 스케쥴러를 통합하여 사용하는 방법을 살펴본다.
Quartz 스케쥴러 실행과 관계된 주요 요소는 Scheduler, Job, JobDetail, Trigger 가 있다.
Scheduler 는 Quartz 실행 환경을 관리하는 핵심 개체이다.
Job 은 사용자가 수행할 작업을 정의하는 인터페이스로서 Trigger 개체를 이용하여 스케쥴할 수 있다.
JobDetail 는 작업명과 작업그룹과 같은 수행할 Job에 대한 상세 정보를 정의하는 개체이다.
Trigger 는 정의한 Job 개체의 실행 스케쥴을 정의하는 개체로서 Scheduler 개체에게 Job 수행시점을 알려주는 개체이다.
Quartz 스케쥴러는 수행 작업을 정의하는 Job과 실행 스케쥴을 정의하는 Trigger를 분리함으로써 유연성을 제공한다. Job 과 실행 스케쥴을 정의한 경우, Job은 그대로 두고 실행 스케쥴만을 변경할 수 있다. 또한 하나의 Job에 여러 개의 실행 스케쥴을 정의할 수 있다.
JobDetail jobDetail =new JobDetail("myJob",// Job 명
sched.DEFAULT_GROUP, // Job 그룹명('null' 값인 경우 DEFAULT_GROUP 으로 정의됨)
DumbJob.class); // 실행할 Job 클래스
Trigger trigger = TriggerUtils.makeDailyTrigger(8, 30); // 매일 08시 30분 실행
trigger.setStartTime(newDate()); // 즉시 시작
trigger.setName("myTrigger");
sched.scheduleJob(jobDetail, trigger);
Spring은 Scheduling 지원을 위한 통합 클래스를 제공한다. Spring 2.5 는 JDK 1.3 버전부터 포함된 Timer 와 오픈소스 소프트웨어인 Quartz 스케쥴러를 지원한다. 여기서는 Quartz 스케쥴러와 Spring을 통합하여 사용하는 방법을 살펴본다. Quartz 스케쥴러와의 통합을 위해 Spring은 Spring 컨텍스트 내에서 Quart Scheduler와 JobDetail, Trigger 를 빈으로 설정할 수 있도록 지원한다. 다음은 예제를 중심으로 Quartz 작업 생성과 작업 스케쥴링, 작업 시작 방법을 살펴본다.
Spring에서 주로 사용되는 Trigger타입은 SimpleTriggerBean과 CronTriggerBean 이 있다. SimpleTrigger 는 특정 시간, 반복 회수, 대기 시간과 같은 단순 스케쥴링에 사용된다. CronTrigger 는 유닉스의 Cron 명령어와 유사하며, 복잡한 스케쥴링에 사용된다. CronTrigger 는 달력을 이용하듯 특정 시간, 요일, 월에 Job 을 수행하도록 설정할 수 있다. 다음은 SimpleTriggerBean과 CronTriggerBean을 이용하여 앞서 생성한 작업을 스케쥴링하는 방법을 살펴본다.
SimpleTriggerBean을 이용한 설정
<beanid="simpleTrigger"class="org.springframework.scheduling.quartz.SimpleTriggerBean"><propertyname="jobDetail"ref="jobDetailBean"/><!-- 즉시 시작 --><propertyname="startDelay"value="0"/><!-- 매 10초마다 실행 --><propertyname="repeatInterval"value="10000"/></bean>
앞서 JobDetailBean 을 이용하여 생성한 작업을 스케쥴링을 위한 Trigger 에 등록한다. SimpleTriggerBean은 즉시 시작하고 매 10초마다 실행하도록 설정하였다.
CronTriggerBean을 이용한 설정
<beanid="cronTrigger"class="org.springframework.scheduling.quartz.CronTriggerBean"><propertyname="jobDetail"ref="jobDetailFactoryBean"/><!-- 매 10초마다 실행 --><propertyname="cronExpression"value="*/10 * * * * ?"/></bean>
앞서 MethodInvokingJobDetailFactoryBean 을 이용하여 생성한 작업을 스케쥴링을 위한 Trigger 에 등록한다. CronTriggerBean은 매 10초마다 실행하도록 설정하였다. 크론 표현식에 대한 자세한 설명은Quartz Cron 표현식를 참조한다.
SEVERE: StandardWrapper.Throwable org.springframework.beans.factory.CannotLoadBeanClassException: Error loading class [org.springframework.scheduling.quartz.JobDetailBean] for bean with name ‘runMeJob’ defined in ServletContext resource [/WEB-INF/quartz-servlet.xml]: problem with class file or dependent class; nested exception is java.lang.IncompatibleClassChangeError: class org.springframework.scheduling.quartz.JobDetailBean has interface org.quartz.JobDetail as super class
심각: Exception sending context initialized event to listener instance of class org.springframework.web.context.ContextLoaderListener
org.springframework.beans.factory.BeanCreationException: Error creating bean with name 'schedulerFactory' defined in ServletContext resource [/WEB-INF/applicationContext.xml]: Instantiation of bean failed; nested exception is java.lang.NoClassDefFoundError: org/springframework/transaction/TransactionException
Quartz는 오픈 소스 작업 스케줄링 프레임워크이다. Quartz는 완전히 자바로 작성되어 있으며, J2SE와 J2EE 어플리케이션 모두에서 사용될 목적으로 설계되었다. Quartz는 매우 유연하며 단순한 구조를 제공한다. 간단한 작업은 물론 복잡한 작업 모두에 대한 스케줄링을 작성할 수 있다. Quartz는 또한 EJB, JavaMail 등을 위한 데이터베이스 지원, 클러스터링, 플러그 인, 미리 내장된 작업들을 포함하고 있으며, cron과 유사한 표현식도 지원한다.
매일 또는 매주 오후 11시 30분 또는 매달 말일에만 실행하는 작업을 수행하는 어플리케이션을 작성해 본 적이 있는가? 수작업 없이 자동으로 실행될 수 있는 작업이 실행되는 동안 만약 실행하는 동안 심각한 오류가 발생할 경우, 어플리케이션은 잘못되었다는 것을 스스로 알아내 알려주고 이를 다시 실행시키도록 시도해야 할 것인가? 여러분과 팀이 자바로 프로그램을 작성하고 있는가? 만약 이들 질문들에 대한 대답이 "그렇다"라면, Quartz Scheduler를 사용해 보아라.
Job Scheduling Made Easy
Quartz는 오픈 소스 작업 스케줄링 프레임워크로 완전히 자바로 작성되었다. 작업 스케줄링 이라는 용어에 대해 너무 겁먹지 말아라. Quartz 프레임워크는 수많은 기능들이 매우 단순한 형태로 무장되어 있으며, 놀라울 정도로 매우 사용하기 쉽게 되어 있다.
org.quartz.Job 인터페이스를 구현하는 자바 클래스를 작성하기만 하면 된다. Job 인터페이스는 다음과 같은 하나의 메소드만을 포함하고 있다.
public void execute(JobExecutionContext context) throws JobExecutionException;
여러분이 작성한 Job 클래스에서 execute() 메소드에 몇 가지 로직을 추가한다. Job 클래스와 스케줄을 설정하게 되면, Quartz는 그 나머지 작업을 처리해준다. Scheduler가 Job에 알려줄 시간이라고 판단하게 되면, Quartz 프레임워크는 Job 클래스의 execute() 메소드를 실행하여 작업을 수행하도록 만들어준다. Scheduler에 어떠한 것도 보고해줄 필요가 없으며, 어떤 특별한 메소드를 호출할 필요도 없다. 단순히 Job 내에 있는 작업들만 수행해주면 끝이다. 만약 여러분이 이후에 다시 Job이 호출되도록 설정했다면, Quartz 프레임워크는 적절한 때에 다시 이를 호출하는 부분을 담당해준다.
만약 여러분이 Apache Struts와 같은 유명한 오픈 소스 프레임워크를 써본 경험이 있다면, Quartz의 설계 내용과 컴포넌트에도 쉽게 익숙해질 것이다. 비록 이 두 오픈 소스 프로젝트가 전혀 서로 다른 문제점들을 해결해주고 있지만, 오픈 소스 소프트웨어를 항시 사용하는 사람들이라면 편안한 느낌을 받을 것이다. Quartz는 표준 독립형 J2SE 어플리케이션 내에서라든지, 웹 어플리케이션 내부, 심지어는 J2EE 어플리케이션 서버 내에서 사용될 수 있다.
The History behind Quartz
Quartz가 주목을 받기 시작한 것은 올해부터지만, 나온 지는 좀 되었다. Quartz는 James House에 의해 개발되었으며, 원래는2001년 봄에 SourceForge 프로젝트에 추가되었다. 수년이 지나면서 많은 기능들이 추가되어 배포되었지만, 두각을 나타내기 시작하면서 주목을 받기 시작한 것은 OpenSymphony 프로젝트의 일부로 되면서 새로운 사이트로 옮겨지게 된 때부터였다.
House는 자신을 도와주는 여러 파트 타임 개발자와 함께 여전히 개발 작업의 많은 부분에 참여하고 있다. Quartz 개발 팀은 올 해 1.5 배포판을 포함해 다양한 새로운 버전들을 배포할 수 있었으며, 이는 현재 candidate 릴리즈 단계에 있다.
Getting Your Hands on Quartz
Quartz 프로젝트는 OpenSymphony 사이트에 호스팅 되어 있다. 이 사이트에는 JavaDocs, 튜토리얼, CVS, 사용자와 개발자 포럼 및 다운로드 링크와 같은 여러 유용한 정보들이 제공되고 있다.
다운로드 링크에서 배포판을 다운로드 한 후, 적절한 위치에 압축을 푼다. 이 안에 보면 어플리케이션에서 사용할 수 있는 Quartz바이너리 파일이 포함되어 있다. Quartz 프레임워크에서 요구 되는 다른 의존적인 라이브러리는 거의 없다.
배포판에 보면, <Quartz 설치 디렉터리>/lib/core와 <Quartz 설치 디렉터리>/lib/optional 디렉터리에 있는 다른 의존 라이브러리들을 프로젝트에 추가하면 된다. 이들 대부분은 표준 Jakarta Commons 라이브러리들로, 여러분도 잘 알고 있는 Commons Logging, Commons BeanUtils 등이다.
The quartz.properties File
Quartz에는 quartz.properties라는 환경 설정 파일이 포함되어 있다. 이 파일을 사용하면 Quartz 프레임워크의 런타임 환경을 수정할 수 있다. 디폴트로, Quartz 바이너리 내에 포함되어 있는 파일이 사용된다. 이 파일을 복사하여 클래스들이 있는 디렉터리에 두면 클래스 로더가 이를 참조할 수 있다. 예제 1은 quartz.properties 파일에 대한 간단한 예이다.
예제 1. quartz.properties 파일을 통해 Quartz 런타임을 변경할 수 있다.
일단 Quartz 바이너리와 의존 라이브러리들을 프로젝트에 추가했고, quartz.properties 파일을 클래스패스 디렉터리에 추가했다면, 이제 몇몇 Job들을 작성해보자. 그러나, 이 작업을 해보기 전에 Quartz 아키텍처에 관해 간단하게 살펴보도록 하자.
Inside the Quartz Architecture
크기로 보자면, Quartz는 다른 대부분의 오픈 소스 프레임워크들과 유사하다. Quartz는 약 300 개의 자바 클래스들과 인터페이스들을 포함하고 있으며, 이들은 약 12개의 패키지로 구성되어 있다. 이는 Apache Struts에 있는 11개의 패키지에 약 325개의 클래스들과 인터페이스들에 비견될 수 있다. 비록 이 크기가 프레임워크의 질을 결정하는데 사용되는 특징이 될 수는 없겠지만, 여기에서 말하고자 하는 점은 Quartz 내에 수많은 기능들이 포함되어 있다는 사실이다. 그리고, 그러한 기능들이 바로 프레임워크의 질을 결정하는데 사용되는 하나의 요소이다. 이는 오픈 소스에만 국한되는 내용은 아니다.
The Quartz Scheduler
Quartz 프레임워크의 핵심은 Scheduler 이다. Scheduler는 Quartz 어플리케이션을 위한 런타임 환경을 관리하는 책임을 지니고 있다. Scheduler 그 자체가 모든 작업들 수행하는 것은 아니다. Scheduler는 프레임워크 내부에 있는 매우 중요한 몇몇 컴포넌트들에 그 작업을 의존하고 있다. 확장성을 보장하기 위해, Quartz는 멀티스레드 아키텍처를 기반으로 하고 있다. Quartz 프레임워크가 시작될 때, 프레임워크는 스케줄링 된 Job들을 실행하기 위해 Scheduler가 사용하는 "worker 스레드들"을 초기화 한다. Quartz가 동시에 수많은 Job들을 실행 가능한 이유가 바로 여기에 있다. Quartz는 스레드 환경을 관리하기 위해 ThreadPool관리 컴포넌트들에 의존하고 있는데, 그 결합도는 느슨하다. 이 글을 통해 여러 번 언급할 것이지만, 이는 Quartz에 있는 모든 것들은 환경 설정이 가능하거나 사용자가 정의해 지정할 수 있음을 의미한다. 예를 들면, 여러분이 정의한 "ThreadPool" 관리 기능을 플러그 인 형태로 끼워 넣고 싶은 경우, 이러한 작업이 가능하다.
Jobs, Jobs, and More Jobs
Quartz의 용어를 사용하자면, Job은 작업을 수행하는 간단한 자바 클래스이다. 이 작업은 자바에서 코드로 작성 가능한 그 어떠한 것이라도 될 수 있다. 필수적으로 요구되는 사항은, org.quartz.Job 인터페이스를 구현하고, 심각한 오류 발생 시JobExecutionException을 발생시키는 것뿐이다. 여러분은 이미 앞에서 Job 인터페이스와 포함된 execute() 메소드를 보았다.
Job 인터페이스와 execute() 메소드를 구현했다면, Quartz는 Job 실행 시기가 되었을 때, Job을 호출한다. execute() 메소드 안에서 무엇을 수행하는가는 전적으로 개발자에게 달려 있다. 다음은 Job 내부에서 실행할 작업들에 대한 몇몇 예이다.
● JavaMail이나 Commons Net과 같은 다른 메일 프레임워크를 사용하여 전자메일 전송
● EJB에 대한 원격 인터페이스를 생성한 후, 이 인터페이스의 메소드 호출
● Hibernate 세션을 얻어 관계형 데이터베이스에 있는 데이터 질의와 갱신
● OSWorkflow를 사용하여 Job으로부터 워크플로우 호출
● FTP를 사용해 파일 옮기기
● Ant 빌드 스크립트를 호출해 스케줄링 되어 있는 빌드 작업 시작
수많은 여러 작업들이 가능하며, 이것이 바로 Quartz 프레임워크를 매우 강력하게 만들어주는 이유이다. Quartz는 매우 일반적이고 반복적인 스케줄을 작성해주는 메커니즘을 제공하기 때문에, 개발자는 단지 실행을 위해 호출될 자바 클래스들만 작성하면 된다.
Job Management and Storage
Job들의 스케줄이 지정되었다면, Scheduler는 이러한 Job들을 기억하고 이들을 실행시킬 시간을 지속적으로 추적해야 한다. 만약 여러분의 Job이 30분 늦게 시작되거나 30초 일찍 시작된다면 Quartz는 그렇게 유용하지 않을 것이다. 사실, 스케줄이 지정된Job들 상에 있는 execute() 메소드를 호출하는 시간은 매우 정확해야 한다. Job 저장과 관리는 Quartz에서 JobStore로 일컬어지는 개념을 통해 이루어진다.
Available JobStores
Quartz 프레임워크에서는 두 가지 기본적인 JobStore 타입을 제공한다. Scheculer 정보를 유지하는데 일반적인 메모리(RAM)을 사용하는 첫 번째 타입은 RAMJobStore라 불린다. 이러한 타입의 JobStore는 설정 및 실행이 매우 간단하다. 많은 어플리케이션들에 대해 이러한 JobStore만으로도 충분할 것이다. 그러나, Scheduler 정보가 JVM에 할당되어 있는 메모리에 저장되기 때문에, 어플리케이션이 멈추게 되면, 스케줄과 관련된 모든 정보가 사라진다. 만약 어플리케이션이 재 시작하는 경우에도 이러한 스케줄 정보를 유지할 필요가 있다면, 두 번째 유형의 JobStore을 사용해야 할 것이다.
두 번째 타입의 JobStore는 실제로 Quartz 프레임워크에서 두 가지의 서로 다른 형태로 구현되어 제공되고 있지만, 이 둘 모두 일반적으로 JDBC JobStore로 일컬어지고 있다. 이 두 가지 모두의 JDBC JobStore는 JDBC 드라이버를 사용하며, 스케줄 정보를 유지하고 있는 관계형 데이터베이스로부터 정보를 가져온다. 이 두 가지 타입은 데이터베이스 트랜잭션을 제어하는지의 여부나 BEA의 WebLogic이나 JBoss와 같은 어플리케이션 컨테이너에 제어를 넘기는지의 여부에 그 차이점이 존재한다 (이는J2EE에서의 BMT와 CMT 사이의 차이점과 유사하다).
두 가지 유형의 JDBC JobStore는 다음과 같다.
● JobStoreTX: 트랜잭션을 제어하고 싶은 경우나, 서버 환경 없이 어플리케이션을 운영하려 할 때 사용된다.
● JobStoreCMT: 어플리케이션 서버 환경 내에서 어플리케이션이 운영되며 컨테이너가 트랜잭션을 관리하도록 하고 싶은 경우 사용된다.
JDBC JobStore는 어플리케이션이 중지되고 다시 시작된 후에라도 스케줄링 정보를 유지하여 Scheduler가 실행되도록 만들어야 할 경우를 위해 설계되었다.
Job and Triggers
Quartz 설계자들은 Job과 스케줄을 분리하였다. Quartz에서 Trigger는 Job이 트리거링 되거나 발생되어야 할 때, Scheduler에게 알려주는데 사용된다. Quartz 프레임워크에서는 간단한 Trigger 타입들을 제공하고 있는데, SimpleTrigger와 CronTrigger가 가장 일반적으로 사용된다.
SimpleTrigger는 스케줄을 간단히 발생시키는데 사용될 목적으로 설계되었다. 일반적으로, 주어진 시간에 Job을 발생시켜 (m)초 간격을 두고 여러 번(n) 이를 실행할 필요가 있을 경우, SimpleTrigger가 적합한 선택이 된다. 반면, Job에 요구되는 스케줄링이 복잡할 경우, CronTrigger가 적합할 것이다.
CronTrigger는 달력과 유사한 스케줄에 기반하고 있다. 만약 여러분의 Job이 매주 토요일과 일요일을 제외한, 매일 오전 10시30분마다 실행되어야 하는 경우에, CronTrigger가 사용된다. 이 이름이 암시하고 있듯, CronTrigger는 Unix의 cron 표현식을 기반으로 하고 있다. 예를 들면, 다음의 Quartz cron 표현식은 월요일부터 금요일에 걸쳐 매일 오전 10시 15분에 Job을 실행할 것이다.
0 15 10 ? * MON-FRI
그리고 다음 표현식은 2002, 2003, 2004, 2005년 동안 매월 마지막 금요일 오후 10시 15분에 Job을 실행할 것이다.
0 15 10 ? * 6L 2002-2005
이러한 작업은 SimpleTrigger로 수행할 수 없다. 이 둘 모두 Job에 사용될 수 있다. 어떠한 것을 사용할 지에 관한 선택은 스케줄링 될 작업 성격에 달려 있다.
Scheduling a Job
이제 예제 Job을 살펴보면서 실제 사용에 관한 부분에 대해 토의해보자. 클라이언트가 자신의 FTP 사이트에 파일을 저장할 때마다 부서에 전자 메일로 통지할 필요가 있는 상황을 여러분이 관리하고 있다고 가정해보자. 우리의 Job은 원격 서버에 있는 파일들을 다운로드 하는 것이 된다. 그런 후, Job은 발견된 파일들의 다운로드 횟수를 포함하고 있는 전자 메일을 전송하게 된다. 이Job은 누군가가 하루 동안 이러한 작업을 수작업으로 전송할 필요가 없도록 편리하게 만들어준다. 우리는 이러한 Job이 일주일 내내 하루 24시간 동안 매 60초마다 검사하도록 설정할 수 있다. 이는 바로 Quartz 프레임워크를 완벽하게 사용하는 예이다.
첫 번째 단계는 FTP와 Email 로직을 수행하는 Job 클래스를 작성하는 것이다. 다음 예제는 Quartz Job 클래스를 나타낸 것으로, org.quartz.Job 인터페이스를 구현하고 있다.
예제 2. FTP 사이트에서 파일들을 다운로드 받고 Email을 전송하는 Quartz Job
public void execute(JobExecutionContext context) throws JobExecutionException {
JobDataMap jobDataMap = context.getJobDataMap();
try {
// FTP 사이트에서 파일들 검사
File[] files = JobUtil.checkForFiles(jobDataMap);
JobUtil.sendEmail(jobDataMap, files);
} catch (Exception ex) {
throw new JobExecutionException(ex.getMessage());
}
}
}
이 글에서는 일부러 ScanFTPSiteJob을 매우 간단하게 구성하였다. 또한 이 글에서는 이 예제를 위해 JobUtil이라는 유틸리티 클래스를 작성하였다. 이 클래스는 Quartz의 부분이 아니지만, 다양한 Job들에서 재사용 할 수 있는 여러분만의 유틸리티 성격의 라이브러리를 만드는 것이 좋다. 이 글에서는 Job 클래스와 Quartz Scheduler 내부에 모든 코드들을 쉽게 둘 수도 있었지만, Quartz를 사용하는 것 때문에 재사용을 고려하지 않을 수는 없었다.
JobUtil.checkForFiles()와 JobUtil.sendEmail()이 사용하는 파라미터들은 JobDataMap 객체를 사용하고 있는데, 이 객체는Quartz가 생성한 객체이다. 이 인스턴스는 Job이 실행될 때마다 생성되며, 이를 사용해 Job 클래스로 환경 설정 파라미터들을 넘겨준다.
JobUtil의 구현 부분은 여기에 나타내지 않았지만, 우리는 FTP와 Email 기능을 모두 구현하고 있는 Jakarta의 Commons Net을 통해 매우 쉽게 사용할 수 있었다.
Calling Your Jobs with the Scheduler
Job을 생성하는 것이 첫 번째 작업이지만, Scheduler에 의해 Job이 호출되도록 하기 위해서는 Scheduler에게 얼마나 자주, 언제 Job이 호출되어야 하는지 알려주어야 한다. 이 작업은 Trigger를 Job에 연관시킴으로써 이루어진다. 우리는 Scheduler가 계속 매 60초마다 Job을 호출하는데 관심을 두고 있기 때문에, SimpleTrigger를 사용할 것이다.
Job과 Trigger의 스케줄은 Quartz Scheduler 인터페이스를 통해 이루어진다. Scheduler의 인스턴스를 얻기 위해서는 팩토리로부터 인스턴스를 얻어와야 한다. 이를 위한 가장 쉬운 방법은 StdSchedulerFactory 클래스의 static 메소드인getDefaultScheduler()를 호출하는 것이다.
Quartz 프레임워크를 사용할 때, 반드시 start() 메소드를 호출하여 Scheduler를 시작시켜야 한다. 예제 3에 있는 코드는 대부분의 Quartz 어플리케이션의 일반적인 패턴을 따르고 있다. 대부분의 Quartz 어플리케이션에서는, 하나 또는 그 이상의 Job들을 생성하고 Trigger들을 생성하고 설정한 후, Scheduler에 Job과 Trigger들에 대한 스케줄을 정하고 Scheduler를 시작시킨다(주: Scheduler를 먼저 시작시켜도 된다. 이는 중요하지 않다).
예제 3. Quartz Job들은 Quartz Scheduler를 통해 스케줄이 지정되어야 한다.
예제 3에서, 우리는 프로그래밍을 통해 ScanFTPSiteJob 스케줄을 작성했다. 즉, Scheduler에 Job과 Trigger를 설정하기 위해 자바 코드를 사용하였다는 의미이다. Quartz 프레임워크에서는 XML 파일들에 Job 스케줄을 선언적으로 설정할 수 있는 기능을 지원하고 있다. 선언적인 접근 방법을 통해 어떠한 Job이 언제 실행되어야 하는지를 보다 빠르게 지정할 수 있다.
Quartz 프레임워크에는 Quartz 어플리케이션이 시작하자마자, Job과 Trigger 정보를 포함하고 있는 XML 파일을 읽어 들이는"플러그 인"을 포함하고 있다. XML 내에 있는 모든 Job들은 이들과 관련된 Trigger들과 함께 Scheduler에 추가된다. 물론 Job클래스들을 작성해야 하지만, 그러한 Job들을 갖는 Scheduler의 환경을 설정하는 것은 매우 동적으로 이루어진다. 예제 4는 예제 3의 코드에 있는 동일한 로직을 수행하는데, 선언적인 방법으로 구성되어 있다.
예제 4. Quartz Job들은 XML 파일을 사용하여 스케줄링 될 수 있다.
<?xml version="1.0" encoding="utf-8"?>
<quartz>
<job>
<job-detail>
<name>ScanFTPSiteJob</name>
<group>DEFAULT</group>
<description>A job that scans an ftp site for files</description>
<job-class>ScanFTPSiteJob</job-class>
<job-data-map allows-transient-data="true">
<entry>
<key>FTP_HOST</key>
<value>homecavanessinbound</value>
</entry>
<!-- 다른 필요한 Job 파라미터들을 여기에 둔다 -->
</job-data-map>
</job-detail>
<trigger>
<simple>
<name>ScanFTPSiteJobTrigger</name>
<group>DEFAULT</group>
<job-name>ScanFTPSiteJob</job-name>
<job-group>DEFAULT</job-group>
<start-time>2005-09-11 6:10:00 PM</start-time>
<!-- 계속 60초마다 반복 실행 -->
<repeat-count>-1</repeat-count>
<repeat-interval>60000</repeat-interval>
</simple>
</trigger>
</job>
</quartz>
예제 4에 있는 XML 엘리먼트들을 예제 3에 있는 자바 코드와 비교해볼 수도 있다. 이들은 개념적으로 동일하다. 예제 4에 보여지는 것과 같은 선언적인 접근 방법의 장점은 유지보수가 매우 간단해진다는 것이다. XML 파일만 변경하고 Quartz 어플리케이션을 재 시작 하기만 하면 되기 때문이다. 소스 코드를 수정하고 재 컴파일 하여 배포할 필요가 없다.
Stateful and Stateless Jobs
이 글에서 살펴보았던 Quartz Job 예제는 모두 상태 정보를 가지고 있지 않다. 즉, 각각의 Job이 실행에 대해, Job이 실행되는 동안 JobDataMap에 가해진 어떠한 변경 사항들도 유지되지 않는다는 것을 의미한다. 만약 JobDataMap에 값을 추가, 변경 또는 삭제하는 기능이 필요하며, 다음 실행에 이러한 변경 사항들이 Job에 반영되도록 해야 한다면, Quartz Stateful Job이 필요하다.
만약 여러분이 EJB 개발을 경험해 보았다면, Stateful이라는 것이 부정적인 의미를 담고 있다는 점 때문에 여러분은 지금 움찔하고 있을 것이다. 이는 주로 "Stateful EJB"가 가지고 있는 확장성 이슈로부터 기인한다. Quartz Stateful Job은org.quartz.StatefulJob 인터페이스를 통해 구현된다. Stateless Job과 Stateful Job 간의 주요 차이점은, Stateful Job은 한 번에Job을 실행하는 인스턴스가 오직 하나를 가질 수 있다는 점이다. 그러므로, 예제 3의 경우, "ScanFTPJob" Job을 실행하는 인스턴스는 한 번에 하나만 가지게 된다. 대부분의 경우, 이는 커다란 문제점을 나타내지는 않는다. 그러나, 만약 자주 실행될 필요가 있는 Job을 가지고 있다거나, 작업 완료까지 오랜 시간을 필요로 하는 Job을 가지고 있을 경우, Stateful Quartz Job은 확장성에 문제를 가져다 줄 수 있다.
Other Features of the Quartz Framework
Quartz 프레임워크는 매우 다양한 기능들을 가지고 있다. 사실, 한 번에 이 모든 기능들을 나열하기에는 너무나 많다. 다음 목록은 이 글에서는 자세히 언급할 시간이 없는 Quartz 내의 여러 기능들 중 몇몇을 간단하게나마 설명한 것이다.
Listeners and Plugins
오늘날 어떠한 오픈 소스 프레임워크라도 사용하고 있는 개념이 바로 이 둘이다.
Quartz Listener는 주요 이벤트가 발생할 때, 프레임워크 내부로부터 콜백을 받는 자바 클래스이다. 예를 들면, Job이 스케줄 되어 있거나 스케줄 되어 있지 않을 때, 또는 Trigger가 끝났거나, 더 이상 발생시키지 않을 때, 이러한 모든 것들은 Listener로 통지되도록 설정될 수 있다. Quartz 프레임워크는 Scheduler, Job, Trigger들을 위한 Listener들을 포함하고 있다. 또한, Job Listener와 Trigger Listener들을 특정한 한 Job이나 Trigger에 적용되도록 만들거나 전체에 걸쳐 적용되도록 설정할 수도 있다.
일단 Listener가 호출되면, 이 정보를 사용해 Listener 클래스 내에서 수행하려는 어떠한 로직이라도 실행시킬 수 있다. 예를 들면, 만약 Job이 완료될 때마다 전자 메일을 보내고 싶은 경우, 이를 Job에 프로그래밍 해 넣을 수 있다. 또한, JobListener를 사용할 수도 있다. 이 JobListener는 결합도를 느슨하게 만들어 보다 나은 설계를 만들어주는데 도움을 줄 수도 있다.
Quartz Plugin은 Quartz 소스를 수정하지 않고도 Quartz 프레임워크에 기능을 추가시켜주는 새로운 기능이다. 이것은 Quartz프레임워크를 확장해야 하는데, 변경한 기능을 Quartz 개발 팀에게 보내주고 다음 버전에 반영되기까지 기다릴 시간이 없는 개발자들을 위한 기능이다. 여러분이 Struts 플러그 인에 익숙하다면, Quartz 플러그 인을 사용하는 방법을 더 쉽게 이해할 수 있을 것이다.
Clustering Quartz Applications
Quartz 어플리케이션은 여러분의 요구 사항에 따라 수직/수평적으로 모두 클러스터링 될 수 있다. 클리스터링을 통해 다른 클러스터링 타입과 마찬가지의 이점들을 제공받을 수 있다.
● 확장성
● 높은 가용성
● 로드 밸런싱
현재 Quartz는 관계형 데이터베이스와 JDBC JobStore중 하나의 도움을 통해 클러스터링을 지원한다. 향후 버전에서는, 이러한 제한이 사라져, 데이터베이스 없이도 RAMJobStore에서 사용 가능해질 것이다.
The Quartz Web Application
Quartz 프레임워크를 2-3주나 몇 달간 사용한 후 보통 Quartz 사용자들이 가장 많이 요구하는 것들 중 하나는 Quartz를 GUI에 통합하는 것에 대한 것이다. 자바 서블릿을 사용하여 Quartz를 초기화 하고 시작시킬 수 있는 기능이 현재 프레임워크에 제공되고 있다. 일단 여러분이 Scheduler 인스턴스에 접근하게 되면, 이 인스턴스는 웹 컨테이너의 ServletContext에 저장하고Scheduler 인터페이스를 통해 스케줄링 환경을 관리할 수 있다.
다행히도, 몇몇 Quartz 개발자들은 Quartz Scheduler 환경을 보다 잘 관리하는데 사용될 수 있는 독립형 Quartz Web Application에 대해 작업해 오고 있다. Struts와 Spring과 같은 다수의 유명한 오픈 소스 프로젝트를 기반으로 구축되어 이 GUI는 많은 기능들을 지원하는데, 이들은 간단한 인터페이스에 랩핑 되어 있다. 그림 1은 이 GUI를 잡아낸 것이다.
그림 1. Quartz 환경을 보다 쉽게 관리해주는데 도움을 주는 Quartz Web Application
What's down the Road?
이미 다음 주요 릴리즈에 대한 움직임도 진행되고 있을 정도로 Quartz 프로젝트는 활발하게 진행되고 있다. OpenSymphony의wiki에서 Quartz 2.0에서 고려되고 있는 기능들과 설계에 대한 정보를 얻을 수도 있다.
항상 그렇듯이, 날마다 Quartz 사용자들은 프레임워크에서 고려될 수 있는 갖가지 기능들에 대한 제안이나 설계에 관해 자유롭게 제안하고 있다.
Find Out More about Quartz
Quartz 프레임워크의 보다 많은 기능들을 사용해 나갈수록, User and Developer Forum은 Quartz 사용자들과의 질문/답변 및 커뮤니케이션을 위한 매우 유용한 자원이 될 것이다.
가끔서버에서주기적으로어떠한작업을하고자할때리눅스에서는크론탭을사용하여주기적으로어떠한작업을처리합니다. 이런주기적작업을처리하기위해 Spring에서지원해주는 Quartz스케쥴러를통해크론탭과같은역할을하는스케쥴러를작성할수있습니다. 이번에는 Spring 과 Quartz를연동하여스케줄러를작성해보겠습니다.
매번 cronTab 으로 배치작업을 실행시키며, 이게 아직 쓰는 놈인지, 언제 만들었는지, 수정하기 번거롭네 등 에로사항이 많았으.. 기억도 안나고.. 그때그때 만든 것들은 버전관리도 안되고,, 해서. 스프링 프로젝트이니, 스프링에서 동작하는 배치를 쓰는게 낫겠다는 생각이 들어 이참에, 배치를 몽땅 quartz 로 만들어서 정리를 해야겠다는 생각이 들었심.
스프링 프로젝트 환경이 세팅이 되어있다고 치고,
*필자의 경우는 Dynamic Web Project 로 qbatch 라는 프로젝트를 만들었고,
이렇게 되어있고, src 폴더에는 비지니스를 구현한 java 파일들(cotroller/service/dao 등), classes 에는 src 의 컴파일된 class 파일들 과 applicationContext.xml 및 각종 properties 파일들, lib 폴더에는 spring.jar, activation.jar, log4j.jar, mysql-connector-java-xxx.jar 등이, views 에는 각종 jsp 파일들이 위치해있다.
<!-- 2. 해당빈이 스케줄을 만들 트리거 설정 --> <bean id="SystemOutTestTrigger" class="org.springframework.scheduling.quartz.SimpleTriggerBean"> <property name="jobDetail" ref="SystemOutTest"/> <property name="repeatInterval" value="3000"/> <!-- every 1000(1초) --> <property name="startDelay" value="2000" /><!-- at first execution 2000(2초) 후에 실행 --> </bean>
이제 톰캣 재시작 하면 3초마다 "음. 배치가 실행되었구만~!!!!" 이라고 찍힐거임. 비지니스 로직이 넘 초라하니, 클래스 추가하여 실제 필요한 동작을 하게끔 비지니스 로직에 시간을 들이심이 좋을듯 해서 초간단으로 적었심. 더 세심한 설정은 구글형이나 네이년에 물어보시면 찾으실 수 있으실거임.
Spring은 스케쥴링을 지원하는 통합 클래스들을 제공한다. 현재적으로, Spring은 1.3 이후버전 JDK의 일부분인 Timer와 Quartz 스케쥴러 (http://www.quartzscheduler.org)를 지원하고 있다. 이 두개의 스케쥴러들은 각각 Timer 혹은 Triggers에 대한 선택적 참조를 가지는 FactoryBean을 사용하여 세팅된다. 게다가 당신이 타겟 object의 메써드를 편리하게 호출할 수 있도록 도와주는 Quartz 스케쥴러와 Timer에 대한 편의 클래스를 제공한다.(이것은 일반적인 MethodInvokingFactoryBeans와 비슷하다.)
19.2. OpenSymphony Quartz 스케쥴러 사용하기
Quartz는 Triggers, Jobs 그리고 모든 종류의 jobs를 인식하고 있는 JobDetail를 사용한다. Quartz에 깔려 있는 기본적인 개념을 알고 싶다면, http://www.opensymphony.com/quartz를 찾아보길 바란다. 편리한 사용을 위해서, Spring은 Spring 기반 어플리케이션 내에서 Quartz의 사용을 손쉽게 만들어주는 두 개의 클래스들을 제공한다.
19.2.1. JobDetailBean 사용하기
JobDetail 객체는 job을 실행하기 위해 필요한 모든 정보를 가지고 있다. Spring은 소위 JobDetailBean이라고 불리는 클래스를 제공하는데, 이것은 JobDetail을 합리적인 디폴트값을 가진 실질적인 JavaBean 객체로 만들어준다. 다음의 예제를 보도록 하자.
위의 job detail bean은 job(ExampleJob)을 실행하기 위한 모든 정보를 가지고 있다. 타임아웃은 job data map으로 기술되었다. job data map은 (실행시 넘겨지는) JobExecutionContext를 통해 이용할 수 있지만, JobDetailBean 역시 job data map으로부터 실질적인 job의 프라퍼티들을 매핑할 수 있다. 때문에 이러한 경우, 만약 ExampleJob이 timeout이라는 프라퍼티를 가지고 있다면, JobDetailBean은 그것을 자동으로 적용할 것이다.
package example;

public class ExampleJob extends QuartzJobBean {

  private int timeout;

  /**
   * Setter called after the ExampleJob is instantiated
   * with the value from the JobDetailBean (5)
   */
  public void setTimeout(int timeout) {
    this.timeout = timeout;
  }

  protected void executeInternal(JobExecutionContext ctx)
  throws JobExecutionException {
      // do the actual work
  }
}
당신은 job detail bean의 모든 부가적인 세팅들 역시 마찬가지로 이용할 수 있다.
주의: name과 group 프라퍼티를 사용함으로써, 당신은 job의 name과 group을 변경할 수 있다. default로 job의 이름은 job detail bean의 이름과 동일하다.(위의 예에서는 exampleJob이 된다.)
19.2.2. MethodInvokingJobDetailFactoryBean 사용하기
종종 당신은 특정한 객체의 메써드를 호출할 필요가 있을 것이다. 당신은 MethodInvokingJobDetailFactoryBean을 사용하여 다음과 같이 할 수 있다.
MethodInvokingJobDetailFactoryBean을 사용할 때, 메써드를 호출할 한줄짜리 jobs를 생성할 필요가 없으며, 당신은 단지 실질적인 비지니스 객체를 생성해서 그것을 묶기만 하면된다.
default로는 Quartz Jobs는 비상태이며, 상호 작용하는 jobs의 가능성을 가진다. 만약 당신이 동일한 JobDetail에 대해 두 개의 triggers를 명시한다면, 첫번째 job이 끝나기 이전에 두번째가 시작할지도 모른다. 만약 JobDetail 객체가 상태 인터페이스를 구현한다면, 이런 일은 발생하지 않을 것이다. 두번째 job은 첫번째가 끝나기 전에는 시작하지 않을 것이다. MethodInvokingJobDetailFactoryBean를 사용한 jobs가 동시작용하지 않도록 만들기 위해서는, concurrent 플래그를 false로 세팅해주어야 한다.
19.2.3. triggers 와 SchedulerFactoryBean을 사용하여 jobs를 묶기
우리는 job details과 jobs를 생성했고, 당신이 특정 객체의 메써드를 호출할 수 있도록 하는 편의클래스 bean을 살펴보았다. 물론, 우리는 여전히 jobs를 그자체로 스케쥴할 필요가 있다. 이것은 triggers와 SchedulerFactoryBean을 사용하여 이루어진다. 여러가지 triggers는 Quartz 내에서 이용할 수 있다. Spring은 편의를 위해 2개의 상속받은 triggers를 기본적으로 제공한다.:CronTriggerBean과 SimpleTriggerBean이 그것이다.
Triggers는 스케쥴될 필요가 있다. Spring은 triggers를 세팅하기 위한 프라퍼티들을 드러내는 SchedulerFactoryBean을 제공하고 있다. SchedulerFactoryBean은 그 triggers와 함께 실질적인 jobs를 스케쥴한다.
다음 두가지 예를 보자.
<bean id="simpleTrigger" class="org.springframework.scheduling.quartz.SimpleTriggerBean">
<property name="jobDetail">
<!-- see the example of method invoking job above -->
<ref bean="methodInvokingJobDetail"/>
</property>
<property name="startDelay">
<!-- 10 seconds -->
<value>10000</value>
</property>
<property name="repeatInterval">
<!-- repeat every 50 seconds -->
<value>50000</value>
</property>
</bean>
<bean id="cronTrigger" class="org.springframework.scheduling.quartz.CronTriggerBean">
<property name="jobDetail">
<ref bean="exampleJob"/>
</property>
<property name="cronExpression">
<!-- run every morning at 6 AM -->
<value>0 0 6 * * ?</value>
</property>
</bean>
OK, 이제 우리는 두 개의 triggers를 세팅했다. 하나는 10초 늦게 실행해서 매 50초마다 실행될 것이고, 다른 하나는 매일 아침 6시에 실행될 것이다. 모든 것을 완료하기 위해서, 우리는 SchedulerFactoryBean을 세팅해야 한다.
Spring에서 스케쥴링 업무를 처리하는 또다른 방법은 JDK Timer 객체들을 사용하는 것이다. Timers 자체에 대한 더 많은 정보는http://java.sun.com/docs/books/tutorial/essential/threads/timer.html에서 찾아볼 수 있다. 위에서 살펴 본 기본개념들은 Timer support에도 마찬가지로 적용된다. 당신은 임의의 timers를 생성하고 메써드들을 호출하기 위해 timer를 사용한다. TimerFactoryBean을 사용하여 timers를 묶는다.
19.3.1. 임의의 timers 생성하기
당신은 TimerTask를 사용하여 임의의 timer tasks를 생성할 수 있다. 이것은 Quartz jobs와 유사하다
public class CheckEmailAddresses extends TimerTask {
private List emailAddresses;
public void setEmailAddresses(List emailAddresses) {
this.emailAddresses = emailAddresses;
}
public void run() {
// iterate over all email addresses and archive them
}
}
위의 예제는 (아래와 같은) exampleBusinessObject에서 호출되는 doIt에서 끝날 것이다
public class BusinessObject {

  // properties and collaborators

  public void doIt() {
    // do the actual work
  }
}
ScheduledTimerTask가 언급된 위의 예제의 참조값을 methodInvokingTask로 변경하면 이 task가 실행될 것이다.
19.3.3. 감싸기 : TimerFactoryBean을 사용하여 tasks를 세팅하기
TimerFactoryBean은 실질적인 스케쥴링을 세팅한다는 같은 목적을 제공한다는 점에서 Quartz의 SchedulerFactoryBean과 비슷하다. TimerFactoryBean는 실질적인 Timer를 세팅하고 그것이 참조하고 있는 tasks를 스케쥴한다. 당신은 대몬 쓰레드를 사용할 것인지 말것인지를 기술할 수 있다.
<bean id="timerFactory" class="org.springframework.scheduling.timer.TimerFactoryBean">
  <property name="scheduledTimerTasks">
    <list>
      <!-- see the example above -->
      <ref local="scheduledTask"/>
    </list>
  </property>
</bean>
Then do only two changes IN YOUR configuration file 1st : for Simple Trigger
Use class=”org.springframework.scheduling.quartz.SimpleTriggerFactoryBean”> instead of class=”org.springframework.scheduling.quartz.SimpleTriggerBean”>
2nd : for Cron Trigger useclass=”org.springframework.scheduling.quartz.CronTriggerFactoryBean” instead ofclass=”org.springframework.scheduling.quartz.CronTriggerBean”
Copies of this document may be made for your own use and for distribution to others, provided that you do not charge any fee for such copies and further provided that each copy contains this Copyright Notice, whether distributed in print or electronically.
Copies of this document may be made for your own use and for distribution to others, provided that you do not charge any fee for such copies and further provided that each copy contains this Copyright Notice, whether distributed in print or electronically.
Copies of this document may be made for your own use and for distribution to others, provided that you do not charge any fee for such copies and further provided that each copy contains this Copyright Notice, whether distributed in print or electronically.
Spring's web MVC framework is designed around a DispatcherServlet that dispatches requests to handlers, with configurable handler mappings, view resolution, locale and theme resolution as well as support for upload files. The default handler is a very simple Controller interface, just offering a ModelAndView handleRequest(request,response) method. This can already be used for application controllers, but you will prefer the included implementation hierarchy, consisting of, for example AbstractController, AbstractCommandController and SimpleFormController. Application controllers will typically be subclasses of those. Note that you can choose an appropriate base class: If you don't have a form, you don't need a FormController. This is a major difference to Struts.
A flexible MVC web application framework, built on core Spring functionality. This framework is highly configurable via strategy interfaces, and accommodates multiple view technologies like JSP, Velocity, Tiles, iText, and POI. Note that a Spring middle tier can easily be combined with a web tier based on any other web MVC framework, like Struts, WebWork, or Tapestry.
Spring의 웹 MVC framework는 설정가능한 핸들러 맵핑들, view분석, 로케일과 파일 업로드를 위한 지원같은 테마분석과 함께 핸들러에 요청을 할당하는 DispatcherServlet을 기반으로 디자인되었다. 디폴트 핸들러는 ModelAndView handleRequest(request,response)메소드를 제공하는 매우 간단한 컨트롤러 인터페이스이다. 이것은 이미 애플리케이션 컨트롤러를 위해 사용될수 있지만 AbstractController, AbstractCommandController그리고 SimpleFormController같은 것들을 포함한 구현 구조를 포함한것을 더 선호할것이다. 애플리케이션 컨트롤러들은 전형적으로 이것들의 하위 클래스가 된다. 당신이 선호하는 빈 클래스를 선택하도록 하라. 만약에 당신이 form을 가지지 않는다면 당신은 FormController가 필요없다. 이것이 Struts와 가장 큰 차이점이다.
유연한 MVC 웹 어플리케이션 프레임웍은 Core Spring과 상호작용하여 만들어진다. 이 프레임웍은 전략적인 인터페이스를 거쳐 높은수준으로 만들어진다. 그리고, JSP, Velocity, Tiles, iText, POI처럼 다양한 view 기술을 수용한다. Spring middle tier는 Struts, WebWork, Tapestry와 같은 다른 웹 MVC 프레임워크를 기반으로 한 웹티어와 결합할수 있다. Spring프레임웍에서 Model-View-Controller를 지원하는 기능이다.
DispattcherServlet이 초기화 할 때 디폴트로 사용하는 빈 설정파일의 이름은 "서블릿 이름-servlet.xml"이 된다.
web-app/WEB-INF/web.xml에서 설정한 <servlet-name>인 action-servlet.xml 파일을 생성한다.
즉 spring.jar 와 web.xml에 DispatcherServlet 을 사용한다는 선언 그리고 서블릿 이름-servlet.xml 을 작성하면 사용할 수 있다.
다양한 예제들
Spring MVC를 사용한 초간단 예제
링크된 강좌를 살펴보고 대략적인 것을 파악한다면 Spring MVC 사용하기 위해서 개발자들이 만들어야 하는 것은 Controller 라는 것을 알게 될 것이다. 물론 화면에 보여주는 jsp(여기선 jsp 를 연결) 파일, 빈 설정 파일을 만드는 것은 당연한 것이다.
Controller를 생성하고 빈 설정파일에 맵핑 하는 방법 등의 관계를 보여주기 위한 데이터를 가져와서 List 형태로 보여주는 예제이다
Controller
package com.tmax.spring.web;

import java.util.List;

import javax.servlet.http.HttpServletRequest;
import javax.servlet.http.HttpServletResponse;

import org.springframework.web.servlet.ModelAndView;
import org.springframework.web.servlet.mvc.Controller;

import com.tmax.spring.service.iface.BbsServiceIface;

public class BbsController implements Controller {

	private BbsServiceIface bbsService;

	public void setBbsService(BbsServiceIface newBbsService){
		this.bbsService = newBbsService;
	}

	public ModelAndView handleRequest(HttpServletRequest arg0,
			HttpServletResponse arg1) throws Exception {

        List list = bbsService.findBbsList();

        return new ModelAndView("bbs/list","bbsList", list);
   }

}
위에서 보면 직접적으로 Controller 인터페이스를 구현해서 ModelAndView handleRequest(HttpServletRequest request, HttpServletResponse response) throws Exception; 를 구현한다. Spring MVC에서 제공하는 다양한 Controller 들은 모두 Controller 인터페이스를 구현하기 때문에 가장 기본적인 구조라고 생각할 수 있다.
Service 객체는 setter Injection을 통해 생성된 것이다. 이것은 이미 앞에서 다 이해했을 것이다. handleRequest(... ) 안에서 실제 메소드를 호출한 뒤 ModelAndView 객체를 통해 리턴을 하였다.
링크된 Spring MVC의 요청에 대한 생명주기를 보게 되면 비지니스 계층에서 전달된 모델 데이타와 클라이언트에게 보여줄 뷰화면에 대한 정보를 ModelAndView 클래스에 담아서 반환을 하게 되어 있다. 즉 전달 데이타 모델, 화면이름, 화면에서 사용될 객체 이름 등을 담아서 ModelAndView객체를 생성, 리턴한다.
ModelAndView 객체의 View정보가 논리적인 view이름(String) 인 경우 빈 설정 파일에 정의되어 있는 ViewResolver클래스를 이용하여 클라이언트에세 출력할 화면이름을 만들어 낼 수 있다. ModelAndView의 첫번째 인자인 "bbs/list"가 view 이름이기 때문에 설정파일의 ViewResolver를 만나서 리턴되는 화면의 전체이름이 완성되는 것이다.
설정파일을 보면 ViewResolver로 InternalResourceViewResolver클래스를 사용한다. 그리고 JSTLView를 사용해서 jsp 로 화면을 출력할 것이라는 것을 알 수 있다. 위에 설정된 것과 ModelAndView객체에 넘긴 view이름을 조합해 보면 /jsp/bbs/list.jsp 가 되는 것이다. (prefix+view 이름+suffix )
설정파일을 보면 BeanNameUrlHandlerMapping 클래스를 사용해서 Controller와 URL을 맵핑해주는 것을 알 수 있다. 만일 빈 설정파일에 HandlerMapping이 설정되어 있지 않으면 default 로 BeanNameURLHandlerMapping을 설정한다. 맵핑 방법에는 BeanNameURLHandlerMapping, SimpleUrlHandlerMapping,CommonsPathMapHandlerMapping 등이 있다.
BeanNameURLHandlerMapping 빈 이름과 URL을 mapping 하는 방법이다.
즉 요청이 ..../bbs/listBbs.do가 오면 BbsController 클래스를 호출하겠다는 의미이다. name에는 <bean name="/bbs/listBbs.do /bbs/listBbs2.do".. /> 로 여러 개를 기술할 수 있다.
SimpleUrlHandlerMapping 매핑에 대한 정보를 각각의 Controller에서 설정하는 것이 아니라 하나의 저장소에서 관리하는 것이다. Controller를 개발하는 개발자들은 빈을 정의하기만 하고 이 Controller가 어떻게 맵핑되어서 사용하는지에 대해서는 몰라도 된다. 위의 설정파일을 SimpleUrlHandlerMapping으로 바꾸어 보면
실제 Controller에 대한 정의는 일반 빈을 정의 할 때와 다르지 않게 된다. 맵핑에 대한 정보는 별도의 빈(urlMapping)에서 관리되고 있다. 만일 더욱 많은 Controller가 생성되고 맵핑을 해 줘야 할 때 모든 매핑 정보는 한곳에서 관리를 할 수 있게 되는 것이다. Controller 마다 맵핑정보까지 나열할 필요가 없게 된다.
urlMapping 빈에서 Controller와 URL을 맵핑할 때 <props/>를 사용해서 기술할 수 있다. 또 다른 방법은 <props/>를 사용하지 않고 별도의 Properties 파일에서 관리 할 수도 있다.
CommonsPathMapHandlerMapping
Spring MVC를 사용하여 다중요청 처리하기
개발자들이 Controller 만 만들면 되지만 개발하면서 페이지, 기능이 추가 될 때마다 새로운 Contoller를 만드는 것은 굉장히 짜증이 나는 작업이다. 게다가 점점 관리해야 하는 파일의 수가 많아져서 빈 설정파일도 점점 복잡해질 것이다.이 같은 상황을 해결하기 위하여 Spring MVC는 MultiActionController를 제공한다. MultiActionController은 하나의 Controller를 구현함으로써 다수의 요청을 처리하는 것이 가능하다.
아래 예는 회원가입,수정을 통해 MultiActionController 구현을 보여준다.
Controller 객체인 MemberController.java
MemberController.java
package net.javajigi.member.web;
import javax.servlet.http.HttpServletRequest;
import javax.servlet.http.HttpServletResponse;
import net.javajigi.member.model.Member;
import net.javajigi.member.service.MemberService;
import org.springframework.web.servlet.ModelAndView;
import org.springframework.web.servlet.mvc.multiaction.MultiActionController;
public class MemberController extends MultiActionController{
private MemberService memberService = null;
public void setMemberService(MemberService memberService){
this.memberService = memberService;
}
public ModelAndView add(HttpServletRequest request, HttpServletResponse reponse) throws Exception{
Member command = new Member();
bind(request,command);
memberService.addMember(command);
returnnew ModelAndView("main");
}
public ModelAndView update(HttpServletRequest request, HttpServletResponse reponse) throws Exception{
Member command = new Member();
bind(request,command);
memberService.updateMember(command);
returnnew ModelAndView("list");
}
}
위의 예제는 add(가입), update(수정)을 구현하기 위해 MultiActionController를 상속받은 Controller 이다. 각각의 메소드에 로직이나 서비스 호출 부분들의 소스를 구현하다. add 메소드를 보면 화면에서 입력받은 내용을 bind()를 사용해 domain 객체에 넘기고 있다.(이 내용은 나중에..) 그 뒤 서비스의 addMember()를 호출한다. 처리 후 리턴될 페이지를 설정한다.(add->main.jsp, update->list.jsp)
Controller를 작성 후 webapps/WEB-INF/action-servlet.xml 파일에 빈을 매핑한다.
MemberController는 두 개의 URL(/member/addMember.do,/member/updateMember.do)에 맵핑이 되었다.각각의 URL이 호출될 때 MemberController 안의 어떤 메소드가 호출될 지는 "memberControllerMethodNameResolver"빈에서 PropertiesMethodNameResolver를 통해 매핑이 된다. 결국 /member/addMember.do 가 호출되면 MemberController의 add 메소드가 /member/updateMember.do가 호출되면 update 메소드가 호출된다.
결국 위의 예는 빈 설정파일에서 URL을 다르게 함으로써 메소드에 접근할 수 있도록 설정한 것이다. (PropertiesMethodNameResolver 클래스를 통해서)
위의 예를 보면 MemberController는 하나의 URL에 맵핑이 되었다. 그럼 어떻게 MemberController의 다른 메소드를 호출할 수 있을까? 그것은 "methodNameResolver" 빈의 "ParameterMethodNameResolver" 를 이용해서 호출이 가능하다. URL을 통해 전달되는 인자중에 "paramName"인 method라는 이름을 가지는 인자의 값에 해당하는 메소드를 호출해 주는 것이다. 즉 /member/member.do?method=add 를 하게 되면 MemberController의 add()를 호출하는 것이다. /member/member.do?method=update를 하면 update()를 호출하게 될 것이다. 만일 아무 값도 없다면 default 으로 add()를 호출하게 된다. 호출하는 URL은 같지만 뒤 인자의 인자값을 변경해 줌으로써 다른 메소드를 호출할 수 있다.
ParameterMethodNameResolver를 이용하면 MultiActionController를 상속받은 Controller 에 메소드가 추가되더라도 설정파일에 추가적인 설정이 필요 없을 것이다. 하지만 호출할 때 추가된 메소드 이름을 알아야 한다.
데이터 바인딩(Data Binding) 웹 애플리케이션 개발에서 입력, 수정과 관련된 기능을 구현하기 위해서 입력하는 값에 대한 유효성 체크와 입력 값을 도메인 모델로 바인딩 하는 기능이 필요하다.그 동안 개발자들은 유효성 체크를 위해서 화면단에는 많은 자바스크립트를 데이타 바인딩을 위해서는 HttpServletRequest에 담긴 인자를 꺼내서 다시 도메인 모델로 set하는 코드들이 난무했을 것이다.
Spring MVC 에서는 입력화면(또는 수정화면)에서 전달되는 입력 데이터를 비즈니스 계층에 전달하기 위하여 HttpServletRequest에 담긴 인자와 도메인 모델의 속성을 자동적으로 연결하는 데이터 바이팅을 지원하고 있다.
위에 나온 bind()가 그 역할을 하는 것이다.
bind(request,command);
Bind request parameters onto the given command bean @param request request from which parameters will be bound @param command command object, that must be a JavaBean @throws Exception in case of invalid state or arguments
대신 클라이언트가 입력한 데이터를 도메인 모델과 데이터 바인딩 하기 위해서는 입력 화면에서 사용한 속성이름과 도메인 모델의 속성이름이 같아야 한다.
memberEntry.jsp의 입력필드의 이름은 id,password,passwordRepeat,passwordHint,passwordAnswer,email로 정의 되어 있다. 그리고 바인딩되는 도메인 모델 Member도 id,password,passwordRepeat,passwordHint,passwordAnswer,email 가 정의되어 있다. 즉 같은 속성이름에 대해서는 가져올 수 있지만 만일 다르다면 가져오지 못하게 된다.
위의 예제에서 사용한 MultiActionController는 입력데이터에 대한 유효성 체크 기능을 지원하지 않는다. 만일 유효성 체크도 원한다면 MultiActionContorller를 상속받아서는 사용할 수 없다. 유효성 체크와 바인딩 기능까지 모든 기능을 사용하길 원한다면 AbstractCommandControllder 클래스를 상속받아야 한다.
AbstractCommandController를 상속받아 구현 하려면 바인딩하는 클래스를 디폴트 생성자 안에 setCommandClass()를 통해서 설정해야 한다. 위의 예를 보면
public MemberAbstractCommandController()
Unknown macro: { setCommandClass(Member.class); }
그러면 들어오는 입력 값들과 설정한 클래스와의 바인딩이 이전에 보았던 bind() 라는 메소드 없이 Casting 만으로 이루어 진다.
하지만 AbstractCommandController는 요청에 대해 각각의 Controller를 만들어야 한다.결국 데이터 바인딩 및 데이터에 대한 유효성 체크 기능을 지원하고 있지만 AbstractCommandController를 상속받은 Controller로는 다수의 요청을 처리 할 수 없는 것이다.즉 Controller 를 이용하면 요청에 따라 추가되고 빈 설정 정보또한 수정해 주어야 한다.
결국 큰 주제로 했던 다수의 요청을 한 Controller에서 처리하는 방법은 아니지만 좀 더 손쉽게 유효성체크와 데이터 바인딩을 할 수 있다는 점에서는 유용하다. 간단한 CRUD 같은 작업은 MultiController를 구현해 한 Controller에서 사용할 수도 있고( 물론 유효성체크는 스크립트나 다른 방법을 통해) 복잡하고 많은 입력 필드를 가지고 있는 화면이라면 AbstractCommandController를 사용해 좀 더 손쉽게 처리 할 수 있을 것이다.
Controller를 URL과 매핑해주어야 한다. login.do에 대한 요청을 loginFormController가 담당하며, 이 Controller는 로그인을 위한 로직처리를 포함하고, 사용자가 직접 작성해야한다. 입력화면은 /login 이며, 로직을 무사히 처리한후에는 /main으로 이동한다. JSTL pages , jsp Page를 사용하기위해 JstlView를 선언하였다.
5.INFO: Loading XML bean definitions from class path resource [beans.xml]
6.Ioc Class with java.util.GregorianCalendar[time=1257842954691,areFieldsSet=true,areAllFieldsSet=true,lenient=true,zone=sun.util.calendar.ZoneInfo[id="Asia/Seoul",offset=32400000,dstSavings=0,useDaylight=false,transitions=14,lastRule=null],firstDayOfWeek=1,minimalDaysInFirstWeek=1,ERA=1,YEAR=2009,MONTH=10,WEEK_OF_YEAR=46,WEEK_OF_MONTH=2,DAY_OF_MONTH=10,DAY_OF_YEAR=314,DAY_OF_WEEK=3,DAY_OF_WEEK_IN_MONTH=2,AM_PM=1,HOUR=5,HOUR_OF_DAY=17,MINUTE=49,SECOND=14,MILLISECOND=691,ZONE_OFFSET=32400000,DST_OFFSET=0]
Spring 3.0 가 곧 출시(4월경) 될 것이라는 이야기 속에, Spring 2.5 버전에 대한 이야기를 해야겠다. Spring 2.1로 줄곧 개발하고 있었는데, 항상 느끼던게 지나치도록 복잡한 설정이었다. 진입장벽이 높다고 했던가? 아마도 SpringFramework의 초기 진입시 가장 어려운 점은 무엇보다도 설정 이 아닌가 생각되었다. Spring 2.1에서의 복잡한 설정(물론 몇 번 해보면 익숙해지면 금방 copy & paste 가 가능하다.)은 Spring 2.5에서 어노테이션이라는 강력한 기능으로 중앙집중적인 설정에서 지방분권적인 설정을 가능하게 만들었다. (xml에 의한 설정이 아닌 개별 java 파일로 설정이 옮겨감)
Hello World를 찍어보라구!!
공실장 : 어이 김과장, 내가 이번에 Spring을 공부 해보고 싶은데 어떤 책을 봐야하지? Spring in Action은 한번 죽 훓어 봤는데, 다른 좀 쉬운 책 그런거 없나? 김과장 : ... Hello World는 찍어보셨나요? 공실장 : 허허허, 나보고 Hello World나 찍어보라는건가? 내가 그런걸... 허허허
(며칠 뒤) 김과장 : 공실장님, Spring 은 어떻게 잘 되고 계세요? 공실장 : 나 Spring은 포기 했네, 설정이 어려워서 그런지 Hello World가 도무지 실행이 안되던데...
어이없이 들릴지 몰라도, 처음 Spring을 접하는 사람이라면 Hello World 조차도 왠지 멀게만 느껴질 것이다. 위의 예처럼 설정만 누군가 해준다면, 자바 소스는 짤 수 있겠는데... 라는 말이 나오겠지만, 무엇보다도 설정을 할 줄 아는게 중요하겠다.
하지만, 개발기간이 초초 단기라면, 한달 이내에 분석부터 구현까지 모두 끝내야하는 것이라면 Step by Step으로 설정부터 배워나가서 Spring을 구성하기가 어려울 것이다. 아마, Spring은 배제될 것이 뻔하다. 단순히 jsp 페이지만으로 구성해서 빨리 마치고자 노력할 것이다. 온통 Copy & Paste 범벅이 될 게 자명하다. 누군가 Copy & Paste도 실력이라는 진리를 이야기 해 준적이 있지만, 생각없는 Copy & Paste는 내 프로그램의 사명이라고 생각되지 않는다면 다른 길을 찾아야 하지 않을까?
Utility를 만들어서 사용하는건 어때?
몇 번의 Copy & Paste 로 만든 사이트가 지긋지긋하다면, 혹은 비즈니스 로직에만 집중하라는 만고의 진리를 느껴보고 싶다면, Utility를 만들어 보는 것도 나쁜 생각은 아닌 것 같다. 초기 진입을 낮춰 주는 무언가가 있다면 난 정말 비즈니스 로직은 환상적으로 짤 수 있을거야라는 정말 Lazy 한 생각이라면 Utility로 간단히 해결하자.
PCube(회사 내 서브 프로젝트명으로 Spring 2.5 기반 설정 파일 자동화 Utility의 이름) 의 시작은 프로젝트 시간이 촉박한 개발자를 위해 시작한 사내 프로젝트이다. Spring을 이용하되, 설정을 쉽게 도와줌으로써 "시작" 할 수 있는 여건을 마련해 준다. 이제 한 컷 씩 따라하면서 "Spring을 누군가 설정만 해준다면..." 라는 Lazy한 개발자가 되보자.
데이터베이스에 대한 설계가 모두 끝난 다음에 PCube를 이용하는게 가장 best practice라고 생각이 되는데, 왜냐하면 위의 Seed 파일의 내용을 보면 데이터베이스의 엔티티 정보가 그대로 들어가 있기 때문이다. 이 정보를 바탕으로 iBatis 쿼리를 만들어 내도록 되어 있기 때문임을 이해해 줬으면 한다.
Seed 파일의 첫 문장은 project: 로 시작하고, 기본적인 프로젝트 정보를 담는 부분과 데이터베이스 엔티티 부분으로 크게 나눌 수가 있다. 기본적인 프로젝트 정보를 담는 부분은 나중에 Java 소스의 주석부분으로 옮겨지게 된다. 중요한 점은 package: 인데, package: 부분에 쓰인 대로 Java 소스에 Package 정보가 부여된다.
패키지명이 Seed 파일에 기술된 대로(com.company.project.package) 구성되었음을 확인 해 볼 수 있다.
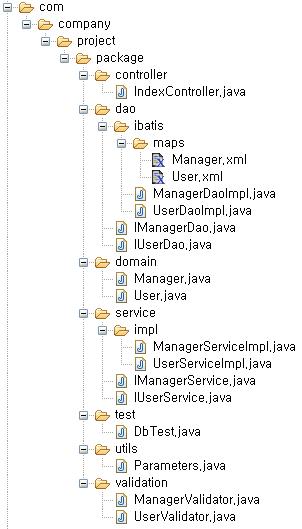
옆에 보여지는 이미지가 자동생성 된 이후에 구성된 Java package 인데, 실제로 controller, dao, domain, service, test, utils, validation 총 7가지의 파일을 자동적으로 생성해 낸다.
domain package 의 파일을 살펴보면 아래와 같다.
대강 살펴보면, Seed 파일에서 작성한 내용이 그대로 옮겨졌다는 걸 알 수가 있다.
domain 클래스만 살펴보았지만, 기타 다른 package를 보면 규칙에 따라서 파일이 생성됨을 알 수가 있다.
본격적으로 실습을 해보자!!!
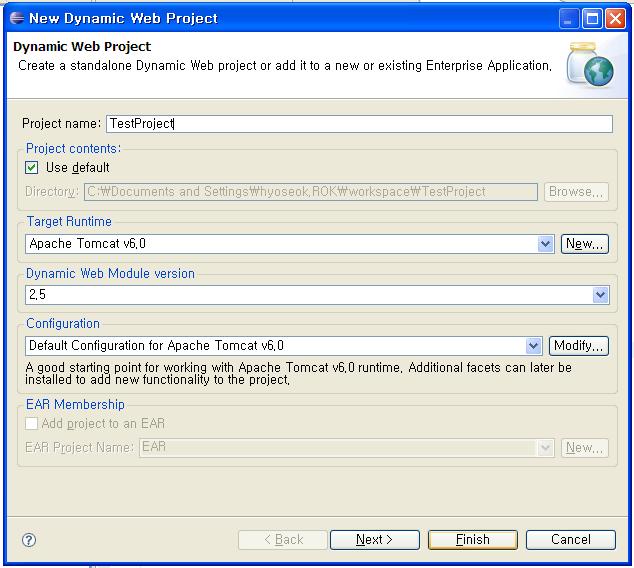
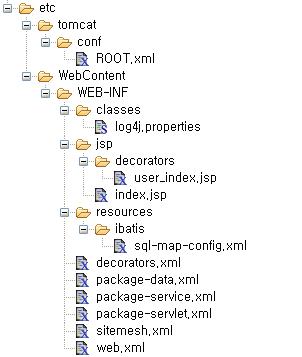
File을 누르고, Dynamic Web Project 를 선택하자.
Project 명으로 TestProject 라고 입력하고, 하단의 Finish 버튼을 누른다.(Project contents, Target Runtime, Dynamic Web Module version, Configuration 등의 설정은 필요에 따라 설정하자.)
lib 폴더를 펼친 후에, 아까 다운로드 받아놓은 pcube-1.0.1.jar 파일을 lib 폴더에 복사한다.
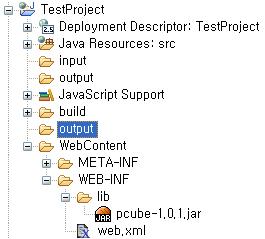
그리고, 2개의 폴더를 새로 만든다. input 과 output 폴더를 만든다.
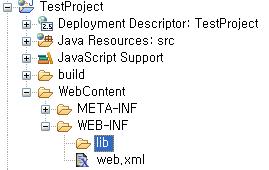
위 과정까지 마친 후의 폴더 모습은 다음과 같다.
input 폴더와 output 폴더가 추가되었고, WEB-INF 밑의 lib 폴더에 pcube-1.0.1.jar 파일이 추가되었음을 알 수가 있다.
그리고, input 폴더에 위에서 받아 놓은 Seed 파일인 project.pcube 파일을 복사 해 둔다. input 폴더에 project.pcube 파일을 읽어 들여서, output 폴더로 파일들이 생성될 예정이다.
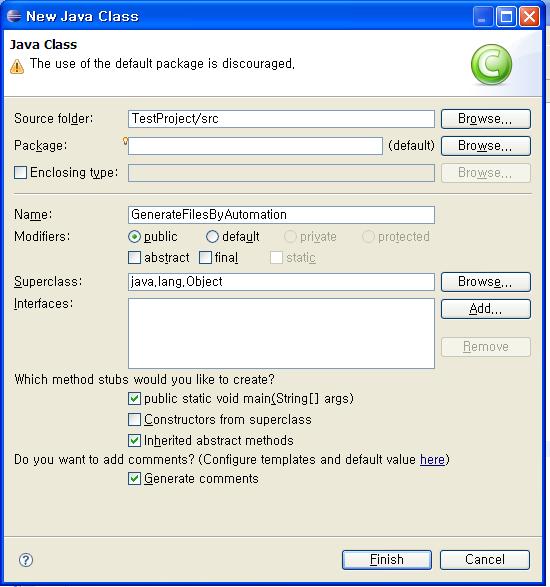
이제 파일들을 Generate 하기 위해서, 클래스 파일 하나를 만들어 보자.
클래스명에 GenerateFilesByAutomation 이라 입력하고, main 함수를 만들 예정이므로 public static void main(String[] args) 에 체크를 했다. Finish 버튼을 누르면, 파일 작성을 하기 위해 파일이 열린다.
<!-- dataSource 설정 설정 --> <!-- (주의) dataSource가 여러개 일 경우 bean id 값을 조정하셔야 합니다. --> <!-- 1번째 dataSource 설정 --> <bean id="dataSource" class="org.springframework.jndi.JndiObjectFactoryBean" p:jndiName="java:comp/env/jdbc/JNDIName" />
<!-- 트랜잭션 부분 코드를 삽입한다. --> <bean id="txManager" class="org.springframework.jdbc.datasource.DataSourceTransactionManager"> <property name="dataSource" ref="dataSource" /> </bean>
<!-- 이 곳에 하위로 사용자와 관리자용 Spring 설정 파일 설정 부분 import 태그를 이용해 입력합니다. 또는 이 예시에 주어진 대로 파일을 생성 하고 아래 내용을 복사하세요. 예시 <import resource="resources/operation/sample-manager-data.xml" /> <import resource="resources/operation/sample-user-data.xml" /> -->
<!-- User DAO 선언 --> <bean id="userDao" class="com.company.project.package.dao.ibatis.UserDaoImpl"> <property name="sqlMapClient" ref="sqlMapClient" /> </bean>
<!-- 빈 스캐닝 부분을 추가한다. --> <context:annotation-config /> <context:component-scan base-package="com.company.project.package" />
<!-- 이 곳에 하위로 사용자와 관리자용 Spring 설정 파일 설정 부분 import 태그를 이용해 입력합니다. --> <!-- 예시 --> <!-- <import resource="resources/operation/sample-manager-service.xml" /> --> <!-- <import resource="resources/operation/sample-user-service.xml" /> -->
</beans>
service 는 더 간단하다. 왜냐하면, 빈 스캐닝을 통해서 굳이 .xml 파일에 설정을 넣을 필요가 없어졌기 때문이다. 그렇다면, Service 레이어를 담당하는 .java 파일을 함께 살펴보자.(좀 길게 되어 있으나, 한번 쯤은 꼭 봐야 하기에 전체 소스를 옮긴다.)
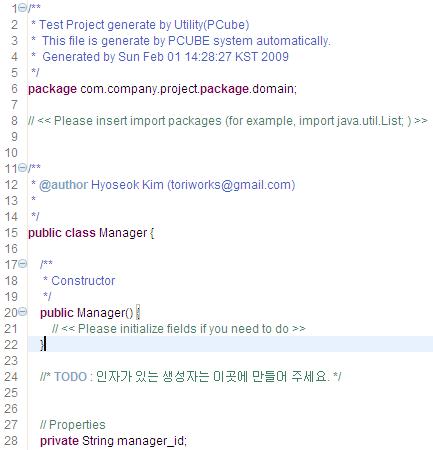
/** * Test Project generate by Utility(PCube) * This file is generate by PCUBE system automatically. * Generated by Sun Feb 01 18:52:46 KST 2009 */ package com.company.project.package.service.impl;
// << Please import packages >> // TODO : import package name if you want to add import org.springframework.stereotype.Service;
/** * @author Hyoseok Kim (toriworks@gmail.com) * */ @Service public class ManagerServiceImpl implements IManagerService {
/** * Constructor */ public ManagerServiceImpl() {}
// Setter injection 대신에 @Autowired와 @Qualifier annotation 사용으로 injection 수행 @Autowired private IManagerDao managerDao = null;
public void setManagerDao(IManagerDao managerDao) { this.managerDao = managerDao; }
/** * C of CRUD - 새로운 정보를 데이터베이스에 입력하기 위해서 DAO 객체에 역할을 위임합니다. */ @Override public void create(Manager manager) throws DataAccessException { managerDao.create(manager); }
/** * U of CRUD - 기존에 등록된 정보를 수정하기 위해서 DAO 객체에 역할을 위임합니다. */ @Override public void update(Manager manager) throws DataAccessException { managerDao.update(manager); }
/** * D of CRUD - 기존에 등록된 정보를 삭제하기 위해서 DAO 객체에 역할을 위임합니다. */ @Override public void delete(Object parameter) throws DataAccessException { managerDao.delete(parameter); }
/** * R of CRUD - DAO 객체에 위임하여 요청받은 목록을 반환합니다. */ @SuppressWarnings("unchecked") @Override public List<Manager> lists(Object parameter) throws DataAccessException { return managerDao.lists(parameter); }
/** * DAO 객체에 위임하여 목록 개수를 반환합니다. */ @Override public Integer listsCount(Object parameter) throws DataAccessException { return (Integer) managerDao.listsCount(parameter); }
/** * R of CRUD - DAO 객체에 위임하여 요청받은 자료의 상세정보를 반환합니다. */ @Override public Manager detail(Object parameter) throws DataAccessException { return managerDao.detail(parameter); }
} // class end
CRUD 에 관한 메소드가 선언되어 있고, 특이점으로 파일 상단에 @Service 라고 어노테이션이 선언되어 있다. @Service 어노테이션 덕분에 빈 스캐닝을 통해 자동적으로 빈이 컨테이너에 올라갈 수 있다.
마지막으로 프로젝트명-servlet.xml 파일을 살펴보자.
<?xml version="1.0" encoding="UTF-8"?> <!-- 이 파일은 XML Schema 기반으로 Spring 설정을 구성합니다. -->
<!-- @RequestMapping 을 사용하기 위한 빈 설정 2개 추가한다. --> <bean class="org.springframework.web.servlet.mvc.annotation.DefaultAnnotationHandlerMapping" /> <bean class="org.springframework.web.servlet.mvc.annotation.AnnotationMethodHandlerAdapter" />
<!-- 빈 스캐닝 부분을 추가한다. --> <context:annotation-config /> <context:component-scan base-package="com.company.project.package" />
<!-- 업로드 임시 공간을 선언합니다. --> <bean id="uploadDirResource" class="org.springframework.core.io.FileSystemResource"> <constructor-arg> <value>C:/eclipse_spring/workspace/TestProject/WebContent/respository_temp/</value> </constructor-arg> </bean>
<!-- 이 곳에 하위로 사용자와 관리자용 Spring 설정 파일 설정 부분 import 태그를 이용해 입력합니다. --> <!-- 예시 --> <!-- <import resource="resources/operation/sample-manager-servlet.xml" /> --> <!-- <import resource="resources/operation/sample-user-servlet.xml" /> -->
</beans>
@RequestMapping 을 사용하기 위해서 추가된 2개의 태그가 있다는 것만 기억하면 될 것 같다. 그렇다면, 실제로 Controller에서 @RequestMapping이 사용되는 걸 보자.
/** * @author Hyoseok Kim (toriworks@gmail.com) * */ @Controller public class IndexController {
@RequestMapping("/index.html") public ModelAndView viewDefaultIndex() {
ModelAndView mav = new ModelAndView(); mav.setViewName("index");
return mav; } }
@RequestMapping 어노테이션의 사용법에 대해서는 차후 좋은 블로그를 찾아서 소개를 하던, 아니면 다뤄보도록 하겠다.
이제 결론을 내보자!!!
작은 귀찮음에서 시작한 거였지만, 그럭저럭 설정에 애 먹고 있는 사람들에게 요긴했으면 한다. 혹 SpringFramework 3.0에는 이런 기능도 함께 있으면 싶기도 하다. 부족하나마, 잘 따라해 주기만 한다면, 데이터베이스 엔티티가 많으면 많은 수록 프로젝트의 기간은 더 많이 단축할 수 있으리라 생각된다. 위의 예에서는 단순히 2개의 엔티티만을 대상으로 했지만, 그 수가 많으면 많을 수록 빛을 발하리라 기대해 본다.
Spring MVC를 활용한 정적인 페이지 개발 : 6장의 Spring MVC를 단계적으로 추가적인 설명과 처음 Spring MVC를 이용하여 구현하고자 하는 개발자에게 도움이 될 만한 내용이 추가된다. 또한 책에서는 메인페이지를 처음으로 구현하고 있는데, 실제 예제소스에서는 이미 완성된 소스를 보이고 있음으로 단계적으로 개발하기에 부족함이 있는 듯 하여 직접 하나씩 구현해 보면서 예제소스를 만들어 가는 것으로 한다.
Spring 프레임워크 워크북 2장 : 이 장에서는 Spring 프레임워크의 가장 핵심적인 기능이라고 할 수 있는 Inversion of Control(이하 IoC) 기능에 대하여 중점적으로 다룬다. Spring 프레임워크가 지원하는 IoC기능은 Spring 프레임워크의 핵심 기능이며, 앞으로 다루게될 예제들의 기본이 되는 기능이라고 할 수 있다.
Spring 프레임워크 워크북 3장 : 이 장에서는 OOP가 가지고 있는 한계점을 극복하기 위한 대안으로 등장한 Aspect Oriented Programming(AOP)에 대하여 다룬다. AOP는 OOP와 경쟁관계에 있는 것이 아니라 상호 보완적인 관계로 새롭게 등장한 패러다임이다. 그러므로 AOP는 지금까지의 개발 방식인 OOP 기반하에서 OOP가 가지고 있는 문제점을 보완하는 역할을 해준다.
Spring 프레임워크는 상당히 방대한 기능을 제공하고 있으며, 빠른 속도로 발전하고 있다. 따라서 한권의 책에서 Spring 프레임워크가 가지고 있는 모든 기능을 다루기는 힘든 것이 사실이다. 따라서 이 위키를 통하여 Spring 프레임워크 워크북에서 다루지 못한 내용들을 하나씩 채워나갈 생각이다.
독자들 중 Spring 프레임워크의 기능 중 책에서 다루지 않고 있는 기능에 대하여 알고 싶은 부분이 있다면 게시판을 통하여 제안을 해주기 바란다. 시간이 허락하는 한도내에서 문서를 작성하고 정보를 제공할 예정이다.
Spring MVC에 HandlerInterceptor 사용하기 : 서블릿 2.3부터 제공하기 시작한 Servlet Filter는 다양한 곳에서 유용하게 사용되고 있다. Spring MVC내부에서 모든 Controller에 전처리 작업과 후처리 작업이 필요하다면 HandlerInterceptor를 이용하여 처리하는 것이 가능하다.
Spring MVC를 활용한 정적인 페이지 개발 : 6장의 Spring MVC를 단계적으로 추가적인 설명과 처음 Spring MVC를 이용하여 구현하고자 하는 개발자에게 도움이 될 만한 내용이 추가된다. 또한 책에서는 메인페이지를 처음으로 구현하고 있는데, 실제 예제소스에서는 이미 완성된 소스를 보이고 있음으로 단계적으로 개발하기에 부족함이 있는 듯 하여 직접 하나씩 구현해 보면서 예제소스를 만들어 가는 것으로 한다.
크기와부하의측면에서경량이고 1MB 크기의 jar파일로배포된다. 그리고스프링은침입적이지않다고한다. 무슨말인지..쩝스프링을도입한애플리케이션의객체가보통의경우스프링의특정클래스에대한의존성을갖지않는다는의미라고한다. 그냥 ejb에비해의존성이없다는얘기로이해하고넘어가야겠다
2.제어역행
제어역행(IoC, Inversion of Control)이라는기술을통해애플리케이션의느슨한결합을도모한다.
이말은기본개념은객체를생성하거나찾는대신, 구현되는 방법을 기술하는 것이다. 컴포넌트와 서비스들을 코드에 직접 연결하지는 않지만, 설정 파일에서 어떤 컴포넌트가 어떤 서비스를 요구하는지를 기술한다. 컨테이너(이 경우, Spring 프레임웍, IOC 컨테이너)는 이 모든 것을 연결한다.
3.관점지향
관점지향프로그래밍(AOP, Aspect-Oriented Programming)을위한풍부한지원을한다. 여기서 관점지향 프로그래밍이란 비즈니스로직을프로그램밍하게만한다는것이다. 트랜잭션과시스템감시같은것은관련모듈을이용하면된다.
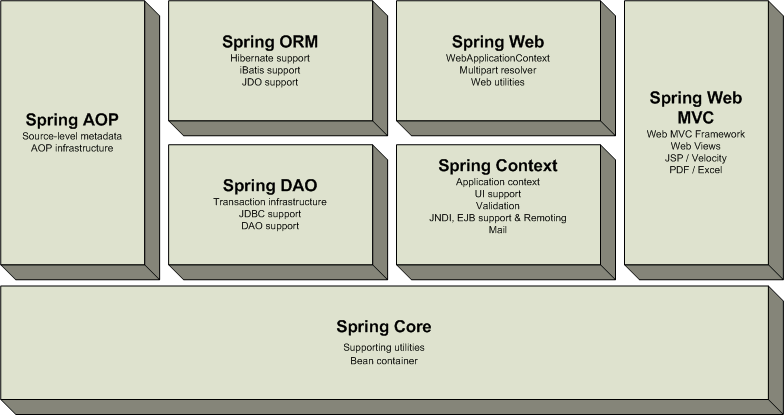
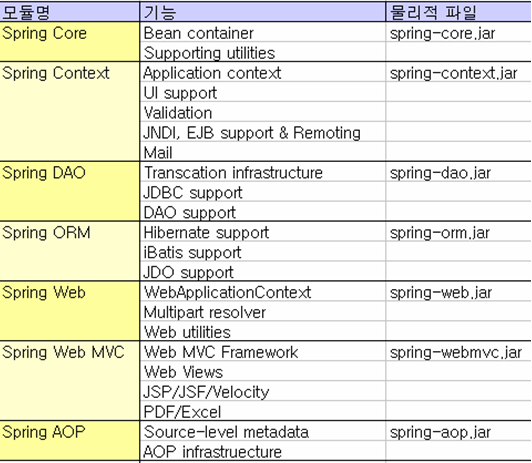
Spring 프레임웍을 구성하는 각 모듈(또는 컴포넌트)은 독립적이거나, 다른 모듈들과 함께 구현된다. 각 컴포넌트의 기능은 다음과 같다.
코어 컨테이너(core container): Spring 프레임웍의 핵심 기능을 제공한다. 코어 컨테이너의 주요 컴포넌트는 BeanFactory(Factory 패턴의 구현)이다. BeanFactory는 Inversion of Control (IOC) 패턴을 사용하여 애플리케이션의 설정 및 의존성 스팩을 실제 애플리케이션 코드에서 분리시킨다.
Spring 컨텍스트(Spring context): Spring 프레임웍에 컨텍스트 정보를 제공하는 설정 파일이다. Spring 컨텍스트에는 JNDI, EJB, 국제화, 밸리데이션, 스케줄링 같은 엔터프라이즈 서비스들이 포함된다.
Spring AOP 모듈(Spring AOP): 설정 관리 기능을 통해 aspect 지향 프로그래밍 기능을 Spring 프레임웍과 직접 통합시킨다. 따라서 Spring 프레임웍에서 관리되는 모든 객체에서 AOP가 가능하다. Spring AOP 모듈은 Spring 기반 애플리케이션에서 객체에 트랜잭션 관리 서비스를 제공한다. Spring AOP에서는 EJB 컴포넌트에 의존하지 않고도 선언적 트랜잭션 관리를 애플리케이션과 결합할 수 있다.
Spring DAO: Spring JDBC DAO 추상 레이어는 다른 데이터베이스 벤더들의 예외 핸들링과 오류 메시지를 관리하는 중요한 예외 계층을 제공한다. 이 예외 계층은 오류 핸들링을 간소화하고, 예외 코드의 양도 줄여준다. Spring DAO의 JDBC 예외는 일반 DAO 예외 계층에 순응한다.
Spring ORM: 프레임웍은 여러 ORM 프레임웍에 플러그인 되어, Object Relational 툴 (JDO, Hibernate, iBatis SQL Map)을 제공한다. 이 모든 것은 Spring의 일반 트랜잭션과 DAO 예외 계층에 순응한다.
Spring Web module: 웹 컨텍스트 모듈은 애플리케이션 컨텍스트 모듈의 상단에 구현되어, 웹 기반 애플리케이션에 컨텍스트를 제공한다. Spring 프레임웍은 Jakarta Struts와의 통합을 지원한다. 웹 모듈은 다중 요청을 핸들링하고, 요청 매개변수를 도메인 객체로 바인딩하는 작업을 수월하게 한다.
Spring MVC framework: MVC 프레임웍은 완전한 기능을 갖춘 MVC 구현이다. MVC 프레임웍은 전략 인터페이스를 통해 설정할 수 있으며, JSP, Velocity, Tiles, iText, POI 같은 다양한 뷰 기술을 허용한다.
1. 한마디로 엔터프라이즈 급의 웹 애플리케이션 개발을 위한 여러 기능(라이브러리)을 제공하는 프레임워크입니다.
2. 특징, 장점 - Lightweight Container - Dependency Injection Pattern 지원 - AOP(Aspect Oriented Programming) 지원 - POJO(Plain Old Java Object) 지원 - 일관된 Transaction 처리 방법 제공 - 다양한 Persistance 관련 API 제공 (JDBC, iBATIS, Hibernate, JPA, JDO...) - Restlet과 연동 가능 (요고는 내 입장에서 특징임)
4. 맺음말 Spring 프레임워크는 최근 가장 많이 사용되고 있는 웹 프레임워크 입니다. 제공하는 기능이 방대하면서도 그 사용은 용이하기 때문입니다. Spring이 제공하는 기능 중에 가장 강력한 기능은 물론 IoC(DI)와 AOP 입니다. 이는 이어지는 포스트에서 아주 자세하게 다루어질 예정입니다.
그리고 최근 주목받고 있는 REST 아키텍쳐의 자바 구현체인 Restlet과 같이 사용할 수 있기도 합니다. Restlet 만으로는 모든 웹서비스를 구현하기에는 불편한 것이 사실입니다. 하지만 다행이도 Spring과 결합 모델로 구현이 가능하다고 합니다. (이 부분은 관련 포스트에서 다룰 수 있을지 잘 모르겠습니다.)
프레임워크라는 것은 일종의 트렌드입니다. 최근에 가장 인기 있는 프레임워크에 대해서 공부해 두는 것 쯤은 개발자에게 도움이 되지 않을 까 생각됩니다. 이후의 포스트들이 지적 호기심 충족에 도움이 되길 바랍니다.
IoC는 Spring Framework의 장점을 꼽으라면 가장 먼저 언급되는 개념입니다. 한국어로 변역하면 '제어의 역행'! 한국어가 더 어려워 보입니다. 비슷한 말로 Dependency Injection(DI)라는 말고 있습니다. 한국말로는 의존성 삽입! 아하~ 조금 이해가 되시나요?
간단하게 이해하기 쉽게 같이 알아보지요.
1. 개념 객체 간의 의존관계를 객체 내부에 선언 또는 정의하지 않고, 외부의 조립기를 이용하여 의존 관계를 설명한다는 것
2. 예제 객체간의 연관성을 선언하는 3가지 방법을 보고, 문제점이 어떻게 IoC(DI)를 이용해서 해결되는 지 알아보지요.
1) 직접 선언하는 방법
public class WriteArticleServiceImpl { private ArticleDao articleDao = new MysqlArticleDao(); ... }
- 쉽습니다. - 하지만, 이를 테스트하기 위해서는 MySqlArticleDao가 정상적으로 동작해야 합니다. 어렵습니다. - 또한, OracleArticleDao를 사용하기로 바뀌었다면 코드를 고쳐야 하지요~ 물론 컴파일도 다시요. 귀찮습니다.
2) Factory 패턴, JNDI를 이용하는 방법
public class WriteArticleServiceImpl { private ArticleDao articleDao = ArticleDaoFactory.create(); ... }
- 조금 나아졌나요? 최소한 Oracle로 바뀌어도 코드 수정은 안해도 되겠네요~ ^^ - 근데 테스트 측면에서는 전혀! 나아진게 없어 보입니다. 올바르게 동작하는 Factory와 JNDI에 등록된 객체가 필요합니다.
3) 외부 조립자를 이용하는 방법
public class WriteArticleServiceImpl { private ArticleDao articleDao; public WriteArticleServiceImpl(ArticleDao articleDao) { this.articleDao = articleDao; } ... }
외부 설정 파일 (applicationContext.xml) <bean name="writeArticleService" class="com.sec.service.WriteArticleServiceImpl"> <constructor-arg><ref-bean="articleDao" /></constructor-arg> </bean>
- 외부 설정(applicationContext.xml)에서 객체간의 의존성을 설명하고 있다는 감이 오시지요? 바로 이겁니다. 외부에서 객체 의존성을 정의하고 있는 것이지요. 책에서는 조립한다고 설명하더군요. (Nice!) - 여기서는 생성자를 이용한 방법을 사용하지만 setter를 이용하는 방법도 있습니다. 요건 나중에 차차.. - 이제 위에서 말한 2가지 문제점이 다 해결되어 보이지요? 아하~ 굳입니다. ^^
Aspect Oriented Programming (AOP) in Spring Framework
작성자 : 김문규 최초 작성일 : 2008. 7.10
1. 정의 AOP는 Spring Framework의 중요한 특징 중 하나입니다. AOP란, 기능을 핵심 비지니스 로직과과 공통 모듈로 구분하고, 핵심 로직에 영향을 미치지 않고 사이사이에 공통 모듈을 효과적으로 잘 끼워넣도록 하는 개발 방법입니다. 공통 모듈은 보안 인증, 로깅 같은 요소들이 해당됩니다.
예를 들어 다시 설명하면, 로그를 찍기위해 로그 출력 모듈을 만들어서 직접 코드 사이사이에 집어 넣을 수 있겠지요? 이런건 AOP 적이지 않은 개발입니다. 반면에 로그 출력 모듈을 만든 후에 코드 밖에서 이 모듈을 비지니스 로직에 삽입하는 것이 바로 AOP 적인 개발입니다. 코드 밖에서 설정된다는 것이 핵심입니다.
2. 예제 1) AOP스럽지 못한 코드
public class InventoryController implements Controller {
protected final Log logger = LogFactory.getLog(getClass());
private ProductManager productManager;
public ModelAndView handleRequest(HttpServletRequest request, HttpServletResponse response) throws ServletException, IOException {
String now = (new java.util.Date()).toString(); logger.info("returning hello view with " + now);
return new ModelAndView("hello", "model", myModel); }
public void setProductManager(ProductManager productManager) { this.productManager = productManager; } }
로그를 찍고 싶은 지점에 로깅 코드를 직접 삽입하는 방법입니다. 물론 이렇게 하는 것이 효율적일 수도 있습니다. 하지만, 클래스 진입 시점마다 로그를 찍는 것과 같이 동일한 패턴이 있는 경우에는 rule을 정의하고 여기에 따라서 동일한 모듈이 호출된다고 하면 매우 직관적이고 간결하면서 유지 보수가 편하게 구현이 될것으로 생각됩니다. 이것을 지원하는 것이 바로 AOP이며 spring에서는 이를 지원하고 있습니다.
2) Spring에서 AOP를 사용하는 방법 Spring에서는 크게 - Spring API를 이용하는 방법 - XML schema을 이용하는 방법 - Annotation 기능을 이용한 방법 이 있습니다. 여기서는 2번째 XML schema를 이용하는 방법의 예제를 소개합니다. 전체 소스를 첨부합니다.
// pointcut method 종료 후에 실행 시킬 로깅 함수 public void afterLogging(JoinPoint joinPoint) { String methodName = joinPoint.getSignature().getName(); logger.info("finish call: " + methodName); } }
먼저 AOP 관련 용어를 설명하도록 하겠습니다. - advice : 언제 어떤 기능을 적용할 지에 대한 정의 - joinpoint : 공통 기능 적용 가능 지점 (spring에서는 메서드 호출만이 가능합니다.) - pointcut : joinpoint 중에 실제로 적용할 지점 - weaving : 핵심 로직에 공통 로직을 삽입하는 것 - aspect : 여러 객체에 공통으로 적용되는 공통 관심 사항
설정 정보는 아래의 구조로 생성합니다. <aop:config> <aop:aspect> : aspect를 설정 <aop:before> : method 실행 전 <aop:after-returning> : method 정상 실행 후 <aop:after-throwing> : method 예외 발생 시 <aop:after> : method 실행 후 (예외 발생 예부 상관 없음) <aop:around> : 모든 시점 적용 가능 <aop:pointcut> : pointcut 설정
pointcut 설정은 AspectJ의 표현식에 따릅니다.
execution( 수식어패턴 리턴타입패턴 패키지패턴.메소드이름패턴(파라미터패턴) )
이제 모든 설정은 끝났습니다. 그닥 힘들이지 않고 설정할 수 있습니다. 하지만 joinpoint에 해당되는 지점만 적용이 가능하기 때문에 사용해야 할 시점을 잘 선택해야 할 듯 합니다.
3. 맺음말 지금까지 필터같은 기술을 이용해서 이와 비슷한 기능을 구현 했었지요. 실제 대형 과제를 할 경우에는 더욱더 필요한 기능이 아닌가 싶습니다. 아무리 모듈화를 하고 그 모듈을 적용한다 하더라도 일일이 코드에 적용하는 것은 정말 귀찮은 일일뿐 아니라 오류의 소지도 많아지게 됩니다. 그렇기 때문에 AOP는 정말 유용한 기능이 아닐 수 없습니다. 개인적인 생각으로는 이거 하나만으로도 spring을 써야할 이유가 아닐까 합니다. 제가 드린 예제를 기반으로 꼭 여러분의 과제에 적용해 보시길 바랍니다. 감사합니다.
4. 참조 마지막으로 AOP를 이해하는 것에 많은 도움을 준 칼럼을 소개하고자 합니다. 한빛미디어에 김대곤님이 기고하신 글입니다.
본 기사는 Aspect Oriented Programming에 대해 간략한 소개글이다. 아직까지는 생소한 분야일 수 있겠지만, 점점 더 많이 듣게 되리라 생각된다. AOP를 설명하는데 있어서 자주 등장하는 네 개의 용어들(Aspect, Cross-cutting concern, Point-cut, Advice)를 설명함으로서 AOP가 왜 등장하게 되었으며, AOP가 제시하는 해결책에 대해 살펴볼 것이다. 먼저 "Aspect", "Oriented", "Programming"에서 생소한 단어는 단연 "Aspect"일 것이다. 야후 사전의 정의에 따르면, "Aspect"은 "사물의 면, 국면, 관점"으로 정의되어 있다. 소프트웨어 시스템은 여러가지 관점에서 바라볼 수 있다, 또는 여러 가지 단면을 가지고 있고 있다. 예를 들어, 자금 이체를 하는 프로그램을 작성한다고 생각해 보자. 출금계좌와 입금계좌, 그리고 이체금액을 입력받아 SQL 문장 또는 함수 한 번 돌리는 것으로 끝나는가? 절대 아니다. 먼저, 해킹을 방지하기 위해 사용자가 적절한 보안 프로그램을 설치했는지 점검하는 코드도 있어야 하고, 사용자가 인증되었는지 점검하는 코드도 써야 하고, 상대방 은행에서 적절하게 처리되었는지도 점점해야 하고, 혹시 사용자가 이체버튼을 두 번 누른 것은 아닌가 체크해야 하고, 시스템 로그도 남겨야 한다. 즉, 구현하려고 하는 기능 뿐 아니라 보안, 인증, 로그, 성능와 같은 다른 기능들도 녹아 있어야 한다. 어쩌면 이체를 위한 코드보다 잡다한 다른 측면의 문제들을 다루는 코드가 더 길어질 수 있다. 이런 코드들은 입금이나 출금 같은 다른 곳에서 들어가야 한다. 구현하려고 하는 비즈니스 기능들을 Primary(Core) Concern, 보안, 로그, 인증과 같이 시스템 전반적으로 산재된 기능들을 Cross-cutting concern이라고 부른다. AOP는 Cross-cutting concern를 어떻게 다룰 것인가에 대한 새로운 패러다임이라고 할 수 있다.
AOP는 구조적 방법론에서 객체지향 방법론으로 전환처럼 시스템 개발에 관한 전체적인 변화는 아니다. Object-Oriented Programming이 Aspect-Oriented Programming으로 대체되는 일은 없을 것이다. AOP는 구조적 방법론에도 적용될 수 있고, 다른 방법론에도 다 적용될 수 있지만, 주로 객체지향방법론이 가지는 단점을 보완하는 것으로 묘사되고 있다. 그러면 객체지향 프로그래밍이 또는 다른 이전의 프로그래밍 기법들이 Cross-cutting Concern를 어떻게 다루는지 알아보자. 매우 간단하다. Primary Concern를 구현한 프로그램에 함께 포함시켰다. 그것이 단 한 줄의 메소드 호출이라 하더라도. 많은 프로그래머들은 거의 모든 프로그램에 산재된 로그하는 단 한 줄의 코드를 찾아서 바꾸어 본 경험이 있을 것이다. 또는 간단하게 생각하고 프로그램을 수정하려고 했는데, 도데체 어디를 수정해야 되는지 모르게 코드가 길고, 알 수 없는 코드들이 자리를 차지하고 있을 때의 난감함. Primary concern, Cross-cutting concern이 하나의 프로그램 안에 들어가게 되면, 프로그램을 이해하기가 힘들고, Cross-cutting concern 코드가 여기저기에 산재되어 수정하기 힘들게 된다. 당연히 생산성 떨어지고, 품질 떨어지고, 유지보수 비용 많이 들게 된다.
그럼 AOP는 Cross-cutting concern를 어떻게 처리하는가? 이것도 매우 간단하다. 새로운 아이디어라고 할 수도 없다. Primary Concern 구현하는 코드 따로, Cross-cutting concern 구현하는 코드 따로 쓰고, 나중에 두 개 조합하게 완벽한 어플리케이션 만들겠다는 것이다. 기술 용어로 쓰면, Advice(Cross-cutting concern 구현한 코드)와 Primary concern 구현한 코드를 Point-cut 정보를 이용해서 Weaving(조합)하는 것이 AOP가 이 문제를 다루는 방법이다.
기술적 용어로서의 "Aspect"은 "Advice"와 "Point-cut"을 함께 지칭하는 단어이다. Point-cut은 어떤 Advice를 Code 어느 위치에 둘 것인가 하는 것이다. 예를 들면, 로그 기능을 구현한 Advice는 Code 속에 있는 모든 public 메소드가 수행되고 나면, 그 마지막에 실행되어라 라고 지정한 것이라 할 수 있다.
이전까지의 객체지향 프로그래밍은 Cross-cutting concern을 정적으로 어플리케이션에 결합시킨 반면 AOP는 동적으로 Cross-cutting concern를 다룬다고 표현하기도 합니다. 용어에서도 알 수 있듯이 AOP는 소프트웨어 엔지니어링 원칙 중에 하나인 "Separation of concern"를 구현하려고 하고 있습니다. 이러한 문제들을 다루고 있는 분야 중에 하나는 디자인 패턴할 수 있고, 예를 들어, Visitor 패턴은 정적인 구조를 동적으로 바꾸려고 합니다. AOP가 현재까지 나온 방법들 중에서 Cross-cutting concern를 다루는 가장 좋은 방법인가 하는 질문엔 아직 답하긴 힘들 것 같습니다. 그럼에도 분명 언제가는 책상 위에 관련 서적 한 권 있어야 할 것 같은 분야가 될 것 같습니다.
-------------------------------------------------------------------------------------------------- Developing a Spring Framework MVC application step-by-step
작성자 : 김문규 (MyMK) 최초 작성일 : 2008.07.22
다음의 내용은 spring framework 공식 홈페이지(www.springframework.org)의 튜토리얼을 정리한 것입니다. 저와 같은 spring 초보자를 위해서 개인적인 방식으로 재구성하였습니다. 처음 spring을 접하는 분들이 학습에 참고 자료로 활용하시길 바랍니다.
코드 자체의 세세한 부분은 다루지 않을 것입니다. spring 프레임워크을 이용해서 기본적인 웹 서비스를 구현하는 방법을 보여주는 것에 주력할 것입니다. 따라서, 이 글에서는 설정 파일의 작성에 대해서 중점적으로 논의하겠습니다. (이 글은 기본적인 자바 웹 개발에 경험이 있는 분을 기준으로 작성합니다.)
튜토리얼치고는 소스와 설정파일이 많은 편입니다. 이는 Spring 자체가 MVC를 지원하는 프레임워크이고 설정 파일도 논리적으로 분리하는 것을 권장하기 때문입니다. 튜토리얼에서도 이 개념은 유지하고 있습니다. 이는 차차 설명하기로 합니다.
1) 소스 구조 최상위 폴더는 아래와 같습니다. ┌ bin - 컴파일된 class 저장 ├ db - DB와 관련된 스크립트 ├ src - 말 그대로 소스들 └ war - WAS에 deploy될 것들 을 가리킵니다.
각각의 폴더에 대해 조금 더 자세히 알아보도록 하겠습니다. 조금 생소한 부분만 설명합니다. 너무 쉬운 부분은 넘어가도록 하겠습니다.
□ /src springapp은 최상위 package이고 여기에 domain, repository, service, web이라는 하위 package가 존재합니다. 아래의 기준으로 클래스 모듈을 위치 시킵니다. . domain - data 모델링 객체 . repository - DAO 과 관련된 객체 . service - 비지니스 로직 . web - web 프리젠테이션 관련 객체
□ /war . /WEB-INF/tld/spring-form.tld spring에서 사용할 수 있는 tag library의 정의입니다. tag library는 기존 jsp에서 사용하던 tag를 spring에서 재정의 한 것으로 좀 더 사용이 편합니다. . /WEB-INF/*.xml 설정 파일들입니다. 실질적으로 spring을 사용함에 있어 가장 먼저 이해하여야 할 부분입니다. 뒤에서 자세히 설명하도록 하겠습니다.
2. Configuration 관련 1) web.xml □ org.springframework.web.context.ContextLoaderListener . 계층별로 나눈 xml 설정파일을 web.xml에서 load되도록 등록할 때 사용. . 기본값으로 applicationContext.xml을 사용함 예시) <listener> <listener-class>org.springframework.web.context.ContextLoaderListener</listener-class> </listener> <context-param> <param-name>contextConfigLocation</param-name> <param-value> /WEB-INF/mars-ibatis.xml /WEB-INF/mars-service.xml </param-value> </context-param>
□ <taglib> . spring tag library의 위치 설정
2) applicationContext.xml □ ContextLoaderListener(또는 ContextLoaderServlet)가 ApplicationContext를 만들 때 사용
□ ApplicationContext란, 웹에 독립적인 애플리케이션의 모든 영역(dao, service, manager, 기타 등등) 에 대한 정의를 말합니다.
□ connection pool에 대한 정의 . org.apache.commons.dbcp.BasicDataSource : datasource를 정의, db driver, 보안 정보등을 알림 . org.springframework.beans.factory.config.PropertyPlaceholderConfigurer : 읽어들일 property 파일에 대한 정보를 알림
□ transaction에 대한 지원을 위한 한 방법 이 부분은 나를 비롯한 spring 초보자의 입장에서 아직 이해하기 어려운 부분이기 때문에 아래의 코드가 AOP 기법을 활용하여 transaction을 지원하고 있다는 것만 알아두기로 하자.
3) springapp-servlet.xml □ DispatcherServlet이 WebApplicationContext를 만들 때 사용
□ WebApplicationContext이란, 특정 웹(DispatcherServlet)에 종속되는 영역(Controller 및 각종 웹관련 설정 bean들)에 대한 정의를 말합니다. (ApplicationContext과의 차이를 확인하세요.)
□ 주로 웹 페이지 리소스에 대한 핸들러 클래스 빈의 정의가 존재합니다.
□ org.springframework.context.support.ResourceBundleMessageSource . message.properties 파일에 정의된 속성 값을 사용할 수 있도록 함 . 국제화에 응용되면 아주 좋아 보입니다~
□ org.springframework.web.servlet.view.InternalResourceViewResolver . prefix와 suffix 값의 정의에 따라 리소스 표현을 축약할 수 있도록 함. 예시) <bean id="viewResolver" class="org.springframework.web.servlet.view.InternalResourceViewResolver"> <property name="viewClass" value="org.springframework.web.servlet.view.JstlView"></property> <property name="prefix" value="/WEB-INF/jsp/"></property> <property name="suffix" value=".jsp"></property> </bean> 라고 선언하면 /WEB-INF/jsp/testfile.jsp은 비지니스 로직 내부에서 testfile로 간단하게 표현 가능 함
3. Inside Code spring web service는 아래의 흐름을 가집니다. ①(사용자) jsp 호출 ②(웹서버) 설정 검색 ③(웹서버) 요청 처리 클래스 호출 ④(웹서버) 비지니스 로직 수행 ⑤(웹서버) view로 결과 반환 ⑥(사용자) jsp 화면
1) Controller □ 사용자에게 jsp가 호출되면 xxxxx-servlet.xml에 정의된 클래스 빈을 호출합니다.
□ 예제에는 DB에 있는 정보를 가져다가 저장하는 페이지와 원하는 값을 저장하는 페이지 두가지가 있습니다. hello.jsp가 전자에 해당하고 priceincrease.jsp는 후자에 해당합니다. 각 페이지를 확인하시고 각 페이지의 핸들러 클래스 빈을 springapp-servlet.xml에서 추적해 보시길 바랍니다.
□ 일반적인 controller의 사용 예 : springapp.web.InventoryController.java . 일단 기본적인 Controller의 예시로 Controller interface를 구현합니다. 대부분의 경우에 사용하면 되고, request에 대한 처리를 위해 handleRequest()로 진입합니다. . 여기서 비지니스 로직을 처리한 후, ModelAndView 객체를 반환합니다. 이 때 넘기고자 하는 데이터를 파라미터에 담아서 보낼 수 있습니다.
public ModelAndView handleRequest(HttpServletRequest request, HttpServletResponse response) throws ServletException, IOException { String now = (new java.util.Date()).toString(); logger.info("returning hello view with " + now);
return new ModelAndView("hello", "model", myModel); }
□ 폼을 처리하는 controller의 예 : springapp.web.PriceIncreaseFormController.java . jsp가 폼을 다루고 있을 경우에는 SimpleFormController Class를 상속하여 확장합니다. . onSubmit()은 jsp에서 버튼이 눌려진 경우 콜백 지점을 가리키도 formBacjingObject는 폼에 기본값을 저장하고자 할 때 사용합니다. . formBackngObject는 domain에 존재하는 모델링 객체를 이용하고 있음에 주의합니다.
public ModelAndView onSubmit(Object command) throws ServletException {
int increase = ((PriceIncrease) command).getPercentage(); logger.info("Increasing prices by " + increase + "%.");
productManager.increasePrice(increase);
logger.info("returning from PriceIncreaseForm view to " + getSuccessView());
return new ModelAndView(new RedirectView(getSuccessView())); }
2) Model □ 비지니스 로직을 수행 중에 데이터를 읽고 쓰고 수정하고 삭제하기 위해 데이터 베이스에 대한 접근을 수행합니다. 해당 예제는 HSQLDB를 사용하고 있으며 이를 JDBC로 연결하고 있습니다.
□ JDBC와 관련하여 몇개의 클래스를 추가 지원하고 있지만 미미합니다. 실제로는 iBatis, Hibernate를 지원하고 있다는 것이 더 큰 특징이라 하겠습니다.
□ 간단한 예제를 확인하시길 바라며, 이 부분은 설명하지 않겠습니다.
3) View □ 예제에서는 JSTL(Java Server page Standard Tag Library)이라는 것을 사용하고 있기에 약간의 공부가 필요합니다. . 예를 들면, <input type='text' /> 이렇게 사용하던 것을 <form:input path="percentage"/> 이런식으로 사용합니다. . iteration, print 같은 주요 제어문과 폼이 tag로 정리되어 있습니다. . 더 자세한 내용은 http://java.sun.com/products/jsp/jstl/ 참조 바랍니다.
4. Ending 이 문서의 목적은 spring을 자세하게 설명하는 것이 아니라, 튜토리얼데로 spring MVC를 간단하게 한번 만들어 보는 것에 그 의의를 두고 있습니다. 튜토리얼과의 차별화를 위해 Top-down 방식을 취했으며 전체의 구성을 설명하고자 했습니다. 저도 약 2주전부터 틈틈히 공부하면서 알게된 것을 정리한 것이라 부족한 면이 많습니다. 시간이 나는데로 잘못된 부분은 수정하고 필요한 내용은 추가하겠습니다. 긍적적이고 발전적인 커멘트를 기다립니다. 감사합니다.
Spring에서 DB에 연결하는 방법에 대해서 알아보려 합니다. 다음과 같이 세가지 방법이 있습니다. - JDBC를 이용하는 방법 - JdbcDaoSupport 클래스를 이용해서 JDBC를 조금 편하게 템플릿화하는 방법 - SqlMapClientDaoSupport 클래스를 이용해서 iBatis Framework를 연동하는 방법
각 방법이 어떻게 다른지를 설명드리고 튜토리얼 수준의 예제를 보여드리겠습니다.
1. JDBC
일반적으로 JDBC를 이용할 경우 아래의 순서를 따라서 구현됩니다. - DriverManager에 해당 DBMS Driver를 등록 - 해당 Driver로 부터 Connection 객체 획득 - Connection 객체로부터 Statement 객체 획득 - Statement의 method를 이용하여 SQL실행 - ResultSet 으로 받아서 처리(executeUpdate 의 경우엔 제외) - 객체 close() (ResultSet, Statement, Connection)
여기서 실제로 개발자의 비지니스 로직이 들어가는 부분은 4번과 5번의 일부입니다. 나머지는 음... 기계적인 코드입니다. 실제 코드를 예로 들면 아래와 같습니다.
Connection.java
......... Connection con = null;
Statement st = null;
ResultSet rs = null;
try {
con=DriverManager("jdbc:mysql://localhost/dbname","root","1234"); // dbname에는 사용하는 database 이름, root 계정, 패스워드는 1234
Statement st=con.createStatement();
ResultSet rs=st1.executeQuery("select * form names");
if( rs.next() ) {
do {
// result set을 잘 정리합니다. 물론 일일이
...
// 비지니스 로직을 수행합니다.
...
} while( rs.next() )
}
} catch (Exception ex) {
// 적절한 예외 처리
} finally {
if( rs != null) rs.close();
if( st != null ) st.close();
if( con != null ) conn.close();
} .........
의외로 너무 많은 부분인 반복되는 느낌입니다. 이런 부분은 Spring을 사용하면 많이 줄어들게 됩니다. 다음절에서 확인해 보지요.
2. DaoSupport in Spring Framework
Spring에는 Template이라는 것을 이용해서 이 과정을 알아서 처리해 줍니다.
- JdbcTemplate
- NamedParameterJdbcTemplate
- SimpleJdbcTemplate
이를 편하게 사용하기 위해서 주로 아래의 Dao 클래스를 이용합니다.
- JdbcDaoSupport
- NamedParameterJdbcDaoSupport
- SimpleJdbcDaoSupport
여기서 가장 다양한 기능을 가진 SimpleJdbcDaoSupport 클래스의 사용법을 코드에서 확인해 보도록 하겠습니다. (전체 코드는 이전 4번 튜토리얼 분석 포스트에서 사용했던 예제를 보시면 됩니다.)
public class JdbcProductDao extends SimpleJdbcDaoSupport implements ProductDao {
public int selectCount() { return getSimpleJdbcTemplate().queryForInt( "select count(*) from products"); }
}
음..확실히 간편해 진것 같습니다.
하지만, 쿼리문이 코드 내부에 하드코딩되어 있다는 점이 약간 아쉬운 부분입니다. 쿼리문 변경 시에 코드도 같이 변경되고 재컴파일도 되어야 합니다. (뭐 솔직히 컴파일 하면 되긴 해요... ^^) 그리고 따로 설명하지 않겠지만 ParameterizeRowMapper 인터페이스를 이용해서 domain 객체와 결과를 연결하는 방법이 있는데 이 역시 하드코딩 되기 때문에 유지 보수의 유연성이 떨어지는 면이 없지 않습니다.
그래서, 쿼리 및 쿼리의 결과와 객체간의 연결을 외부에서 따로 관리하는 기능을 요구하게 되고 이런 기능을 가진 iBatis가 최근 많이 사용되고 있습니다. 다음 절에서 iBatis의 연동에 대해 알아보겠습니다.
3. Spring Framework와 iBatis 연동
1) iBatis
국내 SI 현실에 가장 잘 어울린다고 평가받고 있는 persistance framework 입니다. 그 이유는 SQL 쿼리문을 그대로 사용하기 때문에 기존 JDBC 개발자들에게 거부감이 덜하고 경험적(?)인 시스템의 이해가 빠르기 때문일 겁니다. 여타의 ORM framwork는 배우기도 힘들고 또는 제 3자 입장에서 이해하기도 힘들어서 우리나라 SI 업계처럼 개발팀이 이합집산하는 문화에는 어울리지 않는다는 군요.
각설하고 간단한 예를 보도록 하지요. iBatis에 대해서는 제가 따로 설명하지 않을 것입니다. 아래의 자료들을 보시면 간단하게 이해하실 수 있을 겁니다. 그리고, googling 하시면 JPetStore라는 예제가 있습니다. 이를 한번 실행시켜 보시는 것도 도움이 될 것입니다.
다음은 iBatis 관련해서 많은 자료를 만드신 이동국님의 Tutorial 변역본입니다. 8장밖에 안되지만 iBatis의 동작에 대해서 이해하는데 많은 도움이 되실 것입니다.
자~! 이제 iBatis의 사용법에 대해서 간단히 감을 잡으셨나요? 앞 절에서 언급한 것처럼 제 생각에는 2가지의 큰 장점을 가진다고 생각됩니다. (다른 장점이 있으시면 사알짝 좀 알려주세요~~) - SQL 쿼리문이 외부 설정 파일에서 관리된다. - domain 객체와 SQL result set의 연결이 외부 설정 파일에서 관리된다.
그런데 JDBC와 마찬가지로 iBatis에도 단순하게 기계적으로 반복되는 코드가 있습니다. 바로 SqlMapClient를 선언하는 부분이지요! (아래 코드 참조)
JDBC를 지원하기 위해 JdbcDaoSupport 클래스가 있지요? 그럼 SqlMapClient를 지원해 주는 것은? 네! SqlMapClientDaoSupport 클래스 입니다. 그럼 드디어 sqlMapClientDaoSupport 클래스에 대해 알아보겠습니다.
2) sqlMapClientDaoSupport
앞서 알아본 JdbcDaoSupport와 이름도 비슷하지만 사용법도 매우 유사합니다. 설정 파일과 관련된 자바 코드를 보시지요. applicationContext.xml - sqlMapConfig.xml - Product.xml 이 연쇄적인 관계를 가지고 있습니다. 여기서 applicationContext.xml은 spring 설정 파일이고 나머지는 iBatis 설정 파일입니다. 비지니스 로직 수행 중 iBatisMessageDao의 함수들이 요청될 것이고 이떄 Product.xml에 있는 쿼리문들을 호출해서 수행하게 됩니다. 주석문을 달고 색깔로 구분해 놓았습니다. 연관 관계에 유의하시면서 주의 깊게 확인하시길 바랍니다. (오랜만에 칼라풀한 포스트 입니다. ^^)
<!-- saveProduct --> // saveProduct와 관련된 입력 값의 형태를 정의합니다. <parameterMap id="saveProductParamMap" class="Product"> <parameter property="id" /> <parameter property="description" /> <parameter property="price" /> </parameterMap>
// parameter를 지정하는 방식에 유의 하시길 바랍니다. <update id="saveProduct" parameterClass="Product" > update products set description = (#description#), price = (#price#) where id = (#id#) </update> </sqlMap>
iBatisMessageDao.java
// 코드 내부에는 전혀 쿼리 문이 없습니다!! 여기에 별 5개 꼭 확인하세요! public class iBatisProductDao extends SqlMapClientDaoSupport implements ProductDao {
@SuppressWarnings("unchecked") public List<Product> getProductList() { List<Product> products = getSqlMapClientTemplate().queryForList("getProductList");
return products; }
public void saveProduct(Product prod) { getSqlMapClientTemplate().update("saveProduct", prod); } }
2절에서 설명한 JdbcDaoSupport 클래스의 사용법과 비교했을 때 iBatis는 이를 한단계 더 추상화 되어 있음을 알 수 있습니다. 모든 쿼리문과 해당 쿼리 결과와 객체간의 관계를 XML 외부 설정으로 따로 관리하고 있다는 것이죠. 그렇기 때문에, 앞에서 말씀드린데로 이 방법은 java 코드내에 하드코딩하는 것보다 개발의 유연성을 높이고 추후 관리시에 유리한 장점을 가집니다. (추상화란 처음에는 귀찮고 나중에는 편리한 것이지요!)
다음은 이전 4번째 spring 프레임워크 포스트에서 사용했던 튜토리얼을 iBatis로 연동시킨 예제입니다. 위에 설명드린 내용이 어떻게 적용되어 있는지 한번 더 확인하실 수 있을 것으로 생각됩니다.
휴..정말 긴 튜토리얼 리뷰였습니다. 매일 생각없이 JDBC로 개발하던 저에게는 참으로 재미난 것이 아닐 수 없었습니다. 물론 때에 따라서는 JDBC 자체가 빛나는 순간이 있겠지만, 대부분의 경우에는 iBatis가 우리를 편하게 해주지 않을까 생각됩니다. iBatis 관련 공부 중 이런 글이 있었습니다. "iBatis는 80%의 JDBC 기능을 20%의 자바 코드로 구현한 간단한 프레임워크이다." 맞습니다. 이는 만병통치약이 아닙니다. 다만 대부분에 경우에 잘 먹히는 고마운 녀석인 것이지요. 뭐 종합감기약 정도 ^^; 그렇기 때문에 여러분도 한번 직접 경험해 보시고 개인적인 판단을 세우시길 바랍니다. 여러분에게 맞지 않을 수 있으니까요. 이상입니다. 감사합니다.
5. 참고자료 1) 웹 개발자를 위한 스프링 2.5 프로그래밍 (가메출판사, 최범균 지음)
* 스프링이란? - 스프링(Spring)은 간단히 말하면 엔터프라이즈 어플리케이션에서 필요로 하는 기능을 제공 하는 프레임워크이다. 스프링은 J2EE가 제공하는 다수의 기능을 지원하고 있기 때문에, J2EE를 대체하는 프레임워크로 자리 잡고 있다.
* 스프링 프레임워크 특징 - 스프링은 경량 컨테이너이다. 스프링은 자바 객체를 담고 있는 컨테이너이다. 스프링은 이들 자바 객체의 생성, 소멸과 같은 라이프 사이클을 관리하며, 스프링으로부터 필요한 객체를 가져와 사용 할 수 있다. - 스프링은 DI(Dependency Injection) 패턴을 지원한다. 스프링은 설정 파일을 통해서 객체 간의 의존 관계를 설정할 수 있도록 하고 있다. 따라서 객체는 직접 의존하고 있는 객체를 생성 하거 나 검색할 필요가 없다. - 스프링은 AOP(Aspect Oriented Programming)를 지원한다.스프링은 자체적으로 AOP를 지원 하고 있기 때문에 트랜잭션이나 로깅, 보안과 같이 여러 모듈에서 공통으로 필요로 하지만 실제 모듈의 핵심은 아닌 기능들을 분리해서 각 모듈에 적용할 수 있습니다. - 스프링은 POJO(Plain Old Java Object)를 지원한다. 스프링 컨테이너에 저장되는 자바 객체 는 특정한 인터페이스를 구현하거나 클래스를 상속받지 않아도 된다. 따라서 기존에 작성한 코드를 수정할 필요 없이 스프링에서 사용할 수 있다. - 트랙젝션 처리를 위한 일관된 방법을 제공한다. JDBC를 사용하든, JTA를 사용하든, 또는 컨테 이너가 제공하는 트랙잭션을 사용하든, 설정 파일을 통해 트랜잭션 관련 정보를 입력 하기 때문에 트랙잭션 구현에 상관없이 동일한 코드를 여러 환경에서 사용 할 수 있다. - 영속성과 관련된 다양한 API를 지원한다. 스프링은 JDBC를 비롯하여 iBATIS, Hibernate, JPA, JDO등 데이터베이스 처리와 관련하여 널리 사용되는 라이브러리와의 연동을 지원하고 있다. - 다양한 API에 대한 연동을 지원한다. 스프링은 JMS, 메일, 스케쥴링 등 엔터프라이즈 어플리 케이션을 개발하는데 필요한 다양한 API를 설정 파일을 통해서 손쉽게 사용할 수 있도록 하고 있다.
* IoC(Inversion of Control)란? - Spring 프레임워크가 가지는 가장 핵심적인 기능은 IoC(Inversion of Control)이다.자바가 등장한 최초에는 객체 생성 및 의존관계에 대한 모든 제어권이 개발자에 있었다. 그러나, 서블릿, EJB가 등장하면서 제어권이 서블릿과 EJB를 관리하는 서블릿컨테이너 및 EJB 컨테이 너에게 넘어가게 되었다. Spring 프레임워크도 객체에 대한 생성 및 생명주기를 관리할 수 있는 기능을 제공하고 있다. 이와 같은 이유때문에 Spring 프레임워크를 Spring 컨테이너, IoC컨테이너와 같은 용어로 부르기도 한다. : 물론 모든 객체에 대한 제어권을 컨테이너에게 넘겨버린 것은 아니다. 서블릿 컨테이너와 EJB 컨테이너에서도 서블릿과 EJB에 대한 제어권만 컨테이너가 담당하고 나머지 객체에 대한 제 어권은 개발자들이 직접 담당하고 있다. 이처럼 Spring 컨테이너 일부 POJO(Plain Old Java Object)에 대한 제어권을 가진다. Spring컨테이너에서 관리되는 POJO는 각 계층의 인터페이 스를 담당하는 클래스들에 대한 제어권을 가지는 것이 대부분이다.
* Dependency Injection - DI는 Spring 프레임워크에서 지원하는 IoC의 한 형태이다. DI를 간단히 말하면, 객체 사이의 의존관계를 객체 자신이 아닌 외부의 조립기(assembler)가 수행한다는 개념이다.
일반적인 웹어플리케이션의 경우 클라이언트의 요청을 받아주는 컨트롤러 객체, 비지니스 로직을 수행하는 서비스 객체, 데이터에 접근을 수행하는 DAO객체 등으로 구성된다. 만약, WriteArticleServiceImple클래스가 ArticleDao 인터페이스에 의존하고 있을 경우를 생각 해보자
의존관계를 형성하는 방법에는 아래와 같은 경우들이 있다.
첫번째, 코드에 직접 의존 객체를 명시하는 경우.
public class WriteArticleServiceImpl{
private Article articleDao = new MysqlArticleDao();
....
}
이 경우 의존하는 클래스가 변경되는 경우 코드를 변경해야 하는 문제가 있다.
두번째, Factory 패턴이나 JNDI등을 사용해서 의존 클래스를 검색하는 방법이 있다.
Factory나 JNDI를 사용하면 첫번째문제(즉, 의존 클래스가 변경되면 코드를 변경해야 하는 문제)를 없앨 수는 있지만, WriteArticleServiceImpl클래스를 테스트하려면 올바르게 동작하는 Factory또는 JNDI에 등록된 객체를 필요로 한다는 문제점이 있다.
세번째, DI패턴이다. 이 방식에서는 의존관계에 있는 객체가 아닌 외부 조립기(assembler)가 각 객체 사이의 의존 관계를 설정해준다. WriteArticleServiceImpl클래스의 코드는 MysqlArticleDao 객체를 생성하거나 검색하기 위한 코드가 포함되어 있지 않다. 대신 조립기의 역할을 하는 Assembler가 MysqlArticleDao 객체를 생성한 뒤 WriteArticleServiceImpl객체에 전달해 주게 된다.
DI패턴을 적용할 경우 WriteArticleServiceImpl클래스는 의존하는 객체를 전달받기 위한 설정 메서드(setter method)나 생성자를 제공할 뿐 WriteArticleServiceImpl에서 직접 의존하는 클래스를 찾지 않는다.
* AOP(Aspect Oriented Programming) - 로깅, 트랙잭션처리, 보안과 같은 핵심 로직이 아닌 cross-cutting concern(공통관심사항)을 객체 지향기법(상속이나 패턴등)을 사용해서 여러 모듈에 효과적으로 적용하는데 한계가 있었 으며, 이런 한계를 극복하기 위해 AOP라는 기법이 소개되었다.
공통관심사항(cross-cutting concern)을 별도의 모듈로 구현한 뒤, 각 기능을 필요로 하는 곳 에서 사용하게 될 경우, 각 모듈과 공통 모듈 사이의 의존관계는 복잡한 의존 관계를 맺게 된다.
AOP에서는 각클래스에서 공통 관심사항을 구현한 모듈에 대한 의존 관계를갖기보다는, Aspect를 이용하여 핵심 로직을 구현한 각 클래스에 공통 기능을 적용하게 된다.
AOP에서는 핵심 로직을 구현한 클래스를 실행하기 전 후에 Aspect를 적용하고, 그 결과로 핵심 로직을 수행하면 그에 앞서 공통 모듈을 실행하거나 또는 로직 수행 이후에 공통 모듈을 수행하는 방식으로 공통 모듈을 적용하게 된다.
AOP에서 중요한 점은 Aspect가 핵심 로직 구현 클래스에 의존하지 않는다는 점이다. AOP에 서는 설정 파일이나 설정클래스 등을 이용하여 Aspect를 여러 클래스에 적용할 수 있도록 하고 있다.
스프링 공부를 하는데.. 아무리 이론을 봐도 무슨 말인지 하나도 모르겠고, 자바 처음 배우던 때를 떠올리며.. Helloworld를 찍어봐야겠다고 판단. 네이버에서 찾아 낸 Spring으로 Helloworld찍기.. 시킨대로 하니 화면에 뜨네. 휴. 자 그럼, 안 잊어 먹기 위해 나도 정리를 해놓자.
내 컴퓨터 환경은... JDK1.5 + Tomcat 5.5 + SpringFramework 2.5.6 아 차,, + Eclipse는 Europa.
자 그럼 Eclipse 실행 시키고~ Dynamic Web Project를 만든다. 프로젝트 이름은 SpringHelloWorld 라고 지정. Target Runtime은 Tomcat으로 하고 Finish.
lib폴더에 lib파일들을 넣는다.(제일 중요!!) 스프링 다운 받아서 압축 푼 폴더에 보면 spring-framework-2.5.6\dist\spring.jar 파일 : (스프링 프레임워크 lib파일) spring-framework-2.5.6\lib\jakarta-commons\commons-logging.jar 파일 : (로그 사용을 위한 lib파일) spring-framework-2.5.6\dist\modules\spring-webmvc.jar : (컨트롤러 상속받기 위해서)
*.htm으로 들어오는 요청에 대해서 springapp서블릿을 사용하겠다는 얘기. 서블릿은 스프링 프레임워크에 있는 DispatcherServlet 이다.
DispatcherServlet의 제어 행위를 처리하는 설정 파일이 필요한데, 이것은 서블릿 이름에 -servlet.xml 을 붙여 작성한다. 그러니까 여기서는 springapp-servlet.xml 이겠지. /WEB-INF/springapp-servlet.xml을 작성한다.
잘 보면 beans태그안에 bean태그가 3개가있다. 첫 번째는 Controller인거 같고,, 두 번째는 urlMapping 시켜주는데 /hello.htm으로 요청이 들어오면 springappController에게 넘기라는 거 같다. 세 번째꺼는 선행자 후위자를 정한거네. 미리 써놓으면 항상 쓰이는 WEB-INF/jsp/파일이름.jsp 에서 앞 뒤 없이 이름만 써서 가능.
그럼 SpringappController.java를 작성해 보자. 이놈은 Controller라는 인터페이스를 상속받습니다. web이라는 패키지를 생성 후 거기에다가 class를 생성합니다. 생성할 때 New Java Class화면에서 Interface부분에 Add버튼을 클릭해서 Controller를선택하고 추가 해주면 자동으로 생성됨.
public class SpringappController implements Controller { protected final Log logger = LogFactory.getLog(getClass());
public ModelAndView handleRequest(HttpServletRequest arg0, HttpServletResponse arg1) throws Exception { // TODO Auto-generated method stub String now = (new Date()).toString(); logger.info("returning hello view with " + now);
return new ModelAndView("hello", "now", now); } }
시간을 리턴한다. new Date()로 시간을 생성해서 그걸 String변환 후 now 변수에 넣고, 로그를 기록한 후, return할때 now라는 변수는 now라는 이름으로 쓸 수 있게 hello파일에 넘김. 이 hello는 앞 뒤 합쳐서 /WEB-INF/hello.jsp 가 됨.
이제 /WEB-INF/jsp/hello.jsp 파일을 보자.
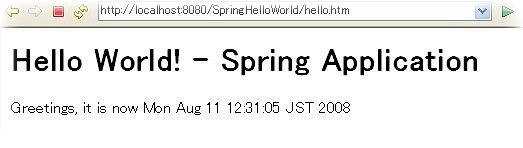
<%@ page language="java" contentType="text/html; charset=windows-31j" pageEncoding="windows-31j"%> <%@ taglib prefix="c" uri="http://java.sun.com/jsp/jstl/core" %> <!DOCTYPE html PUBLIC "-//W3C//DTD HTML 4.01 Transitional//EN" "http://www.w3.org/TR/html4/loose.dtd"> <html> <head> <meta http-equiv="Content-Type" content="text/html; charset=windows-31j"> <title>Hello :: Spring Application</title> </head> <body> <h1>Hello World! - Spring Application</h1> <p>Greetings, it is now <c:out value="${now}" /></p> </body> </html>
now라는 변수를 c:out태그로 출력한다. Controller에서시간을담아서 넘겨 받았다. 그리고 jsp파일을 WEB-INF폴더에 넣는 이유는 JSP파일접근에대한권한이 아마 우리한테 없고 Spring에게 넘겨서라고 내가 찾아 본 블로그 주인장은 말했다.. 즉, 직접적으로 접근하지 못하도록 하려고?
was/SpringHelloWorld로 접속시 index.jsp를 실행하는데 파일이 없으니 하나 만들자. 폴더 위치 : WebContent/index.jsp <head>와 </head> 사이에 <script> location.href="hello.htm" </script> 이렇게만 입력하면 자동으로 hello.htm으로 포워드 해준다. 그럼 실행!
이상.. Helloworld찍을 수 있게 도움 받은 블로그 Kyle's Home님께 감사드린다. 이 글의 내용도 Kyle's Home님의 글을 거의 그대로 옮겨 놓았다.


 invalid-file
 pcube-1.0.1.jar
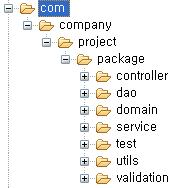


 springapp - aop.zip
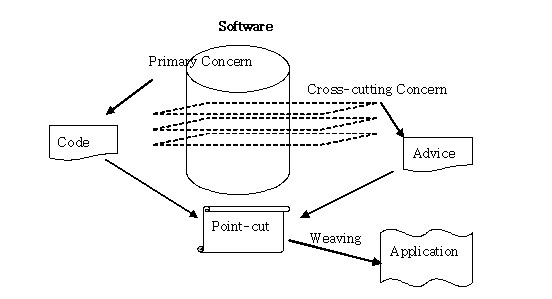
 iBATIS-SqlMaps-2-Tutorial_ko.pdf