98..Etc/weblogic2009. 4. 10. 15:20
반응형

출처 : http://blog.htdocs.kr/entry/Weblogic-815-Sun-Java-System-Web-Server-61-SP6-연동


1.  Sun Java System Web Server 6.1 SP6 (iPlanet) 설치
다음 URL 에서 다운로드 설치: http://www.sun.com/download/products.xml?id=44d819d9
설치된 파일 위치가 /usr/local/SUNwbsvr 에 있다 가정

2. Weblogic 8.1.6 설치
다음 URL 에서 다운로드 설치: http://commerce.bea.com/showallversions.jsp?family=WLS
설치된 파일 위치가 /usr/local/weblogic 에 있다 가정

3. WebServer 환경설정
SJS Web Server의 Configuration 파일들은 웹서버 홈디렉토리의 https-xxx/config 디렉토리에 위치함.
ex) /usr/local/SUNwbsvr/https-eServer/config

  • 연동에 필요한 라이브러리 파일 복사 - 서버가 다른 곳에 위치한다면 반드시 복사함.
    # cd /usr/local/weblogic/bea/weblogic81/server/lib/linux/i686
    # cp libproxy* /usr/local/SUNwbsvr/plugins

  • magnus.conf 수정 - 한 줄씩 작성
    # cd /usr/local/SUNwbsvr/https-eServer/config
    # vi magnus.conf

    magnus.conf (Language : xml)
    1. # 아래와 같이 마지막 줄에 추가
    2. Init fn="load-modules" funcs="wl_proxy,wl_init" shlib="/usr/local/SUNwbsvr/plugins/libproxy.so"
    3. Init fn="wl_init"

  • obj.conf 수정 - "NameTrans fn=..." 과 "PathCheck fn=..." 사이에 추가
    # vi obj.conf

    obj.conf (Language : xml)
    1. # Weblogic 으로 보내야 할것이 JSP 와 Struts를 사용하므로 DO 를 추가
    2. NameTrans fn=document-root root-"$docroot"
    3. Service method="(GET|HEAD|POST|PUT)" type=text/jsp fn=wl_proxy WebLogicHost=123.45.67.89 WebLogicPort=7001
    4. Service method="(GET|HEAD|POST|PUT)" type=text/do fn=wl_proxy WebLogicHost=123.45.67.89 WebLogicPort=7001
    5. PathCheck fn=unix-uri-clean
    6. #
    7. # Servlet을 사용하면 맨아래 다음 아래와 같이 추가
    8. #
    9. <Object name="weblogic" ppath="*/weblogic/*">
    10. Service fn=wl_proxy WebLogicHost=123.45.67.89 WeblogicPort=7001 PathTrim="/weblogic"
    11. </Object>

  • mime.types 수정
    type=magnus-internal/jsp 부분을 찾아서 text/jsp로 바꿈. (없으면 그냥 추가)

    mime.conf (Language : xml)
    1. type=text/jsp     exts=jsp
    2. type=text/do      exts=do

  • WebLogic 서버 서비스 확인

  • SJS Web Server 재시작
    콘솔을 이용하여 재시작 하거나 직접 시작해줌.
    # /usr/local/SUNwbsvr/https-eServer/start

    [LS ls1] http://123.45.67.89 port 80 ready to accept requests
    startup: server started successfully

    위와 같이 메시지가 보이면 성공
  • WebLogic에 JSP 페이지를 작성한 후 http://123.45.67.89 로 접속하여 작성한 JSP가 나오면 연동 성공

※ 자세한 메뉴얼은 http://www.itadvisor.co.kr 에서 다운받을 수 있음. 
Posted by 1010
98..Etc/weblogic2009. 4. 10. 15:08
반응형

WebLogic Platform 8.1 Installation

Guide and so on


Table of Contents

1. WebLogic Platform 8.1 설치 4
1.1. Windows에서 GUI mode로 설치 4
1.2. Unix에서 Console mode로 설치 8
1.2.1. .bin 설치 파일인 경우 8
1.2.2. .jar 설치 파일인 경우 14
1.3. Silent mode로 설치 15
2. Domain Configuration Wizard로 Domain 생성 16
2.1. Wizard를 시작 16
2.2. 새로운 Domain을 생성 17
2.3. Domain의 종류를 선택 17
2.4. Configuration 방법 선택 18
2.5. Administrative username과 pasword설정 18
2.6. Startup mode와 JDK 선택 19
2.7. Summary 와 Domain 이름을 설정 19
2.8. Domain Configuration 결과 20
3. Apache Plug-In 사용방법 21
3.1. Apache HTTP Server Plug-In 정보 21
3.2. Plug-In의 설치 22
3.2.1. 해당하는 플랫폼용 Shared Object 디렉토리로 이동 22
3.2.2. 사용할 Plug-In파일을 선택 22
3.2.3. mod_so.c module의 상태를 점검 22
3.2.4. Apache HTTP Server용 Plug-In을 설치 23
3.2.4.1. Apache 1.x일 경우 23
3.2.4.2. Apache 2.x일 경우 24
3.2.5. Apache HTTP Server Plug-In을 위한 httpd.conf파일 수정 24
3.2.5.1. httpd.conf파일을 open 24
3.2.5.2. WebLogic Server module 확인 24
3.2.5.3. IfModule 블럭을 추가 24
3.2.5.4. IfModule 블록에 MatchExpression을 추가 24
3.2.5.5. t3와 IIOP를 위한 HTTP tunneling 설정(Optional) 25
3.2.5.6. weblogic.conf파일을 사용한 설정(Optional) 25
3.2.6. httpd.conf파일의 syntax 검증 26
3.3. WebLogic Server를 다시 시작 27
3.4. Apache HTTP server를 다시 시작 28
3.5. Plug-In 테스트 29
3.5.1. 테스트용 JSP 29
3.5.2. Web Application을 생성(Default Web Application으로 설정) 29
3.5.3. Web Application을 배포 30
3.5.4. 테스트 34
4. Default Web Application 설정방법 36
5. JDBC 관련 설정방법 37
5.1. JDBC Connection Pool 37
5.1.1. Start Script의 CLASSPATH에 JDBC driver 추가 37
5.1.2. WebLogic Server를 시작 38
5.1.3. JDBC Connection Pool 설정 39
5.2. DataSource 44

Posted by 1010
98..Etc/weblogic2009. 4. 10. 15:03
반응형
WebLogic Server 8.1을 설치하는 것은 매우 간단하다. BEA 홈페이지에서 설치하고자 하는  OS에 맞는 WebLogic Server 8.1 SP6를 다운 받은 다음에 실행 권한을 주고 실행해 주면 된다.

$ ./server816_linux32.bin
Extracting 0%....................................................................................................100%
Unable to instantiate GUI, defaulting to console mode.

프로그램을 실행시키면 먼저 압축되어 있는 설치 파일의 압축을 제거한 한다. GUI 모드에서 실행했다면 설치가 좀더 쉬운 화면이 보였겠지만 지금은 콘솔에서 설치해서 console mode로 기동한다.

<--------------------- BEA Installer - WebLogic Server 8.1 SP6 -------------------->

Welcome:
--------

This installer will guide you through the installation of WebLogic Server 8.1 SP6. Type "Next" or enter to proceed to the next prompt.  If you want to change data entered previously, type
"Previous".  You may quit the installer at any time by typing "Exit".


Enter [Exit][Next]>


다음으로는 WebLogic 설치에 대한 환영인사가 나타난다. 설치가 싫으면 Exit를 입력하라고 한다. 머 언제든지 설치를 중단할 수 있기 때문에 신경 쓰지 않아도 된다. 우선 Enter를 눌러 설치를 진행한다.

<--------------------- BEA Installer - WebLogic Server 8.1 SP6 -------------------->

BEA Systems License Agreement:
------------------------------

BEA SYSTEMS, INC. SOFTWARE LICENSE AGREEMENT

USE OF SOFTWARE ORDERED FROM BEA SYSTEMS, INC. ("BEA") IS PROVIDED ONLY UNDER LICENSE FROM BEA. PLEASE READ THE FOLLOWING LICENSE CAREFULLY AND INDICATE YOUR ACCEPTANCE BY CLICKING THE ACCEPTANCE
BOX. CERTAIN CAPITALIZED TERMS ARE DEFINED IN SECTION 11.

1.      LICENSE TERMS

a.      WebLogic SDK Use.  The terms of this Section 1(a) are applicable to you if you have registered as a WebLogic SDK customer. Subject to the terms of this Agreement, BEA grants to you a
non-exclusive, non-transferable, royalty-free license to use WebLogic SDK solely for Development Use and Scale-Limited Personal Use for the number of users and/or developers and the number of
CPU's, Servers and/or at the Sites, as specified at the time of registration. Third party software products or modules supplied by BEA, if any, may be used solely with the Software. All rights not specifically granted to you herein are retained by BEA.

...

i.      Territory.  The license grants hereunder are limited to use within the Territory.

Select Option:
    1 - Yes, I agree with the terms of the license
    2 - No, I do not agree with the terms of the license


Enter option number to select OR [Up][Down][Exit][Previous]> 1

WebLogic Server의 라이센스 조항이 나오고 이 라이센스에 동의하면 1번을 누르라고 한다. 동의를 안하면 설치가 중단된다. 선택이 있겠는가 1번을 눌러 설치를 진행한다.

<--------------------- BEA Installer - WebLogic Server 8.1 SP6 -------------------->

Choose BEA Home Directory:
--------------------------

    "BEA Home" = [/app/bea/bea]


Input new BEA Home OR [Exit][Previous][Next]> /app/bea

BEA 홈 디렉토리의 위티를 물어본다. Enter를 입력하면 기본 위치인 /app/bea/bea가 설정되고 변경하고자 한다면 원하는 디렉토리를 입력한다.

<--------------------- BEA Installer - WebLogic Server 8.1 SP6 -------------------->


Choose Install Type:
--------------------

 ->1|Complete
    |Install the complete BEA WebLogic Platform.

   2|Custom Installation
    |Choose software components to install and perform optional configuration.


Enter index number to select OR [Exit][Previous][Next]> 1

전체 설치를 할건지 필요한 컴포넌트만 설치할 것인지를 물어보는 창이 뜬다. 쉽게 설치를 하려면 전체 설치를 선택한다.

<--------------------- BEA Installer - WebLogic Server 8.1 SP6 -------------------->

Choose Product Directory:
-------------------------

    "Product Installation Directory" = [/app/bea/weblogic81]


Input new Product Installation Directory OR [Exit][Previous][Next]>

WebLogic Server 8.1 제품이 설치될 위치를 결정한다. 원하는 위치가 있다면 원하는 위치를 적어준다. 기본은 $WL_HOME/weblogic81로 설정된다.

<--------------------- BEA Installer - WebLogic Server 8.1 SP6 -------------------->

Installing files..

0%          25%          50%          75%          100%
[------------|------------|------------|------------]
[***************************************************]

설치가 진행되며 '*'가 모두 채워지면 파일이 생성되는 등의 설치가 완료된다.

<--------------------- BEA Installer - WebLogic Server 8.1 SP6 -------------------->

Installing JDK....

0%          25%          50%          75%          100%
[------------|------------|------------|------------]
[***************************************************]

설치가 완료된 줄 알았는데.. JDK를 설치 한다고 한다.

<--------------------- BEA Installer - WebLogic Server 8.1 SP6 -------------------->

Installation Complete


Congratulations! WebLogic Server 8.1 SP6 has been successfully installed to /app/bea/weblogic81.


Press any key to continue OR [Exit]>

드디어 설치가 완료되었다. Enter키를 누르면 끝이다.

$ ls -la
total 350860
drwx------ 11 bea  web       4096 2007-11-16 11:53 .
drwxr-xr-x  5 root root      4096 2007-11-15 13:45 ..
-rw-------  1 bea  web       2405 2007-11-16 18:19 .bash_history
-rw-r--r--  1 bea  web         33 2007-11-15 13:45 .bash_logout
-rw-r--r--  1 bea  web        284 2007-11-16 10:09 .bash_profile
-rw-r--r--  1 bea  web        124 2007-11-15 13:45 .bashrc
drwxr-xr-x  2 bea  web       4096 2007-11-16 10:15 bea
drwxr-xr-x  3 bea  web       4096 2007-11-16 10:58 domains
drwxr-xr-x  2 bea  web       4096 2007-11-16 10:10 ext_components
drwxr-xr-x  7 bea  web       4096 2007-11-16 10:10 jdk142_11
drwxr-xr-x 10 bea  web       4096 2007-11-16 10:11 jrockit81sp6_142_10
-rw-r--r--  1 bea  web      11514 2007-11-16 10:10 license.bea
-rw-r--r--  1 bea  web      10467 2007-11-16 10:10 license_scale_limited.bea
drwxr-xr-x  2 bea  web       4096 2007-11-16 10:16 logs
-rw-r--r--  1 bea  web         91 2007-11-16 10:07 .mailcap
-rw-r--r--  1 bea  web        230 2007-11-16 10:07 .mime.types
-rw-r--r--  1 bea  web       1446 2007-11-16 10:11 registry.xml
-rwxr-xr-x  1 bea  web  358708754 2007-11-15 14:16 server816_linux32.bin
-rwxr-xr-x  1 bea  web        851 2007-11-16 10:10 UpdateLicense.sh
drwxr-xr-x  3 bea  web       4096 2007-11-16 10:10 utils
-rw-------  1 bea  web       4902 2007-11-16 11:53 .viminfo
drwxr-xr-x  3 bea  web       4096 2007-11-16 11:13 webapps
drwxr-xr-x  8 bea  web       4096 2007-11-16 10:10 weblogic81
-rw-r--r--  1 bea  web        658 2007-11-15 13:45 .zshrc


설치가 완료되면 위와 같은 디렉토리가 생긴다. 설치된 디렉토리를 보면 WebLogic Server 엔진 디렉토리와 JDK 들이 설치된다.

다음에는 WebLogic Server를 이용하여 Admin Server와 Managed Server를 만들어보기로 한다.
Posted by 1010
98..Etc/weblogic2009. 2. 27. 14:07
반응형
Oracle WebLogic Server Downloads

Thank you for accepting the OTN License Agreement; you may now download this software.


Microsoft Windows
Linux
Solaris
HP
Oracle WebLogic Server 10.3 - Net Installer


Oracle WebLogic Server 10.3 - Package Installer

x86: 39 MB
File1


x86: 742 MB
File1

x86: 42 MB
File1


x86: 748 MB
File1
SPARC: 47 MB
File1


SPARC: 463 MB
File1
Itanium: 8 MB
File1


Itanium: 473 MB
File1
Mandatory for 10.3 Net/Package Installers:

- Security Advisory
- Apache Plug-ins zip
- Instructions
Oracle WebLogic Server 10.0 MP1

Oracle WebLogic Server 9.2 MP3


x86: 688 MB
File1

x86: 636 MB
File1
x86: 695 MB
File1

x86: 639 MB
File1
SPARC: 636 MB
File1

SPARC: 598 MB
File1
   
Oracle WebLogic SIP Server 3.1

x86: 371 MB
File1
x86: 379 MB
File1
     
Documentation Library
All    


Additional Fusion Middleware Downloads
 
Microsoft Windows
Linux
Solaris
Oracle Coherence

All versions    
Oracle JRockit

All versions    
Oracle WebLogic Operations Control
All versions
Posted by 1010
98..Etc/weblogic2009. 2. 27. 13:11
반응형
웹로직 시작시 아래와 같은 InvalidClassException 오류가 발생한다면?

serialVersionUID의 값이 다르다는 것으로 보아 웹로직과 JDK가 서로 호환이 되지 않아서 발생하는 문제다.
동일한 클래스일지라도 serialVersionUID가 다르면 다른 클래스로 인식되어 서로 데이터를 주고 받을 수 없다.

There are 1 nested errors:

weblogic.management.ManagementException: [Management:141266]Parsing Failure in c
onfig.xml: javax.xml.namespace.QName; local class incompatible: stream classdesc
 serialVersionUID = 4418622981026545151, local class serialVersionUID = -9120448
754896609940
        at weblogic.management.provider.internal.RuntimeAccessImpl.<init>(Runtim
eAccessImpl.java:122)
        at weblogic.management.provider.internal.RuntimeAccessService.start(Runt
imeAccessService.java:38)
        at weblogic.t3.srvr.ServerServicesManager.startService(ServerServicesMan
ager.java:374)
        at weblogic.t3.srvr.ServerServicesManager.startInStandbyState(ServerServ
icesManager.java:125)
        at weblogic.t3.srvr.T3Srvr.initializeStandby(T3Srvr.java:630)
        at weblogic.t3.srvr.T3Srvr.startup(T3Srvr.java:402)
        at weblogic.t3.srvr.T3Srvr.run(T3Srvr.java:361)
        at weblogic.Server.main(Server.java:67)
Caused by: java.io.InvalidClassException: javax.xml.namespace.QName; local class
 incompatible: stream classdesc serialVersionUID = 4418622981026545151, local cl
ass serialVersionUID = -9120448754896609940
        at java.io.ObjectStreamClass.initNonProxy(ObjectStreamClass.java:546)
        at java.io.ObjectInputStream.readNonProxyDesc(ObjectInputStream.java:155
2)
        at java.io.ObjectInputStream.readClassDesc(ObjectInputStream.java:1466)
        at java.io.ObjectInputStream.readOrdinaryObject(ObjectInputStream.java:1
699)
        at java.io.ObjectInputStream.readObject0(ObjectInputStream.java:1305)
        at java.io.ObjectInputStream.readObject(ObjectInputStream.java:348)
        at java.util.HashMap.readObject(HashMap.java:1066)
        at sun.reflect.NativeMethodAccessorImpl.invoke0(Native Method)
        at sun.reflect.NativeMethodAccessorImpl.invoke(NativeMethodAccessorImpl.
java:39)
        at sun.reflect.DelegatingMethodAccessorImpl.invoke(DelegatingMethodAcces
sorImpl.java:25)
        at java.lang.reflect.Method.invoke(Method.java:585)
        at java.io.ObjectStreamClass.invokeReadObject(ObjectStreamClass.java:946
)
        at java.io.ObjectInputStream.readSerialData(ObjectInputStream.java:1809)

        at java.io.ObjectInputStream.readOrdinaryObject(ObjectInputStream.java:1
719)
        at java.io.ObjectInputStream.readObject0(ObjectInputStream.java:1305)
        at java.io.ObjectInputStream.defaultReadFields(ObjectInputStream.java:19
08)
        at java.io.ObjectInputStream.readSerialData(ObjectInputStream.java:1832)

        at java.io.ObjectInputStream.readOrdinaryObject(ObjectInputStream.java:1
719)
        at java.io.ObjectInputStream.readObject0(ObjectInputStream.java:1305)
        at java.io.ObjectInputStream.readObject(ObjectInputStream.java:348)
        at java.util.HashMap.readObject(HashMap.java:1067)
        at sun.reflect.NativeMethodAccessorImpl.invoke0(Native Method)
        at sun.reflect.NativeMethodAccessorImpl.invoke(NativeMethodAccessorImpl.
java:39)
        at sun.reflect.DelegatingMethodAccessorImpl.invoke(DelegatingMethodAcces
sorImpl.java:25)
        at java.lang.reflect.Method.invoke(Method.java:585)
        at java.io.ObjectStreamClass.invokeReadObject(ObjectStreamClass.java:946
)
        at java.io.ObjectInputStream.readSerialData(ObjectInputStream.java:1809)

        at java.io.ObjectInputStream.readOrdinaryObject(ObjectInputStream.java:1
719)
        at java.io.ObjectInputStream.readObject0(ObjectInputStream.java:1305)
        at java.io.ObjectInputStream.defaultReadFields(ObjectInputStream.java:19
08)
        at java.io.ObjectInputStream.readSerialData(ObjectInputStream.java:1832)

        at java.io.ObjectInputStream.readOrdinaryObject(ObjectInputStream.java:1
719)
        at java.io.ObjectInputStream.readObject0(ObjectInputStream.java:1305)
        at java.io.ObjectInputStream.readObject(ObjectInputStream.java:348)
        at com.bea.staxb.buildtime.internal.bts.BindingFile.forSer(BindingFile.j
ava:77)
        at com.bea.staxb.buildtime.internal.tylar.RuntimeTylar.getBindingFiles(R
untimeTylar.java:111)
        at com.bea.staxb.buildtime.internal.tylar.RuntimeTylar.getBindingLoader(
RuntimeTylar.java:90)
        at com.bea.staxb.runtime.internal.BindingContextFactoryImpl.createBindin
gContext(BindingContextFactoryImpl.java:66)
        at com.bea.staxb.runtime.internal.BindingContextFactoryImpl.createBindin
gContext(BindingContextFactoryImpl.java:52)
        at weblogic.descriptor.internal.MarshallerFactory.<init>(MarshallerFacto
ry.java:48)
        at weblogic.descriptor.DescriptorManager$DefaultMarshallerFactorySinglet
on.<clinit>(DescriptorManager.java:40)
        at weblogic.descriptor.DescriptorManager.getDefaultMF(DescriptorManager.
java:116)
        at weblogic.descriptor.DescriptorManager.getMarshallerFactory(Descriptor
Manager.java:125)
        at weblogic.descriptor.DescriptorManager.getDescriptorFactory(Descriptor
Manager.java:153)
        at weblogic.descriptor.DescriptorManager.createDescriptor(DescriptorMana
ger.java:277)
        at weblogic.management.provider.internal.DescriptorManagerHelper.loadDes
criptor(DescriptorManagerHelper.java:52)
        at weblogic.management.provider.internal.RuntimeAccessImpl$IOHelperImpl.
parseXML(RuntimeAccessImpl.java:599)
        at weblogic.management.provider.internal.RuntimeAccessImpl.parseNewStyle
Config(RuntimeAccessImpl.java:230)
        at weblogic.management.provider.internal.RuntimeAccessImpl.<init>(Runtim
eAccessImpl.java:110)
        ... 7 more

>
<2007. 10. 12 오전 10시 32분 56초 KST> <Notice> <WebLogicServer> <BEA-000365> <S
erver state changed to FAILED>
<2007. 10. 12 오전 10시 32분 56초 KST> <Error> <WebLogicServer> <BEA-000383> <A
critical service failed. The server will shut itself down>
<2007. 10. 12 오전 10시 32분 56초 KST> <Notice> <WebLogicServer> <BEA-000365> <S
erver state changed to FORCE_SHUTTING_DOWN>


해결안:

1. setDomainEnv.cmd 파일에
- Dcom.sun.xml.namespace.QName.useCompatibleSerialVersionUID=1.0 추가

2. ant task 수행 중 다음과 같이 ANT_OPT를 설정한다.
Set ANT_OPT=-Dcom.sun.xml.namespace.QName.useCompatibleSerialVersionUID=1.0

3. 모든 ANT 파일의 java 혹은 javac 작업에서 jvmarg를 아래 샘플처럼 적용하라.
<target name="run">
<java classname="examples.webservices.jws_basic.simple.Client" fork="true"
failonerror="true" >
<!--Note the jvmarg tag -->
<jvmarg line="-Dcom.sun.xml.namespace.QName.useCompatibleSerialVersionUID=1.0" />
<classpath refid="client.class.path"/>
<arg line="http://${wls.hostname}:7001/jws_basic_simple/SimpleService" />
</java>
</target>
Posted by 1010
98..Etc/weblogic2009. 2. 27. 12:02
반응형

1. JEUS 5.0 깔끔하게 삭제
(프로그램 추가/제거에서 삭제 후 C:\TmaxSoft 폴더 직접 삭제)


2. WebLogic 설치 (계속 Next 눌러서 설치)
   -> install 이 시작 됨
   -> Install XML Spy 과 Run QuickStart 체크 해제 후 Done

▶▶▶ 설정 하기 ◀◀◀

Configuration Wizard 실행
-> Create a new WebLogic configuration
-> Basic WebLogic Server Domain
-> Express
-> 패스워드 입력 : 12345678 (최소 8자)
-> Development Mode / Bea Supplied SDKs (Sun SDK 1.4.1)
-> Create 클릭

User Project -> mydomain -> Start Server 실행

http://localhost:7001/console 접속
(아이디 weblogic / 비번 12345678)


C:\bea\user_projects\domains\mydomain\applications 에 webtest 폴더 만들기
(webtest가 루트가 됨)


webtest 폴더 밑에 WEB-INF 폴더 생성
WEB-INF 폴더 밑에 classes, lib, src 폴더 생성(총 3개)

* 폴더 구조 *
webtest ─ WEB-INF ─ classes
          └ lib
          └ src


web.xml, weblogic.xml 를 WEB-INF폴더에 카피 후 내용 지우기

<< web.xml 내용 >>
<?xml version="1.0" encoding="UTF-8" ?>
  <!DOCTYPE web-app PUBLIC
    "-//Sun Microsystems, Inc.//DTD Web Application 2.3//EN"
    "http://java.sun.com/dtd/web-app_2_3.dtd" >
<web-app>
</web-app>

<< weblogic.xml 내용 >>
<?xml version="1.0" encoding="UTF-8"?>
  <!DOCTYPE weblogic-web-app
    PUBLIC "-//BEA Systems, Inc.//DTD Web Application 7.0//EN"
    "http://www.bea.com/servers/wls700/dtd/weblogic700-web-jar.dtd" >
<weblogic-web-app>
</weblogic-web-app>


C:\bea\user_projects\domains\mydomain\startWebLogic.cmd 문서 열기
38번 라인 수정 -> set PRODUCTION_MODE=false


▶▶▶ 테스트 하기 ◀◀◀

webtest 폴더 밑에 index.html 생성

서버 재시작

http://localhost:7001/webtest/index.html

Error 404--Not Found 메세지가 뜨면 성공


▶▶▶ Console로 접속해서 설정 하기 ◀◀◀

http://localhost:7001/console 접속

Web Application Modules 클릭

Deploy a new Web Application Module... 클릭

applications 클릭

webtest 체크 후 Target Module 클릭

Deploy 클릭

http://localhost:7001/webtest/index.html 접속 후 페이지 뜨면 성공


▶▶▶ context-root 추가하기 ◀◀◀

<< weblogic.xml 내용 >>
<?xml version="1.0" encoding="UTF-8"?>
  <!DOCTYPE weblogic-web-app
    PUBLIC "-//BEA Systems, Inc.//DTD Web Application 7.0//EN"
    "http://www.bea.com/servers/wls700/dtd/weblogic700-web-jar.dtd" >
<weblogic-web-app>
 <context-root>/</context-root>
</weblogic-web-app>

http://localhost:7001/webtest 로 접속하던 것을
   http://localhost:7001/ 로 접속 가능함


▶▶▶ Servlet 테스트 하기 ◀◀◀

시작 > 실행 > cmd

C:\bea\user_projects\domains\mydomain 디렉토리로 이동
.\setEnv.cmd 실행 (WebLogic 환경에 맞춰서 컴파일 하는 명령어)

서블릿 파일 작성 후 WEB-INF 밑 src 폴더에 저장
C:\bea\user_projects\domains\mydomain\applications\webtest\WEB-INF\src 디렉토리로 이동

javac -d ..\classes HelloWorldServlet.java (컴파일)


▶▶▶ web.xml 에 서블릿 맵핑 하기 ◀◀◀

<< weblogic.xml 내용 (추가) >>
<web-app>
 <servlet>
  <servlet-name>helloworld</servlet-name>
  <servlet-class>examples.HelloWorldServlet</servlet-class>
 </servlet>

 <servlet-mapping>
  <servlet-name>helloworld</servlet-name>
  <url-pattern>/hello</url-pattern>
 </servlet-mapping>
</web-app>

- 서버 재시작 -
http://localhost:7001/hello (접속)


■■■■■■■■■■■■■■■■■■■■■■■■■■■■■■■■■■■■■■■

DB연결 부분은... 알아서 해석해주세요 ㅡㅡ;; 너무 빨라서 정리를;;

■■■■■■■■■■■■■■■■■■■■■■■■■■■■■■■■■■■■■■■

-jdbc-
Connection Pools 

Configure a new JDBC Connection Pool...

디비타입 - 오라클
디비드라이버 - 오라클스 드라이버 씬

네임 - OracleConnectionPool

디비네임 - XE

127.0.0.1
1521
scott
tiger
tiger

continue

create deploy

///////////////////////////////////////

Data Sources 
Configure a new JDBC Data Source
네임 - OracleDataSource
jndi네임 - XE

Posted by 1010
98..Etc/weblogic2009. 2. 26. 19:11
반응형
[시스템운영] WAS/WebServer | LECTURE  
WebLogic Platform 8.1 Installation Guide (초보자를 위한 웹로직 설치법)
  작성자 : 조대협 (javastudy) 작성일 : 2004-03-18 17:01:00 (2004-04-07 17:02:52)


프린트하기


WebLogic Platform 8.1

Installation Guide


BEA Systems Korea [kr.bea.com]

김현수 [?_N_O_SPAM@bea.com]


MS-WORD 형식의 문서입니다.
아래의 첨부파일 목록에서 *.doc 파일을 다운받아 보실 수 있습니다.


[첨부파일 다운로드]
1. lecture0201_1_3_WebLogic Platform 8.1 Installation Guide and so on.doc (4539KB)
Posted by 1010
98..Etc/weblogic2009. 1. 28. 16:27
반응형
웹로직에는 production mode와 development mode라는게 있다. 나도 잘 모르지만 대충 말하면 프로덕션 모드는 실제 서비스를 하는거고 development mode는 개발단계에서 쓰는거다. 개발단계에서 쓰므로 class파일을 교체해도 자동으로 리로드를 해주기 때문에 class파일을 재컴파일해도 바로 변경사항을 확인할 수 있다. production mode에서는 웹로직을 리스타트 해주어야 class 변경사항이 반영된다.

개발할때는 당연히 development mode에서 해야겠지...

C:\bea\user_projects\domains\mydomain\startWebLogic.cmd 파일을 보자.
(물론 여기서 mydomain은 내가 정해준 domain이름이다. 전에 올린 웹로직 설치문서 참고....)

set PRODUCTION_MODE=false

로 설정을 해주면 development mode가 되고 class가 바로바로 적용된다.(이거 안해놓으면 개발할때 엄청 불편하다.)

설정해주고 웹로직을 리스타해주면 된다. 물론 개발이 완료되고 서비스할때는 다시 true로...
Posted by 1010
98..Etc/weblogic2009. 1. 28. 16:26
반응형
JDBC를 이용해서 웹로직에서 제공하는 Data Source를 이용해서 DB 접속을 해보자. 웹로직에서 Data Source 설정을 해주어야 하는데 이건 웹로직 설치가이드 문서를 참고하기 바란다. 뒷부분에 보면 커넥션풀과 데이터소스를 설정하는 부분에 대해서 나와있다.

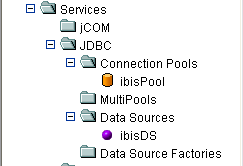
사용자 삽입 이미지
왼쪽 그림과 같이 설정이 되어야 한다.

먼저 Connection Pools를 만들고 만들어진 Connection Pools(여기선 ibisPool)을 이용해서 Data Sources를 만든다.

그리고 Java쪽에서는 만들어진 Data Sources(여기서는 ibisDS)를 사용하여 DB에 연결한다.


디비 연결 클래스를 보자.

  1. // Weblogic DBConnection Class  
  2. import java.sql.Connection;  
  3. import javax.naming.Context;  
  4. import javax.naming.InitialContext;  
  5. import javax.naming.NamingException;  
  6. import javax.sql.DataSource;  
  7.  
  8. import java.sql.ResultSet;  
  9. import java.sql.PreparedStatement;  
  10. import java.sql.Statement;  
  11.  
  12. public class DBConnection {  
  13.  
  14.     public DBConnection() {  
  15.     }  
  16.  
  17.     public Connection getConnection() throws Exception {  
  18.         return getConnection("jdbc/ibisDS");  
  19.     }  
  20.  
  21.     public Connection getConnection(String dsName) throws Exception {  
  22.         Context ctx = null;  
  23.         DataSource ds = null;  
  24.         try {  
  25.             ctx = new InitialContext();  
  26.             ds = (DataSource) ctx.lookup(dsName);  
  27.         } catch (NamingException e) {  
  28.             e.printStackTrace();  
  29.             return null;  
  30.         } finally {  
  31.             try {  
  32.                 if (ctx != null)  
  33.                     ctx.close();  
  34.             } catch (NamingException ne) {  
  35.                 System.err.println("comm.util.conPoool : can't close context resource !!");  
  36.             }  
  37.         }  
  38.         return (Connection) ds.getConnection();  
  39.     }  
  40.  
  41.     public void disConnection(ResultSet rs, PreparedStatement pstmt, Statement cstmt, Connection conn) {  
  42.         try { if(rs   != null) rs.close()   ; rs    = null; } catch(Exception e) { rs    = null;}  
  43.         try { if(pstmt!= null) pstmt.close(); pstmt = null; } catch(Exception e) { pstmt = null;}  
  44.         try { if(cstmt!= null) cstmt.close(); cstmt = null; } catch(Exception e) { cstmt = null;}  
  45.         try { if(conn != null) conn.close() ; conn  = null; } catch(Exception e) { conn  = null;}  
  46.     }  
  47. }  

기존의 JDBC 연결 클래스와 거의 동일하기 때문에 JDBC로 연결을 해본 사람이라면 웹로직에서도 크게 무리가 없으리라고 본다. (내가 그랬기 때문에.....)

일단 생성자인 DBConnection()에서는 아무것도 안하고 있고 오버로딩된 메서드 getConnection()이 2개 정의 되어 있다. 데이터소스 이름을 던져주면 2번째것이 실행되어서 데이터소스에서 해당이름으로 된것이 있는지 검색해서 커넥션을 리턴하고 파라미터를 던지지 않으면 기본으로 설정된 ibisDS(위에서 만든 이름이다. 당연히 각자 웹로직에서 사용한 이름으로...)의 커넥션을 리턴해준다. disConnection메서드에서는 사용한 디비자원을 닫아준다.
Posted by 1010