반응형
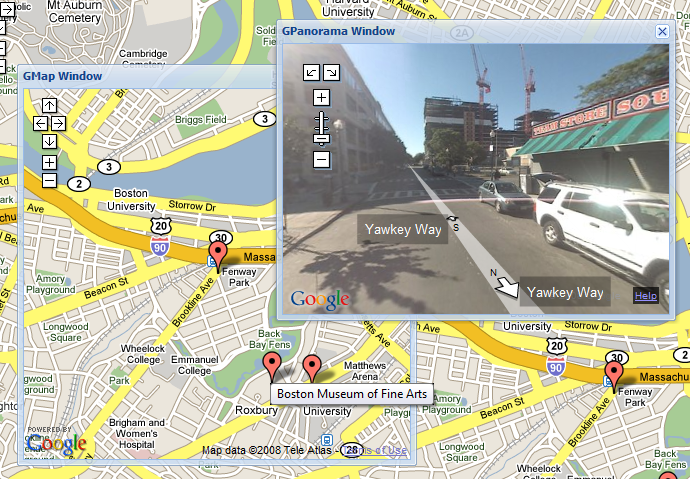
오늘자 ExtJs 공식 블로그에 Intergrating Google Maps API With ExtJS 라는 글이 포스팅 되었다.
ExtJS 의 Panel 을 확장해서 만든 GMapPanel 을 이용한 샘플이 공개 되었는데 Google Maps API를 이용했다.
재미있는것은 Google 의 StreetView 도 Panel 를 확장해서 구현했단는 것.
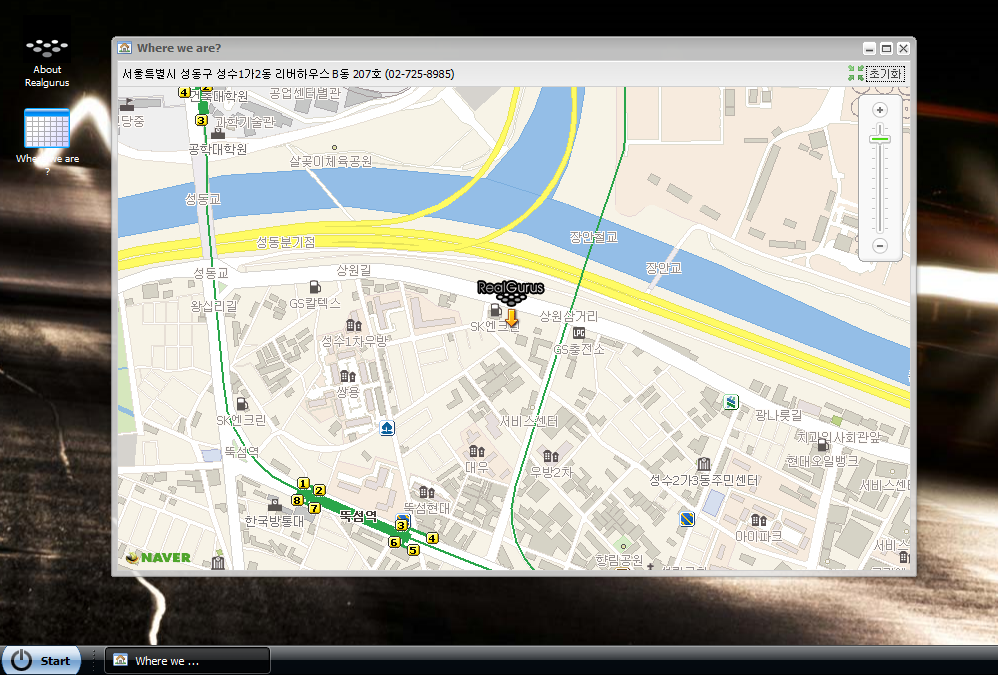
지난달 초에 ExtJS 의 Web Desktop 샘플코드를 이용해서 NaverMap API 를 적용한 코드를 작성한 바 있는데 이를 소개할까 한다.
데모보기
Source Code (일부)
Web Desktop 의 작동방식은 바탕화면의 아이콘이나 시작버튼의 메뉴를 클릭하게 되면 Window 를 생성해서 화면에 보여주게 되는데 이때의 Window 는 별도의 객체에 의해서 생성된다. App 라는 Class 인데 Factory 이자 Status 를 관리하는 Manager 역할도 한다.
NaverMap과 연동하기 위한 코드는 코드상의 볼드 처리된 부분이며 주의할 점은
1. NaverMap API 는 한번만 초기화 되어야 한다.
Web Desktop 은 생성된 Window가 Close 될때 Destroy 하게 설계가 되어있다. 하지만 NaverMap 은 별도로 destroy를 할 수 있는 방법을 제공하지 않는다.
1. NMap 을 전역으로 사용하던가
2. mapWindow 의 멤버로 이용하려면 close 할때 window 를 destroy 하지 말고 hide 하는 방식을 취해야 한다.
상단의 코드는 후자의 방식을 택하고 있고, 파란색 beforeclose 리스너에서 hide 를 호출하고 Desktop App Manager 에서는 윈도우가 닫힌 것으로 인식하게 끔 close 이벤트를 발생시키고 있다.
2. Window resize 를 고려해야 한다.
우선 NMap 을 생성할 때 사이즈에 관한 인자를 주지 않으면 자동으로 컨테이너 사이즈로 생성됨을 확인하였다.
Window resize 이벤트가 발생할 때 NMap 의 인스턴스의 resize() 를 호출하야 한다. (소스코드 보라색)
그러나
사실 Web Desktop 에서 급히 쓰기해서 NaverMap 과의 연동부분이 샘플코드에 인라인으로 코딩이 되었지만 ExtJS 공식블로그에서 소개한 바와 같이 Panel을 확장해서 새로운 클래스로 만드는 편이 재사용을 위해 100만배는 좋다.
ExtJS 의 Panel 을 확장해서 만든 GMapPanel 을 이용한 샘플이 공개 되었는데 Google Maps API를 이용했다.
재미있는것은 Google 의 StreetView 도 Panel 를 확장해서 구현했단는 것.
지난달 초에 ExtJS 의 Web Desktop 샘플코드를 이용해서 NaverMap API 를 적용한 코드를 작성한 바 있는데 이를 소개할까 한다.
데모보기
Source Code (일부)
MyDesktop.MapWindow = Ext.extend(Ext.app.Module, {

    id: 'map-win',

    init: function(){

        this.launcher = {

            text: 'Where we are ?',

            iconCls: 'icon-map',

            handler: this.createWindow,

            scope: this

        }

    },

    createWindow: function(){

        var desktop = this.app.getDesktop();

        var win = desktop.getWindow('map-win');

        var mapObj = null;


        function centerMap(){

            if (mapObj != null) {

                mapObj.setCenterAndZoom(new NPoint(316350, 550250), 2);

            }

        }


        if (!win) {

            win = desktop.createWindow({

                id: 'map-win',

                title: 'Where we are?',

                width: 740,

                height: 480,

                minHeight: 400,

                minWidth: 500,

                iconCls: 'icon-map',

                shim: false,

                animCollapse: false,

                constrainHeader: true,

                layout: 'fit',

                tbar: ['서울특별시 성동구 성수1가2동 리버하우스', '->',

                {

                    xtype: 'button',

                    iconCls: 'map-init',

                    text: '초기화',

                    handler: centerMap,

                    scope: this

                }],

                listeners: {
                    beforeshow: function(){
                        if (mapObj == null) { //최초 생성
                            mapObj = new NMap(this.body.dom);
                            mapObj.enableWheelZoom();
                            centerMap();
                            var zoom = new NZoomControl();
                            if (Ext.isIE6) {
                                var cm = new NMark(
				    new NPoint(316325, 550245),
				    new NIcon('images/here.gif',

                                             new NSize(68, 50),

                                             new NSize(34, 48)

                                        )
				)
                            } else {
                                var cm = new NMark(
				    new NPoint(316325, 550245),
				    new NIcon(

                                            'images/here.png',

                                            new NSize(68, 50),

                                            new NSize(34, 48)

                                         )
				)
                            }
                            NEvent.addListener(cm, 'click', function(){
                                var w = new Ext.Window({
                                    animateTarget: win.getEl(),
                                    modal: true,
                                    iconCls: 'icon-map',
                                    title: '리버하우스 B동 207호',
                                    html: '<img src="images/riverhouse.jpg">',
                                    width: 360,
                                    autoHeight: true,
                                    resizable: false,
                                    stateful: false
                                });
                                w.show();
                            });

                            cm.show();
                            zoom.setAlign("right");
                            zoom.setValign("top");
                            mapObj.addControl(zoom);
                            mapObj.addOverlay(cm);

                        } else { //생성된 적이 있다면!!
                            if (this.animateTarget == null) { //Close 상태
                                this.taskButton = desktop.taskbar.addTaskButton(this);
                                centerMap();
                            }
                            this.animateTarget = this.taskButton.el;
                        }

                    },
                    beforeclose: function(){
                        this.backupTarget = this.animateTarget;
                        this.animateTarget = null;
                        this.fireEvent('close', this); //taskButton remove
                        this.hide();
                        return false;
                    },
                    bodyresize: function(){
                        if (this.rendered && mapObj != null) {
                            mapObj.resize();
                        }
                    },
                    scope: win
                }

            });

        }

        win.show();

    }

});
Web Desktop 의 작동방식은 바탕화면의 아이콘이나 시작버튼의 메뉴를 클릭하게 되면 Window 를 생성해서 화면에 보여주게 되는데 이때의 Window 는 별도의 객체에 의해서 생성된다. App 라는 Class 인데 Factory 이자 Status 를 관리하는 Manager 역할도 한다.
NaverMap과 연동하기 위한 코드는 코드상의 볼드 처리된 부분이며 주의할 점은
1. NaverMap API 는 한번만 초기화 되어야 한다.
Web Desktop 은 생성된 Window가 Close 될때 Destroy 하게 설계가 되어있다. 하지만 NaverMap 은 별도로 destroy를 할 수 있는 방법을 제공하지 않는다.
1. NMap 을 전역으로 사용하던가
2. mapWindow 의 멤버로 이용하려면 close 할때 window 를 destroy 하지 말고 hide 하는 방식을 취해야 한다.
상단의 코드는 후자의 방식을 택하고 있고, 파란색 beforeclose 리스너에서 hide 를 호출하고 Desktop App Manager 에서는 윈도우가 닫힌 것으로 인식하게 끔 close 이벤트를 발생시키고 있다.
2. Window resize 를 고려해야 한다.
우선 NMap 을 생성할 때 사이즈에 관한 인자를 주지 않으면 자동으로 컨테이너 사이즈로 생성됨을 확인하였다.
Window resize 이벤트가 발생할 때 NMap 의 인스턴스의 resize() 를 호출하야 한다. (소스코드 보라색)
그러나
사실 Web Desktop 에서 급히 쓰기해서 NaverMap 과의 연동부분이 샘플코드에 인라인으로 코딩이 되었지만 ExtJS 공식블로그에서 소개한 바와 같이 Panel을 확장해서 새로운 클래스로 만드는 편이 재사용을 위해 100만배는 좋다.
