반응형
'04.Anddoid/listView'에 해당되는 글 3건
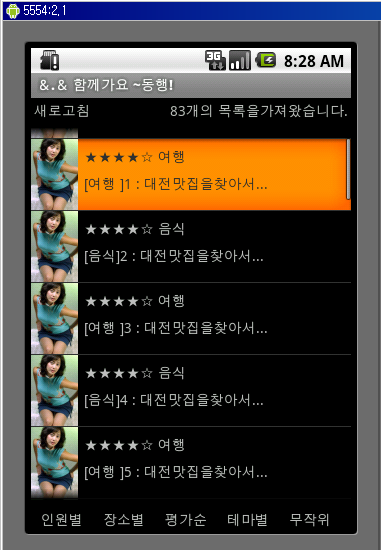
- 2010.08.16 android listView sample 2
- 2010.08.15 Android Selected State ListView Example
- 2010.08.15 Custom ListView items and adapters
04.Anddoid/listView2010. 8. 16. 17:31
 invalid-file
04.Anddoid/listView2010. 8. 15. 01:00
반응형
Sometimes we need to maintain the selected position in a list. This example was taken from a real-world, off-road application where users interact with the application in a bumpy environment and need a fool proof way of changing the sort order of items in a list. When an item is clicked in the list and that row becomes the selected row as indicated by a different background color. The user can then change the position of the selected row using the Move Up and Move Down buttons on the screen.
Here’s a screen-shot of this example running in the emulator.

Android Selected State List Example
Keeping State
Where do we keep the selected state if the view component doesn’t support this? I considered extending data objects to maintain selected state but that would only pollute data objects with view-only state information. Another thought was to extend List and keep the state there. But that would mean shoehorning view-only state info into already stable and settled Lists used throughout the application. In the end, it was decided that a custom ArrayAdapter, SelectedAdapter, was the best place to keep this state. We only care about the selected state during the lifespan of the ListView, no reason to lug around extra baggage. This turned out to be a very simple solution.
The Activity class for this example loads the view and has event handlers for list item selection and the Move Up and Move Down buttons.
package com.bestsiteinthemultiverse.selected;

import java.util.ArrayList;
import android.app.Activity;
import android.os.Bundle;
import android.view.View;
import android.widget.AdapterView;
import android.widget.Button;
import android.widget.ListView;
import android.widget.AdapterView.OnItemClickListener;

public class SelectedActivity extends Activity {

	private SelectedAdapter selectedAdapter;
	private ArrayList list;

	@Override
	protected void onCreate(Bundle savedInstanceState) {
		super.onCreate(savedInstanceState);
		setContentView(R.layout.selected_example);

		// populate the model - a simple a list
		list = new ArrayList();
		list.add("Apple");
		list.add("Orange");
		list.add("Grape");

		// create our SelectedAdapter
		selectedAdapter = new SelectedAdapter(this,0,list);
		selectedAdapter.setNotifyOnChange(true);

        ListView listview = (ListView) findViewById(R.id.listExample);
        listview.setAdapter(selectedAdapter);

        listview.setOnItemClickListener(new OnItemClickListener() {
			@Override
			public void onItemClick(AdapterView arg0, View view,
                                           int position, long id) {
				// user clicked a list item, make it "selected"
				selectedAdapter.setSelectedPosition(position);
			}
        });

        // move up event handler
        Button btnMoveUp = (Button) findViewById(R.id.btnMoveUp);
        btnMoveUp.setOnClickListener(new View.OnClickListener() {
           public void onClick(View arg0) {
        	   moveUp();
           }
        });

        // move down event handler
        Button btnMoveDown = (Button) findViewById(R.id.btnMoveDown);
        btnMoveDown.setOnClickListener(new View.OnClickListener() {
           public void onClick(View arg0) {
        	   moveDown();
           }
        });
	}

	// Move selected item "up" in the ViewList.
	private void moveUp(){
    	int selectedPos = selectedAdapter.getSelectedPosition();
    	if (selectedPos > 0 ){
    		String str = list.remove(selectedPos);
    		list.add(selectedPos-1, str);
    		// set selected position in the adapter
    		selectedAdapter.setSelectedPosition(selectedPos-1);
    	}
	}

	// Move selected item "down" in the ViewList.
	private void moveDown(){
    	int selectedPos = selectedAdapter.getSelectedPosition();
    	if (selectedPos < list.size()-1 ){
    		String str = list.remove(selectedPos);
    		list.add(selectedPos+1, str);
    		// set selected position in the adapter
    		selectedAdapter.setSelectedPosition(selectedPos+1);
    	}
	}

}
The SelectedAdapter class used in this example does three things: it extends ArrayAdapter, maintains the selected state and loads a custom row view. If that row is the selected row, a background color is applied to indicate the selected state. If you need to use something other than .toString() to describe your objects, call your method in the overridden getView(). Another thing to notice is the reference for convertView is reused from call-to-call. This saves the expense of inflating the layout every time getView() is called.
package com.bestsiteinthemultiverse.selected;

	import java.util.List;
	import android.content.Context;
	import android.graphics.Color;
	import android.view.LayoutInflater;
	import android.view.View;
	import android.view.ViewGroup;
	import android.widget.ArrayAdapter;
	import android.widget.TextView;

	public class SelectedAdapter extends ArrayAdapter{

		// used to keep selected position in ListView
		private int selectedPos = -1;	// init value for not-selected

		public SelectedAdapter(Context context, int textViewResourceId,
                           List objects) {
			super(context, textViewResourceId, objects);
		}

		public void setSelectedPosition(int pos){
			selectedPos = pos;
			// inform the view of this change
			notifyDataSetChanged();
		}

		public int getSelectedPosition(){
			return selectedPos;
		}

		@Override
		public View getView(int position, View convertView, ViewGroup parent) {
		    View v = convertView;

		    // only inflate the view if it's null
		    if (v == null) {
		        LayoutInflater vi
                            = (LayoutInflater)this.getContext().getSystemService(Context.LAYOUT_INFLATER_SERVICE);
		        v = vi.inflate(R.layout.selected_row, null);
		    }

		    // get text view
	        TextView label = (TextView)v.findViewById(R.id.txtExample);

	        // change the row color based on selected state
	        if(selectedPos == position){
	        	label.setBackgroundColor(Color.CYAN);
	        }else{
	        	label.setBackgroundColor(Color.WHITE);
	        }

	        label.setText(this.getItem(position).toString());
	        /*
	        // to use something other than .toString()
	        MyClass myobj = (MyClass)this.getItem(position);
	        label.setText(myobj.myReturnsString());
	        */
	        return(v);
		}
	}
The layout xml used for the row view.
<?xml version="1.0" encoding="utf-8"?>

<TextView android:id="@+id/txtExample"
    xmlns:android="http://schemas.android.com/apk/res/android"
    android:layout_width="fill_parent"
    android:layout_height="wrap_content"
    android:textSize="18sp"
    android:textColor="#000000"
    android:background="#FF0000"
/>
04.Anddoid/listView2010. 8. 15. 01:00
반응형
Android Series: Custom ListView items and adapters
Posted by admin | Posted in Mobile Development | Posted on 20-05-2009
84
This is a short tutorial on how to populate your android list view, with data downloaded from the internet or other sources, using ArrayAdapter. ListView items view is declared in a separate XML file and displayed using custom adapter class.
First things first, so go ahead and create a new project using Eclipse equipped with ADT plugin.
The project described below assumes you have a list of objects created, this can be either downloaded from the internet as XML and parsed to create ArrayList of your custom objects or anything you imagine. I will not go into details on this tutorial how to create such an ArrayList but your imagination is the limit. Parsing XML downloaded from the net will be covered in the next tutorial coming up soon.
Click File -> New -> Project and select the ‘Android Project’ wizard:

Click next and fill out the next screen with the following values:

Once you have filled out all the necessary data you can click finish.
Your new project has just been created. Now lets modify it a bit to display our custom made list.
Open up SoftwarePassionView.java in the eclipse editor and change the class file to the following:
1. Define necessary member variables we will use later in our class
private ProgressDialog m_ProgressDialog = null;
private ArrayList<Order> m_orders = null;
private OrderAdapter m_adapter;
private Runnable viewOrders;
private ArrayList<Order> m_orders = null;
private OrderAdapter m_adapter;
private Runnable viewOrders;
m_ProgressDialog is a small pop up displaying information that your data is being downloaded or retrieved other way.
m_orders is an ArrayList which will hold our data downloaded from the internet or acquired other way
m_adapter is our custom class extending ArrayAdapter
viewOrders is a runnable for downloading data from the internet in a separate thread
To import whatever you can at this point click Ctrl+Shit+O, some classes like Order or OrderAdapter are not created yet but don’t worry we will come to that point soon.
Another important note at this point is that your SoftwarePassoinView should extend ListActivity instead of simple Activity.
Your class should look more or less something like this now:
package com.softberries.lve;
import java.util.ArrayList;
import android.app.ListActivity;
import android.app.ProgressDialog;
import android.os.Bundle;
public class SoftwarePassionView extends ListActivity{
private ProgressDialog m_ProgressDialog = null;
private ArrayList<Order> m_orders = null;
private OrderAdapter m_adapter;
private Runnable viewOrders;
/** Called when the activity is first created. */
@Override
public void onCreate(Bundle savedInstanceState) {
super.onCreate(savedInstanceState);
setContentView(R.layout.main);
}
}
Now lets create our simple Order class holding single order.
Right click on the project and and select ‘New’ -> ‘Class’, name it order and open it up in the editor.
The source code for our orders looks like this:
package com.softberries.lve;
public class Order {
private String orderName;
private String orderStatus;
public String getOrderName() {
return orderName;
}
public void setOrderName(String orderName) {
this.orderName = orderName;
}
public String getOrderStatus() {
return orderStatus;
}
public void setOrderStatus(String orderStatus) {
this.orderStatus = orderStatus;
}
}
The Order class is very simple and contains only 2 strings with getters and setter generated for them
Now lets change our main.xml file to hold our custom list items:
<?xml version="1.0" encoding="utf-8"?>
<LinearLayout xmlns:android="http://schemas.android.com/apk/res/android"
android:orientation="vertical"
android:layout_width="fill_parent"
android:layout_height="fill_parent"
>
<ListView
android:id="@+id/android:list"
android:layout_width="fill_parent"
android:layout_height="fill_parent"
/>
<TextView
android:id="@+id/android:empty"
android:layout_width="fill_parent"
android:layout_height="fill_parent"
android:text="@string/main_no_items"/>
</LinearLayout>
This layout will display our list items if any and if the list is empty it will display ‘No orders to display’ string defined in string.xml resource file.
<?xml version="1.0" encoding="utf-8"?>
<resources>
<string name="hello">Hello World, SoftwarePassionView!</string>
<string name="app_name">Software Passion</string>
<string name="main_no_items">No orders to display</string>
</resources>
<resources>
<string name="hello">Hello World, SoftwarePassionView!</string>
<string name="app_name">Software Passion</string>
<string name="main_no_items">No orders to display</string>
</resources>
Our list item (single row on the list) have a custom layout as well, defined in row.xml file:
<?xml version="1.0" encoding="utf-8"?>
<LinearLayout xmlns:android="http://schemas.android.com/apk/res/android"
android:layout_width="fill_parent"
android:layout_height="?android:attr/listPreferredItemHeight"
android:padding="6dip">
<ImageView
android:id="@+id/icon"
android:layout_width="wrap_content"
android:layout_height="fill_parent"
android:layout_marginRight="6dip"
android:src="@drawable/icon" />
<LinearLayout
android:orientation="vertical"
android:layout_width="0dip"
android:layout_weight="1"
android:layout_height="fill_parent">
<TextView
android:id="@+id/toptext"
android:layout_width="fill_parent"
android:layout_height="0dip"
android:layout_weight="1"
android:gravity="center_vertical"
/>
<TextView
android:layout_width="fill_parent"
android:layout_height="0dip"
android:layout_weight="1"
android:id="@+id/bottomtext"
android:singleLine="true"
android:ellipsize="marquee"
/>
</LinearLayout>
</LinearLayout>
Single row example has been borrowed from the romain Guy website here
Ok, so we have all our layouts defined in the res folder under layout. Now its time to go back to our code and create our custom OrderAdapter class which will manage our list of orders:
private class OrderAdapter extends ArrayAdapter<Order> {
private ArrayList<Order> items;
public OrderAdapter(Context context, int textViewResourceId, ArrayList<Order> items) {
super(context, textViewResourceId, items);
this.items = items;
}
@Override
public View getView(int position, View convertView, ViewGroup parent) {
View v = convertView;
if (v == null) {
LayoutInflater vi = (LayoutInflater)getSystemService(Context.LAYOUT_INFLATER_SERVICE);
v = vi.inflate(R.layout.row, null);
}
Order o = items.get(position);
if (o != null) {
TextView tt = (TextView) v.findViewById(R.id.toptext);
TextView bt = (TextView) v.findViewById(R.id.bottomtext);
if (tt != null) {
tt.setText("Name: "+o.getOrderName()); }
if(bt != null){
bt.setText("Status: "+ o.getOrderStatus());
}
}
return v;
}
}
This is a private class and should be added to our SoftwarePassionView. This is extended ListAdapter which inside overriden getView method returns our row with assigned string values to the textfields defined in row.xml.
A huge part of our application is already done. Now we have to add some modifications to the onCreate method to initialize everything properly and add a method retrieving our orders from somewhere, lets start with the latter:
private void getOrders(){
try{
m_orders = new ArrayList<Order>();
Order o1 = new Order();
o1.setOrderName("SF services");
o1.setOrderStatus("Pending");
Order o2 = new Order();
o2.setOrderName("SF Advertisement");
o2.setOrderStatus("Completed");
m_orders.add(o1);
m_orders.add(o2);
Thread.sleep(2000);
Log.i("ARRAY", ""+ m_orders.size());
} catch (Exception e) {
Log.e("BACKGROUND_PROC", e.getMessage());
}
runOnUiThread(returnRes);
}
Instead of creating our simple orders in the method above you could of course download them from somewhere and assign the result to the m_orders array list. The method runOnUIThread is a utility method for running tasks back on the main UI thread after the job is done on the separate thread created for long running tasks. We will call our getOrders method from a separate thread.
The returnRes runnable adds newly retrieved Order object to our custom Adapter and notifies it of the data change:
Now lets move to our overriden onCreate method. We will initialize here all the member variables as well as start a new thread retrieving our orders:
@Override
public void onCreate(Bundle savedInstanceState) {
super.onCreate(savedInstanceState);
setContentView(R.layout.main);
m_orders = new ArrayList<Order>();
this.m_adapter = new OrderAdapter(this, R.layout.row, m_orders);
setListAdapter(this.m_adapter);
viewOrders = new Runnable(){
@Override
public void run() {
getOrders();
}
};
Thread thread = new Thread(null, viewOrders, "MagentoBackground");
thread.start();
m_ProgressDialog = ProgressDialog.show(SoftwarePassionView.this,
"Please wait...", "Retrieving data ...", true);
}
After initialization, we start new thread using the viewOrders runnable and show the progress dialog which we close once the orders are retrieved.
Now you should be able to run your application. After the application starts it spawns new thread and displays the loader:
 |
 |
And thats it. You can add an Item Click Listener to your list to start new activities etc.
Full source code for the SoftwarePassionView below:
package com.softberries.lve;
import java.util.ArrayList;
import android.app.ListActivity;
import android.app.ProgressDialog;
import android.content.Context;
import android.os.Bundle;
import android.util.Log;
import android.view.LayoutInflater;
import android.view.View;
import android.view.ViewGroup;
import android.widget.ArrayAdapter;
import android.widget.TextView;
public class SoftwarePassionView extends ListActivity{
private ProgressDialog m_ProgressDialog = null;
private ArrayList<Order> m_orders = null;
private OrderAdapter m_adapter;
private Runnable viewOrders;
@Override
public void onCreate(Bundle savedInstanceState) {
super.onCreate(savedInstanceState);
setContentView(R.layout.main);
m_orders = new ArrayList<Order>();
this.m_adapter = new OrderAdapter(this, R.layout.row, m_orders);
setListAdapter(this.m_adapter);
viewOrders = new Runnable(){
@Override
public void run() {
getOrders();
}
};
Thread thread = new Thread(null, viewOrders, "MagentoBackground");
thread.start();
m_ProgressDialog = ProgressDialog.show(SoftwarePassionView.this,
"Please wait...", "Retrieving data ...", true);
}
private Runnable returnRes = new Runnable() {
@Override
public void run() {
if(m_orders != null && m_orders.size() > 0){
m_adapter.notifyDataSetChanged();
for(int i=0;i<m_orders.size();i++)
m_adapter.add(m_orders.get(i));
}
m_ProgressDialog.dismiss();
m_adapter.notifyDataSetChanged();
}
};
private void getOrders(){
try{
m_orders = new ArrayList<Order>();
Order o1 = new Order();
o1.setOrderName("SF services");
o1.setOrderStatus("Pending");
Order o2 = new Order();
o2.setOrderName("SF Advertisement");
o2.setOrderStatus("Completed");
m_orders.add(o1);
m_orders.add(o2);
Thread.sleep(5000);
Log.i("ARRAY", ""+ m_orders.size());
} catch (Exception e) {
Log.e("BACKGROUND_PROC", e.getMessage());
}
runOnUiThread(returnRes);
}
private class OrderAdapter extends ArrayAdapter<Order> {
private ArrayList<Order> items;
public OrderAdapter(Context context, int textViewResourceId, ArrayList<Order> items) {
super(context, textViewResourceId, items);
this.items = items;
}
@Override
public View getView(int position, View convertView, ViewGroup parent) {
View v = convertView;
if (v == null) {
LayoutInflater vi = (LayoutInflater)getSystemService(Context.LAYOUT_INFLATER_SERVICE);
v = vi.inflate(R.layout.row, null);
}
Order o = items.get(position);
if (o != null) {
TextView tt = (TextView) v.findViewById(R.id.toptext);
TextView bt = (TextView) v.findViewById(R.id.bottomtext);
if (tt != null) {
tt.setText("Name: "+o.getOrderName()); }
if(bt != null){
bt.setText("Status: "+ o.getOrderStatus());
}
}
return v;
}
}
}
Enjoy!
