반응형
지난번에는 Maven 에서 GWT 프로젝트를 만들어 보았습니다.
[Maven] GWT 프로젝트 만들기
이제는 만들어진 프로젝트를 가지고 GWT 에뮬레이터를 실행시켜보겠습니다.
사실 처음 Maven 을 접했을때는 진입장벽이 있었는데 해보니깐 재미 있네요~~
Maven Plugin 도 기회가 된다면 만들어 보고 싶네요~~
출처 : http://vicki.tistory.com/536
[Maven] GWT 프로젝트 만들기
이제는 만들어진 프로젝트를 가지고 GWT 에뮬레이터를 실행시켜보겠습니다.
지난번에 만들었던 프로젝트에서 조금 바뀌었습니다.
일단 gwt 모듈의 설정파일을 수정합니다.
/kr.co.vicki.gwt.mytodo/src/main/java/kr/co/vicki/gwt/mytodo/Application.gwt.xml
아래와 같이 수정을 해야만 GWT Ext 라이브러리를 사용할 수 있습니다.
일단 gwt 모듈의 설정파일을 수정합니다.
/kr.co.vicki.gwt.mytodo/src/main/java/kr/co/vicki/gwt/mytodo/Application.gwt.xml
 |
아래와 같이 수정을 해야만 GWT Ext 라이브러리를 사용할 수 있습니다.
- <module>
- <!-- Inherit the core Web Toolkit stuff. -->
- <inherits name='com.google.gwt.user.User'/>
- <!-- inherit css based theme -->
- <inherits name='com.google.gwt.user.theme.standard.Standard'/>
- <!-- inherit GWT Ext -->
- <inherits name='com.gwtext.GwtExt'/>
- <!-- Specify the app entry point class. -->
- <entry-point class='kr.co.vicki.gwt.mytodo.client.Application'/>
- <!-- Specify the application specific style sheet. -->
- <stylesheet src='Application.css' />
- <!-- GWT Ext stylesheet and script files -->
- <stylesheet src='js/ext/resources/css/ext-all.css' />
- <script src="js/ext/adapter/ext/ext-base.js"/>
- <script src="js/ext/ext-all.js"/>
- </module>
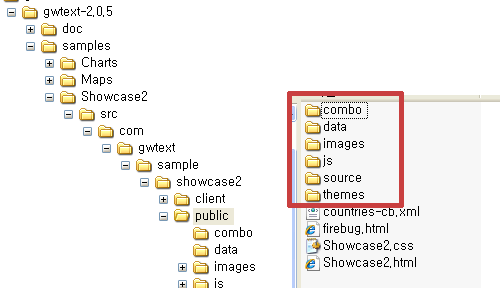
실제로 GWT Ext 에 사용하는 js, css, 이미지 파일들을 복사하는 작업을 해야합니다.
http://gwt-ext.com/download/
다운받은 gwtext-2.0.5.zip 의 압축을 풀고 해당 위치의 디렉토리들을 아래의 경로에 복사합니다.
/kr.co.vicki.gwt.mytodo/src/main/java/kr/co/vicki/gwt/mytodo/public
source 디렉토리는 필요없긴하나~ 검토의 귀차니즘으로 인해~ 그냥 복사함이 편합니다~
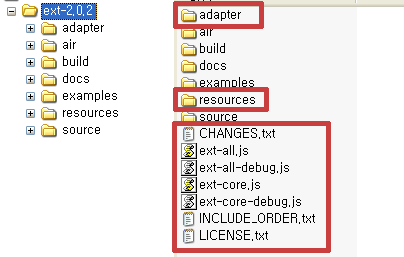
라이센스 문제로 인해 extjs 는 별도로 복사를 해야 합니다. ext-2.0.2.zip 의 압축을 풀고
위와 같은 위치해 해당 파일들과 디렉토리들을 복사합니다.
/kr.co.vicki.gwt.mytodo/src/main/java/kr/co/vicki/gwt/mytodo/public/js/ext
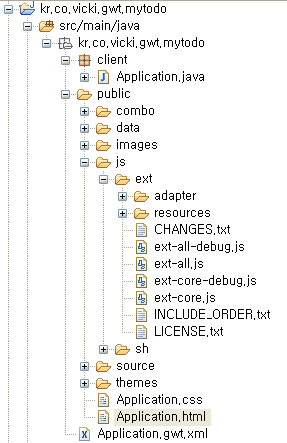
아래와 같이 구성이 되면됩니다.
http://gwt-ext.com/download/
 |
다운받은 gwtext-2.0.5.zip 의 압축을 풀고 해당 위치의 디렉토리들을 아래의 경로에 복사합니다.
/kr.co.vicki.gwt.mytodo/src/main/java/kr/co/vicki/gwt/mytodo/public
source 디렉토리는 필요없긴하나~ 검토의 귀차니즘으로 인해~ 그냥 복사함이 편합니다~
 |
라이센스 문제로 인해 extjs 는 별도로 복사를 해야 합니다. ext-2.0.2.zip 의 압축을 풀고
위와 같은 위치해 해당 파일들과 디렉토리들을 복사합니다.
/kr.co.vicki.gwt.mytodo/src/main/java/kr/co/vicki/gwt/mytodo/public/js/ext
 |
아래와 같이 구성이 되면됩니다.
 |
이제 실제 구현될 파일을 수정해보도록 하겠습니다.
/kr.co.vicki.gwt.mytodo/src/main/java/kr/co/vicki/gwt/mytodo/client/Application.java
이제 에뮬레이터로 확인하는 일만 남았습니다.
프로젝트의 pom.xml 이 있는 위치에 콘솔창을 열고 아래와 같은 명령을 입력합니다.
(http://gwt-maven.googlecode.com/svn/docs/maven-googlewebtoolkit2-plugin/plugin-info.html 참조)
재대로 실행이 되지 않을 것입니다.
http://code.google.com/p/gwt-maven/wiki/M2FAQ 를 참조하여 다시 실행해보겠습니다.
위와 같이 실행이 되면 성공입니다~~~
/kr.co.vicki.gwt.mytodo/src/main/java/kr/co/vicki/gwt/mytodo/client/Application.java
- package kr.co.vicki.gwt.mytodo.client;
- import com.google.gwt.core.client.EntryPoint;
- import com.gwtext.client.core.RegionPosition;
- import com.gwtext.client.widgets.Panel;
- import com.gwtext.client.widgets.Viewport;
- import com.gwtext.client.widgets.layout.BorderLayout;
- import com.gwtext.client.widgets.layout.BorderLayoutData;
- /**
- * Entry point classes define <code>onModuleLoad()</code>.
- */
- public class Application implements EntryPoint {
- /**
- * This is the entry point method.
- */
- public void onModuleLoad() {
- Panel bodyPanel = new Panel();
- bodyPanel.setLayout(new BorderLayout());
- Panel leftPanel = new Panel("메뉴");
- leftPanel.setWidth(250);
- leftPanel.setCollapsible(true);
- leftPanel.setHtml("여기는 메뉴 공간입니다.");
- bodyPanel.add(leftPanel, new BorderLayoutData(RegionPosition.WEST));
- Panel centerPanel = new Panel();
- centerPanel.setHtml("여기는 센터입니다.");
- bodyPanel.add(centerPanel, new BorderLayoutData(RegionPosition.CENTER));
- new Viewport(bodyPanel);
- }
- }
이제 에뮬레이터로 확인하는 일만 남았습니다.
프로젝트의 pom.xml 이 있는 위치에 콘솔창을 열고 아래와 같은 명령을 입력합니다.
(http://gwt-maven.googlecode.com/svn/docs/maven-googlewebtoolkit2-plugin/plugin-info.html 참조)
mvn googlewebtoolkit2:gwt
재대로 실행이 되지 않을 것입니다.
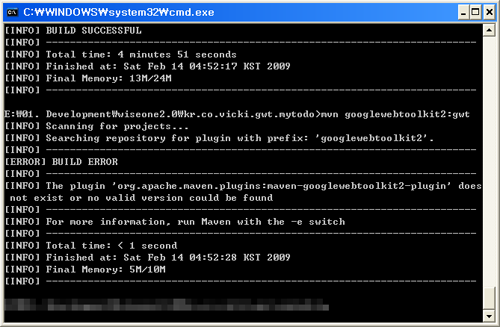 |
http://code.google.com/p/gwt-maven/wiki/M2FAQ 를 참조하여 다시 실행해보겠습니다.
mvn com.totsp.gwt:maven-googlewebtoolkit2-plugin:gwt
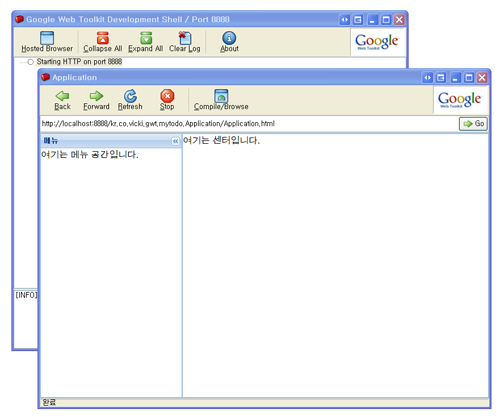 |
위와 같이 실행이 되면 성공입니다~~~
사실 처음 Maven 을 접했을때는 진입장벽이 있었는데 해보니깐 재미 있네요~~
Maven Plugin 도 기회가 된다면 만들어 보고 싶네요~~
출처 : http://vicki.tistory.com/536
