반응형
JavaBeans as datasource in JasperReports
JasperReports is very flexible report generation tool on both beginner as well as enterprise level. It supports many data access mechanisms for retrieving data and rendering to the report like SQL, EJBQL, HSQL, XML, JavaBeans, XPath etc. But here our main focus is on the usage of JavaBeans.
I have divided the whole task of report generation into certain activities as shown below:
1. Create a simple Java Class (JavaBean) with properties and their accessors and mutators.
2. Design a report either manually or you can use IDE like iReports for that, I have used iReports.
3. Compile the report using Java and run it to test whether its working or not.
We will start with step 1:
Create a simple Java Class thats a simple POJO(Plain Old Java Object) its contains the data for the report. You can take any entity for that, I am here taking a simple entity Student and creating a Java file shown below with the name Student.java.
package beansforjasper;
public class Student
{
private String name;
private String roll_no;
private String fathers_name;
private String studying_in;
public String getName() {
return name;
}
public void setName(String name) {
this.name = name;
}
public String getRoll_no() {
return roll_no;
}
public void setRoll_no(String roll_no) {
this.roll_no = roll_no;
}
public String getFathers_name() {
return fathers_name;
}
public void setFathers_name(String fathers_name) {
this.fathers_name = fathers_name;
}
public String getStudying_in() {
return studying_in;
}
public void setStudying_in(String studying_in) {
this.studying_in = studying_in;
}
}
In addition to the above code we have to add a static method that returns a collection. This will be used as datasource for report. I have made a simple static method as follows:
public static Collection getStudentList()
{
Vector students = new Vector();
try
{
Student student = new Student();
student.setRoll_no("101");
student.setName("Steve");
student.setFathers_name("Jack");
student.setStudying_in("I-A");
students.add(student);
student = new Student();
student.setRoll_no("102");
student.setName("Mark");
student.setFathers_name("Henry");
student.setStudying_in("I-A");
students.add(student);
}
catch(Exception ex)
{
System.out.println(ex);
}
return students;
}
Thats all for as far as datasource for report is concerned.
Step 2 (The iReports part):
Create a new report in iReports as show in diagram 1.

Diagram 1
Now create a new datasource by clicking on "Report Datasources" button on toolbar. You will see a window showing the tabular representation of the all existing datasources. Now click on "New" button and you will see datasource types as shown in Diagram 2 below:

Diagram 2
Now select JavaBean set datasource and click on the "Next" button. This will take you to a new window, that will ask you for name, fully qualified class name of the factory class that will generate set and of course the static method thats going to return either Collection or Array of JavaBeans. Be care full to select the radio button specific to the return type of your static method. This is shown in Diagram 3 below:
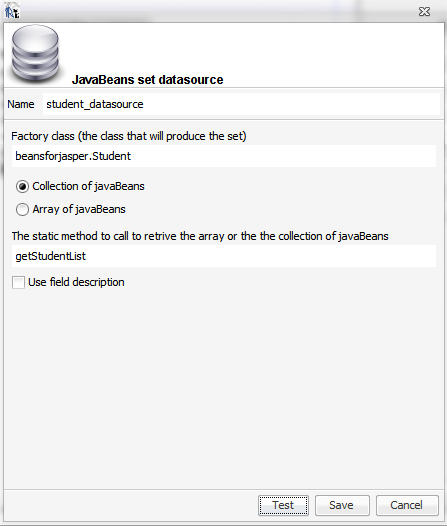
Diagram 3
1. Goto Tools(Menu)>>Options
2. Select iReport tab and then select "Classpath" tab now click on "Add Folder" if you have only class file and add directory containing it else "Add JAR" if you have distributable jar file.
After the classpath is set Now its time to add data fields so that these can be used in our report.
In order to do that Right click the Report Node(Root Node) in the "Report Inspector" and choose "Edit Query" from popup menu. A window will appear choose "JavaBean Datasource" tab in that window as shown below:

Diagram 4
I have created a simple design just to show you how easy it is to create reports with iReport. My sample is shown as Diagram 5.

Diagram 5
This is actually an attemp to show how JavaBeans can be used as datasource for the JasperReports.
Here I have used iReport 3.7.2.
On clicking the preview its generates preview as as shown below in Diagram 6.

Diagram 6
Step 3(Compilation and Test using Java)
To test this demo using a Java program we can use the following code:
public static void main(String[] str)
{
try
{
JasperReport jasperReport = null;
JasperPrint jasperPrint = null;
JasperDesign jasperDesign = null;
Map parameters = new HashMap();
jasperDesign = JRXmlLoader.load("<Path of Report>");
jasperReport = JasperCompileManager.compileReport(jasperDesign);
jasperPrint = JasperFillManager.fillReport(jasperReport, parameters, new JRBeanCollectionDataSource(beansforjasper.Student.getStudentList()));
JasperExportManager.exportReportToPdfFile(jasperPrint,"StudentInfo.pdf");
JasperViewer.viewReport(jasperPrint);
}
catch(Exception ex)
{
System.out.println("EXCEPTION: "+ex);
}
}
This will generate a "StudentInfo.pdf" file and will invoke Jasper report viewer that will show you the generated report.
Remember to put the dependencies at the classpath while running the above program.
