다 아시겠지만 혹시 모르는 분을 위해 정리해 올려봅니다.
==========================================================
| Struts Guide : 스트럿츠 처음 배우기 |
|
스트럿츠를 공부하면서 그 내용들을 스트럿츠를 처음 배우는 사람들의 입장에서 정리해봤습니다.
원래는 회사 동료들을 위해 만들려고 시작한 것이었습니다.
내가 본 스트럿츠 책 대부분(모두 한국어 책들)이 지나치게 숲을 보기를 강조한 경향이 있는 것 같습니다.
커다란 예제 프로그램 하나를 가지고, 스트럿츠의 많은 기능들을 설명하죠. 그래서 각 기능별 예제가
부족해 읽는 순간 순간 스트럿츠의 각 기능 단위로 책의 내용을 이해하기가 좀 껄끄러운 면이 있습니다.
그래서 각 기능별로 조각조각 쪼개서 각 단위마다 모두 예제를 포함하도록 만들었습니다.
각 기능을 모두 예제를 직접 실행해서 확인해보며 진행할 수 있도록 했습니다.
원래는 더 많이 마무리 한 다음에 올려리고 했는데, 갑자기 투입된 프로젝트(스트럿츠와 아무관련없는..)
때문에 한동안 공부가 힘들것 같아서 지금까지 완성한 부분만 올립니다.
부족한 점 있으면 연락주세요. 시간 나는대로 추가해보겠습니다.
--
소스코드 추가하였습니다. StrutsGuide1.zip |
|
|
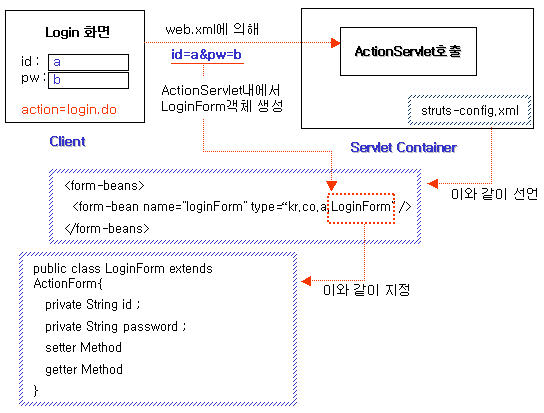
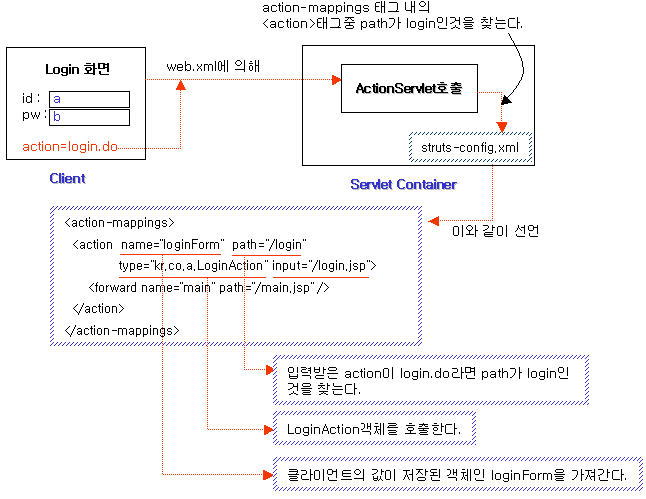
클라이언트로부터 값을 입력받아 해당 아이디와 패스워드가 맞다면,
원하는 페이지로 이동하는 스트러츠 구조는 아래와 같다.
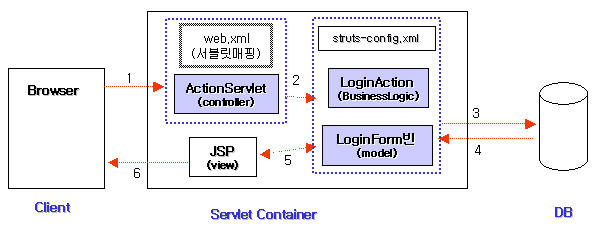
좀더 구체적인 내용을 살펴보자.
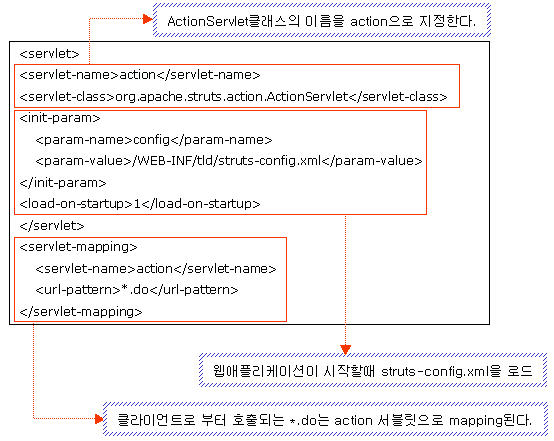
- 웹애플리케이션이 시작할 때 ActionServlet의 init()가 호출되고 web.xml에
- 선언되어 있는대로 struts-config.xml를 로드한다. struts-config.xml은
- Struts프레임워크에서 사용하는 모든 설정 정보를 담고 있는 파일이라고
- 생각하면 된다. config 이름은 꼭 struts-config.xml이 아닌 다른 이름을 가지는
- XML파일이어도 상관없다.
ActionServlet클래스는 struts에서 제공하고 있다.
- 클라이언트가 id와 pw를 입력한 후 submit를 누르면 action=login.do 로
- 이동한다.
web.xml에 *.do 는 전부 org.apache.struts.action.ActionServlet로 이동
- 하게끔 mapping 시켜놨다.
- 클라이언트가 입력한 id와 pw는 ActionForm 클래스를 상속받는 클래스의 객체에
- 자동으로 저장된다.
이러한 형식은 struts-config.xml <form-beans> 태그에 지정한다.
- 클라이언트의 입력값을 저장한 객체를 가지고 어떤 동작을 취할것인가를 지정한
- 부분은 struts-config.xml의 <action-mappings>태그이다. 이 태그에서 지정한
- 클래스로 객체를 전달한다. 해당 클래스는 Action클래스를 상속한 클래스로 DB에
- 직접 연결하는 클래스를 호출하는 부분이 들어 있다.
- 처리한 후 <action> 태그에서 지정한 문서로 mapping한다. 전달하는 클래스의 타입은 ActionForward이다.
작성자 : 진은영
============================================================================
<<간단한 login 예제를 이용한 Struts 흐름 실습>>
-저희도 해봤던 간단한 실습예제입니다-
==========================================================
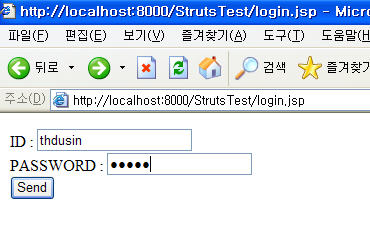
1. login.jsp에서 아이디와 패스워드를 입력하면
login.do(ActionServlet)를 호출
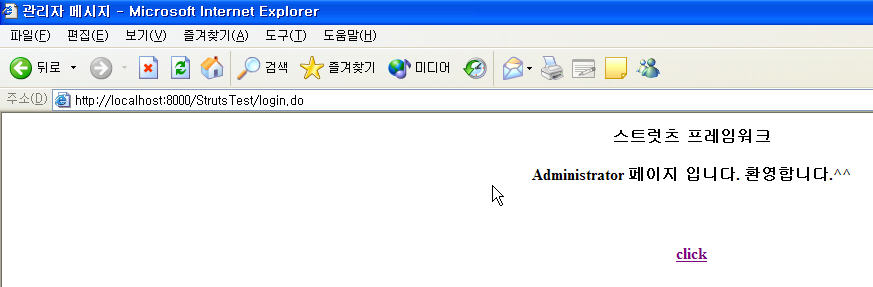
(login.do는 LoginAction의 execute()메소드를 실행하여
아이디와 패스워드가 맞는지 확인하여 일반 사용자이면 main.jsp로 이동,
관리자이면 admin.jsp, 아이디나 패스워드가 맞지 않을 경우, 에러가 발생한
경우에는 error.jsp로 넘어가게 한다.)
|
<%@ page contentType="text/html;charset=utf-8" %>
<html>
<body>
<form action="login.do" mehtod="post">
ID : <input type="text" name="id" value=""> <br>
PASSWORD : <input type="password" name="pwd" value=""><br>
<input type="sumit" value="Send">
</form>
<body>
<html> |
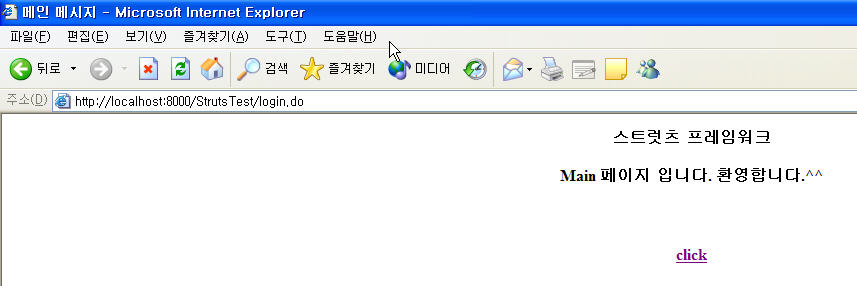
• main.jsp
|
<%@ page contentType="text/html;charset=utf-8"%>
<html>
<head>
<title>메인 메시지</title>
</head>
<body>
<div align="center">
<table width="85%" border="0" cellpadding="0" cellspacing="0">
<tr>
<td align="center"><b>스트럿츠 프레임워크</b></td>
</tr>
</table>
<br>
<table width="85%" border="0" cellspacing="0" cellpadding="0">
<tr>
<td align="center"><b>Main 페이지 입니다. 환영합니다.^^</b></td>
</tr>
<tr>
<td align="center">
<a href="javascript:history.back()"><b>click</b></a></td>
</tr>
</table>
</div>
</body>
</html> |
• admin.jsp
|
<%@ page contentType="text/html;charset=utf-8"%>
<html>
<head>
<title>관리자 메시지</title>
</head>
<body>
<div align="center">
<table width="85%" border="0" cellpadding="0" cellspacing="0">
<tr>
<td align="center"><b>스트럿츠 프레임워크</b></td>
</tr>
</table>
<br>
<table width="85%" border="0" cellspacing="0" cellpadding="0">
<tr>
<td align="center"><b>Administrator 페이지 입니다. 환영합니다.^^</b></td>
</tr>
<tr>
<td align="center">
<a href="javascript:history.back()"><b>click</b></a></td>
</tr>
</table>
</div>
</body>
</html> |
• error.jsp
|
<%@ page isErrorPage="true" contentType="text/html;charset=utf-8"%>
<html>
<head>
<title>에러 메시지</title>
</head>
<body>
<div align="center">
<table width="85%" border="0" cellpadding="0" cellspacing="0">
<tr>
<td align="center"><b>스트럿츠 프레임워크</b></td>
</tr>
</table>
<br>
<table width="85%" border="0" cellspacing="0" cellpadding="0">
<tr>
<td align="center"><b>에러 메시지</b></td>
</tr>
<tr>
<td height="60" align="center">
<%= exception.toString() %>
</td>
</tr>
<tr>
<td align="center">
<a href="javascript:history.back()"><b>click</b></a></td>
</tr>
</table>
</div>
</body>
</html> |
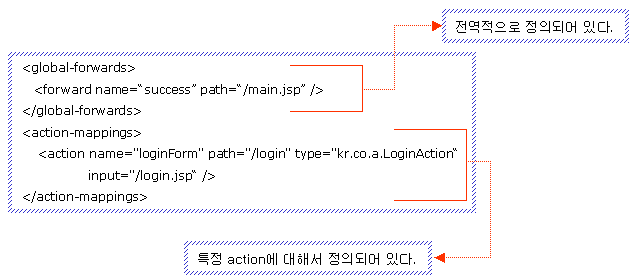
2. 스트럿츠 설정 파일 struts-config.xml에서 액션의 매핑, 메시지 자원의 파일의 지정,
데이터 소스의 설정, 플러그 인 지정 등을 합니다.
• form-bean 요소의 name 속성에는 HTMl입력 폼의 이름, 액션 매핑에서의 name 속성을
지정하며 type 속성에는 전체 클래스명을 지정합니다.
• 액션에서 사용할 포워드 정보의 name 속성이 같은 액션 매핑이 오버라이드 되지 않는 한
액션에 전역적으로 사용됩니다.
• 액션 매핑 설정은 ActionServlet에서 type 속성 클래스의 exeute()메소드를 호출하고 name에는
폼 빈의 이름이 들어가며 scope는 폼 빈이 저장되는 영역을 설정합니다. 그리고
input 속성에는 입력 폼이 있는 페이지를 저장하여 입력값이 유효하지 않거나 에러가
발생할 때 입력 페이지로 이동할 수 있게 합니다.
• 뷰페이지에서 사용할 메시지 자원의 설정은 StrutsTest/WEB-INF/classes/test/struts/messaage
를 참조합니다.
|
<?xml version="1.0" encoding="UTF-8"?>
<!DOCTYPE struts-config PUBLIC "-//Apache Software Foundation//DTD Struts Configuration 1.1//EN"
"http://jakarta.apache.org/struts/dtds/struts-config_1_1.dtd">
<struts-config>
<!-- Form Bean Definitions -->
<form-beans>
<form-bean name="loginForm" type="test.struts.LoginForm" />
</form-beans>
<!-- Global Forward Definitions -->
<global-forwards>
<forward name="login" path="/login.jsp" />
<forward name="main" path="/main.jsp" />
<forward name="error" path="/error.jsp" />
</global-forwards>
<!-- Action Mapping Definitions -->
<action-mappings>
<action path="/login" type="test.struts.LoginAction" scope="request" input="login.jsp">
<forward name="admin" path="/admin.jsp" />
</action>
<action path="/main" forward="/main.jsp" />
<action path="/loginFb" type="test.struts.LoginFbAction" name="loginForm" scope="request"
input="/loginFb.jsp">
<forward name="admin" path="/admin.jsp" />
</action>
</action-mappings>
<message-resources parameter="test.struts.message.ApplicationResources" />
</struts-config> |
☞ 스트럿츠와 관련한 폼 빈 클래스나 Action클래스를 수정하거나 추가할 때는
struts-config.xml 설정 파일을 먼저 수정하고 빈즈 클래스를 변경하여야 합니다.
3. 클라이언트가 입력하는 id, password 정보를 저장하는 클래스
StrutsTest/WEB-INF/src에 저장합니다.
|
package test.struts;
import javax.servlet.http.HttpServletRequest;
import org.apache.struts.action.ActionForm;
import org.apache.struts.action.ActionMapping;
import org.apache.struts.action.ActionErrors;
import org.apache.struts.action.ActionError;
public final class LoginForm extends ActionForm {
private String id;
private String passwd;
public String getId() {
return id;
}
public void setId(String id) {
this.id = id;
}
public String getPasswd() {
return passwd;
}
public void setPasswd(String passwd) {
this.passwd = passwd;
}
/**
* 세션에 저장되어 있는 LoginForm을 초기화한다.
*/
public void reset(ActionMapping mapping, HttpServletRequest request) {
this.id = null;
this.passwd = null;
}
/**
* ID와 패스워드를 4자 이상 입력해야만 에러가 발생하지 않는다.
*/
public ActionErrors validate(ActionMapping mapping,
HttpServletRequest request) {
ActionErrors errors = new ActionErrors();
if (id == null || id.trim().length() < 4) {
errors.add("id", new ActionError("error.id.tooshort"));
}
if (passwd== null || passwd.trim().length() < 4) {
errors.add("password", new ActionError("error.passwd.tooshort"));
}
return errors;
}
} |
4. 클라이언트로부터 입력한 밧을 비교하여 해당 JSP문서로 매핑 처리하는 클래스
StrutsTest/WEB-INF/src에 저장합니다.
|
import javax.servlet.http.HttpServletResponse;
import javax.servlet.http.HttpSession;
import org.apache.struts.action.Action;
import org.apache.struts.action.ActionForm;
import org.apache.struts.action.ActionForward;
import org.apache.struts.action.ActionMapping;
public class LoginAction extends Action {
public ActionForward execute(ActionMapping mapping,
ActionForm form,
HttpServletRequest request,
HttpServletResponse response)
{
String next = "main"; // forward 페이지
String id = request.getParameter("id");
String passwd = request.getParameter("passwd");
try {
String[] idList = {"admin", "thdusin"};
String[] passwdList = {"admin1234", "12345"};
int[] gradeList = {1, 2};
int idx = -1;
for (int i=0; i<idList.length; i++) {
if (idList[i].equals(id)) {
idx = i;
break;
}
}
if (idx > -1) {
if (passwdList[idx].equals(passwd)) {
if (gradeList[idx] == 1)
next = "admin";
UserSession user = new UserSession();
user.setId(id);
user.setGrade(gradeList[idx]);
HttpSession session = request.getSession();
session.setAttribute("user", user);
} else {
throw new Exception("PASSWD NOT MISMATCH");
}
} else {
throw new Exception("ID NOT EXIST");
}
} catch (Exception e) {
e.printStackTrace();
request.setAttribute("javax.servlet.jsp.jspException", e);
next = "error";
}
return mapping.findForward(next);
}
} |
5. 자바 소스를 컴파일 하는 데 사용하는 build.xml 파일
StrutsTest/WEB-INF 디렉토리 아래에 저장합니다.
|
<?xml version="1.0" ?>
<project name="test_struts" basedir="." default="compile">
<property name="dist.servelt.jar" value="C:\eclipse\plugins\org.eclipse.tomcat.4.1.30\servlet.jar"/>
<path id="classpath">
<fileset dir="${basedir}/lib" includes="*.jar"/>
<pathelement location="${dist.servlet.jar}"/>
</path>
<target name="compile">
<echo message="encoding property files..."/>
<native2ascii src="${basedir}/src"
dest="${basedir}/classes"
includes="**/*.properties"/>
<echo message="Compiling the java source files..."/>
<javac srcdir="${basedir}/src"
destdir="${basedir}/classes" debug="on">
<classpath refid="classpath"/>
</javac>
</target>
</project> |
6. 컴파일 and 결과 ^^

 =========================================================================================================
Struts 핵심 클래스
처음 스트러츠를 접한 개발자들은 무엇을 먼저 해야할지 망설이는 경우가 많다. 스트러츠 API를 보면 "왜 그리 많은 패키지와 클래스들이 있는지..", "이것을 언제 다 익힌단 말인가?" 하고 어려워하는 개발자들이 많다. 하지만 스트러츠가 Model 2에 기반하고 있기 때문에 Model 2개발 방식에 대하여 이해하고 있는 개발자들이라면 그 원리를 파악하기란 생각보다 어렵지 않다.
먼저 스트러츠의 중심을 이루고 있는 클래스들의 클래스 다이어그램을 통하여 스트러츠의 전체적인 그림을 한번 그려 보도록 하겠다.
- ActionServlet : MVC 컨트롤러이며 요청 디스패터의 역할을 한다. 스트럿츠
- 프레임워크 내에 단 하나의 서블릿 인스턴스가 존재한다.
- ActionMapping : URL 패턴과 비즈니스 로직(Action)간의 매핑을 표현한다. 입력과 출력 및
- 비즈니스 로직에 기반한 '보내지는'대상을 지정한다.
- ActionForm : MVC모델이다. MVC뷰로부터의 입력을 표현하는 자바빈처럼 작동한다.
- ActionServlet은 자동적으로 빈이 인스턴스화된 이후에 프로퍼티를 지정해 주며, 빈에
- validate()메소드를 가지고 있으면 사용자가 만든 Action클래스를 호출하기 이전에 이
- 메소드를 호출한다. ActionForm은 JSP 뷰를 표현하기 위해 확장되었다.
- ActionForward : 이동할 페이지 정보와 포워드(forward), 리다이렉트(redirect)중 어느 방식으로
- 다음 페이지로 이동할 것인지에 대한 정보를 담고 있다.
- Action : 비즈니스 로직을 나타내며 MVC모델이다. 특정한 요청에 대한 비즈니스
- 로직을 처리하기 위해 확장된다. 예를 들어 /login URI를 위해 LoginAction을 만든다.
① ActionServlet
처음으로 논의할 스트럿츠 프레임워크의 컴포넌트는 ActionServlet이다.
org.apache.struts.action
패키지에 있는
ActionServlet은 추상클래스인 javax.servlet.HttpServlet 추상클래스를 상속받았다.
클라이언트로 부터 호출 받으면 가장 먼저 호출되는 클래스이다.
- process() : doGet() 이나 doPost()로부터 요청과 응답을 넘겨받는다. process()메소드는
- 요청을 처리하기 위해, ActionServlet안에 있는 다른 메소드를 호출한다. process()메소드는
- 요청을 처리하기 위해, ActionServlet안에 있는 다른 메소드를 호출한다. 여기에서는 중요한
- 9개의 메소드를 살펴볼 것이다.
- processPath() : 요청 URI 인자에서 접미사나 접두사를 제거하여 URI를 추출한다.
- 예를 들어, /login.do라면 /login을 반환한다.
- processLocale() : Locale이 요청에 설정되어 있으면 검사하고, 없으면 하나 만들어서
- 세션에 저장한다.
- processMapping() : ActionMapping객체를 얻기 위해 path를 키로 이용한다. 만약 path가
- 맞는 ActionMapping객체가 ActionMappings collection안에 있으면 process()메소드로 반환된다.
- processActionForm() : ActionMapping의 name속성을 이용하여 이런 종류의 ActionForm이
- 이미 만들어졌는지를 확인한다. 그렇다면, 그 ActionForm이 process()메소드로 반환되며,
- 그렇지 않으면 ActionMapping에 정의된 새로운 ActionForm을 만들어서 반환한다.
- processPopulate() : ActionForm내에 ActionServlet의 참조를 설정하며, ActionForm()의
- reset()메소드를 호출하여 값들을 디폴트 값으로 만든다.
- processValidate() : ActionForm에 확인작업이 필요한지를 검사한다.
- processActionCreate() : ActionMapping과 연결된 Action클래스를 반환한다. 이 메소드는
- Action컬렉션에서원하는 Action클래스의 인스턴스가 있는지를 검사하고, 만약 있으면 이를
- 반환하며, 없으면 새로운 Action 클래스의 객체를 만들고 이를 Action컬렉션에 저장하며,
- 이에 대한 참조를 반환한다. 반환된 Action클래스는 요청 URI에 매핑되며, 요청을 처리하는
- 비즈니스 로직을 가지고 있다.
- processActionPerform() : processActionCreate()에서 반환된 Action객체의 perform()메소드가
- 호출된다. 비즈니스 로직을 수행한 후에, Action객체는 ActionServlet이 요청을 보낼 타겟을
- 가지고 있는 ActionMapping을 반환한다.
- processActionForward() : RequestDispatcher나 Request.sendRedirect()를 이용하여 원하는
- 뷰를 만들고, 요청을 ActionServlet에 의해 완전히 처리한다.
- initApplication() : 애플리케이션을 위해 MessageResource를 로딩한다.
- initMapping() : ActionServlet에 pageckage.ClassforName을 등록하도록 한다. formBean의 디폴트 클래스는 org.apache.struts.action.ActionFormBean이다.
- initDigester() : org.apache.struts.digester.Digester클래스를 써어 struts-config.xml 파일로부터 설정을 읽어들인다.
- initOter() : 초기화에 필요한 작업을 처리한다. struts-config.xml에 있는 initOther()는 content , locale , cache를 찾는다.
② ActionMapping
비즈니스 로직을 처리할 Action클래스에 요청을 보내기 위해 ActionServlet이 알아야 할 처리 정보를 가지고 있다.
ActionMapping은 <action-mappings> 요소 내의 <action>정보를 이용하여 만들어진다.
<action-mappings> <action name="loginForm" path="/login" type="kr.co.a.LoginAction"
input="/login.jsp"> </action> </action-mappings>
/login의 경로를 가진 요청을 받으면, 액션 클래스는 LoginAction이고, 입력은 loginForm이 표현하며 입력 폼의
경로는 /login.jsp라는 것을 의미한다.
-
name : 이 액션이 사용할 struts-config.xml에 정의된 폼 빈의 이름
-
path : 이 매핑을 선택하는 데 매칭되는 요청 URI. URI는 '/'로 시작해야 한다.
-
type : 이 매핑에서 사용되는 Action 구현의 완전한 자바 클래스 이름
-
input : 입력 페이지를 매핑한다. ActionServlet이 ActionForm의 확인작업을 수행하는데, 만일
-
에러가 있다면 input변수가 forward나 sendRedirect의 목표가 될 것이다.
③ ActionForm
ActionForm클래스는 struts-config.xml에 의해 정의된다.
<form-beans> <form-bean name="loginForm" type="kr.co.a.LoginForm" /> </form-beans>
모든 ActionForm 구현은 <form-beans>태그의 몸체에 등록되어야 한다. ActionForm이 추상 클래스이므로,
개발자는 이를 확장하여 사용자의 입력 데이터를 저장하는 클래스를 만들어야 한다.
④ Action
어떤 URI에 특정 액션을 제공하기 위해 확장된다. 이것의 목적은 요청을 위한 비즈니스 로직을 실행하는 것이다.
Action클래스는 ActionServlet에 의해 인스턴스로 만들어진다. Action클래스는 기본 Locale을 저장하며,
애플리케이션에 대한 MessageResources의 참조를 저장한다.
⑤ ActionForward
ActionForward클래스는 struts-config.xml 파일에서 설정된다. 두 종류의 ActionForward가 있다.
참고문헌
작성자 : 진은영
======================================================================================================
struts에서 공통 폼빈(formbean) 및 파일업로드 쓰기
아래의 내용은 여기에 올라와 있는 것과 유사한것입니다.
그런데. 이번에는 파일 업로드 부분이 추가 되었습니다.
form type이 mutilpart 일경우에. request에서 getParameter로
파라메터를 못 가져오더군요.
그래서 한참을 찾은 것이. CommonsMultipartRequestHandler 클래스를 이용해서
해결했습니다.
또한 파일을 여기 Action에서 가져가서 따른 Action으로 넘길때. 메모리의 공간을 찾이 할꺼
같아서. 여기서 바로 템프 디렉토리에 저장을 한 다음 파일 명과, 파일의 크기를 넘겨 주는
방식을 취했습니다.
참고 하실 것이 있으면 참고 하세요.
/*
* 파일명 : BaseAction.java
* 버 젼 : 1.0
* 저작권 :
* 설 명 : 공통 Action 처리
*/
package ad.com.action;
import java.util.Enumeration;
import java.util.Vector;
import java.util.Hashtable;
import javax.servlet.http.HttpServletRequest;
import javax.servlet.http.HttpServletResponse;
import javax.servlet.http.HttpSession;
import javax.servlet.http.Cookie;
import org.apache.struts.action.Action;
import org.apache.struts.action.ActionForm;
import org.apache.struts.action.ActionForward;
import org.apache.struts.action.ActionMapping;
import org.apache.struts.action.RequestProcessor;
import org.apache.struts.upload.FormFile;
import org.apache.struts.upload.CommonsMultipartRequestHandler;
import java.io.FileOutputStream;
import java.io.File;
import java.io.InputStream;
import java.io.OutputStream;
import java.io.BufferedOutputStream;
import org.apache.commons.fileupload.FileItem;
import ad.com.form.BaseForm;
import ad.util.common.ReturnResult;
import ad.util.common.Constant;
/**
* <pre>
* 공통 Action 처리
* 세션처리
* 폼빈처리
* [관련항목]
*
* [사용법]
*
* [변경기록]
*
* </pre>
* @author Copyright(c) 2004-05 by KSC. All right reserved.
* @version 1.0
* @see ad.util.common.ReturnResult
* @see ad.com.form.BaseForm
* @since 1.1
*/
public abstract class BaseAction extends Action
{
/**
* Description : Action Servlet 에서 호출
* @param ActionMapping mapping
* @param ActionForm form
* @param HttpServletRequest request
* @param HttpServletResponse response
* @return ActionForward
* @exception Exception - doExecute 수행
*/
public ActionForward execute (
ActionMapping mapping,
ActionForm form,
HttpServletRequest request,
HttpServletResponse response
) throws Exception
{
/**
* 공통 Form Bean
*/
BaseForm lo_BaseForm = null;
/**
* content Type
*/
String contentType = null;
/**
* HttpServletRequest
*/
HttpServletRequest req = null;
CommonsMultipartRequestHandler mRhdl = null;
try
{
contentType = request.getContentType();
/**
* 사용자 로그인 여부 체크
*/
if (!CookieCheck(request) )
{
return mapping.findForward("login");
}
/**
* contentType 이 multipart/form-data 인지 구분
*/
if ( (contentType != null) && contentType.startsWith("multipart/"))
{
/**
* Request parser
*/
req = request;
mRhdl = new CommonsMultipartRequestHandler();
mRhdl.handleRequest(req);
lo_BaseForm = getFileitems( mRhdl, getCookieValue(req, getEdtValue ( getFormValue(req) ))) ;
/**
* 업로드 파일 삭제처리(임시 데이터)
*/
mRhdl.rollback();
}
else
{
req = request;
lo_BaseForm = getCookieValue(req, getEdtValue ( getFormValue(req) )) ;
}
return doExecute(mapping, form, req, response, lo_BaseForm);
}
catch (Exception e)
{
System.out.println("Exception :: Base Action ["+e.getMessage()+"]");
return doExecute(mapping, form, request, response, null);
}
}
/**
* Description : request에서 폼의 이름과 값을 가져온다.
* @param HttpServletRequest req
* @return BaseForm
* @exception Exception return null
*/
private BaseForm getFormValue(HttpServletRequest req )
{
Enumeration lo_getParam = null;
String ls_Param = "";
String ls_Value = "";
BaseForm lo_BForm = null;
try
{
lo_BForm = new BaseForm();
lo_getParam = req.getParameterNames();
if (lo_getParam != null )
{
for ( ; lo_getParam.hasMoreElements() ;)
{
ls_Param = (String)lo_getParam.nextElement() ;
ls_Value = req.getParameter(ls_Param);
lo_BForm.setParam(ls_Param, ls_Value);
}
return lo_BForm;
}
else
{
return null;
}
}
catch (Exception e)
{
System.out.println("Exception :: BaseAction :: getFormValue ["+e.getMessage()+"]");
return null;
}
}
/**
* Description : 에디터 테이블의 데이터를 ReturnResult 형태로 변환 하여
* edtList 의 키 값으로 넣는다.
* @param BaseForm lo_BaseForm
* @return BaseForm
* @exception Exception return BaseForm
*/
private BaseForm getEdtValue ( BaseForm lo_BaseForm ){
ReturnResult lo_retRst = null;
BaseForm lo_BF = null;
String ls_edtList = "";
String ls_edtValue = "";
String [] la_edtRowval = null;
String [] la_edtColval = null;
String [] la_edtList = null;
int li_idx = 0;
Vector lo_lstVt = new Vector();
try
{
ls_edtList = lo_BaseForm.getParam("edtlist" ) != null ? lo_BaseForm.getParam("edtlist" ) : "";
ls_edtValue = lo_BaseForm.getParam("edtvalue") != null ? lo_BaseForm.getParam("edtvalue") : "";
if ( (!ls_edtList.trim().equals(""))
&& (!ls_edtValue.trim().equals(""))
)
{
la_edtList = ls_edtList.trim().toUpperCase().split(";");
la_edtRowval = ls_edtValue.split("@");
for ( li_idx = 0 ; li_idx < la_edtRowval.length ; li_idx ++)
{
la_edtColval = la_edtRowval[li_idx].split(";");
lo_lstVt.addElement(la_edtColval);
}
lo_retRst = new ReturnResult (lo_lstVt, la_edtList) ;
lo_BaseForm.setParam ( "edtList" , lo_retRst);
lo_BF = lo_BaseForm;
}
else
{
lo_BF = lo_BaseForm;
}
}
catch ( Exception e )
{
System.out.println(" Exception :: BaseAction :: getEdtValue ["+e.getMessage()+"]");
}
return lo_BF;
}
/**
* Description : 로그인 여부 체크
* @param HttpServletRequest request
* @return boolean
* @exception Exception return false
*/
private boolean CookieCheck ( HttpServletRequest request ){
int li_Loop = 0;
String ls_userid = "";
Cookie[] lo_Cookie = request.getCookies();
boolean lb_chk = false;
try
{
for(li_Loop = 0 ; li_Loop < lo_Cookie.length ; li_Loop ++)
{
if (lo_Cookie[li_Loop].getName().equals("PK_USERID"))
{ // 시스템 계정
ls_userid = lo_Cookie[li_Loop].getValue();
break;
}
}
if (ls_userid.trim().equals("") )
{
lb_chk = false;
}
else
{
lb_chk = true;
}
return lb_chk;
}
catch ( Exception e )
{
System.out.println(" Exception :: BaseAction :: CookieCheck ["+e.getMessage()+"]");
}
return lb_chk;
}
/**
* Description : 쿠키 값을 Form Bean 에 저장
* @param HttpServletRequest request
* @param BaseForm lo_BaseForm
* @return BaseForm lo_BaseForm
* @exception none
*/
private BaseForm getCookieValue ( HttpServletRequest request, BaseForm lo_BaseForm )
{
int li_Loop = 0;
Cookie[] lo_Cookie = request.getCookies();
try
{
for(li_Loop = 0 ; li_Loop < lo_Cookie.length ; li_Loop ++)
{
if (lo_Cookie[li_Loop].getName().equals("PK_USERID"))
{
lo_BaseForm.setParam ( "gs_userid" , lo_Cookie[li_Loop].getValue());
continue;
}
else if (lo_Cookie[li_Loop].getName().equals("PK_USERNM"))
{
lo_BaseForm.setParam ( "gs_usernm" , lo_Cookie[li_Loop].getValue());
continue;
}
else if (lo_Cookie[li_Loop].getName().equals("PK_DEPTCD"))
{
lo_BaseForm.setParam ( "gs_deptcd" , lo_Cookie[li_Loop].getValue());
continue;
}
else if (lo_Cookie[li_Loop].getName().equals("PK_DEPTNM"))
{
lo_BaseForm.setParam ( "gs_deptnm" , lo_Cookie[li_Loop].getValue());
continue;
}
else if (lo_Cookie[li_Loop].getName().equals("PK_WORKDT"))
{
lo_BaseForm.setParam ( "gs_workdt" , lo_Cookie[li_Loop].getValue());
continue;
}
else if (lo_Cookie[li_Loop].getName().equals("PK_WORKS"))
{
lo_BaseForm.setParam ( "gs_works" , lo_Cookie[li_Loop].getValue());
continue;
}
else if (lo_Cookie[li_Loop].getName().equals("PK_WORKSNM"))
{
lo_BaseForm.setParam ( "gs_worksnm" , lo_Cookie[li_Loop].getValue());
continue;
}
else if (lo_Cookie[li_Loop].getName().equals("PK_CLIENTIP"))
{
lo_BaseForm.setParam ( "gs_clientip" , lo_Cookie[li_Loop].getValue());
continue;
}
}
} catch ( Exception e ){
System.out.println(" Exception :: BaseAction :: getCookieValue ["+e.getMessage()+"]");
}
return lo_BaseForm;
}
/**
* Description : 파일 명과 파일 크기를 Form Bean 에 저장
* @param HttpServletRequest request
* @param BaseForm lo_BaseForm
* @return BaseForm lo_BaseForm
* @exception Exception return BaseForm
*/
private BaseForm getFileitems ( CommonsMultipartRequestHandler cMRH, BaseForm lo_BaseForm )
{
Enumeration oFileNames = null;
Hashtable oFileItems = null;
String sFileObjName = null;
String sFileName = null;
FormFile oFileItem = null;
File oCFile = null;
int nFileSize = -1;
try
{
/**
* 파일 Object HashTable
*/
oFileItems = cMRH.getFileElements();
if ( oFileItems != null)
{
/**
* 파일 Object Form Name
*/
oFileNames = oFileItems.keys();
if (oFileNames != null)
{
for ( ; oFileNames.hasMoreElements() ; )
{
sFileObjName = (String) oFileNames.nextElement();
/**
* 파일
*/
oFileItem = (FormFile) oFileItems.get(sFileObjName) ;
if ( oFileItem == null) continue;
sFileName = oFileItem.getFileName();
nFileSize = oFileItem.getFileSize() ;
System.out.println("BaseAction :: getFileName ::sFileName ["+ sFileName+"]");
System.out.println("BaseAction :: getFileName ::nFileSize ["+ nFileSize+"]");
lo_BaseForm.setParam(sFileObjName , sFileName );
/**
* 파일 크기 10 M
*/
if ( (nFileSize > (10 * 1024000)) )
{
/**
* 파일 용량 초과 및 파일이 존재하지 않을 경우
*/
lo_BaseForm.setParam(sFileObjName+"_size" , "-1" );
continue;
}
/**
* 파일 크기 0M 제외
*/
if ( (nFileSize <= 0 ) )
{
/**
* 파일 용량 초과 및 파일이 존재하지 않을 경우
*/
lo_BaseForm.setParam(sFileObjName+"_size" , "0" );
continue;
}
InputStream stream = oFileItem.getInputStream();
oCFile = new File (Constant.TEMP_DIR + sFileName.trim());
OutputStream bos = new BufferedOutputStream(new FileOutputStream(oCFile));
int bytesRead = 0;
byte[] buffer = new byte[8192];
while ((bytesRead = stream.read(buffer, 0, 8192)) != -1) {
bos.write(buffer, 0, bytesRead);
}
bos.close();
lo_BaseForm.setParam(sFileObjName+"_size" , new Integer(nFileSize).toString() );
stream.close();
}
}
}
}
catch (Exception e)
{
System.out.println(" Exception :: BaseAction :: getFileitems ["+e.getMessage()+"]");
}
return lo_BaseForm;
}
/**
* Description : BaseAction클래스를 상속하는 클래스들이 구현해야할 메써드.
* @param ActionMapping mapping,
* @param ActionForm form,
* @param HttpServletRequest request,
* @param HttpServletResponse response,
* @param BaseForm oTmpMap
* @return ActionForward
* @exception none
*/
protected abstract ActionForward doExecute(
ActionMapping mapping,
ActionForm form,
HttpServletRequest request,
HttpServletResponse response,
BaseForm oTmpMap
) throws Exception;
==============================================================================================
파일업로드 예제
net.sung2li.file.action.FileAction.java-----------------
/*
* 작성된 날짜: 2006. 1. 23
*
* 프로젝트명 : test
* 페키지명 : net.sung2li.file.action
* 파일명 : FileAction.java
* ------------------------------------------
* 수정일자 :
* 수정내용 :
* 수정자 :
*/
package net.sung2li.file.action;
import java.io.BufferedOutputStream;
import java.io.File;
import java.io.FileOutputStream;
import java.io.IOException;
import java.io.InputStream;
import java.io.OutputStream;
import java.text.SimpleDateFormat;
import java.util.Date;
import javax.servlet.http.HttpServletRequest;
import javax.servlet.http.HttpServletResponse;
import net.sung2li.file.form.FileForm;
import org.apache.struts.action.Action;
import org.apache.struts.action.ActionForm;
import org.apache.struts.action.ActionForward;
import org.apache.struts.action.ActionMapping;
/**
* @author 장성일
*
* 파일 업로드 테스트
*
*/
public class FileAction extends Action {
/* (비Javadoc)
* @see org.apache.struts.action.Action#execute(org.apache.struts.action.
ActionMapping, org.apache.struts.action.ActionForm, javax.servlet.http.HttpServletRequest, javax.servlet.http.HttpServletResponse)
*/
public ActionForward execute(
ActionMapping arg0,
ActionForm arg1,
HttpServletRequest arg2,
HttpServletResponse arg3)
throws Exception {
FileForm fileform = (FileForm) arg1;
String result;
try{
//Create an input stream to read the file.
InputStream in = fileform.getFile().getInputStream();
//파일의 중복처리 문제로 파일앞에 날짜를 붙여서 저장
Date date = new Date();
SimpleDateFormat sdf = new SimpleDateFormat("yyyyMMddHHmmss");
result = sdf.format(date)+System.currentTimeMillis();
File file = new File("d:\\"+result); //저장경로
OutputStream os = new BufferedOutputStream(new FileOutputStream(file));
int i;
byte[] buffer = new byte[1024*4]; //4kbytes
while((i=in.read(buffer, 0, 1024*4)) != -1){
os.write(buffer, 0, i);
}
//Close the output stream.
os.close();
//Close the input stream.
in.close();
}catch(IOException e){
e.printStackTrace();
result = null;
}
return null;
}
}
net.sung2li.file.form.FileForm.java-----------------
/*
* 작성된 날짜: 2006. 1. 23
*
* 프로젝트명 : test
* 페키지명 : net.sung2li.file.form
* 파일명 : FileForm.java
* ------------------------------------------
* 수정일자 :
* 수정내용 :
* 수정자 :
*/
package net.sung2li.file.form;
import org.apache.struts.action.ActionForm;
import org.apache.struts.upload.FormFile;
/**
* @author 장성일
*
* 파일 업로드 테스트
*
*/
public class FileForm extends ActionForm {
private FormFile file;
/**
* @return
*/
public FormFile getFile() {
return file;
}
/**
* @param file
*/
public void setFile(FormFile file) {
this.file = file;
}
}
index.jsp----------------------
<%@ page language="java" pageEncoding="EUC-KR" %>
<!DOCTYPE HTML PUBLIC "-//w3c//dtd html 4.0 transitional//en">
<html>
<head>
<title>파일</title>
</head>
<body bgcolor="#FFFFFF">
<form name="f" action="./file.do" method="post" enctype="multipart/form-data">
<input type="file" name="file" value="1" /><br />
<input type="submit" />
</form>
</body>
</html>
/WEB-INF/struts-config.xml----------------
<?xml version="1.0" encoding="ISO-8859-1" ?>
<!DOCTYPE struts-config PUBLIC
"-//Apache Software Foundation//DTD Struts Configuration 1.2//EN"
"http://jakarta.apache.org/struts/dtds/struts-config_1_2.dtd">
<struts-config>
<form-beans>
<form-bean type="net.sung2li.file.form.FileForm" name="fileForm" />
</form-beans>
<action-mappings>
<action path="/file" type="net.sung2li.file.action.FileAction" name="fileForm" scope="request" />
</action-mappings>
</struts-config>
=========================================================================================
[간단소스]
//struts-config.xml
<form-beans type="org.apache.struts.action.ActionFormBean">
<form-bean name="uploadForm" type="local.struts.upload.UploadForm"/>
</form-beans>
<global-forwards type="org.apache.struts.action.ActionForward">
<forward name="upload_ok" path="/upload_ok.jsp" />
</global-forwards>
<action-mappings type="org.apache.struts.action.ActionMapping">
<action
input="/upload.jsp"
name="uploadForm"
path="/uploadPersist"
type="local.struts.upload.UploadAction"
validate="false" />
</action-mappings>
//UploadForm.java
package local.struts.upload;
import javax.servlet.http.HttpServletRequest;
import org.apache.struts.action.ActionForm;
import org.apache.struts.action.ActionMapping;
import org.apache.struts.upload.FormFile;
public class UploadForm extends ActionForm {
/**
*
*/
private static final long serialVersionUID = 1L;
private FormFile upFile = null;
public void reset(ActionMapping mapping, HttpServletRequest request) {
upFile = null;
}
public FormFile getUpFile() {
return upFile;
}
public void setUpFile(FormFile upFile) {
this.upFile = upFile;
}
}
//UploadAction.java
package local.struts.upload;
import java.io.FileOutputStream;
import java.io.InputStream;
import java.io.OutputStream;
import javax.servlet.http.HttpServletRequest;
import javax.servlet.http.HttpServletResponse;
import org.apache.struts.upload.FormFile;
import org.apache.struts.action.Action;
import org.apache.struts.action.ActionForm;
import org.apache.struts.action.ActionForward;
import org.apache.struts.action.ActionMapping;
public class UploadAction extends Action {
public ActionForward execute(
ActionMapping mapping,
ActionForm form,
HttpServletRequest request,
HttpServletResponse response) throws Exception {
FormFile upFile = ((UploadForm)form).getUpFile();
InputStream stream = upFile.getInputStream();
String path = "C:/javawork/Tomcat4.1/webapps/struts/upload/";
OutputStream bos = new FileOutputStream( path + upFile.getFileName() );
int bytesRead = 0;
byte[] buffer = new byte[8192];
while ((bytesRead = stream.read(buffer, 0, 8192)) != -1)
{
bos.write(buffer, 0, bytesRead);
}
bos.close();
stream.close();
return (mapping.findForward( "upload_ok" ));
}
}
//upload.jsp
<html>
<body>
<form name=upload action=uploadPersist.do method=post enctype="multipart/form-data">
file:<input type=file name=upFile>
<BR>
<input type=submit>
</form>
</body>
</html>
========================================================================================
스트러츠 왕초보가 써보기
samplestruts.zip
흠.. 요즘 바빠설..쩝... 내 프로젝트에 참여한다고 맘먹은 친구가 있는데..
내글과 소스를 보기만 했단다.. 이해를 해야쥐..
넘 어렵다고.. 처음부터 방법을 가르쳐 달라고..
그래서 이렇게 글을 쓴다.
여기서 struts 를 받는다.
http://jakarta.apache.org/site/binindex.cgi
받은 다음 압축을 풀면 그안에 lib 밑에 *.jar 파일과 *.tld 등등이 있다.
이 파일들이 있어야 struts 를 사용할 수 있다.
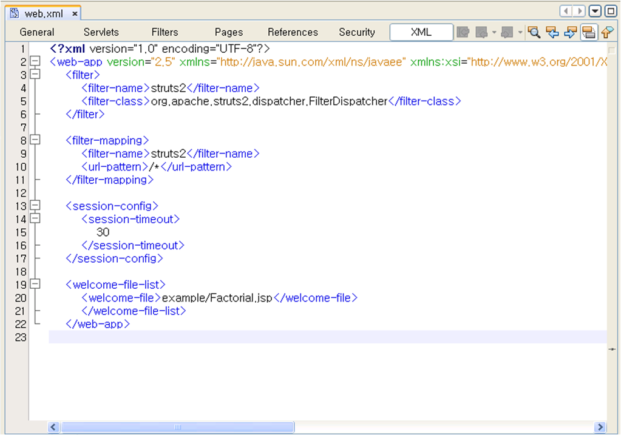
이제 톰켓에 컨텍스트를 만들고 WEB-INF 밑에 web.xml에 아래와 같이 만들어 준다.
web.xml ===============================================================================
<?xml version="1.0" encoding="UTF-8"?>
<!DOCTYPE web-app PUBLIC "-//Sun Microsystems, Inc.//DTD Web Application 2.3//EN" "http://java.sun.com/j2ee/dtds/web-app_2_3.dtd">
<web-app>
<servlet>
<servlet-name>action</servlet-name>
<servlet-class>org.apache.struts.action.ActionServlet</servlet-class>
<init-param>
<param-name>config</param-name>
<param-value>/WEB-INF/struts-config.xml</param-value>
</init-param>
<init-param>
<param-name>debug</param-name>
<param-value>3</param-value>
</init-param>
<init-param>
<param-name>detail</param-name>
<param-value>3</param-value>
</init-param>
<load-on-startup>1</load-on-startup>
</servlet>
<servlet-mapping>
<servlet-name>action</servlet-name>
<url-pattern>*.do</url-pattern>
</servlet-mapping>
</web-app>
web.xml ===============================================================================
위와 같이 struts를 사용한다고 web.xml 에 만들었다면 이제 그에 관련된 Action 클래스와
ActionForm 를 만들어준다.
sampleForm============================================================================
package sung2li.struts.form;
import org.apache.struts.action.ActionForm;
public class SampleForm extends ActionForm {
private String hi = "hi";
//setXXX, getXXX는 input form의 name과 반드시 동일하게 맞춰준다.
public String getHi() {
return hi;
}
public void setHi(String hi) {
this.hi = hi;
}
}
sampleForm============================================================================
sampleAction===========================================================================
package sung2li.struts.action;
import javax.servlet.http.HttpServletRequest;
import javax.servlet.http.HttpServletResponse;
import org.apache.struts.action.Action;
import org.apache.struts.action.ActionForm;
import org.apache.struts.action.ActionForward;
import org.apache.struts.action.ActionMapping;
import sung2li.struts.form.SampleForm;
public class SampleAction extends Action {
public ActionForward execute(
ActionMapping mapping,
ActionForm form,
HttpServletRequest request,
HttpServletResponse response)
throws Exception {
//ActoinForm에 input form 에서 입력한 데이터가 자동으로 들어간다.
// 그 ActionForm 을 위에서 만든 sampleForm 에 넣어준다.
SampleForm sampleForm = (SampleForm) form;
request.setAttribute("hi", sampleForm.getHi());
//포워드 시키는 부분이다. 이 포워드는 아래서 만들 struts-config.xml에 정의된
//path로 이동한다.
return mapping.findForward("result");
}
}
sampleAction===========================================================================
이제 필요한 클래스를 만들었으니 입력 페이지와 결과 페이지를 만든다.
index.jsp===============================================================================
<html>
<head>
<title>sung2li - sample struts</title>
</head>
<body>
<!--
폼 액션 부분에 아래와 같이 해준다.
sample.do 역시 아래서 만든 struts-config.xml 에 정의된다.
-->
<form action="/samplestruts/sample.do">
<input type="text" name="hi"></br>
<input type="submit">
</form>
<body>
</html>
index.jsp===============================================================================
result.jsp===============================================================================
<%@ page language="java" pageEncoding="EUC-KR" %>
<!DOCTYPE HTML PUBLIC "-//w3c//dtd html 4.0 transitional//en">
<html>
<head>
<title>sung2li - sample struts</title>
</head>
<body bgcolor="#FFFFFF">
<%=request.getAttribute("hi")%>
</body>
</html>
result.jsp===============================================================================
struts-config.xml =======================================================================
<?xml version="1.0" encoding="UTF-8"?>
<!DOCTYPE struts-config PUBLIC "-//Apache Software Foundation//DTD Struts Configuration 1.1//EN" "http://jakarta.apache.org/struts/dtds/struts-config_1_1.dtd">
<struts-config>
<!-- ========== Data Source Configuration =============================== -->
<data-sources />
<!-- ========== Form Bean Definitions ================================== -->
<!-- 이전에 만든 sampleForm.java 를 폼빈으로 사용하겠다고 선언한 부분이다. -->
<form-beans>
<form-bean name="sampleForm" type="sung2li.struts.form.SampleForm">
<form-property name="hi" type="java.lang.String" initial="hi" />
</form-bean>
</form-beans>
<!-- ========== Global Exception Definitions ============================== -->
<global-exceptions />
<!-- ========== Global Forward Definitions =============================== -->
<global-forwards />
<!-- ========== Action Mapping Definitions =============================== -->
<!-- 이전에 만든 sampleAction.java 를 사용하겠다고 선언한 부분이다. -->
<action-mappings>
<action
attribute="sampleForm"
input="/input.jsp"
name="sampleForm"
path="/sample"
type="sung2li.struts.action.SampleAction">
<!-- return mapping.findForward("result"); 이부분의 포워드 선언 이다. -->
<forward name="result" path="/result.jsp" />
</action>
</action-mappings>
<!-- ========== Controller Configuration ================================ -->
<controller />
<!-- ========== Message Resources Definitions ============================ -->
<message-resources parameter="sung2li.struts.ApplicationResources" />
<!-- ========== Plug Ins Configuration ================================= -->
</struts-config>
struts-config.xml =======================================================================
이렇게 셋팅한다음에 실행해 보면 된다..ㅡ.ㅡ;; 너무 간단하다고 무책임 한거 아니냐고 생각하지
말아라. 나 잠못자고 만들어서 지금 제정신 아니다.
단순히 샘플이니 어떻게 움직이는 지를 설명한 것이다.
더많은 정보를 얻으려면 http://jakarta.apache.org/struts/index.html 에서 찾아보도록..
위 설명을 위해 만든 소스를 첨부 했으니 읽어보지만 말고 이해해라~~


 struts-1.1-guide.pdf
 StrutsGuide1.zip
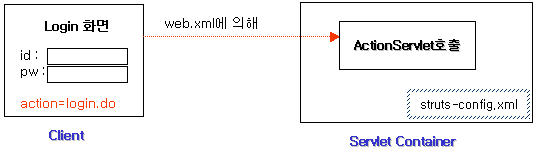


 이올린에 북마크하기


 ojdbc14.jar


