51.Struts22010. 8. 26. 15:09
반응형

FreeMarker

# 이 문서는 오라클클럽에서 작성하였습니다.
# 이 문서를 다른 블로그나 홈페이지에 게재하실 경우에는 출처를 꼭 밝혀 주시면 고맙겠습니다.~^^
# 출처 : http://www.gurubee.net/display/SWDEV/FreeMarker?


3.1 FreeMarker


* 아래 내용은 http://blog.daum.net/younwoomom/6685378 의 내용을 정리한 자료 입니다.

Freemarker 사용법

1. @macro

프리마커 템플릿 전역에서 공통으로 사용되는 UI 디펜던트한 함수는 매크로로 만들어 여러 ftl에서 사용할 수 있도록 해준다. 샘플을 참고하도록 한다.

형식 : <@매크로명 변수1, 변수2, ... />

샘플1) 긴 문자열을 적당한 크기로 자르는 기능의 매크로

*사용법 :

<@trimX item.title, 20 />

*매크로 :
<#macro trimX src max><#compress>
<#if src?length &gt; max>
${src[OSF:0..max-1]}
<#else>
${src}
</#if>
</#compress></#macro>

샘플2) YYYYMMDD 형식의 문자열을 YYYY.MM.DD 형식으로 변환하는 매크로

*사용법 :

<@parseDay item.regdate />

*매크로 :
<#macro parseDay src><#compress>
<#if src?length == 8>
${src[OSF:0..3]}.${src[OSF:4..5]?number}.${src[OSF:6..7]?number}
<#else>
${src}
</#if>
</#compress></#macro>


2. #list

배열 형식의 오브젝트를 루핑 처리할때 사용하는 프리마커 지시자이다. "로컬엘리어스_index" 라는 변수는 0부터 시작하는 시퀀스번호이다.

형식 : <#list 배열객체 as 로컬엘리어스명></#list>

샘플1)

<#list LIST as item>
번호 : ${item_index+1} | 이름 : ${item.name} | 아이디 : ${item.id}
</#list>


3. #if

프리마커 조건문에 사용되는 지시자이다.

형식 : <#if 조건식></#if>

샘플1) string 비교

<#if ENTITY.usergrade == "A" >......</#if>

샘플2) number 비교

<#if ENTITY.userclass?number == 3>.....</#if>

샘플3) boolean 비교

<#if ENTITY.isAuth()>.....</#if>


4. #break

Loop문을 중단하고 다음 스크립트로 넘어가려고 할때 사용되는 지시자이다.

형식 : <#break>

샘플1) 루프문을 실행하는 중 5번째에서 escape 하는 예

<#list LIST as item>
<#if item_index &gt; 3><#break></#if>
</#list>


5. #assign

프리마커내에서 사용자 정의 로컬변수가 필요할 때 사용하는 지시자이다.

형식 : <#assign 로컬변수명 = 초기화값>

샘플1)
<#assign CHECK = item_index>


6. [OSF: x...y]

문자열의 일정 범위를 자를때 사용하는 함수

형식 :

 ${문자열[OSF: 1..5 ]} 

샘플1)
${item.name[OSF:1..5]}


7. ?has_content

리스트형 오브젝트가 null이 아니고 최소 1개 이상의 컨텐츠를 가지고 있는지 체크하는 함수로써 ?has_content는 ?exists와 ?size>0 두가지 체크를 동시에 해주는 함수이다.

형식 : 리스트오브젝트?has_content

샘플1)
<#if LIST?has_content>.....</#if>


8. ?exists

NULL체크 함수. if_exists는 <#if 지시자 없이도 사용할 수 있게 해주는 표현식이다.

형식 : 오브젝트?exists

샘플1)
<#if ENTITY.username?exists>${ENTITY.username?substring(0, 5)}</#if>

샘플2)
<#if LIST?exists && LIST?size &gt; 0>.....</#if>

샘플3)
${ENTITY.username?if_exists}


9. ?default

NULL값을 대체해주는 함수

형식 : 오브젝트?default(디폴트값)

샘플1)
${item.userclass?default("99")}

샘플2)
${item.age?default(20)}


10. ?string

문자열로 형변환하는 함수

형식 : 오브젝트?string

샘플1)
<#if item.age?string == "29">.....</#if>

샘플2)
${item.regdate?string("yyyy/MM/dd HH:mm")}

샘플3) 숫자를 통화표시로 나타내는 예

<#assign MONEY = 1234567>
${MONEY?string(",##0")}


11. ?number

숫자로 형변환하는 함수

형식 : 오브젝트?number

샘플1)
<#if item.userclass?number &gt; 3>.....</#if>

샘플2)
${LIST_POINTS[OSF:item.gid?number].entityname?default("")}


12. ?js_string

문자열을 자바스크립트에 유효하도록 필터링해주는 함수.
문자열내에 싱글쿼테이션(')등이 포함되어 스크립트에 오류가 나는것을 방지하기 위하여 사용되는 함수이다.
화면상에는 HTML 태그로 취급된다.

형식 : 오브젝트?js_string

샘플1)

문자열 <img src='/image/enterprise.gif'>을 js_string으로 처리했을때 소스보기를 하면 <img src=\'/image/enterprise.gif\'>으로 출력된다.

샘플2)
<a href="javascript:getName('${item.homeurl?js_string}');">


13. ?html

문자열을 HTML Symbolic Entity로 필터링해주는 함수. 문자열내의 HTML태그등을 깨뜨려 화면상으로 출력되도록 할때 사용하는 함수이다. 화면상에 HTML태그가 아닌 일반 문자열로 취급된다.

형식 : 오브젝트?html

샘플1)

문자열 <img src='/image/enterprise.gif'>을 html로 처리하면 화면상에 <img src='/image/enterprise.gif'> 로 출력되고 
소스보기를 하면 &lt;img src='/image/enterprise.gif'&gt;로 출력된다.


14. ?index_of

특정 문자(열)가 시작되는 위치를 정수형으로 반환한다. 인덱스는 0부터 시작됨.

형식 : 오브젝트?index_of(특정문자)

샘플1)
"abcde"?index_of("c") 는 2를 반환한다.


15. ?replace

문자열의 일부를 주어진 문자로 대체하는 함수

형식 : 오브젝트?replace(찾을문자열, 대체할문자열)

샘플1)
${item.content?replace(">", "&gt;")}


16. item_has_next

리스트 객체의 다음 컨텐츠가 존재하는지(EOF) 체크하는 함수

형식 : 리스트엘리어스이름_has_next

샘플1) 이름과 이름사이에 , 를 찍어주되 마지막은 찍지 않는 경우의 예

<#list LIST as item>
${item.name?default("")}<#if item_has_next>,</#if>
</#list>

문서에 대하여

  • 이 문서는 http://blog.daum.net/younwoomom/6685378 의 내용을 참고하여 작성하였습니다.
  • 최초작성자 : 김정식
  • 최초작성일 : 2008년 1월 15일
  • 이 문서를 다른 블로그나 홈페이지에 퍼가실 경우에는 출처를 꼭 밝혀 주시면 고맙겠습니다.~^^

# 이 문서는 오라클클럽에서 작성하였습니다.
# 이 문서를 다른 블로그나 홈페이지에 게재하실 경우에는 출처를 꼭 밝혀 주시면 고맙겠습니다.~^^
# 출처 : http://www.gurubee.net/display/SWDEV/FreeMarker?
Posted by 1010
51.Struts22010. 8. 26. 15:05
반응형

freemarker 설명 및 기본 예제

# 이 문서는 오라클클럽에서 작성하였습니다.
# 이 문서를 다른 블로그나 홈페이지에 게재하실 경우에는 출처를 꼭 밝혀 주시면 고맙겠습니다.~^^
# 출처 : http://www.gurubee.net/pages/viewpage.action?pageId=1343682&


1 FreeMarker 란?

  • 프리마커는 자바 서블릿을 위한 오픈소스 HTML 템플릿 엔진이다.
  • 프리마커에서는 HTML을 템플릿으로 저장하는데 이들은 결국 템플릿 객체로 컴파일 된다.
  • 이 템플릿 객체들은 서블리셍서 제공하는 데이터들을 이용하여 HTML을 동적으로 생성한다.
  • 프리마커 객체들은 서블릿에서 제공하는 데이터들을 이용하여 HTML을 동적으로 생성한다.
    [*.java]Servlet \+Template[*.ftl] = [*.html]Output

2 FreeMarker 구조

  • FreeMarker는 표현의 결과물을 HTML(템플릿)로 관리하고 여기에 자바 객체를 연결하여 최종적인 결과를 만들어낸다.

3 FreeMarker 셋팅

3.1 다운로드

3.2 설치

  • freemarker.jar 파일을 WEB-INF/lib 안에 넣는다.
  • ecilpse에서는 프로젝트 마다 lib안에 import 시킨다.

3.3 Java 코딩시

import freemarker.template.*;
  • FreemarkerServlet를 extends 한 후 Java coding 해주면 된다.

4 FreeMaker 문법

  • FreeMarker의 메뉴얼 : http://www.freemarker.org/docs/
    FTL tag 
    <# > 
    
    
    주석 
    <#--주석달기--> 
    
    
    반복문 
    1. 
    <#list [Object code에서 key값 ]  as  [별칭할 값]> 
     
    2. for(int i=0;i<10;i++)
    <#list  1..10  as i > 
          ${i}
       <#assign i=i+1?int>
     
    3. 사이즈를 알고 싶을때.. Key 값이 list 인 경우
     
    <#assign size=list?size>
     
    4. 다른 변수로 정의하고 싶을때에는 
    <#setting [새로]=[기존]>
    
     
    5. 변수선언 
    
    <#assign x=0>   <#--x에 0를 할당해 준것이다. --> 
    x값을 출력하고자 할때 --> ${x} 
    
    
    6. <#macro green> 
    "<@green>"이런식으로 쓴다. 
    주로 변하지 않는 변수를 이렇게 선언해서 쓴다. 
     
    7. 조건문 
    <#if> 
     
    8. int형으로 선언해 주고 싶은때에는
    <#assign x=0 ? int>

5 FreeMarker 예제

5.1 TLD 파일

  • fmtag.tld (WEB-INF 아래 위치)
    <?xml version="1.0" encoding="ISO-8859-1" ?>
    <!DOCTYPE taglib
          PUBLIC "-Sun Microsystems, Inc.//DTD JSP Tag Library 1.1//EN"
          "http://java.sun.com/j2ee/dtds/web-jsptaglib_1_1.dtd">
    <taglib>
      <tlibversion>2.0<.tlibversion>
      <jspversion>1.1</jspversion>
      <shortname>FreeMarker JSP Support</shortname>
    
      <tag>
       <name>template</name>
       <tagclass>freemarker.ext.jsp.FreemarkerTag</tagclass>
       <bodycontent>tagdependent</bodycontent>
       <info>Allow evaluation of FreeMarker templates inside JSP</info>
       <attribute>
        <name>cashing</name>
        <required>false</required>
       </attribute>
      </tag>
    </taglib>

5.2 java 파일

  • SimpleBean.java (WEB-INF/classes/freemarker/examples/jsp)
  • Custom Tag 수행을 위한 Tag Handler Class
    package freemarker.examples.jsp;
    
    public class SimpleBean
    {
      private static String[] arr = {"a","b","c","d"};
      private String theString = "Hello from " + toString();
    
      public void setString(String foo)
      {
        theString = foo;
      }
    
      public String getString()
      {
        return theString;
      }
    
      public String[] getArray()
      {
        return arr;
      }
    }

5.3 jsp 파일

  • freemarker2.jsp (View 파일)
    <%@ page contentType="text/html; charset=euc-kr" %>
    <%@ taglib uri="/WEB-INF/fmtag.tld" prefix="fm" %>
    
    <jsp:useBean id="mybean" class="freemarker.examples.jsp.SimpleBean"/>
    <jsp:useBean id="mybeanreq" class="freemarker.examples.jsp.SimpleBean" scope="request" />
    
    <fm:template>
    <html>
    <body>
     <h1>FreeMarker JSP example</h1>
     <hr>
     <p>JSP 페이지</p>
    
     <#assign mybean = page.mybean>
     <#assign mybeanreq = request.mybeanreq>
    
     <p>page : ${mybean.string}
     <#list mybean.array as item>
      <br>${item}
     </#list>
    
     <p><b>Note:</b>
    </body>
    </html>
    </fm.template>


# 이 문서는 오라클클럽에서 작성하였습니다.
# 이 문서를 다른 블로그나 홈페이지에 게재하실 경우에는 출처를 꼭 밝혀 주시면 고맙겠습니다.~^^
# 출처 : http://www.gurubee.net/pages/viewpage.action?pageId=1343682&
Posted by 1010
51.Struts22009. 2. 26. 14:13
반응형

Index of /apache/struts/binaries

Icon  Name                           Last modified      Size  Description
[DIR] Parent Directory - [   ] struts-1.3.10-all.zip 08-Dec-2008 08:36 44M [TXT] struts-1.3.10-all.zip.asc 08-Dec-2008 08:35 202 [   ] struts-1.3.8-all.zip 12-Mar-2007 09:01 44M [TXT] struts-1.3.8-all.zip.asc 12-Mar-2007 09:01 186 [   ] struts-1.3.9-all.zip 11-Aug-2007 23:29 43M [TXT] struts-1.3.9-all.zip.asc 11-Aug-2007 23:29 186 [   ] struts-2.0.12-all.zip 16-Oct-2008 11:22 90M [TXT] struts-2.0.12-all.zip.asc 16-Oct-2008 11:22 189 [   ] struts-2.0.12-backport.zip 16-Oct-2008 11:29 3.0M [TXT] struts-2.0.12-backport.zip.asc 16-Oct-2008 11:29 189 [   ] struts-2.0.14-all.zip 23-Nov-2008 05:52 89M [TXT] struts-2.0.14-all.zip.asc 23-Nov-2008 05:52 189 [   ] struts-2.0.14-backport.zip 23-Nov-2008 05:52 3.0M [TXT] struts-2.0.14-backport.zip.asc 23-Nov-2008 05:52 189 [   ] struts-2.1.2-all.zip 25-May-2008 12:42 97M [TXT] struts-2.1.2-all.zip.asc 25-May-2008 12:41 189 [   ] struts-2.1.6-all.zip 13-Jan-2009 11:05 110M [TXT] struts-2.1.6-all.zip.asc 13-Jan-2009 11:06 189
Posted by 1010
51.Struts22009. 2. 26. 14:09
반응형

archive.apache.org

This site contains the historical archive of old software releases.

For current releases, please visit the mirrors.

Icon  Name                          Last modified      Size  Description
[DIR] Parent Directory - [DIR] binaries/ 14-Jan-2009 02:19 - [DIR] documentation/ 13-Jan-2009 02:03 - [DIR] examples/ 14-Jan-2009 02:16 - [DIR] library/ 14-Jan-2009 02:14 - [DIR] old/ 26-May-2005 20:18 - [DIR] scripting/ 18-Mar-2007 07:21 - [DIR] shale/ 28-Mar-2006 05:04 - [DIR] source/ 13-Jan-2009 02:02 - [DIR] struts-1.0.2/ 26-May-2005 04:37 - [DIR] struts-1.1-b1/ 26-May-2005 04:49 - [DIR] struts-1.1-b2/ 26-May-2005 04:50 - [DIR] struts-1.1-b3/ 26-May-2005 04:52 - [DIR] struts-1.1-rc1/ 26-May-2005 04:11 - [DIR] struts-1.1-rc2/ 26-May-2005 04:10 - [DIR] struts-1.1/ 26-May-2005 04:34 - [DIR] struts-1.2.2/ 26-May-2005 20:10 - [DIR] struts-1.2.4/ 26-May-2005 04:04 - [DIR] struts-1.2.6/ 26-May-2005 20:10 - [DIR] struts-1.2.7/ 26-May-2005 04:15 - [DIR] struts-faces/ 26-May-2005 04:54 - [DIR] struts-legacy/ 26-May-2005 04:40 - [   ] KEYS 24-Dec-2008 14:26 23K [   ] KEYS.20060311 05-Dec-2005 22:57 11K [   ] KEYS.bu 26-May-2005 02:45 7.7K [   ] struts-current-all.zip 16-Aug-2006 18:46 39M [TXT] struts-current-all.zip.asc 16-Aug-2006 18:45 188 [TXT] struts-current-all.zip.md5 16-Aug-2006 18:45 55 [   ] struts-current-all.zip.sha1 16-Aug-2006 18:45 63 [   ] struts-current-apps.zip 16-Aug-2006 18:46 19M [TXT] struts-current-apps.zip.asc 16-Aug-2006 18:46 188 [TXT] struts-current-apps.zip.md5 16-Aug-2006 18:46 56 [   ] struts-current-apps.zip.sha1 16-Aug-2006 18:46 64 [   ] struts-current-docs.zip 16-Aug-2006 18:46 12M [TXT] struts-current-docs.zip.asc 16-Aug-2006 18:46 188 [TXT] struts-current-docs.zip.md5 16-Aug-2006 18:46 56 [   ] struts-current-docs.zip.sha1 16-Aug-2006 18:46 64 [   ] struts-current-lib.tar.gz 22-Mar-2006 20:57 1.3M [TXT] struts-current-lib.tar.gz.asc 22-Mar-2006 20:57 226 [TXT] struts-current-lib.tar.gz.md5 22-Mar-2006 20:57 32 [   ] struts-current-lib.zip 16-Aug-2006 18:46 2.6M [TXT] struts-current-lib.zip.asc 16-Aug-2006 18:46 188 [TXT] struts-current-lib.zip.md5 16-Aug-2006 18:46 55 [   ] struts-current-lib.zip.sha1 16-Aug-2006 18:46 63 [   ] struts-current-src.tar.gz 22-Mar-2006 20:57 5.5M [TXT] struts-current-src.tar.gz.asc 22-Mar-2006 20:57 226 [TXT] struts-current-src.tar.gz.md5 22-Mar-2006 20:57 32 [   ] struts-current-src.zip 16-Aug-2006 18:46 5.8M [TXT] struts-current-src.zip.asc 16-Aug-2006 18:46 188 [TXT] struts-current-src.zip.md5 16-Aug-2006 18:46 55 [   ] struts-current-src.zip.sha1 16-Aug-2006 18:46 63 [   ] struts-current.tar.gz 22-Mar-2006 20:56 14M [TXT] struts-current.tar.gz.asc 22-Mar-2006 20:56 226 [TXT] struts-current.tar.gz.md5 22-Mar-2006 20:56 32 [   ] struts-current.zip 22-Mar-2006 20:56 14M [TXT] struts-current.zip.asc 22-Mar-2006 20:56 226 [TXT] struts-current.zip.md5 22-Mar-2006 20:56 32
Posted by 1010
51.Struts22009. 2. 26. 12:18
반응형

기본적인 struts 어플리케이션 개발의 Quick Start

최종갱신:   번역: April 27, 2007

목차


1. 머리말

이 문서는 Sun JDK 1.4.2. Eclipse 3.2 및 MyEclipse 5.1.1을 이용해 작성되고 있습니다. 모든 스크린 샷은 Eclipse, MyEclipse Enterprise Workbench 및 Windows XP의 Default User Interface 설정에 근거하고 있습니다. 이 문서의 설명으로 불명한 점이 있는 경우 「사용자 피드백」 섹션으로 MyEclipse Document 팀에 피드백하는 방법을 참조해 주세요.


2. 처음

이 튜톨리얼에서는 MyEclipse Enterprise Workbench 를 사용해 단순한 샘플 Struts 어플리게이션의 개발 및 테스트에 대해 설명합니다. Struts 나 MyEclipse 의 사전 지식은 필요없습니다.

체제와 기능 범위가 유사하기 때문에, 이 튜토리얼은「JSF 튜토리얼」과 비슷합니다. 이 두개의 같은 프로젝트 목표 및 개요를 가지기 때문에, MyEclipse에서의 Struts 툴의 사용방법을 이해하면, JSF 와 Struts 를 다음에 비교할 수 있습니다.


3. 요건

아래는 이 가이드로 사용하는 소프트웨어의 리스트입니다.

Sun Java(TM) Development Kit(JDK)5.0

http://java.sun.com/javase/downloads/previous.jsp

Eclipse Platform 3.2.2

http://www.eclipse.org/downloads/index.php

Eclipse Platform 3.2.1 NLpack1

http://download.eclipse.org/eclipse/downloads/drops/L-3.2.1_Language_Packs-200609210945/index.php

Eclipse Java Development Tools 3.2.2

http://www.eclipse.org/downloads/index.php

Eclipse Java Development Tools 3.2.1 NLpack1

http://download.eclipse.org/eclipse/downloads/drops/L-3.2.1_Language_Packs-200609210945/index.php

MyEclipse 5.1.1

https://www.myeclipseide.jp

Tomcat 5.0.x ( 5.0.28 이 바람직하다. 또는 다른 벤더의 서블릿/EJB 컨테이너)

http://tomcat.apache.org/download-55.cgi

이 데모에서는 유저명과 패스워드는「myeclipse」입니다.


주: JDK 를 인스톨해 컴퓨터를 재기동한 후 Eclipse, MyEclipse 및 Tomcat 을 인스톨 해주세요. MyEclipse 의 인스톨에 대한 자세한 것은「MyEclipse 인스톨/언인스톨 퀵 스타트」를 참조해주세요. 모든 소프트웨어를 인스톨하면「어플리케이션 디플로이먼트 및 서버 관리 퀵 스타트」로 설명되고 있듯이, MyEclipse로 Tomcat 5 컨넥터를 셋업하지 않으면, 셈플 어플리케이션을 디플로이 및 실행할 수 없습니다.


4. 신규 프로젝트의 셋업 및 구성

개발물을 작성하려면, MyEclipse로 Struts기능이 추가된 신규 Web프로젝트를 작성해야합니다. Web 프로젝트를 작성하려면, 아래의 그림1에 보이듯이「파일」>「신규」>「프로젝트」>「MyEclipse」>「J2EE 프로젝트」>「Web 프로젝트」의 위저드를 사용합니다.


그림 1 - 「신규 J2EE Web 프로젝트」위저드


그림 2 처럼 신규 프로젝트의 정보를 모두 입력합니다.


그림 2 - Web 프로젝트 설정


Web 프로젝트를 설정하면, Struts 기능을 추가해야 합니다. 이것을 실행하려면, 「패키지 익스플로어」뷰에서 프로젝트의 루트를 오른쪽 클릭하고, 그림 3 처럼「MyEclipse」>「Struts 기능추가」를 선택합니다.


그림 3 - Web 프로젝트에 Struts 기능추가


「MyEclipse Web 프로젝트의 Struts Support」다이얼로그에는, 적절한 Default가 설정되어 있습니다. 다만「신규 클래스용 Base 패키지」를 변경해서, 희망하는 로케이션을 변경시킬 수도 있습니다. 아래의 그림 4 에서는 단순히 Default로 놔둡니다.


그림 4 - Struts 기능 구성


위저드가 완료되면, 프로젝트 구조는 그림 5 처럼 나타나게 됩니다.


그림 5 - 구성 후의 프로젝트 레이아웃


프로젝트를 작성하면, 다음 섹션에서 설명하듯이 Web컨텐츠의 작성을 개시할 수 있습니다.


5. Struts 프로젝트의 개시

이 섹션에서는 단순한 Web사이트 로그인 화면을 닮은 샘플 Struts 어플리케이션을 작성하는 것에 초점을 맞추었습니다. 그래서, 필요한건 유저에게 로그인을 재촉하는 페이지와 로그인이 성공한 것을 나타내는 페이지의 2개 JSP페이지 뿐 입니다. 이러한 페이지는 각각 userLogic.jsp 및 userLoginSuccess.jsp 입니다. 단순화한것이기 때문에, 로그인 시행중 허가 에러가 발생했을 경우, 유저를 userLogin.jsp 페이지에 리다이렉트해 에러 멧세지를 표시합니다.


Struts 프로젝트를 개시할 때는 일반적으로 어플리케이션 전체의 프로우를 레이아웃하는 것이 유용합니다. 개발 팀은 어플리케이션의 개개의 부품을 얼마나 조합하면 좋은가를 충분히 검토할 수 있겠지요. 플로우를 잘라내는 가장 용이한 방법은, Struts 구성 편집자의 그래픽컬 디자인 모드를 사용해 그래픽컬하게 작성하는 방법입니다. Struts구성 편집자에게는 드러그 앤 드롭 툴의 팔레트가 있어서 유저는 디자인 실물모형으로 부터 페이지 플로우를 재빠르게 복사하는 것으로 어플리케이션의 작성을 시작할 수 있습니다. 셈플 로그인 어플리케이션의 플로우는 아래의 그림 6과 같이 됩니다.


주: 어플리케이션 플로우의 스크린샷은 Struts 디자이너를 사용해 작성되었습니다.

    Struts 디자이너의 액세스 방법 및 사용방법에 대해서는 다음 섹션에서 설명합니다.


그림 6 - 셈플 어플리케이션 플로우


이 디자인 레이아웃으로부터 userLogin.jsp 페이지를 표시하는 것으로 어플리케이션은 시작하는 것을 압니다. 로그인 페이지는 userLogin 액션을 호출해 로그인 조작을 실행합니다. 검증에러 또는 문제가 발생했을 경우 userLogin액션은 userLogin.jsp 페이지에 되돌립니다. 다만, 로그인이 성공했을 경우 어플리케이션은 userLoginSuccess.jsp 페이지로 진행됩니다.


5.1 Struts 프로젝트의 컴포넌트

일반적인 Struts 프로젝트는 이하의 개발 결과물의 카테고리로 구성됩니다.

  • JSP
  • Action
  • ActionForward *
  • ActionForm **
  • Struts 디플로이먼트 기술자 : struts-config.xml

* ActionForward 는 struts-config.xml 파일내의 <forward> 엔트리이며, 액션이 완료했을 때에 실행하는 패스를 정의합니다. ActionForward 클래스의 커스텀 임플리멘테이션에 대해서는 말하지 않습니다만, 이것은 가능하고, 확정 유저를 위한 툴로 서포트되고 있습니다.


** ActionForm 는 유저가 구체적인 ActionForm 임플리멘테이션을 작성해 페이지를 랩하는 것을 원하지 않는 경우에 DynaForm의 사용에 옮겨놓을 수 있습니다.


MyEclipse 에서는 이러한 컴포넌트의 언젠가 또는 모든것 (struts-config.xml 파일은 제외하다)을 3가직 방법으로 작성할 수 있습니다.

방법 1

아래의 그림 7 에 보이듯이「파일」>「신규」>「그 외」>「MyEclipse」>「Web-Struts」>「Struts 1.1 (또는 1.0)」메뉴를 사용해 Struts위저드를 선택합니다.


그림 7 - 모든 사용가능한 Struts 위저드


위저드는 단순하고, 지정된 Struts 컴포넌트가 서포트하는 모든값에 대해 prompt를 냅니다. 다만 다른 위저드보다 복잡한 위저드도 있습니다. 예를 들면, 아래의 그림 8 에 보이는「Struts Action」위저드에서는 Struts Action 으로 서포트되는 모든 기능의 포괄적인 범위가 표시됩니다.


그림 8 - 「신규 Struts Action」위저드

방법 2

「아웃라인」뷰를 사용합니다. 이 뷰는 Struts 구성 편집자의 소스 뷰 표시가 액티브한 편집 문맥일 때 사용 가능합니다.「아웃라인」뷰로부터 위저드를 액티브하게 하는 임의의 루트레벨의 노드를 오른쪽 클릭해서 그 타입의 신규 컴포넌트를 작성하는 일도 위저드를 사용해 기존은 컴포넌트를 편집할 수 도 있습니다. 그림 9 는 이러한 문맥의 위저드를 사용하는 예를 나타냅니다.


그림 9 - 「아웃라인」뷰로부터의 Struts 위저드의 기동


이 스크린샷이 주목할 만한 점은 일부의 액션이 실제로 논리적으로 관련한 위저드이며, 플로우 전체의 작성을 가능하게 하는 것입니다. 위저드는 함께 링크되어, 공통의 값을 심리스에 재이용해 수동의 재입력을 최소한으로 합니다.

방법 3

그림 10 에 나타내는 Struts 구성 편집자의 디자인 페이지의 사용도, Struts 성과물을 작성하기 위한 매우 편리한 방법입니다. 디자이너에는, struts-config.xml 파일을 열어 액세스 합니다. 편집자의 하부에서 「디자인」탭을 클릭하면, 디자이너를 실행할 수 있습니다.


그림 10 - Struts 디자이너에의 액세스


디자이너로 전환하면, 아래의 그림 11 과 같은 뷰가 표시됩니다.


그림 11 - Struts 디자이너의 개요


Struts 프로젝트의 다양한 컴퍼넌트의 작성 방법에 대해 설명했습니다. 다음의 섹션에서는, 로그인 데모 어플리케이션의 다양한 부분을 작성합니다.


5.2 어플리케이션의 구축

데모 어플리케이션의 구축은, 우선 JSP 페이지의 작성을 중심으로 실시합니다. 데모 어플리케이션을 Web 사이트의 로그인 화면과 같이 하므로, userLogin.jspuserLoginSuccess.jsp 라고 하는 2 개의 JSP 페이지만 필요하게 됩니다. 대부분의 Struts 어플리케이션과 같게, 로그인중에 문제가 발생했을 경우, 유저를 userLogin.jsp 페이지에 되돌려, 에러를 표시합니다 (loginUserFailure.jsp 페이지를 작성할 필요가 없는 것은 이 때문에입니다).


우선, userLoginSuccess.jsp 페이지를 작성합니다. 최초로 마지막 페이지를 작성하므로 순서가 역과 같이 생각됩니다만, 이렇게 하는 것으로, 「신규 Form, Action 및 JSP」위저드를 사용해 최초의 JSP 페이지를 작성함과 함께, 관련하는 Action 및 ActionForm 를 작성할 수 있습니다.


디자이너 뷰로부터 userLoginSuccess.jsp JSP 페이지를 작성하려면 , "JSP" 팔레트 툴을 사용합니다. 우선 이 툴을 클릭하고 나서, 캔버스를 클릭합니다. 아래의 그림 12 의 설명에 따라 주세요.


그림 12 - 디자이너의 사용에 의한 JSP 의 작성


캔버스를 클릭하면, 그림 13 에 나타내는 것 같은 「신규 JSP 페이지」다이얼로그가 표시됩니다.


:「Struts 1.1 을 사용하는 표준 JSP」템플릿을 선택해 주세요.


그림 13 - JSP 위저드의 구성


종료」버튼을 클릭하면, 그림 14 에 나타나듯이, 디자인 뷰에 신규에 작성된 페이지가 표시됩니다.


: 「위저드 완료 후 파일을 연다」체크 박스를 선택했을 경우, 신규의 JSP 페이지를 추가하면, MyEclipse 는 JSP 편집자내에 신규 JSP 페이지를 엽니다. 아래의 스크린샷에서는, 어플리케이션이 어떻게 표시되는지를 나타내기 위해서 클릭해 디자이너에 돌아오고 있습니다. 이것은 JSP 페이지를 작성할 경우에 표시되는 플로우가 아니기 때문에 잘못되지 않게 해 주세요.


그림 14 - JSP 페이지가 표시된 Struts 디자이너


JSP 페이지를 완성시키기 위한 나머지의 작업은, 유저에게 로그인이 성공한 것을 알리는 메세지의 출력입니다. 완성한 페이지의 소스 코드를, 아래의 그림 14a 에 나타냅니다.


주: 이 가이드를 이해하기 쉽게 하기 위해서 (또, 코드 순이 펫을 짧게하기 위해 ), 이하의 JSP 페이지는, 파일을 처음으로 열었을 때에 표시되는 디폴트의 JSP 템플릿과는 닮지 않았습니다. 여기에 있는 코드를 그대로 카피하거나 신규 JSP 파일의 작성 후에 이 코드를 디폴트의 JSP 템플릿 코드에 거두어 들이거나 해도 상관하지 않습니다.


userLoginSuccess.jsp

<%@ page language= "java"%>

<%@ taglib uri="http://jakarta.apache.org/struts/tags-bean" prefix="bean" %>
<%@ taglib uri="http://jakarta.apache.org/struts/tags-html" prefix="html" %>
<%@ taglib uri="http://jakarta.apache.org/struts/tags-logic" prefix="logic" %>
<%@ taglib uri="http://jakarta.apache.org/struts/tags-tiles" prefix="tiles" %>
<%@ taglib uri="http://jakarta.apache.org/struts/tags-template" prefix="template" %>
<%@ taglib uri="http://jakarta.apache.org/struts/tags-nested" prefix="nested" %>

<!DOCTYPE HTML PUBLIC "-//W3C//DTD HTML 4.01 Transitional//EN">
<html:html locale="true">
  <head>
    <title>My Struts 'userLoginSuccess.jsp' ending page</title>
  </head>
 
  <body>
    Hello <bean:write name="userName" scope="request" />, you successfully logged in!
  </body>
</html:html>

그림 14a - userLoginSuccess.jsp 의 코드


이 페이지는 매우 단순합니다. 여기서의 작업으로 중요한 것은 <body> 태그의 내용뿐이어, 어플리케이션의 request 스코프에 보관되고 있는 변수 userName 의 값을 출력합니다. 따라서, 다음에 작성하는 Action 로, request 스코프내의 userName 의 이름에 의해 속성을 지정할 필요가 있습니다.


여기에서도,userLogin.jsp 페이지, ActionForm, 및 Action 를 작성할 필요가 있습니다. 작업이 많이 있는 것처럼 생각됩니다만, MyEclipse 에서는 「신규 Form」 및 「신규 Form, Action 및 JSP」위저드를 사용하는 것으로, 이 작업을 큰폭으로 간소화합니다.


userLogin.jsp 페이지를 작성할 때는, 이 페이지에 표시하는 필드를 검토해, 그러한 필드를 각각의 ActionForm 에 맵 할 필요가 있습니다. Form 에는 값이 보관되어 적절한 Action 에게 건네집니다. Form 를 생성할 때, 앞서 얘기한 2 개의 MyEclipse 위저드는, Form 와 함께 JSP 페이지를 작성하는 기능을 제공합니다. 이 기능에서는 Form 의 모든 자산이 사용되어 이러한 모든 Form 필드가 이미 존재해 사용 가능한 JSP 페이지가 생성됩니다. 이러한 상황으로, 로그인을 처리하기 위한 Action 도 작성하기 때문에, 단순한「Form」위저드는 아니고「Form, Action 및 JSP」위저드를 사용합니다.


어플리케이션의 작성을 속행하려면 , 그림 15 에 나타나듯이, Struts 디자이너의 흰 캔버스 에리어를 오른쪽 클릭해,「신규」> 「Form, Action 및 JSP」위저드의 순서에 선택합니다.


그림 15 - 디자이너로부터의 「Form, Action 및 JSP」위저드의 기동


최초로「Struts 1.1 Form 선언」위저드가 표시됩니다. 이것이 3 스텝 위저드의 최초의 위저드입니다. 위저드가 적절한 디폴트치를 설정할 수 있도록(듯이), 유스케이스명을 입력해 주세요. 그림 16 에,유스케이스를 입력하면 어떻게 값이 설정되는지를 나타냅니다.


그림 16 - 「Struts 1.1 Form 선언」위저드


다음에, 2 개의 Form 자산, userNamepassword 를 추가할 필요가 있습니다. 「패스워드」필드를 추가하는 경우, 그림 17 에 나타나듯이「JSP 입력 타입」필드의 「password」를 선택합니다.


그림 17 - Form 에의 자산의 추가


그림 18 - Form 자산


「다음」버튼을 선택하기 전에, 「JSP」탭을 클릭해, MyEclipse 로 이러한 값이 설정된 Form 를 가지는 양식 JSP 페이지를 생성하는 것을 위저드에 나타납니다. 아래의 그림 19 에 이것을 나타냅니다.

: 위저드의 디폴트의 행동에서는, 생성된 JSP 는 "/form" 서브 디렉토리에 배치됩니다만, 이 데모 어플리케이션에서는, 모든 JSP 를 webroot 에 배치합니다.


그림 19 - Form 용의 JSP 페이지의 생성을 유효하게 한다


마지막에 「메소드」탭을 클릭해, 위저드가 신규 Form 에 자동 생성할 수 있는 모든 메소드의 체크를 제외합니다. 아래의 그림 20 에 이 구성을 나타냅니다.


: 이 데모를 단순한 것으로 하기위해, reset 메소드나 validate 메소드를 생성합니다만, 일반적으로는 독자적인 어플리케이션을 코딩 할 경우에 이러한 메소드를 사용하는 것은 유리한 계책입니다.


그림 20 - 메소드 생성을 무효로 한다


「다음」버튼을 클릭하면,「Struts 1.1 Action 선언」위저드에 진행됩니다. 이 위저드에서는, 거의 모든 값이 이미 입력되고 있습니다. 여기에서는, 작성 끝난 Form 와 신규 Action 를 묶는 것에 의해 시간이 절약됩니다. 변경은 자유롭게 가 상관하지 않습니다만, 대부분의 경우 (물론 이 데모 어플리케이션에서도), 여기서 유일 주의할 필요가 있는 것은, Action 를 사용할 수 있는 「Forward」를 입력하는 것입니다. 그림 21 에 위저드의 스크린샷를 나타냅니다.


그림 21 - 「Struts 1.1 Action 선언」위저드


「ActionForward」를 지정하려면 , 그림 22 에 나타내도록(듯이)「Forward」탭을 클릭합니다.


그림 22 - Action Forwards 의 셋업


이 Action 에의 Forward 의 추가 후, 「종료」버튼을 클릭하면(자), MyEclipse 로 모든 신규 정보를 사용해 모든 자원을 작성하거나struts-config.xml 파일 ( 및 디자이너)을 갱신하거나 할 수 있습니다. 그림 23 에 갱신된 레이아웃 및 어플리케이션 구조를 나타냅니다.


: 작은 스크린샷에 다이어그램의 모든 엘리먼트를 명시할 수 있도록, 일부가 수동으로 레이아웃 되고 있습니다. 다이어그램을 수동으로 레이아웃 할 때, 변경 내용은 장래의 편집을 위해서 보존됩니다.


그림 23 - Struts 디자이너 및 어플리케이션의 개요


이것으로 어플리케이션 플로우가 정의되었기 때문에, Action 에 논리를 추가해, 이 데모·어플리케이션의 "login" 순서를 처리할 필요가 있습니다. 그림 24 에 나타내도록(듯이), 디자인을 더블 클릭 하면 자원으로 점프 할 수 있습니다.


그림 24 - 디자이너·자원을 더블 클릭 해 편집자를 연다


UserLoginAction.java 파일을 처음으로 열었을 경우,execute 메소드용으로 생성된 코드는 그림 24a 와 같이 됩니다.


UserLoginAction.java
public ActionForward execute(
  ActionMapping mapping,
  ActionForm form,
  HttpServletRequest request,
  HttpServletResponse response) {
  UserLoginForm userLoginForm = (UserLoginForm) form;
  // TODO Auto-generated method stub
  return null;
 }

그림 24a - 생성된 execute 메소드


디폴트의 임플리멘테이션에서는 단지 null 를 돌려주고 있을 뿐입니다만, 이것을 제거해, 그림 24b 에 나타내는 것 같은 단순한 로그인 Logic에 옮겨놓습니다.

UserLoginAction.java
 public ActionForward execute(
  ActionMapping mapping,
  ActionForm form,
  HttpServletRequest request,
  HttpServletResponse response) {
  UserLoginForm userLoginForm = (UserLoginForm) form;
 
  if(userLoginForm.getUserName().equals("myeclipse") && userLoginForm.getPassword().equals("myeclipse"))
  {
   request.setAttribute("userName", userLoginForm.getUserName());
   return mapping.findForward("success");
  }
 
  return mapping.findForward("failure");
 }

그림 24b - 수정된 execute 메소드


여기에서는 매우 단순하게,userNamepassword 의 값이 함께 "myeclipse" 일지 어떨지를 체크합니다. "myeclipse" 인 경우,userName 를 request 스코프에 보관해,success forward 를 돌려주므로, userLoginSuccess.jsp 페이지에 사용자 정의의 메세지를 표시할 수 있습니다. 그렇지 않은 경우, 문제가 있으면, failure forward 를 돌려줍니다. 일반적으로 실제의 어플리케이션에서는, 발생한 문제를 설명하기 위해, failure forward 를 되돌리기 전에 ActionMessages 또는 ActionErrors 콜렉션을 request 스코프에 추가합니다.


6. 데모의 실행

이것으로 어플리케이션이 완성했습니다. 「데프로이먼트 관리」다이얼로그를 열어, 이 프로젝트의 신규 데프로이먼트를 셋업 하는 것으로, Tomcat 5 에 데프로이 할 수 있습니다. 그림 25 에 나타내는 관리 다이얼로그를 열려면 , 「패키지 익스플로어」뷰로 프로젝트를 오른쪽 클릭해,「MyEclipse」> 「프로젝트 데프로이먼트의 추가와 제거」를 선택하는지, 툴바의「MyEclipse J2EE 프로젝트를 서버에 데프로이」아이콘을 클릭합니다.


주: MyEclipse 로 Tomcat 5 (또는 그 외의) 어플리케이션 서버 컨넥터를 이미 셋업 하고 있는 것이 전제가 되고 있습니다. 아직 셋업 하고 있지 않고, help가 필요한 경우는,「어플리케이션의 데프로이먼트 및 서버 관리의 퀵 스타트」가이드를 참조해 주세요.


그림 25 - 신규 데프로이먼트의 작성


데프로이먼트의 완료 후에 데프로이먼트 상황을 체크해, 에러가 발생하고 있지 않는 것을 확인하는 것을 추천합니다. 이것을 실시하려면 , 그림 26 의 설명에 따릅니다.


그림 26 - 데프로이먼트가 성공한 것의 확인


마지막으로, 그림 27 에 나타내는 어플리케이션 서버의 시작 버튼을 사용해 Tomcat 를 기동합니다.


그림 27 - 어플리케이션·서버의 개시


서버가 시작되면, 출력이 Eclipse 의 「콘솔」뷰에 송신됩니다. 그림 28 에, 이하의 2 개를 확인할 수 있도록 통상의 Tomcat 의 기동을 나타냅니다.
 1) Tomcat 가 Web 어플리케이션을 정상적으로 데프로이 했다
 2) Tomcat 가 정상적으로 기동했다


그림 28 - 어플리케이션과 서버가 올바르게 기동한 것의 확인


Tomcat 5 가 실행되면(자), 「MyEclipse Web 브라우저」뷰를 열어 테스트할 수 있습니다. 이것을 실시하려면 ,「윈도우」> 「뷰의 표시」> 「그 외...」(을)를 선택해, 「뷰의 표시」다이얼로그에 액세스 해, 「MyEclipse Enterprise Workbench」> 「Web 브라우저」뷰를 선택합니다.


Open
그림 29 - 「Web 브라우저」뷰의 오픈


그림 30 에 나타나듯이 브라우저의 주소·바에 http://localhost:8080/StrutsLoginDemo/userLogin.jsp 라고 입력해, 샘플 어플리케이션을 액티브하게 합니다.


그림 30 - 데모 어플리케이션에의 로그인


이와 같이, 어플리케이션은 사용 가능하다라고 하는 것을 알수있습니다. 이것으로, 유저명과 패스워드를 입력할 수 있습니다.


주: 이 데모의 유저명과 패스워드는, 어느쪽이나 'myeclipse'입니다.


로그인 후, Form 가 검증되어 어플리케이션은 유저를 로그인 성공 페이지에 진행합니다. 그림 31 은, Action 에 의해 유저가 올바르게 진행된 userLoginSuccess.jsp 페이지를 나타내고 있습니다.


그림 31 - 성공한 로그인


주:본 샘플 어플리케이션에의 액세스때는, HTTP 포토로서 8080 을 지정하고 있습니다만, 포토 번호는 사용하시는 서버 설정에 맞추어 적당히 변경해 주세요.


7. 통계

이 데모에서는, MyEclipse Enterprise Workbench 로 사용 가능한 Struts 툴을 사용해, 단순한 Struts 어플리케이션을 작성했습니다.


이것으로, Struts 의 설명은 종료됩니다. Web 프로젝트에서의 작업, 어플리케이션의 데프로이먼트 및 서버 관리에 대한 개요는, 그 외의 퀵 스타트 문서로 입수할 수 있습니다. 자세하게는, 메인 메뉴의문서에 액세스 해 주세요.


8. 사용자 피디백

이 문서에 대해 의견, 제안이 있으면, 서포트 포럼으로 보내 주세요. 

Posted by 1010
51.Struts22009. 2. 26. 12:16
반응형
Posted by 1010
51.Struts22009. 2. 26. 12:15
반응형
Posted by 1010
51.Struts22009. 2. 26. 12:12
반응형

다 아시겠지만 혹시 모르는 분을 위해 정리해 올려봅니다.

==========================================================


Struts Guide : 스트럿츠 처음 배우기
스트럿츠를 공부하면서 그 내용들을 스트럿츠를 처음 배우는 사람들의 입장에서 정리해봤습니다.
원래는 회사 동료들을 위해 만들려고 시작한 것이었습니다.

내가 본 스트럿츠 책 대부분(모두 한국어 책들)이 지나치게 숲을 보기를 강조한 경향이 있는 것 같습니다.

커다란 예제 프로그램 하나를 가지고, 스트럿츠의 많은 기능들을 설명하죠. 그래서 각 기능별 예제가
부족해 읽는 순간 순간 스트럿츠의 각 기능 단위로 책의 내용을 이해하기가 좀 껄끄러운 면이 있습니다.

그래서 각 기능별로 조각조각 쪼개서 각 단위마다 모두 예제를 포함하도록 만들었습니다.

각 기능을 모두 예제를 직접 실행해서 확인해보며 진행할 수 있도록 했습니다.

원래는 더 많이 마무리 한 다음에 올려리고 했는데, 갑자기 투입된 프로젝트(스트럿츠와 아무관련없는..)
때문에 한동안 공부가 힘들것 같아서 지금까지 완성한 부분만 올립니다.

부족한 점 있으면 연락주세요. 시간 나는대로 추가해보겠습니다.

--
소스코드 추가하였습니다. StrutsGuide1.zip


클라이언트로부터 값을 입력받아 해당 아이디와 패스워드가 맞다면,

원하는 페이지로 이동하는 스트러츠 구조는 아래와 같다.


좀더 구체적인 내용을 살펴보자.

  • 웹애플리케이션이 시작할 때 ActionServlet의 init()가 호출되고 web.xml에
  • 선언되어 있는대로 struts-config.xml를 로드한다. struts-config.xml은
  • Struts프레임워크에서 사용하는 모든 설정 정보를 담고 있는 파일이라고
  • 생각하면 된다. config 이름은 꼭 struts-config.xml이 아닌 다른 이름을 가지는
  • XML파일이어도 상관없다.
    ActionServlet클래스는 struts에서 제공하고 있다.


  • 클라이언트가 id와 pw를 입력한 후 submit를 누르면 action=login.do 로
  • 이동한다.
    web.xml에 *.do 는 전부 org.apache.struts.action.ActionServlet로 이동
  • 하게끔 mapping 시켜놨다.

  • 클라이언트가 입력한 id와 pw는 ActionForm 클래스를 상속받는 클래스의 객체에
  • 자동으로 저장된다.
    이러한 형식은 struts-config.xml <form-beans> 태그에 지정한다.

  • 클라이언트의 입력값을 저장한 객체를 가지고 어떤 동작을 취할것인가를 지정한
  • 부분은 struts-config.xml의 <action-mappings>태그이다. 이 태그에서 지정한
  • 클래스로 객체를 전달한다. 해당 클래스는 Action클래스를 상속한 클래스로 DB에
  • 직접 연결하는 클래스를 호출하는 부분이 들어 있다.

  • 처리한 후 <action> 태그에서 지정한 문서로 mapping한다. 전달하는 클래스의 타입은 ActionForward이다.

작성자 : 진은영

============================================================================


<<간단한 login 예제를 이용한 Struts 흐름 실습>>


-저희도 해봤던 간단한 실습예제입니다-


==========================================================

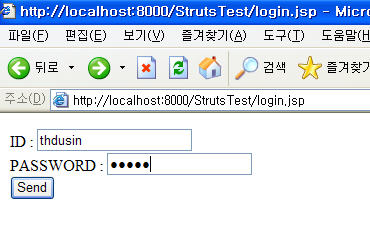
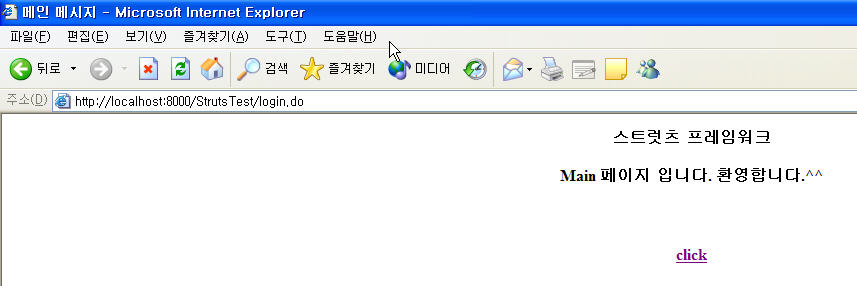
1. login.jsp에서 아이디와 패스워드를 입력하면

 login.do(ActionServlet)를 호출

(login.do는 LoginAction의 execute()메소드를 실행하여

아이디와 패스워드가 맞는지 확인하여 일반 사용자이면 main.jsp로 이동, 

관리자이면 admin.jsp, 아이디나 패스워드가 맞지 않을 경우, 에러가 발생한

경우에는 error.jsp로 넘어가게 한다.)

<%@ page contentType="text/html;charset=utf-8" %>

<html>

<body>

<form action="login.do" mehtod="post">

 ID       : <input type="text" name="id" value=""> <br>

       PASSWORD : <input type="password" name="pwd" value=""><br>

<input type="sumit" value="Send">

</form>

<body>

<html>

• main.jsp

<%@ page  contentType="text/html;charset=utf-8"%>

<html>

    <head>

        <title>메인 메시지</title>

    </head>

    <body>

        <div align="center">

            <table width="85%" border="0" cellpadding="0" cellspacing="0">

                <tr>

                    <td align="center"><b>스트럿츠 프레임워크</b></td>

                </tr>

            </table>

            <br>

            <table width="85%" border="0" cellspacing="0" cellpadding="0">

                <tr>

                    <td align="center"><b>Main 페이지 입니다. 환영합니다.^^</b></td>

                </tr>


                <tr>

                    <td align="center">

                        <a href="javascript:history.back()"><b>click</b></a></td>

                </tr>

            </table>

        </div>

    </body>

</html>


• admin.jsp

<%@ page  contentType="text/html;charset=utf-8"%>

<html>

    <head>

        <title>관리자 메시지</title>

    </head>

    <body>

        <div align="center">

            <table width="85%" border="0" cellpadding="0" cellspacing="0">

                <tr>

                    <td align="center"><b>스트럿츠 프레임워크</b></td>

                </tr>

            </table>

            <br>

            <table width="85%" border="0" cellspacing="0" cellpadding="0">

                <tr>

                    <td align="center"><b>Administrator 페이지 입니다. 환영합니다.^^</b></td>

                </tr>

                <tr>

                    <td align="center">

                        <a href="javascript:history.back()"><b>click</b></a></td>

                </tr>

            </table>

        </div>

    </body>

</html>


• error.jsp

<%@ page isErrorPage="true" contentType="text/html;charset=utf-8"%>

<html>

    <head>

        <title>에러 메시지</title>

    </head>

    <body>

        <div align="center">

            <table width="85%" border="0" cellpadding="0" cellspacing="0">

                <tr>

                    <td align="center"><b>스트럿츠 프레임워크</b></td>

                </tr>

            </table>

            <br>

            <table width="85%" border="0" cellspacing="0" cellpadding="0">

                <tr>

                    <td align="center"><b>에러 메시지</b></td>

                </tr>

                <tr>

                    <td height="60" align="center">

                        <%= exception.toString() %>

                    </td>

                </tr>

                <tr>

                    <td align="center">

                        <a href="javascript:history.back()"><b>click</b></a></td>

                </tr>

            </table>

        </div>

    </body>

</html>


2. 스트럿츠 설정 파일 struts-config.xml에서 액션의 매핑, 메시지 자원의 파일의 지정,

데이터 소스의 설정, 플러그 인 지정 등을 합니다.

form-bean 요소의 name 속성에는 HTMl입력 폼의 이름, 액션 매핑에서의 name 속성을

지정하며 type 속성에는 전체 클래스명을 지정합니다.

액션에서 사용할 포워드 정보의 name 속성이 같은 액션 매핑이 오버라이드 되지 않는

액션에 전역적으로 사용됩니다.

액션 매핑 설정은 ActionServlet에서 type 속성 클래스의 exeute()메소드를 호출하고 name에는

빈의 이름이 들어가며 scope 빈이 저장되는 영역을 설정합니다. 그리고

input 속성에는 입력 폼이 있는 페이지를 저장하여 입력값이 유효하지 않거나 에러가

발생할 입력 페이지로 이동할 있게 합니다.

뷰페이지에서 사용할 메시지 자원의 설정은 StrutsTest/WEB-INF/classes/test/struts/messaage

참조합니다.


<?xml version="1.0" encoding="UTF-8"?>

<!DOCTYPE struts-config PUBLIC "-//Apache Software Foundation//DTD Struts Configuration 1.1//EN"

    "http://jakarta.apache.org/struts/dtds/struts-config_1_1.dtd">


<struts-config>


    <!-- Form Bean Definitions -->

    <form-beans>

        <form-bean name="loginForm" type="test.struts.LoginForm" />

    </form-beans>


    <!-- Global Forward Definitions -->

    <global-forwards>

        <forward name="login" path="/login.jsp" />

        <forward name="main" path="/main.jsp" />

        <forward name="error" path="/error.jsp" />

    </global-forwards>


    <!--  Action Mapping Definitions  -->

    <action-mappings>


        <action path="/login" type="test.struts.LoginAction" scope="request" input="login.jsp">

            <forward name="admin" path="/admin.jsp" />

        </action>

        <action path="/main" forward="/main.jsp" />

        <action path="/loginFb" type="test.struts.LoginFbAction" name="loginForm" scope="request"

            input="/loginFb.jsp">

            <forward name="admin" path="/admin.jsp" />

        </action>


    </action-mappings>


    <message-resources parameter="test.struts.message.ApplicationResources" />


</struts-config>


스트럿츠와 관련한 폼 빈 클래스나 Action클래스를 수정하거나 추가할 때는

struts-config.xml 설정 파일을 먼저 수정하고 빈즈 클래스를 변경하여야 합니다.


3. 클라이언트가 입력하는 id, password 정보를 저장하는 클래스

StrutsTest/WEB-INF/src에 저장합니다.

package test.struts;


import javax.servlet.http.HttpServletRequest;

import org.apache.struts.action.ActionForm;

import org.apache.struts.action.ActionMapping;

import org.apache.struts.action.ActionErrors;

import org.apache.struts.action.ActionError;


public final class LoginForm extends ActionForm {


    private String id;

    private String passwd;


    public String getId() {

        return id;

    }


    public void setId(String id) {

        this.id = id;

    }


    public String getPasswd() {

        return passwd;

    }


    public void setPasswd(String passwd) {

        this.passwd = passwd;

    }   


           /**

            * 세션에 저장되어 있는 LoginForm을 초기화한다.

            */

    public void reset(ActionMapping mapping, HttpServletRequest request) {

        this.id = null;

        this.passwd = null;

    }


    /**

     * ID와 패스워드를 4자 이상 입력해야만 에러가 발생하지 않는다.

     */

    public ActionErrors validate(ActionMapping mapping,

                                 HttpServletRequest request) {

        ActionErrors errors = new ActionErrors();

        if (id == null || id.trim().length() < 4) {

            errors.add("id", new ActionError("error.id.tooshort"));

        }

        if (passwd== null || passwd.trim().length() < 4) {

            errors.add("password", new ActionError("error.passwd.tooshort"));

        }

        return errors;

    }

}


4. 클라이언트로부터 입력한 밧을 비교하여 해당 JSP문서로 매핑 처리하는 클래스

StrutsTest/WEB-INF/src에 저장합니다.

import javax.servlet.http.HttpServletResponse;

import javax.servlet.http.HttpSession;

import org.apache.struts.action.Action;

import org.apache.struts.action.ActionForm;

import org.apache.struts.action.ActionForward;

import org.apache.struts.action.ActionMapping;


public class LoginAction extends Action {


    public ActionForward execute(ActionMapping mapping,

                                ActionForm form,

                                HttpServletRequest request,

                                HttpServletResponse response)

    {   

        String next = "main"; // forward 페이지

        String id = request.getParameter("id");

        String passwd = request.getParameter("passwd");

        try {

            String[] idList = {"admin", "thdusin"};

            String[] passwdList = {"admin1234", "12345"};

            int[] gradeList = {1, 2};


            int idx = -1;           

            for (int i=0; i<idList.length; i++) {

                if (idList[i].equals(id)) {

                    idx = i;

                    break;

                }

            }               

            if (idx > -1) {

                if (passwdList[idx].equals(passwd)) {

                    if (gradeList[idx] == 1)

                        next = "admin";

                    UserSession user = new UserSession();

                    user.setId(id);

                    user.setGrade(gradeList[idx]);

                    HttpSession session = request.getSession();

                    session.setAttribute("user", user);

                } else {

                    throw new Exception("PASSWD NOT MISMATCH");

                }

            } else {

                throw new Exception("ID NOT EXIST");

            }


        } catch (Exception e) {

            e.printStackTrace();

            request.setAttribute("javax.servlet.jsp.jspException", e);

            next = "error";

        }

        return mapping.findForward(next);

    }

}


5. 자바 소스를 컴파일 하는 데 사용하는 build.xml 파일

StrutsTest/WEB-INF 디렉토리 아래에 저장합니다.

<?xml version="1.0" ?>

<project  name="test_struts"  basedir="."  default="compile">


           <property name="dist.servelt.jar" value="C:\eclipse\plugins\org.eclipse.tomcat.4.1.30\servlet.jar"/>


           <path id="classpath">

                      <fileset dir="${basedir}/lib" includes="*.jar"/>

                     <pathelement location="${dist.servlet.jar}"/>

           </path>


           <target name="compile">

                     <echo message="encoding property files..."/>

                     <native2ascii src="${basedir}/src"

                     dest="${basedir}/classes"

                     includes="**/*.properties"/>

                     <echo message="Compiling the java source files..."/>

                     <javac srcdir="${basedir}/src"

                     destdir="${basedir}/classes" debug="on">

                        <classpath refid="classpath"/>

                              </javac>

                                </target>

</project>


6. 컴파일 and 결과 ^^


=========================================================================================================
 
Struts 핵심 클래스
 
처음 스트러츠를 접한 개발자들은 무엇을 먼저 해야할지 망설이는 경우가 많다. 스트러츠 API를 보면 "왜 그리 많은 패키지와 클래스들이 있는지..", "이것을 언제 다 익힌단 말인가?" 하고 어려워하는 개발자들이 많다. 하지만 스트러츠가 Model 2에 기반하고 있기 때문에 Model 2개발 방식에 대하여 이해하고 있는 개발자들이라면 그 원리를 파악하기란 생각보다 어렵지 않다.

먼저 스트러츠의 중심을 이루고 있는 클래스들의 클래스 다이어그램을 통하여 스트러츠의 전체적인 그림을 한번 그려 보도록 하겠다.


  • ActionServlet : MVC 컨트롤러이며 요청 디스패터의 역할을 한다. 스트럿츠
  • 프레임워크 내에 단 하나의 서블릿 인스턴스가 존재한다.
  • ActionMapping : URL 패턴과 비즈니스 로직(Action)간의 매핑을 표현한다. 입력과 출력 및
  • 비즈니스 로직에 기반한 '보내지는'대상을 지정한다.
  • ActionForm : MVC모델이다. MVC뷰로부터의 입력을 표현하는 자바빈처럼 작동한다.
  • ActionServlet은 자동적으로 빈이 인스턴스화된 이후에 프로퍼티를 지정해 주며, 빈에
  • validate()메소드를 가지고 있으면 사용자가 만든 Action클래스를 호출하기 이전에 이
  • 메소드를 호출한다. ActionForm은 JSP 뷰를 표현하기 위해 확장되었다.
  • ActionForward : 이동할 페이지 정보와 포워드(forward), 리다이렉트(redirect)중 어느 방식으로
  • 다음 페이지로 이동할 것인지에 대한 정보를 담고 있다.
  • Action : 비즈니스 로직을 나타내며 MVC모델이다. 특정한 요청에 대한 비즈니스
  • 로직을 처리하기 위해 확장된다. 예를 들어 /login URI를 위해 LoginAction을 만든다.


① ActionServlet
처음으로 논의할 스트럿츠 프레임워크의 컴포넌트는 ActionServlet이다.

org.apache.struts.action

패키지에 있는

ActionServlet은 추상클래스인 javax.servlet.HttpServlet 추상클래스를 상속받았다.

클라이언트로 부터 호출 받으면 가장 먼저 호출되는 클래스이다.


  • process() : doGet() 이나 doPost()로부터 요청과 응답을 넘겨받는다. process()메소드는
  • 요청을 처리하기 위해, ActionServlet안에 있는 다른 메소드를 호출한다. process()메소드는
  • 요청을 처리하기 위해, ActionServlet안에 있는 다른 메소드를 호출한다. 여기에서는 중요한
  • 9개의 메소드를 살펴볼 것이다.
    • processPath() : 요청 URI 인자에서 접미사나 접두사를 제거하여 URI를 추출한다.
    • 예를 들어, /login.do라면 /login을 반환한다.
    • processLocale() : Locale이 요청에 설정되어 있으면 검사하고, 없으면 하나 만들어서
    • 세션에 저장한다.
    • processMapping() : ActionMapping객체를 얻기 위해 path를 키로 이용한다. 만약 path가
    • 맞는 ActionMapping객체가 ActionMappings collection안에 있으면 process()메소드로 반환된다.
    • processActionForm() : ActionMapping의 name속성을 이용하여 이런 종류의 ActionForm이
    • 이미 만들어졌는지를 확인한다. 그렇다면, 그 ActionForm이 process()메소드로 반환되며,
    •  그렇지 않으면 ActionMapping에 정의된 새로운 ActionForm을 만들어서 반환한다.
    • processPopulate() : ActionForm내에 ActionServlet의 참조를 설정하며, ActionForm()의
    •  reset()메소드를 호출하여 값들을 디폴트 값으로 만든다.
    • processValidate() : ActionForm에 확인작업이 필요한지를 검사한다.
    • processActionCreate() : ActionMapping과 연결된 Action클래스를 반환한다. 이 메소드는
    • Action컬렉션에서원하는 Action클래스의 인스턴스가 있는지를 검사하고, 만약 있으면 이를
    • 반환하며, 없으면 새로운 Action 클래스의 객체를 만들고 이를 Action컬렉션에 저장하며,
    • 이에 대한 참조를 반환한다. 반환된 Action클래스는 요청 URI에 매핑되며, 요청을 처리하는
    • 비즈니스 로직을 가지고 있다.
    • processActionPerform() : processActionCreate()에서 반환된 Action객체의 perform()메소드가
    • 호출된다. 비즈니스 로직을 수행한 후에, Action객체는 ActionServlet이 요청을 보낼 타겟을
    • 가지고 있는 ActionMapping을 반환한다.
    • processActionForward() : RequestDispatcher나 Request.sendRedirect()를 이용하여 원하는
    • 뷰를 만들고, 요청을 ActionServlet에 의해 완전히 처리한다.

  • initApplication() : 애플리케이션을 위해 MessageResource를 로딩한다.
  • initMapping() : ActionServlet에 pageckage.ClassforName을 등록하도록 한다. formBean의 디폴트 클래스는 org.apache.struts.action.ActionFormBean이다.
  • initDigester() : org.apache.struts.digester.Digester클래스를 써어 struts-config.xml 파일로부터 설정을 읽어들인다.
  • initOter() : 초기화에 필요한 작업을 처리한다. struts-config.xml에 있는 initOther()는 content , locale , cache를 찾는다.


② ActionMapping
비즈니스 로직을 처리할 Action클래스에 요청을 보내기 위해 ActionServlet이 알아야 할 처리 정보를 가지고 있다.

ActionMapping은 <action-mappings> 요소 내의 <action>정보를 이용하여 만들어진다.

<action-mappings> <action name="loginForm" path="/login" type="kr.co.a.LoginAction" 
input="/login.jsp"> </action> </action-mappings> 


/login의 경로를 가진 요청을 받으면, 액션 클래스는 LoginAction이고, 입력은 loginForm이 표현하며 입력 폼의

 경로는 /login.jsp라는 것을 의미한다.

  • name : 이 액션이 사용할 struts-config.xml에 정의된 폼 빈의 이름
  • path : 이 매핑을 선택하는 데 매칭되는 요청 URI. URI는 '/'로 시작해야 한다.
  • type : 이 매핑에서 사용되는 Action 구현의 완전한 자바 클래스 이름
  • input : 입력 페이지를 매핑한다. ActionServlet이 ActionForm의 확인작업을 수행하는데, 만일
  • 에러가 있다면 input변수가 forward나 sendRedirect의 목표가 될 것이다.


③ ActionForm
ActionForm클래스는 struts-config.xml에 의해 정의된다.

<form-beans> <form-bean name="loginForm" type="kr.co.a.LoginForm" /> </form-beans> 


모든 ActionForm 구현은 <form-beans>태그의 몸체에 등록되어야 한다. ActionForm이 추상 클래스이므로,

개발자는 이를 확장하여 사용자의 입력 데이터를 저장하는 클래스를 만들어야 한다.

  • name : ActionMapping에서 정의된 범위 안에서 이를 얻기 위해 사용된느 변수명
  • type : 사용자가 구현한 ActionForm에 대한 패키지의 올바른 참조


④ Action
어떤 URI에 특정 액션을 제공하기 위해 확장된다. 이것의 목적은 요청을 위한 비즈니스 로직을 실행하는 것이다.

Action클래스는 ActionServlet에 의해 인스턴스로 만들어진다. Action클래스는 기본 Locale을 저장하며,

애플리케이션에 대한 MessageResources의 참조를 저장한다.

⑤ ActionForward
ActionForward클래스는 struts-config.xml 파일에서 설정된다. 두 종류의 ActionForward가 있다.


참고문헌

작성자 : 진은영

======================================================================================================

struts에서 공통 폼빈(formbean) 및 파일업로드 쓰기


아래의 내용은 여기에 올라와 있는 것과 유사한것입니다.


그런데. 이번에는 파일 업로드 부분이 추가 되었습니다.


form type이 mutilpart 일경우에. request에서 getParameter로


파라메터를 못 가져오더군요.


그래서 한참을 찾은 것이. CommonsMultipartRequestHandler 클래스를 이용해서


해결했습니다.


또한 파일을 여기 Action에서 가져가서 따른 Action으로 넘길때. 메모리의 공간을 찾이 할꺼


같아서. 여기서 바로 템프 디렉토리에 저장을 한 다음 파일 명과, 파일의 크기를 넘겨 주는


방식을 취했습니다.


참고 하실 것이 있으면 참고 하세요.


/*
 * 파일명 : BaseAction.java
 * 버  젼 : 1.0
 * 저작권 :

 * 설  명 : 공통 Action 처리
 */
package ad.com.action;

import java.util.Enumeration;
import java.util.Vector;
import java.util.Hashtable;
import javax.servlet.http.HttpServletRequest;
import javax.servlet.http.HttpServletResponse;
import javax.servlet.http.HttpSession;
import javax.servlet.http.Cookie;
import org.apache.struts.action.Action;
import org.apache.struts.action.ActionForm;
import org.apache.struts.action.ActionForward;
import org.apache.struts.action.ActionMapping;
import org.apache.struts.action.RequestProcessor;
import org.apache.struts.upload.FormFile;

import org.apache.struts.upload.CommonsMultipartRequestHandler;
import java.io.FileOutputStream;
import java.io.File;
import java.io.InputStream;
import java.io.OutputStream;
import java.io.BufferedOutputStream;

import org.apache.commons.fileupload.FileItem;

import ad.com.form.BaseForm;
import ad.util.common.ReturnResult;
import ad.util.common.Constant;

/**
 * <pre>
 *  공통 Action 처리
 *  세션처리
 *  폼빈처리
 * [관련항목]
 *
 * [사용법]
 *
 * [변경기록]
 *  

 * </pre>
 * @author Copyright(c) 2004-05 by KSC. All right reserved.
 * @version 1.0
 * @see ad.util.common.ReturnResult
 * @see ad.com.form.BaseForm
 * @since 1.1
 */

public abstract class BaseAction extends Action
{

    /**
    * Description  : Action Servlet 에서 호출
    * @param   ActionMapping mapping
    * @param   ActionForm form
    * @param   HttpServletRequest request
    * @param   HttpServletResponse response
    * @return  ActionForward
    * @exception Exception - doExecute 수행
    */
    public ActionForward execute (
                                    ActionMapping mapping,
                                    ActionForm form,
                                    HttpServletRequest request,
                                    HttpServletResponse response
                                 ) throws Exception
    {
        /**
         * 공통 Form Bean
         */
        BaseForm           lo_BaseForm  = null;
        /**
         * content Type
         */
        String             contentType  = null;
        /**
         * HttpServletRequest
         */
        HttpServletRequest req          = null;

        CommonsMultipartRequestHandler mRhdl = null;

        try
        {
            contentType    = request.getContentType();
            /**
             * 사용자 로그인 여부 체크
             */
            if (!CookieCheck(request) )
            {
                return mapping.findForward("login");
            }


            /**
             * contentType 이 multipart/form-data 인지 구분
             */
            if ( (contentType != null) && contentType.startsWith("multipart/"))
            {
                /**
                 * Request parser
                 */
                req   = request;
                mRhdl = new  CommonsMultipartRequestHandler();
                mRhdl.handleRequest(req);
                lo_BaseForm =  getFileitems( mRhdl, getCookieValue(req, getEdtValue ( getFormValue(req) ))) ;

                /**
                 * 업로드 파일 삭제처리(임시 데이터)
                 */
                mRhdl.rollback();
            }
            else
            {
                req = request;
                lo_BaseForm =  getCookieValue(req, getEdtValue ( getFormValue(req) )) ;
            }

            return doExecute(mapping, form, req, response, lo_BaseForm);
        }
        catch (Exception e)
        {
            System.out.println("Exception :: Base Action ["+e.getMessage()+"]");
            return doExecute(mapping, form, request, response, null);
        }
    }

    /**
    * Description  : request에서 폼의 이름과 값을 가져온다.
    * @param   HttpServletRequest req
    * @return  BaseForm
    * @exception Exception return null
    */
    private BaseForm getFormValue(HttpServletRequest req )
    {
        Enumeration  lo_getParam = null;
        String       ls_Param    = "";
        String       ls_Value    = "";
        BaseForm     lo_BForm    = null;

        try
        {
            lo_BForm    = new BaseForm();

            lo_getParam = req.getParameterNames();

            if (lo_getParam != null )
            {
                for ( ; lo_getParam.hasMoreElements() ;)
                {
                    ls_Param = (String)lo_getParam.nextElement() ;
                    ls_Value = req.getParameter(ls_Param);
                    lo_BForm.setParam(ls_Param, ls_Value);
                }
                return lo_BForm;
            }
            else
            {
                return null;
            }
        }
        catch (Exception e)
        {
            System.out.println("Exception :: BaseAction :: getFormValue ["+e.getMessage()+"]");
            return null;
        }
    }

    /**
    * Description  : 에디터 테이블의 데이터를 ReturnResult 형태로 변환 하여
    *                edtList 의 키 값으로 넣는다.
    * @param   BaseForm lo_BaseForm
    * @return  BaseForm
    * @exception Exception return BaseForm
    */
    private BaseForm getEdtValue ( BaseForm lo_BaseForm ){
        ReturnResult  lo_retRst   = null;
        BaseForm      lo_BF       = null;
        String        ls_edtList  = "";
        String        ls_edtValue = "";

        String []     la_edtRowval = null;
        String []     la_edtColval = null;
        String []     la_edtList   = null;

        int           li_idx       = 0;
        Vector        lo_lstVt   = new Vector();

        try
        {
            ls_edtList  = lo_BaseForm.getParam("edtlist" ) != null ? lo_BaseForm.getParam("edtlist" ) : "";
            ls_edtValue = lo_BaseForm.getParam("edtvalue") != null ? lo_BaseForm.getParam("edtvalue") : "";

            if (    (!ls_edtList.trim().equals(""))
                 && (!ls_edtValue.trim().equals(""))
               )
            {
                la_edtList   = ls_edtList.trim().toUpperCase().split(";");
                la_edtRowval = ls_edtValue.split("@");
                for ( li_idx = 0 ; li_idx < la_edtRowval.length ; li_idx ++)
                {
                    la_edtColval = la_edtRowval[li_idx].split(";");
                    lo_lstVt.addElement(la_edtColval);
                }
                lo_retRst = new ReturnResult (lo_lstVt, la_edtList) ;
                lo_BaseForm.setParam ( "edtList" , lo_retRst);
                lo_BF  = lo_BaseForm;
            }
            else
            {
                lo_BF  = lo_BaseForm;
            }

        }
        catch ( Exception  e )
        {
            System.out.println(" Exception :: BaseAction :: getEdtValue ["+e.getMessage()+"]");
        }
        return lo_BF;
    }

    /**
    * Description  : 로그인 여부 체크
    * @param   HttpServletRequest request
    * @return  boolean
    * @exception Exception return false
    */
    private boolean CookieCheck ( HttpServletRequest request ){
        int      li_Loop      = 0;
        String   ls_userid    = "";
        Cookie[] lo_Cookie    = request.getCookies();
        boolean  lb_chk       = false;
        try
        {
            for(li_Loop = 0 ; li_Loop < lo_Cookie.length ; li_Loop ++)
            {
                if (lo_Cookie[li_Loop].getName().equals("PK_USERID"))
                {   // 시스템 계정
                    ls_userid     = lo_Cookie[li_Loop].getValue();
                    break;
                }
            }

            if (ls_userid.trim().equals("") )
            {
                lb_chk  =  false;
            }
            else
            {
                lb_chk  =  true;
            }
            return lb_chk;
        }
        catch ( Exception  e )
        {
            System.out.println(" Exception :: BaseAction :: CookieCheck ["+e.getMessage()+"]");
        }
        return lb_chk;
    }

    /**
    * Description  : 쿠키 값을 Form Bean 에 저장
    * @param   HttpServletRequest request
    * @param   BaseForm lo_BaseForm
    * @return  BaseForm lo_BaseForm
    * @exception none
    */
    private BaseForm getCookieValue ( HttpServletRequest request, BaseForm lo_BaseForm )
    {
        int      li_Loop      = 0;
        Cookie[] lo_Cookie    = request.getCookies();
        try
        {
            for(li_Loop = 0 ; li_Loop < lo_Cookie.length ; li_Loop ++)
            {
                if (lo_Cookie[li_Loop].getName().equals("PK_USERID"))
                {
                    lo_BaseForm.setParam ( "gs_userid" , lo_Cookie[li_Loop].getValue());
                    continue;
                }
                else if (lo_Cookie[li_Loop].getName().equals("PK_USERNM"))
                {
                    lo_BaseForm.setParam ( "gs_usernm" , lo_Cookie[li_Loop].getValue());
                    continue;
                }
                else if (lo_Cookie[li_Loop].getName().equals("PK_DEPTCD"))
                {
                    lo_BaseForm.setParam ( "gs_deptcd" , lo_Cookie[li_Loop].getValue());
                    continue;
                }
                else if (lo_Cookie[li_Loop].getName().equals("PK_DEPTNM"))
                {
                    lo_BaseForm.setParam ( "gs_deptnm" , lo_Cookie[li_Loop].getValue());
                    continue;
                }
                else if (lo_Cookie[li_Loop].getName().equals("PK_WORKDT"))
                {
                    lo_BaseForm.setParam ( "gs_workdt" , lo_Cookie[li_Loop].getValue());
                    continue;
                }
                else if (lo_Cookie[li_Loop].getName().equals("PK_WORKS"))
                {
                    lo_BaseForm.setParam ( "gs_works" , lo_Cookie[li_Loop].getValue());
                    continue;
                }
                else if (lo_Cookie[li_Loop].getName().equals("PK_WORKSNM"))
                {
                    lo_BaseForm.setParam ( "gs_worksnm" , lo_Cookie[li_Loop].getValue());
                    continue;
                }
                else if (lo_Cookie[li_Loop].getName().equals("PK_CLIENTIP"))
                {
                    lo_BaseForm.setParam ( "gs_clientip" , lo_Cookie[li_Loop].getValue());
                    continue;
                }
            }
        } catch ( Exception  e ){
            System.out.println(" Exception :: BaseAction :: getCookieValue ["+e.getMessage()+"]");
        }
        return lo_BaseForm;
    }

    /**
    * Description  : 파일 명과 파일 크기를 Form Bean 에 저장
    * @param   HttpServletRequest request
    * @param   BaseForm lo_BaseForm
    * @return  BaseForm lo_BaseForm
    * @exception Exception return BaseForm
    */
    private BaseForm getFileitems ( CommonsMultipartRequestHandler cMRH, BaseForm lo_BaseForm )
    {
        Enumeration  oFileNames    = null;
        Hashtable    oFileItems    = null;
        String       sFileObjName  = null;
        String       sFileName     = null;
        FormFile     oFileItem     = null;
        File         oCFile        = null;
        int          nFileSize     = -1;
        try
        {
            /**
             * 파일 Object HashTable
             */
            oFileItems  = cMRH.getFileElements();
            if ( oFileItems != null)
            {
                /**
                 * 파일 Object Form Name
                 */
                oFileNames  = oFileItems.keys();
                if (oFileNames != null)
                {
                    for ( ; oFileNames.hasMoreElements() ; )
                    {

                        sFileObjName  = (String) oFileNames.nextElement();

                        /**
                         * 파일
                         */
                        oFileItem  = (FormFile) oFileItems.get(sFileObjName) ;

                        if ( oFileItem == null) continue;

                        sFileName = oFileItem.getFileName();
                        nFileSize = oFileItem.getFileSize() ;

System.out.println("BaseAction :: getFileName ::sFileName ["+ sFileName+"]");
System.out.println("BaseAction :: getFileName ::nFileSize ["+ nFileSize+"]");

                        lo_BaseForm.setParam(sFileObjName ,  sFileName );
                        /**
                         * 파일 크기 10 M
                         */
                        if ( (nFileSize > (10 * 1024000))  )
                        {
                            /**
                             * 파일 용량 초과 및 파일이 존재하지 않을 경우
                             */
                            lo_BaseForm.setParam(sFileObjName+"_size" , "-1" );
                            continue;
                        }

                        /**
                         * 파일 크기 0M 제외
                         */
                        if ( (nFileSize <= 0 ) )
                        {
                            /**
                             * 파일 용량 초과 및 파일이 존재하지 않을 경우
                             */
                            lo_BaseForm.setParam(sFileObjName+"_size" , "0" );
                            continue;
                        }

                        InputStream stream = oFileItem.getInputStream();
                        oCFile             = new File (Constant.TEMP_DIR + sFileName.trim());
                        OutputStream bos   = new BufferedOutputStream(new FileOutputStream(oCFile));
                        int bytesRead      = 0;
                        byte[] buffer      = new byte[8192];
                        while ((bytesRead = stream.read(buffer, 0, 8192)) != -1) {
                            bos.write(buffer, 0, bytesRead);
                        }
                        bos.close();
                        lo_BaseForm.setParam(sFileObjName+"_size" , new Integer(nFileSize).toString() );
                        stream.close();

                    }
                }
            }
        }
        catch (Exception e)
        {
            System.out.println(" Exception :: BaseAction :: getFileitems ["+e.getMessage()+"]");
        }
        return lo_BaseForm;
    }


    /**
    * Description  : BaseAction클래스를 상속하는 클래스들이 구현해야할 메써드.
    * @param ActionMapping mapping,
    * @param ActionForm form,
    * @param HttpServletRequest request,
    * @param HttpServletResponse response,
    * @param BaseForm oTmpMap
    * @return  ActionForward
    * @exception none
    */
 protected abstract ActionForward doExecute(
                                          ActionMapping mapping,
                                          ActionForm form,
                                          HttpServletRequest request,
                                          HttpServletResponse response,
                                          BaseForm oTmpMap
                                           ) throws Exception;
==============================================================================================


파일업로드 예제


net.sung2li.file.action.FileAction.java-----------------

/*
 * 작성된 날짜: 2006. 1. 23
 *
 * 프로젝트명 : test
 * 페키지명 : net.sung2li.file.action
 * 파일명 : FileAction.java
 * ------------------------------------------
 * 수정일자 :
 * 수정내용 :
 * 수정자 :
 */
package net.sung2li.file.action;

import java.io.BufferedOutputStream;
import java.io.File;
import java.io.FileOutputStream;
import java.io.IOException;
import java.io.InputStream;
import java.io.OutputStream;
import java.text.SimpleDateFormat;
import java.util.Date;

import javax.servlet.http.HttpServletRequest;
import javax.servlet.http.HttpServletResponse;

import net.sung2li.file.form.FileForm;

import org.apache.struts.action.Action;
import org.apache.struts.action.ActionForm;
import org.apache.struts.action.ActionForward;
import org.apache.struts.action.ActionMapping;

/**
 * @author 장성일
 *
 * 파일 업로드 테스트
 *
 */
public class FileAction extends Action {
 /* (비Javadoc)
  * @see org.apache.struts.action.Action#execute(org.apache.struts.action.

ActionMapping, org.apache.struts.action.ActionForm, javax.servlet.http.HttpServletRequest, javax.servlet.http.HttpServletResponse)
  */
 public ActionForward execute(
  ActionMapping arg0,
  ActionForm arg1,
  HttpServletRequest arg2,
  HttpServletResponse arg3)
  throws Exception {
 
  FileForm fileform = (FileForm) arg1;
 
  String result;
  try{
   //Create an input stream to read the file.
   InputStream in = fileform.getFile().getInputStream();
   
   //파일의 중복처리 문제로 파일앞에 날짜를 붙여서 저장
   Date date = new Date();
   SimpleDateFormat sdf = new SimpleDateFormat("yyyyMMddHHmmss");
   result = sdf.format(date)+System.currentTimeMillis();
   File file = new File("d:\\"+result); //저장경로
   OutputStream os = new BufferedOutputStream(new FileOutputStream(file));
   int i;
   byte[] buffer = new byte[1024*4]; //4kbytes
   
   while((i=in.read(buffer, 0, 1024*4)) != -1){
    os.write(buffer, 0, i);
   }
   
   //Close the output stream.
   os.close();      
   //Close the input stream.
   in.close();
   
  }catch(IOException e){
   e.printStackTrace();
   result = null;
  }
 
  return null;
 }

}


net.sung2li.file.form.FileForm.java-----------------

/*
 * 작성된 날짜: 2006. 1. 23
 *
 * 프로젝트명 : test
 * 페키지명 : net.sung2li.file.form

 * 파일명 : FileForm.java
 * ------------------------------------------
 * 수정일자 :
 * 수정내용 :
 * 수정자 :
 */
package net.sung2li.file.form;

import org.apache.struts.action.ActionForm;
import org.apache.struts.upload.FormFile;


/**
 * @author 장성일
 *
 * 파일 업로드 테스트
 *
 */
public class FileForm extends ActionForm {
 private FormFile file;


 /**
  * @return
  */
 public FormFile getFile() {
  return file;
 }

 /**
  * @param file
  */
 public void setFile(FormFile file) {
  this.file = file;
 }

}

index.jsp----------------------

<%@ page language="java" pageEncoding="EUC-KR" %>
<!DOCTYPE HTML PUBLIC "-//w3c//dtd html 4.0 transitional//en">
<html>
 <head>
  <title>파일</title>
 </head>
 
 <body bgcolor="#FFFFFF">
  <form name="f" action="./file.do" method="post" enctype="multipart/form-data">
   <input type="file" name="file" value="1" /><br />
   <input type="submit" />
  </form>
 </body>
</html>


/WEB-INF/struts-config.xml----------------

<?xml version="1.0" encoding="ISO-8859-1" ?>

<!DOCTYPE struts-config PUBLIC
          "-//Apache Software Foundation//DTD Struts Configuration 1.2//EN"
          "http://jakarta.apache.org/struts/dtds/struts-config_1_2.dtd">

<struts-config>
 <form-beans>
  <form-bean type="net.sung2li.file.form.FileForm" name="fileForm" />
 </form-beans>
 <action-mappings>
  <action path="/file" type="net.sung2li.file.action.FileAction" name="fileForm" scope="request" />
 </action-mappings>
</struts-config>


=========================================================================================


[간단소스]


//struts-config.xml


<form-beans type="org.apache.struts.action.ActionFormBean">
  <form-bean name="uploadForm" type="local.struts.upload.UploadForm"/>
</form-beans>


 <global-forwards type="org.apache.struts.action.ActionForward">
  <forward name="upload_ok" path="/upload_ok.jsp" />
 </global-forwards>


 <action-mappings type="org.apache.struts.action.ActionMapping">
  <action
   input="/upload.jsp"
   name="uploadForm"
   path="/uploadPersist"
   type="local.struts.upload.UploadAction"  
   validate="false" />
 </action-mappings>


//UploadForm.java


package local.struts.upload;

import javax.servlet.http.HttpServletRequest;
import org.apache.struts.action.ActionForm;
import org.apache.struts.action.ActionMapping;
import org.apache.struts.upload.FormFile;


public class UploadForm extends ActionForm {
 
 /**
  *
  */
 private static final long serialVersionUID = 1L;
 private FormFile upFile = null;
   
    public void reset(ActionMapping mapping, HttpServletRequest request) {
     upFile = null;
    }
   
    public FormFile getUpFile() {
     return upFile;
    }
   
    public void setUpFile(FormFile upFile) {
     this.upFile = upFile;
    }
}


//UploadAction.java


package local.struts.upload;

import java.io.FileOutputStream;
import java.io.InputStream;
import java.io.OutputStream;
import javax.servlet.http.HttpServletRequest;
import javax.servlet.http.HttpServletResponse;
import org.apache.struts.upload.FormFile;
import org.apache.struts.action.Action;
import org.apache.struts.action.ActionForm;
import org.apache.struts.action.ActionForward;
import org.apache.struts.action.ActionMapping;

public class UploadAction extends Action {
 
 public ActionForward execute(
   ActionMapping mapping,
   ActionForm form,
   HttpServletRequest request,
   HttpServletResponse response) throws Exception {
 
        FormFile upFile = ((UploadForm)form).getUpFile();
        InputStream stream = upFile.getInputStream();
        String path = "C:/javawork/Tomcat4.1/webapps/struts/upload/";
        OutputStream bos = new FileOutputStream( path + upFile.getFileName()  );
        int bytesRead = 0;
        byte[] buffer = new byte[8192];
        while ((bytesRead = stream.read(buffer, 0, 8192)) != -1)
        {
                bos.write(buffer, 0, bytesRead);
        }
        bos.close();       
        stream.close();     
       
        return (mapping.findForward( "upload_ok" ));
 }
}


//upload.jsp


<html>
<body>
 <form name=upload action=uploadPersist.do method=post enctype="multipart/form-data">
  file:<input type=file name=upFile>
  <BR>
  <input type=submit>
 </form>
</body>
</html>


========================================================================================


스트러츠 왕초보가 써보기

samplestruts.zip


흠.. 요즘 바빠설..쩝... 내 프로젝트에 참여한다고 맘먹은 친구가 있는데..


내글과 소스를 보기만 했단다.. 이해를 해야쥐..


넘 어렵다고.. 처음부터 방법을 가르쳐 달라고..


그래서 이렇게 글을 쓴다.


여기서 struts 를 받는다.

http://jakarta.apache.org/site/binindex.cgi


받은 다음 압축을 풀면 그안에 lib 밑에 *.jar 파일과 *.tld 등등이 있다.


이 파일들이 있어야 struts 를 사용할 수 있다.


이제 톰켓에 컨텍스트를 만들고 WEB-INF 밑에 web.xml에 아래와 같이 만들어 준다.


web.xml ===============================================================================


<?xml version="1.0" encoding="UTF-8"?>
<!DOCTYPE web-app PUBLIC "-//Sun Microsystems, Inc.//DTD Web Application 2.3//EN" "http://java.sun.com/j2ee/dtds/web-app_2_3.dtd">
<web-app>
    <servlet>
        <servlet-name>action</servlet-name>
        <servlet-class>org.apache.struts.action.ActionServlet</servlet-class>
        <init-param>
            <param-name>config</param-name>
            <param-value>/WEB-INF/struts-config.xml</param-value>
        </init-param>
        <init-param>
            <param-name>debug</param-name>
            <param-value>3</param-value>
        </init-param>
        <init-param>
            <param-name>detail</param-name>
            <param-value>3</param-value>
        </init-param>
        <load-on-startup>1</load-on-startup>
    </servlet>
    <servlet-mapping>
        <servlet-name>action</servlet-name>
        <url-pattern>*.do</url-pattern>
    </servlet-mapping>
</web-app>


web.xml ===============================================================================


위와 같이 struts를 사용한다고 web.xml 에 만들었다면 이제 그에 관련된 Action 클래스와


ActionForm 를 만들어준다.


sampleForm============================================================================

package sung2li.struts.form;

import org.apache.struts.action.ActionForm;

public class SampleForm extends ActionForm {

 private String hi = "hi";

//setXXX, getXXX는 input form의 name과 반드시 동일하게 맞춰준다.

 public String getHi() {
  return hi;
 }

 public void setHi(String hi) {
  this.hi = hi;
 }


}
sampleForm============================================================================


sampleAction===========================================================================

package sung2li.struts.action;

import javax.servlet.http.HttpServletRequest;
import javax.servlet.http.HttpServletResponse;

import org.apache.struts.action.Action;
import org.apache.struts.action.ActionForm;
import org.apache.struts.action.ActionForward;
import org.apache.struts.action.ActionMapping;

import sung2li.struts.form.SampleForm;

public class SampleAction extends Action {

 public ActionForward execute(
  ActionMapping mapping,
  ActionForm form,
  HttpServletRequest request,
  HttpServletResponse response)
  throws Exception {
//ActoinForm에 input form 에서 입력한 데이터가 자동으로 들어간다.

// 그 ActionForm 을 위에서 만든 sampleForm 에 넣어준다.

  SampleForm sampleForm = (SampleForm) form;


  request.setAttribute("hi", sampleForm.getHi());


//포워드 시키는 부분이다. 이 포워드는 아래서 만들 struts-config.xml에 정의된

//path로 이동한다.
  return mapping.findForward("result");
 }

}

sampleAction===========================================================================


이제 필요한 클래스를 만들었으니 입력 페이지와 결과 페이지를 만든다.


index.jsp===============================================================================

<html>
 <head>
  <title>sung2li - sample struts</title>
 </head>
 <body>

<!--

폼 액션 부분에 아래와 같이 해준다.

sample.do 역시 아래서 만든 struts-config.xml 에 정의된다.

-->
  <form action="/samplestruts/sample.do">
   <input type="text" name="hi"></br>
   <input type="submit">
  </form>
 <body>
</html>

index.jsp===============================================================================


result.jsp===============================================================================

<%@ page language="java" pageEncoding="EUC-KR" %>
<!DOCTYPE HTML PUBLIC "-//w3c//dtd html 4.0 transitional//en">
<html>
<head>
<title>sung2li - sample struts</title>
</head>
<body bgcolor="#FFFFFF">
<%=request.getAttribute("hi")%>


</body>
</html>

result.jsp===============================================================================


struts-config.xml =======================================================================

<?xml version="1.0" encoding="UTF-8"?>
<!DOCTYPE struts-config PUBLIC "-//Apache Software Foundation//DTD Struts Configuration 1.1//EN" "http://jakarta.apache.org/struts/dtds/struts-config_1_1.dtd">
<struts-config>
   
    <!-- ========== Data Source Configuration =============================== -->
    <data-sources />
   
    <!-- ========== Form Bean Definitions ================================== -->

    <!-- 이전에 만든 sampleForm.java 를 폼빈으로 사용하겠다고 선언한 부분이다.  -->

    <form-beans>
        <form-bean name="sampleForm" type="sung2li.struts.form.SampleForm">
            <form-property name="hi" type="java.lang.String" initial="hi" />
        </form-bean>
       
    </form-beans>

   
    <!-- ========== Global Exception Definitions ============================== -->
    <global-exceptions />
   
    <!-- ========== Global Forward Definitions =============================== -->
    <global-forwards />
   
    <!-- ========== Action Mapping Definitions =============================== -->

    <!-- 이전에 만든 sampleAction.java 를 사용하겠다고 선언한 부분이다. -->
    <action-mappings>
        <action
            attribute="sampleForm"
            input="/input.jsp"
            name="sampleForm"
            path="/sample"
            type="sung2li.struts.action.SampleAction">

    <!-- return mapping.findForward("result"); 이부분의 포워드 선언 이다. -->

            <forward name="result" path="/result.jsp" />
        </action>
    </action-mappings>
   
    <!-- ========== Controller Configuration ================================ -->
    <controller />
   
    <!-- ========== Message Resources Definitions ============================ -->
    <message-resources parameter="sung2li.struts.ApplicationResources" />
   
    <!-- ========== Plug Ins Configuration ================================= -->
</struts-config>


struts-config.xml =======================================================================


이렇게 셋팅한다음에 실행해 보면 된다..ㅡ.ㅡ;; 너무 간단하다고 무책임 한거 아니냐고 생각하지


말아라. 나 잠못자고 만들어서 지금 제정신 아니다.


단순히 샘플이니 어떻게 움직이는 지를 설명한 것이다.


더많은 정보를 얻으려면  http://jakarta.apache.org/struts/index.html 에서 찾아보도록..


위 설명을 위해 만든 소스를 첨부 했으니 읽어보지만 말고 이해해라~~

Posted by 1010
51.Struts22009. 2. 23. 17:36
반응형

   Struts2 강좌  

  •  uychoi66
  • 2008년 1월 22일 am 12:27

문서설명 : Struts2에 대한 tip에서 부터 간단한 강좌까지를 정리합니다.

태그: 없음

평가점수 (5 표) : 
좋습니다.
 
로그인하세요.

조회수 4234 , 즐겨찾기수 0 

회원 (4) :
rkdq98d, coolbyj, ykkim, yhlee

포함된 문서 목록

-

Struts-result 

uychoi66 2008년 2월 22일, 조회수 995 , 덧글수 0

태그: 없음

 즐겨찾기에 추가 이메일 보내기 문서꾸러미에 추가 그룹에 추가

Struts-parameter 

uychoi66 2008년 2월 22일, 조회수 1113 , 덧글수 0

태그: 없음

 즐겨찾기에 추가 이메일 보내기 문서꾸러미에 추가 그룹에 추가

Struts-action 

uychoi66 2008년 2월 22일, 조회수 1302 , 덧글수 0

태그: 없음

 즐겨찾기에 추가 이메일 보내기 문서꾸러미에 추가 그룹에 추가

Struts2_theme 

uychoi66 2008년 2월 22일, 조회수 915 , 덧글수 0

태그: 없음

 즐겨찾기에 추가 이메일 보내기 문서꾸러미에 추가 그룹에 추가

Struts-result-stream 

uychoi66 2008년 2월 22일, 조회수 1115 , 덧글수 0

태그: 없음

 즐겨찾기에 추가 이메일 보내기 문서꾸러미에 추가 그룹에 추가

스트러츠2 

uychoi66 2008년 1월 9일, 조회수 3587 , 덧글수 0

태그: 없음

 즐겨찾기에 추가 이메일 보내기 문서꾸러미에 추가 그룹에 추가

Posted by 1010
51.Struts22009. 2. 23. 15:47
반응형

Struts2, Spring, iBatis 사용

1. 다운로드

1-0. Mysql 다운로드

URL : http://dev.mysql.com/get/Downloads/MySQL-5.0/mysql-5.0.67-win32.zip/from/pick#mirrors

1-1. Spring 다운로드 : spring-framework-2.5.5.zip

URL : http://www.springframework.org/download
(2008년 9월 현재 최신버젼 2.5.5)

spring-framework-2.5.5-with-dependencies.zip (82M) 라이브러리 + 문서 + common-lib 포함
spring-framework-2.5.5-with-docs.zip (36M) 문서포함
spring-framework-2.5.5.zip (6M) 라이브러리

1-2. iBatis 다운로드 : ibatis-2.3.3.720.zip

URL : http://ibatis.apache.org/javadownloads.cgi
(2008년 9월 현재 최신버젼 2.3.3)

ibatis-2.3.3.720.zip (1.9M) 라이브러리

1-3. Struts 다운로드 : struts-2.0.11.2-lib.zip

URL : http://struts.apache.org/downloads.html
(2008년 9월 현재 최신버젼 2.0.11.2 )

struts-2.0.11.2-all.zip (91M) Full Distribution
struts-2.0.11.2-apps.zip (23M) Example Applications
struts-2.0.11.2-lib.zip (4M) Essential Dependencies Only

1-4. Mysql-Connector 다운로드 : mysql-connector-java-5.0.8.zip

URL : http://dev.mysql.com/downloads/connector/j/5.1.html

mysql-connector-java-5.0.8.tar.gz (8.4M) tar 압축(일반적으로 리눅스)
mysql-connector-java-5.0.8.zip (8.4M) zip 압축

2. 이클립스 프로젝트 생성

  • 환경
    이클립스 3.4 WTP
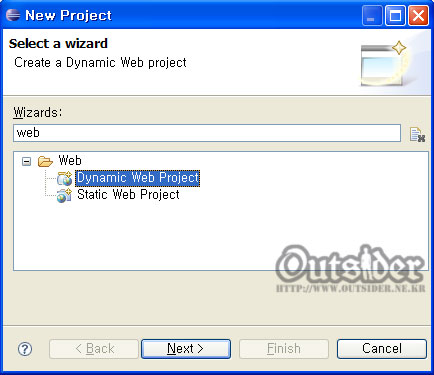
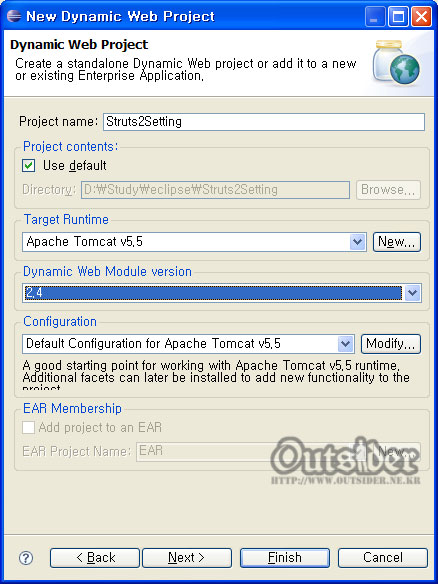
  • 새 프로젝트 작성
    File >> New >> Project >> Ohter >> Dyanmic Web Project
    Project Name : devTest 입력 >> Finish
  • Output폴더 변경
    Propterties >> Java Build Path >>Source탭 >> 제일 밑에 Default output folder 이 있다.
    Default output folder : devTest/WebContent/WEB-INF/classes

3. 설치

3-0. Mysql 설치

알아서 설치~^^; 윈도우용이라면 .exe 파일을 실행하셔서.
"다음", "다음".... 클릭신공 발휘!!

3-1. Spring 설치

  • (V) 표시가 되어있는 파일을 이클립스 프로젝트의 /devTest/WebContent/WEB-INF/lib 안에 넣는다.
    (파일을 복사하게 되면 자동으로 이클립스가 라이브러리를 Java Resources: src/Libraries/Web App Libraries 에 등록한다.신기 _!)
    spring-framework-2.5.5
        │  changelog.txt
        │  license.txt
        │  notice.txt
        │  readme.txt
        │  
        └─dist
            │  (V) spring.jar
            │  
            ├─modules
            │      (V) spring-aop.jar
            │      (V) spring-beans.jar
            │      (V) spring-context-support.jar
            │      (V) spring-context.jar
            │      (V) spring-core.jar
            │      (V) spring-jdbc.jar
            │      (V) spring-jms.jar
            │      (V) spring-orm.jar
            │      (V) spring-test.jar
            │      (V) spring-tx.jar
            │      (V) spring-web.jar
            │      (V) spring-webmvc-portlet.jar
            │      (V) spring-webmvc-struts.jar
            │      (V) spring-webmvc.jar
            │      
            ├─resources
            │      spring-aop-2.0.xsd
            │      spring-aop-2.5.xsd
            │      spring-beans-2.0.dtd
            │      spring-beans-2.0.xsd
            │      spring-beans-2.5.xsd
            │      spring-beans.dtd
            │      spring-context-2.5.xsd
            │      spring-form.tld
            │      spring-jee-2.0.xsd
            │      spring-jee-2.5.xsd
            │      spring-jms-2.5.xsd
            │      spring-lang-2.0.xsd
            │      spring-lang-2.5.xsd
            │      spring-tool-2.0.xsd
            │      spring-tool-2.5.xsd
            │      spring-tx-2.0.xsd
            │      spring-tx-2.5.xsd
            │      spring-util-2.0.xsd
            │      spring-util-2.5.xsd
            │      spring.ftl
            │      spring.tld
            │      spring.vm
            │      
            └─weaving
                    spring-agent.jar
                    spring-aspects.jar
                    spring-tomcat-weaver.jar

3-2. iBatis 설치

  • (V) 표시가 되어있는 파일을 이클립스 프로젝트의 /devTest/WebContent/WEB-INF/lib 안에 넣는다.
    ibatis-2.3.3.720
    │  jar-dependencies.txt
    │  license.txt
    │  notice.txt
    │  release.txt
    │  
    ├─doc
    │      dev-javadoc.zip
    │      user-javadoc.zip
    │      
    ├─lib
    │      (V) ibatis-2.3.3.720.jar
    │      
    ├─META-INF
    │      MANIFEST.MF
    │      
    ├─simple_example
    │  │  README.TXT
    │  │  
    │  └─com
    │      └─mydomain
    │          ├─data
    │          │      Account.xml
    │          │      SimpleExample.java
    │          │      SqlMapConfig.xml
    │          │      
    │          └─domain
    │                  Account.java
    │                  
    └─src
            ibatis-src.zip

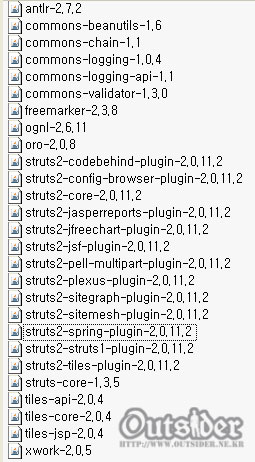
3-3. Struts 설치

  • (V) 표시가 되어있는 파일을 이클립스 프로젝트의 /devTest/WebContent/WEB-INF/lib 안에 넣는다.
    struts-2.0.11.2
        │  LICENSE.txt
        │  NOTICE.txt
        │  
        └─lib
                antlr-2.7.2.jar
                commons-beanutils-1.6.jar
                commons-chain-1.1.jar
                (V) commons-logging-1.0.4.jar
                commons-logging-api-1.1.jar
                commons-validator-1.3.0.jar
                (V) freemarker-2.3.8.jar
                (V) ognl-2.6.11.jar
                oro-2.0.8.jar
                struts-core-1.3.5.jar
                struts2-codebehind-plugin-2.0.11.2.jar
                struts2-config-browser-plugin-2.0.11.2.jar
                (V) struts2-core-2.0.11.2.jar
                struts2-jasperreports-plugin-2.0.11.2.jar
                struts2-jfreechart-plugin-2.0.11.2.jar
                struts2-jsf-plugin-2.0.11.2.jar
                struts2-pell-multipart-plugin-2.0.11.2.jar
                struts2-plexus-plugin-2.0.11.2.jar
                struts2-sitegraph-plugin-2.0.11.2.jar
                struts2-sitemesh-plugin-2.0.11.2.jar
                struts2-spring-plugin-2.0.11.2.jar
                struts2-struts1-plugin-2.0.11.2.jar
                struts2-tiles-plugin-2.0.11.2.jar
                tiles-api-2.0.4.jar
                tiles-core-2.0.4.jar
                tiles-jsp-2.0.4.jar
                (V) xwork-2.0.5.jar

3-4. Mysql-Connector 다운로드 : mysql-connector-java-5.1.6.zip

  • 압축을 풀고 mysql-connector-java-5.1.6-bin.jar 파일을 JRE_HOME/lib 안에 복사한다.

4. HelloWorld!! HelloWorld!! HelloWorld!! HelloWorld!! HelloWorld!! HelloWorld!!

4-1. HelloWorld!! Spring!!

Spring을 사용하는 이유? 10가지!!

1. Spring Provides Better Leverage
적은 노력을 하고도 많은 결과를 줄 수 있다.
2. Spring Provides Better Leverage
적은 노력을 하고도 많은 결과를 줄 수 있다.
3. Spring Provides Better Leverage
적은 노력을 하고도 많은 결과를 줄 수 있다.
4. Spring Provides Better Leverage
적은 노력을 하고도 많은 결과를 줄 수 있다.
5. Spring Provides Better Leverage
적은 노력을 하고도 많은 결과를 줄 수 있다.
6. Spring Enables POJO Programming
Spring은 POJO프로그래밍을 가능하게 한다.
7. Spring Enables POJO Programming
Spring은 POJO프로그래밍을 가능하게 한다.
8. Dependency Injection Helps Testability
DI는 테스트를 용이하게 해준다.
9. Inversion of Control Simplifies JDBC
IoC는 JDBC를 단순화한다.
10. Spring's Community Thrives
Spring 커뮤니티의 번영

4-1-1. Controller + Model 생성 및 테스트

  • hello1 패키지 생성
  • hello1.HelloWorld.java 인터페이스 생성
    HelloWorld.java
    package hello1;
    
    public interface HelloWorld {
    	public String sayHello(String message);
    }
  • hello1.HelloWorldImpl.java 클래스 생성
    hello1.xml에서 message를 설정
    HelloWorldImpl.java
    package hello1;
    
    public class HelloWorldImpl implements HelloWorld {
    
     
        private String message;
    
        public HelloWorldImpl() {
        }
    
        public HelloWorldImpl(String message) {
                this.message = "From Constructor" + message;
        }
    
        public String sayHello(String message) {
                return this.message + message;
        }
    
        public void setMessage(String a) {
                message = a;
        }
    }
  • /src/hello1.xml 생성
    <?xml version="1.0" encoding="UTF-8"?>
    <!DOCTYPE beans PUBLIC "-//SPRING//DTD BEAN//EN" "http://www.springframework.org/dtd/spring-beans.dtd">
    <beans>
       <!--  bean 설정 -->
    	<bean id="hello" class="hello1.HelloWorldImpl">
    		<property name="message">
    			<value>HelloWorld!! Spring!!</value>
    		</property>
    	</bean>
    </beans>
    친절한 클립스씨

    이클립스에서 컴파일시 자동으로 /devTest/WebContent/WEB-INF/hello1.xml로 옴겨준다. '친절한것..^^'

  • 테스트를 위한 HelloClient.java 생성
    HelloClient 테스트 (hello1.xml과 HelloWorld연동 테스트)
    package hello1;
    
    import org.springframework.beans.factory.BeanFactory;
    import org.springframework.beans.factory.xml.XmlBeanFactory;
    import org.springframework.core.io.ClassPathResource;
    import org.springframework.core.io.Resource;
    
    public class HelloClient {
            public static void main(String[] args) {              
                    Resource res = new ClassPathResource("hello1.xml"); // 리소스를 읽어온다.
                                
                    BeanFactory factory = new XmlBeanFactory(res); // 스프링 컨테이너.
                    
                    HelloWorld bean1 = (HelloWorld)factory.getBean("hello"); // hello1.xml에서 입력한 beanID
                    
                    String str = bean1.sayHello("I need you!");
                    
                    System.out.println(str);                
            }
    }
    <결과>
    
    HelloWorld!! Spring!!I need you!

4-1-2. WAS 연동 : 웹으로 사용해보자.

  • HelloWorldServlet.java 생성
    package hello1;
    
    import java.io.IOException;
    import java.io.PrintWriter;
    
    import javax.servlet.ServletException;
    import javax.servlet.http.HttpServlet;
    import javax.servlet.http.HttpServletRequest;
    import javax.servlet.http.HttpServletResponse;
    
    import org.springframework.beans.factory.BeanFactory;
    import org.springframework.beans.factory.xml.XmlBeanFactory;
    import org.springframework.core.io.ClassPathResource;
    import org.springframework.core.io.Resource;
    
    public class HelloWorldServlet extends HttpServlet {
            public void doGet(HttpServletRequest req, HttpServletResponse res) throws ServletException, IOException {
                    res.setContentType("text/html; charset=euc-kr");
                    req.setCharacterEncoding("KSC5601");
                    PrintWriter out = res.getWriter();
                    String text = req.getParameter("message");
                    
                    try {                        
                            Resource resource = new ClassPathResource("hello1.xml");
                            BeanFactory factory = new XmlBeanFactory(resource);
                            HelloWorld bean1 = (HelloWorld)factory.getBean("hello");
                            String s = bean1.sayHello(text);
                            out.println(s);                        
                    }
                    catch(Exception e) {
                            
                    }
            }
            
            public void doPost(HttpServletRequest req,HttpServletResponse resp) throws ServletException,IOException
             {
              doGet(req, resp);
             }
    
    }

    컴파일 오류시 tomcat5/common/lib/servlet-api.jar 를 lib 추가한다.

  • 필터를 위한 WebContent/WEB-INF/web.xml 생성
    <?xml version="1.0" encoding="UTF-8"?>
    <!DOCTYPE web-app PUBLIC "-//Sun Microsystems, Inc.//DTD Web Application 2.3//EN" "http://java.sun.com/dtd/web-app_2_3.dtd">
    <web-app>
    	<!-- 설정 -->
    	<servlet>
    	<!-- hello1.HelloWorldServlet클래스의 서블릿이름은 HelloWorld 이다. -->
    		<servlet-name>HelloWorld</servlet-name>
    		<servlet-class>hello1.HelloWorldServlet</servlet-class>
    	</servlet>
    	
    	<!-- 맵핑 -->
    	<servlet-mapping>
    	<!-- url끝에     /servlet/HelloWorld.ok가 들어오면 서블릿이름이 HelloWorld인것을 연결시켜라 -->
    		<servlet-name>HelloWorld</servlet-name>
    		<url-pattern>/servlet/HelloWorld.ok</url-pattern> 
    	</servlet-mapping>
    </web-app>
  • 입력을 위한 index.html 생성
    <html>
    <body>
    	<form method=post
    		action="http://localhost:8080/devTest/servlet/HelloWorld.ok"><input
    		type=text name="message"> <input type=submit></form>
    </body>
    </html>

4-1-3. 실행

4-2. HelloWorld!! iBatis!!

iBatis의 장점 5가지..

적은 노력으로 SQL문을 변경할수 있다.
기존 데이터베이스 프로그램 코드의 20%정도만 사용해도 80%이상의 같은 기능을 수행할 수가 있게 된다
코드를 간단(simple)하게 해준다.

4-2-1. SqlMap

  • src/SqlMapConfig.xml 생성
    SqlMapConfig.xml
    <?xml version="1.0" encoding="UTF-8" ?>
    <!DOCTYPE sqlMapConfig PUBLIC "-//iBATIS.com//DTD SQL Map Config 2.0//EN" 
    "http://www.ibatis.com/dtd/sql-map-config-2.dtd">
    <sqlMapConfig>
    	<properties resource="SqlMapConfig.properties" />
    	<settings cacheModelsEnabled="true" enhancementEnabled="true"
    		lazyLoadingEnabled="true" maxRequests="32" maxSessions="10"
    		maxTransactions="5" useStatementNamespaces="false" />
    	<typeAlias alias="Hello" type="hello2.Hello" />
    	<transactionManager type="JDBC">
    		<dataSource type="DBCP">
    			<property name="JDBC.Driver" value="${driver}" />
    			<property name="JDBC.ConnectionURL" value="${url}" />
    			<property name="JDBC.Username" value="${username}" />
    			<property name="JDBC.Password" value="${password}" />
    			<property name="JDBC.DefaultAutoCommit" value="false" />			 
    			
    		</dataSource>
    	</transactionManager>
    	
    	<sqlMap resource="HelloMessage" />
    	<!-- 요런식으로 추가할 수 있다. -->
    	<!-- <sqlMap resource="Comment.xml" />  -->
    	<!-- <sqlMap resource="Message.xml" />  -->
    </sqlMapConfig>
  • settings 엘리먼트의 속성들
    acheModelsEnabled SqlMapClient 를 위한 모든 캐시모델을 가능 유무. Default: true (enabled)
    enhancementEnabled 런타임시 바이트코드 향상을 가능유무. Default: false (disabled)
    lazyLoadingEnabled 모든 늦은(lazy)로딩을 가능유무. Default: true (enabled)
    maxRequests 동시에 SQL문을 수행할 수 있는 쓰레드의 수. 셋팅값보다 많은 쓰레드는 다른 쓰레드가 수행을 완료할 때까지 블록 된다. Default: 512
    maxSessions 주어진 시간동안 활성화될 수 있는 세션의 수. Default: 128
    maxTransactions 한꺼번에 SqlMapClient.startTransaction()에 들어갈 수 있는 쓰레드의 최대갯수. 셋팅값보다 많은 쓰레드는 다른 쓰레드가 나올 때까지 블록 된다. Default: 32
    useStatementNamespaces 이 셋팅을 가능하게 하면 당신은 sqlmap이름과 statement이름으로 구성된 전체적인 이름(fully qualified name)으로 맵핑된 statement를 참조해야 한다. 예를 들면: queryForObject("sqlMapName.statementName"); Default: false (disabled)
  • transactionManager 엘리먼트의 별칭
    JDBC com.ibatis.sqlmap.engine.transaction.jdbc.JdbcTransactionConfig
    JTA com.ibatis.sqlmap.engine.transaction.jta.JtaTransactionConfig
    EXTERNAL com.ibatis.sqlmap.engine.transaction.external.ExternalTransactionConfig
  • dataSource 엘리먼트의 별칭
    SIMPLE com.ibatis.sqlmap.engine.datasource.SimpleDataSourceFactory
    DBCP com.ibatis.sqlmap.engine.datasource.DbcpDataSourceFactory
    JNDI com.ibatis.sqlmap.engine.datasource.JndiDataSourceFactory

4-2-2. ibatis

  • 환경
    mysql
    SQL 쿼리
    create table hello(name varchar(10), text varchar(10)); 
    
    insert into hello values("spring", "helloworld 1");
    insert into hello values("ibatis", "helloworld 2");
    insert into hello values("struts", "helloworld 3");
    
    commit;
  • hello2 패키지 생성
  • hello2.Hello.java 생성 (VO)
    Hello.java
    package hello2;
    
    public class Hello {
    	private String name;
    	private String text;
    	
    	public Hello(String name, String text) {	
    		this.name = name;
    		this.text = text;
    	}
    	
    	public String getName() {
    		return name;
    	}
    	public void setName(String name) {
    		this.name = name;
    	}
    	public String getText() {
    		return text;
    	}
    	public void setText(String text) {
    		this.text = text;
    	}
    	
    	
    }
  • src/SqlMapConfig.properties 생성
    SqlMapConfig.xml의 $Driver같은 참조를 사용할 속성 정의
    SqlMapConfig.properties
    driver=org.gjt.mm.mysql.Driver
    url=jdbc:mysql://192.168.10.200:3306/swjang
    username=swjang
    password=xxxxxxxx
  • src/HelloMessage.xml 생성
    HelloMessage.xml
    <?xml version="1.0" encoding="UTF-8" standalone="no"?>
    <!DOCTYPE sqlMap PUBLIC "-//iBATIS.com//DTD SQL Map 2.0//EN" "http://www.ibatis.com/dtd/sql-map-2.dtd">
    <sqlMap>
    	<select id="getHelloMessage" parameterClass="string" resultMap="Hello">
      <![CDATA[
        select 
          name,
          text
        from userinfo
        where name=#name#
      ]]>
    	</select>
    </sqlMap>
  • hello2.HelloWorld.java 생성
    HelloWorld.java
    package hello2;
    
    import java.io.IOException;
    import java.io.Reader;
    import java.sql.SQLException;
    
    import com.ibatis.common.resources.Resources;
    import com.ibatis.common.util.PaginatedList;
    import com.ibatis.sqlmap.client.SqlMapClient;
    import com.ibatis.sqlmap.client.SqlMapClientBuilder;
    
    public class HelloWorld {
    
    	 
    	@SuppressWarnings("deprecation")
    	public static void main(String[] args) throws SQLException {		
    		Reader reader = null;
    		try {
    			reader = Resources.getResourceAsReader("SqlMapConfig.xml");
    			
    		} catch (IOException e) {
    			e.printStackTrace();
    		}
    		
    		SqlMapClient sqlMap = SqlMapClientBuilder.buildSqlMapClient(reader);
    		
    		
    		PaginatedList list = (PaginatedList) sqlMap.queryForPaginatedList("getHelloMessage", "struts", 0);
    		
    		for (int i = 0; i < list.size(); i++) {
    			
    			System.out.println(list.getPageIndex());
    			list.nextPage();			  
    		}		
    		
    	}
    	
    }
    org.apache.commons.dbcp.BasicDataSource 클래스가 없다고 징징거릴때는?

    tomcat5/common/lib/nameing-factory-dbcp.jar 추가

그런데... 해도 에러난다?; =ㅅ=;

4-3. HelloWorld!! Spring + iBatis!!

4-3-1. SqlMapConfig.xml(ibatis용) => applicationContext.xml(spring용) 로 변경

<?xml version="1.0" encoding="UTF-8" ?>
<!DOCTYPE beans PUBLIC "-//SPRING//DTD BEAN//EN" "http://www.springframework.org/dtd/spring-beans.dtd">
<beans>
	<!--
		iBATIS SQLMaps의 설정파일 위치를 지정한다. class값은 SQLMaps 1.x버전을 사용할때는
		org.springframework.orm.ibatis.SqlMapFactoryBean SQLMaps 2.x버전을 사용할때는
		org.springframework.orm.ibatis.SqlMapClientFactoryBean 를 사용한다.
	-->
	<bean id="sqlMapClient" class="org.springframework.orm.ibatis.SqlMapClientFactoryBean">
		<property name="configLocation">
			<value>WEB-INF/SqlMapConfig.xml</value>
		</property>
	</bean>
	<!--
		dataSource를 사용하는것에 대한 정보를 나타낸다. 여기서 사용될수 있는 dataSource타입은 다른 문서를 참조하길
		바란다. 여기선 apache의 DBCP Connection pooling을 사용하는 것이다.
	-->
		
	<bean id="dataSource" class="org.apache.commons.dbcp.BasicDataSource"
		destroy-method="close">
		<property name="driverClassName">
			<value>org.gjt.mm.mysql.Driver</value>
		</property>
		<property name="url">
			<value>jdbc:mysql://192.168.10.200:3306/swjang</value>
		</property>
		<property name="username">
			<value>swjang</value>
		</property>
		<property name="password">
			<value>xxxxxxx</value>
		</property>
		<property name="defaultAutoCommit">
			<value>false</value>
		</property>
	</bean>
	<!--
		DB연결에 관련된 설정을 DataSource형태로 지정을 했기 때문에 트랜잭션 관리를
		org.springframework.jdbc.datasource.DataSourceTransactionManager 가
		담당하도록 지정한다.
	-->
	<bean id="myTransactionManager"
		class="org.springframework.jdbc.datasource.DataSourceTransactionManager">
		<property name="dataSource">
			<ref local="dataSource" />
		</property>
	</bean>  
  
 <!--?? -->
  <!-- 각각의 메소드 별로 트랜잭션관리 속성을 지정한다. -->
	<bean id="guestService"
		class="org.springframework.transaction.interceptor.TransactionProxyFactoryBean">
		<property name="transactionManager">
			<ref local="myTransactionManager" />
		</property>
		<property name="target">
			<ref local="guestTarget" />
		</property>
		<property name="transactionAttributes">
			<props>
				<prop key="get*">PROPAGATION_REQUIRED,readOnly</prop>
				<prop key="save*">PROPAGATION_REQUIRED</prop>
				<prop key="update*">PROPAGATION_REQUIRED</prop>
				<prop key="delete*">PROPAGATION_REQUIRED</prop>
			</props>
		</property>
	</bean>
	<!--
		소위 Spring을 사용하게 되는 비지니스 객체의 클래스를 지정하는 부분이다. 즉 여기선
		gikim.dongguk.guestboard.spring.GuestSpringImpl 클래스가 Spring의 여러가지 기능을
		담당하게 되는것이다. 그리고 관리하게 되는 DAO는 guestDAO로 지정한다.
	-->
	<bean id="guestTarget" class="gikim.dongguk.guestboard.spring.GuestSpringImpl">
		<property name="guestDAO">
			<ref local="guestDAO" />
		</property>
	</bean>
	<!--
		DAO에 관련된 셋팅이다. 실제로 iBATIS SQLMaps를 사용하게 되는 클래스를 지정하게 된다. DB정보인
		dataSource값과. iBATIS SQLMaps설정파일의 위치에 해당하는 sqlMapClient를 지정한다.
	-->
	<bean id="guestDAO" class="gikim.dongguk.guestboard.dao.IbatisGuestDAOImpl">
		<property name="dataSource">
			<ref local="dataSource" />
		</property>
		<property name="sqlMapClient">
			<ref local="sqlMapClient" />
		</property>
	</bean>
</beans>

4-3-2. code

spring은 SqlMapClient객체를 대체하는 SqlMapClientTemplate를 제공하는데 이를 생성하는 메소드는 getSqlMapClientTemplate()이다.

Reader reader = Resources.getResourceAsReader("SqlMapConfig.xml");
SqlMapClient sqlMap = SqlMapClientBuilder.buildSqlMapClient(reader);
user = (User) sqlMap.queryForObject("getUser", id);

사용자 정보를 가져오는 소스가 위와 같다고 할 때 spring의 SqlMapClientTemplate를 사용하면 아래와 같이 될 것이다..

User user = getSqlMapClientTemplate().queryForObject("getUser", id);

눈에 띄게 소스가 간편해진다. 이것밖에 장점이 없을까.? 아니다. 다음의 소스를 보자. spring이 자동적으로 트랜잭션을 처리해 주기 때문에 조금 전 입력예제로 사용되었던 소스가 아래처럼 다시 변경될 수 있다.

getSqlMapClientTemplate().insert("insertMessage", message);
return true;

spring의 트랜잭션 관리를 사용하면 위와 같이 소스가 간단해진다.

이것은 transactionAttributes 속성 하위의 설정값들에 의해 spring의 DI(dependency injection)을 사용하여 가능한 것이지만, 일단 개발자들에게는 SQLMaps로 인해 간단해진 소스가 더욱 심플해졌다는 사실 자체로 행복한 일일 것이다. 이건 개발 프레임워크를 제대로 사용할 때 개발 프레임워크가 개발자에게 주는 혜택이다

4-4. HelloWorld!! Struts + Spring + iBatis!!

5. 결론

이런 프레임워크를 사용하는 이유는...

보다 적은 노력 큰 효과
1) 유연성
2) 간결함
3) 재사용성

6. 참고자료

spring : http://cafe.naver.com/hdjv.cafe?iframe_url=/ArticleRead.nhn%3Farticleid=299
spring의 장점 : http://epro.tistory.com/tag/spring의 장점

ibatis : http://openframework.or.kr/Wiki.jsp?page=SqlmapsOfMaso
ibatis 장점 : http://okjsp.pe.kr/seq/104465

spring + ibatis + struts로 게시판 만들기 : http://blog.naver.com/phcs1219?Redirect=Log&logNo=140044056674

문서에 대하여

Posted by 1010
51.Struts22009. 2. 23. 15:46
반응형

Apache Struts 2 Framework

  • 작성자 : 고덕한
  • 최종수정날짜 : 2007년 8월 27일
개요

Apache Struts 2 Framework 에 대한 한글 문서를 제공하여, 국내 개발자들에게 Apache Struts 2 Framework 을 익히는 데 조금이나마 쉽게 접근할 수 있도록 하고자 합니다.

이 문서에서는 Apache Struts 싸이트에 있는 문서를 기반으로 한글로 다시 작성하여 올립니다. 일부 내용은 번역이 이루어지거나 혹은 나름대로 이해하고 문서를 작성하여 올리겠습니다. 가능한한 원문에 가깝도록 내용을 구성하겠습니다.

국내 자바 개발자들이 Struts 2 Framework 를 익히고, 개발하는데 서로의 노하우를 공유할 수 있도록 게시판을 만들어 질답 및 팁을 여러사람이 볼 수 있도록 하였습니다.

version 2.0.9

Download Now
Get Started
Plugin Registry

Struts 2 Framework 란 ?

Struts 2 Framework 은 WebWork Framework 에 기반을 두고 있습니다. WebWork Framework 은 여러해동안 좋은 아키텍처로 Framework 를 정립하여, 웹 어플리케이션 개발에 많이 활용되어 왔습니다. 이에 Struts Communites 와 WebWork Communities 들이 모여서 WebWork Framework 을 Struts 2 Framework 으로 명명하여 Framework 를 발전시키고자 합의를 하였습니다.

따라서 Struts 2 Framework 는 대부분 WebWork Framework 를 따르고 있으며, 초기의 Struts 2 Framework 는 WebWork Framework 와 같다고 여겨도 됩니다.

Struts 2 Framework 는 Struts 1.x Framework 와는 전혀 다른 아키텍처로 구성되어 있습니다. 일반적으로 Framework 든 어플리케이션이든, 버전업이 되면 기존에 있는 기능에 더 많은 기능을 추가하고, 부족한 기능을 보완하여 버전업을 합니다.

하지만 Struts 2 Framework 는 처음부터 Struts 1.x Framework 에 기반하지 않고, 전혀 다른 WebWork Framework 을 이름을 바꾸어서 새로운 아키텍처로 구성된 Struts 2 Framework 을 만들었습니다. 따라서 개발자들은 Struts 1.x Framework 와 다른 Struts 2 Framework 를 다시 익혀야 됩니다.


Documentation(문서)

Struts 2 Framework 싸이트(struts.apache.org) 에 있는 문서를 한글화 합니다. 원문의 내용에 대한 의미를 잃어버리지 않도록 하기 위해서 원문을 그대로 사용하는 부분도 있고, 좀 더 나은 의미 전달을 위해서 의역해서 내용을 보완하거나 추구하는 것도 있습니다.

목차는 원문에 있는 그대로 따라서 작성하도록 하겠습니다.

관련 내용

Posted by 1010
51.Struts22009. 2. 23. 15:44
반응형
아파치 스트러츠2에 대한 튜토리얼이 아파치 사이트보다 이곳이 더 잘 되어 있군요..
스트러츠2에 대해서 소개, 태그등의 예제까지 스트러츠2를 공부하시는 분은
이 사이트를 방문하시면 한큐에 갈증을 해소할 수 있을것입니다.  아래는 스트러츠2에 대한 튜토리얼을 Copy&Paste 한 내용입니다.

Struts 2 Tutorial

RoseIndia Struts 2 Tutorial and Online free training helps you learn new elegant Struts 2 Framework with examples. Struts 2 is very elegant and flexible front controller framework based on many standard technologies like Java Filters, Java Beans, ResourceBundles, XML etc.

  1. Struts 2 Features It is very extensible as each class of the framework is based on an Interface and all the base classes are given an extra application and even you can add your own. 
  2. Struts 2 History Apache Struts is an open-source framework that is used for developing Java web application. Originally developed by the programmer and author Craig R. McClanahan this was later taken over by the Apache Software Foundation in 2002.  
  3. Struts 2 Architecture Struts and webwork has joined together to develop the Struts 2 Framework. Struts 2 Framework is very extensible and elegant for the development of enterprise web application of any size. In this section we are going to explain you the architecture of Struts 2 Framework.  
  4. Why Struts 2 The new version Struts 2.0 is a combination of the Sturts action framework and Webwork. According to the Struts 2.0.1 release announcement, some key features are:
  5. Struts 1.x Vs Struts 2.x In the following section, we are going to compare the various features between the two frameworks. Struts 2.x  is very simple in comparison to the struts 1.x ,  few of its excelling features are:  
  6. Downloading and Installing Struts 2 In this section we will download and install the Struts 2.0 on the latest version of Tomcat container. We will first download tomcat and configure it as our development server.
       
    Struts 2 Hello World Application
  7. Creating the development directory Structure In this section we will create directory structure of our Struts 2 Hello World application based on Struts 2 framework. Our Struts 2 Hello World application is your first step towards developing applications based on Struts 2 framework.
  8. Writing Jsp, Java and Configuration files In this section we will write JSP, Java and required configuration files for our Struts 2 Hello World application. Now in struts 2 struts.xml is used to configure the applications. We will also deploy and test the application.   
  9. Struts 2 xml configuration file In this section we will introduce you with the struts.xml file. This section explains you how best you can use the struts.xml file for you big projects.
     
    Struts 2 Actions
  10. Struts 2 Actions Example When a client request matches the action's name, the framework uses the mapping from struts.xml file to process the request.  
  11. Struts 2 Actions Introduction When a client request matches the action's name, the framework uses the mapping from struts.xml file to process the request. The mapping to an action is usually generated by a Struts Tag.

    Struts 2 Login Application
  12. Developing Login Application in Struts 2 In this section we are going to develop login application based on Struts 2 Framework. Our current login application does not validate the user against the database 
  13. Adding Validation to Struts 2 Login Application In this section we will write the code to validate the login application. After completing this section you will be able to write validations for your Struts 2 projects.
  14. Running and testing application In this section we will run the example on Tomcat 6.0 server and check how it works.  
  15. Client Side Validation in Struts 2 Login Application In this section we will see how to write code that will generate Java Script code for client side validation. In the last section we developed Login-validator.xml configuration file for defining the server side validation.    
  16. Validations using Struts 2 Annotations In this section we are going to validate our login application using Annotations in Action class. Our current login application does not validate the user against the database. 
  17. Login/Logout With Session In this section, we are going to develop a login/logout application with session. This application checks the user authentication. Whenever you run, it takes an user id and a password (Both the user id and password is "admin") it displays the welcome page, when both fields are correctly filled.

    Struts 2 Tags  
  18. Struts Tags In this section we will introduce you with the tags provided along with Struts 2 framework. It is necessary to understand all the tags provided along with Struts 2 framework.
     
    Struts 2 Tags Examples          
  19. Struts 2 Tags Examples (Generic Tags) Struts 2 tags tutorials and examples.
  20. Control Tags-If / Else If / Else In this section we are going to discuss the various control tags ( The Control Tags are used for flow control, such if, else and iterate.).
  21. Append Tag (Control Tags) Example In this section, we are going to describe the append tag . The append tag is a generic tag that is used to merge multiple iterators into one iterator.
  22. Generator Tag (Control Tags) Example In this section, we are going to describe the generator tag . The generator tag is a generic tag that is used to generate iterators based on different attributes passed .
  23. Generator Tag (Control Tags) Using Count Attributes In this section, we are going to describe the generator tag using the count attributes.
  24. Generator Tag (Control Tags) Using an Iterator with Id Attributes In this section, we are going to describe the generator tag using the id attributes.
  25. Iterator Tag (Control Tags) Example In this section, we are going to describe the Iterator tag. Iterator tag is used to iterate over a value. An iterable value can be either of: java.util.Collection, java.util.Iterator.
  26. Merge Tag (Control Tags) Example In this section, we are going to describe the merge tag . The merge tag is a generic tag that is used to  merge iterators. The successive call to the merged iterator causes each merge iterator to have a chance to expose its element, subsequently next call allows the next iterator to expose its element.
  27. Subset Tag (Control Tags) Example In this section, we are going to describe the subset tag . The subset tag is a generic tag that  takes an iterator and outputs a subset of it. It delegates to org.apache.struts2.util.SubsetIteratorFilter internally to perform the subset functionality.
  28. Subset Tag (Control Tags) Example Using Count In this section, we are going to describe the subset tag using the count  parameter. The count parameter indicate the number of entries to be set in the resulting subset iterator.
  29. Subset Tag (Control Tags) Example Using Start In this section, we are going to describe the subset tag using the start parameter. The start parameter is of integer type. It indicates the starting index (eg. first entry is 0) of entries in the source (needed to make available as the first entry in the resulting subset iterator).
  30. Action Tag (Data Tag) Example In this section, we are going to describe the action tag . The action tag is a generic tag that is used to call actions directly from a JSP page by specifying the action name and an optional namespace.
  31. Bean Tag (Data Tag) Example In this section, we are going to describe the Bean Tag . The Bean tag is a generic tag that is used to instantiates a class that conforms to the JavaBeans specification.
  32. Date Tag (Data Tag) Example In this section, we are going to describe the Date tag .The date tag allows to format a Date in a quick and easy way. User can specify a custom format (eg. "dd/MM/yyyy hh:mm"), can generate easy readable notations (like "in 2 hours, 14 minutes"), or can just fall back on a predefined format with key 'struts.date.format' in the properties file.
  33. Include Tag (Data Tag) Example In this section, we are going to describe the include tag . The include tag is a generic tag that is used to include a servlet's output (result of servlet or a JSP page) to the current page.
  34. Param Tag (Data Tag) Example In this section, we are going to describe the param tag. The param tag is a generic tag that is used to parameterize other tags. For example the include tag and bean tag. The parameters can be added with or without a name as a key.
  35. Set Tag (Data Tag) Example In this section, we are going to describe the Set tag . The set tag is a generic tag that is used to assign a value to a variable in a specified scope.
  36. Text Tag (Data Tag) Example In this section, we are going to describe the text tag. The text tag is a generic tag that is used to render a I18n text message.
  37. Property Tag (Data Tag) Example In this section, we are going to describe the property tag . The property tag is a generic tag that is used to get the property of a value, which will default to the top of the stack if none is specified.
  38. Struts 2 Tags (UI Tags) Examples
           
    Form Tags Examples
  39. Checkbox Tag (Form Tag) Example In this section, we are going to describe the checkbox tag . The checkbox tag is a UI tag that is used to render an HTML input element of type checkbox, populated by the specified property from the ValueStack.
  40. Checkboxlist Tag (Form Tag) Example In this section, we are going to describe the checkboxlist tag . The checkboxlist tag is a UI tag that creates a series of checkboxes from a list. Setup is like <s:select /> or <s:radio />, but creates checkbox tags.
  41. Combobox Tag (Form Tag) Example In this section, we are going to describe the combobox tag . The combo box is basically an HTML INPUT of type text and HTML SELECT grouped together to give you a combo box functionality.
  42. Datetimepicker Tag (Form Tag) Example In this section, we are going to describe the datetimepicker tag . The datetimepicker tag is a UI tag that is used to render a date/time picker in a dropdown container.
  43. Doubleselect Tag (Form Tag) Example In this section, we are going to describe the doubleselect tag . The doubleselect tag is a UI tag that renders two HTML select elements with second one changing displayed values depending on selected entry of first one.
  44. File Tag (Form Tag) Example In this section, we are going to describe the file tag . The file tag is a UI tag that renders an HTML file input element achieved through browsing.
  45. Form Tag Example In this section, we are going to describe the form tag . The form tag is a UI tag that renders HTML an input form.
  46. Label Tag (Form Tag) Example In this section, we are going to describe the label tag . The label tag is a UI tag that is used to render an HTML LABEL that allow to output label:name type of combinations that has the same format treatment as the rest of UI controls.
  47. Optiontransferselect Tag (Form Tag) Example In this section, we are going to describe the Optiontransferselect tag. The Optiontransferselect tag is a UI tag that create an option transfer select component.
  48. Optgroup Tag (Form Tag) Example In this section, we are going to describe the optgroup tag . The optgroup tag is a UI tag that creates an optgroup component which needs to resides within a select tag <s:select>.
  49. Password Tag (Form Tag) Example In this section, we are going to describe the password tag . The password tag is a UI tag that renders an HTML input tag of type password.
  50. Radio Tag (Form Tag) Example In this section, we are going to describe the radio tag . The radio tag is a UI tag that renders a radio button input field.
  51. Reset Tag (Form Tag) Example In this section, we are going to describe the reset tag . The reset tag is a UI tag that  is used together with the form tag to provide form resetting.
  52. Select Tag (Form Tag) Example In this section, we are going to describe the select tag. The select tag is a UI tag that is used to render a HTML input tag of type select.
  53. Submit Tag (Form Tag) Example In this section, we are going to describe the submit tag. The submit tag is a UI tag that is used to render a submit button. The submit tag is used together with the form tag to provide asynchronous form submissions.
  54. Textarea Tag (Form Tag) Example In this section, we are going to describe the textarea tag. The textarea tag is a UI tag that is used to render HTML textarea.
  55. Textfield Tag (Form Tag) Example In this section, we are going to describe the textfield tag. The textfield tag is a UI tag that is used to render an HTML input field of type text.
  56. Updownselect Tag (Form Tag) Example In this section, we are going to describe the updownselect tag. The updownselect tag is a UI tag that creates a select component with buttons to move up and down the elements in the select component .

    Non-Form UI Tags
  57. Actionerror and Actionmessage Tags (Non-Form UI Tags) Example In this section, we are going to describe the actionerror and actionmessage tags. The actionerror tag is a UI tag that renders action errors(in the jsp pages.) if they exists while the actionmessage tag renders action messages if they exists.
  58. Fielderror Tag (Non-Form UI Tags) Example In this section, we are going to describe the fielderror tags. The fielderror tag is a UI tag that renders field errors if they exists.                         
     
    Struts 2 Examples 
  59. Struts 2 Date
    In this section we will discuss the date processing functionalities available in the Struts 2 Framework. 
  60. Date Format Examples In this tutorials you will learn about Date Format function in Struts 2. We have provided fully tested example code to illustrate the concepts.  
  61. Struts 2 datepicker Example In this section we will show you how to develop datetimepicker in struts 2. Struts 2 uses the dojo toolkit for creating date picker.  
  62. Struts 2 Format Examples In this section you will learn how to format Date and numbers in Struts 2 Framework. Our Struts 2 Format Examples are very easy to grasp and you will learn these concepts in very small time.
  63. Struts 2 File Upload In this section you will learn how to write program in Struts 2 to upload the file on the server. In this example we will also provide you the code to save the save on the server in the upload directory.
     
    Struts 2 Resources Examples
  64. Struts 2 Resources Examples The struts 2 resources examples     
  65. Static Parameter In this section, we will develop a simple application to access the static parameter. We will use a JavaBean to set and get the static parameters. Each static parameter has a value.   
  66. Accessing Session Object In this section, we will develop a simple application to access the framework resources like the session object, session context and the last accessed session time.
  67. Access Request and Response In this section, you will learn to develop an application that accesses the request and response object in struts 2 application.

    Struts 2 Tools
  68. Struts 2 Eclipse Plugin This page contains the examples and the list of plugins that are available for Struts 2 Development using Eclipse IDE.
  69. Struts 2 IDE This page contains the list of IDE available to ease the development of Struts 2 Framework based applications. The IDE for Struts 2 will actually make the development cycle of the much easier.
  70. Struts 2 Application Developing user registration application based on Struts 2 Framework. This Struts 2 Application is a simple user registration application that will help you learn how to develop real world application using Struts 2 Framework.
  71. Struts 2 Ajax In this section explains you Ajax based development in Struts 2. Struts 2 provides built-in support for Ajax using Dojo toolkit.
Posted by 1010
51.Struts22009. 2. 23. 15:29
반응형
Posted by 1010
51.Struts22009. 2. 23. 15:26
반응형
새로운 신입이라서 경력 선배분들이 하는 것을 보고 있으면 참 신기하고 재미있게 보이는게 많다..
어깨 넘어로 보고 있자니 이런거 저런거 배우라고 하는것도 많고...배울것도 많고...
배우고 싶은것도 많... 아니 이건 쫌 그렇고... -_-;;

어재 처음으로  NetBeans로 struts2 Framework 이라는 것을 봤는데..(NetBeans도 처음이고..아는게 없네 ㅜㅜ)
참... 전자동이군... 하는 생각이 ..
몇달전에  Struts 라는 것을 처음 볼때 느낀 프레임웍이라는게 참 좋은거구나.. 하는 거였다..
설정만 살짝살짝 해주면 일은 알아서 다 한다. (굿인데...)
근데 요 Struts2 라는 놈은 더 자동이다 ㅡㅡ

아직은 잘 모르겠지만 Struts1.x 와  Struts2.x 는 상당히 다르다고 하는데..
공부할게 점점 많아지는거 같다..
사용방법을 알아보고자 간단하게 펙토리얼을 구해 보았다


아무튼 각설하고,

view 단에서 발생한 Request가 최종적으로 Response되어  view 단에 출력되어지는 동작순서를 알아보자..

1. Servlet Container(톰켓)는 Browser로 부터 Request를 받아 들인다.
    이 Request에는 해당 작업을 수행하기 위한 r_factorial.action( .do와 같은 역할)이 포함되어 있다.


2. web.xml 에서 url을 통해 들어온 모든 request 는 Mapping에 의해 struts2 로 전달되도록
    설정되어 있다. 따라서 org.apache.struts2.dispatcher.FilterDispatcher 로 보내지게 된다.


3. .action이 있기에  Struts2 Framework에서는 Struts2 Framework 에서 Request 를 처리하도록 한다.


4. Sturts2 는 struts.xml 에서 요청한 r_factorial.action 과 같은 이름의 파일r_factorial이 있는지 찾는다.
    같은 이름이 존재하면 struts.xml 에서 지정한 클래스의 객체의 execute() 메소드를 실행한다.

    - 이름이 반드시 struts.xml이어야 하는것은 아니다. struts.xml에 동일한 위치에 있는 xml 파일을
       include시켜 주어도 된다(사용자별 or 기능별 action 관리를 위해 xml 파일을 나누어 관리할 수 있다)

    - xml 파일에서 이름을 찾을때 r_factorial.action과 동일한 이름 찾지만 뒤에 .action은 빼고 찾는다 ;;

- struts.xml 파일에 example.xml 파일을 include 시켜 사용할 수 있다.


5. r_Factorial.execute() 메소드가 실행되고, 이에 필요한 비즈니스 로직이 실행된다.
    return 하는 값이 SUCCESS 이면 정상적인 정상으로 판단하고,
    struts.xml(example.xml) 에서 지정한 Result 에 기술된 example/r_factorial.jsp 로 Forwarding 된다.

- ActionSupport 상속을 위해 com.opensymphony.xwork2.ActionSupport 를 import 필요
- ActionSupport 를 상속 받지 않으면 상수인 SUCCESS , 요놈이 먹히지가 않는다 -_-;;

6. Factorial.jsp에서는 <s:property value="str" />, <s:property value="result" />태그를 인식하여
    r_Factorial.factorial() 메소드를 호출하여, HTML 을 구성한다.


7. 마지막으로 HTML 코드를 Browser 로 response 한다.   

일단 내가 아는건 여기까지다.. 완전 기본 뿐이지만..

점점 더 공부해서 초중급.... 내용을 올려보련다  ^_^;;;
Posted by 1010
51.Struts22009. 2. 23. 15:22
반응형
# 강좌를 시작하며 #
1부에서는 스트럿츠의 가장 기본인 Action mapping 을 직접 따라 해보고
스트럿츠의흐름을 이해하도록 합시다.
그리고 스트럿츠를 처음 시작하는 사람의 이해를 돕기 위해서 화면 캡처부분을
많이 추가 했습니다.
강좌의 원할한 진행을 위해 존칭은 생략 하겠습니다.


# 스트럿츠란 #
모델1 방식
직접 jsp을 호출하는 방식이다. jsp에는 DB연결부터 모든 비지니스 로직과
실제 브라우저상에 보여줄 프리젠테이션 레이어 부분이 같이있다.
물런 Beans을 사용하면 DB부분은 따로 뺄수 있지만. 각각의 jsp 가
호출된다면 모델1 방식이다.

모델2(MVC) 방식
모델1의 가장 큰 단점은 jsp 소스가 길어진다는것이다. 모든것을 jsp가 주도로
처리 하니 당연한 일이다.그로므로서 개발 속도는 빠를지언정 나중에 그소스를
다시 보거나 유지보수할땐 힘들어지는 경우가 많다.그래서 등장한것이 모델2
MVC(model - Controller - view) 방식이다.모든 요청은 Controller 맞고 비지니스
로직은 model이 담당하고 jsp는 view의 역활로 결과를 화면상에 뿌려주는 역활이다.
모델1에서 jsp 혼자 했던 일을 각각의 역활을 나눠주는것이다. jsp는 훨씬 가벼워졌고
비지니스로직과 프리젠테이션 레이어를 분리하므로서 비지니스로직을 재사용도 가능해졌고
유지보수에 많은 장점을 가지게 된다.

스트럿츠(struts) Framework
모델2 도 Controller 가 너무 복잡해지고 재사용이 거의 불가능 해지는 단점이 있다
그래서 그런 단점을 보완하고 모델1의 장점과 모델2의 장점을 모아서 스트럿츠를 만들었다.
스트럿츠는 가장 널리 쓰이는 Framework중에 하나이다.


# 기본 환경 #
JDK 1.5
Tomcat 5.5
struts-1.3
이클립스 3.2 (wtp 포함 all-in-one)


# 환경 세팅 #
1 기본 환경 세팅
http://www.jspclub.co.kr/board/view.jsp?div=study&no=700&npage=1
위 강좌를 보고 이클립스 세팅을 마친다.
참고로 필자는 이클립스의 workspace 는 c:\dev 로 했고 프로젝트 명은 myjsp로
했다.

2 struts 라이브어리 다운
http://struts.apache.org/download.cgi#struts135
struts-1.3.5-lib.zip 을 다운 받는다.

3 다운받은 라이브어리 WEB-INF/lib 안에 넣는다.


# WEB-INF/web.xml 에서 struts 설정 부분 추가 #
web.xml 부분에 확장자가 *.do 패턴으로 오는것은 모두 org.apache.struts.action.ActionServlet 을
호출하라는 부분을 추가 하는 부분이다.
<!--Standard  Action  Servlet  Configuration  -->    
<servlet>    
    <servlet-name>action</servlet-name>    
    <servlet-class>org.apache.struts.action.ActionServlet</servlet-class>    
    <init-param>    
            <param-name>config</param-name>    
              <param-value>/WEB-INF/struts-config.xml</param-value>    
    </init-param>    
    <init-param>    
          <param-name>debug</param-name>  
             <param-value>2</param-value>    
    </init-param>  
       <init-param>    
          <param-name>detail</param-name>    
          <param-value>2</param-value>    
    </init-param>    
    <load-on-startup>2</load-on-startup>    
</servlet>    

<!--  Standard  Action  Servlet  Mapping  -->    
<servlet-mapping>    
    <servlet-name>action</servlet-name>  
       <url-pattern>*.do</url-pattern>    
</servlet-mapping>


# WEB-INF/struts-config.xml 파일 추가 #
스트럿츠의 config파일이다.


# WEB-INF/struts-config.xml 에 action-mapping 내용 추가 #
위의 web.xml에 의해 호출된 ActionServlet은 struts-config.xml 정보를 읽어 처리 되어진다.
action 패스가 /Index 이면 examples.IndexAction 클래스의 excute 메소드를 호출한다.
<?xml  version="1.0"  encoding="UTF-8"?>    

<!DOCTYPE  struts-config  PUBLIC    
"-//Apache  Software  Foundation//DTD  Struts  Configuration  1.3//EN"
"http://jakarta.apache.org/struts/dtds/struts-config_1_3.dtd">    
<struts-config>    
    <action-mappings>
      <action  path="/Index"  type="examples.IndexAction">
                <forward  name="success"  path="/index.jsp"  />
        </action>
      </action-mappings>
</struts-config>  


# examples 페키지 추가 #
examples라는 패키지를 만든다 .


# IndexAction class 추가 #


# IndexAction class 비지니스 로직 부분추가 #
struts-config.xml 정보에 의해 호출된 excute 안에서 request 에 title 이란 이름으로
"나의 첫번째 struts 성공" 이라고 request attribute에 추가 한다.
return mapping.findForward("success"); 이부분은 struts-config.xml 에 정의된 매핑이름이
success 일경우 index.jsp 파일로 Forward 시켜준다
package  examples;

import  javax.servlet.http.HttpServletRequest;
import  javax.servlet.http.HttpServletResponse;

import  org.apache.struts.action.Action;
import  org.apache.struts.action.ActionForm;
import  org.apache.struts.action.ActionForward;
import  org.apache.struts.action.ActionMapping;

public  class  IndexAction  extends  Action  {

        public  ActionForward  execute(
                ActionMapping  mapping,
                ActionForm  form,
                HttpServletRequest  request,
                HttpServletResponse  response)
                throws  Exception  {
        
         request.setAttribute("title",  "나의  첫번째  struts  성공");

                return  mapping.findForward("success");

        }

}


# index.jsp 추가 #


# index.jsp 내용 #
examples.IndexAction 에서 넣은 request attribute 부분을 출력한다.
<%@  page  language="java"  contentType="text/html;  charset=EUC-KR"
        pageEncoding="EUC-KR"%>
<%=request.getAttribute("title")  %>


# 추가된 파일들 #


# 톰켓 서버 시작 #


# 결과 확인 #
"나의 첫번째 struts 성공" 이란 글씨가 보이면 성공이다.

출처 : Tong - [별난상이]님의 STRUTS통

Posted by 1010
51.Struts22009. 2. 4. 17:00
반응형

기본적인 struts 어플리케이션 개발의 Quick Start

최종갱신:   번역: April 27, 2007

목차


1. 머리말

이 문서는 Sun JDK 1.4.2. Eclipse 3.2 및 MyEclipse 5.1.1을 이용해 작성되고 있습니다. 모든 스크린 샷은 Eclipse, MyEclipse Enterprise Workbench 및 Windows XP의 Default User Interface 설정에 근거하고 있습니다. 이 문서의 설명으로 불명한 점이 있는 경우 「사용자 피드백」 섹션으로 MyEclipse Document 팀에 피드백하는 방법을 참조해 주세요.


2. 처음

이 튜톨리얼에서는 MyEclipse Enterprise Workbench 를 사용해 단순한 샘플 Struts 어플리게이션의 개발 및 테스트에 대해 설명합니다. Struts 나 MyEclipse 의 사전 지식은 필요없습니다.

체제와 기능 범위가 유사하기 때문에, 이 튜토리얼은「JSF 튜토리얼」과 비슷합니다. 이 두개의 같은 프로젝트 목표 및 개요를 가지기 때문에, MyEclipse에서의 Struts 툴의 사용방법을 이해하면, JSF 와 Struts 를 다음에 비교할 수 있습니다.


3. 요건

아래는 이 가이드로 사용하는 소프트웨어의 리스트입니다.

Sun Java(TM) Development Kit(JDK)5.0

http://java.sun.com/javase/downloads/previous.jsp

Eclipse Platform 3.2.2

http://www.eclipse.org/downloads/index.php

Eclipse Platform 3.2.1 NLpack1

http://download.eclipse.org/eclipse/downloads/drops/L-3.2.1_Language_Packs-200609210945/index.php

Eclipse Java Development Tools 3.2.2

http://www.eclipse.org/downloads/index.php

Eclipse Java Development Tools 3.2.1 NLpack1

http://download.eclipse.org/eclipse/downloads/drops/L-3.2.1_Language_Packs-200609210945/index.php

MyEclipse 5.1.1

https://www.myeclipseide.jp

Tomcat 5.0.x ( 5.0.28 이 바람직하다. 또는 다른 벤더의 서블릿/EJB 컨테이너)

http://tomcat.apache.org/download-55.cgi

이 데모에서는 유저명과 패스워드는「myeclipse」입니다.


주: JDK 를 인스톨해 컴퓨터를 재기동한 후 Eclipse, MyEclipse 및 Tomcat 을 인스톨 해주세요. MyEclipse 의 인스톨에 대한 자세한 것은「MyEclipse 인스톨/언인스톨 퀵 스타트」를 참조해주세요. 모든 소프트웨어를 인스톨하면「어플리케이션 디플로이먼트 및 서버 관리 퀵 스타트」로 설명되고 있듯이, MyEclipse로 Tomcat 5 컨넥터를 셋업하지 않으면, 셈플 어플리케이션을 디플로이 및 실행할 수 없습니다.


4. 신규 프로젝트의 셋업 및 구성

개발물을 작성하려면, MyEclipse로 Struts기능이 추가된 신규 Web프로젝트를 작성해야합니다. Web 프로젝트를 작성하려면, 아래의 그림1에 보이듯이「파일」>「신규」>「프로젝트」>「MyEclipse」>「J2EE 프로젝트」>「Web 프로젝트」의 위저드를 사용합니다.


그림 1 - 「신규 J2EE Web 프로젝트」위저드


그림 2 처럼 신규 프로젝트의 정보를 모두 입력합니다.


그림 2 - Web 프로젝트 설정


Web 프로젝트를 설정하면, Struts 기능을 추가해야 합니다. 이것을 실행하려면, 「패키지 익스플로어」뷰에서 프로젝트의 루트를 오른쪽 클릭하고, 그림 3 처럼「MyEclipse」>「Struts 기능추가」를 선택합니다.


그림 3 - Web 프로젝트에 Struts 기능추가


「MyEclipse Web 프로젝트의 Struts Support」다이얼로그에는, 적절한 Default가 설정되어 있습니다. 다만「신규 클래스용 Base 패키지」를 변경해서, 희망하는 로케이션을 변경시킬 수도 있습니다. 아래의 그림 4 에서는 단순히 Default로 놔둡니다.


그림 4 - Struts 기능 구성


위저드가 완료되면, 프로젝트 구조는 그림 5 처럼 나타나게 됩니다.


그림 5 - 구성 후의 프로젝트 레이아웃


프로젝트를 작성하면, 다음 섹션에서 설명하듯이 Web컨텐츠의 작성을 개시할 수 있습니다.


5. Struts 프로젝트의 개시

이 섹션에서는 단순한 Web사이트 로그인 화면을 닮은 샘플 Struts 어플리케이션을 작성하는 것에 초점을 맞추었습니다. 그래서, 필요한건 유저에게 로그인을 재촉하는 페이지와 로그인이 성공한 것을 나타내는 페이지의 2개 JSP페이지 뿐 입니다. 이러한 페이지는 각각 userLogic.jsp 및 userLoginSuccess.jsp 입니다. 단순화한것이기 때문에, 로그인 시행중 허가 에러가 발생했을 경우, 유저를 userLogin.jsp 페이지에 리다이렉트해 에러 멧세지를 표시합니다.


Struts 프로젝트를 개시할 때는 일반적으로 어플리케이션 전체의 프로우를 레이아웃하는 것이 유용합니다. 개발 팀은 어플리케이션의 개개의 부품을 얼마나 조합하면 좋은가를 충분히 검토할 수 있겠지요. 플로우를 잘라내는 가장 용이한 방법은, Struts 구성 편집자의 그래픽컬 디자인 모드를 사용해 그래픽컬하게 작성하는 방법입니다. Struts구성 편집자에게는 드러그 앤 드롭 툴의 팔레트가 있어서 유저는 디자인 실물모형으로 부터 페이지 플로우를 재빠르게 복사하는 것으로 어플리케이션의 작성을 시작할 수 있습니다. 셈플 로그인 어플리케이션의 플로우는 아래의 그림 6과 같이 됩니다.


주: 어플리케이션 플로우의 스크린샷은 Struts 디자이너를 사용해 작성되었습니다.

    Struts 디자이너의 액세스 방법 및 사용방법에 대해서는 다음 섹션에서 설명합니다.


그림 6 - 셈플 어플리케이션 플로우


이 디자인 레이아웃으로부터 userLogin.jsp 페이지를 표시하는 것으로 어플리케이션은 시작하는 것을 압니다. 로그인 페이지는 userLogin 액션을 호출해 로그인 조작을 실행합니다. 검증에러 또는 문제가 발생했을 경우 userLogin액션은 userLogin.jsp 페이지에 되돌립니다. 다만, 로그인이 성공했을 경우 어플리케이션은 userLoginSuccess.jsp 페이지로 진행됩니다.


5.1 Struts 프로젝트의 컴포넌트

일반적인 Struts 프로젝트는 이하의 개발 결과물의 카테고리로 구성됩니다.

  • JSP
  • Action
  • ActionForward *
  • ActionForm **
  • Struts 디플로이먼트 기술자 : struts-config.xml

* ActionForward 는 struts-config.xml 파일내의 <forward> 엔트리이며, 액션이 완료했을 때에 실행하는 패스를 정의합니다. ActionForward 클래스의 커스텀 임플리멘테이션에 대해서는 말하지 않습니다만, 이것은 가능하고, 확정 유저를 위한 툴로 서포트되고 있습니다.


** ActionForm 는 유저가 구체적인 ActionForm 임플리멘테이션을 작성해 페이지를 랩하는 것을 원하지 않는 경우에 DynaForm의 사용에 옮겨놓을 수 있습니다.


MyEclipse 에서는 이러한 컴포넌트의 언젠가 또는 모든것 (struts-config.xml 파일은 제외하다)을 3가직 방법으로 작성할 수 있습니다.

방법 1

아래의 그림 7 에 보이듯이「파일」>「신규」>「그 외」>「MyEclipse」>「Web-Struts」>「Struts 1.1 (또는 1.0)」메뉴를 사용해 Struts위저드를 선택합니다.


그림 7 - 모든 사용가능한 Struts 위저드


위저드는 단순하고, 지정된 Struts 컴포넌트가 서포트하는 모든값에 대해 prompt를 냅니다. 다만 다른 위저드보다 복잡한 위저드도 있습니다. 예를 들면, 아래의 그림 8 에 보이는「Struts Action」위저드에서는 Struts Action 으로 서포트되는 모든 기능의 포괄적인 범위가 표시됩니다.


그림 8 - 「신규 Struts Action」위저드

방법 2

「아웃라인」뷰를 사용합니다. 이 뷰는 Struts 구성 편집자의 소스 뷰 표시가 액티브한 편집 문맥일 때 사용 가능합니다.「아웃라인」뷰로부터 위저드를 액티브하게 하는 임의의 루트레벨의 노드를 오른쪽 클릭해서 그 타입의 신규 컴포넌트를 작성하는 일도 위저드를 사용해 기존은 컴포넌트를 편집할 수 도 있습니다. 그림 9 는 이러한 문맥의 위저드를 사용하는 예를 나타냅니다.


그림 9 - 「아웃라인」뷰로부터의 Struts 위저드의 기동


이 스크린샷이 주목할 만한 점은 일부의 액션이 실제로 논리적으로 관련한 위저드이며, 플로우 전체의 작성을 가능하게 하는 것입니다. 위저드는 함께 링크되어, 공통의 값을 심리스에 재이용해 수동의 재입력을 최소한으로 합니다.

방법 3

그림 10 에 나타내는 Struts 구성 편집자의 디자인 페이지의 사용도, Struts 성과물을 작성하기 위한 매우 편리한 방법입니다. 디자이너에는, struts-config.xml 파일을 열어 액세스 합니다. 편집자의 하부에서 「디자인」탭을 클릭하면, 디자이너를 실행할 수 있습니다.


그림 10 - Struts 디자이너에의 액세스


디자이너로 전환하면, 아래의 그림 11 과 같은 뷰가 표시됩니다.


그림 11 - Struts 디자이너의 개요


Struts 프로젝트의 다양한 컴퍼넌트의 작성 방법에 대해 설명했습니다. 다음의 섹션에서는, 로그인 데모 어플리케이션의 다양한 부분을 작성합니다.


5.2 어플리케이션의 구축

데모 어플리케이션의 구축은, 우선 JSP 페이지의 작성을 중심으로 실시합니다. 데모 어플리케이션을 Web 사이트의 로그인 화면과 같이 하므로, userLogin.jspuserLoginSuccess.jsp 라고 하는 2 개의 JSP 페이지만 필요하게 됩니다. 대부분의 Struts 어플리케이션과 같게, 로그인중에 문제가 발생했을 경우, 유저를 userLogin.jsp 페이지에 되돌려, 에러를 표시합니다 (loginUserFailure.jsp 페이지를 작성할 필요가 없는 것은 이 때문에입니다).


우선, userLoginSuccess.jsp 페이지를 작성합니다. 최초로 마지막 페이지를 작성하므로 순서가 역과 같이 생각됩니다만, 이렇게 하는 것으로, 「신규 Form, Action 및 JSP」위저드를 사용해 최초의 JSP 페이지를 작성함과 함께, 관련하는 Action 및 ActionForm 를 작성할 수 있습니다.


디자이너 뷰로부터 userLoginSuccess.jsp JSP 페이지를 작성하려면 , "JSP" 팔레트 툴을 사용합니다. 우선 이 툴을 클릭하고 나서, 캔버스를 클릭합니다. 아래의 그림 12 의 설명에 따라 주세요.


그림 12 - 디자이너의 사용에 의한 JSP 의 작성


캔버스를 클릭하면, 그림 13 에 나타내는 것 같은 「신규 JSP 페이지」다이얼로그가 표시됩니다.


:「Struts 1.1 을 사용하는 표준 JSP」템플릿을 선택해 주세요.


그림 13 - JSP 위저드의 구성


종료」버튼을 클릭하면, 그림 14 에 나타나듯이, 디자인 뷰에 신규에 작성된 페이지가 표시됩니다.


: 「위저드 완료 후 파일을 연다」체크 박스를 선택했을 경우, 신규의 JSP 페이지를 추가하면, MyEclipse 는 JSP 편집자내에 신규 JSP 페이지를 엽니다. 아래의 스크린샷에서는, 어플리케이션이 어떻게 표시되는지를 나타내기 위해서 클릭해 디자이너에 돌아오고 있습니다. 이것은 JSP 페이지를 작성할 경우에 표시되는 플로우가 아니기 때문에 잘못되지 않게 해 주세요.


그림 14 - JSP 페이지가 표시된 Struts 디자이너


JSP 페이지를 완성시키기 위한 나머지의 작업은, 유저에게 로그인이 성공한 것을 알리는 메세지의 출력입니다. 완성한 페이지의 소스 코드를, 아래의 그림 14a 에 나타냅니다.


주: 이 가이드를 이해하기 쉽게 하기 위해서 (또, 코드 순이 펫을 짧게하기 위해 ), 이하의 JSP 페이지는, 파일을 처음으로 열었을 때에 표시되는 디폴트의 JSP 템플릿과는 닮지 않았습니다. 여기에 있는 코드를 그대로 카피하거나 신규 JSP 파일의 작성 후에 이 코드를 디폴트의 JSP 템플릿 코드에 거두어 들이거나 해도 상관하지 않습니다.


userLoginSuccess.jsp

<%@ page language= "java"%>

<%@ taglib uri="http://jakarta.apache.org/struts/tags-bean" prefix="bean" %>
<%@ taglib uri="http://jakarta.apache.org/struts/tags-html" prefix="html" %>
<%@ taglib uri="http://jakarta.apache.org/struts/tags-logic" prefix="logic" %>
<%@ taglib uri="http://jakarta.apache.org/struts/tags-tiles" prefix="tiles" %>
<%@ taglib uri="http://jakarta.apache.org/struts/tags-template" prefix="template" %>
<%@ taglib uri="http://jakarta.apache.org/struts/tags-nested" prefix="nested" %>

<!DOCTYPE HTML PUBLIC "-//W3C//DTD HTML 4.01 Transitional//EN">
<html:html locale="true">
  <head>
    <title>My Struts 'userLoginSuccess.jsp' ending page</title>
  </head>
 
  <body>
    Hello <bean:write name="userName" scope="request" />, you successfully logged in!
  </body>
</html:html>

그림 14a - userLoginSuccess.jsp 의 코드


이 페이지는 매우 단순합니다. 여기서의 작업으로 중요한 것은 <body> 태그의 내용뿐이어, 어플리케이션의 request 스코프에 보관되고 있는 변수 userName 의 값을 출력합니다. 따라서, 다음에 작성하는 Action 로, request 스코프내의 userName 의 이름에 의해 속성을 지정할 필요가 있습니다.


여기에서도,userLogin.jsp 페이지, ActionForm, 및 Action 를 작성할 필요가 있습니다. 작업이 많이 있는 것처럼 생각됩니다만, MyEclipse 에서는 「신규 Form」 및 「신규 Form, Action 및 JSP」위저드를 사용하는 것으로, 이 작업을 큰폭으로 간소화합니다.


userLogin.jsp 페이지를 작성할 때는, 이 페이지에 표시하는 필드를 검토해, 그러한 필드를 각각의 ActionForm 에 맵 할 필요가 있습니다. Form 에는 값이 보관되어 적절한 Action 에게 건네집니다. Form 를 생성할 때, 앞서 얘기한 2 개의 MyEclipse 위저드는, Form 와 함께 JSP 페이지를 작성하는 기능을 제공합니다. 이 기능에서는 Form 의 모든 자산이 사용되어 이러한 모든 Form 필드가 이미 존재해 사용 가능한 JSP 페이지가 생성됩니다. 이러한 상황으로, 로그인을 처리하기 위한 Action 도 작성하기 때문에, 단순한「Form」위저드는 아니고「Form, Action 및 JSP」위저드를 사용합니다.


어플리케이션의 작성을 속행하려면 , 그림 15 에 나타나듯이, Struts 디자이너의 흰 캔버스 에리어를 오른쪽 클릭해,「신규」> 「Form, Action 및 JSP」위저드의 순서에 선택합니다.


그림 15 - 디자이너로부터의 「Form, Action 및 JSP」위저드의 기동


최초로「Struts 1.1 Form 선언」위저드가 표시됩니다. 이것이 3 스텝 위저드의 최초의 위저드입니다. 위저드가 적절한 디폴트치를 설정할 수 있도록(듯이), 유스케이스명을 입력해 주세요. 그림 16 에,유스케이스를 입력하면 어떻게 값이 설정되는지를 나타냅니다.


그림 16 - 「Struts 1.1 Form 선언」위저드


다음에, 2 개의 Form 자산, userNamepassword 를 추가할 필요가 있습니다. 「패스워드」필드를 추가하는 경우, 그림 17 에 나타나듯이「JSP 입력 타입」필드의 「password」를 선택합니다.


그림 17 - Form 에의 자산의 추가


그림 18 - Form 자산


「다음」버튼을 선택하기 전에, 「JSP」탭을 클릭해, MyEclipse 로 이러한 값이 설정된 Form 를 가지는 양식 JSP 페이지를 생성하는 것을 위저드에 나타납니다. 아래의 그림 19 에 이것을 나타냅니다.

: 위저드의 디폴트의 행동에서는, 생성된 JSP 는 "/form" 서브 디렉토리에 배치됩니다만, 이 데모 어플리케이션에서는, 모든 JSP 를 webroot 에 배치합니다.


그림 19 - Form 용의 JSP 페이지의 생성을 유효하게 한다


마지막에 「메소드」탭을 클릭해, 위저드가 신규 Form 에 자동 생성할 수 있는 모든 메소드의 체크를 제외합니다. 아래의 그림 20 에 이 구성을 나타냅니다.


: 이 데모를 단순한 것으로 하기위해, reset 메소드나 validate 메소드를 생성합니다만, 일반적으로는 독자적인 어플리케이션을 코딩 할 경우에 이러한 메소드를 사용하는 것은 유리한 계책입니다.


그림 20 - 메소드 생성을 무효로 한다


「다음」버튼을 클릭하면,「Struts 1.1 Action 선언」위저드에 진행됩니다. 이 위저드에서는, 거의 모든 값이 이미 입력되고 있습니다. 여기에서는, 작성 끝난 Form 와 신규 Action 를 묶는 것에 의해 시간이 절약됩니다. 변경은 자유롭게 가 상관하지 않습니다만, 대부분의 경우 (물론 이 데모 어플리케이션에서도), 여기서 유일 주의할 필요가 있는 것은, Action 를 사용할 수 있는 「Forward」를 입력하는 것입니다. 그림 21 에 위저드의 스크린샷를 나타냅니다.


그림 21 - 「Struts 1.1 Action 선언」위저드


「ActionForward」를 지정하려면 , 그림 22 에 나타내도록(듯이)「Forward」탭을 클릭합니다.


그림 22 - Action Forwards 의 셋업


이 Action 에의 Forward 의 추가 후, 「종료」버튼을 클릭하면(자), MyEclipse 로 모든 신규 정보를 사용해 모든 자원을 작성하거나struts-config.xml 파일 ( 및 디자이너)을 갱신하거나 할 수 있습니다. 그림 23 에 갱신된 레이아웃 및 어플리케이션 구조를 나타냅니다.


: 작은 스크린샷에 다이어그램의 모든 엘리먼트를 명시할 수 있도록, 일부가 수동으로 레이아웃 되고 있습니다. 다이어그램을 수동으로 레이아웃 할 때, 변경 내용은 장래의 편집을 위해서 보존됩니다.


그림 23 - Struts 디자이너 및 어플리케이션의 개요


이것으로 어플리케이션 플로우가 정의되었기 때문에, Action 에 논리를 추가해, 이 데모·어플리케이션의 "login" 순서를 처리할 필요가 있습니다. 그림 24 에 나타내도록(듯이), 디자인을 더블 클릭 하면 자원으로 점프 할 수 있습니다.


그림 24 - 디자이너·자원을 더블 클릭 해 편집자를 연다


UserLoginAction.java 파일을 처음으로 열었을 경우,execute 메소드용으로 생성된 코드는 그림 24a 와 같이 됩니다.


UserLoginAction.java
public ActionForward execute(
  ActionMapping mapping,
  ActionForm form,
  HttpServletRequest request,
  HttpServletResponse response) {
  UserLoginForm userLoginForm = (UserLoginForm) form;
  // TODO Auto-generated method stub
  return null;
 }

그림 24a - 생성된 execute 메소드


디폴트의 임플리멘테이션에서는 단지 null 를 돌려주고 있을 뿐입니다만, 이것을 제거해, 그림 24b 에 나타내는 것 같은 단순한 로그인 Logic에 옮겨놓습니다.

UserLoginAction.java
 public ActionForward execute(
  ActionMapping mapping,
  ActionForm form,
  HttpServletRequest request,
  HttpServletResponse response) {
  UserLoginForm userLoginForm = (UserLoginForm) form;
 
  if(userLoginForm.getUserName().equals("myeclipse") && userLoginForm.getPassword().equals("myeclipse"))
  {
   request.setAttribute("userName", userLoginForm.getUserName());
   return mapping.findForward("success");
  }
 
  return mapping.findForward("failure");
 }

그림 24b - 수정된 execute 메소드


여기에서는 매우 단순하게,userNamepassword 의 값이 함께 "myeclipse" 일지 어떨지를 체크합니다. "myeclipse" 인 경우,userName 를 request 스코프에 보관해,success forward 를 돌려주므로, userLoginSuccess.jsp 페이지에 사용자 정의의 메세지를 표시할 수 있습니다. 그렇지 않은 경우, 문제가 있으면, failure forward 를 돌려줍니다. 일반적으로 실제의 어플리케이션에서는, 발생한 문제를 설명하기 위해, failure forward 를 되돌리기 전에 ActionMessages 또는 ActionErrors 콜렉션을 request 스코프에 추가합니다.


6. 데모의 실행

이것으로 어플리케이션이 완성했습니다. 「데프로이먼트 관리」다이얼로그를 열어, 이 프로젝트의 신규 데프로이먼트를 셋업 하는 것으로, Tomcat 5 에 데프로이 할 수 있습니다. 그림 25 에 나타내는 관리 다이얼로그를 열려면 , 「패키지 익스플로어」뷰로 프로젝트를 오른쪽 클릭해,「MyEclipse」> 「프로젝트 데프로이먼트의 추가와 제거」를 선택하는지, 툴바의「MyEclipse J2EE 프로젝트를 서버에 데프로이」아이콘을 클릭합니다.


주: MyEclipse 로 Tomcat 5 (또는 그 외의) 어플리케이션 서버 컨넥터를 이미 셋업 하고 있는 것이 전제가 되고 있습니다. 아직 셋업 하고 있지 않고, help가 필요한 경우는,「어플리케이션의 데프로이먼트 및 서버 관리의 퀵 스타트」가이드를 참조해 주세요.


그림 25 - 신규 데프로이먼트의 작성


데프로이먼트의 완료 후에 데프로이먼트 상황을 체크해, 에러가 발생하고 있지 않는 것을 확인하는 것을 추천합니다. 이것을 실시하려면 , 그림 26 의 설명에 따릅니다.


그림 26 - 데프로이먼트가 성공한 것의 확인


마지막으로, 그림 27 에 나타내는 어플리케이션 서버의 시작 버튼을 사용해 Tomcat 를 기동합니다.


그림 27 - 어플리케이션·서버의 개시


서버가 시작되면, 출력이 Eclipse 의 「콘솔」뷰에 송신됩니다. 그림 28 에, 이하의 2 개를 확인할 수 있도록 통상의 Tomcat 의 기동을 나타냅니다.
 1) Tomcat 가 Web 어플리케이션을 정상적으로 데프로이 했다
 2) Tomcat 가 정상적으로 기동했다


그림 28 - 어플리케이션과 서버가 올바르게 기동한 것의 확인


Tomcat 5 가 실행되면(자), 「MyEclipse Web 브라우저」뷰를 열어 테스트할 수 있습니다. 이것을 실시하려면 ,「윈도우」> 「뷰의 표시」> 「그 외...」(을)를 선택해, 「뷰의 표시」다이얼로그에 액세스 해, 「MyEclipse Enterprise Workbench」> 「Web 브라우저」뷰를 선택합니다.


Open
그림 29 - 「Web 브라우저」뷰의 오픈


그림 30 에 나타나듯이 브라우저의 주소·바에 http://localhost:8080/StrutsLoginDemo/userLogin.jsp 라고 입력해, 샘플 어플리케이션을 액티브하게 합니다.


그림 30 - 데모 어플리케이션에의 로그인


이와 같이, 어플리케이션은 사용 가능하다라고 하는 것을 알수있습니다. 이것으로, 유저명과 패스워드를 입력할 수 있습니다.


주: 이 데모의 유저명과 패스워드는, 어느쪽이나 'myeclipse'입니다.


로그인 후, Form 가 검증되어 어플리케이션은 유저를 로그인 성공 페이지에 진행합니다. 그림 31 은, Action 에 의해 유저가 올바르게 진행된 userLoginSuccess.jsp 페이지를 나타내고 있습니다.


그림 31 - 성공한 로그인


주:본 샘플 어플리케이션에의 액세스때는, HTTP 포토로서 8080 을 지정하고 있습니다만, 포토 번호는 사용하시는 서버 설정에 맞추어 적당히 변경해 주세요.


7. 통계

이 데모에서는, MyEclipse Enterprise Workbench 로 사용 가능한 Struts 툴을 사용해, 단순한 Struts 어플리케이션을 작성했습니다.


이것으로, Struts 의 설명은 종료됩니다. Web 프로젝트에서의 작업, 어플리케이션의 데프로이먼트 및 서버 관리에 대한 개요는, 그 외의 퀵 스타트 문서로 입수할 수 있습니다. 자세하게는, 메인 메뉴의문서에 액세스 해 주세요.


8. 사용자 피디백

이 문서에 대해 의견, 제안이 있으면, 서포트 포럼으로 보내 주세요. 

Posted by 1010
51.Struts22009. 1. 28. 16:17
반응형
Struts 2 는 MVC Model 2에 기반한 Web Application Framework(WAF)이다. 국내 SI업계에서는 거의 장악한 Struts 의 후속 프레임워크이다. 머 스트럿츠2에 대해서 소개하는 건 아니라서(사실 잘 모르기 때문에 은근슬쩍...) 생략하기로 하고 자세한 내용은 다른 루트를 통해서 검색해 보시길....

사용자 삽입 이미지

Struts2를 사용하려면 기본적인 셋팅을 약간 해야되기 때문에 Eclipse 에서 셋팅하는 법을 보자. 일단 프로젝트를 만들자 프로젝트를 만드는 것은 기본적인 자바프로젝트랑 동일하다.

사용자 삽입 이미지

웹어플리케이션이므로 Dynamic Web Project으로 만든다.

사용자 삽입 이미지

여기서는 Server를 Tomcat 5.5를 사용한다. 이클립스의 톰캣설정에 대한 부분은 여기서는 생략하고 넘어간다. (서버설정이 되어 있다는 전제하에서.....) 프로젝트를 만들었으면 이제 Struts2를 올려야 한다.Struts2는 다운로드 페이지 에서 받을 수 있다. 다운로드 받은 파일의 압축을 풀고 안에 lib안에 보면 스트럿츠2에서 필요한 jar들이 들어 있다.

사용자 삽입 이미지

많은 jar파일들이 있는데 스트럿츠2를 구동하는데 이 모든 jar가 다 필요한 것은 아니다. 기본적으로 필요한 파일들은 다음과 같고 나머지는 다른 플러인등을 위한 파일들이다.

  • antlr-2.7.2.jar
  • commons-beanutils-1.6.jar
  • commons-chain-1.1.jar
  • commons-logging-1.0.4.jar
  • commons-logging-api-1.1.jar
  • commons-validator-1.3.0.jar
  • freemarker-2.3.8.jar
  • ognl-2.6.11.jar
  • oro-2.0.8.jar
  • struts2-core-2.0.11.2.jar
  • struts-core-1.3.5.jar
  • xwork-2.0.5.jar
위의 파일들을 WebContent/WEB-INF/lib 에 복사를 한다.

WebContent/WEB-INF/에 있는 web.xml 을 다음과 같이 수정한다.
  1. <?xml version="1.0" encoding="UTF-8"?> 
  2. <web-app id="WebApp_ID" version="2.4" xmlns="http://java.sun.com/xml/ns/j2ee" xmlns:xsi="http://www.w3.org/2001/XMLSchema-instance" xsi:schemaLocation="http://java.sun.com/xml/ns/j2ee http://java.sun.com/xml/ns/j2ee/web-app_2_4.xsd"> 
  3.     <display-name> 
  4.     Struts2Setting</display-name> 
  5.     <welcome-file-list> 
  6.         <welcome-file>index.html</welcome-file> 
  7.         <welcome-file>index.htm</welcome-file> 
  8.         <welcome-file>index.jsp</welcome-file> 
  9.         <welcome-file>default.html</welcome-file> 
  10.         <welcome-file>default.htm</welcome-file> 
  11.         <welcome-file>default.jsp</welcome-file> 
  12.     </welcome-file-list> 
  13.       
  14.     <filter> 
  15.         <filter-name>struts</filter-name> 
  16.         <filter-class>org.apache.struts2.dispatcher.FilterDispatcher</filter-class> 
  17.     </filter> 
  18.       
  19.     <filter-mapping> 
  20.         <filter-name>struts</filter-name> 
  21.         <url-pattern>/*</url-pattern> 
  22.     </filter-mapping> 
  23. </web-app> 

이제 struts.xmlstruts.properties 2개의 파일이 필요하다. 만들어진 웹어플리케이션이 배포될 때의 이 2개의 파일의 위치는 WebContent/WEB-INF/classes/ 이다. 이클립스에 src폴더 아래 있는 것은 자동으로 classes로 배포하기 때문에 src폴더 안에 넣으면 된다. 이클립스의 Project뷰에서는 java파일 말고는 생성되지 않기 때문에 Navigator뷰에서 만들어 넣으면 된다.(이걸 어디다 넣어야 되는지 몰라서 어찌나 고생했는지....)

사용자 삽입 이미지

struts.xml
  1. <?xml version="1.0" encoding="UTF-8"?> 
  2.  
  3. <!DOCTYPE struts PUBLIC "-//Apache Software Foundation//DTD Struts Configuration 2.0//EN" "http://struts.apache.org/dtds/struts-2.0.dtd"> 
  4.  
  5. <struts> 
  6.     <package name="default" extends="struts-default" namespace=""> 
  7.     </package> 
  8. </struts>   


struts.properties
  1. struts.i18n.reload=true 
  2. struts.devMode = false 
  3. struts.configuration.xml.reload=true 
  4. struts.continuations.package = org.apache.struts2.showcase  
  5. struts.custom.i18n.resources=globalMessages 
  6. #struts.action.extension=jspa 
  7. struts.url.http.port = 8080 
  8. #struts.freemarker.manager.classname=customFreemarkerManager 
  9. struts.serve.static=true 
  10. struts.serve.static.browserCache=false 
  11. struts.multipart.maxSize=2097252 

이렇게 하면 스트럿츠2를 구동하기 위한 셋팅은 완료되었다. (아~ 글 길다... ㅡ..ㅡ) 그럼 이제 돌려보자... 셋팅이 잘 되었는지 봐야되니까...

다음과 같은 PrintStringAction.java 파일을 만든다.(팩키지생성같은 설명을 생략한다.) 이 파일이 비즈니스로직을 담당한다.
  1. package ex.struts;  
  2.  
  3. public class PrintStringAction {  
  4.     private String greetings;  
  5.       
  6.     public String execute() throws Exception {  
  7.         greetings = "Hello World!";  
  8.         return "success";  
  9.     }  
  10.       
  11.     public String getGreetings() { return greetings; }  
  12.     public void setGreetings(String greetings) {  
  13.         this.greetings = greetings;  
  14.     }  
  15. }  

그리고 WebContent/ 아래에 printString.jsp를 만들어 준다. 이 jsp파일이 뷰단을 담당한다.
  1. <!DOCTYPE html PUBLIC "-//W3C//DTD XHTML 1.0 Transitional//EN" "http://www.w3.org/TR/xhtml1/DTD/xhtml1-transitional.dtd"> 
  2. <%@ page contentType="text/html; charset=utf-8" %> 
  3. <% request.setCharacterEncoding("utf-8"); %> 
  4. <% response.setContentType("text/html; charset=utf-8"); %> 
  5. <%@ taglib prefix="s" uri="/struts-tags" %> 
  6. <html xmlns="http://www.w3.org/1999/xhtml" xml:lang="ko" lang="ko"> 
  7.   <head> 
  8.     <meta http-equiv="Content-Type" content="text/html; charset=utf-8" /> 
  9.     <title>pringtString</title> 
  10.   </head> 
  11.       
  12.   <body>      
  13.     <s:property value="greetings" /> 
  14.   </body> 
  15. </html> 

이제 struts.xml파일에 위 2파일에 대한 맵핑을 추가한다.
  1. <?xml version="1.0" encoding="UTF-8"?> 
  2.  
  3. <!DOCTYPE struts PUBLIC "-//Apache Software Foundation//DTD Struts Configuration 2.0//EN" "http://struts.apache.org/dtds/struts-2.0.dtd"> 
  4.  
  5. <struts> 
  6.   <package name="default" extends="struts-default" namespace=""> 
  7.         <action name="printString" class="ex.struts.PrintStringAction"> 
  8.             <result>/printString.jsp</result> 
  9.         </action> 
  10.   </package> 
  11. </struts>   

이제 프로젝트를 실행하면 된다. Run As. > Run on Server를 실행하고 주소에 printString.action을 실행한다.

사용자 삽입 이미지

위처럼 Hello World! 가 찍히면 struts 셋팅이 완료된거다.

셋팅에만 집중했기 때문에 다른 부분에 대한 설명은 거의 하지 않았다. 다른것들은 나중에...
Posted by 1010
51.Struts22009. 1. 23. 15:10
반응형
1. 이클립스 설치 http://eclipse.org -> Download 3.3 version
    - tomcatplugin
      http://www.sysdeo.com/eclipse 아래쪽에 tomecatplugin 클릭
      tomcatPluginV31.zip 다운
2. TomCat http://tomcat.apache.org 다운후 설치 struts도 다운

3. 이클립스에서 스트럿츠를 편리하게 사용하기 위해서는
    GEF(Graphical Editing Framework), htmleditor, strutsIDE가 필요하다.
    GEF : http://www.eclipse.org/gef/ 
    htmleditor :
    http://amateras.sourceforge.jp/cgi-bin/fswiki_en/wiki.cgi?page=EclipseHTMLEditor
    strutsIDE : https://sourceforge.jp/projects/amateras/files/?release_id=24130#24130

4. 라이브러리 다운후 각 파일을 압축을 풀고
    - GEF는 eclipse가 설치된 폴더에 붙여넣기 한다.
    - htmleditor과 strutsIDE 는 eclipse설치파일/plugins에 붙여넣기 한다.

5. 이제 프로젝트를 시작해 보자.
    이클립스를 켜고 프로젝트를 생성한다. 프로젝트 - 동적 웹

6. 프로젝트 생성 후 struts를 추가한다.
    프로젝트를 클릭후 마우스 오른쪽 - new - other을 선택
    Amateras/struts 폴더 밑에 add struts support를 선택하고 next한다.
    tiles와  validator plugin을 사용하겠다는 것!! finish 클릭

7. web-inf아래에  Struts-config파일이 생성되었다면 성공 이제 스트럿츠를 사용해 보자!!

8. 설정
<tomcat 설정>
    윈도우 - 설정 - tomcat5.5 - context file 설정 - 확인
    포트바꾸기 : tocathome\conf\server.xml 8080을 원하는것으로
<java 설정>
    윈도우 -  설정 - Java - 설치된 jre - 추가 클릭
Posted by 1010
51.Struts22009. 1. 15. 13:15
반응형

Tutorials

  • 작성자 : 고덕한
  • 최종수정날짜 : 2007년 8월 23일

이 프레임워크 문서는 웹 개발자들을 위해서 작성되어졌습니다. 그리고 자바 웹 어플리케이션 개발을 할 수 있는 지식이 있다는 가정하에 작성되어 졌습니다. 만약에 좀 더 자세한 내용을 알고 싶으시면 아래 문서를 참고하시기 바랍니다.

Key Technologies Primers

Primers

이 문서에서는 Apache Struts 싸이트에 있는 문서를 기반으로 한글로 다시 작성하여 올립니다. 일부 내용은 번역이 이루어지거나 혹은 나름대로 이해하고 문서를 작성하여 올리겠습니다. 가능한한 원문에 가깝도록 내용을 구성하겠습니다.

국내 자바 개발자들이 Struts 2 Framework 를 익히고, 개발하는데 서로의 노하우를 공유할 수 있도록 게시판을 만들어 질답 및 팁을 여러사람이 볼 수 있도록 하였습니다.

Speciality

  • 사용자 정의 Plugin 들로 어플리케이션 확장하기
  • CRUD 작성
  • JasperReport Tutorial
  • Portlet Tutorial(WebWork 2.2)

예제(Examples)

Framework 에는 여러가지의 예제들을 포함하고 있다.

  • Blank : 처음 프로젝트를 만들어서 실행해 볼 수 있는 아무 내용이 없는 어플리케이션
  • Showcase : 간단한 예제
  • MailReader : 실제로 작성하여 테스트해볼 수 있는 가장 좋은 예제
  • Portlet :
  • Other Examples :

Books

Other Resources

Community Wiki

Next(다음) :


Guides

  • 작성자 : 고덕한
  • 최종수정날짜 : 2007년 8월 23일

Struts 2 Framework 의 핵심적인 내용을 다루고 있습니다. 이 문서들을 이해하시면 Struts 2 Framework 를 이해하는데 많은 도움이 될 것입니다.

1. Core Developers Guide

Request 가 진행됨에 있어서 Struts 2 Framework 에서 주요 세가지 타입(Actions, Interceptors, and Results)을 사용합니다. 이러한 설정은 XML 문서로 설정하거나 Java5 의 Annotation 으로 설정 가능합니다.

1.2 Overview
1.3 Configuration
1.3.2 Annotation
1.3.5 Wildcard Mappings
1.3.6 Performance Tuning
1.3.7 Application Servers
1.4 Localization
1.4.1 Localization
1.5 Validation
1.5.1 Validation
1.6 Type Conversion
1.6.1 Type Conversion
1.7 Interceptors
1.7.1 Interceptors
1.7.2 Writing Interceptors
1.8 Actions
1.8.1 Action Chaning
1.9 Results
1.9.1 Result Types
1.9.2 DispatcherListener
1.9.3 PreResultListener
1.10 Portlets
1.10.1 tutorial
1.10.2 configuration
1.11 FAQs

2. Tag Ddevelopers Guide

여러가지 view technologies, 즉 JSP, Freemarker, Velocity 등의 View Layer 를 제공합니다.

2.1 Struts Tags
2.1.1 Generic Tags
2.1.2 UI Tags
2.1.3 Themes and Templates
2.1.4 Tag Reference
2.1.5 Ajax Tags
  • Ajax and JavaScript Recipes
2.2 OGNL
2.3 Tag Syntax
2.4 JSP
2.4.1 specific tag
2.5 Freemarker
2.5.1 specific tag
2.6 Velocity
2.6.1 specific tag

3. Plugin Developers Guide

Apache Struts 2 provides a simple plugin architecture so that developers can extend the framework just by adding a JAR to the application's classpath. Since plugins are contained in a JAR, they are easy to share with others. Several plugins are bundled with the framework, and others are available from third-party sources.

  • Writing Plugins
3.1 Bundled Plugins
3.1.1 Codebehind Plugin
3.1.2 Config Browser Plugin
3.1.3 JssperReports Plugin
3.1.4 JFreeChart Plugin
3.1.5 JSF Plugin
3.1.6 Plexus Plugin
3.1.7 SiteGraph Plugin
3.1.8 Sitemesh Plugin
3.1.9 Spring Plugin
3.1.10 Struts 1 Plugin
3.1.11 Tiles Plugin
4.1.3 Action Proxy & ActionProxy Factory
4.1.4 Configuration Provider & Configuration

5. Migration Guide

Release Notes 2.1.x
  • Release Notes 2.1.0
Release Notes 2.0.x
  • Release Notes 2.0.9
  • Release Notes 2.0.8
  • Release Notes 2.0.7
  • Release Notes 2.0.6
  • Release Notes 2.0.5
  • Release Notes 2.0.4
  • Release Notes 2.0.3
  • Release Notes 2.0.2
  • Release Notes 2.0.1
  • Release Notes 2.0.0
Struts 1 to Struts 2
  • Comparing Struts 1 and 2
  • Struts 1 Solutions
  • Migration Strategies
  • Migration Tools
Tutorials
  • Migration to Struts 2
  • Migrating Application to Struts 2
Roadmap
  • Roadmap FAQ
  • A History of Struts 2
  • Struts Reloaded
WebWork 2.2 to Struts 2
  • Key Changes From WebWork 2
  • WebWork 2 Migration Strategies

6. Contributors Guide

Source
  • Building the Framework from Source
  • Creating and Signing a Distribution
  • Requirements and Use Cases
  • Precise Error Reporting
  • Obtaining and IDEA license
  • How to Write Doc Comments for the Javadoc Tool(Sun)
Documentation
Core Guide TODOs
  • Creating Resources
  • Writing Validators
  • Writing Type Converters
  • Actions
  • Writing Actions
  • Writing Results
Tools
Licensing and Copyright

Next(다음) :

Posted by 1010
51.Struts22009. 1. 15. 09:40
반응형
Added by Ted Husted, last edited by Dave Newton on Feb 16, 2008  (view change) show comment

AJAX is an acronym for Asynchronous JavaScript and XML. Essentially, a JavaScript can make a HTTP request and update portions of a page directly, without going through a conventional POST or GET and refreshing the entire page. Better yet, a page can contain several JavaScripts making simultaneous (asynchronous) requests.

The key point is that when a script makes an "Ajax request" (XHR), the server doesn't know it came from a script, and handles it like any other request. One reason Ajax is so successful is that it works just fine with existing server technologies, including Struts.

It's not the Ajax request that is different, but the Ajax response. Instead of returning an entire page for the browser to display (or redisplay), an Ajax response will just return a portion of a page. The response can take the form of XML, or HTML, or plain text, another script, or whatever else the calling script may want.

Both Struts 1 and Struts 2 can return any type of response. We are not limited to forwarding to a server page. In Struts 1, you can just do something like:

Struts 1 Action fragment
response.setContentType("text/html");
    PrintWriter out = response.getWriter();
    out.println("Hello World!  This is an AJAX response from a Struts Action.");
    out.flush();
    return null;

In Struts 2, we can do the same thing with a Stream result.

Struts 2 Stream result Action
package actions;

import java.io.InputStream;
import java.io.StringBufferInputStream;
import com.opensymphony.xwork2.ActionSupport;

public class TextResult extends ActionSupport  {
    private InputStream inputStream;
    public InputStream getInputStream() {
        return inputStream;
    }

    public String execute() throws Exception {
        inputStream = new StringBufferInputStream("Hello World! This is a text string response from a Struts 2 Action.");
        return SUCCESS;
    }
}
Struts 2 Configuring the TextResult Action
<action name="text-result" class="actions.TextResult">
 <result type="stream">
    <param name="contentType">text/html</param>
    <param name="inputName">inputStream</param>
  </result>
</action>

Struts 2 can also return a JSON (JavaScript Object Notation) response, using a plugin.

On the client side, there are two basic strategies, which can be mixed and matched.

First, you can use some type of JSP tag. Here, you don't have to know very much at all about Ajax or JavaScript. The taglib does all the work, and you just have to figure out how to use the taglib. The standard Struts 2 taglib includes several Ajax JSP tags, and many third-party libraries are available, including:

Alternatively, you can use a plain-old Ajax widget on a plain-old HTML page, using libraries like Dojo, JQuery, or YUI, and the StreamResult or the JSON Plugin. Here, the sky's the limit, but you actually have to learn something about JavaScript as a language.

Ajax Plugins

While Struts works fine with Ajax out-of-the-box, for added value, several Ajax-centric plugins are available.

Ajax Tag Plugins

Other Ajax Plugins

  • Ajax File Upload - With the Ajax File Upload Plugin we can upload a file to the server and asynchronously monitor its progress.
  • GWT - The Google Web Toolkit Plugin exposes Struts 2 actions to the GWT RPC mechanism.
  • JSON - The JSON Plugin serializes Actions properties into JSON, making it easy to respond to JavaScript requests.

See the Struts Plugin Repository for a complete list of Struts 2 plugins.

Ajax Results with JSP

While server pages are most often used to generate HTML, we can use server pages to create other types of data streams. Here's an example:

book.jsp
<%@ page import="java.util.Iterator,
		 java.util.List,
		 com.esolaria.dojoex.Book,
		 com.esolaria.dojoex.BookManager" %>
<%
	String bookIdStr = request.getParameter("bookId");
	int bookId = (bookIdStr == null || "".equals(bookIdStr.trim())) 
		? 0 : Integer.parseInt(bookIdStr);
	Book book = BookManager.getBook(bookId);
	if (book != null) {
		out.println(book.toJSONString());
		System.out.println("itis: " + book.toJSONString());
	}
%>

In the code example, we use System.out.println to return a JSON data stream as the response. For more about this technique, see the article Using Dojo and JSON to Build Ajax Applications.

Next: Dependency Injection

Posted by 1010
51.Struts22009. 1. 14. 14:44
반응형

Struts2 맛보기!


개인적으로 Struts2 시작하는 입장에서 확실히 해야 것은 ,  Struts2 기존 Struts 다르다는 관점입니다 . 완전히 다르다고 생각하고 공부를 하는 편이 나을리라 생각하면 싶다 . 기본적인 형태는 Struts1 Webwork 병합된 모양이라고는 하지만 이게 그리 중요한 것은 아니다 . Struts1 몰랐어도 , Webwork 써봤어도 지금부터 하면 되기 때문이다 .


스트러츠 2 하는 일이 뭘까 ? 흔히 MVC 원활하게 만들어준다고 이야기 한다 . 간단히 이야기 하면 웹은 기본적으로 사용자 입력을 받고 이에 대한 응답을 해주는데 , 작업을 깔끔하게 하는데 도움을 준다는 이야기다 . 안타까운 점은 개인적으로 스트러츠 1 이것을 해주리라 하고 나왔는데 , 다루게 되면 정글을 헤메는 느낌을 주곤 했다는 점이다 . 그러한 면에서는 스트러츠 2 프로젝트를 마치고 느낌은 그런 점이 없어질 같다는 느낌이다 . 그럼 어떻게 도와줄까 ? 부분은 MVC 깔끔하게 처리할 있는 환경과 규칙을 제공해준다 . 여기서 확실히 짚고 넘어가야 점은 환경과 규칙을 주기 때문에 이를 적절히 활용하지 않으면 우리는 다시 지저분한 정글을 누빌 밖에 없다는 점이다 .


모든 웹은 단순하다 . 사용자는 특정 action 취하기 위해서 우리가 제공하는 service 접근한다 . 그리고 우리가 제공하는 service 사용자 요청에 따라서 적절한 행동 취하고 그에 걸맞는 result 반환해 준다 . 이게 바로 웹이다 .


여기서 action은 모든 동작을 의미한다. 물론 사용자가 직접적으로 하는 action이 아닌 action도 다 action이다. 즉 시스템이 외부 요소들에 제공하는 모든 action은 action인 것이다. 그리고 요청에 따른 적절한 행동은 흔히 이야기하는 비지니스 로직과 연관된 부분이다. 그리고 마지막으로 result는 모든 결과물이다. 모든 결과물이라고 하면 단순한 jsp 페이지가 될 수도 있고, 사용자가 다운로드 받을 수 있도록 해주는 stream일 수도 있으며, 또 다른 action으로 연계하는 동작이 될 수 있다. 그런데, 여기서 스트러츠2에서 배우고 익혀야할 부분은 커스텀 태그다. 이제 지겹지 않는가 <%를 열자 마자 %>로 닫아야 하는 단순 작업이.


서론이 길었다. 이제 서론이 아닌 실전이다. 당연히 스트러츠2를 하기 위해서는 다운을 받아야 한다. 다운로드 주소는 다음과 같다.


http://apache.tt.co.kr/struts/examples/struts2-blank-2.0.11.war


현재로서는 위 주소에서 blank application을 얻을 수 있다. 해당 주소가 안 살아 있으면, struts2사이트 찾아가서 최신 blank application을 받도록 하자.


그리고 eclipse WTP를 다운 받아서 설치하자. WTP에서 "Dynamic Web Project"를 하나 만들어서 아까 받은 blank application 내부 "WEB-INF/lib" 하단에 있는 파일들을 가져다가 아까 만든 프로젝트 하단 WEB-INF/lib 하단에 복사하자. 잘 되었으면 아래와 같은 형태가 되어 있어야 한다.


아 위에 있는 pages 폴더는 테스트 페이지를 위치시키려 임의로 만든 폴더이니, 신경을 쓰지 않아도 됩니다. 이 상태에서 web.xml에 다가 이 web-app는 스트러츠2로 돌 수 있도록 설정해주도록 합니다.


다른 것 보다 위 파일 같이 <filter>항목과 <filter-mapping> 항목을 추가 합니다. 이게 의미하는 것은 우리가 만든 서비스에 요청 들어오는 것들을 스트러츠2가 우선 검사해서 필요에 따라서 처리한다는 이야기 입니다. 이에 대한 세부 내용을 알고 싶으면, FilterDispatcher에 대해서 알아보면 여러 정보를 접할 수 있을 것 입니다.


이제 사용자가 우리가 만든 시스템에 action을 취한다고 생각하고 이에 따라서 처리를 해봅시다. "ThinkFree"라고 찍힌 화면을 보고자 하는 경우를 가정하고 작업을 합시다. 이거 단순하죠. thinkfree.jsp를 만들고 그 안에 ThinkFree라고 적고 해당 페이지로 바로 사용자가 접근하면 되는 거죠. 그래도 스트러츠2 세계관을 이해하기 위해서 일부러 좀 더 어렵게 가봅시다.


아까 이야기 했죠. 모든 웹은 action에서 시작된다고. 그럼 우리는 왠지 그 action에 따른 행동을 어딘가에 적어서 컴퓨터가 알게 해주어야 겠다는 생각이 들지 않나요? 이를 위해서 아래 그림과 같이 classes 하단에 컴파일되어 들어갈 수 있도록 src 하단에 struts.xml을 만듭니다. (이는 시간 절약을 위해서 WTP에서 작업하는 기준으로 이야기하는 것이니 적절히 자신 상황에 맞춰서 작업하시면 됩니다. 무조건 돌릴 때에는 WEB-INF/classes 하단에 struts.xml이 위치하면 아무 문제 없습니다.)


이제 해당 파일을 열어서 다음과 같이 적어 줍니다.


사용자가 hello_thinkfree라는 action을 취하면 그 결과로 ThinkFree라고 적힌 thinkfree.jsp를 보여주라고 컴퓨터에게 이야기 해 준거지요. 음 스트러츠2 기본 확장자가 action이니깐 잘 구동 되는지 확인해보기 위해서 아래와 같이 주소 입력해서 확인해 봅니다.


이거 봤으면 이제 스트러츠2 좀 해봤다고 이야기 할 수 있습니다. ^^ 우선 아까 웹이 해주는 역할에 있어서 빠진 부분이 있죠. 바로 " 사용자 요청에 따라서 적절한 행동 취하고 "라는 부분입니다. 음 사용자가 자신의 이름을 명시해주면, 그 이름을 반영해서 "ThinkFree loves xxx"라고 처리를 해준다고 생각해 봅시다. 음 그럼 시스템은 우선 사용자에게서 이름을 받아야 겠네요. 그 이름에 대한 지칭자를 "name"이라고 하고 그 값을 준다고 생각합시다. Form 만들고 하는거 귀찮으니깐 사용자가 바로 GET 방식으로 호출을 한다고 합시다. 그럼 사용자는 다음 주소와 같이 호출을 할 것입니다.


http://localhost:8080/struts-test/hello_thinkfree.action?name=Web


그럼 이제 이 요청에 따라서 적절한 행동을 시스템이 하도록 해줍시다. 우선 HelloThinkFree 클래스를 아무 위치에 만듭니다. 그리고 아래 그림과 같이 public String execute() 함수를 정의합니다. 우리는 이 함수에서 기본 동작을 정의할 것입니다.


여기서 해당 함수가 반환하는 success라고 하는 것은 행동 결과가 어떤 상태라는 결과 상태를 명시하는 것으로 이해하시면 될 것 입니다. 그럼 이제 사용자가 입력한 값을 받도록 해야 합니다. 아무 생각없이 사용자가 주는 변수 이름을 기본으로 적당히 내부에 변수 선언합니다. name이라는 변수이름 이름을 주니깐 아래와 같이 private String name; 이라고 지정하고 이 변수에 getter, setter를 지정합니다.


음 이제 사용자가 볼 메세지를 만들어야 할 것입니다. 음 우선 사용자가 보는 화면이 이제 좀 조작된 것이니깐 message라는 변수를 String 형으로 만들고, 해당 값을 화면에서 가져가서 볼 수 있도록 getter, setter를 만듭니다.


아 그러고 보니 이 hello_thinkfree 액션을 통해 전달된 값이 위 클래스에서 처리된다고 컴퓨터에게 이야기 해주는 것을 잊어버렸군요. 이를 위해서 아래와 같이 struts.xml을 수정합니다.


이제 그러면 마지막으로 이렇게 처리된 결과를 적절히 화면에서 뿌려 주어야 겠죠. 화면에서야 아까 설정한 message만 화면에 뿌려 주면 됩니다. 우선 무조건 아래와 같이 해당 페이지에 써봅시다. 우선 struts2에서 제공해주는 tag를 쓰겠다고 선언을 합니다. 그 뒤에는 아까 결과로 얻은 message를 가져다가 뿌려주겠다고 s:property 태그와 뿌릴 변수 이름을 적어 둡니다.


이제 다 했습니다. 이제 제대로 되는지 테스트 해봅시다.


지금까지 한 것을 보면 참 간단합니다. 사실 워낙 간단한 예제니깐 당연히 간단하겠죠. 그럼 이제 정리해 봅시다. 우리는 다음과 같이 해서 간단한 action을 취하는 서비스를 만들었습니다.


  1. 시스템이 제공할 action을 나름 생각합니다.

  2. 정리된 action을 적절히 이름 지어서 struts.xml에 정의합니다.

  3. 그리고 사용자가 주는 정보들 이름들과 같은 이름을 가진 내부 변수를 가진 POJO를 만듭니다.

  4. 해당 POJO 클래스를 아까 정의한 struts.xml에 기록합니다.

  5. 이에 시스템이 최종적으로 내놓을 정보를 담은 변수들을 그 POJO에 정의하고, execute 함수를 정의해서 적절히 처리합니다.

  6. 최종 result로 나올 page를 정의한 jsp 페이지에서 tag-lib를 정의한 다음에 그에 적절히 tag를 사용해서 결과로 나온 정보들을 화면에 뿌려줍니다.


지금까지 한 것을 정상적으로 수행했다면, 이제 스트러츠2가 어떤 것인지 대충 감을 잡아갈 수 있을 것 입니다. 아마 기존에 스트러츠1을 사용했던 분은 왠지 깔끔하게 느껴지리라 생각합니다. 그럼 여기서 이만 줄이겠습니다.

출처 : http://docs.thinkfree.com/docs/view.php?dsn=842331

Posted by 1010
51.Struts22008. 12. 15. 15:07
반응형

<%@ page language="java" contentType="text/html; charset=EUC-KR"
    pageEncoding="EUC-KR"%>
<!DOCTYPE HTML PUBLIC "-//W3C//DTD HTML 4.01 Transitional//EN">
<html>
<head>
<meta http-equiv="Content-Type" content="text/html; charset=EUC-KR">
<title>Insert title here</title>
</head>
<body>

<form method="post" action="/strutsboard/insert.no">
 <table align="center">
  <tr>
   <td>작성자<input type="text" name="writer"></td>
  </tr>
  <tr>
   <td>제목<input type="text" name="title"></td>
  </tr>
  <tr>
   <td>내용<input type="text" name="content"></td>
  </tr>
  <tr>
   <td>패스워드<input type="password" name="password"></td>
  </tr>
  <tr>
   <td colspan=2 align="center"><input type="submit" value="save"></td>
   
  </tr>
 </table>
</form>
</body>
</html>


** info.jsp


<%@ page language="java" contentType="text/html; charset=EUC-KR"
    pageEncoding="EUC-KR"%>
   
    <%@page import="board.vo.VisitorVO" %>
   
    <%
     VisitorVO vo = (VisitorVO)request.getAttribute("info");
    %>
<!DOCTYPE HTML PUBLIC "-//W3C//DTD HTML 4.01 Transitional//EN">
<html>
<head>
<meta http-equiv="Content-Type" content="text/html; charset=EUC-KR">
<title>Insert title here</title>
<script>

 function goDelete(no){
  var dbpassword= document.getElementById("dbpassword").value;
  var userpassword= document.getElementById("password").value;
  if(dbpassword != userpassword){
   alert('비밀번호가 맞지않습니다');
  }else{
   location.href="/strutsboard/delete.no?=no="+no;
 }
 
 function goModify(no){
  var dbpassword= document.getElementById("dbpassword").value;
  var userpassword= document.getElementById("password").value;
  if(dbpassword != userpassword){
   alert('비밀번호가 맞지않습니다');
  }else{
   location.href="/strutsboard/modify.no?no="+no;
  }
 }


</script>


</head>
<body >

<table align="center" cellpadding="1" cellspacing="1" border="1" bordercolor="pink">
 <tr>
  <td bgcolor="pink">글번호</td>
  <td><%=vo.getNo() %>
  <td bgcolor="pink">작성날짜</td>
  <td><%=vo.getRegdate() %></td>
 </tr>
 <tr>
  <td bgcolor="pink">작성자</td>
  <td colspan=3><%=vo.getWriter() %></td>
 </tr>
 <tr>
  <td bgcolor="pink">제목</td>
  <td colspan=3><%=vo.getTitle() %></td>
 </tr>
 <tr>
  <td bgcolor="pink">내용</td>
  <td colspan=3 height="100"><%=vo.getContent() %></td>
 </tr>
 
 <tr>
  <td bgcolor="pink">패스워드</td>
  <td colspan=3><input type="password" id="password" ></td>
  <input type="hidden" id="dbpassword" value="<%=vo.getPassword() %>">
 </tr>
 
 <tr>
  <td colspan=4 align="center">
 <input type="button" value="수정" onclick="location='/strutsboard/modify.no?no=<%=vo.getNo() %>'">
 <input type="button" value="삭제" onclick="location='/strutsboard/delete.no?no=<%=vo.getNo() %>'">
 <input type="button" value="리스트" onclick="location='/strutsboard/list.no'">
 
  </td>
 
 </tr>
</table>
</body>
</html>


** list.jsp


<%@ page language="java" contentType="text/html; charset=EUC-KR"
    pageEncoding="EUC-KR"%>
   
   
  <%@page import="board.vo.VisitorVO,java.util.*" %>
 
  <%
   ArrayList list= (ArrayList)request.getAttribute("list");
  %>
<!DOCTYPE HTML PUBLIC "-//W3C//DTD HTML 4.01 Transitional//EN">
<html>
<head>
<meta http-equiv="Content-Type" content="text/html; charset=EUC-KR">
<title>Insert title here</title>
</head>
<body>

<table align="center" cellspacing="1" border="1" bordercolor="pink">
 <tr>
  <td>글번호</td>
  <td>작성자</td>
  <td>제목</td>
  <td>작성날짜</td>
 </tr>
 
  
 <%
  for(int i=0; i<list.size();i++){
   VisitorVO vo = (VisitorVO)list.get(i);  
 %>
 <tr>
  <td><%=vo.getNo() %></td>
  <td><%=vo.getWriter() %></td>
  <td width=40%><a href="/strutsboard/info.no?no=<%=vo.getNo() %>"><%=vo.getTitle() %></td>
  <td><%=vo.getRegdate() %></td>
 </tr>
 
 <% } %>
 
 <tr>
  <td align="center" colspan=4><input type="button" value="작성하기" onclick="location='/strutsboard/board/write.jsp'"></td>
 </tr>
 
</table>

</body>
</html>


** modifyForm.jsp


<%@ page language="java" contentType="text/html; charset=EUC-KR"
    pageEncoding="EUC-KR"%>
    <%@page import="board.vo.VisitorVO" %>
   
    <%
     VisitorVO vo = (VisitorVO)request.getAttribute("info");
    %>
<!DOCTYPE HTML PUBLIC "-//W3C//DTD HTML 4.01 Transitional//EN">
<html>
<head>
<meta http-equiv="Content-Type" content="text/html; charset=EUC-KR">
<title>Insert title here</title>
</head>
<body>

<table align="center" cellpadding="1" cellspacing="1" border="1" bordercolor="pink">
 
 <input type="hidden" name="no" value="<%=vo.getNo() %>">
 
 <tr>
  <td bgcolor="pink">글번호</td>
  <td><%=vo.getNo() %>
 
  <td bgcolor="pink">작성날짜</td>
  <td><%=vo.getRegdate() %></td>
 </tr>
 <tr>
  <td bgcolor="pink">작성자</td>
  <td colspan=3><input type="text" name="writer" value="<%=vo.getWriter() %>"></td>
 </tr>
 <tr>
  <td bgcolor="pink">제목</td>
  <td colspan=3><input type="text" name="title" value="<%=vo.getTitle() %>"></td>
 </tr>
 <tr>
  <td bgcolor="pink">내용</td>
  <td colspan=3 height="100"><textarea name="content" rows=10><%=vo.getContent() %></textarea></td>
 </tr>
 <tr>
  <td>새 비밀번호</td>
  <td colspan=3><input type="text" name="password"></td>
 </tr>


 <tr>
  <td><input type="button" value="수정" onclick="location='/strutsboard/update.no?no=<%=vo.getNo() %>'">
  <td><input type="button" value="리스트" onclick="location='/strutsboard/list.no'">
 </tr>

</table>
</body>
</html>

Posted by 1010
51.Struts22008. 12. 7. 20:20
반응형
struts.devMode=true

struts2 에서 어플리케이션을 개발할 때 개발모드로 하면 뭔가 편리한 것을 도와준다는 것 같은데...이넘 때문에 한시간 삽질했다.

어플리케이션에서 unexception이 발생하던가 잘못된 요청이 오면 error.jsp 페이지로 돌려 사용자에게 안내메시지를 뿌려주는 것을 만들었다.

그런데 유독 xxx.action(*.action은 struts가 처리하도록 매핑했음) 으로 끝나는 넘들은 error.jsp로 가지 않고 struts가 아래와 같은 에러페이지를 뿌리는 것이 아닌가?

Struts Problem Report

Struts has detected an unhandled exception:

Messages:
  • There is no Action mapped for namespace / and action name dfasdf.

  • Stacktraces

    There is no Action mapped for namespace / and action name dfasdf. - [unknown location]
        com.opensymphony.xwork2.DefaultActionProxy.prepare(DefaultActionProxy.java:186)
        org.apache.struts2.impl.StrutsActionProxyFactory.createActionProxy(StrutsActionProxyFactory.java:41)
        org.apache.struts2.dispatcher.Dispatcher.serviceAction(Dispatcher.java:494)
        org.apache.struts2.dispatcher.FilterDispatcher.doFilter(FilterDispatcher.java:419)

    response 상태도 200으로 떨어지는 것이다.

    struts2 이넘이 내부적으로 뭔가 처리를 하는 것 같은데 왜 이렇게 하는지 알 수가 없었다.

    혼자 엄청 삽질하다가 구글에서 뒤져 보았다. 그랬더니 devMode=true 로 했을 경우 어쩌구 저쩌구 하는 것이 아닌가..
    그래서 혹시나 싶어 devMode=false로 바꾸었더니 정상적으로 내가 원하는 error.jsp로 가더군..

    음..이런 삽질...싫다..ㅠㅠ
    Posted by 1010
    51.Struts22008. 10. 30. 10:38
    반응형

    Tong - [별난상이]님의 STRUTS2통

    http://tong.nate.com/rks623/

    1. Ready, Set, Go!

    처음 Struts 2 Framework 을 설치하고 환경설정하는 내용입니다. Struts 2 Framework 으로 웹 어플리케이션을 작성하기 위해서는 기본 선수 지식이 필요합니다. 아래의 기술들을 어느정도 알고 있어야 Struts 2 Framework 으로 웹 어플리케이션 작성이 쉽습니다.

    • Java
    • Filters, JSP, and Tag Libraries
    • JavaBeans
    • HTML and HTTP
    • Servlet Containers(Tomcat 등)
    • XML

    국내 자바 개발자들이 Struts 2 Framework 를 익히고, 개발하는데 서로의 노하우를 공유할 수 있도록 게시판을 만들어 질답 및 팁을 여러사람이 볼 수 있도록 하였습니다.

    1.1 Download the Distribution

    Apache Struts 2 Framework 를 다운로드 받기 위해서는 Apache Struts Download 싸이트로 가서 최신 버전을 다운로드 받습니다.

    1.2 Setup

    Struts 2 Framework 웹 어플리케이션을 작성하기 위한 설정을 살펴본다.

    1.2.1 환경설정 파일들

    Struts 2 Framework 어플리케이션을 개발하기 위해서는 최소한 필요한 파일을 복사합니다. 그 목록은 아래에 나와 있습니다.

    • struts2-core.jar : Framework Library 파일입니다.
    • xwork.jar : XWork 2 라이브러리로써 Struts 2 에서 사용되어 집니다.
    • ognl.jar : OGNL(Object Graph Navigation Library) 를 지칭하며 Framework 에서 사용되는 Expression Language 입니다.
    • freemarker.jar : Freemarker 로 쓰여진 UI Tag template 에서 사용합니다.
    • common-logging.jar : 로그 처리를 위한 라이브러리입니다.
    • web.xml : Struts 2 Framework 을 연동하는 웹 어플리케이션 환경설정 파일
    • struts.xml : Struts 2 Framework 의 환경설정 내용을 포함하고 있으며, Action, Result, interceptor 등의 내용을 포함하고 있습니다.
    1.2.2 web.xml

    web.xml 파일에 Struts 2 Framework 을 연동하는 내용을 기술합니다. 아래의 내용과 같이 web.xml 을 구성합니다.

    web.xml 에 FilterDispatcher 를 등록하여 request 가 발행하면 Struts 2 Framework 가 그 request 를 받도록 설정합니다.

    <?xml version="1.0"?>
    <!DOCTYPE web-app PUBLIC "-//Sun Microsystems, Inc.//DTD Web Application 2.3//EN"
    "http://java.sun.com/dtd/web-app_2_3.dtd">

    <web-app>
    <display-name>My Application</display-name>
    <filter>
    <filter-name>struts2</filter-name>
    <filter-class>org.apache.struts2.dispatcher.FilterDispatcher</filter-class>
    </filter>
    <filter-mapping>
    <filter-name>struts2</filter-name>
    <url-pattern>/*</url-pattern>
    </filter-mapping>
    </web-app>

    1.2.3 Struts.xml

    Struts 에서 작성한 어플리케이션이 정상적인 동작을 하기 위해서 필요한 환경설정 내용을 포함하고 있습니다.

    <!DOCTYPE struts PUBLIC
    "-//Apache Software Foundation//DTD Struts Configuration 2.0//EN"
    "http://struts.apache.org/dtds/struts-2.0.dtd">

    <struts><!-- Configuration for the default package. -->
    <package name="default" extends="struts-default">
    ...
    </package>
    </struts>

    2. Hello World

    Struts 2 Framework 를 사용한 Hello World 웹 어플리케이션을 작성해봅니다. 웹페이지에서 Request 를 발생시키고, 서버에서 해당 Request 를 받은 다음, Hello World 문자열을 다시 보내서, 브라우저에서 Hello World 문자열을 나타냅니다.

    원문에서는 간단한 소스와 환경설정하는 방법이 나와 있지만, 한글화를 하면서 Eclipse 를 사용하여, 각 단계별로 이미지를 포함하였습니다.

    2.1 Web Project 생성

    최신 Eclipse 버전인 Eclipse Europa JEE 버전을 사용하여 HelloWorld Web Application 을 작성합니다.

    우선 Workspace 를 생성합니다.


    File -> New -> Project 메뉴를 선택하고, Web -> Dynamic Web Project 를 선택합니다.

    Project Name : Hello World 로 입력합니다.


    Dynamic Web Project 를 생성한 후에 실행할 서버(runtime) 을 지정해야 합니다. 현재는 처음으로 프로젝트를 생성하였기에, 설정된 Target Runtime 이 없습니다.

    Hello World 어플리케이션은 웹 어플리케이션이기 때문에, 가장 많이 사용되는 Tomcat 를 지정하여 실행을 하도록 합니다.

    따라서 Tomcat 을 설치하고 난 후, 톰캣을 Target Runtime 으로 지정합니다.

    New 버튼을 클릭하고, Apache -> Apache Tomcat 5.5 를 선택합니다.


    그리고 Tomcat 이 설치된 디렉토리를 지정합니다.


    Finish 버튼을 클릭하면 Target Runtime 이 위에서 설정한 Tomcat 으로 지정된 것을 확인할 수 있습니다.

    2.2 Struts 2 Library 추가

    Struts 2 Framework 을 사용하기 위해서는 위에서 설명한 필수 라이브러리를 포함시켜야 합니다.

    Eclipse 에서 User Library 에 Struts 2 Framework 에서 사용되는 라이브러리를 추가합니다.


    2.3 web.xml 수정

    Struts 2 Framework 을 연동하여, Request 가 발생되면 Struts 2 로 처리가 되도록 web.xml 을 아래와 같이 수정합니다.


    2.4 JSP, Action 구현

    Request 가 발생되고, 그 결과를 화면에 보여질 JSP 파일을 추가합니다.

    File -> New -> JSP 를 선택하고, HelloWorld.jsp 로 입력합니다.

    그리고 아래와 같이 소스 코드를 입력합니다.


    그리고 HelloWorld 클래스를 생성하고 아래와 같이 구현합니다.

    File -> New -> Class 메뉴를 선택하고, Package : com.javamodeling.struts2, Name : HelloWorld 를 입력합니다.


    2.5 struts.xml 생성

    Request 가 발생되고, 어느 Action 클래스가 Request 를 처리하고, 그에 따른 처리 결과에 따라서 JSP 파일로 Forwording 을 해야 합니다.

    이러한 sturts 2 의 전체 환경설정을 struts.xml 에 정의를 합니다.

    src -> new -> Other -> XML -> XML 을 선택하고, struts.xml 파일을 생성하고 아래와 같이 입력합니다.


    2.6 배포 및 실행

    배포하기 위해서는 Servers 탭에서 Add and Remove Projects 메뉴를 선택하고, HelloWorld 프로젝트를 추가합니다.


    Server 를 실행하고, 주소창에 다음과 같이 입력하면 http://localhost:8080/HelloWorld/HelloWorld.action 아래와 같은 결과를 확인할 수 있습니다.


    2.7 동작 순서

    간단하게 Struts2 Framework 을 사용하여 HelloWorld 어플리케이션을 작성해 보았습니다.

    Request 가 발생해서, 최종 Response 가 Browser 까지 전달되는 과정이 어떻게 되는지 살펴보겠습니다.

    • Servlet Container(Tomcat)는 Browser 로부터 Request 를 받습니다. 이 Request 에는 HelloWorld.action 이 포함되어 있습니다.
    • web.xml 에서 모든 request 는 struts2 로 전달되도록 URL Mapping 에 의해서 설정되어 있습니다. 따라서 org.apache.struts2.dispatcher.FilterDispatcher 를 경유하게 되어 있습니다.
    • .action 이 있기에 Struts2 Framework 에서는 Struts 2 Framework 에서 Request 를 처리하도록 합니다.
    • Sturts2 는 struts.xml 에서 요청한 HelloWorld.action 과 같은 이름의 HelloWorld(.action 은 빼고) 가 있는지 찾습니다. 같은 이름이 존재하면, struts.xml 에서 지정한 클래스의 객체를 execute() 메소드를 실행합니다.
    • HelloAction.execute() 메소드가 실행되고, 필요한 비즈니스 로직이 실행됩니다. return 하는 값이 SUCCESS 이면 정상적인 정상으로 판단하고, struts.xml 에서 지정한 Result 에 기술된 HelloWorld.jsp 로 Forwarding 합니다.
    • HelloWorld.jsp 에서는 <s:property value="message"> 태그를 인식하여 HelloWorld.getMessage() 메소드를 호출하여, HTML 을 구성합니다.
    • 마지막으로 HTML 코드를 Browser 로 response 합니다.

    3. Using Tags

    지금부터는 위에서 작성한 Hello World 어플리케이션에 추가로 기능을 덧붙이도록 하겠습니다. Hello World 는 실행하기 위해서 간단하게 설정만 하였지만, 지금 부터는 몇몇 기능을 추가하여 기본적인 어플리케이션을 만들어보겠습니다.

    우선 웹 어플리케이션에서는 다른 페이지나 Request 를 발생할 수 있고, HyperLink 를 추가할 수 도 있습니다.

    페이지에 동적으로 HTML 코드를 처리하기 위해서 많이 사용되고 있는 것이 Tag 이며, Struts 2 Framework 에서 사용되고 있는 몇 개의 Tag 를 살펴보겠습니다.

    3.1 Linking

    많이 사용되고 있는 기능중에 하나가 다른 페이지로 연결하는 Link 입니다. Welcome.jsp 파일을 추가하고, 아래와 같이 코딩합니다.


    결과 페이지를 각 언어별로 볼 수 있도록 페이지 링크를 추가한 화면입니다. 각 언어별로 Resource Bundle 에서 값을 읽어서 결과를 처리하기 위함입니다.


    위와 같이 처리하기 위해서 HelloWorld.jsp 파일을 아래와 같이 추가합니다.


    위 Welcome.jsp 와 HelloWorld.jsp 에서 두가지의 Link 하는 방법을 나타내고 있습니다. HellWorld.jsp 에서 사용된 %{url} 은 <s:url> 태그에서 사용된 url 값을 그대로 사용하는 방법입니다.

    <s:url> 이 사용된 방법은 위 예제에서 아래의 세가지 경우입니다.

    • Resource links : <link href= "<s:url value=" /css/tutorial.css "/>" rel= "stylesheet" type= "text/css" />
      Resource Link 는 header 에서 필요한 리소스(파일, 페이지)를 Link 하는 역할을 합니다.
    • Direct links : <li><a href= "<s:url action=" Register "/>" >Register</a></li>
      Direct Link 는 해당 Action 을 직접 호출합니다. Action 의 확장자를 지정하지 않아도, Tag 가 rendering 하면서 자동을 확장자를 붙여줍니다.
    • Links with parameters : <s:url id= "url" action= "Welcome" > <s:param name= "request_locale" >en</s:param> </s:url> <s:a href= "%{url}" >English</s:a>
      이 param 태그는 request 가 전송될때, ?request_locale=en 으로 변환하여 Welcome Action 에 전송됩니다. 그리고 %{url} 에 파라미터가 포함된 경로가 포함되어 집니다.

    3.2 Wildcard Mappings

    만약 Welcom Action 이 실행된 후, 그 결과를 특정 페이지로 Forwarding 해야 합니다. Welcome Action 을 처리하기 위해서 struts.xml 에 아래 내용을 추가합니다.

    <actjon> 태그에서 class 속성을 부여하지 않으면 Action 클래스를 수행하지 않고 직접 페이지로 Forwarding 합니다.


    이렇게 Action 이름과 Forwarding 할 페이지 이름이 동일할 경우, 아래과 같이 wildcard mapping 을 사용하여 처리를 하면 훨씬 편리합니다.

    아래와 같이 코딩해도 결과는 마찬가지로 나타납니다.


    3.3 Data Entry Forms

    입력폼을 처리해야 하는 경우에, Struts 2 의 태그에서도 입력 폼을 위한 태그를 사용할 수 있습니다. 아래와 같이 간단하게 태그를 추가해보겠습니다.

    Logon.jsp 파일을 생성하고, 아래와 같이 코딩합니다. Struts 2 태크가 HTML Form 형식에 맞게 rendering 을 해줍니다.

    4. Coding Action

    위에서 Tag 부분을 설명하면서 Login Form 을 완성하였습니다. 이번에는 Login Action 을 구현해 보겠습니다. Login Action 에서 비즈니스 로직이 수행되고 난후에 그 결과에 따라서 리턴하는 값이 달라지게 됩니다.

    그리고 아래 URL 로 로그인 기능이 수행됩니다.


    http: //localhost:8080/HelloWorld/Logon.action

    Login.action 이 호출되면, User Name 과 Password 값을 받아서 로그인 처리를 하기 위한 Logon 클래스를 생성합니다.

    아래와 같이 Logon 클래스를 추가하고, 코딩합니다.

    package com.javamodeling.struts2;
    
    import com.opensymphony.xwork2.ActionSupport;
    
    public class Logon extends ActionSupport {
    
        public String execute() throws Exception {
    
            if (isInvalid(getUsername())) return INPUT;
            if (isInvalid(getPassword())) return INPUT;
            return SUCCESS;
        }
    
        private boolean isInvalid(String value) {
            return (value == null || value.length() == 0);
        }
    
        private String username;
        public String getUsername() {
            return username;
        }
        public void setUsername(String username) {
            this.username = username;
        }
    
        private String password;
        public String getPassword() {
            return password;
        }
        public void setPassword(String password) {
            this.password = password;
        }
    
    }


    위 Logon class 에서 비즈니스 로직이 수행되는 것은 execute() 메소드입니다. Logon.action 이 호출되면 execute() 메소드가 실행되고 비즈니스 로직이 수행되고, HTML Form 값은 자동으로 Action 클래스의 getter/setter 로 지정된 property 에 저장이 됩니다.

    위의 Logon 클래스에서 setUserName() 과 setPassword() 메소드가 HTML Form 의 값을 저장하여 Logon 클래스에 해당 값이 저장됩니다.

    5. Selecting Results

    Request 에 대한 Action 이 수행된 후, Response 를 처리하기 위해서 Result 가 선택되어집니다. Result 는 간단한 HTML 페이지, JSP 페이지, Freemaker 나 Velocity 같은 Template 엔진, 혹은 PDF 같은 문서나 복잡한 리포트로 Forward 될 수 있습니다. 또한 Action mapping 통하여 여러개의 Result 도 가능합니다. 특정 하나의 Result 로 선택되기 위해서는, Action 클래스에서 Result 에 맞는 결과 값을 리턴해야 합니다.

    아래와 같이 struts.xml 에 코드를 추가합니다.


    Logon.jsp 에서 username 과 password 를 입력하면 Logon Action 에서 success 값을 리턴합니다. succuess 값은 디폴트 result 값으로써, Menu action 으로 전송됩니다.

    만약에 두 값이 입력되지 않으면, Logon Action 은 input 값을 리턴하게 되고, 다시 Logon.jsp 로 Forwarding 됩니다.

    일반적으로 Result 의 Type 은 Dispatcher forward 입니다. 이는 특정 JSP 페이지로 forwarding 을 하며, 위에서 설정된 redirect-action 은 client browser 에서 다시 rediect 를 생성하게 하여 Action 을 호출합니다.

    5.1 Using a Stub Page

    Logon Action 이 정상적으로 수행하고 난 후, 다음으로 Forwarding 할 페이지를 아직 결정하지 않았습니다. 그래서 Logon Action 이 정상적으로 수행되고 난 후에 Forwarding 할 Menu.jsp 파일을 아래와 같이 생성하고 코딩합니다.


    Menu Action 이 호출되면, Menu.jsp 으로 Forwarding 됩니다. 이렇게 되는 것은 위에서 struts.xml 파일에 * 라는 wildcard 를 설정해 놓았고, Action Name 과 동일한 JSP 파일로 Forwarding 하게 되어 있습니다. 따라서 Logon Action 에서 Menu Action 을 호출하게 되면, Menu.jsp 로 Forwarding 됩니다.

    5.2 Including a Missing Page

    하나의 JSP 페이지로 화면에 보이는 모든 내용을 포함하지는 않습니다. 여러개의 JSP 파일로 나누어서 한 화면을 구성하는게 일반적입니다. 따라서 Struts 2 태그를 사용하여 다른 JSP 파일을 포함하는 것은 아래와 같은 태그를 사용할 수 있습니다.

    <%@ taglib prefix="s" uri="/struts-tags" %>
    <s:include value="Missing.jsp" />

    6. Validating Input

    앞서서 Logon Action 에서는 User Name 과 Password 에서 Validation 을 수행하였습니다. 이렇게 간단한 어플리케이션에서는 코드상에서 Validation 을 체크할 수도 있지만, 큰 어플리케이션이나 대용량 어플리케이션을 개발할 경우에는 코드상에서 Validation 을 체크하는 것은 매우 힘듭니다. 또한 유지보수하는데 매우 어려움이 많습니다.

    Struts 2 Framework 에서는 Validation Framework 을 제공하여 Input 값에 대한 Validation 을 체크할 수 있습니다.

    Validation 은 XML 파일로 Validation 에 대한 내용을 정의할 수 있고, Annotation 으로 Validation 을 정의할 수 있습니다.

    XML 파일은 Action Name 과 동일한 이름으로 시작하고, 파일명 뒷 부분에 "-validation.xml" 이라고 파일명을 정하면 됩니다. 이 문서에서 작성하고 있는 Logon Action 에 Validation 을 설정하려면 Logon-validation.xml 로 파일을 생성하면 됩니다.

    LOgon Action 클래스가 있는 같은 패키지에 Logon-validation.xml 파일을 생성하고 아래와 같이 코딩합니다.


    위와 같이 Validation 을 추가하면, 첫 페이지를 호출할때 Validation 을 수행하게 됩니다. 하지만 첫 페이지는 그냥 입력화면을 처리하고 Validation 을 수행하지 말아야 합니다.

    따라서 첫 페이지를 호출할때, Validation 을 수행하지 않게 하기 위해서 Welcome.jsp 와 struts.xml 파일을 아래와 같이 수정합니다.


    Logon 화면이 보일때 까지 과정

    • Welcome.jsp 에서 Logon_input.action 이 호출되기에, struts2 에서 이에 맞는 actioin mapping 을 찾습니다. struts.xml 에 Logon_* 가 있기에 이 action mapping 을 찾습니다.
    • method={1} 가 설정되어 있기에, method=input 으로 인식합니다.
    • struts2 에서 Logon.input() 메소드를 호출합니다.
    • input() method 는 vadidation 을 처리하지 않는 특별한 메소드로 지정되어 있기에, Validation 을 수행하지 않고 그냥 실행합니다.
    • 디폴트 input() method 는 input 값을 리턴합니다.
    • struts2 는 Validation 메시지 없이 그냥 Logon.jsp 로 Forwarding 합니다.


    Logon 페이지에서 Submit 버튼을 클릭할 경우

    • struts2 에서는 Submit 버튼이 클릭하게 되면, Logon Action 에 맞는 Validation 을 수행합니다.
    • Logon-validation.xml 파일을 찾고, XML 내용에 맞게 Validation 객체를 생성합니다. Validation 객체는 각 Validator 객체들로 구성되어 있습니다.
    • Validator 는 각 입력 속성에 대해서 체크를 합니다.
    • 만약 Validator 가 실패할 경우(Validation 체크에서 에러가 난 경우), 해당 메시지가 Queue 에 저장됩니다.
    • 모든 Validator 가 수행되고 난 후에, struts2 에는 발생된 에러가 있는지 확인합니다. 만약에 에러가 있다면, input Result 를 찾고, Action 클래스는 실행되지 않습니다.
    • 에러가 없다면 Action 클래스가 수행되고, input 속성에 대한 validation 이 끝났기에, success Result 를 리턴합니다.


    7. Localizing Output

    Validation 체크할 경우, 메시지를 화면에 보여줬습니다. 같은 메시지를 여러 곳에 처리하거나, 각자 다른 언어를 사용할 경우, 해당 언어에 맞는 메시지를 화면에 보여줘야 할 경우가 많이 있습니다.

    이럴때 메시지를 리소스 번들(Resource Bundle)에 저장해서 사용하면 매우 편리합니다.

    페이지에서 나타내는 메시지와 Validation 에서 처리하는 메시지를 저장하기 위한 Resouce Bundle 을 생성해 보겠습니다.

    Struts 2 에서 Resource Bundle 은 Action Name 과 동일하게 주고, 파일 확장자를 .properties 로 주면 됩니다. 따라서Logon Action 에 대한 Resource Bundle 파일명은 Logon.properties 가 됩니다.

    파일이 저장되는 위치는 Validation 과 마찬가지로, Action 클래스의 패키지 경로와 동일합니다.

    그리고 해당 패키지에서 공통적으로 사용되는 Resource Bundle 을 정의하고 싶으면, package.properties 파일을 만들면 이 package.properties 가 있는 패키지 경로의 모든 클래스에서 사용할 수 있습니다.

    우선 Logon Action 과 같은 패키지 경로에 package.properties 파일을 생성하고 아래와 같이 입력합니다.


    그리고 위에서 정의한 Resource Bundle 을 사용하도록, Logon.jsp 파일과 Logon-validation.xml 파일을 수정합니다.


    7.1 한글 메시지 처리

    한글 메시지를 보이게 하는 것을 살펴보겠습니다. Resource Bundle 을 사용하는데 있어서 한글 메시지를 처리하기 위해서는 한글이 유니코드로 저장이 되어야 합니다.

    Logon Action 클래스가 위치한 곳에 Logon.properties 파일을 생성하고 아래와 같이 입력합니다.

    //requiredstring = $\{getText(fieldName)} 는 필수입력입니다.
    requiredstring = $\{getText(fieldName)} \ub294\u0020\ud544\uc218\uc785\ub825\uc785\ub2c8\ub2e4.
    
    //password = 암호
    password = \uc554\ud638
    
    //username = 사용자명
    username = \uc0ac\uc6a9\uc790\uba85
    

    정리

    Struts 2 Framework 을 사용하여 간단한 어플리케이션을 작성하였습니다. Eclipse 로 쉽게 따라할 수 있도록 이미지를 많이 추가하였으며, 혹시 궁금한 점이 있으시면 아래 게시판에 글을 남겨주시기 바랍니다.

    Posted by 1010
    51.Struts22008. 10. 30. 10:19
    반응형


    [Action 예제]


    [웹 애플리캐이션의 web.xml 설정]

    <?xml version="1.0" encoding="UTF-8"?>
    <web-app>   
     <servlet>       
      <servlet-name>action</servlet-name>       
      <servlet-class>org.apache.struts.action.ActionServlet</servlet-class>       
      <init-param>           
       <param-name>config</param-name>           
       <param-value>/WEB-INF/struts-config.xml</param-value>       
      </init-param>       
                                      :
                                     중략
                                      :
      <load-on-startup>1</load-on-startup>   
     </servlet>   
     <servlet-mapping>       
      <servlet-name>action</servlet-name>       
      <url-pattern>*.do</url-pattern>   
     </servlet-mapping>
    </web-app>

    ActionServlet에는 여러 개의 초기 인자를 전달할 수 있다. 그 중 유독 눈에 띄는 부분은 struts-config.xml을 초기
    인자로 전달 한다는 것이다. 이 의미는 만약 struts-config.xml이외에 다른 이름으로 스트럿츠 설정 파일을 사용하고
    싶다면 web.xml에서 변경해 주면 다. 또 하나 다른 점은 태그를 사용한다는 것이다. 이 태그의 의미는 애플리케이션이
    시작할 때 ActionServlet의 init() 메소드를 호출하여 초기화를 진행 하겠다는 뜻이다.
    이 과정을 통하여 struts-config.xml의 모든 정보가 객체로 변환되어 메모리에 저장 되었다가 이후에 재 사용된다.
    마지막으로 확장자는 *.do로 사용하겠다는 정보를 명시하고있다.

    [ActionForm]

    public class UserForm extends ActionForm {
        // --------------------------------------------------------- Instance Variables
        private String password;
        private String userId;
        private String email;
        private String name;

        public ActionErrors validate(
             ActionMapping mapping,
      HttpServletRequest request) {
            return null;
        }

        public void reset(ActionMapping mapping, HttpServletRequest request) {
      password = null;
      userId = null;
      email = null;
      name = null;
        }
        ……. 중략 ……..

    특이할만한 메소드는 validate()와 reset() 메소드이다.
    reset() 메소드는 한번의 요청을 처리한 다음 초기화할 속성에 대하여 초기화 작업을 담당하는 메소드이다.
    validate() 메소드는 사용자로부터 전달되는 값들의 유효성을 서버측에서 체크하기 위한 메소드이다.
    보통의 웹 애플리케이션은 자바 스크립트(Java Script)를 이용하여 클라이언트 측에서 유효성 체크를 많이 한다.
    하지만 서버측에서 유효성 체크를 같이 해주는 것이 애플리케이션을 더 좋게 만들 수 있는 기초가 된다.
    스트럿츠에서는 클라이언트가 입력한 값이 ActionForm을 상속하는 클래스에 저장된다.
    따라서 클라이언트가 입력한 값을 구하기 위하여 request.getParameter("paramName")을 사용할 필요 없이 Form클래스를 이용하여 가능하다.
    스트럿츠가 추가된 Form클래스를 인식하도록 하기 위하여 struts-config.xml에 다음과 같이 추가해주어야 한다.

    <form-beans>
     <form-bean name="userForm" type=“com.paran.struts.form.UserForm" />       
    </form-beans>

    [struts-config.xml]

    애플리케이션 실행을 위한 메타 데이터 관리
    Logical-to-physical 맵핑. (Actions, ActionForms, ActionForwards)
    폼 빈 지정, 추상적 페이지 맵핑, 페이지 흐픔, 액션 클래스 지정, 예외처리, 메시지 리소스, 플러그인 지정.

    <?xml version="1.0" encoding="ISO-8859-1" ?>
    <!DOCTYPE struts-config PUBLIC "-//Apache Software Foundation//DTD Struts Configuration 1.1//EN" "http://jakarta.apache.org/struts/dtds/struts-config_1_1.dtd">

    <struts-config>
      <!-- ========== Form Bean Definitions =================================== -->
      <form-beans>
        <form-bean name="boardForm“ type="net.javajigi.form.BoardForm“ />
        <form-bean name="listForm“ type=“com.paran.form.ListForm“ />
      </form-beans>

      <!-- ========== Global Forward =================================== -->
        <global-forwards>
            <forward name=“logoff” path=“/logoff.do” />
            <forward name=“logon” path=“/logon.jsp” />
        </global-forwards>

    <!-- ========== Action Mapping Definitions =================================== -->
       <action-mappings>
        <action
          path="/board_writeForm"
          type=“com.paran.action.BoardWriteFormAction"
          name="boardForm"
          scope="request"
          unknown="false"
          validate="true"
        >
          <forward
            name="write"
            path="/board_write.jsp"
            redirect="false"
          />
        </action>

        <exception key=“expired.password”
                   type=“rog.apache.struts.webapp.example.ExpiredPasswordException”
                   path=“/changePassword.jsp” />
        </action-mappings>

        <controller
         contentType="text/html;charset=euc-kr"
         debug="3"
         locale="true"
         nocache="true"
         processorClass=“com.paran.processor.MyAppRequestProcessor"/>
        
        <message-resources parameter="net.javajigi.resources.ApplicationResources"/>
    </struts-config>

    [다중 모듈 지원]

    규모(메뉴)에 따라 애플리케이션을 여러 개로 분할하여 관리하면 효율적이다.

    [선언적 에러 처리]

    전역이나 Action별로 특정 Exception을 처리하는 Exception Handler를 선언적으로 지정할 수 있다.

    [유효성(Validation) 확인]

    1) 버전 1.1부터 Struts 패키지에 포함됨.
    2) XML 파일을 통한 유효성 검증.(validation.xml, validation-rule.xml)
    3) 서버 및 클라이언트 사이드 Validation 지원 - java script 자동 생성(클라이언트 사이드)
    4) Regular expression 사용
    5) 확장 가능한 아키텍처
    6) 기본적으로 제공하는 Validation : 숫자 여부(float, int), 자릿수 체크, 신용카드 번호, 이메일 주소

    [플러그 인 기능]

    StartUp Class를 선언적으로 추가
    Ex) Validator, Tiles 플러그인 등 등…

    [Struts Commons Libraries]

    ■ Jakarta Commons 라이브러리 사용

    1) commons-beanutils
       Bean 프로퍼티 핸들링
    2) commons-collections
       표준 JAVA2 커렉션 클래스의 확장 라이브러리
    3) commons-dbcp
       Optional JDBC Connection Pool
    4) commons-digester
       XML 파싱
    5) commons-fileupload
       Http를 통한 파일 업로드
    6) commons-logging
       애플리케이션 logging wrapper
    7) commons-pool
       오브젝트 풀링
    8) commons-resources
       메시지 리소스 지원
    9) commons-validator
       필드 validation

    [Struts의 “전과 후”]

    ■ Struts 장점

       1) JSP 태그 메커니즘 사용
          이 태그 기능은 재사용 가능한 코드를 조장하고 JSP 파일에서 자바 코드를 제거한다.
          이 기능은 JSP 기반 개발툴로 잘 통합된다.
       2) 태그 라이브러리(Tag library)
          재구현이냐, 태그 라이브러리냐? 필요로 하는 것이 라이브러리에 없다면 여러분이 기여하면 된다.
          또한 Struts는 JSP 태그 기술을 배울 수 있는 좋은 토대이다.
       3) 오픈 소스
          코드를 볼 수 있다는 오픈 소스만의 장점이 있다. 보는 눈들이 많은 만큼 코드 리뷰가 확실하다.
       4) Sample MVC 구현
          자신만의 MVC 구현을 만들고 싶다면 Struts가 도움이 된다.
       5) 문제 관리
          분할과 정복(Divide & conquer)은 문제를 해결하고 문제를 관리할 수 있는 좋은 방법이다.

    ■ Struts 단점

       1) 정확한 추상화 레벨
         Struts는 정확한 레벨의 추상화를 제공하는가? 페이지 디자이너에게 맞는 추상화 레벨은 무엇인가? 좋은 질문이다. 페이지 디자이너가 페이지 개발 시 자바 코드에 액세스 하도록 할 수 있는가? UI 개발 시 자바 코드 액세스를 제한하는 이유가 있다. 가장 중요한 이유는 페이지 디자이너에게 자바를 조금만 제공해도 많은 자바를 사용하기 때문이다. Microsoft ASP 개발이 이를 증명한다. ASP 개발 시 COM 객체를 만들어서 ASP 객체들을 구현한 다음 ASP 스크립트를 작성하여 이를 함께 묶는다. 대신, ASP 개발자들은 ASP 스크립트 때문에 미칠 지경에 이른다. "내가 VBScript로 직접 프로그래밍 할 수 있는 것을 왜 COM 개발자가 이를 구현할 때 까지 기다려야 하나?" 라고 푸념하는 소리가 들린다. Struts는 태그 라이브러리를 통해 JSP 파일에 필요한 자바 코드의 양을 제한한다. Logic Tag는 아웃풋의 조건적 생성을 관리하지만 자바 코드 때문에 UI 개발자가 괴로워하는 것에는 속수무책이다. 어떤 유형의 프레임웍을 사용하든지 전개 및 관리 환경은 이해해야 한다. 물론 어려운 일이다.
       2) 범위 제한
         Struts는 웹 기반 MVC 솔루션으로서 HTML, JSP 파일, 서블릿을 사용하여 구현된다.

    [Struts의 미래]

    새로운 소프트웨어 개발 시대에 모든 것은 빠르게 변화한다. 5년도 채 못 되어서 Struts는 웹 애플리케이션 개발에
    표준으로 자리매김 하고 있다. 기존 Servlet, JSP의 문제점이나 편리성 등을 모두 만족시켰기에 가능하였다.
    현재 Struts2.0 버전이 베타 릴리즈 될 만큼 계속적인 진화게 진행 중이다. 향후 Servlet, JSP의 대안이 아닌 J2EE
    환경이 보다 확장된 기능까지 지원될지 지켜볼 만 하다.


    출처 : http://narahasi.tistory.com/11

    Posted by 1010