'60.Unix'에 해당되는 글 89건

  1. 2009.04.13 Solaris 8에서 Apache 1.3.27과 Tomcat 4.1.24 연동하기
  2. 2008.12.19 unix os별 종료 명령어
  3. 2008.12.17 solaris10 apache 2.0.59 설치 2222
  4. 2008.12.17 Solaris10 Apache 2.0.59 설치
  5. 2008.12.17 solaris에 subversion 설치 및 사용법
  6. 2008.12.17 솔라리스 10에 톰켓 5.0.28 버전의 catalina.out 로그 로테이트 관리
  7. 2008.12.17 솔라리스에서 Xmanager 사용하기
  8. 2008.12.17 solaris 설치후 기본적인 설정(추천)
  9. 2008.12.17 ssh 관련 1
  10. 2008.12.17 솔라리스 패키지 관련 명령어
  11. 2008.12.17 SPARC/Solaris Installing OpenSSH
  12. 2008.12.17 solaris 설치후 기본적인 설정 및 설치
  13. 2008.12.17 RAID 구성하기
  14. 2008.12.17 solaris 시스템 디스크 교체 후 E3500 부팅 절차
  15. 2008.12.17 solaris 부팅시 잘못되었을때 vi 명령 안될때
  16. 2008.12.17 solaris 에 proftpd 설치 (추천)
  17. 2008.12.17 solaris 에 openssl 설치하기 (추천)
  18. 2008.12.17 solaris 에 tomcat 설치하기 (추천)
  19. 2008.12.17 solaris 에 amp(Apache HTTPD, MySQL, PHP) 설치하기 (추천)
  20. 2008.12.17 solaris 에 oracle 설치하기(추천)
  21. 2008.12.16 유닉스에서 개발 웹 서버 설치, 설정하기7
  22. 2008.12.16 유닉스에서 개발 웹 서버 설치, 설정하기6
  23. 2008.12.16 유닉스에서 개발 웹 서버 설치, 설정하기5
  24. 2008.12.16 유닉스에서 개발 웹 서버 설치, 설정하기4
  25. 2008.12.16 유닉스에서 개발 웹 서버 설치, 설정하기3
  26. 2008.12.16 유닉스에서 개발 웹 서버 설치, 설정하기2
  27. 2008.12.16 유닉스에서 개발 웹 서버 설치, 설정하기1 1
  28. 2008.12.16 How to Quickly Install the Solaris 10 10/08 OS on x86 Systems
  29. 2008.12.16 솔라리스 어드민 요약본
  30. 2008.12.16 solaris 해상도/그래픽 카드 설정 및 확인 1
60.Unix2009. 4. 13. 14:11
반응형

Solaris 8에서 Apache 1.3.27과 Tomcat 4.1.24 연동하기
4일동안 꼬박 헤메이다가 지금에야 연동 성공했다.
1. 고생한 이유
A. Unix를 잘 몰라서
B. Java 버전 문제
C. Unix에서 사용하는 프로그램 버전이 낮아서
2. 계정 만들기 (apcss)
A. useradd –d /data02 apcss
3. tar 다운로드
A. 기존 Solaris 8에 있는 tar는 z option이 없다. Gunzip 과 tar를 이용하여 풀면 나중에 에러가 발생할 수 있으니 www.sunfreeware.com에서 Solaris8 버전의 tar를 Download 받는다.
B. Download 받은 tar 파일은 root 권한으로 들어가 “pkgadd -d 파일명”으로 설치한다. 설치후 해당 계정에 path를 잡아주면 사용할 수 있다.
4. 아파치 설치
A. apache 다운로드 (apache.org)
i. www.apache.kr.net나 www.apache.org에서 apache를 다운 받는다.
B. apache 압축 풀기
i. “tar xvfz 파일명”으로 압축을 풀어준다.
C. ./configure
i. 아파치의 압축을 풀면 생긴 디렉토리로 들어가서 ./configure를 해준다. 이때 여러 옵션을 줄 수 있는데, 예제에 적힌 enable로 시작하는 3가지 옵션은 주어야 한다. 그래야 나중에 톰캣과 연동할 때 LoadModule를 사용할 수 있다. (이를 몰라서 무척 헤멨었음.) prefix이후는 아파치를 설치할 디렉토리명을 적어주면 된다.
ii. <예제> “./configure --prefix=/data02/apache --enable-shared=max --enable-rule=SHARED_CORE --enable-module=so”
iii. 만일 gcc가 설치되지 않았거나 path 잡혀있지 않다면 에러가 발생하니, www.sunfreeware.com에서 다운받거나 패스를 잡아주도록 한다.
D. apache make
i. configure가 이상없이 실행되면 “make”를 실행한다.
ii. 이때 ar이나 ranlib가 설치되지 않았거나 path 잡혀있지 않다면 에러가 발생하니, www.sunfreeware.com에서 다운받거나 패스를 잡아주도록 한다.
E. apache make install
i. make가 이상없이 실행되면 “make install”을 실행하면 해당 디렉토리에 apache가 설치된다.
F. apache/conf/httpd.conf
i. 우리 Site의 경우에는 기존에 apache가 설치되어 사용하고 있어서 port를 변경했다. $apache_home/conf에 들어가 “vi httpd.conf”를 한후 “/80”으로 포트를 찾은 후 80  90으로 변경한다. 그리고 ServerName을 해당 도메인이 있다면 주고 아니라면 “127.0.0.1” 로 준후 저장하여 닫는다.
ii. $apache_home/bin에 들어가 “apachectl start”를 실행 후 브라우저를 띄워서 “해당 IP:90”또는 “127.0.0.1:90”을 실행하여 index.html.xx가 적힌 화면이 나오면 설치 완료.
5. Tomcat 설치
A. JDK 설치
i. Tomcat 4.1.24 스팩에는 JDK 1.2이상이면 된다고 되어 있으나, 우리 SITE의 경우 JDK 1.2를 깔아 사용하니 톰캣이 작동을 안함. (솔라리스 내부 문제인지 잘 모르겠음) 그래서 JDK 1.3 이상을 깔기를 권장함.
B. 환경변수 JAVA_HOME
i. JDK를 설치하였다면 해당 계정의 .profile에 export JAVA_HOME=JDK Path를 적고 저장하여 닫는다.
C. tomcat 다운로드 (apache.org)
i. www.apache.org에서 Tomcat 4.1.24를 다운로드 받는다.
ii. “Tar xvfz 톰캣파일명”으로 압축을 푼다.
iii. 풀려서 생성된 디렉토리는 그대로 사용이 가능하다. 이를 원하는 곳으로 mv명령어를 이용하여 옮긴다.
D. 환경변수 CATALINA_HOME
i. “.profile에 export CATALINA_HOME=Tomcat 설치 디렉토리”를 적고 저장한다.
ii. 변경된 .profile을 다시 적용한후 $tomcat_home/bin에 들어가 startup.sh을 구동한후 Browser에서 “해당 IP:8080” 또는 “127.0.0.1:8080”을 실행하여 수코양이가 보이면 설치 완료
6. Apache와 Tomcat 설치
A. http://jakarta.apache.org/builds/jakarta-tomcat-connectors/jk/release/v1.2.0/bin/solaris8/에서 해당되는 mod_jk.so파일을 다운 받는다. (우리 Site의 경우 mod_ssl을 같이 안 깔았아서 mod_jk-1.3-noeapi.so을 다운 받음. 그리고 jk가 v.2.X버전도 나와 있다고 들었으나 참조한 레퍼런스에서 불안정하다하여 1.2.0버전으로 설치함)
B. 받은 파일을 mod_jk.so로 이름을 변경하여 $apache_home/libexec/밑에 저장한다.
C. mod_jk.conf
i. www.jongsclub.com/pds/mod_jk.conf에서 다운 받은 후 $tomcat_home/conf 밑에 저장한다.
D. workers.properties
i. www.jongsclub.com/pds/workers.properties에서 다운 받은 후 $tomcat_home/conf 밑에 저장한다.
E. Apache 설정 파일 수정
i. $apache_home/conf/httpd.conf 수정
<IfModule mod_dir.c>

DirectoryIndex index.html index.php index.jsp

</IfModule>


우선 DirectoryIndex 부분에 index.jsp 를 추가해넣습니다.
( esc키를 누른후 /DirectoryIndex 엔터 하시면 쉽게 찾을수 있습니다. )

그리고 아래처럼 DocumentRoot 라고 된 부분을 톰캣의 /webapps/ROOT 경로로 잡아놓습니다.
DocumentRoot “/data02/tomcat/webapps/ROOT”

ROOT 어플리케이션은 톰캣에서 최상위 즉 http://hostname/ 으로 매핑되기 때문에 디렉토리 패턴으로 매핑 하기위해서는 반드시 설정해주셔야 합니다

( /jsp-examples/* 이런형태를 ajp로 매핑했을경우 루뜨에서 부터 찾아나가기 때문에 결국 /톰캣/webapps/jsp-examples/ 로 찾아갈수 있습니다. )

다음으로 맨 밑줄로 이동한후 ( esc 키를 누른뒤 Shift+g ) 아래와 같이 mod_jk.conf 를 인클루드 시켜줍니다
Include “/data02/tomcat/conf/mod_jk.conr”

(톰캣의 경로는 자신의 설치경로로 정확히 입력해주세요 )

ii. $Tomcat_home/conf/mod_jk.conf 수정
LoadModule jk_module libexec/mod_jk.so
JkWorkersFile /usr/local/tomcat-5.0.1/conf/workers.properties
JkLogFile logs/jk.log
JkLogLevel error
JkMount /*.jsp ajp13
JkMount /servlet/* ajp13
JkMount /jsp-examples/* ajp13

JkMount /디렉토리패턴 ajp13 ,,, 즉 해당 패턴의 url 요청이 들어오면 연동포트인 ajp로 보내라는 소립니다. 별로 어려운 내용이 없습니다. ^^
iii. $Tomcat_home/conf/workers.properties 수정
tomcat 이 실행될 환경을 지정하는 workers.properties 파일을 수정합니다. 다음과 같은 곳을 수정해줍니다. 필요에 따라 localhost 를 도메인으로 바꿔주시면 됩니다. 주석(#)을 잘 보시면서 설정을 해주시면 됩니다.

C:\tomcat4\conf\workers.properties
...
workers.tomcat_home=c:\tomcat4
...
workers.java_home=c:\jdk1.3
...
worker.list=ajp12, ajp13
...
worker.ajp13.port=8009
worker.ajp13.host=localhost
worker.ajp13.type=ajp13

위로서 모든 설정이 끝났음

$Tomcat_home/bin/startup.sh
$apache_home/bin/./apachectl start

실행후
웹브라우저로 http://ip 혹은 도메인/ 을 입력하고 고양이 로고가 그려진 톰캣 첫화면을 띄운뒤
jsp-examples 메뉴를 클릭해서 잘돌아가는지 테스트 합니다.
다른 메뉴도 테스트 해보시려면 mod_jk.conf 에서 패턴 매핑을 시켜줘야 합니다..


관련 자료.
1. http://okjsp.pe.kr/lecture/lec01/mod_jk01.html
2. http://www.jongsclub.com/webedit/studyView.jsp?num=3
3. 아리샘 자료중

Posted by 1010
60.Unix2008. 12. 19. 20:06
반응형
1. AIX
   shutdown -F
   shutdown -Fr 0
 
2. HPUX
   종료 shutdown -hy 0
   리붓 shutdown –r 0
 
3. Solaris
   종료 shutdown -y -i0 -g0
   리붓 shutdown -y -i6 -g0
Posted by 1010
60.Unix2008. 12. 17. 17:01
반응형
~ 드디어 아파치를 설치 해보자..
일단 프로그램을 다운받자..(종속프로그램도 모두 다운을 받자..혹시 모르는 경우를 대비해서..)


여기 중요한것은....Tomcat과 연동을 하기위해서는 패키지 설치로 하면 잘 안된다는 것이다..
(왜 안되는지 잘은 모르겠지만...ㅡ.ㅡ;;)
그리고 패키지로 설치하면 $APACHE/conf/httpd.conf 파일이 없다..
이게 왜 없는지는 잘 모르겠다...어디서 만들어줘야 하나??? 아니면 다른 방법으로 ??
제길...

그래서 결국 소스버전으로 설치를 하기로 했다...위 화면에서 패키지 버젼말고 밑으로 조금만 눈을 내리면 소스버젼이 있으니 그것을 받도록 하자~

그리고 설치하자...

1. 받은 파일을 gunzip으로 압축을 풀고 tar도 풀자~


2. 압축이 풀린 폴더로 이동하여
# configure --enable-so --enable-mods-shared=most
명령어를 실행하자.


3. make를 실행하자.
(make는 솔라리스 설치시 설치 되었는데..난 그거 모르고 새로 설치를 해버렸다..ㅡ.ㅡ;)

* 주의
1. /.profile에 PATH가 추가되어 있어야 한다. (/usr/ccs/bin)
2. /.profile에 LD_LIBRARY_PATH가 추가 되어있어야 한다.
(export LD_LIBRARY_PATH=/usr/local/lib:/usr/lib)


4. 에러없이 make가 실행 됬다면 make install을 실행한다.


5. 설치가 끝났다면 /.profile PATH에 아래 경로를 추가해준다.


6. 설치된 /usr/local/apache2/conf/httpd.conf 파일에 아래 부분을 수정해준다.

* 주의
1. 솔라리스에서는 Group #-1 을 그냥 두고 실행하면 안된다..왠지는 모른다..근데 정말 안된다..
2. ServerName을 도메인명 or IP로 설정한다.


7. 아파치를 실행한다. 잘되는지 프로세스도 검사~


8. 자~ 이제 웹으로 확인해보자~!!!!


오늘 아파치 설치할려고 생각한 뻘짓은...정말..한도 끝도 없다...ㅡ.ㅡ;;
제길...뭐 그래도 얻은게 크다~

휴~ ;;;;
Posted by 1010
60.Unix2008. 12. 17. 16:10
반응형
자~ 드디어 아파치를 설치 해보자..
일단 프로그램을 다운받자..(종속프로그램도 모두 다운을 받자..혹시 모르는 경우를 대비해서..)


여기 중요한것은....Tomcat과 연동을 하기위해서는 패키지 설치로 하면 잘 안된다는 것이다..
(왜 안되는지 잘은 모르겠지만...ㅡ.ㅡ;;)
그리고 패키지로 설치하면 $APACHE/conf/httpd.conf 파일이 없다..
이게 왜 없는지는 잘 모르겠다...어디서 만들어줘야 하나??? 아니면 다른 방법으로 ??
제길...

그래서 결국 소스버전으로 설치를 하기로 했다...위 화면에서 패키지 버젼말고 밑으로 조금만 눈을 내리면 소스버젼이 있으니 그것을 받도록 하자~

그리고 설치하자...

1. 받은 파일을 gunzip으로 압축을 풀고 tar도 풀자~


2. 압축이 풀린 폴더로 이동하여
# configure --enable-so --enable-mods-shared=most
명령어를 실행하자.


3. make를 실행하자.
(make는 솔라리스 설치시 설치 되었는데..난 그거 모르고 새로 설치를 해버렸다..ㅡ.ㅡ;)

* 주의
1. /.profile에 PATH가 추가되어 있어야 한다. (/usr/ccs/bin)
2. /.profile에 LD_LIBRARY_PATH가 추가 되어있어야 한다.
(export LD_LIBRARY_PATH=/usr/local/lib:/usr/lib)


4. 에러없이 make가 실행 됬다면 make install을 실행한다.


5. 설치가 끝났다면 /.profile PATH에 아래 경로를 추가해준다.


6. 설치된 /usr/local/apache2/conf/httpd.conf 파일에 아래 부분을 수정해준다.

* 주의
1. 솔라리스에서는 Group #-1 을 그냥 두고 실행하면 안된다..왠지는 모른다..근데 정말 안된다..
2. ServerName을 도메인명 or IP로 설정한다.


7. 아파치를 실행한다. 잘되는지 프로세스도 검사~


8. 자~ 이제 웹으로 확인해보자~!!!!


오늘 아파치 설치할려고 생각한 뻘짓은...정말..한도 끝도 없다...ㅡ.ㅡ;;
제길...뭐 그래도 얻은게 크다~

휴~ ;;;;
Posted by 1010
60.Unix2008. 12. 17. 16:09
반응형

오늘 하루종일 물고 늘어져서 간신히 설치했다..ㅋ;
시스템 설치가 다 그렇듯이.. 간만에 닭질 좀..ㅎㅎ
다음에 똑같은 실수를 하지 말아야겠다는 생각에 정리하는데..
아.. 이미지 뜨기 귀찮군.. 그래서 텍스트로 대충..ㅋㅋㅋ

subversion의 공식 사이트는 아래와 같다.
http://subversion.tigris.org/getting.html


또한 solaris용 subversion 및 관련 프로그램들은 아래에서 다운받을 수 있다.
http://www.sunfreeware.com/programlistsparc10.html

현재 subversion의 버전은 1.4.6이지만 sunfreeware 사이트에서 솔라리스로 패키징된건 1.4.5까지만 나와있다.

subversion 1.4.5를 설치하려면 다음 프로그램이 먼저 설치되어 있어야만 한다.

- apache 2.2.6
- openssl-0.9.8h

둘 다 sunfreeware 사이트에서 구할 수 있으며, sunfreeware 사이트에서 제공하는 프로그램은 모두 솔라리스용으로 컴파일 & 패키징이 되어 있기 때문에 다음과 같이 하기만 하면 쉽게 설치할 수 있다..ㅎㅎ

# gzip -d openssl-0.9.8h-sol10-sparc-local.gz
# pkgadd -d openssl-0.9.8h-sol10-sparc-local

1. openssl 설치
openssl은 위와 같이 pkgadd하면 아주 간단히 설치할 수 있다..ㅋ;

2. apache 2.2.6 설치
(1) apache 설치
apache도 위와 같이 pkgadd하면 디폴트로 /usr/local/apache2에 설치된다.
그 다음에 다음과 같이 httpd.conf를 수정한다.

- User와 Group을 nobody로 설정
- ServerName에 서버 아이피 또는 도메인 설정
- DirectoryIndex 지시자에 index.jsp 추가
- <Directory />에 보면 "Deny from all" 라인이 있다. 이걸 주석 처리한다. (이게 왜 디폴트로 되어 있는지 모르겠군..ㅎㅎ)

# /usr/local/apache2/bin/apachectl start 하면 apache가 뜬다.
# /usr/local/apache2/bin/apachectl stop 하면 종료

이렇게 하면 간단히 되는데.. 나한테는 tomcat하고 연동해야 하는 문제가 있었다..ㅡㅡ

(2) apache와 tomcat 연동
apache와 tomcat을 연동하기 위해서는 apache tomcat connector (http://tomcat.apache.org/connectors-doc/) 가 필요하다.
현재 1.2.26버전이 나와 있는데.. 이걸 컴파일하면 mod_jk.so 라는 모듈이 생성된다.

검색하다보면 mod_jk2.so라는 것도 나오는데 첨에는 2라는 것 때문에 이게 최신일줄 알고 컴파일하는데 잘 안되서 한참 애먹었다.  하지만 나중에 알고보니 이건 옛날 버전이라고..ㅡㅡ;
암튼.. 압축풀고 들어가서 jk 디렉토리 밑에 native 디렉토리로 간다.. (이건 또 왜이리 깊어..)

# ./configure --with-apxs=/usr/local/apache2/bin/apxs
# make
# make install

인스톨까지 끝내면 /usr/local/apache2/modules에 mod_jk.so 파일이 복사된다.
이제 httpd.conf를 열어 LoadModule들이 있는 부분에 다음 줄을 추가한다.

LoadModule jk_module modules/mod_jk.so

그리고 나서 /usr/local/apache2/conf/extra 디렉토리에 httpd-mod_jk.conf 파일 생성한다.
(예제) (아래에서 적당히 자신의 환경에 맞게 수정해야 합니다..ㅎㅎ; 간단하니 다 아실듯)
Alias /test TOMCAT_HOME/webapps/test
LoadModule jk_module modules/mod_jk.so
JkWorkersFile conf/extra/httpd-workers.properties
JkLogFile logs/mod_jk.log
JkLogLevel info
JkLogStampFormat "[%a %b %d %H:%M:%S %Y] "
JkOptions +ForwardKeySize +ForwardURICompat -ForwardDirectories
JkRequestLogFormat "%w %V %T"
JkMount /test/servlet/* ajp13
JkMount /test/*.jsp ajp13

또한 httpd-mod_jk.conf에서 참고하는 httpd-workers.properties 파일도 생성한다
(예제)
workers.tomcat_home=TOMCAT_HOME
workers.java_home=JAVA_HOME
ps=/
worker.list=ajp12, ajp13
worker.ajp12.port=8007
worker.ajp12.host=localhost
worker.ajp12.type=ajp12
worker.ajp12.lbfactor=1

worker.ajp13.port=8009
worker.ajp13.host=localhost
worker.ajp13.type=ajp13
worker.ajp13.lbfactor=1

worker.loadbalancer.type=lb
worker.loadbalancer.balanced_workers=ajp12, ajp13
worker.inprocess.type=jni
worker.inprocess.class_path=$(workers.tomcat_home)$(ps)lib$(ps)tomcat.jar
worker.inprocess.cmd_line=start
worker.inprocess.stdout=$(workers.tomcat_home)$(ps)logs$(ps)inprocess.stdout
worker.inprocess.stderr=$(workers.tomcat_home)$(ps)logs$(ps)inprocess.stder

이제 이 파일을 httpd.conf 에서 로딩한다.
httpd.conf 파일 아무데나.. 마지막 줄도 되고 다음과 같이 추가한다.

Include conf/extra/httpd-mod_jk.conf

다 되었으면 아파치와 톰켓을 재시작하고 아무 jsp를 실행해본다..
사실 처음에는 httpd-mod_jk.conf하고 httpd-workers.properties 파일을 생성 안했었다.
그래도 apache와 tomcat 모두 잘 뜬다..
그런데 jsp를 호출하면 브라우저에 jsp가 실행되는 것이 아니고 jsp 소스 코드가 그냥 텍스트로 떡하니 나온다.. 헐..
이것 때문에 http 소스를 다운받아 컴파일도 하고 멀쩡한 httpd.conf를 몇시간 동안 만지작거리다가 알고보니 이 파일들을 생성 안해서 생긴 문제였다..

3. subversion 설치
(1) subversion 인스톨
subversion-1.4.5-sol10-sparc-local.gz 파일을 다운받아 1,2번의 경우처럼 설치한다.
# gzip -d subversion-1.4.5-sol10-sparc-local.gz
# pkgadd -d subversion-1.4.5-sol10-sparc-local

pkgadd할때 apache2 모듈과 중복된다고 하는데.. 과감히 yes ㅎㅎ
그럼 파일 몇개가 apache2에 덮어 써진다.

(2) httpd.conf 수정
httpd.conf 파일을 열어서 LoadModule들이 있는 줄에 다음줄 추가
LoadModule dav_svn_module modules/mod_dav_svn.so

맨 마지막 줄에는 다음을 추가한다.
이는 svn 저장소가 /data2/svn/repository 이고 접속 주소는 http://서버IP/svn 이며
/data2/svn/password 파일에 있는 아이디와 패스워드로 인증한다는 의미가 된다.
<Location /svn>
    DAV svn
    SVNPath /data2/svn/repository
    AuthType Basic
    AuthName "Subversion repository"
    AuthUserFile /data2/svn/password
    Require valid-user
</Location>

(3) svn 저장소 생성
# cd /data2/svn
# svnadmin create --fs-type fsfs repository
# chmod -R g+w repository
# chown -R nobody repository
# chgrp -R nobody repository
# /usr/local/apache2/bin/htpasswd -c password username
New password:
Re-type new password:
(사용자를 추가할 경우에는 /usr/local/apache2/bin/htpasswd password username)

이제 svn에 접속하면 끝.. 추가로 나는 eclipse에서 접속하기 때문에 eclipse에서 사용법을 간단히..ㅎㅎ

(4) eclipse svn 연동
- Help -> software updates -> find and install 을 선택하면 창이 뜨는데 search for new features to install를 체크하고 next
- new remote site를 클릭하고 다음을 입력한다음에 next
Name : subclipse
URL : http://subclipse.tigris.org/update
- next, ..., next해서 다 설치하고 eclipse를 다시 부팅하면 SVN Repository perspective가 생성됨
- 서버 접속 및 사용..ㅎㅎ; 뭐 이건 svn을 한번쯤 사용해본 사람은 다 알테니 생략..

Posted by 1010
60.Unix2008. 12. 17. 16:06
반응형
  1. 솔라리스 10 spac-64
  2. 톰켓 5.0.28
    • 설치 경로 : /app/tomcat
  3. cronolog 1.6.2
    • 설치 경로 : /usr/local/src 에 http://cronolog.org/서 다운 받아서 압축 해재
    • 압축 해재한 폴더에서
      • ./configure
      • make
      • make install
      • 위 처럼 하면 /usr/local/sbin/에 cronolog 실행 파일이 생성됨
  4. 톰켓 설치 폴더로 이동
    • bin 폴더로 이동
      • cd bin
      • vi catalina.sh 해서 아래 처럼 수정
      • shift
          touch "$CATALINA_BASE"/logs/catalina.out
          if [ "$1" = "-security" ] ; then
            echo "Using Security Manager"
            shift
            "$_RUNJAVA" $JAVA_OPTS $CATALINA_OPTS \
              -Djava.endorsed.dirs="$JAVA_ENDORSED_DIRS" -classpath "$CLASSPATH" \
              -Djava.security.manager \
              -Djava.security.policy=="$CATALINA_BASE"/conf/catalina.policy \
              -Dcatalina.base="$CATALINA_BASE" \
              -Dcatalina.home="$CATALINA_HOME" \
              -Djava.io.tmpdir="$CATALINA_TMPDIR" \

              ==== 추가해야 할 부분 ===
              org.apache.catalina.startup.Bootstrap "$@" \
              start |/usr/local/sbin/cronolog "$CATALINA_BASE"/logs/catalina.out.%y%m%d >> /dev/null 2>&1 &
              =========================
             
              ==== 주석처리 할 부분 ===
        #      org.apache.catalina.startup.Bootstrap "$@" start \
        #      >> "$CATALINA_BASE"/logs/catalina.out 2>&1 &
              =========================

              if [ ! -z "$CATALINA_PID" ]; then
                echo $! > $CATALINA_PID
              fi
          else
            "$_RUNJAVA" $JAVA_OPTS $CATALINA_OPTS \
              -Djava.endorsed.dirs="$JAVA_ENDORSED_DIRS" -classpath "$CLASSPATH" \
              -Dcatalina.base="$CATALINA_BASE" \
              -Dcatalina.home="$CATALINA_HOME" \
              -Djava.io.tmpdir="$CATALINA_TMPDIR" \

              ==== 추가해야 할 부분 ===
              org.apache.catalina.startup.Bootstrap "$@" \
              start |/usr/local/sbin/cronolog "$CATALINA_BASE"/logs/catalina.out.%y%m%d >> /dev/null 2>&1 &
              =========================

              ==== 주석처리 할 부분 ===
        #      org.apache.catalina.startup.Bootstrap "$@" start \
        #      >> "$CATALINA_BASE"/logs/catalina.out 2>&1 &
              =========================

  5. 톰켓 서버 재시작 후 톰켓 설치 폴더의  ./logs 디렉토리를 확인 한다.

    1. catalina.out.080312 이런 형식으로 파일이 생기면 정삭적으로 작동 하는 것이다.

Posted by 1010
60.Unix2008. 12. 17. 14:49
반응형

솔라리스에서 Xmanager 사용하기


=========================================================================================================

작성자 : 김재벌 ( ostoneo@naver.com )


본 문서의 내용은 비 상업적 까페에서만 사용이 가능합니다.

특히, 학원광고를 위한 영업까페로의 게시 및 펌질은 불허 하며, 저작권자의 내용을 임의 수정하시는 것도 불법입니다.

==========================================================================================================


오랜만에 팁하나 올립니다.


요즘 뭐..이름만 대면 알만한 보안회사의 일을 갑작스레 떠 앉게 되어 8-9월까지는 죽었다고....살아야 하는판인데..

그래도, 테크넷에 안와 볼수도 없고...^^ (중독이라..)


넷사랑에서 나온 Xmanager라는 콘솔 GUI를 제공하는 원격도구가 있죠,


과거 vm 이 활성화 되기 전에는 참으로 공부용으로도 인기가 최고 였지요.


헌데, IP console기반의 장비들을 이용해서 콘솔 접속이 가능하긴 하지만 실제 장비에서 GUI를 이용한 원격관리시에는 여전히 Xmanager는 매우 효과적이고 뛰어난 제품입니다.


게다가 근래에는 개인 사용자들에게는 무료로 배포되고 있으니, 더 좋구요.


헌데, 최신 버전의 솔라리스에 과거 방식으로 접속하면 거부가되는 일들이 발생합니다.


이는 솔라리스의 secure by default는 보안 기능에 의해 차단되는 것으로 이를 오픈해 주면 간단하게 사용하실 수 있습니다.


=============================================================================

# which netservices
/usr/sbin/netservices
# /usr/sbin/netservices open
restarting syslogd
restarting sendmail
restarting wbem
# svcs -a |grep x
disabled       14:37:01 svc:/system/device/mpxio-upgrade:default
disabled       14:37:12 svc:/network/nis/xfr:default
disabled       14:37:41 svc:/network/rpc/rex:default
disabled       14:37:44 svc:/network/rexec:default
online         14:37:45 svc:/application/x11/xfs:default
online         14:37:49 svc:/application/management/snmpdx:default

=============================================================================


보다 쉽게 사용할 수 있으실 것입니다.

또, Xshell 세션을 이용한 방식으로도 사용이 가능합니다.


무엇보다 XDMCP 기반의 통신보다는 ssh -x 의 터널링이 보안에 더 안전하다는 것은 잊지 마셔야 합니다.


그럼...^^


Posted by 1010
60.Unix2008. 12. 17. 14:41
반응형

윈디하나의 솔라나라: 솔라리스 10 u6 기본설정

최종 갱신일: 2008-11-03, 이 문서는 윈디하나의 솔라나라, http://www.solanara.net/에서 최근에 갱신된 문서를 찾을 수 있다.

1. 개요

  • 소프트웨어 설치 문서에 생략되어있는 공통 설정 사항에 대해, 솔라리스 10 u6 기준으로 설명하는 문서이다.
  • LD_LIBRARY_PATH와 PATH 환경변수는 반드시 일치해야 한다.
  • 본 문서는 솔라리스 10 u6 x86, 32bit을 기준으로 작성했다. 자신의 솔라리스 버전 및 업데이트 번호는 아래와 같이 확인할 수 있다.
    root@wl ~ # cat /etc/release
                           Solaris 10 10/08 s10x_u6wos_07b X86 1)
               Copyright 2008 Sun Microsystems, Inc.  All Rights Reserved.
                            Use is subject to license terms.
                                Assembled 27 October 2008
    root@wl ~ # isainfo -kv
    32-bit i386 kernel modules 2)
    root@wl ~ # 
    
    1) [솔라리스 10, 2008년 10월에 배포, 업데이트번호는 6, x86버전]이라는 뜻이다.
    2) 32비트 x86 커널을 사용하고 있다는 뜻이다.

2. 솔라리스 설정

  1. 네트워크 설정 확인. 네트워크가 동작하는지 확인해야 한다. 아직 DNS가 설치된것은 아니므로, 도메인으로 외부 서버에 접속할 수 없다.
    # cat /etc/hosts 1)
    127.0.0.1       localhost       
    192.168.0.3  wl     loghost
    # cat /etc/hostname.pcn0 2)
    wl
    # cat /etc/netmasks 3)
    192.168.0.0    255.255.255.0
    # cat /etc/defaultrouter 4)
    192.168.0.1
    # ifconfig -a 5)
    lo0: flags=1000849<UP,LOOPBACK,RUNNING,MULTICAST,IPv4> mtu 8232 index 1
            inet 127.0.0.1 netmask ff000000
    pcn0: flags=1000843<UP,BROADCAST,RUNNING,MULTICAST,IPv4> mtu 1500 index 2
            inet 192.168.0.3 netmask ffffff00 broadcast 192.168.0.255
    
    1) /etc/hosts에 자신의 호스트 이름과 맞는 IP가 입력되어있는지 확인한다. 이 예제에서 호스트 이름은 wl 이다.
    2) NIC와 호스트이름을 확인한다. pcn0는 솔라리스의 pcn 이라는 NIC의 첫번째 드라이버라는 뜻으로 벤더마다 다르다. (솔라리스 스팍용은 ce로 되어있을것이다) pcn0 인터페이스에 wl 호스트의 IP를 넣을 것이다.
    3) netmask를 확인한다. 192.168.0.3의 경우 192.168.0.0/24에 포함된다. 따라서 넷마스크값으로 255.255.255.0 를 정해줄 것이다.
    4) 기본 라우터를 확인한다. 윈도우XP로 따지자면 게이트웨이에 해당된다.
    5) ifconfig -a 를 해보면 pcn0에 IP및 넷마스크가 입력된 것을 확인할 수 있다. 이 정보가 정확하면, 다음으로 단계로 넘어간다. 만약 정확하지 않다면 위 파일들을 고치거나, /usr/sbin/sys-unconfig 명령을 실행해 재시작후, 네트워크 설정을 다시 한다.
  2. 네트워크 테스트
    예제의 네트워크 구성
    ┌─┐
    │A├──┐
    └─┘ ┌┴─┐ ┌───┐ ┏───┓
        │허브├─┤라우터├─┤인터넷├─
    ┌─┐ └┬─┘ └───┘ ┗───┛
    │B├──┘
    └─┘
    
    A: 세팅하고 있는 호스트. 192.168.0.3
    B: 이미 세팅되었으며 정상 작동하고 있는 호스트. 192.168.0.2
    라우터: 192.168.0.1
    
    1. 같은 스위치/허브에 물려있는 호스트로 PING 테스트
      # ping 192.168.0.2
      192.168.0.3 is alive
      #
      
      - 성공시 NIC와 네트워크 케이블, IP세팅, 스위치의 작동은 정상임
      - 실패시 솔라리스 설정, 호스트에 연결되어있는 케이블 및 NIC 드라이버등을 점검
    2. 라우터로 PING 테스트
      # ping 192.168.0.1
      192.168.0.1 is alive
      #
      
      - 성공시 라우터(게이트웨이)까지 가는 장비 스위치/허브들도 정상임. 라우터도 응답 하고 있음.
      - 실패시 라우터 관리자에게 문의 (라우터가 PING응답을 하지 않도록 설정한 경우도 있음)
    3. 외부 호스트로 PING 테스트
      # ping 211.174.186.251
      211.174.186.251 is alive
      #
      
      - 성공시 라우터의 설정이 정상적으로 되어있으며 네트워크는 정상적으로 작동함
      - 실패시 라우터 관리자에게 문의 (외부에 있는 임의의 호스트가 PING응답을 하지 않도록 설정한 경우도 있음)
      여기까지 잘 되면 네트워크 설정은 마무리 된 것이다.
    4. 도메인으로 ping 테스트
      # cp /etc/nsswitch.dns /etc/nsswitch.conf
      # vi /etc/resolv.conf
      domain xxxx.com
      search xxxx.com
      nameserver 168.126.63.1 # 한국통신의 DNS 서버이다.
      nameserver 168.126.63.2
      # ping www.solarisschool.com
      www.solarisschool.com is alive
      #
      
      - 성공시 도메인 서버 세팅 및 도메인 서버가 제대로 작동함
      - 실패시 도메인 서버 세팅 확인 및 다른 도메인 서버 사용
    5. 접속 테스트
      - ICMP패킷이 올바르게 전송되는지만 확인해도 좋지만 확실하게 하기 위해서는 TCP패킷까지 보내보는 것이 좋다. 외부의 호스트에 telnet접속한 후에 다시 자시 서버로 telnet접속해보는 형식. 이건 각자의 환경에 따라 다르기 때문에 구체적인 예는 생략하겠다.
  3. 디스크 확인
    솔라리스 10 u6부터 ROOT 슬라이스도 ZFS를 이용해 설치할 수 있다. 게다가 2개 이상의 디스크가 있고 인스톨시 선택했다면 자동으로 아래와 같이 미러링 해준다. 당연히 이를 이용해야할 것이다. 아래의 예는 40GB인 디스크 2개를 선택해 전체 설치한 예이다.
    # df -h
    파일시스템             크기   사용   가용   용량    설치지점
    rpool/ROOT/rset         37G   3.8G    31G    11%    /
    /devices                 0K     0K     0K     0%    /devices
    ctfs                     0K     0K     0K     0%    /system/contract
    proc                     0K     0K     0K     0%    /proc
    mnttab                   0K     0K     0K     0%    /etc/mnttab
    swap                   1.5G   900K   1.5G     1%    /etc/svc/volatile
    objfs                    0K     0K     0K     0%    /system/object
    sharefs                  0K     0K     0K     0%    /etc/dfs/sharetab
    /usr/lib/libc/libc_hwcap1.so.1
                            35G   3.8G    31G    11%    /lib/libc.so.1
    fd                       0K     0K     0K     0%    /dev/fd
    rpool/ROOT/rset/var     37G    70M    31G     1%    /var
    swap                   1.5G    76K   1.5G     1%    /tmp
    swap                   1.5G    24K   1.5G     1%    /var/run
    rpool/export            37G    19K    31G     1%    /export
    rpool/export/home       37G    18K    31G     1%    /export/home
    rpool                   37G    35K    31G     1%    /rpool
    # zpool status
      풀: rpool
     상태: ONLINE
     스크럽: 요청된 항목이 없습니다.
    구성:
    
            NAME        STATE     READ WRITE CKSUM
            rpool       ONLINE       0     0     0
              mirror    ONLINE       0     0     0
                c0d0s0  ONLINE       0     0     0
                c0d1s0  ONLINE       0     0     0
    
    오류: 알려진 데이터 오류가 없습니다.
    # zfs list
    NAME                  USED  AVAIL  REFER  MOUNTPOINT
    rpool                5.63G  31.0G  35.5K  /rpool
    rpool/ROOT           3.88G  31.0G    18K  legacy
    rpool/ROOT/rset      3.88G  31.0G  3.81G  /
    rpool/ROOT/rset/var  70.1M  31.0G  70.1M  /var
    rpool/dump           1.00G  31.0G  1.00G  -
    rpool/export           37K  31.0G    19K  /export
    rpool/export/home      18K  31.0G    18K  /export/home
    rpool/swap            767M  31.8G    16K  -
    #
    
  4. 솔라리스 패치 - 권장패치를 이용하는 방법
    - 솔라리스 권장 패치는 http://sunsolve.sun.com/pub-cgi/show.pl?target=patches/patch-access 에서 회원가입 후 받을 수 있다. 이곳에서 원하는 버전과 아키텍처를 선택한후 다운로드 하면 된다. 이파일은 솔라리스 전체 패치가 아니라 선에서 권장하는 권장 패치일 뿐이다. README 에는 어떠한 패치가 포함되어있는지 나와있다. 권장패치는 [썬 서비스 플랜]에 가입해야 받을 수 있으며 가입은 유료다. 예전에 찾아봤을때는 일년에 240달러였다.
    - 선은 솔라리스를 6개월에서 1년마다 업데이트해 내놓고 있다. 이것을 이용해 업그레이드 하면 최신 패치를 설치한것과 동일한 효과를 가질 수 있다.
    - 게다가 상당수 개별 패치는 무료다. (권장 패치는 개별 패치들의 모음이다. 역설적으로 말하면 README에 나와있는 패치를 일일이 다 다운받아서 수동으로 설치하면 같은 효과를 낸다는 뜻이다)
    - 여의치 않다고 생각되면 OpenSolaris 를 사용할 수 있다. 솔라나라의 내용은 모두 오픈 솔라리스와 호환된다. [레드햇 엔터프라이즈 리눅스]와 [페도라]의 관계가 [솔라리스]와 [오픈 솔라리스]의 관계와 비슷하다.
    # unzip 10_x86_Recommended.zip
    # cd 10_x86_Recommended
    # ./install_cluster -nosave 1)
    Are you ready to continue with install? [y/n]: y
    Installing xxxxxx-yy...
      Installation of xxxxxx-yy failed. Return code z. 2)
    # sync
    # sync
    # sync
    # init 6
    
    1) 패치 클러스터는 패치 언인스톨을 위해 관련 파일을 압축해 저장해 놓는데 이 파일의 크키가 꽤 크다. 게다가 압축률 안좋은 .Z 확장자로 압축한다. /var/sadm/pkg/*/save/*/*.Z 파일이 그것이다. -nosave옵션을 주면 이를 생성하지 않을 수 있다. 단 패치의 언인스톨은 불가능해진다.
    2) z에 리턴된 코드중 2, 8, 35번은 무시해도 좋다. 코드에 대한 전체 설명은 message.html을 참고한다.
    2 Attempt to apply a patch that's already been applied
    8 Attempting to patch a package that is not installed
    35 Later revision already installed
  5. 솔라리스 패치 - smpatch 를 이용한 방법
    # cp /usr/lib/breg/data/RegistrationProfile.properties /tmp 1)
    # vi /tmp/RegistrationProfile.properties 
    userName=사용자아이디
    password=사용자패스워드
    # /usr/sbin/sconadm register -a -r /tmp/RegistrationProfile.properties
    sconadm이 실행되는 중
    사용자를 인증하는 중 ...
    finish registration!
    # rm /tmp/RegistrationProfile.properties 
    # smpatch get 2)
    patchpro.backout.directory      -       ""
    patchpro.baseline.directory     -       /var/sadm/spool
    patchpro.download.directory     -       /var/sadm/spool
    patchpro.install.types          -       rebootafter:reconfigafter:standard
    patchpro.patch.source           -       https://getupdates1.sun.com/
    patchpro.patchset               -       current
    patchpro.proxy.host             -       ""
    patchpro.proxy.passwd           ****    ****
    patchpro.proxy.port             -       8080
    patchpro.proxy.user             -       ""
    # smpatch analyze 3)
    메시지 생략
    # smpatch download 4)
    (으)로 패치 다운로드 /var/sadm/spool...
    xxxxxx-yy has been validated.
    메시지 생략
    # smpatch update 5)
    에서 패치 설치 /var/sadm/spool...
    xxxxxx-yy 적용되었습니다.
    메시지 생략
    설치 정책이 허용하지 않는 업데이트의 ID가 파일에
    기록되었습니다.6)
            /var/sadm/spool/disallowed_patch_list
    
    설치한 하나 이상의 업데이트를 활성화하려면 시스템을 종료해야 합니다. 시스템 종료를 시작하려면 다음 명령 중 하나를 사용해야 합니다.
    o 펌웨어 프롬프트로 이동 - init 0 또는 shutdown -i 0
    o 시스템 전원 끄기 - init 5 또는 shutdown -i 5
    o 시스템 재시작 - init 6 또는 shutdown -i 6
    # sync
    # init 6
    
    1) 등록을 하지 않았다면 등록한다. 한번만 하면 된다.
    2) 등록이 완료되면 패치프로의 설정 내용을 확인한다. [patchpro.patch.source]가 위와같이 나오는지 확인한다. 프록시를 사용하는 경우 [smpatch set patchpro.proxy.host=xxx.xxx.xxx.xxx]와 같이 지정해 주어야 한다.
    3) 패치를 분석해본다. 설치되어있지 않은 패치번호가 나올 것이다.
    4) 패치를 다운로드 한다. /var/sadm/spool 에 패치를 받는다. 생략 가능하다. 하단에 나오는 [smpatch update] 명령에 필요한 패치를 자동으로 다운로드해준다.
    5) 패치를 적용한다. /var/sadm/spool 에 받은 패치를 실행시킨다. 만약 설치해야할 패치가 다운로드 되지 않았으면 다운로드 한다.
    6) [싱글모드]로 전환([init s]명령을 사용하면 된다)해 [smpatch add -x idlist=/var/sadm/spool/disallowed_patch_list]명령을 주면 [설치 정책이 허용하지 않는 업데이트]를 설치할 수 있다. 허용하지 않는 패치에는 커널 업데이트와 드라이버 업데이트가 포함되기 때문에 반드시 해야한다. 또한 반드시 수동 설치해야 하는 패치도 있는데(SMPATCH LIVE UPGRADE처럼) 이는 [smpatch add -i 121431-25]처럼 명령을 주면 된다
  6. root의 기본 셸과 홈 디렉토리를 변경한다. 아울러 패스워드 암호화 방식도 MD5로 변경한다.
    # mkdir -m 700 /root
    # vi /etc/passwd
    root:x:0:1:Super-User:/root:/bin/bash
    # vi /etc/security/policy.conf
    CRYPT_ALGORITHMS_ALLOW=1,2a,md5,5,6 1)
    CRYPT_DEFAULT=md5 2)
    # passwd root 3)
    새 암호:
    새 암호를 다시 입력하십시오:
    passwd: 암호(root용)가 성공적으로 변경되었습니다.
    # 
    
    1) 사용할 수 있는 알고리즘을 나타낸 것으로 이는 /etc/security/crypt.conf 에 연결되어있는 약어이다.
    1: UNIX crypt 알고리즘
    2a: Blowfish 알고리즘
    md5: MD5 알고리즘
    5: SHA256 알고리즘 (Solaris 10 u6 이상부터 지원)
    6: SHA512 알고리즘 (Solaris 10 u6 이상부터 지원)
    2) __unix__ 를 md5로 변경한다. 이후 패스워드 변경시 /etc/shadow파일을 보면 패스워드 필드가 $md5 로 시작하는 것을 볼 수 있다. 8자 이상의 패스워드도 지원해준다. 참고로 *LK*는 잠금상태, NP는 로그인 불가상태를 의미한다. 참고로 솔라리스 10 u6 이상 사용자들은 더 나은 알고리즘인 6(SHA512)을 사용하는 것도 좋다.
    3) __unix__로 암호화 되어있는 패스워드를 MD5로 암호화 하기 위해 root 패스워드를 한번 더 변경한다.
  7. 환경 설정 파일을 변경한다. 필자는 /etc/profile을 변경한다. 가장 아래줄에 다음과 같이 추가해준다. 필자는 sh와 bash를 사용한다.
    # vi /etc/default/init
    메시지 생략
    LANG=ko_KR.UTF-8
    # vi /etc/profile
    메시지 생략
    alias ll="ls -alF"
    tty -s && stty cs8 -istrip defeucw
    
    case "$0" in
    bash | -bash)
    	PS1="\u@\h \w \\$ "; export PS1
    	;;
    sh | -sh)
    	PS1="`/usr/ucb/whoami`@`hostname'` "
    	case `/usr/xpg4/bin/id -u` in
    		0) PS1="${PS1}# ";;
    		*) PS1="${PS1}$ ";;
    	esac
    	;;
    esac
    EDITOR=vi; export EDITOR
    CC=cc; export CC
    PATH=/usr/local/bin:/opt/SUNWspro/bin:/usr/bin:/usr/sbin:/usr/ccs/bin:/usr/openwin/bin; export PATH
    LD_LIBRARY_PATH=/usr/local/xml/lib:/usr/lib:/usr/local/lib:/usr/ucblib:/usr/ccs/lib; export LD_LIBRARY_PATH
    #
    
    ※ 이 문서에서 가장 중요한 부분이 PATH 환경변수 세팅과 LD_LIBRARY_PATH 환경변수 세팅이다. 꼭 맞춰주자. PATH와 LD_LIBRARY_PATH가 기존에 소개했던 솔라리스 9용 설정과 다르다.
    ※ 솔라리스 콘솔도 컬러를 지원하기 때문에 안시코드를 이용해 컬러를 넣을수도 있다.
    PS1="\u@\h ^[[1;31m\w^[[0m \\$ "; export PS1
    
    처럼 입력할 수 있다. ^[[의 ^[부분은 안시 이스케이프 코드로, vi에디터의 입력 모드에서, Ctrl+V를 누르고 ESC키를 눌러 입력해야 한다.
  8. SAR(System Activity Reporter)를 활성화 하고 크론의 sar 설정을 활성화한다. NTP 데몬을 활성화한다.
    # svcadm enable sar
    # EDITOR=/usr/bin/vi; export EDITOR
    # crontab -e sys 1)
    0 * * * 0-6 /usr/lib/sa/sa1
    20,40 8-17 * * 1-5 /usr/lib/sa/sa1
    5 18 * * 1-5 /usr/lib/sa/sa2 -s 8:00 -e 18:01 -i 1200 -A
    # vi /etc/inet/ntp.conf 2)
    # 한국표준과학연구원, time.bora.net
    server 203.248.240.103
    # svcadm enable ntp
    
    1) 주석만 풀어주면 된다.
    2) 여기에서는 NTP 데몬을 이용한 타임서버 동기화 방법을 설명했다. 다른 방법으로 rdate를 cron에 등록시키는 방법도 있다. [rdate time.bora.net]명령을 이용하면된다. [svcadm enable time:stream]와 [svcadm enable time:dgram]가 활성화되어있는 솔라리스 호스트라면 그 호스트에서 시간을 가져올 수 있다.
  9. 사용자를 추가하고 패스워드를 지정한다.
    # useradd -d /export/home/windy -c "윈디하나" -g staff -m -u 101 -s /bin/bash windy 1)
    64 블록
    # passwd windy
    새 암호:
    새 암호를 다시 입력하십시오:
    passwd: 암호(windy용)가 성공적으로 변경되었습니다.
    # 
    
    1) 관리자가 주로 사용할 계정을 생성한다. (당연한 말이지만 꼭 windy가 아니어도 된다. 솔라나라와 똑같이 하라는 말 때문인지, 사용할 계정 이름까지 까지 똑같이 하는 경우를 봤다. 많이 봤다. ㅎㅁ) 8자 이상의 아이디를 가진 계정을 생성하면 [UX: useradd: xxxxxxxxxx name too long.]과 같은 메시지가 발생하지만 생성 되어있다. (그리고 정상적으로 사용 가능하다)
  10. 솔라나라에 필요한 링크를 걸어준다.
    반드시 필요해 링크를 거는 것이 아니라 솔라나라의 문서는 모두 wget을 이용해 받고, (GNU) tar를 이용해 압축을 풀도록 되어있기 때문에 걸어놓는 것이다.
    # mkdir -p /usr/local/bin
    # cd /usr/local/bin
    # ln -s /usr/sfw/bin/wget wget
    # ln -s /usr/sfw/bin/gtar tar
    
  11. 가뿐하게 한번 재시작해준다.
    # sync
    # sync
    # init 6
    

3. 컴파일러/기본 라이브러리 설치

아래에 소개된 프로그램을 설치한다. 솔라나라의 문서를 적용하려면 반드시 설치해야 한다.

Sun Studio 12

※ cc(C 컴파일러)를 설치한다. 솔라나라는 gcc가 아닌 cc를 사용할 것이다. SunStudio12ml-solaris-x86-200709-pkg.tar.bz2 파일은 Sun Studio Downloads에서 Sun Developer Network에 무료로 가입한 후 받을 수 있다.

※ 솔라나라를 2005년 7월에 오픈하면서 이번 리뉴얼에까지 가장 많이 바뀐것이 바로 gcc기준의 문서를 cc로 바꾼것이다. 솔라리스에서 cc가 유료였던 관계로 하는수 없이 gcc를 썼었는데 Sun Studio 11부터 무료로 배포되고 사용할 수 있기 때문에 cc를 사용하는 것이다. (솔라나라에서는 SunStudio 12를 사용한다) gcc와 cc를 혼합해서 쓰는것에는 여러가지 문제가 있으며, 아직까지는 솔라리스를 제대로 지원해주는게 cc라고 생각하기 때문에 cc를 기준으로 설명한다. 솔라나라의 문서는 cc를 기준으로 하지만 gcc를 사용해도 큰 문제 없도록 구성 되어있다. sunfreeware의 gcc나 솔라리스 기본 설치된 gcc(/usr/sfw/bin/gcc)를 사용해도 문제 없다는 의미이다. 실제로 어플리케이션이 컴파일시 gcc만을 요구하는 경우 솔라리스에 이미 설치되어있는 gcc를 이용해 컴파일 할 것이다.
  1. root@wl ~ # mkdir SunStudio
    root@wl ~ # cd SunStudio
    root@wl ~/SunStudio # tar xvfj ../SunStudio12ml-solaris-x86-200709-pkg.tar.bz2
    root@wl ~/SunStudio # ./batch_installer --show-sla 1)
    메시지 생략
    Please contact Sun Microsystems, Inc.  4150 Network Circle,
    Santa Clara, California 95054 if you have questions.
    root@wl ~/SunStudio # ./batch_installer -p all --accept-sla 1)
    Java Accessibility Bridge for GNOME loaded.
    
    
    root@wl ~/SunStudio # cc 2)
    usage: cc [ options] files.  Use 'cc -flags' for details
    root@wl ~/SunStudio # 
    
    1) 라이센스를 확인한다. [./batch_installer -p all --accept-sla]는 라이센스에 동의하였으며, 아무것도 묻지 않고 전체설치할때 사용하는 명령어이다. [Java Accessibility Bridge for GNOME loaded] 메시지가 나온 이후 한참 걸린다.
    2) cc는 [/opt/SUNWspro/bin/cc]에 있다. 경로를 설정해주었으므로 cc만 쳐도 위와같이 나와야 한다. [/usr/ucb/cc: language optional software package not installed] 이렇게 나오면 안된다.
  2. 컴파일러를 설치한 후에는 패치를 해야 한다. Sun Studio 12 Patches에 가보면 버전별로 받아서 설치해야할 패치 목록이 나와있다. 리스트된 패치는 모두 무료로 제공되니 받아서 설치하면 된다. 물론 SDN에 가입해야 받을 수 있다. 솔라나라의 문서는 최소한 아래의 패치를 적용한 것을 기준으로 작성했다.
    root@wl ~/SunStudio/patch # ls -al *.zip
    -rw-r--r--   1 windy    staff    1487960 11월 18일  09:55 119964-11.zip
    -rw-r--r--   1 windy    staff    33330549 11월 18일  09:55 124864-08.zip
    -rw-r--r--   1 windy    staff    2099859 11월 18일  09:55 124868-07.zip
    -rw-r--r--   1 windy    staff    50663857 11월 18일  09:55 124869-02.zip
    -rw-r--r--   1 windy    staff    4446424 11월 18일  09:55 124873-06.zip
    -rw-r--r--   1 windy    staff     324661 11월 18일  09:55 126496-02.zip
    -rw-r--r--   1 windy    staff    6463178 11월 18일  09:55 126498-11.zip [먼저패치해야함]
    -rw-r--r--   1 windy    staff    3136678 11월 18일  09:55 126996-04.zip
    -rw-r--r--   1 windy    staff    10531891 11월 18일  09:55 127002-04.zip
    -rw-r--r--   1 windy    staff     538400 11월 18일  09:55 127144-03.zip [먼저패치해야함]
    root@wl ~/SunStudio/patch # unzip 126498-11
    ...
    root@wl ~/SunStudio/patch # patchadd 126498-11
    ...
    Patch packages installed:
      SPROcpl
      SPROcplx
      SPROmrcpl
      SPROscl
      SPROsclx
      SPROstl4a
      SPROstl4h
      SPROstl4o
      SPROstl4x
      SPROstl4y
      SPROtl7x
      SPROtlbn7
      SPROtll7
      SPROtll7x
    
    root@wl ~/SunStudio/patch # [다른 파일도 위와같이 실행한다]
    
  3. smpatch (위에서 설명) 를 이용하면 cc가 시스템과 같이 패치된다.

OpenSSL

더 자세한 사항은 윈디하나의 솔라나라: OpenSSL을 참고한다. 솔라나라에서 소개하는 상당수의 어플리케이션이 OpenSSL을 지원하고 있으며 SSL과 같이 컴파일할것이다.
root@wl ~/source # wget http://www.openssl.org/source/openssl-0.9.8h.tar.gz
root@wl ~/source # tar xvfz openssl-0.9.8h.tar.gz
root@wl ~/source # cd openssl-0.9.8h
root@wl ~/source/openssl-0.9.8h # ./config
root@wl ~/source/openssl-0.9.8h # make
root@wl ~/source/openssl-0.9.8h # make test
root@wl ~/source/openssl-0.9.8h # make install
Valid XHTML 1.0 Transitional Valid CSS!
Posted by 1010
60.Unix2008. 12. 17. 14:31
반응형
ssh이라는 것이 있다는 이야기를 들었습니다.
 
그래서 telnet을 사용하지 않고 SSH를 사용 하려고 하는데.;;
안되네요..
 
인터넷 검색을 해보니 딱히 설치해야 할 것은 없는거 같고..
 
 
pkginfo -i |grep -i ssh 를 해보면 설치된 패키지가 있습니다.
system      SUNWsshcu                        SSH Common, (Usr)
system      SUNWsshdr                        SSH Server, (Root)
system      SUNWsshdu                        SSH Server, (Usr)
system      SUNWsshr                         SSH Client and utilities, (Root)
system      SUNWsshu                         SSH Client and utilities, (Usr)
 
 
/etc/services 에는 이렇게 되어있습니다.
ssh             22/tcp                          # Secure shell
 
svcs ssh하면
STATE          STIME    FMRI
online         10:44:00 svc:/network/ssh:default
 
그런데 putty나 secureCRT를 이용해서 접근을 하려고 하면
화면에 아무것도 뜨지 않습니다..
 
어떻게 해야하는건지 궁금해서 질문 올려 봅니다.
 
아 /etc/ssh/sshd_config 에서
PermitRootLogin yes
도 해주었습니다..
 
왜 안될까요/..ㅠㅠ
Posted by 1010
60.Unix2008. 12. 17. 14:25
반응형
솔라리스는 거의 모든 오퍼레이팅이 패캐지화 되어 있다구 하여도 과언이 아닙메다.
패캐지 파일은 binaries,configure file,document 파일등으로 구성 되어 있습니다.
우리가 sunfreeware.com 에서 패캐지를 쉽게 얻을수 있듯이 솔라리스 패캐지는 리눅스의
rpm과 마찬가지로 솔라리스에 유용하게 사용 됩니다.

그라믄 가략하게 패캐지 관련 명령어와 사용법을 소개 하것슴다..

1. pkgchk : 말그대로 패캐지를 채크 합니다.

ex)
# pkgchk -l -p /usr/bin/mkdir ----> -l 은 리스트를 말하며 -p는 위치를 의미하는 옵션 입니다.

Pathname: /usr/bin/mkdir
Type: regular file
Expected mode: 0555
Expected owner: bin
Expected group: bin
Expected file size (bytes): 10264
Expected sum(1) of contents: 4598
Expected last modification: 10월 06 16:42:34 1998
Referenced by the following packages:
SUNWcsu
Current status: installed

위와 같은 결과를 보여 줍니다. 그밖에도 많은 옵션이 있는데 manpage를 참조 하세영...

2. pkginfo : 인스톨 되어 있는 패캐지 리스트를 보여 줍니다.

ex)

# pkginfo
system AUBtocsin Auburn Univ. Engineering tocsin network scan detector
system FJSVhea SunOS Header Files for FUJITSU platform specific
system FJSVvplr Fujitsu platform specific symlinks (Root)
system FJSVvplu Fujitsu platform specific symlinks (user)
application FSFgzip gzip
application GLIB glib
application GNUbash bash
tools GNUgzip GNU gzip
tools GNUrcs GNU rcs and diffutils
application GNUwget wget
application GTK+ gtk+
system INTACT INTACT Change Detection System
application IZzip zip
application JSparm parm V5.0b2 - Performance Analysis Report Maker
application LWperl perl
application MHmpg123 mpg123
system MRsnort Marty Roesch's Snort (/usr/local)
utility NRMXkstat NRM Xkstat 0.90 SPARC Solaris 7
application NSCPcom Netscape Communicator
tools PARCdaily DailyCronJob
application PPkde KDE Desktop (PatriotSoft Packages)
application PPqtgif QT (PatriotSoft Packages)
...

3. pkgadd : 패캐지를 Add 합니다.

ex)
# pkgadd -d ntop-1.1-sol7-sparc-local

다음과 같은 패키지를 사용할 수 있습니다.
1 SMCntop ntop
(sparc) 1.1

처리할 패키지(들)를 선택하십시오.(또는 모든 패키지를
처리하려면'all'을 입력하십시오.) (default: all) [?,??,q]:all


4. pkgrm : 패캐지를 지웁니다.

ex)
# pkgrm SMCntop ---> 이렇게 하면 SMCntop만 지워지겠죠.
현재 설치되어 있는 패키지는 다음과 같습니다:
SMCntop ntop
(sparc) 1.1

이 패키지를 제거하겠습니까? y

# pkgrm ----> 패캐지 리스트를 열거하여 주므로 선택하여 지울수 있습니다.


5. pkgproto : prototype file 의 형태를 보여 줍니다.

ex)

# cd /usr/local/apache
# find . -print | pkgproto > prototype ----> 형태를 prototype 파일에 저장 합니다.
d none bin 0755 root other
f none bin/httpd 0755 root other
f none bin/ab 0755 root other
f none bin/apachectl 0755 root other
f none bin/htpasswd 0755 root other
f none bin/htdigest 0755 root other
f none bin/dbmmanage 0755 root other
f none bin/logresolve 0755 root other
f none bin/rotatelogs 0755 root other
f none bin/apxs 0755 root other
d none libexec 0755 root other
d none man 0755 root other
d none man/man1 0755 root other
f none man/man1/htpasswd.1 0644 root other
f none man/man1/htdigest.1 0644 root other
f none man/man1/dbmmanage.1 0644 root other
d none man/man8 0755 root other
f none man/man8/httpd.8 0644 root other
f none man/man8/ab.8 0644 root other
f none man/man8/apachectl.8 0644 root other
f none man/man8/logresolve.8 0644 root other
f none man/man8/rotatelogs.8 0644 root other
f none man/man8/apxs.8 0644 root other
....

여그서 f는 파일을 의미하며 d는 디렉터리를 의미합니다. 위에서 보듯이 퍼미션 코드와 유저 그룹도
알수 있습니다...끝내 줍니다영 ^^;
Posted by 1010
60.Unix2008. 12. 17. 14:21
반응형

Installing OpenSSH Packages for SPARC/Solaris 2.5(.1), 2.6 or 7


Openssh is meant to supply security to your systems. If you don't understand how to properly use it, you may have problems. Such problems are your responsibility. See our disclaimer. Please read the instructions below fully and carefully before you do any installation.

Installation of the openssh software on a Solaris machine is lengthy, but straightforward. To get ssh and sshd running you need to install a number of packages. There are a number of places on the net with details of this procedure. One of the best is on the Sun Blueprints web pages (in pdf format) at

Building and Deploying OpenSSH on Solaris[tm] Operating System (a pdf file)

or the

The OpenSSH Home Page

I do not use the Sun blueprint method exactly because some things have changed since that document was created.

The seven pieces of software that may need to be on your system to use ssh properly are openssl, openssh, zlib, libgcc (if you have gcc-3.3.2 installed, you do not need to install libgcc), and optionally egd, prngd, perl (there is a perl with Solaris 9 and 10 in /usr/bin), and tcp_wrappers. You can either download the sources and do the compiles yourself if you have a C compiler installed and working or you can go to sunfreeware.com and get pre-compiled packages. If you are very concerned about your machine's security and don't want to trust software compiled by someone else, then it is best for you to compile the software yourself. It is also a great learning experience.

The sources for these different programs are on sunfreeware.com or you can go to their home pages at

http://www.zlib.org zlib
http://www.perl.org perl
http://www.aet.tu-cottbus.de/personen/jaenicke/postfix_tls/prngd.html prngd
http://www.openssl.org openssl
http://www.openssh.org openssh
http://www.lothar.com/tech/crypto/ egd
ftp://ftp.porcupine.org/pub/security/index.html tcp_wrappers

You will also need to have the /usr/local/lib/libgcc_s.so.1 library from the libgcc-3.3 or gcc-3.3.2 or higher packages.

I have included support for the optional use of the tcp_wrappers program (using the so-called Advanced Method). This can help to restrict the use of ssh logins to those computers defined in the so-called hosts.allow and hosts.deny files when set up properly. Ssh logins can also be logged using this software.


Installation Steps


Step One: Getting the packages

To install the version of openssh from sunfreeware.com, go to the main page and select the files for SPARC/Solaris 2.6 or SPARC/Solaris 7 at the right.

Or, here are the files you need to download for Solaris 7 (get the similar files for Solaris 2.5(,1) (you will also need the snprintf package), or 2.6):

openssh-5.1p1-sol7-sparc-local.gz (5.1p1 for Solaris 7 now)
openssl-0.9.8h-sol7-sparc-local.gz
tcp_wrappers-7.6-sol7-sparc-local.gz (optional, but recommended
(unless you are using IPV6 - see the tcp_wrappers listing for details on this issue)
zlib-1.2.1-sol7-sparc-local.gz
libgcc-3.3.2-sol7-sparc-local.gz or the gcc-3.3.2-sol7-sparc-local.gz
perl-5.8.3-sol7-sparc-local.gz (optional)
prngd-0.9.25-sol7-sparc-local.gz
egd-0.8-sol7-sparc-local.gz

If you have already installed some of the above files, you can skip their downloads, but most are new.

Step Two: Installing the packages

With the files downloaded, go to the directory where you put them and run

# gunzip openssh-5.1p1-sol7-sparc-local.gz

# gunzip openssl-0.9.8h-sol7-sparc-local.gz

# gunzip zlib-1.2.1-sol7-sparc-local.gz
 
# gunzip libgcc-3.3-sol7-sparc-local.gz  (if you don't have gcc-3.3.2 installed)

# gunzip tcp_wrappers-7.6-sol7-sparc-local.gz (again optional)

# gunzip prngd-0.9.25-sol7-sparc-local.gz

# gunzip egd-0.8-sol7-sparc-local.gz

# gunzip perl-5.8.5-sol7-sparc-local.gz (optional if you already have perl)

# gunzip snprintf-2.2-sol25-sparc-local.gz (for Solaris 2.5(.1) only)

Then run as root:

# pkgadd -d openssh-5.1p1-sol7-sparc-local

# pkgadd -d openssl-0.9.8h-sol7-sparc-local

# pkgadd -d zlib-1.2.1-sol7-sparc-local

# pkgadd -d libgcc-3.3-sol7-sparc-local  (if you don't have gcc-3.3.2 installed)

# pkgadd -d tcp_wrappers-7.6-sol7-sparc-local (optional)

# pkgadd -d prngd-0.9.25-sol7-sparc-local

# pkgadd -d snprintf-2.2-sol25-sparc-local (for Solaris 2.5(.1) only)

# pkgadd -d egd-0.8-sol7-sparc-local

# pkgadd -d perl-5.8.5-sol7-sparc-local (optional)

Once you have installed the packages above, you will have files in various subdirectories of /usr/local. The default location for the ssl files is in /usr/local/ssl. While these files were compiled to avoid the need to put directories like /usr/local/lib and /usr/local/ssl/lib in your LD_LIBRARY_PATH, it is possible that you may need to set this. You should now find ssh in /usr/local/bin and sshd in /usr/local/sbin. Make sure you have /usr/local/bin and /usr/local/sbin in your PATH environment variable. The perl scripts in the optional egd package (with .pl extensions) will look for perl in /usr/local/bin. If you are using the Sun perl, then the Perl programs will need to have /usr/bin at the beginning, while the sunfreeware Perl goes in /usr/local/bin.

Step Three: Getting Entropy

The next step in installation is to start the generation of entropy for use by openssl and openssh. This is done with the prngd program. To set this up, read the README.prngd file. Make sure you have /usr/local/sbin in your PATH first. Now go to your /var/log, /var/adm, or similar directories and look for some log files like messages, syslog, etc. Make sure you are logged in as root user and run

cat ....various log files from your /var/log or /var/adm directories... > /usr/local/etc/prngd/prngd-seed

such as

cat syslog messages > /usr/local/etc/prngd/prngd-seed

Then run

mkdir /var/spool/prngd

/usr/local/sbin/prngd /var/spool/prngd/pool

This should start up the prngd daemon and start generating entropy. You can check this by running

/usr/local/bin/egc.pl /var/spool/prngd/pool get

which, if the egd package (see README.egd) is installed along with perl, will give a message like

32800 bits of entropy in pool

indicating that the prngd is working.

Note: Several users have pointed out that they may get a "PRNG not seeded" message when trying to start sshd. This seems to be a new issue with openssl 0.9.7 versions. They point out that the OpenSSL FAQ says:

Starting with version 0.9.7, OpenSSL will automatically
look for an EGD socket at /var/run/egd-pool, /dev/egd-pool,
/etc/egd-pool and /etc/entropy.
and if they did a link like

ln -s /var/spool/prngd/pool /dev/egd-pool

or similar, the not seeded message above goes away and opnessh programs then work properly.

If you want to automatically start prngd at boot time, you will need to create a startup script appropriate to your setup.

I use the script below placed in /etc/init.d as prngd, which you may wish to modify:

#!/bin/sh

pid=`/usr/bin/ps -e | /usr/bin/grep prngd | /usr/bin/sed -e 's/^  *//' -e 's/ .*//'`
case $1 in
'start')
	/usr/local/sbin/prngd /var/spool/prngd/pool
	;;
'stop')
	if [ "${pid}" != "" ]
	then
		/usr/bin/kill ${pid}
	fi
	;;
*)
	echo "usage: /etc/init.d/prngd {start|stop}"
	;;
esac
placed in /etc/init.d with file name prngd and then as root run

# chown root /etc/init.d/prngd
# chgrp sys /etc/init.d/prngd
# chmod 555 /etc/init.d/prngd
# ln -s /etc/init.d/prngd /etc/rc2.d/S98prngd

# /etc/rc2.d/S98prngd start

will start the process if you want to do it by hand and

# /etc/rc2.d/S98prngd stop

will stop the prngd daemon. You can test that this script actually starts the prngd daemon at boot time by rebooting your system and then doing

ps -e | grep prngd

to see if the process is started.

Step Four: Setting up the sshd user and the /var/empty directory

In openssh 3.5p1, a new security method is setup called privilege separation. The details can be found in the README.privsep file in the openssh source distribution. This method is now the default in openssh. Before doing anything else, you should read the above document and if you agree, implement these steps as root:

# mkdir /var/empty
# chown root:sys /var/empty
# chmod 755 /var/empty
# groupadd sshd
# useradd -g sshd -c 'sshd privsep' -d /var/empty -s /bin/false sshd

/var/empty should not contain any files.

The default sshd_config file /usr/local/etc has the last line

Subsystem sftp /usr/libexec/sftp-server

This may need to be changed to

Subsystem sftp /usr/local/libexec/sftp-server

If you do not do this and attempt to start up sshd, you will get error messages and the daemon will not start.

Step Five: Setting up tcp_wrappers

The next step it to setup tcp_wrappers. First read the README.tcpwrappers so that you know what tcp_wrappers does and how. Basically, tcp_wrappers is used to restrict to some limited group of machines access to your communication ports such as the port 22 that the sshd program uses. If you have tcp_wrappers running already, then you will only need to make sure that the sshd daemon entry is placed in the /etc/hosts.allow and /etc/hosts.deny files in a way that is appropriate to your setup. If you are not currently running tcp_wrappers, you can first create the file /etc/hosts.deny and put the single line

sshd: ALL

in it. Then, create the file /etc/hosts.allow file and put a line, for example, like

sshd: ... a list of the IP numbers of machine you want to be able to communicate with your machine separated by commas ...

in the file. We will test these entries later.

Step Six: Installing ssh and sshd

This is the final step. You should have read the README.openssl and INSTALL.openssl documents and you should also have read the openssh documents README.openssh and INSTALL.openssh.

Each machine that you want to communicate with via the ssh client will need to have an sshd daemon running. But first, you need to run the following three lines to create the key information for the server machine. Again, make sure you have /usr/local/bin and /usr/local/sbin in your PATH. If you have been running sshd before and have keys in /usr/local/etc, running these commands will overwrite them. As root, enter

# ssh-keygen -t rsa1 -f /usr/local/etc/ssh_host_key -N ""
# ssh-keygen -t dsa -f /usr/local/etc/ssh_host_dsa_key -N ""
# ssh-keygen -t rsa -f /usr/local/etc/ssh_host_rsa_key -N ""
and wait until each is done - this may take a few minutes depending on the speed of your machine.

You might also want to study the /usr/local/etc/ssh_config and /usr/local/etc/sshd_config files to see if there is anything you want to configure differently.

Now we can set up scripts to start the sshd daemon. I use the script below which I place in /etc/init.d as sshd, but you are free to devise others to match your needs. There have been some comments on the net recently in the sun-managers mailing list that this script should be replaced. See the post below for details.

#!/bin/sh

pid=`/usr/bin/ps -e | /usr/bin/grep sshd | /usr/bin/sed -e 's/^  *//' -e 's/ .*//'`
case $1 in
'start')
	/usr/local/sbin/sshd
	;;
'stop')
	if [ "${pid}" != "" ]
	then
		/usr/bin/kill ${pid}
	fi
	;;
*)
	echo "usage: /etc/init.d/sshd {start|stop}"
	;;
esac

Alternative script comments

Date: Mon, 13 Jan 2003 14:43:53 -0600 (CST)
From: "Mike's List" 
To: sunmanagers@sunmanagers.org
Subject: SUMMARY: sshd weirdness

Lots of responses on this one, I used the basic script below (from Luc).
Most responded that the script for the sunfreeware.com is badly written
and that the error or non-existence PID is from the grep to kill sshd.
I'm no script expert, only reporting what others replied.

Some recommends search for the /var/run/sshd.pid, this way your ssh
terminal won't get zap while sshd daemon is re-hup or stop/start.

Thanks all.


- Mike


case "$1" in
'start')
        if [ -x /usr/local/sbin/sshd ]; then
                echo "Starting the secure shell daemon"
                /usr/local/sbin/sshd &
        fi
        ;;

'stop')
        echo "Stopping the secure shell daemon "
        pkill -TERM sshd
        ;;
*)
        echo "Usage: /etc/init.d/sshd { start | stop }"
        ;;
esac
exit 0


On Fri, 10 Jan 2003, Mike's List wrote:

> Ok, quite a few asked to see the script (below) --Solaris 8 2/02 running
> sunfreeware.com openssh 3.5p1 --a couple of suggestions below doing
> 
> /bin/sh -x /etc/init.d/sshd stop
> 
> ...to see what's going on, I'm in the server remotely right now so I can't
> stop/start (because stop would just kills all the sshd processes and I
> can't get back in to start).
> 
> 
> - Mike
> 
> 
> #!/bin/sh
> pid=`/usr/bin/ps -e | /usr/bin/grep sshd | /usr/bin/sed -e 's/^  *//' -e 's/ .*//'`
> case $1 in
> 'start')
>         /usr/local/sbin/sshd
> ;;
> 'stop')
>         if [ "${pid}" != "" ]
>         then
>                 /usr/bin/kill ${pid}
>         fi
>         ;;
> *)
>         echo "usage: /etc/init.d/sshd {start|stop}"
>         ;;
> esac

End of alternative script comment

I then do

# chown root /etc/init.d/sshd
# chgrp sys /etc/init.d/sshd
# chmod 555 /etc/init.d/sshd
# ln -s /etc/init.d/sshd /etc/rc2.d/S98sshd

# /etc/rc2.d/S98sshd start

will start the process if you want to do it by hand and

# /etc/rc2.d/S98sshd stop

will stop the sshd daemon. You can check this with

# ps -e | grep sshd

to see if sshd is running. If sshd is running and you have set up tcp_wrappers the way you want, then you can test the system. Of course, you have to have another machine that has the ssh program installed so that you can try to communicate with the machine on which you just started sshd. See the OpenSSH documentation for further details. To test that tcp_wrappers is working, you can put a machine's IP address in hosts.allow and see if you can ssh to the server machine from the client and then take it out and see if access is denied.

To repeat, if you have questions about the detailed use of any of these programs, please read the documentation first or go to their web sites. I do not want to know the security details of any of your systems and it would not be a good idea for you to tell me or anyone else. Security issues are very important and I strongly urge anyone to install as much security software as they can master and to keep a close eye out on the latest CERT and other vulnerability sites for announcements.

I am fully open to constructive suggestions on how make these instructions clearer or better and will include reasonable comments as they arrive.

A sunfreeware.com user, Erick Mechler, has generously submitted a shell script that helps to automate some of the above installation for Solaris 2.6 and 7. The script can be downloaded at

openssh-install.sh

You may need to modify it for your system's structure. Comments should be sent directly to Erick.


© Copyright 2008 Steven M. Christensen and Associates, Inc.
This page was last updated on August 29, 2008.
Posted by 1010
60.Unix2008. 12. 17. 14:17
반응형
Solaris  Basic  Set


  **  네트워크  설정  **


/etc/hosts

  127.0.0.1              localhost

  192.168.211.20      solaris10  loghost


/etc/hostname.pcn0

  solaris10


/etc/netmasks

  192.168.211.0          255.255.255.0


/etc/defaultrouter

  192.168.211.2


        -  부팅시  GW자동인식이  안돼면
            /etc/init.d/inetsvc

            route  add  default  route_IP  1    
   

/etc/resolv.conf
nameserver  219.250.36.130


/etc/nsswitch.conf
hosts:        files  dns


**  shell  바꾸기**                  

작업의  편의를  위해  root  의  쉘과  홈디렉토리부터  변경해준다.
솔라리스에서는  기본적으로  root  의  홈디렉토리를  /  로  사용하지만  관리의  편의를  위해  /root  라는  디렉토리를  만들어서  root  의  홈디렉토리로  사용한다.

  #  mkdir  /root
 
root의  기본  쉘을  bash로  변경해주고,  홈디렉토리를  /root  로  변경해준다.

  기본  :  root:x:0:1:Super-User:/:/sbin/sh

  변경  :  root:x:0:1:Super-User:/root:/bin/bash

/etc/bashrc와  root의  홈디렉토리에  .bash_profile  을  만들어준다.
  리눅스의  파일을  참조하여  사용한다.

  +++  /etc/bashrc  ++++++++++++++++++++++++++++++++++++++++

#  /etc/bashrc

#  System  wide  functions  and  aliases
#  Environment  stuff  goes  in  /etc/profile

#  by  default,  we  want  this  to  get  set.
#  Even  for  non-interactive,  non-login  shells.
if  [  $UID  -gt  99  ]  &&  [  "`id  -gn`"  =  "`id  -un`"  ];  then
        umask  002
else
        umask  022
fi

#  are  we  an  interactive  shell?
if  [  "$PS1"  ];  then
        case  $TERM  in
        xterm*)
                if  [  -e  /etc/sysconfig/bash-prompt-xterm  ];  then
                        PROMPT_COMMAND=/etc/sysconfig/bash-prompt-xterm
                else
                        PROMPT_COMMAND='echo  -ne  "\033]0;${USER}@${HOSTNAME%%.*}:${PWD/#$HOME/~}\007"'
                fi
                ;;
        screen)
                if  [  -e  /etc/sysconfig/bash-prompt-screen  ];  then
                        PROMPT_COMMAND=/etc/sysconfig/bash-prompt-screen
                else
                PROMPT_COMMAND='echo  -ne  "\033_${USER}@${HOSTNAME%%.*}:${PWD/#$HOME/~}\033\\"'
                fi
                ;;
        *)
                [  -e  /etc/sysconfig/bash-prompt-default  ]  &&  PROMPT_COMMAND=/etc/sysconfig/bash-prompt-default
                ;;
        esac
        #  Turn  on  checkwinsize
        shopt  -s  checkwinsize
        [  "$PS1"  =  "\\s-\\v\\\$  "  ]  &&  PS1="[\u@\h  \W]\\$  "
fi

if  !  shopt  -q  login_shell  ;  then  #  We're  not  a  login  shell
                for  i  in  /etc/profile.d/*.sh;  do
                if  [  -r  "$i"  ];  then
                        .  $i
                fi
        done
        unset  i
fi
#  vim:ts=4:sw=4

  ++++++++++++++++++++++++++++++++++++++++++++++++++++++++

  +++  /etc/bashrc  ++++++++++++++++++++++++++++++++++++++++

#  .bash_profile

#  Get  the  aliases  and  functions
if  [  -f  /etc/bashrc  ];  then
                .  /etc/bashrc
fi

#  User  specific  environment  and  startup  programs

PATH=$PATH:$HOME/bin

export  PATH
unset  USERNAME

  ++++++++++++++++++++++++++++++++++++++++++++++++++++++++

-  다른  사용자의  shell  을  변경하고자  할때도  위와  같은  방법을  참고하여  변경해  준다.


**  솔라리스에서  한글  사용하기**

set  |  grep  LANG  으로  설정  확인
LANG=ko

변경은    /etc/profile  에


LANG=ko
export  LANG

  를  추가해  준다.


**  솔라리스에서  /home  사용하기**

  솔라리스에서는  /home을  automounter가  mount해서  사용하기  때문에  root라  할지라도  디렉토리나  파일을  만들  수  없다.  하지만  리눅스에  익숙한  관리자라면  /home  에서  모든  사용자  홈디렉토리를  관리하기를  원할  것이다.  /home  을  automount  하지  않으려면  /etc/auto_master파일에서  /home부분을  주석처리  하고  시스템을  재부팅하면  된다.

/etc/auto_master

......
+auto_master
/net                        -hosts                    -nosuid,nobrowse
#/home                      auto_home              -nobrowse
/xfn                        -xfn

reboot


**  시스템  시간  맞추기**

직접  맞추기
 
  rdate  명령어를  사용하여  필요할때마다  수정해도  좋지만,  이보다는  시스템  재부팅시에  자동으로  세팅되도록  부팅  스크립트에  포함시켜  준다.  time  서버로는  time.bora.net  또는  time.kriss.re.kr  를  사용한다.
  일단  현재  시간을  맞추기  위하여  프롬프트  상에서  한번  실행해  준다.  이때  리눅스에서는  -s  옵션을  주어  시스템  시간을  동기화  시키지만  솔라리스에서는  -s  옵션을  주지  않는  것을  주의한다.

rdate  time.bora.net

  다음  시스템  부팅시마다  자동으로  맞추기  위하여  부팅  스크립트에  포함시켜  준다.

  /etc/rc3
  …
rdate  time.bora.net

자동으로  맞추기

XNTP  라는  프로그램을  사용하면  시스템에  항상  XNTP  프로그램이  데몬으로  상주하며  자동으로  시스템  시간을  정확히  맞혀  준다  설정방법은

pkginfo  |  grep  ntp

NTP  패키지가  설치되어  있는지  확인하고,  설치되어  있으면

/etc/inet                          /  디렉토리로  이동하여,  ntp.client  파일을  ntp.conf라는  이름으로  복사한다.

ntp.conf  를  열어  맨  밑에

server  time.bora.net
server  time.nuri.net
server  gps.bora.net
server  ntp1.cs.pusan.ac.kr
server  ntp.ewha.net
server  ntp1.gngidc.net
server  ntp2.gngidc.net
server  time.kriss.re.kr

를  추가해  준다.

/etc/init.d/xntpd  start

다음  시스템  재부팅부터는  자동  실행된다

ntpq  -p

로  ntp  서버에  정상  접속하는지  확인한다.


**  DNS  설정  **

솔라리스에서  DNS  설정법은  리눅스와  약간의  차이가  있다.  먼저  리눅스처럼  resolv.conf  파일에  사용할  DNS  를  추가한다.  추가  방법은  동일하지만,  리눅스처럼  resolv.conf  파일이  생성되어  있는  것이  아니고,  시스템  관리자가  직접  생성해  줘야  한다.  위치는  리눅스와  같은  /etc/resolv.conf  가  된다.

resolv.conf

nameserver  211.115.194.2
nameserver  211.115.194.3
nameserver  203.255.112.34
search  localdomain

다음으로  nsswitch.conf  라는  파일을  열어서  hosts:  ….  줄의  맨  끝에  DNS를  추가해  준다.

nsswitch.conf

  …
hosts:            files  dns


**  패키지  다운로드  **

http://www.sunfreeware.com

  패키지  설치  확인은  아래의  명령어를  사용하여  확인한다.

pkginfo  |  grep  {Package  Name}

  패키지  설치법

  보통  솔라리스  패키지는  패키지명-패키지버전-OS버젼-cpu타입-local.gz  으로  제공된다.
  우선  gzip  을  사용하여  gz  압축을  해제후에  pkgadd  를  사용하여  설치한다.

ex)  gzip  -d  autoconf-2.59-sol9-intel-local.gz
    pkgadd  -d  autoconf-2.59-sol9-intel-local


**  컴파일  환경  만들기  **

wget  패키지를  미리  설치하여  다운로드에  사용한다
 
    ftp://ftp.sunfreeware.com/pub/freeware/intel/10/wget-1.10.2-sol10-x86-local.gz  
 
autoconf  패키지  설치

  wget  ftp://ftp.sunfreeware.com/pub/freeware/intel/10/autoconf-2.59-sol10-intel-local.gz

make  패키지  설치

  wget  ftp://ftp.sunfreeware.com/pub/freeware/intel/10/make-3.80-sol10-intel-local.gz


automake  패키지  설치

  wget  ftp://ftp.sunfreeware.com/pub/freeware/intel/10/automake-1.9-sol10-intel-local.gz

gcc  패키지  설치

  wget  ftp://ftp.sunfreeware.com/pub/freeware/intel/10/gcc-3.3.2-sol10-intel-local.gz


패키지는  일반적으로  /usr/local  ~  에  설치  되므로  /etc/profile  에  PATH와  LD_LIBRARY_PATH를  수정  또는  추가해  준다.

  /etc/profile

...

PATH=/usr/local/bin:$PATH
LD_LIBRARY_PATH=/usr/lib:/usr/local/lib:/usr/openwin/lib:/usr/openwin/bin:/usr/dt/lib:/usr/ucblib:/opt/lib:/usr/sfw/lib/:.
export  PATH  LD_LIBRARY_PATH

주의사항:
LD_LIBRARY_PATH에서  디렉토리  경로의  순서를  바꾸시면  안됩니다!  역시  PATH에서  /usr/local/bin이  앞에  나와야  합니다.


libgcc  패키지  설치

  wget  ftp://ftp.sunfreeware.com/pub/freeware/intel/10/libgcc-3.3-sol10-intel-local.gz

libiconv  패키지  설치

  wget  ftp://ftp.sunfreeware.com/pub/freeware/intel/10/libiconv-1.9.2-sol10-x86-local.gz


**  개발  환경  만들기**

  --  ls  하이라이팅  세팅

  솔라리스에  기본적으로  제공되는  ls  는  하이라이팅  기능을  지원하지  않으므로  fileutils에  포함되어  있는  ls를  사용하기  위하여  fileutils를  설치한다.
  현재  intel  기반  솔라리스용  fileutils  패키지를  제공하지  않으므로  앞서  세팅한  컴파일  환경을  사용하여  설치한다.

wget  http://ftp.gnu.org/pub/gnu/fileutils/fileutils-4.1.tar.gz
 
gzip  -d  fileutils-4.1.tar.gz
tar  xvf  fileutils-4.1.tar.gz

cd  ./fileutils-4.1

./configure

make
  make  시에  컴파일  에러가  난다면
  ........
  error:  parse  error  before  "ctid_t"  
  ........
 
  -  PATH  에  /usr/ccs/bin  가  추가되어  있는지  확인
  -  cd  /usr/local/lib/gcc-lib/sparc-sun-solaris2.10/3.3.2/install-tools
      ./mkheaders


make  install


설치가  완료되었다면,  /usr/local/bin  에  ls  가  설치되었는지  확인한다.

/usr/local/bin/ls  --color=auto

하이라이팅이  정상적으로  나타난다면,  쉘  스크립트에  alias  를  주어  사용한다.

/etc/profile
...
alias  ls  =  ‘/usr/local/bin/ls  --color=auto’


  --  vi  환경  설정

솔라리스에  기본적으로  제공되는  vi  는  하이라이팅  기능을  지원하지  않으므로  vim  을  설치하여  하이라이팅과  탐색  옵션  기능,  탭  설정  기능  등을  사용한다.

vim  패키지를  다운로드하여  설치한다.
wget  ftp://ftp.sunfreeware.com/pub/freeware/intel/10/vim-6.3-sol10-intel-local.gz

vim  패키지를  사용하기  위해  ncurses  패키지를  다운로드하여  설치한다.
wget  ftp://ftp.sunfreeware.com/pub/freeware/intel/10/ncurses-5.4-sol10-intel-local.gz
 
정상적으로  설치되었는지  확인하여  본다.
vim

이때  라이브러리  에러가  난다면  /etc/profile의  LD_LIBRARY_PATH  에  /usr/sfw/lib/  가  포함되어  있는지  확인하여  본다.

정상적으로  실행되지만  vim  역시  하이라이팅  기능이  기본  설정이  아니다.  터미널을  ansi  표준으로  세팅하고,  vi  를  vim  으로  aliasing  하고,  vim  설정  파일을  각자의  홈  디렉토리에  생성하여  하이라이팅  on  한다.

/etc/profile
...
alias  vi='vim'
TERM=ansi
export  TERM

을  포함하여  준다.


기타  추가  aliasing

/etc/profile

....

alias  cp='cp  -i'
alias  l.='ls  -d  .[a-zA-Z]*  --color=tty'
alias  ll='ls  -l  --color=tty'
alias  ls='ls  --color=tty'
alias  mv='mv  -i'
alias  rm='rm  -i'
alias  vi='vim'
alias  which='alias  |  /usr/bin/which  --tty-only  --read-alias  --show-dot  --show-tilde'


그리고  각자의  홈  디렉토리에  .

/root/.vimrc

set  incsearch
set  hlsearch
set  laststatus=2
set  ts=4
set  sw=4
syn  on

[출처]  Solaris  설치  후  기본적인  설정|작성자  바람추적
[2008년  04월  01일  22:27:00  수정되었습니다.]
[본문링크] Solaris 설치 후 기본적인 설정
Posted by 1010
60.Unix2008. 12. 17. 13:32
반응형
RAID
 (1) VERITAS(VxVM)
 (2) SUN(DiskSuite) = SVM(Solaris 불륨 레이블)
    용량과 리던딘시 문제를 해결하기 위해 , 솔라리스는 " redundant  array of
    inexpenisive disks"(RAID) 표준에 대한 지원을 지원한다.
    <-  redundant '여유도' 의미
    그리고 RAID는 중요한 데이터를 가지고 있는 서버에 주로 사용한다.
   
    RAID는 다양한 유형의 'striping'과 'mirroring'을 제공하는 여러 서로 다른
    수준(Level)을 제공한다.
   
    RAID 0 - Concatenation Strinping
            :  이 중에 Striping 은 동일한 사이즈의 두 개 이상의 디스크에
                I/O를 분산 시키는 것
                --성능 높고 가용성은 낮다.
           
               
    RAID 1 - 미러링
            : 두 개 이상의 디스크에 테이터를 미러링(복사) 한다.
            즉 디스크 한계가 장애가 생기더라도 데이터가 손실되지 않는다.
            --중요한 데이터에 치중한다면
           
    RAID 5 - parity
            : 스트라이핑이지만 패러티 정보를 분산시켜서 저장함으로써
            RAID 0 이 제공 못하는 가용성을 제공한다.
            디스크 한 개가 장애가 생기더라도 나머지 디스크를 가지고 장애난 디스크의
            정보를 계산함. 
            --성능 향상(즉, 속도에 치중한다면 )
            foar
           
--metadb 옵션들
 
  -a :
 
  Attach a new database device
  The /kernel/drv/md.conf file is automatically
  updated with th new information
  meta database 정보를 add(추가)
 
  -f :
  The -f option is used the create the initial
  static database.
  :force(강제로 추가)
 
  -c :
  number : Specifies the number of replicas to be placed on each
  device
  :meta database replica(복사본)의 개수 지정
 
  -------------------------------------------------------------------
 
  MetaDB 란
  DiskSuite의 전체의 config 정보와 metadevice의 상태 정보를 가지고 있는 DB
  slice당 20M 정도면 충분하고, 최소 2개의 DB 복사본(Replicas)이 요구된다.
 
  [권장사항]
  Disk 1 -3 Replicas
  Disk 2 -4 각 Disk 당 Replicas (총 4 -8)
  Disk 5 이상 - 각 Disk 당 Replice
  - MetaDB 생성할 공간이 없으면, swap를 조금 줄이고, 공간을 확보한다.
  -OS Mirror시에는 두 Disk에 각각 2개 이상의 MetaDB 를 생성한다.
 
 ===================================================================
 

 -- RAID 0 구성 실습
           
bash-2.05# df -h
파일시스템            크기  사용  가용  용량    설치지점
/dev/dsk/c0t0d0s0      5.8G  2.9G  2.8G    51%    /
/proc                    0K    0K    0K    0%    /proc
mnttab                  0K    0K    0K    0%    /etc/mnttab
fd                      0K    0K    0K    0%    /dev/fd
swap                  838M    40K  838M    1%    /var/run
swap                  838M  328K  838M    1%    /tmp
/dev/dsk/c0t0d0s3      94M  1.0M    84M    2%    /p3
/dev/dsk/c0t0d0s4      94M  1.0M    84M    2%    /p4
/dev/dsk/c0t0d0s5      94M  1.0M    84M    2%    /p5
/dev/dsk/c0t0d0s7      1.8G  1.9M  1.7G    1%    /export/home

--Raid 구성하기 전에 /p /p4 mount file --> umount 시킴

bash-2.05# umount /p3
bash-2.05# umount /p4

bash-2.05# df -h
파일시스템            크기  사용  가용  용량    설치지점
/dev/dsk/c0t0d0s0      5.8G  2.9G  2.8G    51%    /
/proc                    0K    0K    0K    0%    /proc
mnttab                  0K    0K    0K    0%    /etc/mnttab
fd                      0K    0K    0K    0%    /dev/fd
swap                  839M    40K  839M    1%    /var/run
swap                  839M  328K  839M    1%    /tmp
/dev/dsk/c0t0d0s5      94M  1.0M    84M    2%    /p5
/dev/dsk/c0t0d0s7      1.8G  1.9M  1.7G    1%    /export/home
bash-2.05#

bash-2.05# metadb
metadb: solaris3: 기존 데이터베이스 없음

bash-2.05# metadb -a -f  -c 1 /dev/dsk/c0t0d0ns3 /dev/dsk/c0t0d0s4
bash-2.05# metadb
        flags          first blk      블록 개수
    a        u        /dev/dsk/c0t0d0s3
    a        u        /dev/dsk/c0t0d0s4
bash-2.05#
bash-2.05# vi /etc/lvm/md.tab

# Logging with mirrored master device and striped logging device
#
#      d1              -t d14 d13
#      blue/d1        -t blue/d14 blue/d13
#
# RAID of devices
#
#      d15            -r /dev/dsk/c1t0d0s0 /dev/dsk/c1t1d0s0 \
#                          /dev/dsk/c1t2d0s0 /dev/dsk/c1t3d0s0
#      blue/d15        -r /dev/dsk/c2t0d0s0 /dev/dsk/c2t1d0s0 \
#                          /dev/dsk/c2t2d0s0 /dev/dsk/c2t3d0s0
#
# Hot Spare Pool of devices
#
#      hsp001          /dev/dsk/c1t0d0s0
#      blue/hsp001    /dev/dsk/c2t0d0s0
#
# 100MB Soft Partition
#
#      d1              -p /dev/dsk/c1t0d0s1 100M
#      blue/d1        -p /dev/dsk/c2t0d0s1 100M
d5 2 1 /dev/dsk/c0t0d0s3 1 /dev/dsk/c0t0d0s4
--마지막 라인 추가 하기
~
:wq!

bash-2.05# metainit d5
d5: Concat/스트립이 설정됨

bash-2.05# newfs /dev/md/rdsk/d5
newfs: 새 시스템 파일 /dev/md/rdsk/d5을(를) 구성하시겠습니까: (y/n)? y
/dev/md/rdsk/d5:        16 트랙, 63 섹터의 390 실린더에 있는 393120 섹터
        192.0MB (25 실린더 그룹) (16 c/g, 7.88MB/g, 3776 i/g)
수퍼 블록 백업 (fsck -F ufs -o b=#의 경우):
 32, 16224, 32416, 48608, 64800, 80992, 97184, 113376, 129568, 145760,
 242912, 258080, 274272, 290464, 306656, 322848, 339040, 355232, 371424,
 387616,
bash-2.05#

bash-2.05# tail /etc/lvm/md.tab
# Hot Spare Pool of devices
#
#      hsp001          /dev/dsk/c1t0d0s0
#      blue/hsp001    /dev/dsk/c2t0d0s0
#
# 100MB Soft Partition
#
#      d1              -p /dev/dsk/c1t0d0s1 100M
#      blue/d1        -p /dev/dsk/c2t0d0s1 100M
d5 2 1 /dev/dsk/c0t0d0s3 1 /dev/dsk/c0t0d0s4
bash-2.05

bash-2.05# cd /

bash-2.05# mkdir /stripe

bash-2.05# mount /dev/md/dsk/d5 /stripe/

bash-2.05# cd /stripe/

bash-2.05# ls
lost+found
bash-2.05# pwd
/stripe
bash-2.05# mkdir aaa
bash-2.05# touch bb.txt
bash-2.05# ls
aaa        bb.txt      lost+found

bash-2.05# metastat
d5: Concat/Stripe
    크기: 393120 블록(191 MB)
    스트립 0:
        장치      시작 블록    Dbase  Reloc
        c0t0d0s3      9072    예      예
    스트립 1:
        장치      시작 블록    Dbase  Reloc
        c0t0d0s4      9072    예      예

장치 재배치 정보:
장치    재배치 장치 ID
c0t0d0  예    id1,dad@AST39140A=AY425135
bash-2.05#

bash-2.05# df -h
파일시스템            크기  사용  가용  용량    설치지점
/dev/dsk/c0t0d0s0      5.8G  2.9G  2.8G    51%    /
/proc                    0K    0K    0K    0%    /proc
mnttab                  0K    0K    0K    0%    /etc/mnttab
fd                      0K    0K    0K    0%    /dev/fd
swap                  836M    40K  836M    1%    /var/run
swap                  836M  328K  836M    1%    /tmp
/dev/dsk/c0t0d0s5      94M  1.0M    84M    2%    /p5
/dev/dsk/c0t0d0s7      1.8G  1.9M  1.7G    1%    /export/home
/dev/md/dsk/d5        180M  1.0M  161M    1%    /stripe

--Raid 0 으로 구성됨 파일 100M 합 200M 구성됨.
bash-2.05#

======================================================================

--미러링 실습

bash-2.05# vi /etc/lvm/md.tab

d50 -m /dev/md/dsk/d52 /dev/md/dsk/d53

d52 1 1 /dev/dsk/c0t0d0s3
d53 1 1 /dev/dsk/c0t0d0s4

:wq!
--마지막 라인에 추가시킴

bash-2.05# metainit d52
d52: Concat/스트립이 설정됨

bash-2.05# metainit d53
d53: Concat/스트립이 설정됨

bash-2.05# metainit d50
metainit: d50: 경고: 이 형식의 metainit는 바람직하지 않음.
submirror가 동일한 데이터를 갖고 있지 않을 수 있음.
추가 정보는 metainit(1M)의 ERRORS를 참조하십시오.
d50: 이중화가 설정됨


bash-2.05# newfs /dev/md/rdsk/d50
newfs: 새 시스템 파일 /dev/md/rdsk/d50을(를) 구성하시겠습니까: (y/n)? y
/dev/md/rdsk/d50:      16 트랙, 63 섹터의 187 실린더에 있는 188496 섹터
        92.0MB (12 실린더 그룹) (16 c/g, 7.88MB/g, 3776 i/g)
수퍼 블록 백업 (fsck -F ufs -o b=#의 경우):
 32, 16224, 32416, 48608, 64800, 80992, 97184, 113376, 129568, 145760,
 161952, 178144,


bash-2.05# tail /etc/lvm/md.tab
#
#      d1              -p /dev/dsk/c1t0d0s1 100M
#      blue/d1        -p /dev/dsk/c2t0d0s1 100M
#d5 2 1 /dev/dsk/c0t0d0s3 1 /dev/dsk/c0t0d0s4

d50 -m /dev/md/dsk/d52 /dev/md/dsk/d53

d52 1 1 /dev/dsk/c0t0d0s3
d53 1 1 /dev/dsk/c0t0d0s4

bash-2.05# df -h
파일시스템            크기  사용  가용  용량    설치지점
/dev/dsk/c0t0d0s0      5.8G  2.9G  2.8G    51%    /
/proc                    0K    0K    0K    0%    /proc
mnttab                  0K    0K    0K    0%    /etc/mnttab
fd                      0K    0K    0K    0%    /dev/fd
swap                  864M    40K  864M    1%    /var/run
swap                  864M  312K  864M    1%    /tmp
/dev/dsk/c0t0d0s5      94M  1.0M    84M    2%    /p5
/dev/dsk/c0t0d0s7      1.8G  1.9M  1.7G    1%    /export/home
bash-2.05# pwd
/
bash-2.05# mkdir /mirror
bash-2.05#

bash-2.05# mount /dev/md/dsk/d50 /mirror
bash-2.05#
bash-2.05# cd mirror/
bash-2.05# mkdir ccc
bash-2.05# touch ddd.txt
bash-2.05#
bash-2.05# df -h
파일시스템            크기  사용  가용  용량    설치지점
/dev/dsk/c0t0d0s0      5.8G  2.9G  2.8G    51%    /
/proc                    0K    0K    0K    0%    /proc
mnttab                  0K    0K    0K    0%    /etc/mnttab
fd                      0K    0K    0K    0%    /dev/fd
swap                  863M    40K  863M    1%    /var/run
swap                  863M  312K  863M    1%    /tmp
/dev/dsk/c0t0d0s5      94M  1.0M    84M    2%    /p5
/dev/dsk/c0t0d0s7      1.8G  1.9M  1.7G    1%    /export/home
/dev/md/dsk/d50        86M  1.0M    77M    2%    /mirror

-- 마지막 라인 확인 미러로 구성시 2개의 용량을 반만 사용됨을 알수 있다.

bash-2.05# metastat
d50: 이중화
    서브미러 0: d52
      상태: 확인       
    서브미러 1: d53
      상태: 확인       
    전달: 1
    읽기 옵션: roundrobin (기본값)
    쓰기 옵션: parallel (기본값)
    크기: 188496 블록(92 MB)

d52: d50의 Submirror
    상태: 확인       
    크기: 188496 블록(92 MB)
    스트립 0:
        장치      시작 블록    Dbase        상태 Reloc 핫 스패어
        c0t0d0s3      17136    예            확인    예


d53: d50의 Submirror
    상태: 확인       
    크기: 188496 블록(92 MB)
    스트립 0:
        장치      시작 블록    Dbase        상태 Reloc 핫 스패어
        c0t0d0s4      17136    예            확인    예


장치 재배치 정보:
장치    재배치 장치 ID
c0t0d0  예    id1,dad@AST39140A=AY425135
bash-2.05#


========================================================================

 --기존  Meta 정보 삭제
 -- Raid 삭제
 
#metastat
#df -h
#umount /mirror
--unmount 하기 전에 기존 마운트 해제 시킴
bash-2.05# umount /mirror

bash-2.05# metaclear d52
d5: Concat/스트립이 지워짐
bash-2.05# metaclear d53
d5: Concat/스트립이 지워짐
bash-2.05# metaclear d50
d5: Concat/스트립이 지워짐
bash-2.05#

  --강제 삭제시  metaclear -f 옵션을 주고 강제 삭제 시킴

bash-2.05# metadb -d /dev/dsk/c0t0d0s3
bash-2.05# metadb -d /dev/dsk/c0t0d0s4
metadb: solaris3: 최소 1개의 데이터베이스를 갖고 있어야 함(-f 무시)

bash-2.05# metadb -df /dev/dsk/c0t0d0s4
bash-2.05# metadb
bash-2.05# metastat

d50: 이중화
    서브미러 0: d52
      상태: 확인       
    서브미러 1: d53
      상태: 확인       
    전달: 1
    읽기 옵션: roundrobin (기본값)
    쓰기 옵션: parallel (기본값)
    크기: 196560 블록(95 MB)

d52: d50의 Submirror
    상태: 확인       
    크기: 196560 블록(95 MB)
    스트립 0:
        장치      시작 블록    Dbase        상태 Reloc 핫 스패어
        c0t0d0s3      9072    아니          확인    예


d53: d50의 Submirror
    상태: 확인       
    크기: 196560 블록(95 MB)
    스트립 0:
        장치      시작 블록    Dbase        상태 Reloc 핫 스패어
        c0t0d0s4      9072    아니          확인    예


장치 재배치 정보:
장치    재배치 장치 ID
c0t0d0  예    id1,dad@AST39140A=AY425135
bash-2.05#
Posted by 1010
60.Unix2008. 12. 17. 13:27
반응형
----------------------------------------------------------------------------
                        시스템 디스크 교체 후 E3500 부팅 절차
----------------------------------------------------------------------------
시스템 디스크 교체 후 E3500 부팅

개요: 시스템 디스크 교체 후 E3500 부팅
상세 설명:

E3500의 내부 부트 디스크 교체 지침(광채널 디스크)
이 지침은 A5000으로도 알려진 SENA(Solstice Enterprise Network Array)의 부트 디스크에도 적용됩니다.
그러나 SEVM 또는 SDS에 의해 미러링된 부트 디스크에는 적용되지 않습니다
(Solstice Enterprise Volume Manager 또는 Solstice Disk Suite).
Ultra Enterprise 3500의 내부 부트 디스크에 문제가 발생하여 다른 드라이브로 교체했습니다.
새 드라이브는 newfs가 수행되었으며 원본 디스크의 덤프 테이프로부터 복원되었습니다.
새 디스크의 월드 와이드 번호(WWN)를 반영하기 위해 Open Boot Prom의 부트 디바이스 변수를 변경했습니다.

STOP + A

boot cdrom -sw

일반적인 절차에 따라 새 디스크에 적합한 디스크 파티션과 파일 시스템을 생성하고 백업 덤프를 복원합니다.
그런 다음, 아래와 같은 명령을 수행합니다.
이제, 새 디스크로 시스템을 부팅할 수 있도록 교체 디스크의 WWN이 적절한 경로에 생성됩니다.


기존 생성된 디바이스 정보를 삭제한다.

/a/devices/.... <-- 파일 삭제
/a/dev/....  <-- 파일 삭제

drvconfig -r /a/devices -p /a/etc/path_to_inst
disks -r /a
devlinks -r /a

버그 ID 4161768로 인해 다음과 같은 두 명령이 필요합니다.
cd /devices
find . -print | cpio -pduvm /a/devices

(cdrom의 /device 트리를 마운트된 파일시스템으로 복사)
마지막으로, 부트 디스크를 설치합니다.

installboot /usr/platform/`uname -i`/lib/fs/ufs/bootblk /dev/rdsk/cXtXdXsX

#installboot /usr/platform/sun4u/lib/fs/ufs/bootblk /dev/rdsk/cXtXdXs0
# ls -l /dev/rdsk/cXtXdXsX

lrwxrwxrwx 1 root root 50 Aug 1 10:48 /dev/rdsk/cXtXdXsX -> ../../devices/pci@1f,0/pci@1,1/ide@3/dad@1,0:a,raw

여기서 주의 : 윗라인의 pci@1f,0/pci@1,1/ide@3/dad@1,0:a,raw 부분을 꼭 기억 하세요.

--부팅 디스크 앨리어스 지정하기
STOP + A (prom mode)

OK prompt

ok nvalias mirror /pci@1f,0/pci@1,1/ide@3/dad@1,0:a,raw ; --앨리어스 지정함.

ok boot mirror --새로구성된 디스크로 부팅함.


--A5000으로 구성된 경우
마운트된 파일시스템을 해제합니다.모든 파일시스템에 최종 fsck 검사를 수행합니다.
luxadm 명령을 사용하여 부트 디바이스를 생성합니다.
luxadm -v set_boot_dev -y /dev/dsk/cXtXdXs0
시스템이 정지되고 부팅이 제대로 수행되어야 합니다.


----------------------------------------------------------------------------
              기존 디스크 / 에서 새 디스크 / dd copy
----------------------------------------------------------------------------
boot_disk 만들기

1)root 장치 확인
#df -k /

2)디스크 정보 확인
#format  --파일 크기가 동일해야 한다.
0.c1t0d0  <-- 원본
1.c1t1d0  <-- 백업
--원본디스크 와 백업디스크 확인하기

3)백업 디스크 확인
#fdisk /dev/rdsk/c1t1d0p0

y <-- 선택

#dd if=/dev/rdsk/c1t0d0p0 of=/dev/rdsk/c1t1d0p0 bs=8192k


4)백업 디스크에 boot 환경 설정

어떤 디스크로 booting 하는지 부팅패스 확인
#eeprom | grep bootpath
bootpath=/pci@1,0/pci1014,8f@3/sd@0,0:a

두번째 디스크 물리 장치명 확인
#ls -l /dev/rdsk/c1t1d0s0
--경로명확인


5)모든 파일 시스템 체크함

#fsck -y /dev/rdsk/c1t1d0s0
#fsck -y /dev/rdsk/c1t1d0sX --기존 파일시스템 모두 체크함


6)두번째 디스크를 root를 마운트 한다.

#mount /dev/dsk/c1t1d0s0 /mnt

7)boot path 설정

#vi /mnt/boot/solaris/bootenv.rc
--기존 셋팅
setprop bootpath=/pci@1,0/pci1014,8f@3/sd@0,0:a
--변경 셋팅
setprop bootpath=/pci@1,0/pci1014,8f@3/sd@1,0:a

8)자동 마운트 포이트 수정
#vi /mnt/etc/vfstab
--기존 마운트 포인터 수정함

--------------------------------------------------------------------------
                      슬라이스  dd로 copy test
--------------------------------------------------------------------------
# format
Searching for disks...done


AVAILABLE DISK SELECTIONS:
      0. c1t0d0 <DEFAULT cyl 1302 alt 2 hd 255 sec 63>
          /pci@0,0/pci1000,30@10/sd@0,0
      1. c1t1d0 <DEFAULT cyl 1788 alt 2 hd 128 sec 32>
          /pci@0,0/pci1000,30@10/sd@1,0
      2. c1t2d0 <DEFAULT cyl 1020 alt 2 hd 64 sec 32>
          /pci@0,0/pci1000,30@10/sd@2,0
      3. c1t3d0 <DEFAULT cyl 1020 alt 2 hd 64 sec 32>
          /pci@0,0/pci1000,30@10/sd@3,0
      4. c1t4d0 <DEFAULT cyl 1020 alt 2 hd 64 sec 32>
          /pci@0,0/pci1000,30@10/sd@4,0
      5. c1t5d0 <DEFAULT cyl 1020 alt 2 hd 64 sec 32>
          /pci@0,0/pci1000,30@10/sd@5,0
      6. c2t0d0 <DEFAULT cyl 1020 alt 2 hd 64 sec 32>
          /pci@0,0/pci1000,30@11/sd@0,0
      7. c2t1d0 <DEFAULT cyl 1020 alt 2 hd 64 sec 32>
          /pci@0,0/pci1000,30@11/sd@1,0
Specify disk (enter its number): 2
selecting c1t2d0
[disk formatted]


FORMAT MENU:
        disk      - select a disk
        type      - select (define) a disk type
        partition  - select (define) a partition table
        current    - describe the current disk
        format    - format and analyze the disk
        fdisk      - run the fdisk program
        repair    - repair a defective sector
        label      - write label to the disk
        analyze    - surface analysis
        defect    - defect list management
        backup    - search for backup labels
        verify    - read and display labels
        save      - save new disk/partition definitions
        inquiry    - show vendor, product and revision
        volname    - set 8-character volume name
        !<cmd>    - execute <cmd>, then return
        quit
format> p


PARTITION MENU:
        0      - change `0' partition
        1      - change `1' partition
        2      - change `2' partition
        3      - change `3' partition
        4      - change `4' partition
        5      - change `5' partition
        6      - change `6' partition
        7      - change `7' partition
        select - select a predefined table
        modify - modify a predefined partition table
        name  - name the current table
        print  - display the current table
        label  - write partition map and label to the disk
        !<cmd> - execute <cmd>, then return
        quit
partition> p
Current partition table (original):
Total disk cylinders available: 1020 + 2 (reserved cylinders)

Part      Tag    Flag    Cylinders        Size            Blocks
  0 unassigned    wm      0              0        (0/0/0)          0
  1 unassigned    wm      0              0        (0/0/0)          0
  2    backup    wu      0 - 1019    1020.00MB    (1020/0/0) 2088960
  3 unassigned    wm      0              0        (0/0/0)          0
  4 unassigned    wm      0              0        (0/0/0)          0
  5 unassigned    wm      0              0        (0/0/0)          0
  6 unassigned    wm      0              0        (0/0/0)          0
  7 unassigned    wm      0              0        (0/0/0)          0
  8      boot    wu      0 -    0        1.00MB    (1/0/0)      2048
  9 unassigned    wm      0              0        (0/0/0)          0

partition> 0
Part      Tag    Flag    Cylinders        Size            Blocks
  0 unassigned    wm      0              0        (0/0/0)          0

Enter partition id tag[unassigned]:
Enter partition permission flags[wm]:
Enter new starting cyl[0]:
Enter partition size[0b, 0c, 0e, 0.00mb, 0.00gb]: $
partition>
partition>
partition> p
Current partition table (unnamed):
Total disk cylinders available: 1020 + 2 (reserved cylinders)

Part      Tag    Flag    Cylinders        Size            Blocks
  0 unassigned    wm      0 - 1019    1020.00MB    (1020/0/0) 2088960
  1 unassigned    wm      0              0        (0/0/0)          0
  2    backup    wu      0 - 1019    1020.00MB    (1020/0/0) 2088960
  3 unassigned    wm      0              0        (0/0/0)          0
  4 unassigned    wm      0              0        (0/0/0)          0
  5 unassigned    wm      0              0        (0/0/0)          0
  6 unassigned    wm      0              0        (0/0/0)          0
  7 unassigned    wm      0              0        (0/0/0)          0
  8      boot    wu      0 -    0        1.00MB    (1/0/0)      2048
  9 unassigned    wm      0              0        (0/0/0)          0

partition> q

# prtvtoc /dev/rdsk/c1t2d0s2 | fmthard -s - /dev/rdsk/c1t3d0s2
fmthard:  New volume table of contents now in place.
#
#
#
# newfs /dev/rdsk/c1t2d0s0
newfs: construct a new file system /dev/rdsk/c1t2d0s0: (y/n)? y
/dev/rdsk/c1t2d0s0:    2088960 sectors in 1020 cylinders of 64 tracks, 32 sectors
        1020.0MB in 64 cyl groups (16 c/g, 16.00MB/g, 7680 i/g)
super-block backups (for fsck -F ufs -o b=#) at:
 32, 32832, 65632, 98432, 131232, 164032, 196832, 229632, 262432, 295232,
 1771232, 1804032, 1836832, 1869632, 1902432, 1935232, 1968032, 2000832,
 2033632, 2066432,
#
#
# newfs /dev/rdsk/c1t3d0s0
newfs: construct a new file system /dev/rdsk/c1t3d0s0: (y/n)? y
/dev/rdsk/c1t3d0s0:    2088960 sectors in 1020 cylinders of 64 tracks, 32 sectors
        1020.0MB in 64 cyl groups (16 c/g, 16.00MB/g, 7680 i/g)
super-block backups (for fsck -F ufs -o b=#) at:
 32, 32832, 65632, 98432, 131232, 164032, 196832, 229632, 262432, 295232,
 1771232, 1804032, 1836832, 1869632, 1902432, 1935232, 1968032, 2000832,
 2033632, 2066432,
#
#
#

#
# mkdir backup1
# mkdir backup2
#
#
# mount /dev/dsk/c1t2d0s0 /backup1
# mount /dev/dsk/c1t3d0s0 /backup2
#
#
# df -k 
Filesystem            kbytes    used  avail capacity  Mounted on
/dev/dsk/c1t0d0s0    9524711 1348982 8080482    15%    /
/proc                      0      0      0    0%    /proc
mnttab                    0      0      0    0%    /etc/mnttab
fd                        0      0      0    0%    /dev/fd
swap                  316836      20  316816    1%    /var/run
swap                  317116    300  316816    1%    /tmp
/dev/dsk/c1t0d0s7    483151    1048  433788    1%    /export/home
/dev/dsk/c1t2d0s0    981999    1041  922039    1%    /backup1
/dev/dsk/c1t3d0s0    981999    1041  922039    1%    /backup2
# cd /backup1
# pwd   
/backup1
# mkdir folder
#
# mkfile 100m ddfiletest
#
# dd if=/dev/rdsk/c1t2d0s0 of=/dev/rdsk/c1t3d0s0 bs=8192k
127+1 records in
127+1 records out
#
# fsck -y /dev/rdsk/c1t3d0s0

FILE SYSTEM IS CURRENTLY MOUNTED.  CONTINUE?  yes

** /dev/rdsk/c1t3d0s0
** Currently Mounted on /backup2
** Phase 1 - Check Blocks and Sizes
** Phase 2 - Check Pathnames
** Phase 3 - Check Connectivity
** Phase 4 - Check Reference Counts
** Phase 5 - Check Cyl groups
FREE BLK COUNT(S) WRONG IN SUPERBLK
SALVAGE?  yes

4 files, 102474 used, 980957 free (13 frags, 122618 blocks, 0.0% fragmentation)

***** FILE SYSTEM WAS MODIFIED *****

# cd /backup2
# ls -l
total 204946
-rw------T  1 root    other    104857600 Mar  3 17:32 ddfiletest
drwxr-xr-x  2 root    other        512 Mar  3 17:28 folder
drwx------  2 root    root        8192 Mar  3 16:44 lost+found
# pwd
/backup2
#

--dd copy 됨


----------------------------------------------------------------------------
                        테이프 명령어
----------------------------------------------------------------------------

테이프 명령어
명령:mt - 자기 테이프 용도:테이프 상태 확인, 되감기, 지우기 등 경로:/usr/bin/mt

구문:mt [ -f 테이프 장치 이름 ] 명령 [ 반복 횟수] 여기서 테이프 장치 이름은 보통
   /dev/rmt/0입니다.

   명령은 다음과 같습니다.

   status  -테이프 드라이브의 상태 정보를 표시합니다
   rewind  -테이프를 되감습니다.
   retension  -테이프를 팽팽한 상태로 만듭니다.
   erase  -테이프 전체를 지웁니다.
   fsf   -지정된 반복 횟수만큼 파일을 앞으로 건너뜁니다.
   bsf   -지정된 반복 횟수 만큼 파일을 뒤로 건너뜁니다.
   eom   -기록된 미디어의 끝부분으로 건너 뜁니다.

   반복 횟수는 요청된 작업을 수행하는 횟수를 말합니다.
   기본적으로 mt는 명령을 한 번 수행합니다.
   하나의 명령을 두 번 이상 반복하려면 반복 횟수를 지정하면 됩니다.

   예:mt -f /dev/rmt/0 status ---> 테이프의 상태를 표시합니다.
   mt -f /dev/rmt/0 rewind ---> 테이프를 되감습니다.
   mt -f /dev/rmt/0n fsf 2 ---> 첫 번째 두 개의 파일을 건너뜁니다.
   mt -f /dev/rmt/0n bsf 2 ---> 두 개의 파일만큼 뒤로 건너뜁니다.

명령: tar - 테이프 아카이브
용도: 테이프 아카이브를 만들거나 복원합니다.
    디렉토리 구조를 유지하면서 하나 또는 여러 개의 파일을 백업하는데 사용합니다.
경로: /usr/bin/tar
구문: tar [옵션] [장치 이름] [파일 이름]

   옵션은 다음과 같습니다.
   c    tar 파일을 새로 만듭니다.
   r    기존 tar 파일을 대체합니다.
   t    테이프 아카이브의 목차를 표시합니다.
   u    업데이트합니다.
       업데이트할 파일이 tar 파일에 없거나 마지막으로 tar 파일을 쓴 후
       수정된 경우에는 tar 파일의 끝에 씁니다. 업데이트 수행은 다소
       느릴 수 있습니다. 5.x 시스템에서 만든 tar 파일은 4.x 시스템에서
       업데이트할 수 없습니다.
   x    추출하거나 복원합니다.
      추출하거나 복원할 파일은 tar 파일에서 추출하고 현재 디렉토리에서
      tar 파일에 지정된 디렉토리에 씁니다. 추출할 파일 및 디렉토리에
      대해 상대 경로 이름을 사용하십시오.
   v    자세한 정보를 표시합니다.
      기능 문자 다음에 각 파일의 이름을 출력합니다.

여기서 장치 이름은 대개 /dev/rmt/0입니다. 또는 파일 이름일 수도 있습니다. 파일
이름은 아카이브로 만들 파일 이름입니다.

예:
tar cvf /dev/rmt/0 /export/home/user1 --> /dev/rmt/0 테이프에 /export/home/user1의
테이프 아카이브를 만듭니다.
tar tvf /dev/rmt/0 ---> /dev/rmt/0의 목차를 표시합니다.
tar xvf /dev/rmt/0 ---> /dev/rmt/0에서 데이터를 복원합니다.

참고: 위의 명령에서 /dev/rmt/0 대신 /dev/rmt/0n을 사용할 수 있습니다.
/dev/rmt/0n을 사용하면 백업 수행 후 테이프를 되감지 않습니다.
명령: ufsdump
용도: 파일 시스템, 파일 또는 디렉토리를 백업하는데 사용합니다.
   전체 백업이나 증분 백업을 수행할 수 있습니다.
경로: /usr/sbin/ufsdump
구문: ufsdump [옵션] [장치 이름] [덤프할 파일]

옵션은 다음과 같습니다.

0 ~ 9 덤프 레벨 옵션을 지정합니다.
    레벨 0은 가장 낮은 수준으로 전체 백업을 수행합니다. 레벨 1 ~ 9는 증분
    백업을 수행합니다.
u   현재 백업의 날짜와 덤프 레벨을 /etc/dumpdates 덤프 기록에 업데이트합니다.
f   파일이 쓰여질 장치를 지정합니다.이 옵션은 장치 이름이 필요합니다.
v   테이프에 있는 데이터를 파일 시스템에 있는 데이터와 비교하고 검사합니다.

여기서 장치 이름은 /dev/rmt/0입니다.
덤프할 파일은 초기 파일 시스템 /dev/rdsk/c0t2d0s0이나 블록 파일 시스템
/dev/dsk/c0t2d0s0입니다. 또한 /export/home과 같이 파일 시스템 이름이나
/export/home/user1과 같이 파일 이름 또는 디렉토리 이름을 사용할 수도 있습니다.

예:
ufsdump 0uf /dev/rmt/0 /export/home ---> /export/home 파일 시스템을 /dev/rmt/0
으로 덤프하고 전체 백업을 수행합니다.

ufsdump 1uf /dev/rmt/0 /dev/dsk/c0t2d0s4 --> /dev/dsk/c0t2d0s4 파일 시스템을
/dev/rmt/0로 덤프합니다. 이 명령은 레벨 1의 증분 백업을 수행합니다.

ufsdump 4uf dbserver:/dev/rmt/0 /export/home/user1 --> /export/home/user1에 대한
레벨 4의 증분 백업을 Remote Box dbserver에 마운트된 dev/rmt/0 테이프 장치에 덤프
합니다.   여기서 테이프 장치는 로컬 시스템이 아니라원격 시스템인 dbserver에 있는
장치입니다.

명령: ufsrestore
용도: ufsdump 명령으로 만들어진 백업본에서 파일을 복구하거나 추출하는데 사용합니다.
경로: /usr/sbin/ufsrestore
구문: ufsrestore [옵션] [장치 이름] [복원할 파일]

옵션은 다음과 같습니다.
i    대화형 모드로 파일을 복원합니다.
r    백업 전체를 복원합니다.
t    백업의 목차를 표시합니다.
x    명령행에서 지정한 파일을 복원합니다.
f    /dev/rmt/0과 같이 장치 이름을 지정합니다.
v    파일을 복원하고 있는 경로 이름을 표시합니다(세부 정보 표시 모드).

참고: 이 옵션은 ufsdump 명령에서 사용하는 v(verify) 옵션과 다릅니다.

예:
ufsrestore xvf /dev/rmt/0 ./etc/hosts ---> /etc/hosts 파일을 현재 디렉토리로
                   복원합니다.   
ufsrestore ivf /dev/rmt/0 ---> 복원될 파일을 선택합니다.
ufsrestore rvf /dev/rmt/0 ./opt ---> /opt 파일 시스템을 현재 디렉토리로 복원합니다.
ufsrestore tvf /dev/rmt/0 ---> /dev/rmt/0의 목차를 표시합니다.


----------------------------------------------------------------------------
                        ufsdump & ufsrestore & tape 응용편
----------------------------------------------------------------------------
#sync;sync;sync;
#shutdown -i0 -y -g0

stop + A
ok setenv auto-boot? false

ok boot cdrom -sw

#ufsdump 0uf /dev/rmt/0 /dev//rdsk/c0t0d0s0
--백업 완료후..
#poweroff (파워를 내리고 디스크 교체)

또는 새 디스크 교체후

ok boot probe-scsi  -scsi disk 정보 인식시킴 (prom mode)
ok boot probe-ide  -ide disk 정보인식시킴
format  --디스크 인식여부 확인후 작업
ok reset  (or)
ok reset-all


운영중에 인식시키기
#drvconfig;disks;devlinks;
#devfsadm;


#shutdown -i5 -y -g0
ok setenv auto-boot? true

ok boot cdrom -sw

#format

#newfs /dev/rdsk/c0t0d0s0

--(y/n)?  y

#fsck -y /dev/rdsk/c0t0d0s0
--파일 시스템 이상여부 체크함


#mount /dev/dsk/c0t0d0s0 /a

#cd /a

#ufsrestore rvf /dev/rmt/0

--복원시킴


#rm restoresymtable

#installboot /usr/platform/'uname -m'/lib/fs/ufs/bootblk /dev/rdsk/c0t0d0s0

#cd /

#umount /a

#shutdown -g0 -y -i6

--shutdown command
종료 shutdown -y -i0 -g0
-y (yes or no)
-i (default run level S를 다른 레벨로 지정가능함)
-g (default 60초 -g0 바로 셧다운)
리붓 shutdown -y -i6 -g0


----------------------------------------------------------------------------
                백업 4가지 방법 간단히 마무리 정리
----------------------------------------------------------------------------

1. tar
2. cpio
3. dd
4. ufsdump/ufsrestore

1. tar

tar를 화일 또는 디렉토리 전체를 백업 받는데 사용된다.

1.1 화일 시스템에서 테이프로 백업 받기

# tar cvf /dev/rmt/0 .

1.2 테이프에서 화일 시스템로 백업 받기

# tar xvf /dev/rmt/0

1.3 테이프 내용 보기

# tar tvf /dev/rmt/0


2. cpio

2.1 화일 시스템에서 테이프로 백업 받기

# find . -print | cpio -ocvB -O /dev/rmt/0

2.2 테이프에서 화일 시스템로 백업 받기

# cpio -icvBmd -I /dev/rmt/0

2.3 테이프 내용 보기

# cpio -ict -I /dev/rmt/0


3. dd

3.1 화일을 테이프로 백업 받기

# dd if=file1 of=/dev/rmt/0 bs=4096k

3.2 테이프에서 화일로 백업 받기

# dd if=/dev/rmt/0 of=file1 bs=4096k


4. ufsdump/ufsrestore

4.1 화일시스템에서 테이프로 백업 받기

# ufsdump 0cuf /dev/rmt/0 /

4.2 테이프에서 화일 시스템으로 백업 받기

# ufsrestore rvf /dev/rmt/0

4.3 테이프 내용 보기

# ufsrestore tvf /dev/rmt/0

4.4 Interactive restore

# ufsrestore ivf /dev/rmt/0
[이 게시물은 아쿠아님에 의해 2007-05-05 21:24:07 시스템자료실에서 이동 됨]
Posted by 1010
60.Unix2008. 12. 17. 12:50
반응형

#3 잘못 종료 되었을 때

가끔 하다보면 리부팅 시켰을 때
Type control-d to proceed with normal startup,
(or give root password for system maintenance):
이런 메세지가 뜰 때가 있다
이럴 때 당황하게 되는데 처음 화면 떳을때 처럼 복구 시키자

우선 리눅스와 솔라리스의 차이점
linux                                                        solaris

/bin             기본 관리 네트웍 배제               /bin  /usr/bin의심볼릭링크원시
/sbin                                                        /sbin 복구모드에 필요한 명령어들

/usr/bin/    (네트웍 포함한 클라이언트 서버     /usr/bin 일반적인명령어들..
/usr/sbin/ rpm     소스 형식의 컴파일)           /usr/sbin /bin의 파일들의 바로가기(?)

/usr/local/bin       일반적인 명령어                 x
/usr/local/sbin     일반적인 명령어                 x


Type control-d to proceed with normal startup,
(or give root password for system maintenance):

저 메세지가 떳을 때 패스워드를 치면 #프롬프트 상태에 있게 되는데
그곳에서 cd /sbin을 친다 들어가는 이유는 그곳에 있는 명령어를 쓰기 위해..
그리고 fsck란 명령어를 친다( 그리고 계속 물어보는 게 나오는데 그건 고치겠느냐를
물어보는것으로써 전부 y를 치자(안치면 ㅡ.ㅡ안고처줌,,)
그럼 다시 #가 뜨게 되는데 exit를 누르면 화면으로 복구.

다음은 복구 모드에서 파일을 고치거나 하는 방법을 설명..

우선 솔라리스 부팅하다보면 회색바탕화면에
type  b[fine-name][boot-flags] <enter>
or  i<enter>
or <enter>
화면이 나오는데 거기서 b라고 치면 복구모드로 들어가게 된다
b -b라고 치면 완전 복구 모드라고 해서 read-only상태로 들어가게 되고
b -s라고 치면 write-read상태로 들어가게 된다

우선 b -b상태로 들어가게 되면 아까처럼 패스워드 치는 화면이 나오는데 치고나면
프롬프트가 나오는데 거기서
#cd /sbin을친다  <여기에 마운트 명령과 복구 명령들이 있는데 이걸 가능하게 쓰게
하기 위해서..쿨럭..;
#./mount -o remount / 를 치는데 이게 안될수도 있다..
그럼 ./mount -o remount /dev/dsk/c0d0s0를 처주자 위에 것이 안되는 이유는
확실한 경로를 안집어줬기 때문이 아닐까 싶다 ㅡ,.ㅡ(이것때문에 하루를 날려따 ㅠㅠ)
이말뜻은 sbin을 옵션을 변경시켜read-only 상태에서
write-read 상태로 변화시켜 sbin의 명령어를 쓸수 있게 만드는 그런 장치인거 같다
#./mount /usr<--이건 ls을 사용시키기 위한 마운트
fsck <--파일시스템 체크
이상태에서 내가 vi 파일을 잘못 건들였거나 아니면 환경파일등을 잘못 건들여서
부팅이 정상적으로 안될때 하는 방법이다
지금 처음부터 시도 했다면 전부 이제 마운트가 걸렸기 때문에 이제 이상태에서
vi 처주고 고칠 파일 치면 가능하다 만약에 안된다면
앞의 과정에서 fsck대신 vi 고칠파일명으로 써주면 된다

----------------------------------------------------------------------------------------------

이부분은 대충 이런 식으로 이해했는데 맞는건지좀 알려주세요..;;

제가 이해하는데 왠지 핀치가 어긋난다는 느낌을 지울수가 없네요..

뭐 추가 되거나 아니면 수정될 부분있으면 알려주세요 부탁드립니다~~

Posted by 1010
60.Unix2008. 12. 17. 12:32
반응형

윈디하나의 솔라나라: ProFTPD

최종 갱신일: 2008-04-07, 이 문서는 윈디하나의 솔라나라, http://www.solanara.net/에서 최근에 갱신된 문서를 찾을 수 있다.

들어가기 전에

  • ProFTPD는 보안에 중심을 둔 FTP서버이다. 패치도 자주 되는데, http://www.proftpd.org를 모니터링 해 최신 버전이 나오면 패치해 준다. rc버전이라도 서비스에 문제 없다면 업데이트 해 주는 것이 좋다.
  • ProFTPD Korean User Group에서 한글 자료를 구할 수 있다.

1. 설치 전에

ftpwho, ftptop, ftpshut를 쉽게 사용하기 위해 PATH를 걸어준다.
root@wl # vi /etc/profile
# for ProFTPD located at /usr/local/proftpd
if [ -x /usr/local/proftpd/bin/ftpwho ]
then
  PATH=/usr/local/proftpd/bin:$PATH; export PATH;
fi
root@wl #

2. ProFTPD 설치

  1. TCPWrappers
    ProFTPD 1.2.9버전까지만 해도 솔라리스 9에 기본 설치되어있는 TCPWrappers를 이용해 설치할 수 있었지만, 1.2.10에 와서는 설치가 되지 않는다. 최신 버전의 TCPWrappers를 설치한다. sunfreeware.com의 tcp_wrappers-7.6-sol9-intel-local.gz 를 받아 설치한다.
    root@wl ~ # wget ftp://ftp.sunfreeware.com/pub/freeware/intel/9/tcp_wrappers-7.6-sol9-intel-local.gz
    root@wl ~ # gunzip tcp_wrappers-7.6-sol9-intel-local.gz
    root@wl ~ # pkgadd -d tcp_wrappers-7.6-sol9-intel-local
    
  2. OpenSSL의 설치는 openssl.html을 참고한다.
  3. ProFTPD
    root@wl ~ # gtar xvfz cd proftpd-1.3.1.tar.gz
    root@wl ~ # cd proftpd-1.3.1
    root@wl ~/proftpd-1.3.1 # ./configure \
    --with-includes=/usr/sfw/include:/usr/include:/usr/local/include:/usr/local/ssl/include:/usr/local/mysql/include/mysql:/usr/local/mysql/include/mysql \
    --prefix=/usr/local/proftpd \
    --enable-sendfile \
    --enable-shadow \
    --with-modules=mod_wrap:mod_tls:mod_sql:mod_sql_mysql 1)
    root@wl ~/proftpd-1.3.1 # make
    root@wl ~/proftpd-1.3.1 # make install
    
    1) 모듈설명
    mod_wrap: IP주소를 기준으로 사용자들의 접근 제어가 가능하도록 해주는 모듈. 필요없으면 이 부분을 삭제한다.
    mod_tls: ftps를 사용할 수 있도록 하는 모듈. 필요없으면 이 부분을 삭제한다.
    mod_sql: 데이터베이스를 이용해 인증해주는 모듈. 필요없으면 이 부분을 삭제한다.
    mod_sql_mysql: mod_sql의 데이터베이스로 MySQL을 사용할 수 있도록 하는 모듈. 필요없으면 이 부분을 삭제한다.
    ':'은 각각의 명령을 구분하는 구분자이다.
    오류가 나면 --with-include 라인과, --with-modules 라인을 삭제한다.

3. 설치후 기본 설정

ProFTPD는 inetd를 이용해 띄울수 있지만 여기서는 StandAlone으로 띄우는 방법에 대해 설명한다.
root@wl ~ # vi /etc/inetd.conf
#ftp ~~~
root@wl ~ # ps -ef | grep inetd
  root   150     1  0  10월 22 ?        0:00 /usr/sbin/inetd -s
root@wl ~ # kill -HUP 150
root@wl ~ # vi /usr/local/proftpd/etc/proftpd.conf
DefaultRoot ~ # 언 코멘트
root@wl ~ # /usr/local/proftpd/sbin/proftpd # 실행
root@wl ~ # pkill proftpd # 종료

4. 설정하기

root@wl ~ # vi /usr/local/proftpd/etc/proftpd.conf
# 이 내용을 복사해서 사용할 때 # 뒷 부분은 삭제해야 한다.
AllowstoreRestart on      # Upload Resume 허용. 대부분의 서버는 off로 되어있다. 익숙한 ftp사용자가 아니면 off로 해 놓는것이 좋다.
RequireValidShell off     # 익명연결 허용
ShowSymlinks      on      # 심볼릭 링크 보임
DefaultRoot       ~       # 기본 루트 설정
ServerIdent       on      "FTP server" # 서버 정보 보임
DisplayConnect    /etc/proftp.connect.msg # 로그인 이전 메시지
DisplayLogin      /etc/proftp.login.msg   # 로그인 이후 메시지
MaxClients        100	"Sorry, the maximum number(%m) of allowed users are already connected" # 최대 클라이언트 수
MaxClientsPerHost 5	"Sorry, the maximum number clients (%m) from your host are already connected" # 호스트당 최대 클라이언트 수
HideUser          root    # 사용자 숨김
HideGroup         root    # 그룹 숨김
AuthPAM           On      # PAM 인증
AuthPAMConfig     ftp     # PAM 설정
TCPAccessFiles /etc/hosts.allow /etc/hosts.deny # TCPWrapper
<Directory /export/home/*>
  AllowstoreRestart on # Upload Resume을 가능하게 한다.
</Directory>

<IfModule mod_tls.c>
  TLSEngine on
  TLSLog TLSLog  /var/log/ftps.log
  TLSProtocol TLSv1

  # Are clients required to use FTP over TLS when talking to this server?
  TLSRequired off

  # Server's certificate
  TLSRSACertificateFile /usr/local/ssl/certs/signed-req.pem
  TLSRSACertificateKeyFile /usr/local/ssl/certs/req.key

  # CA the server trusts
  TLSCACertificateFile /usr/local/ssl/certs/ca.crt

  # Authenticate clients that want to use FTP over TLS?
  TLSVerifyClient off
</IfModule>
root@wl ~ # vi /etc/pam.conf
ftp auth required /usr/lib/security/pam_unix.so
ftp account required /usr/lib/security/pam_unix.so
※ 파일 전송을 위한 암호화된 프로토콜에는 FTPS, SFTP가 있다. 이중 쉽게 사용할 수 있는 것은 SFTP로 SSH를 설치하면 자동 설치되며, Solaris 9 x86 9/04에 전체 설치를 선택했다면 이미 설치되어있다. 그러나 이는 FTP의 기능중 몇가지, 예를 들면 이어받기나 이어 보내기를 지원하지 않아 불편하다. 그래서 ProFTPD에 SSL을 이용해 FTPS를 사용하는것이며 proftpd는 mod_tls.c를 통해 구현된다.
※ CuteFTP Pro로 FTP with TLS/SSL (AUTH TLS - Explicit)과 FTP with SSL (AUTH SSL - Explicit) 프로토콜을 테스트했으며 모두 정상적으로 되었다.

5. Anonymous FTP 설정

익명 FTP는 사용자인증 과정 없이 사용할 수 있는 FTP서비스를 말한다. 서비스를 비 정상적으로 사용하는 사용자가 많기 때문에 주기적인 트래픽 모니터링은 필수다.
# 익명 FTP에 사용할 계정을 만든다. Anonymous FTP를 이 사용자의 권한으로 실행될 것이다.
root@wl ~ # /usr/sbin/groupadd -g 103 ftp
root@wl ~ # useradd -d /export/home/ftp -g ftp -u 104 -s /bin/false ftp
root@wl ~ # mkdir /export/home/ftp # Anonymous FTP의 홈 디렉토리. 소유자와 그룹 모두 root, staff로 놔둔다.
root@wl ~ # vi /usr/local/proftpd/etc/proftpd.conf # 설정은 모두 되어있다. 한번 보자.
root@wl ~ # pkill proftpd
root@wl ~ # /usr/local/proftpd/sbin/proftpd # ProFTPD는 재시작하는 것이 없다.
익명 사용자도 업로드 할 수 있도록 incomming 디렉토리 만들어 보자. 장담하지만, 특별한 접근 제한이 없다면 일주일 이내에 WAREZ에 의해 장악된다. TCPWrapper등을 이용해 접근제한을 하지 않는다면, 실제 서비스에서는 하지 않는 것이 좋다.
root@wl ~ # mkdir /export/home/ftp/incomming
root@wl ~ # chmod 777 /export/home/ftp/incomming
root@wl ~ # vi /usr/local/proftpd/etc/proftpd.conf
# 다음을 추가한다.
<Anonymous ~ftp>
  ...
  # <Anonymous ~ftp>와 </Anonymous> 사이에 아래를 추가한다.
  <Directory incoming>
  AllowOverwrite                on
  AllowStoreRestart             on
    <Limit STOR MKD>
      AllowALL
    </Limit>
  </Directory>
</Anonymous>
root@wl ~ # pkill proftpd
root@wl ~ # /usr/local/proftpd/sbin/proftpd # ProFTPD는 재시작하는 것이 없다.
※ Anonymous의 User와 Group을 모두 ftp로 하였고, AnonymousFTP로 접속한 유저는 ftp:ftp권한을 가진다는 것을 생각하면 이해하기 쉬울 것이다.

5. IP기반의 접근 제어

아래 예제는 192.168.0.3,192.168.0.2에서만 접근 가능하도록 설정한 것이다. FTP서버와 TCP/IP Connection이 이루어지나, 인증이 되지 않는다. 아예 Connection이 안되게 하려면 방하벽을 이용한다.
root@wl ~ # vi /usr/local/proftpd/etc/proftpd.conf
# TCPAccessFiles부분을 추가한다.
TCPAccessFiles /etc/hosts.allow /etc/hosts.deny
root@wl ~ # vi /etc/hosts.deny
ALL:ALL
root@wl ~ # vi /etc/hosts.allow
proftpd: 192.168.0.3,192.168.0.2
root@wl ~ # pkill proftpd
root@wl ~ # /usr/local/proftpd/sbin/proftpd

6. SQL 인증

※ 많은 사람들이 사용하는 ftp서비스를 운영함에 있어서 문제될 수 있는 부분은, 일일이 계정을 주어야 한다는 것이다. ftp만을 접속하게 하기 위해 시스템 로컬 계정을 발급하는 것은 보안상의 문제를 포함해, 여러가지 문제를 야기할 수 있다. 따라서 ftp사용자들의 계정 데이터베이스로 시스템을 이용하지 않는 방법이 나오게 되었으며, 그중 proftpd에서 유용하게 사용 할 수 있는 MySQL Database를 이용한 방법에 대해 설명한다.
root@wl ~ # vi /usr/local/proftpd/etc/proftpd.conf
# 아래부분을 추가한다.
<IfModule mod_sql.c>
SQLAuthenticate on
SQLConnectInfo ftpdb@localhost root
SQLAuthTypes Plaintext
SQLLogFile /var/log/proftpdsqllog
# SQLUserInfo users userid passwd uid gid homedir shell 
# SQLGroupInfo groups groupname gid members
</IfModule>
※ 위세팅은 localhost에 있는 MySQL의 ftpdb 데이터베이스를 사용하며, 사용자 이름은 root, 패스워드는 없다. 테이블 이름은 ftpusers, ftpgroups 이다. 만약 데이터베이스 접속에 패스워드가 필요하다면, [SQLConnectInfo ftp@localhost root]에 한칸 띄우고 패스워드를 써 주면 된다. 이제 MySQL을 세팅할 차례다.
※ SQLUserInfo, SQLGroupInfo 부분의 세팅은 테이블 이름이며 테이블의 필드 이름이다. 기본값을 그대로 사용하기에 주석처리 해 놓은 것이다.
root@wl ~ # mysql -u root
mysql> create database ftpdb;
Query OK, 1 row affected (0.00 sec)
mysql> use ftpdb
Database changed
mysql> CREATE TABLE users (
    userid VARCHAR(30) NOT NULL UNIQUE,
    passwd VARCHAR(80) NOT NULL,
    uid INTEGER UNIQUE,
    gid INTEGER,
    homedir VARCHAR(255),
    shell VARCHAR(255)
  );
Query OK, 0 rows affected (0.00 sec)
mysql> CREATE TABLE groups (
    groupname VARCHAR(30) NOT NULL,
    gid INTEGER NOT NULL,
    members VARCHAR(255)
  );
Query OK, 0 rows affected (0.00 sec)
mysql> insert into users (userid, passwd, uid, gid, homedir, shell) values ('dbtest', 'test', 101, 10, '/export/home/windy', '/bin/bash');
Query OK, 1 row affected (0.00 sec)
mysql> insert into groups (groupname, gid, members) values ('staff', 10, 'dbtest');
Query OK, 1 row affected (0.00 sec)
mysql> exit
Bye
root@wl ~ # pkill proftpd
root@wl ~ # /usr/local/proftpd/sbin/proftpd
- 뭔가 이상하다면 /var/log/proftpdsqllog 파일을 확인해본다. 테이블이름의 기본값이 ProFTPD 버전마다 다른듯 하다.

7. xferlog

ProFTPD는 전송 로그를 /var/log/xferlog에 저장한다. 아래는 로그 파일의 형식에 대한 예이다.
root@wl ~ # tail /var/log/xferlog
Fri Nov 11 11:56:28 2005 0 xxx.xxx.xxx.xxx zzzz /sample.txt a _ i r webmaster ftp  1  *  c
-----------------------1 2 --------------3 ---4 ----------5 6 7 8 9 -------10 -11 12 13 14
로그시간 전송시간 원격호스트이름 파일크기 파일이름 전송종류 특별전송플래그 방향 접근모드 유저이름 서비스이름 인증방법 인증된유저ID 완료여부
1 로그시간. 로그가 저장된 로컬 호스트의 현재 시간
2 전송시간. 전송에 소요된 시간. 초
3 원격호스트이름. 없는 경우 IP로 저장됨
4 파일크기. 바이트
5 파일이름.
6 전송종류. a: 아스키 전송, b: 바이너리 전송
7 특별전송플래그. C: 파일 압축됨, U: 파일 압축풀림, _: 해당없음
8 방향. o: 외부(Outgoing), i:내부(Incoming), d:삭제(Deleted)
9 접근모드. a: 익명유저(Anonymous), g: 손님유저(Guest), r: 로컬 인증된 유저(Real)
10 유저이름. 로컬 유저이름. 손님인 경우 주어진 ID.
11 서비스이름. 수행될때의 서비스 이름. 일반적으로 ftp.
12 인증방법. 0: 없음, 1: RFC931
13 인증된유저ID. 인증 메쏘드에 의해 얻은 유저ID. *의 경우 존재하지 않음
14 완료여부. c: 전송이 완료됨, i: 전송이 완료되지 않음
Posted by 1010
60.Unix2008. 12. 17. 12:31
반응형

윈디하나의 솔라나라: OpenSSL

최종 갱신일: 2008-07-04, 이 문서는 윈디하나의 솔라나라, http://www.solanara.net/에서 최근에 갱신된 문서를 찾을 수 있다.

들어가기 전에

  • OpenSSL은 보안 향상을 위해 사용된다. 그러나 OpenSSL에는 아직 버그가 존재하기 때문에, 수시로 OpenSSL의 버전을 확인해 업데이트 해주어야 한다.
  • SSL은 주로 패킷 스나이핑으로 인한 피해를 줄여줄 뿐이다. 그 이상은 안된다. 만능이 아니다! SSL 설치하고 '보안은 끝'이라고 생각하는 것은 오산일 뿐이다. [SSL을 설치했는데 왜 해킹을 당했나요?]라는 질문은 참 바보같은 질문이다. 해킹에는 수십~수백가지 방법이 있으며, SSL은 그중 하나인 패킷 스나이핑을 무력화할 뿐이다. (패킷스나이핑이 되지 않도록 하는게 아니라, 스나이핑 해봤자 내용이 암호화되어있어 무슨 내용인지 알 수 없도록 만드는 것이다)
  • SSL의 단점? 단 한가지있다. 느리다는 것이다. 느려도 너무 느리다. 패킷의 인코딩/디코딩에 많은 CPU자원을 소모한다. 필자는 이런 서버에는 과감히 다음과 같이 말한다. 'SSL 쓰지말아' 패킷 암호화를 하지 않아도 보안을 향상시킬 수 있는 다른 방법도 많다.
  • 소스가 오픈되어있다고 해서 '무료'인것은 아니다. OpenSSL의 많은 알고리즘은 저작권이 있고, 특허가 취득되어 있다. 만약 OpenSSL의 특정 알고리즘을 사용하려면 사용하기 전에 법률가와 상의 하는것이 좋다. [./config no-idea no-mdc2 no-rc5]와 같이 문제가 될만한 것은 아예 사용 안하도록 설정하는것도 하나의 방법이다. 자세한 사항은 파일의 README에 PATENTS섹션을 참고하자.

1. OpenSSL 설치

아래의 세가지 방법중 어떤것을 사용해도 된다. 솔라나라는 첫번째에 있는 소스 설치방법을 따랐다.
  • OpenSSL 소스 설치: http://www.openssl.org
    root@wl ~ # wget http://www.openssl.org/source/openssl-0.9.8i.tar.gz
    root@wl ~ # tar xvfz openssl-0.9.8i.tar.gz
    root@wl ~ # cd openssl-0.9.8i
    root@wl ~/openssl-0.9.8i # ./config shared
    메시지 생략
    Configured for solaris-x86-cc.
    root@wl ~/openssl-0.9.8i # make
    메시지 생략
    making all in tools...
    root@wl ~/openssl-0.9.8i # make test 1)
    메시지 생략
    compiler: cc -KPIC -DOPENSSL_PIC -DOPENSSL_THREADS -D_REENTRANT -DDSO_DLFCN -DHAVE_DLFCN_H -fast -O -Xa
    OPENSSLDIR: "/usr/local/ssl"
    root@wl ~/openssl-0.9.8i # make install
    메시지 생략
    chmod 644 /usr/local/ssl/lib/pkgconfig/openssl.pc
    root@wl ~/openssl-0.9.8i #
    
    # 환경 설정
    root@wl ~ # vi /etc/profile
    # for OpenSSL located at /usr/local/ssl
    if [ -d /usr/local/ssl ]
    then
      PATH=$PATH:/usr/local/ssl/bin
      LD_LIBRARY_PATH=$LD_LIBRARY_PATH:/usr/local/ssl/lib
    fi
    
    1) OpenSSL은 반드시 테스트를 하자. 흔하지는 않지만 gcc, cc의 버그로 인해 테스트에 실패하는 경우가 있다. 이런경우 패치를 하거나, gcc, cc, openssl 버전을 낮추거나 gcc, cc의 옵티마이징을 꺼야 한다. [compiler: cc ...] 부분은 시스템마다 다를 수 있다.
  • OpenSSL은 솔라리스 10에 0.9.7d 이 설치되어있다. 경로만 걸어준다.
    root@wl ~ # cd /usr/local/bin
    root@wl /usr/local/bin # ln -s /usr/sfw/bin/openssl openssl
    
  • 패키지 설치. sunfreeware.com 에서 받아 설치한다.
    root@wl ~ # wget ftp://ftp.sunfreeware.com/pub/freeware/intel/10/libgcc-3.4.6-sol10-x86-local.gz
    root@wl ~ # gunzip libgcc-3.4.6-sol10-x86-local.gz
    root@wl ~ # pkgadd -d libgcc-3.4.6-sol10-x86-local
    root@wl ~ # wget ftp://ftp.sunfreeware.com/pub/freeware/intel/10/openssl-0.9.8h-sol10-x86-local.gz
    root@wl ~ # gunzip openssl-0.9.8h-sol10-x86-local.gz
    root@wl ~ # pkgadd -d openssl-0.9.8h-sol10-x86-local
    

2. OpenSSL 인증서 만들기

root@wl ~ # cd /usr/local/ssl/certs
root@wl /usr/local/ssl/certs # openssl req -newkey rsa:2048 -nodes -out req.pem -keyout req.key 1)
Generating a 2048 bit RSA private key
.......++++++
.......++++++
writing new private key to '/usr/local/ssl/certs/root.cert'
-----
You are about to be asked to enter information that will be incorporated
into your certificate request.
What you are about to enter is what is called a Distinguished Name or a DN.
There are quite a few fields but you can leave some blank
For some fields there will be a default value,
If you enter '.', the field will be left blank.
-----
Country Name (2 letter code) [AU]:KR
State or Province Name (full name) [Some-State]:GyungGiDo
Locality Name (eg, city) []:Suwon
Organization Name (eg, company) [Internet Widgits Pty Ltd]:Solanara
Organizational Unit Name (eg, section) []:SolanaraTeam
Common Name (eg, YOUR name) []:*.solanara.net 2)
Email Address []:admin@solanara.net
Please enter the following 'extra' attributes
to be sent with your certificate request
A challenge password []:
An optional company name []:
root@wl /usr/local/ssl/certs # ls -alF 3)
1) OpenSSL 버전이 낮으면 [-newkey rsa:2048]에서 오류가 난다. [-new]로 대체한다.
2) Apache 설정파일인 httpd.conf의 ServerName에 들어갈 값을 적어준다. 아파치는 이부분을 검사한다. www.solanara.net 과 같이 전체를 다 써줘도 되고, 위와 같이 '별표'를 사용할 수 있으며, 192.186.0.1과 같이 IP를 써도 된다. 다른 내용을 쓰면 인증을 다시 받아야 하는 불상사가 생길 수 있다. 유료 루트 인증기관에 보내기 전에 전화를 걸어 반드시 확인하도록 한다.
3) 총 2개의 파일이 생성되었다. req.key는 공개키로, 유출되지 않고 잃어버리지 않도록 보관해야한다. req.pem (certificate signing request)파일은 CA(Certification Authority=인증기관, 예: 베리사인, 타우트)에게 보내 인증 받아야 한다.

3. Root CA가 되기

CA에서 인증 받으려면 비용이 들기 때문에 테스트용으로는 자신이 CA가 될 필요가 있다. 그런데 CA가 되려면 Root CA(최상위 인증 기관)의 인증이 필요하다. 그리고 그 인증을 받기 위해서는 비용이 든다. 따라서 여기서는 Root CA가 되는 방법을 소개한다. Root CA도 CA중 하나이므로 CA가 하는 일을 모두 할 수 있다.
root@wl /usr/local/ssl/certs # openssl genrsa -des3 -out ca.key 2048 1)
Generating RSA private key, 2048 bit long modulus
............................++++++
............++++++
e is 65537 (0x10001)
Enter pass phrase for ca.key:*****
Verifying - Enter pass phrase for ca.key: *****
root@wl /usr/local/ssl/certs # openssl req -new -x509 -days 365 -key ca.key -out ca.crt 2)
Enter pass phrase for ca.key:
You are about to be asked to enter information that will be incorporated
into your certificate request.
What you are about to enter is what is called a Distinguished Name or a DN.
There are quite a few fields but you can leave some blank
For some fields there will be a default value,
If you enter '.', the field will be left blank.
-----
Country Name (2 letter code) [AU]:KR
State or Province Name (full name) [Some-State]:GyungGiDo
Locality Name (eg, city) []:Suwon
Organization Name (eg, company) [Internet Widgits Pty Ltd]:Solanara
Organizational Unit Name (eg, section) []:SolanaraTeam
Common Name (eg, YOUR name) []:Solanara CA
Email Address []:admin@solanara.net
root@wl /usr/local/ssl/certs # openssl x509 -req -CA ca.crt -CAkey ca.key -days 365 -in req.pem -out signed-req.pem -CAcreateserial 3)
Signature ok
subject=/C=KR/ST=GyungGiDo/L=Suwon/O=Solanara/OU=SolanaraTeam/CN=wl.solanara.net/emailAddress=admin@solanara.net
Getting CA Private Key
Enter pass phrase for ca.key:*****
root@wl /usr/local/ssl/certs # chmod 600 *
root@wl /usr/local/ssl/certs # ls -alF 4)
총 18
drwxr-xr-x   2 root     bin          512 10월 26일  13:44 ./
drwxr-xr-x  10 root     bin          512 10월 26일  13:40 ../
-rw-------   1 root     other       1671  4월  8일  11:27 ca.crt
-rw-------   1 root     other       1751  4월  8일  11:26 ca.key
-rw-------   1 root     other         17  4월  8일  11:49 ca.srl
-rw-------   1 root     other       1679  4월  8일  11:48 req.key
-rw-------   1 root     other       1074  4월  8일  11:48 req.pem
-rw-------   1 root     other       1330  4월  8일  11:49 signed-req.pem
root@wl /usr/local/ssl/certs # 
1) Root CA의 2048bit private key 파일을 만든다. 결과 파일은 ca.key 이다.
2) 인증서를 만든다. 결과파일은 ca.crt파일이다. ca.crt를 Internet Explorer에 등록해주면 '올바르지 않은 CA'라는 에러메시지를 없앨 수 있다.
3) 이제 Root CA가 되는 일은 끝났다. 클라이언트가 요청한 req.pem을 싸인해주자. 결과파일은 signed-req.pem이다. 베리싸인과 같은 인증 기관은 이 명령 한줄만 실행 해주면 된다. (그러면서 도대체 얼마를 받는거야... ㅡ,.ㅡ)
4) ca.key와 req.key는 소중하게 보관해야 한다. 절대 외부에 유출되서는 안된다.
※ 아파치와 같은 여러 유닉스 데몬에서 SSL을 사용할 때 사용되는 파일은 req.key와 signed-req.pem의 내용이며, 몇몇 데몬은 ca.crt의 내용까지 요구하는 경우도 있다. (형태가 파일인 경우가 대부분이지만 DB에 저장된 문자열일 수도 있다. 실제로 req.key 와 signed-req.pem 은 vi 에디터등으로 열어 내용을 볼 수 있는 텍스트 파일이다) ca.key파일은 디스켓에 담아 별도로 보관한다. (이것이 유출되지 않아야 SSL의 보안이 안전해진다. CA는 이 키 파일의 보안에 많은 비용을 들인다)
Valid XHTML 1.0 Transitional Valid CSS!
Posted by 1010
60.Unix2008. 12. 17. 12:18
반응형

페이지 수정중입니다.

윈디하나의 솔라나라: TOMCAT

최종 갱신일: 2008-11-12, 이 문서는 윈디하나의 솔라나라, http://www.solanara.net/에서 최근에 갱신된 문서를 찾을 수 있다.

아파치 톰캣(Apache Tomcat)

※ 아파치 톰캣은 아파치 소프트웨어 재단에서 만든 자카르타 프로젝트에 속해 있던 소프트웨어로, 현재는 톱레벨프로젝트로 승격되었다. 톰캣을 한마디로 정의하자면 자바 서블릿과 자바서버페이지(JSP)를 구현한 자바 서블릿 컨테이너다. 자카르타 프로젝트는 아파치 소프트웨어 재단에서 지원하는 오픈 소스 자바 솔루션 프로젝트의 이름이다. 톰캣은 자바 서블릿(Servlet)과 자바 서비스 페이지(JSP)를 지원하며 표준 스펙을 만족하고 있다. 자세한 사항은 Apache - Tomcat 홈페이지를 참고하기 바란다.

※ 본 문서에서는 아파치 톰캣을 설치하고, 아파치 웹 서버와 연동시키며, 톰캣 네이티브 라이브러리까지 설치하는 것을 다룬다.

톰캣 설치

  1. Java SE Downloads: 톰캣은 자바로 만들어져 있기 때문에 자바를 설치해야 한다. (솔라리스10의 /usr/java 디렉토리에 있는 자바를 사용해도 된다)
    root@wl ~ # cd /usr/local
    root@wl /usr/local # ~/jdk-6u10-solaris-i586.sh
    root@wl /usr/local # ln -s jdk1.6.0_10/ java
    root@wl /usr/local # vi /etc/profile
    # for Tomcat
    if [ -d /usr/local/tomcat ]
    then
      PATH=$PATH:/usr/local/tomcat/bin; export PATH;
    fi
    
    # for JAVA
    if [ -d /usr/local/java ]
    then
      PATH=/usr/local/java/bin:$PATH; export PATH;
      JAVA_HOME=/usr/local/java; export JAVA_HOME;
    fi
    root@wl /usr/local # . /etc/profile
    
  2. Apache - Tomcat
    root@wl ~ # wget http://apache.mirror.cdnetworks.com/tomcat/tomcat-6/v6.0.18/bin/apache-tomcat-6.0.18.tar.gz
    root@wl ~ # cd /usr/local
    root@wl /usr/local # tar xvfz ~/apache-tomcat-6.0.18.tar.gz
    root@wl /usr/local # ln -s apache-tomcat-6.0.18 tomcat
    root@wl /usr/local # /usr/local/tomcat/bin/startup.sh
    
    ※ 톰캣의 압축을 풀기만 하면 톰캣의 설치는 끝난다. http://localhost:8080 에서 톰캣이 실행된 것을 확인할 수 있다. 8080 포트가 아닌 80 포트로 톰캣을 실행시키려면 /usr/local/tomcat/conf/server.xml 에 8080으로 된 문자를 전부 80으로 바꾸면 되며, 파일 이미지와 JSP파일은 /usr/local/tomcat/webapps/ROOT 에 넣으면 된다.

톰캣 - 아파치 웹 서버 연동

※ 톰캣만으로도 웹 서비스를 하는데에는 지장 없지만, 정적 컨텐츠(예를 들어 이미지들)의 효율적인 전송이나 rewrite와 같은 기능, php의 연동을 위해 아파치 웹 서버가 필요할 때가 있다. 웹서비스시, 톰캣은 JSP와 서블릿을 실행하기 위한 용도로만 사용하고, 나머지(이미지 전송, PHP/CGI실행 등등)는 아파치 웹 서버에 맡기는 방법이다. 여기서는 아파치 웹 서버가 /usr/local/apache2 에 설치되었다고 가정한다. 아파치 웹 서버의 설치방법은 윈디하나의 솔라나라: AMP를 참고한다.

※ 80 포트로 오는 요청은 아파치 웹서버가 담당한다. 이 요청중 JSP/서블릿요청은 톰캣에게 주어 톰캣이 처리하도록 해야 한다. 톰캣과 아파치 웹 서버를 연결해주는 프로토콜은 현재 AJP v1.3이 많이 사용되고 있으며 이를 구현한게 mod_jk 이라는 모듈이다.
  1. Apache Tomcat - Tomcat Connectors (mod_jk) Downloads
    root@wl ~ # wget http://apache.tt.co.kr/tomcat/tomcat-connectors/jk/source/jk-1.2.27/tomcat-connectors-1.2.27-src.tar.gz
    root@wl ~ # tar xvfz tomcat-connectors-1.2.27-src.tar.gz
    root@wl ~ # cd tomcat-connectors-1.2.27-src/native
    root@wl ~/tomcat-connectors-1.2.27-src/native # ./configure --with-apxs=/usr/local/apache2/bin/apxs -enable-jni --with-java-platform=2
    root@wl ~/tomcat-connectors-1.2.27-src/native # /usr/sfw/bin/gmake
    root@wl ~/tomcat-connectors-1.2.27-src/native # /usr/sfw/bin/gmake install
    root@wl ~/tomcat-connectors-1.2.27-src/native # cd ../conf
    root@wl ~/tomcat-connectors-1.2.27-src/conf # cp workers.properties /usr/local/tomcat/conf/workers.properties
    
  2. 아파치 웹 서버, 톰캣 설정
    root@wl ~ # vi /usr/local/apache2/conf/httpd.conf 1)
    LoadModule jk_module modules/mod_jk.so
    JkWorkersFile "/usr/local/tomcat/conf/workers.properties"
    JkLogFile "logs/mod_jk.log"
    JkLogLevel warn
    JkMount /*.jsp ajp13
    root@wl ~ # vi /usr/local/tomcat/conf/workers.properties 2)
    workers.tomcat_home=/usr/local/tomcat
    workers.java_home=/usr/local/jdk
    root@wl ~ # vi /usr/local/tomcat/conf/tomcat-users.xml
    <?xml version='1.0' encoding='utf-8'?>
    <tomcat-users>
      <role rolename="standard" />
      <role rolename="manager"/>
      <user username="tomcat" password="s3cret" roles="standard,manager"/>
    </tomcat-users>
    root@wl ~ # vi /usr/local/tomcat/conf/server.xml
    <!-- Connector 태그에 URIEncoding="UTF-8" 속성을 추가한다.  -->
    <Connector port="8009" protocol="AJP/1.3" redirectPort="8443" URIEncoding="UTF-8"/>
    <!-- 아래의 내용을 <Engine>과 </Engine>사이에 넣어야 한다. -->
    <Host name="APACHE_SERVER_NAME" appBase="APACHE_DOCUMENT_HOME"
       unpackWARs="true" autoDeploy="true"
       xmlValidation="false" xmlNamespaceAware="false">
    </Host>
    root@wl ~ # mkdir -p APACHE_DOCUMENT_HOME/ROOT/WEB-INF
    root@wl ~ # /usr/local/tomcat/bin/startup.sh
    root@wl ~ # /usr/local/apache2/bin/apachectl restart
    
    1) 아파치 웹 서버의 설정 파일을 변경한다. 만약 가상 호스트를 사용하고 있다면, [JkMount /*.jsp ajp13]부분은 각각의 가상호스트세팅(<VirtualHost> ~ </VirtualHost>)에 모두 넣어주어야 한다.
    2) JNI를 사용하기 위해서는 반드시 아래 두 태그를 설정해야 한다.
    3) server.xml을 아파치의 설정에 맞게 바꿔야 한다. APACHE_SERVER_NAME, APACHE_DOCUMENT_HOME은 아파치의 설정에 맞게바꿔야 한다. APACHE_SERVER_NAME은 httpd.conf의 ServerName과 동일하게 해야 하며, APACHE_DOCUMENT_HOME은 httpd.conf의 DocumentRoot와 동일하게 값을 넣어야 한다.

    ※ Context를 정해주지 않으면 400: No Host matches server name xxxx 를 보게 될 것이다. 톰캣 5.5부터 context는 WEB-INF에서 설정할 수 있다.
    ※ http://APACHE_SERVER_NAME/manager/html/ 으로 접속후 tomcat / s3cret 를 사용해 접속하면 톰캣 관리자 페이지가 나온다.

테스트

root@wl ~ # vi $APACHE_DOCUMENT_HOME/ROOT/test.jsp
<%@ page language="java" contentType="text/html; charset=UTF-8" pageEncoding="UTF-8"%>
<html>
<head><title>JSP TEST</title></head>
<body><pre>
ClassPath: <%=System.getProperty("java.class.path",".")%>
LibraryPath: <%=System.getProperty("java.library.path", ".")%>
Parameter: <%=request.getParameter("param")%> (must be correct)
</pre></body>
</html>
root@wl ~ # http://localhost/test.jsp?param=%ED%95%9C%EA%B8%80 를 확인해보면 된다

The Apache Tomcat Native library

톰캣을 실행시킨후 CATALINA_HOME/logs/catalina.out 을 살펴보면 톰캣을 시작할때 아래와 같은 메시지가 나오는 것을 확인할 수 있다.

정보: The APR based Apache Tomcat Native library which allows optimal performance in production environments was not found on the java.library.path: ... (이하생략)

이 메시지는 톰캣 네이티브 라이브러리를 사용하지 않았을때 나오는 안내문구이다. 성능을 위해서는 네이티브 라이브러리를 사용하라는 것이다. 이는 http://tomcat.apache.org/tomcat-6.0-doc/apr.html 의 문서를 보면 더 많은 정보를 얻을 수 있다. 이 네이티브 라이브러리를 컴파일해 설치하기 위해서는 APR 1.2+(아파치2를 설치할때 같이 설치된다), OpenSSL 0.9.7+, JDK 1.4+ 가 필요하다. 단순히 아래와 같이 설치해주면 된다.
root@wl ~ # cd /usr/local/tomcat/bin
root@wl /usr/local/tomcat/bin # tar xvfz tomcat-native.tar.gz
root@wl /usr/local/tomcat/bin # cd tomcat-native-1.1.14-src/jni/native
root@wl /usr/local/tomcat/bin/tomcat-native-1.1.14-src/jni/native # ./configure --prefix=/usr/local --with-apr=/usr/local/apache2 1)
root@wl /usr/local/tomcat/bin/tomcat-native-1.1.14-src/jni/native # make
root@wl /usr/local/tomcat/bin/tomcat-native-1.1.14-src/jni/native # make install 2)
1) 아파치2의 APR 라이브러리를 사용하고, /usr/local에 설치한다.
2) 설치한 후, 톰캣을 재시작하면 네이티브 라이브러리를 로드하면서 기동할 것이다.
Posted by 1010
60.Unix2008. 12. 17. 12:17
반응형

윈디하나의 솔라나라: AMP(Apache HTTPD, MySQL, PHP)

최종 갱신일: 2008-06-12, 이 문서는 윈디하나의 솔라나라, http://www.solanara.net/에서 최근에 갱신된 문서를 찾을 수 있다.

1. 개요

  • 아파치 2.2.x, MySQL 5.0.x, PHP 5.2.x에 대해 솔라리스 10 u6 기본설정대로 설정시 설치하는 방법에 대해 설명하는 문서이다. 만약 사용자의 현재 설정이 이와 다르다면 약간의 수정이 필요할 수 있다.
  • SAMP(Solaris, Apache, MySQL, PHP)는 오픈 솔라리스 10에 이미 설치되어있기도 하지만, 여기서는 소스를 이용해 별도의 디렉토리(/usr/local)에 설치한다. 본 내용대로 하기 위해 솔라리스에 이미 설치되어있는 APM을 삭제해야할 필요는 없다.

2. 라이브러리 설치

  1. OpenSSL: Apache와 MySQL에 SSL라이브러리를 넣어 같이 컴파일 한다. 필요없다면 SSL설치를 생략하고 Apache, MySQL 의 configure 시 ssl 옵션을 뺀다. OpenSSL의 설치는 윈디하나의 솔라나라: OpenSSL을 참고한다.
  2. The GNU Readline Library
    root@wl ~ # wget ftp://ftp.cwru.edu/pub/bash/readline-5.2.tar.gz 1)
    root@wl ~ # tar xvfz readline-5.2.tar.gz
    root@wl ~ # cd readline-5.2
    root@wl ~/readline-5.2 # ./configure --enable-multibyte
    root@wl ~/readline-5.2 # make
    root@wl ~/readline-5.2 # make install
    
    1) 사이트가 너무 느리면 [wget http://user.chol.com/~laday/solaris/downloads/readline-5.2.tar.gz] 을 사용할 수 있다.
  3. Oracle Berkeley DB: 유닉스 프로그램에서 보통 DB라 하면 이 버클리 DB를 말할정도로 대중적인 임베디드 데이터베이스이다. 처음엔 UCB(캘리포티아대 버클리)에서 관리하던 버클리DB를, 좀 더 체계적인 관리를 목적으로 1996년 SleepyCat 이라는 법인이 설립되어 이어져오다가, 2006년 2월 오라클에 합병되었다. db-x.x.x.tar.gz 파일은 Oracle Berkeley DB Downloads에서 오라클에 가입(무료)한후 무료로 다운로드 받을 수 있다.
    root@wl ~ # tar xvfz db-4.7.25.tar.gz
    root@wl ~ # cd db-4.7.25
    root@wl2 ~/db-4.7.25 # cd build_unix
    root@wl2 ~/db-4.7.25/build_unix # ../dist/configure \
     --enable-pthread_api
    메시지 생략
    config.status: creating db.h
    config.status: creating db_config.h
    root@wl2 ~/db-4.7.25/build_unix # make
    root@wl2 ~/db-4.7.25/build_unix # make install
    root@wl2 ~/db-4.7.25/build_unix # vi /etc/profile
    # for Oracle Berkeley DB located at /usr/local/db
    if [ -d /usr/local/db ]
    then
      LD_LIBRARY_PATH=$LD_LIBRARY_PATH:/usr/local/db/lib; export LD_LIBRARY_PATH
    fi
    
    root@wl2 ~/db-4.7.25/build_unix # cd /usr/local
    root@wl2 /usr/local # ln -s BerkeleyDB.4.7/ db
    
  4. The XML C parser and toolkit of Gnome
    root@wl ~ # wget ftp://xmlsoft.org/libxml2/libxml2-2.6.32.tar.gz
    root@wl ~ # tar xvfz libxml2-2.6.32.tar.gz
    root@wl ~ # cd libxml2-2.6.32
    root@wl ~/libxml2-2.6.32 # ./configure --prefix=/usr/local/xml
    root@wl ~/libxml2-2.6.32 # make
    root@wl ~/libxml2-2.6.32 # make install
    
  5. zlib
    root@wl ~ # wget http://www.zlib.net/zlib-1.2.3.tar.gz
    root@wl ~ # tar xvfz zlib-1.2.3.tar.gz
    root@wl ~ # cd zlib-1.2.3
    root@wl ~/zlib-1.2.3 # ./configure -s
    root@wl ~/zlib-1.2.3 # make 1)
    root@wl ~/zlib-1.2.3 # make test
    메시지 생략
                    *** zlib test OK ***
    root@wl ~/zlib-1.2.3 # make install
    
    1) 경고 메시지는 무시한다
  6. libiconv
    root@wl ~ # wget http://ftp.gnu.org/pub/gnu/libiconv/libiconv-1.12.tar.gz
    root@wl ~ # tar xvfz libiconv-1.12.tar.gz
    root@wl ~ # cd libiconv-1.12
    root@wl ~/libiconv-1.12 # ./configure --prefix=/usr/local
    root@wl ~/libiconv-1.12 # vi srclib/stdint.h
    /* Verify that intmax_t and uintmax_t have the same size.  Too much code
       breaks if this is not the case.  If this check fails, the reason is likely
       to be found in the autoconf macros.  */
    //typedef int _verify_intmax_size[2 * (sizeof (intmax_t) == sizeof (uintmax_t)) - 1];
    root@wl ~/libiconv-1.12 # make
    root@wl ~/libiconv-1.12 # make install
    
    1) 주석처리한다. 257번째 라인이다. autoconf 의 버그인듯 하다.
  7. FreeType
    root@wl ~ # wget http://nchc.dl.sourceforge.net/sourceforge/freetype/freetype-2.3.6.tar.bz2
    root@wl ~ # tar xvfj freetype-2.3.6.tar.bz2
    root@wl ~ # cd freetype-2.3.6
    root@wl ~/freetype-2.3.6 # GNUMAKE="/usr/sfw/bin/gmake" ./configure
    root@wl ~/freetype-2.3.6 # /usr/sfw/bin/gmake
    root@wl ~/freetype-2.3.6 # /usr/sfw/bin/gmake install
    
  8. LibGD
    root@wl ~ # wget http://www.libgd.org/releases/gd-2.0.35.tar.bz2
    root@wl ~ # tar xvfj gd-2.0.35.tar.bz2
    root@wl ~ # cd gd-2.0.35
    root@wl ~/gd-2.0.35 # ./configure
    root@wl ~/gd-2.0.35 # make
    root@wl ~/gd-2.0.35 # make install
    

3. APM 설치

  1. MySQL
    root@wl ~ # wget http://dev.mysql.com/get/Downloads/MySQL-5.0/mysql-5.0.67.tar.gz/from/http://mysql.byungsoo.net/
    root@wl ~ # tar xvfz mysql-5.0.67.tar.gz
    root@wl ~ # cd mysql-5.0.67
    root@wl ~/mysql-5.0.67 # ./configure \
     --without-readline \
     --with-openssl=/usr/local/ssl \
     --prefix=/usr/local/mysql \
     --enable-thread-safe-client \
     --with-charset=utf8 \
     --with-extra-charsets=ucs2,euckr \
     CFLAGS="-I/usr/local/include" \
     CXXFLAGS="-I/usr/local/include"
    메시지 생략
    Thank you for choosing MySQL!
    root@wl ~/mysql-5.0.67 # make
    메시지 생략
    CC -DDBUG_OFF -D_POSIX_C_SOURCE=199506L -D__EXTENSIONS__ -I/usr/local/include -D
    BIG_TABLES -DHAVE_RWLOCK_T -o mysqlmanager command.o mysqlmanager.o manager.o lo
    g.o thread_registry.o listener.o protocol.o mysql_connection.o user_map.o messag
    es.o commands.o instance.o instance_map.o instance_options.o buffer.o parse.o gu
    ardian.o parse_output.o  ./.libs/liboptions.a -lpthread -lthread -lpthread -lthr
    ead -lpthread -lthread -lpthread -lthread libnet.a ../../vio/libvio.a ../../mysy
    s/libmysys.a ../../strings/libmystrings.a ../../dbug/libdbug.a -lz -lpthread -lt
    hread -lposix4 -lgen -lsocket -lnsl -lm -lpthread -lthread
    root@wl ~/mysql-5.0.67 # make install
    메시지 생략
    Making install in instance-manager
    test -z "/usr/local/mysql/libexec" || /root/source/mysql-5.0.51b/install-sh -d "
    /usr/local/mysql/libexec"
      /bin/bash ../../libtool --preserve-dup-deps --mode=install ../.././install-sh 
    -c 'mysqlmanager' '/usr/local/mysql/libexec/mysqlmanager'
    ../.././install-sh -c mysqlmanager /usr/local/mysql/libexec/mysqlmanager
    root@wl ~/mysql-5.0.67 # 
    
    ※ MySQL 설치하는데 가장 오래걸린다. P4 2.0에서는 보통 30분 정도 걸릴 것이다.
  2. The Apache HTTP Server
    root@wl ~ # wget http://apache.tt.co.kr/httpd/httpd-2.2.9.tar.bz2
    root@wl ~ # tar xvfj httpd-2.2.9.tar.bz2
    root@wl ~ # cd httpd-2.2.9
    root@wl ~/httpd-2.2.9 # ./configure \
      --prefix=/usr/local/apache2 \
      --enable-so \
      --enable-auth-digest \
      --enable-dav \
      --enable-dav-fs \
      --with-mpm=worker \
      --enable-rewrite \
      --enable-deflate \
      --enable-headers \
      --enable-expires \
      --enable-log-forensic \
      --enable-ssl \
      --with-ssl=/usr/local/ssl \
      --enable-dbd \
      --enable-authn-dbm \
      --enable-authn-dbd \
      --enable-authz-dbm
    root@wl ~/httpd-2.2.9 # make
    root@wl ~/httpd-2.2.9 # make install
    
    ※ PHP를 개발한 The PHP Group이나 APACHE를 개발한 The Apache Software Foundation에서는 mpm으로 worker나 perchild를 권장하지 않는다. 값을 지정하지 않는다면 기본값인 prefork을 사용한다.
  3. PHP Hypertext Preprocessor
    root@wl ~ # wget http://kr2.php.net/get/php-5.2.6.tar.bz2/from/this/mirror
    root@wl ~ # tar xvfj php-5.2.6.tar.bz2
    root@wl ~ # cd php-5.2.6
    root@wl ~/php-5.2.6 # ./configure \
    	--prefix=/usr/local/php \
    	--with-apxs2=/usr/local/apache2/bin/apxs \
    	--with-mysql=/usr/local/mysql \
    	--with-mysqli=/usr/local/mysql/bin/mysql_config \
    	--with-pdo-mysql=/usr/local/mysql \
    	--with-iconv=/usr/local \
    	--with-libxml-dir=/usr/local/xml \
    	--enable-mbstring \
    	--enable-mbregex \
    	--enable-dbase \
    	--with-gd \
    	--enable-sigchild \
    	--enable-gd-native-ttf \
    	--with-jpeg-dir=/usr/local \
    	--with-png-dir=/usr/local \
    	--with-zlib-dir=/usr/local \
    	--with-freetype-dir=/usr/local \
    	--enable-wddx \
    	--enable-sysvmsg \
    	--enable-sysvsem \
    	--enable-sysvshm \
    	--enable-sockets \
    	--enable-soap \
    	--enable-ftp \
    	--enable-safe-mode \
    	--enable-exif \
    	--enable-bcmath
    root@wl ~/php-5.2.5 # make
    root@wl ~/php-5.2.5 # make test
    TEST 1/3990 [...]
    ...
    # test스크립트의 오류로 실패하는 경우가 많으므로 실패한다고 해서 설치못하는건 아니다.
    root@wl ~/php-5.2.6 # make install
    root@wl ~/php-5.2.6 # cp php.ini-dist /usr/local/php/lib/php.ini
    
    # 여기까지 하면 설치는 끝난다. 아래는 Zend Optimizer를 설치하는 과정이다.
    root@wl ~ # gtar xvfz ZendOptimizer-3.3.0a-sunos5.9-i386.tar.gz
    root@wl ~ # cd ZendOptimizer-3.3.0a-sunos5.9-i386
    root@wl ~/ZendOptimizer-3.3.0a-sunos5.9-i386 # ./install 1)
    
    1)
    - php.ini파일은 /usr/local/php/lib 디렉토리에 있다.
    - Apache Control Utility는 /usr/local/apache2/bin/apachectl 에 있다.
    - 설치가 완료되면 /usr/local/php/lib/php.ini가 /usr/local/Zend/etc/php.ini파일로 심볼릭 링크된다.
    - 원래의 php.ini은 /usr/local/php/lib/php.ini-zend_optimizer.bak 에 있다.
    - php.ini만 이전것으로 복구하면 자연스럽게 Zend Optimizer를 언인스톨 할 수 있다.
    - Zend Optimizer는 http://www.zend.com에서 무료 회원 가입후 무료로 받을 수 있다.
    - Zend Optimizer는 필수사항이 아니다. Zend Encoder로 인코딩된 php 소스를 실행할 수 있으며, php를 좀 더 빨리 실행시켜준다고 알려져 있으며, Solaris Sparc이나 리눅스에서는 큰 효과가 있지만, Solaris x86에서는 그리 큰 효과가 없는듯 하다. (성능향상이 되는지도 잘 모르겠다 ^^ 스팍에서 설치할땐 쉽게 느낄 수 있을정도의 성능향상이 있었다)

3. APM 설정(기본적인것만)

  1. PATH 설정
    root@wl ~ # vi /etc/profile
    # for Apache located at /usr/local/apache2
    if [ -d /usr/local/apache2 ]
    then
      LD_LIBRARY_PATH=$LD_LIBRARY_PATH:/usr/local/apache2/lib; export LD_LIBRARY_PATH
      PATH=$PATH:/usr/local/apache2/bin; export PATH;
    fi
    
    # for MySQL located at /usr/local/mysql
    if [ -d /usr/local/mysql/lib/mysql ]
    then
      LD_LIBRARY_PATH=$LD_LIBRARY_PATH:/usr/local/mysql/lib/mysql; export LD_LIBRARY_PATH
      PATH=$PATH:/usr/local/mysql/bin; export PATH;
    fi
    
  2. MySQL 설정
    root@wl ~ # useradd -d /export/home/mysql -g staff -m -u 102 -s /bin/false mysql 1)
    root@wl ~ # cp /usr/local/mysql/share/mysql/my-medium.cnf /etc/my.cnf 2)
    root@wl ~ # vi /etc/my.cnf 2)
    skip-networking
    #log-bin
    root@wl ~ # /usr/local/mysql/bin/mysql_install_db 3)
    root@wl ~ # chown -R mysql:staff /usr/local/mysql/var 4)
    root@wl ~ # /usr/local/mysql/share/mysql/mysql.server start 5)
    root@wl ~ # /usr/local/mysql/bin/mysqladmin -u root password 'new-password' 6)
    root@wl ~ # /usr/local/mysql/bin/mysqladmin -u root -h wl password 'new-password' 6)
    
    1) MySQL을 실행할 유닉스 계정을 생성한다.
    2) MySQL 설정 파일을 복사한 후 적당히 수정한다. /usr/local/mysql/share/mysql 에 my-huge.cnf, my-large.cnf, my-medium.cnf, my-small.cnf 의 예제 설정 파일이 있다. 이를 /etc/my.cnf 으로 이름을 바꿔 복사하면 된다. 리플리케이션을 사용하지 않는다면 [log-bin]을 찾아 주석처리하고 외부에서 접속이 없다면 [skip-networking]의 주석을 푼다.
    3) 기본 MySQL DB를 생성한다.
    4) 기본 MySQL DB는 /usr/local/mysql/var 에 생성되는데 이 디렉토리및 파일들의 소유자를 변경한다.
    5) MySQL 서버를 시작한다. 종료는 [/usr/local/mysql/share/mysql/mysql.server stop] 커맨드를 사용한다.
    6) MySQL의 root 패스워드를 변경한다. 기본값은 없기 때문에 반드시 수정해야 한다. [wl]부분은 MySQL이 설치된 호스트의 이름이다.
  3. Apache 설정
    아파치 2.2.x로 오면서 기본 설정 방법이 다소 차이난다. 그리고 기본값도 다소 차이가 있다. 예를 들면 디렉토리 권한이 기본적으로 거부되어있다. 따라서 <Directory>지시자로 사용할 디렉토리에 대해 접근권한을 주어야 한다. (그나마 다행인것은 2.0.x와 설정 파일이 호환되기 때문에 기존것을 그대로 써도 되는것 같다) 기존에 httpd.conf파일 하나로 제공되던 기본 설정파일이 httpd.conf와 extra 디렉토리의 파일로 나누어 제공되며 각각의 파일을 include해서 사용하도록 하고 있다. include자체는 이전 버전부터 제공되어왔었지만, 그런 기능을 기본 제공된 httpd.conf에서 사용하는 것은 이번이 처음이 아닐까 한다.
    root@wl ~ # cd /usr/local/apache2/conf
    root@wl /usr/local/apache2/conf # vi httpd.conf
    User nobody 1)
    Group nobody 1)
    
    # AddDefaultCharset ISO-8859-1 2)
    
    # Dynamic Shared Object (DSO) Support
    AddType application/x-httpd-php	.php 3)
    AddType application/x-httpd-php-source	.phps 3)
    
    ServerName xxx.solanara.com:80 4)
    
    Include conf/extra/httpd-mpm.conf 5)
    Include conf/extra/httpd-multilang-errordoc.conf
    Include conf/extra/httpd-autoindex.conf
    Include conf/extra/httpd-languages.conf
    Include conf/extra/httpd-userdir.conf
    Include conf/extra/httpd-info.conf
    Include conf/extra/httpd-vhosts.conf
    Include conf/extra/httpd-manual.conf
    Include conf/extra/httpd-dav.conf
    Include conf/extra/httpd-default.conf
    Include conf/extra/httpd-ssl.conf
    
    root@wl ~ # /usr/local/apache2/bin/apachectl start
    
    1) 아파치 2.2.x에서는 daemon 계정을 사용하도록 되어있다. 이를 nobody를 사용하도록 변경한다.
    2) [AddDefaultCharset ISO-8859-1] 부분이 있다면 주석처리 한다. (2.2.0에는 없다)
    3) PHP사용을 위해 AddType부분의 두라인을 추가한다. [LoadModule php5_module modules/libphp5.so]도 필요하지만, 이 설정은 php에서 make install 시 이미 추가되어있을 것이다.
    4) ServerName을 정해준다. 정하지 않아도 되지만 아파치 시작시 [httpd: Could not determine the server's fully qualified domain name, using xxx.xxx.xxx.xxx for ServerName]와 같은 메시지가 나올 수 있다. 만약 도메인이 없다면 IP를 입력해준다. 예) [ServerName 192.168.0.1]
    5) 각종 삽입 파일 지시자의 주석을 풀어 사용 하도록 한다. 기본값을 그대로 사용하겠다면 풀지 않아도 된다.
  4. PHP 테스트
    root@wl ~ # vi /usr/local/apache2/htdocs/index.php
    <?
      phpinfo();
    ?>
    root@wl ~ #
    
    이후 http://localhost/index.php 에서 php정보가 제대로 나오는지 확인한다. 아래와 비슷하게 나와야 한다. 확인되었으면 index.php파일을 지운다. (보안때문)
    PHP정보
    root@wl ~ # rm /usr/local/apache2/htdocs/index.php
    

    여기까지 되면 설치는 완료되었다.
Valid XHTML 1.0 Transitional Valid CSS!
Posted by 1010
60.Unix2008. 12. 17. 12:16
반응형

윈디하나의 솔라나라: Oracle

최종 갱신일: 2008-06-23, 이 문서는 윈디하나의 솔라나라, http://www.solanara.net/에서 최근에 갱신된 문서를 찾을 수 있다.

개요

  • Oracle 10g Release 2, Solaris 10 u5 x86 을 기준으로 오라클 설치에 대한 설명이다.

1. 설치 전에

  • Oracle은 모두 /export/home/oracle에 설치할 것이다. 필자는 /export/home/oracle을 4GB 주었다.
  • 오라클사에서 말하는 오라클 인스톨을 위한 필수 패키지는 SUNWarc SUNWlibms SUNWi1of SUNWbtool SUNWsprot SUNWi1cs SUNWhea SUNWsprox SUNWi15cs SUNWlibm SUNWtoo SUNWxwfnt 이다. 전체 설치시 모두 설치되어있다. 또한 최신의 커널 패치를 적용해야 한다. 물론 솔라리스 10 u5에서는 이미 설치되어있다.
  • 오라클에서 권장하는 사양은 512MB이상의 램, 1GB이상의 스왑공간, /tmp이 400MB이상 남아있어야 한다. 임시공간이 문제될 것이라 생각되면 TEMP환경변수와 TMPDIR 환경변수를 수정해준다. 예) export TEMP=/disk2/tmp
  1. 솔라리스 10 미만의 시스템인 경우, 시스템 커널 파라메터 변경해야 한다. (솔라리스 10에서는 할 필요 없다) 주로 System V IPC와 관련된 파라미터를 늘려주어야 한다. 자세한 사항은 솔라리스 매뉴얼의 Tunable Parameter부분을 참고한다. /etc/system 파일은 매우 중요하므로 백업받은 후 수정하자.
    root@wl ~ # cp /etc/system /etc/systemold
    root@wl ~ # vi /etc/system
    set noexec_user_stack=1
    set semsys:seminfo_semmni=100
    set semsys:seminfo_semmns=1024
    set semsys:seminfo_semmsl=256
    set semsys:seminfo_semvmx=32767
    set shmsys:shminfo_shmmax=4294967295
    set shmsys:shminfo_shmmin=1
    set shmsys:shminfo_shmmni=100
    set shmsys:shminfo_shmseg=10
    root@wl ~ # sync; sync; reboot
    
  2. 오라클 계정을 생성한다. 오라클은 root로 설치할 수 없다. 오라클에서는 설치를 위해 oinstall 그룹, dba 그룹, oracle 유저를 생성하는 것을 권하고 있다.
    root@wl ~ # groupadd -g 101 oinstall
    root@wl ~ # groupadd -g 102 dba
    root@wl ~ # useradd -d /export/home/oracle -g oinstall -G dba -m -u 103 -s /bin/bash oracle
    root@wl ~ # passwd oracle
    
  3. 오라클 계정의 환경을 설정한다. ORACLE_HOME과 같은 중요한 환경 변수를 설정한다.
    root@wl ~ # /usr/openwin/bin/xhost + 2)
    access control disabled, clients can connect from any host
    root@wl ~ # su - oracle
    oracle@wl ~ $ mkdir oradata 4)
    oracle@wl ~ $ mkdir flash_recovery_area 4)
    oracle@wl ~ $ vi .profile 5)
    DISPLAY=localhost:0.0; export DISPLAY # 다른 호스트의 X윈도우를 사용하려면 해당 호스트의 IP를 localhost대신 적는다.
    ORACLE_BASE=/export/home/oracle; export ORACLE_BASE
    if [ -x /usr/local/bin/dbhome ] # 오라클 설치시 root.sh를 실행하면 dbhome이 존재하며 실행 가능하게 된다.
    then
    	. /usr/local/bin/oraenv
      ORACLE_HOME=`dbhome orcl`; export ORACLE_HOME
      PATH=$PATH:$ORACLE_HOME/bin; export PATH
      LD_LIBRARY_PATH=$LD_LIBRARY_PATH:$ORACLE_HOME/lib
    fi
    # TNS_ADMIN 환경변수는 설정하지 않는다.
    oracle@wl ~ $ . .profile
    oracle@wl ~ $ cksum 10202_database_solx86.zip
    1350902623      681090961       10202_database_solx86.zip
    oracle@wl ~ $ unzip 10202_database_solx86.zip 1)
    oracle@wl ~ $ cd database
    oracle@wl ~/database $ ./runInstaller
    Oracle Universal Installer 시작 중...
    
    설치 프로그램 요구 사항 확인 중...
    
    운영 체제 버전 확인 중: 필수 버전5.10.    실제 5.10
                                          성공함
    
    임시 공간 확인 중: 250MB 이상이어야 합니다..   실제 1020MB    성공함
    스왑 공간 확인 중: 500MB 이상이어야 합니다..   실제 1339MB    성공함
    모니터 확인 중: 최소 256 색상을 표시하도록 구성되어 있어야 합니다..    실제 16777216    성공함
    
    설치 프로그램 요구 사항을 모두 충족했습니다.
    
    다음에서 Oracle Universal Installer의 시작을 준비하는 중 /tmp/OraInstall2008-06-19_04-40-02PM. 기다리십시오.
    oracle@wl ~/database $ 
    
1) 오라클 다운로드 사이트: 가기
2) [xhost +]는 X윈도우의 디스플레이의 접근 권한 제어를 끄는 명령어이다. 오라클 설치가 끝나면 [xhost -]로 다시 켜 놓는다. 당연한 말이지만 X윈도우에 미리 로그인 되어있어야 한다. [/usr/openwin/bin/xhost: unable to open display ""] 메시지가 나오면 DISPLAY 환경변수를 설정5) 해본다.
3) 오라클 어플리케이션이 설치될 곳. 2.5GB정도 필요
4) 오라클 데이터가 설치될 곳. 1.2GB이상 필요
5) 환경 변수를 설정해준다.

2. 오라클 및 오라클 컴패니언 설치

위와같이 한후 마지막에 runInstaller를 실행했다면 GUI화면이 뜰 것이다. 자바로 되어있어 썩 모양이 좋지는 않지만 그럭저럭 봐줄만 한다. 각각의 화면마다 선택해야할 것은 다음과 같다. 빠른 설치를 위해 설정은 대부분 기본값으로 해 놓았다. (필요한 설정은 이전에 .profile을 수정할 때 모두 했다) 또한 이 내용은 Oracle Quick Installation Guide의 내용이기도 하다.
스크린 제목 내용
Welcome Next를 클릭한다.
Specify Inventory Directory and Credentials 오라클 인벤토리설정 화면이다. 기본값으로 놔둔다. Next를 클릭하면 루트 권한으로 orainstRoot.sh를 실행하라고 나오는데 화면을 참조해 실행해준다.
Specify File Locations 파일이 설치될 디렉토리이다. $ORACLE_BASE/product/10.1.0/db_1에 설치된다. Next를 클릭한다.
Select Installation Type Enterprise Edition을 선택하고 Next를 클릭한다.
Select Database Configuration Next를 클릭한다.
Specify Database Configuration Options Global Database Name이 orcl로 되어있는 것을 확인한다. Database Character Set은 KO16KSC5601(완성형)으로 선택되어있는데, 필요하다면 KO16MSWIN949 (확장완성형)로 수정한다. 예제 스키마를 생성할 것인가를 물어보는데 체크하는 것이 테스트용으로 설치하는 목적에 부합할 것이다. Next를 클릭한다.
Select Database Management Option Next를 클릭한다.
Specify Database File Storage Option 위에서 생성한 디렉토리를 선택해준다. 기본값은 $ORACLE_BASE/oradata 이다.
Specify Backup and Recovery Options Next를 클릭한다.
Specify Database Schema Passwords 각각의 계정에 대해 암호를 입력한 후 Next를 클릭한다.
Summary 이제까지 설정한 것을 보여준다. 확인 후 Next를 클릭한다.
Install 인스톨 화면이다. 기다리면 다음 화면으로 자동으로 넘어간다.
Configuration Assistants 설정 화면이다. 데이터 베이스 생성이 끝나면 안내 메시지가 나오는데, 전역데이터베이스이름, SID식별자, http://localhost:5500/em 과 SYS,SYSTEM암호는 반드시 외워놓는다. OK를 클릭한 후 Next를 클릭하면 다음 화면으로 넘어간다.
Setup Privileges 루트 유저로 $ORACLE_HOME/root.sh 을 실행하라는 메시지가 나온다. 루트로 실행해준다. 나오는 메시지 중에서 필요한 것은 다음과 같다.
ORACLE_OWNER= oracle
ORACLE_HOME=/export/home/oracle/oraapp/product/10.1.0/Db_1
End of Installation 주어진 내용을 읽어본 후 Exit를 클릭해 인스톨러를 마친다. (포트 리스트는 $ORACLE_HOME/install/portlist.ini 에 있다.) 이것으로 인스톨을 모두 끝냈다.
Ultra Search URL: http://localhost:5620/ultrasearch
Ultra Search Administration Tool URL: http://localhost:5620/ultrasearch/admin
iSQL*Plus URL: http://localhost:5560/isqlplus
iSQL*Plus DBA URL: http://localhost:5560/isqlplus/dba
Enteprise Manager 10g Database Control URL: http://localhost:5500/em
여기까지 하면 오라클의 설치가 끝난것이다. 여기까지만 설치하더라도 오라클의 운영에는 문제 없지만, 좀 더 편한 관리를 위해 컴패니언을 설치한다. (필자는 오라클은 컴패니언까지 인스톨해야 한다고 보고 있다)
oracle@wl ~ $ cksum solarisx86_CCD_10_1_0_3_Disk1.cpio.gz
4119132538      438221549       solarisx86_CCD_10_1_0_3_Disk1.cpio.gz
oracle@wl ~ $ rm -rf Disk1 # 기존에 압축 풀었던 오라클 데이터베이스 인스톨 파일을 지운다
oracle@wl ~ $ gunzip solarisx86_CCD_10_1_0_3_Disk1.cpio.gz
oracle@wl ~ $ cpio -idcmv < solarisx86_CCD_10_1_0_3_Disk1.cpio
oracle@wl ~/Disk1 $ ./runInstaller

3. 오라클 패치

오라클 패치는 오라클을 구매했을때 주는 CID를 이용해 메타링크(http://metalink.oracle.com) 에 가입한 후 받을 수 있다. 직접 패치하는것도 좋지만, 오라클 전문가의 도움을 받는것도 좋을 것이다.
다음은 패치# 2617419(OPatch 1.0.0.0.55), 4751926 (CPUJan2006)를 설치하는 예를 보인 것이다.
oracle@saturn4 ~ $ echo $ORACLE_HOME
/export/home/oracle/oraapp/OraHome_1
oracle@saturn4 ~ $ echo $PATH
/usr/local/bin:/usr/sfw/bin:/usr/bin:/bin:/usr/sbin:/sbin:/usr/ccs/bin:/export/home/oracle/oraapp/OraHome_1/bin
oracle@saturn4 ~ $ echo $LD_LIBRARY_PATH
/usr/local/xml/lib:/usr/lib:/usr/local/lib:/usr/ucblib:/usr/ccs/lib:/usr/sfw/lib:/export/home/oracle/oraapp/OraHome_1/lib
oracle@saturn4 ~ $ unzip p2617419_10102_GENERIC.zip 
... # OPatch 디렉토리 생성됨
oracle@saturn4 ~ $ cp -r OPatch/ ./oraapp/OraHome_1/ 
oracle@saturn4 ~ $ unzip p4751926_10103_SOLARISx86.zip 
... # README.html, 4751926 디렉토리 생성됨. README.html은 읽어볼것.
oracle@saturn4 ~ $ cd 4751926
oracle@saturn4 ~/4751926 $ /export/home/oracle/oraapp/OraHome_1/OPatch/opatch apply

Oracle Interim Patch Installer version 1.0.0.0.55
Copyright (c) 2006 Oracle Corporation. All Rights Reserved..

We recommend you refer to the OPatch documentation under
OPatch/docs for usage reference. We also recommend using
the latest OPatch version. For the latest OPatch version
and other support related issues, please refer to document
293369.1 which is viewable from metalink.oracle.com

Oracle Home = /export/home/oracle/oraapp/OraHome_1
Location of Oracle Universal Installer components = /export/home/oracle/oraapp/OraHome_1/oui
Location of OraInstaller.jar  = "/export/home/oracle/oraapp/OraHome_1/oui/jlib"
Oracle Universal Installer shared library = /export/home/oracle/oraapp/OraHome_1/oui/lib/intelsolaris/liboraInstaller.so
Location of Oracle Inventory Pointer = /var/opt/oracle/oraInst.loc
Location of Oracle Inventory = /export/home/oracle/oraapp/OraHome_1/inventory
Path to Java = /export/home/oracle/oraapp/OraHome_1/jre/1.4.2/bin/java
Log file = /export/home/oracle/oraapp/OraHome_1/.patch_storage//*.log

Creating log file "/export/home/oracle/oraapp/OraHome_1/.patch_storage/4751926/Apply_4751926_03-21-2006_11-49-00.log"

Invoking fuser to check for active processes.

Invoking fuser on "/export/home/oracle/oraapp/OraHome_1/bin/oracle"
Invoking fuser on "/export/home/oracle/oraapp/OraHome_1/bin/lsnrctl"
Invoking fuser on "/export/home/oracle/oraapp/OraHome_1/bin/tnslsnr"
Backing up comps.xml ...

OPatch detected non-cluster Oracle Home from the inventory and will patch the local system only.


Please shut down Oracle instances running out of this ORACLE_HOME
(Oracle Home = /export/home/oracle/oraapp/OraHome_1)
Is this system ready for updating?
Please respond Y|N > 
Y 1)
Executing the Apply pre-patch script (/export/home/oracle/4751926/custom/scripts/pre)...
Applying patch 4751926...

Patching archive files...

Patching jar files...

Patching copy files...

Creating new directory "/export/home/oracle/oraapp/OraHome_1/cpu/CPUJan2006/MODPLSQL/owa_all/90"
Creating new directory "/export/home/oracle/oraapp/OraHome_1/olap/admin"
Creating new directory "/export/home/oracle/oraapp/OraHome_1/cpu/CPUJan2006/MODPLSQL/owa_all/30"
Creating file to hold list of directories that were mkdir'ed: "/export/home/oracle/oraapp/OraHome_1/.patch_storage/4751926/opatch_dirs_created.lst"
Running make for target client_sharedlib.

Running make for target ioracle.

Running make for target iexp.

Running make for target iimp.

Running make for target iexpdp.

Running make for target iimpdp.

Running make for target libnmuc.

Running make for target libnmemso.

Running make for target ilsnrctl.

Running make for target itnslsnr.

Running make for target ictxload.


Inventory is good and does not have any dangling patches.


Updating inventory...

Verifying patch...
  Verifying that patch ID is in Oracle Home inventory.

  Verifying copy files.

  Verifying jar files.

  Verifying archive files.

OPATCH_VERIFY_OK: Patch has been applied.

Backing up comps.xml ...

********************************************************************************
********************************************************************************
**                                ATTENTION                                   **
**                                                                            **
** Please note that the Security Patch Installation (Patch Deinstallation) is **
** not complete until all the Post Installation (Post Deinstallation)         **
** instructions noted in the Readme accompanying this patch, have been        **
** successfully completed.                                                    **
**                                                                            **
********************************************************************************
********************************************************************************
Executing the Apply post-patch script (/export/home/oracle/4751926/custom/scripts/post)...

OPatch succeeded.
oracle@saturn4 ~/4751926 $ cd $ORACLE_HOME/cpu/CPUJan2006
oracle@saturn4 ~/oraapp/OraHome_1/cpu/CPUJan2006 $ sqlplus /nolog
SQL> connect / as sysdba
SQL> STARTUP
SQL> @catcpu.sql 2)
SQL> QUIT
oracle@saturn4 ~/oraapp/OraHome_1/cpu/CPUJan2006 $ cd $ORACLE_HOME/rdbms/admin
oracle@saturn4 ~/oraapp/OraHome_1/rdbms/admin $ sqlplus /nolog
SQL> connect / as sysdba
SQL> STARTUP
SQL> @utlrp.sql 3)
SQL> select OBJECT_NAME from DBA_OBJECTS where status = 'INVALID'; 4)

no rows selected

SQL> QUIT
oracle@saturn4 ~/oraapp/OraHome_1/rdbms/admin $ 
1) 오라클관련 인스턴스가 모두 종료되었는지 물어보는 프롬프트. 준비되었으면 Y를 입력하고 엔터를 친다.
2) 오랫동안 걸리는 패치가 끝났다. 패치 이후 스크립트를 실행시킨다.
3) 만약 있을지도 모르는 INVALID 객체를 제거하기 위해 실행한다.
4) no rows selected 가 나오면 정상이다.

4. 오라클 인스턴트 클라이언트 설치

Oracle Instant Client는 오라클 10g에서 새롭게 선 보이는 배포버전이다. 오라클 OCI 라이브러리와 SDK, SQL*Plus, JDBC드라이버만을 지원해준다.
파일이름                                                 크기(바이트)   CRC32
instantclient-basic-solarisx86-10.1.0.3-20050404.zip     30,141,480     4208528557
instantclient-jdbc-solarisx86-10.1.0.3-20050404.zip       4,572,527      556902813
instantclient-sqlplus-solarisx86-10.1.0.3-20050404.zip      266,435      793421160
instantclient-sdk-solarisx86-10.1.0.3-20050404.zip          293,993     1919831458
root@wl ~ # unzip instantclient-basic-solarisx86-10.1.0.3-20050404.zip
root@wl ~ # unzip instantclient-sqlplus-solarisx86-10.1.0.3-20050404.zip
root@wl ~ # unzip instantclient-sdk-solarisx86-10.1.0.3-20050404.zip
root@wl ~ # unzip instantclient-jdbc-solarisx86-10.1.0.3-20050404.zip
root@wl ~ # mv instantclient10_1 /usr/local/instantclient10_1
root@wl ~ # vi /usr/local/instantclient10_1/tnsnames.ora
ORCL =
  (DESCRIPTION =
    (ADDRESS = (PROTOCOL = TCP)(HOST = 192.168.0.100)(PORT = 1521))
    (CONNECT_DATA =
      (SERVER = DEDICATED)
      (SERVICE_NAME = orcl)
    )
  )
root@wl ~ # vi /etc/profile
# for Oracle Instant Client
if [ -d /usr/local/instantclient10_1 ]
then
  LD_LIBRARY_PATH=$LD_LIBRARY_PATH:/usr/local/instantclient10_1; export LD_LIBRARY_PATH
  PATH=$PATH:/usr/local/instantclient10_1; export PATH;
  NLS_LANG=Korean_Korea.KO16KSC5601; export NLS_LANG;
  TNS_ADMIN=/usr/local/instantclient10_1; export TNS_ADMIN;
  SQLPATH=/usr/local/instantclient10_1; export SQLPATH;
fi
root@wl ~ # sqlplus 사용자아이디/사용자패스워드@//호스트주소:포트/DB이름
* 오라클 인스턴트 클라이언트는 라이브러리 파일 크기가 크기 때문에, 가상 메모리를 많이 소모한다.

5. 오라클 관련 어플리케이션 설정

  1. 모든 오라클 관련 어플리케이션은 ORACLE_HOME 환경변수가 있어야 동작한다. 따라서 톰캣이나 아파치/PHP을 사용할 때에도 웹서버를 띄우기 전에 ORACLE_HOME이 환경변수에 존재하는지 확인해야 한다.
  2. 한글문제 해결의 기본은 NLS_LANG 환경 변수를 지정해주는 것이다. NLS_LANG=Korean_Korea.KO16KSC5601 또는 NLS_LANG=American_America.KO16MSWIN949 의 조합으로도 사용할 수 있다. 오라클 데이터베이스에 접속하기 전에 NLS_LANG 환경 변수가 존재하며, 올바르게 설정되었는지 반드시 확인해야 한다.
  3. 오라클 시작/종료
    # 오라클 데이터베이스 시작.
    oracle@wl ~ $ sqlplus /nolog # 'dbstart' 스크립트를 이용할 수도 있다.
    SQL> connect sys/패스워드 as sysdba
    SQL> startup
    SQL> exit
    oracle@wl ~ $ lsnrctl start # 리스너 시작 (외부에서 접속하기 위해서는 필요하다)
    oracle@wl ~ $ searchctl start # Ultra Search 시작
    oracle@wl ~ $ isqlplusctl start # iSQL*Plus 시작
    oracle@wl ~ $ emctl start dbconsole # OEM(Oracle Enterprise Manager) 시작
    
    # 인스톨 이후. 오라클을 시작한 상태에서 실행한다.
    # PL/SQL 모듈 재 컴파일
    oracle@wl ~ $ sqlplus "/ AS SYSDBA"
    SQL> @?/rdbms/admin/utlrp.sql
    # 스태틱 라이브러리 생성
    oracle@wl ~ $ $ORACLE_HOME/bin/genclntst
    
    # 종료
    oracle@wl ~ $ emctl stop dbconsole
    oracle@wl ~ $ isqlplusctl stop
    oracle@wl ~ $ searchctl stop
    oracle@wl ~ $ lsnrctl stop
    oracle@wl ~ $ sqlplus /nolog # 'dbshut' 스크립트를 이용할 수도 있다.
    SQL> connect sys/패스워드 as sysdba
    SQL> shutdown immediate
    SQL> exit
    oracle@wl ~ $
    
  4. Java와 Oracle연동
    * 자바용 오라클 JDBC드라이버는 크게 두가지가 있다. 하나는 THIN을 지원해주는 드라이버고 다른 하나는 OCI기반의 드라이버이다. THIN드라이버의 경우 오라클 라이브러리를 설치할 필요 없다는 장점이있다. (성능은 비슷한것으로 판단된다) 아래는 THIN드라이버를 기준으로 한다.
    * Java 1.4인 경우 $ORACLE_HOME/jdbc/lib/ojdbc14.jar 과 $ORACLE_HOME/jdbc/lib/orai18n.jar 를 CLASS_PATH 에 환경변수 넣어준다.
    * Java 1.2, Java 1.3인 경우 $ORACLE_HOME/jdbc/lib/classes12.jar 과 $ORACLE_HOME/jdbc/lib/nls_charset12.jar 를 환경변수 CLASS_PATH에 넣어준다.
  5. PHP 와 Orale연동
    * PHP컴파일시 ./configure부분을 다음으로 대체한다. 반드시 설치하기 전에 오라클에 설치되어있어야 하며 컴파일 할때 환경 변수 ORACLE_HOME 이 설정되어있어야 한다.
    root@wl ~/php-5.0.4 # . ~oracle/.profile
    root@wl ~/php-5.0.4 # ./configure \
     --prefix=/usr/local/php \
     --with-apxs2=/usr/local/apache2/bin/apxs \
     --with-mysql=/usr/local/mysql \
     --with-mysqli=/usr/local/mysql/bin/mysql_config \
     --with-oci8 \
     --enable-sigchild \
     --with-iconv \
     --with-libxml-dir=/usr/local/xml \
     --enable-modules=so \
     --enable-mbstring \
     --enable-mbregex \
     --with-gd \
     --enable-gd-native-ttf \
     --with-jpeg-dir=/usr/sfw \
     --with-png-dir=/usr/sfw \
     --with-zlib-dir=/usr/local
    root@wl ~/php-5.0.4 # make
    root@wl ~/php-5.0.4 # make install
    
    * PHP 4.3.11, PHP 5.0.4부터 오라클 인스턴트 클라이언트(Oracle Instant Client)를 공식 지원한다. 아래는 PHP 5.2.x에서의 인스턴트 클라이언트를 이용한 방법이다. 4.3.x, 5.0.x에서는 설정 방법이 약간 다르다.
    root@wl ~/php-5.2.3 # ./configure \
     --prefix=/usr/local/php \
     --with-apxs2=/usr/local/apache2/bin/apxs \
     --with-mysql=/usr/local/mysql \
     --with-mysqli=/usr/local/mysql/bin/mysql_config \
     --with-oci8=instantclient,/usr/local/instantclient10_1 \
     --enable-sigchild \
     --with-iconv \
     --with-libxml-dir=/usr/local/xml \
     --enable-modules=so \
     --enable-mbstring \
     --enable-mbregex \
     --with-gd \
     --enable-gd-native-ttf \
     --with-jpeg-dir=/usr/sfw \
     --with-png-dir=/usr/sfw \
     --with-zlib-dir=/usr/local
    root@wl ~/php-5.2.3 # make
    root@wl ~/php-5.2.3 # make install
    
    * 필자가 확인한 결과 PHP 5.0.x에서는 오라클의 커넥션이 끊어지지 않는 현상이 있다. 꼭 솔라리스에 국한된 문제는 아니며, OCI라이브러리를 사용하던 인스턴트 클라이언트를 사용하던 결과는 같다. 상용 서비스에서 오라클이 필요하다면 PHP 4.4.x를 사용하도록 한다. 설치방법은 PHP 5.0.x와 같다. 꼭 PHP 5를 사용해야 한다면, PHP 4.4.0의 OCI익스텐션 소스를 PHP 5.0.x소스에 덮어써 해결할 수 있다고 한다. PHP버그ID 32361 번 (http://bugs.php.net/bug.php?id=32361)에서 확인할 수 있다. 이는 PHP 5.1.2에서 해결되었다.
Posted by 1010
60.Unix2008. 12. 16. 17:11
반응형

유닉스에서 개발 웹 서버 설치, 설정하기

빠르고 기능이 풍부하고 자유롭게 사용 가능한 웹 서버를 만들면서 여러분의 유닉스 실력을 한 단계 높여보자

developerWorks
Go to the previous page 12 페이지 중 8 페이지 Go to the next page

문서 옵션
수평출력으로 설정

이 페이지 출력


제안 및 의견
피드백

튜토리얼 평가

이 컨텐츠를 개선하기 위한 도움을 주십시오.


예제 애플리케이션 설치

톰캣에는 한 가지 주요 예제 애플리케이션이 들어 있다. 이 애플리케이션이 여러분에게 들어맞는 애플리케이션 요구 사항을 테스트하는 데에 확실히 충분하다고는 말할 수 없겠지만 기본적인 JSP 애플리케이션과 기본 서블릿의 기능 테스트를 제공할 것이다.

WAR 위치 찾기

애플리케이션 배치를 위해 톰캣 애플리케이션 매니저를 사용한다면 배치를 위한 웹 아카이브(Web Archive: WAR)를 선택하고자 어떤 디렉터리를 찾아야 할지 알아야 할 것이다. 이 파일을 찾으려면 Listing 11의 코드를 사용한다.


Listing 11. 배치를 위해 WAR 파일 찾기
                    
bash-3.00# cd $CATALINA_HOME
bash-3.00# find . -name *.war
./webapps/docs/appdev/sample/sample.war
./webapps/sample.war


위로


서버를 배치하기 위해 톰캣 웹 애플리케이션 매니저 콘솔 열기

Manager Application에서 Deploy 섹션을 스크롤하여 아래로 내린다. 그림 5에 보였다.


그림 5. 예제 애플리케이션 배치
예제 애플리케이션 배치

War file to deploy에서 Browse를 클릭한다. 위에 나타난 경로를 보고 예제용 애플리케이션을 선택한다. Open을 클릭하고 나서 Deploy를 클릭한다. 실제로 에제 애플리케이션 배치는 이처럼 간단하다.


위로


예제 애플리케이션 테스트하기

애플리케이션 배치 후 http://localhost:8080/sample/로 가서 제대로 나타나는지 살펴볼 수 있다. 여기서 JSP를 클릭하고 난 후 그림 6처럼 기본 애플리케이션 기능이 제대로 뜨고 잘 동작하는지 확인하고자 Servlet을 클릭해볼 수 있다. 이제 서버가 애플리케이션을 띄울 준비가 되었다.


그림 6. 예제 애플리케이션 테스트 및 검증 페이지
예제 애플리케이션 테스트 및 검증 페이지

이건 그저 여러분의 톰캣 서버가 제대로 설치되어 의도했던 대로 동작한다는 걸 말하려는 것뿐이다. 개인 애플리케이션을 배치하려면 톰켓 서버 디렉터리 하의 "컨텍스트 루트(context roots)"에 패키징하여 설치하는 것을 고려하는 J2EE 지침에 따라야 한다.

Posted by 1010
60.Unix2008. 12. 16. 17:10
반응형

유닉스에서 개발 웹 서버 설치, 설정하기

빠르고 기능이 풍부하고 자유롭게 사용 가능한 웹 서버를 만들면서 여러분의 유닉스 실력을 한 단계 높여보자

developerWorks
Go to the previous page 12 페이지 중 7 페이지 Go to the next page

문서 옵션
수평출력으로 설정

이 페이지 출력


제안 및 의견
피드백

튜토리얼 평가

이 컨텐츠를 개선하기 위한 도움을 주십시오.


톰캣 웹 애플리케이션 매니저 설정

톰캣 웹 애플리케이션 매니저에서는 웹 애플리케이션 관리에 도움을 주는 많은 기능을 제공한다. 여기서는 여러 가지 방식으로 웹 애플리케이션을 배치 그리고 "철수(undeploy)", 애플리케이션 목록 보기, 재탑재, 애플리케이션 중지와 시작 등을 할 수 있도록 해준다.

특정 사용자 접근 허용하기

톰캣 웹 애플리케이션 매니저를 구현하려면 우선 tomcat-users.xml 파일에서 특정 사용자에게 접근을 허용해야 한다. 그렇게 하려면 Listing 9의 코드를 사용한다.


Listing 9. 사용자와 역할을 추가하여 톰캣 웹 애플리케이션 매니저에 접근 허용
                    
vi tomcat-users.xml
아래와 같은 두 <tomcat-users> 태그 사이에 그 사이에 있는 두 줄을 추가 
	<tomcat-users>
	<role rolename="manager"/>
	<user username="tomcat1" password="test1234" roles="manager"/>
	</tomcat-users>

이상하게 여기겠지만 위의 user와 password 부분의 사용자 이름과 암호는 완전히 임의로 넣은 것이다. 유닉스 서버 상의 암호를 가진 사용자를 생성할 필요는 없으며 원하는 대로 생성하면 된다. 다만 이 생성된 정보를 갖고 관리 콘솔에 로그인할 정보로 사용하게 될 것이라는 건 명심해두자.

보안을 위해 tomcat-user.xml 파일을 파일 소유자만 접근할 수 있도록 제한하자. 그렇게 하려면 권한을 700으로 설정해야 한다. 예를 들면 아래와 같이 한다.

# chmod 600 tomcat-users.xml


위로


톰캣 서버 재시작

변경된 내용을 적용하려면 톰캣 서버를 재시작해야 한다. 그러기 위해서는 Listing 10의 코드를 사용한다.


Listing 10. 톰캣 서버 재시작하기
                    
cd $CATALINA_HOME/bin
./shutdown.sh 
./startup.sh ;tail -f ../logs/catalina.out

catalina.out 로그 파일을 tail 명령어로 보면 다음과 비슷할 것이다.

May 15, 2008 4:08:12 PM org.apache.jk.server.JkMain start
INFO: Jk running ID=0 time=0/74  config=null
May 15, 2008 4:08:12 PM org.apache.catalina.startup.Catalina start
INFO: Server startup in 6271 ms


위로


톰캣 웹 애플리케이션 매니저 콘솔 열기

톰캣 관리 콘솔로 되돌아가자. 화면 왼쪽 네이게이션 부분에서 Administration에서 Tomcat manager 링크를 클릭한다. 그러고 나면 그림 4와 비슷한 창을 보게 될 것이다.


그림 4. 톰캣 웹 애플리케이션 매니저 시작 페이지
톰캣 웹 애플리케이션 매니저

톰캣은 상태 애플리케이션도 갖고 있다. 이 애플리케이션에서는 JVM의 메모리 사용량과 쓰레드 개수 등 톰캣 서버의 상태를 표시해준다. 톰캣 웹 애플리케이션 매니저의 오른쪽 상단에서 Server Status를 클릭하면 아주 유용한 이 도구에 접근할 수 있다.

Posted by 1010
60.Unix2008. 12. 16. 17:10
반응형

유닉스에서 개발 웹 서버 설치, 설정하기

빠르고 기능이 풍부하고 자유롭게 사용 가능한 웹 서버를 만들면서 여러분의 유닉스 실력을 한 단계 높여보자

developerWorks
Go to the previous page 12 페이지 중 6 페이지 Go to the next page

문서 옵션
수평출력으로 설정

이 페이지 출력


제안 및 의견
피드백

튜토리얼 평가

이 컨텐츠를 개선하기 위한 도움을 주십시오.


서버 설정, 컴파일 시작

필자가 작업해온 모든 아파치 제품에는 설정, 컴파일, 시작 단계가 포함된다. 이 과정은 코드를 준비하고 소프트웨어가 어떻게 그리고 어디에 설치될지 등에 대해 알려주게 된다.

소프트웨어 설정하기

톰캣 소프트웨어를 설정하려면 다음과 같이 타이핑한다.

cd $CATALINA_HOME/bin

./configure --with-java=/usr/java

또는 다음과 같다.

export JAVA_HOME
./configure


위로


코드 컴파일하기

톰캣 코드를 컴파일했다면 이제 컴파일한다.

바이너리와 라이브러리 빌드하기

Listing 5에 톰캣 바이너리와 라이브러리를 빌드하는 코드를 보였다.


Listing 5. 바이너리와 라이브러리 빌드하기
                    
# gunzip jsvc.tar.gz

# pwd
/opt/apache-tomcat-6.0.16/bin

# tar -xvf jsvc.tar

# gmake 

gmake가 위치한 경로가 PATH에 있는지 확인하기 바란다(예를 들어 ./sfw/bin/).

기억해둘 것: 톰캣 사이트에서는 FreeBSD 시스템의 자체 BSD make 명령어 대신 GNU make(gmake)를 사용해야 한다고 언급하고 있다.

Listing 6의 코드로 실행 파일인 .jsvc를 생성한다. 이 파일은 톰캣을 데몬으로 성공적으로 구동하는 데 필요하다.

jsvc에 대한 간단 명료한 정의

jsvc는 런처(launcher) 프로세스, 통제(controller) 프로세스, 통제되는(controlled) 프로세스 이렇게 세 개의 프로세스를 사용한다. 통제되는 프로세스는 주 자바 쓰레드다. 이 주 자바 가상 머신(JVM)이 비정상적으로 종료되면 통제 프로세스, 즉 컨트롤러 다음에 재시작한다. jsvc는 데몬 프로세스이므로 root로 시작해야 한다. 인자값으로 -user를 주면 root 권한이 없는 사용자로도 동작시킬 수 있다.


Listing 6. jsvc에 권한을 설정하여 복사하기
                    
chmod 775 jsvc
cp jsvc ..
cd ..


위로


서버 시작하기

CLI나 내장된 서버 형태로 된 자바 프로그램으로 서버를 시작할 수 있다. 게다가 서버는 데몬 형태로 구동할 수 있는데 이렇게 하면 윈도 환경에서 서비스와 비슷한 형태로 자동 구동된다.

기본 시작 스크립트 구동하기

Listing 7에서는 톰캣용 기본 시작 스크립트를 보였다.


Listing 7. 기본 시작 스크립트
                    
cd $CATALINA_HOME/bin
./startup.sh 
cd ../logs

에러가 나는지 catalina.out을 확인하기 바란다. cat, vi, more, less를 쓴다면 파일 아래로 갈 때 시프트+G키를 누른다. 아니면 다음과 같이 타이핑할 수도 있다.

tail -50 catalina.out

위처럼 하면 에러 파일의 마지막 50번째 줄까지 체크할 수 있다.

이렇게 하는 게 이 튜토리얼의 범위를 넘어가긴 하지만 톰캣 코드를 수정하거나 스스로 LifecycleListeners를 구현하여 시작 프로세스를 입맛에 맞게 고칠 수도 있다.

시작 데몬 구동하기

데몬은 다양한 옵션을 사용해 시작할 수 있다. 이를테면 root가 아닌 사용자로 구동하려면 -user를 주거나, 특정 .pid 파일 위치를 명시하려면 -pid 옵션을 준다거나, 에러 및 출력 파일 로그를 설정하려면 각각 -errfile-outfile을 준다거나 할 수 있다. 어떤 옵션이 지원되는지 전체 내용을 보려면 ./jsvc -help라고 타이핑한다. Listing 8에서 jsvc 시작 스크립트의 예를 보였다.

데몬이란 무엇인가?

데몬은 비 대화형(non-interactive) 서버 애플리케이션으로서 명시한 시그널(signal)들을 운영체제가 통제하게 된다. 윈도에서 서비스를 떠올려보자. 윈도의 서비스는 서버 애플리케이션의 정상적인 셧다운을 위해 제공된다. 운영체제는 셧다운이 절박한 상황인 경우 서버 애플리케이션에게 이를 고지하게 되고 애플리케이션은 수행중인 과정을 끝내기 전에 어떤 작업을 수행할 수 있도록 할 여지가 생기게 된다.


Listing 8. jsvc 시작 스크립트의 예
                    
Bash#./jsvc –home /usr/jdk/instances/jdk1.5.0 \
–Dcatalina.home=/opt/apache-tomcat-6.0.16 \
-cp ./bin/bootstrap.jar -outfile ./logs/catalina.out \
-errfile ./logs/catalina.err \
       org.apache.catalina.startup.Bootstrap

jsvc/bin 디렉터리에 포함되어 있는 Tomcat.sh 스크립트를 사용하는 것도 꽤 도움이 된다. 하지만 여러분 환경에 맞게끔 경로 같은 것들을 맞춰서 변수를 편집할 필요는 있을 것이다.


위로


톰캣 설치 테스트하기

기본 톰캣은 http 포트 8080에 내부 HTTP 서버를 설치한다(Coyote HTTP/1.1). 이 아키텍처와 설정을 위해 아파치 HTTP 서버가 별도로 필요하지는 않다. $CATALINA_HOME 디렉터리의 server.xml 파일을 수정해서 80 같은 전형적인 웹 서버 포트 번호로 간단히 변경할 수 있다. 또한 기본 SSL(Secure Sockets Layer) 포트도 전형적인 SSL 포트 번호인 443으로 간단히 변경할 수 있다. server.xml 파일은 톰캣이 핵심 설정 서버 정보를 얻는 곳이라 할 수 있다.

http://localhost:8080/을 가보는 것으로서 톰캣이 성공적으로 구동되었는지 여부를 판별해볼 수 있다. 제대로 되었다면 그림 3과 비슷한 시작 페이지를 볼 수 있어야 한다.


그림 3. 톰캣 관리 콘솔 환영 페이지
톰캣 최초의 시작 페이지
Posted by 1010
60.Unix2008. 12. 16. 17:09
반응형

유닉스에서 개발 웹 서버 설치, 설정하기

빠르고 기능이 풍부하고 자유롭게 사용 가능한 웹 서버를 만들면서 여러분의 유닉스 실력을 한 단계 높여보자

developerWorks
Go to the previous page 12 페이지 중 5 페이지 Go to the next page

문서 옵션
수평출력으로 설정

이 페이지 출력


제안 및 의견
피드백

튜토리얼 평가

이 컨텐츠를 개선하기 위한 도움을 주십시오.


서버 설치 파일 다운로드, 추출하기

서버 설치 파일을 추출하는 다양한 방법을 찾아보자.

설치 파일을 찾아 옮기기

GUI를 사용하고 있다면 Launch > Applications > Utilities > Terminal을 선택해 터미널 창을 연다. 파일을 바탕 화면에 저장했고 아직 root 사용자라면 cd /Desktop 명령어를 입력한다. ls -ltr이라고 명령어를 실행하여 톰캣의 tar.gz 파일이 거기에 있는지 살핀다. 그러고 나서 그 파일을 /opt 디렉터리 아래로 옮긴다(/opt 디렉토리는 대부분의 신규 소프트웨어가 설치되는 디렉터리다). 설치 파일을 옮기려면 다음과 같이 타이핑한다.

mv *tar.gz /opt

그러고 나서 ls -ltr /opt를 타이핑하여 파일이 제 위치에 있는지 확인한다.

권한 설정하기

권한은 유닉스 시스템의 근원이다. 적절한 권한이 없다면 아무것도 할 수가 없다. 어떤 것에 대한 권한 제한 없이는 어떠한 사용자라도 어떠한 일이든 할 수가 있다. 이는 우선 설치에서 여러분 스스로에게 가장 높은 수준의 권한을 주어서 여러분(혹은 다른 사용자가) 적절히 실행 가능하도록 하게끔 해야 하는 이유다. 다음으로 Listing 4에 보인 대로 설치 코드를 풀어낼 때 모든 임시 및 설치 디렉터리에 적절히 쓰기가 이뤄질 수 있도록 umask 명령어를 사용한다.


Listing 4. 적절한 권한과 umask 설정
                    
cd /opt
chmod +x *gz (same as chmod 775)
umask 007 (사용자가 770 권한을 갖고 신규 파일을 생성할 수 있도록 한다. chmod를 역으로 생각해 보라.)


위로


설치 파일 추출하기

대부분의 코드 패키지는 .tar 파일 형태이며 좀 더 크기를 줄이고자 .gz 파일 형태를 갖고 있다. 간단히 gunzip 명령어를 써서 압축을 해제할 수 있다.

gunzip *.gz


위로


.tar 파일 추출하기

마지막으로 코드를 "untar"(풀어내기) 해야 한다. 묶어 놓았던 것을 정확히 그대로 코드를 추출해내는 것이다(디렉터리를 비롯하여 모두 다). 이것이 바로 필요한 디렉터리 경로 하에 파일을 untar하는 것이 중요한 이유다. 유닉스에서는 /opt가 최상의 위치다.

tar -xvf *.tar

이 명령어를 쓰면 애플리케이션 파일이 추출된다. ls -latr을 쓰면 추출된 파일을 볼 수 있다. 몇 가지 .bat나 .exe 파일로 설치가 되었다면 다음과 같이 타이핑해 삭제한다.

rm *.exe
rm *.bat

톰캣 디렉터리가 만들어졌으니 서버 설정, 컴파일, 시작으로 가보자.

Posted by 1010
60.Unix2008. 12. 16. 17:09
반응형

유닉스에서 개발 웹 서버 설치, 설정하기

빠르고 기능이 풍부하고 자유롭게 사용 가능한 웹 서버를 만들면서 여러분의 유닉스 실력을 한 단계 높여보자

developerWorks
Go to the previous page 12 페이지 중 4 페이지 Go to the next page

문서 옵션
수평출력으로 설정

이 페이지 출력


제안 및 의견
피드백

튜토리얼 평가

이 컨텐츠를 개선하기 위한 도움을 주십시오.


서버 준비하기

변수를 설정하고 설정 파일을 수정한 뒤 사용자를 생성하는 등 여러 작업을 하여 서버를 준비하자.

경로 설정

서버에 설치해야 하는 도구뿐 아니라 셸에 대해 PATH 변수 설정을 정확히 할 필요가 있다. PATH 변수는 셸이 어떤 소프트웨어와 도구 등이 어디에 있는지 찾는 위치를 알려준다.

자바 버전 점검

사용중인 자바 기술 버전을 점검하려면 java -version 명령을 사용하라. 그러면 다음과 같은 내용을 보게 될 것이다.

bash-3.00# java -version
java version "1.5.0_12"
Java(TM) 2 Runtime Environment, Standard Edition (build 1.5.0_12-b04)
Java HotSpot(TM) Client VM (build 1.5.0_12-b04, mixed mode, sharing)

JAVA_HOME

먼저 릴리스에 포함된 지시에 따라 JRE를 설치해야 한다. 필자는 보통은 JRE보다는 자바 소프트웨어 개발 키트(JDK)를 사용한다. 여러분도 그렇게 하기로 했다면 JDK를 설치한 디렉터리의 경로 이름(예를 들어 /usr/local/java/j2sdk5.0)을 JAVA_HOME 환경 변수에 설정한다. JAVA_HOME 변수를 설정하려면 다음 코드를 사용한다.

bash-3.00# export JAVA_HOME=/usr/jdk/instances/jdk1.5.0

다음과 같이 할 수도 있다.

JAVA_HOME=/usr/bin/java; export JAVA_HOME'

(차이점은 없다).

명령이 제대로 동작하는지 체크하기 위해 echo 명령어를 타이핑해 본다.

bash-3.00# echo $JAVA_HOME
/usr/jdk/instances/jdk1.5.0

CATALINA_HOME(톰캣의 기본 홈 디렉터리)

CATALINA_HOME은 릴리스 디렉터리의 완전한 경로 이름을 참조하는 데 사용한다. 이 변수를 설정하려면 다음 코드를 사용한다.

bash-3.00# export CATALINA_HOME=/opt/apache-tomcat-6.0.16 

이 코드는 설치한 톰캣 버전에 따라 달라진다. 의심이 간다면 추출한 .tar 파일을 보고 이름을 붙이기 바란다. 이름에 정확한 버전이 붙어있기 때문이다.

셸과 설정 파일 편집

예제 명령어에서 bash에 대한 몇 가지 참조할 내용을 얻었을 것 같다. 유닉스에 로그인한 사용자들은 지루하게 자세한 내용에는 매달리지 않고 서버를 살펴보고 관리할 수 있는 CLI를 수행하고 서버를 벗어난다. 다른 운영체제와 다른 점이라고 할 수는 없지만 본 셸(Borune shell, sh)이나 본 어게인 셸(Bourne-again shell, bash) 같은 것들을 타이핑하여 해당 셸을 정의할 수 있다는 점에서 좀 더 유연성을 제공한다.

추가로 사용하는 셸에 따라 자동으로 PATH 변수를 설정하고 서버 상의 유용한 공통 명령어를 표현하는 별칭(alias) 설정도 할 수 있는 등 CLI에 맞게 맞춤 셸 프로파일을 수정할 수 있다. 그러기 위해선 .bashrc, .profile(bash의 기본 파일) 등을 수정해야 한다. 이 파일을 생성하려면 vi 편집기를 사용한다. 그러고 나서 root, 개인 계정, 톰캣 사용자 ID에 맞게 서버에 로그인할 때마다 PATH 변수가 적절히 설정될 수 있도록 편집해준다.

홈 디렉터리 하에서 .profile 파일을 생성한다(Listing 1 참조). 없다면 표준 유닉스 편집기인 vi를 사용하여 생성한다.


Listing 1. 표준 유닉스 편집기를 사용하여 .profile 생성하기
                    
cd ~/ (home dir)
vi .profile

문자 삽입(insert)을 위해 i를 누른다. 그러고 나서 위에서 설정할 경로를 추가한다. 다음과 같을 것이다.

# /bin/sh
stty istrip
PATH=$PATH:/usr/bin:/usr/local/bin:/usr/ucb:/etc
export PATH
umask 077

export SHELL=/usr/bin/ksh
export ENV=$HOME/.kshrc
export EDITOR=vi
export FCEDIT=vi

#Tomcat specific PATHs

export JAVA_HOME=/usr/jdk/instances/jdk1.5.0
export CATALINA_HOME=/opt/apache-tomcat-6.0.16

또한 이번이 앞으로 참조할 도구를 설치할 모든 영역을 커버할 PATH 변수에 덧붙일 좋은 때일 수도 있겠다. 필자가 설정한 걸 예로 들면 필자는 다음과 같이 두 경로를 넣었다.

bash-3.00# PATH=/usr/ccs/bin:$PATH; export PATH (for make cmd)
bash-3.00# PATH=/usr/sfw/bin:$PATH; export PATH


위로


사용자와 그룹

여러 사용자가 서버를 사용하게 된다면 당연히 각기 다른 사용자가 다양한 도구와 파일 시스템에 접근할 수 있도록 허용할 사용자와 그룹 권한을 설정하고 싶을 것이다. root가 아닌 사용자로 톰캣을 설치하여 동작시키려 한다면 이 또한 필수다(대부분의 실 서비스 환경에서 추천되는 방식이다). 튜토리얼 뒷 부분에서 이에 대해 자세히 다루겠다. 다만 여기서 명령어 몇 개 정도 나열하도록 한다.

톰캣 그룹을 생성하려면 Listing 2의 코드를 사용한다.


Listing 2. 톰캣을 구동할 그룹 생성하기
                    
/usr/sbin/groupadd -g {구체적인 gid 명시. 명시하지 않으면 OS가 gid를 알아서 할당해줄 것이다.} 
{그룹 이름}
말하자면 다음과 같다.
/usr/sbin/groupadd -g 10004 tomcatgroup

톰캣 사용자를 생성하려면 Listing 3의 코드를 사용한다.


Listing 3. 톰캣을 구동할 사용자 생성하기
                    
/usr/sbin/useradd -d {사용자 홈 디렉터리} -g {사용자가 속한 주 그룹} -u 
{구체적인 UID 명시. 이 란은 비워둘 수 있다. 명시하지 않으면 운영체제가 UID를 알아서 할당해줄 것이다.)  
-s {해당 사용자에 대한 기본 셸} -c "{사용자에 대한 상세 정보 명기}" {사용자 이름}
말하자면 다음과 같다.
/usr/sbin/useradd -d /export/home/tomcat -g tomcatgroup -u 10010 -s /bin/ksh -c 
"Main Tomcat Administrative User" tomcat
Posted by 1010
60.Unix2008. 12. 16. 17:08
반응형

유닉스에서 개발 웹 서버 설치, 설정하기

빠르고 기능이 풍부하고 자유롭게 사용 가능한 웹 서버를 만들면서 여러분의 유닉스 실력을 한 단계 높여보자

developerWorks
Go to the previous page 12 페이지 중 3 페이지 Go to the next page

문서 옵션
수평출력으로 설정

이 페이지 출력


제안 및 의견
피드백

튜토리얼 평가

이 컨텐츠를 개선하기 위한 도움을 주십시오.


아키텍처 개요

톰캣의 제약 사항과 전형적인 엔터프라이즈 환경이 어떻게 구성되는지 알아보자.

제약 사항

톰캣이 개발 환경에서 단일 서버로 돌아가도록 할 것인가? 꽤나 제한적이지 않은가? 그렇다. 사실이다! 톰캣은 사실 다운로드 횟수만 수백만 회이고 여러 잘 알려진 웹 사이트의 실 서비스 환경에서도 성공적으로 동작하고 있다. 하지만 거기엔 제약 사항이 있다.

상용 소프트웨어 제품(특히 IBM WebSphere Application Server)은 실 서비스 환경에서 훨씬 더 우월한데 J2EE를 완벽히 준수하고 추가 기능과 보안 기능을 갖추고 있다는 것이 주된 이유다. 기능적으로 완벽한 실 서비스 환경에서 톰캣을 구현하려고 한다면 기초를 갖추는 데 이 튜토리얼을 이용할 수 있을 것이다.

엔터프라이즈 환경

그림 1에서 보인 엔터프라이즈 아키텍처에 대한 것은 브라우저에서 엔터 키를 눌렀을 때 벌어지는 일들을 다소 정확하게 표현한 것이다. 이 아키텍처에는 IBM과 미 공군(United States Air Force)의 수억 달러짜리 미션 크리티컬 애플리케이션을 포함한 내가 봐온 나라 전역에서 고객을 위해 동작하는 애플리케이션들의 반복되는 요소들로 구성되어 있다.


그림 1. 엔터프라이즈 아키텍처의 예
엔터프라이즈 아키텍처의 예

A. 네트워크에 대한 경계

보통은 네트워크에 경계가 있다. 라우터나 방화벽, 그리고 웹 요청과 적절한 도메인을 일치시켜 주는 프록시 서버(엄밀히 말하면 리버스 프록시) 같은 것들 말이다. 어떤 인증의 수준이 있을 수도 있고, 심지어 DMZ(demilitarized zone)에 의해 보호받게 될 네트워크 상의 첫 서버에 도달하기도 전에 앞단의 IBM Tivoli® Access Manager(TAM)/TAM WebSEAL 서버 수준에서 허가를 받아야 할지도 모른다.

B. 웹 서버

다음엔 웹 서버다. 이런 서버들은 모두 수직적 그리고 수평적 장애 극복(failover) 기능을 갖추고 있는데 이 말 뜻은 각 단에서 분리되었지만 쌍둥이인 하드웨어가 존재하고 가능한 한 소프트웨어 단에서 복제해 둠을 의미한다. 웹 서버가 웹 요청을 받아서 정적인 내용을 제공하는 일을 한다면 또 다른 계층의 네트워크 디스패처(dispatcher: ND)를 갖거나 최소한 추가적인 라우팅을 수행하는 플러그인(IBM HTTP 서버(IHS) 플러그인 같은 것)을 가질 수도 있다.

C. 애플리케이션 서버(서블릿 엔진)

이제 J2EE 엔진(WebSphere Application Server)이다. J2EE 엔진은 웹 혹은 서블릿 컨테이너뿐 아니라 기본적인 것에서 전문적인 자바 함수와 비즈니스 로직을 다루는 EJB(Enterprise JavaBean) 컨테이너로 구성되어 있다. 웹 서비스와 IBM WebSphere MQ 메시지를 연결하는 등 무수히 많은 일을 하기 위해 여러 어댑터를 쓸 수도 있다. 그리고 자주 MySQL, IBM DB2®, 오라클(Oracle) 백엔드와 연결하는 데이터베이스 연결 풀도 갖는다.

LDAP(Lightweight Directory Access Protocol) 서버 그리고 옛날 방식의 서버들과 연결할 가능성이 있다면 실제 n-티어 아키텍처를 갖는다. 이제 웹 서버 환경을 시작해 보자.


위로


개발 환경

그림 2를 보자. 브라우저를 통해 인터넷에 접근할 수 있는 도구를 일부 갖고 있는 단일 유닉스 운영체제에 단일 서버 설치에 기반을 둔다고 가정하자. 이 서버에는 톰캣, 여러 운영체제 수준의 도구들뿐만 아니라 (가능하다면) 자체 로컬 데이터베이스나 최소한 로컬 저장소(로컬 디렉터리 구조)에 저장되는 소프트웨어와 애플리케이션 코드도 함께 저장될 것이다.

기억해둘 것: 필자가 톰캣 서버라 함은 전체 컨테이너를 의미한다.


그림 2. 독립형 서버 아키텍처의 예
독립형 톰켓 서버

실제 엔터프라이즈 아키텍처처럼 보이진 않겠지만 적어도 서버에서 기본적인 애플리케이션 기능을 복제할 수 있을 것이다. 제한적이긴 하지만 의도와 목적면에서 여러분이 관리자라면 이번에 설치해 보는 것은 예제로 테스트 개발 서버를 설치한다거나 그저 연습삼아 써볼 서버를 설치한다고 생각하자.

아파치 HTTP 서버 프런트 엔드와 톰캣을 분리해서 설정하여 구동할지 선택할 수 있으나 이 튜토리얼의 목적 상 추천하지는 않는다. 좀 더 해야 할 일도 많고 관리하고 설정할 것도 많아지기 때문이다. 또한 mod_jk 모듈도 필요할 것이고 적절히 라우팅도 설정해야만 한다.

어느 쪽을 택하든 설치와 설정을 하기 전에 공통 질문으로 가자.

Posted by 1010
60.Unix2008. 12. 16. 16:52
반응형

유닉스에서 개발 웹 서버 설치, 설정하기

빠르고 기능이 풍부하고 자유롭게 사용 가능한 웹 서버를 만들면서 여러분의 유닉스 실력을 한 단계 높여보자

developerWorks
12 페이지 중 1 페이지 Go to the next page

문서 옵션
수평출력으로 설정

이 페이지 출력


제안 및 의견
피드백

튜토리얼 평가

이 컨텐츠를 개선하기 위한 도움을 주십시오.


난이도 : 중급

Matthew Skamser, 소프트웨어 컨설턴트, Solution Destination, Inc.

2008 년 9 월 09 일

개발 또는 테스트 용도로 사용할 아파치 톰캣(Apache Tomcat) 서버 설치와 설정에 대해 단계별로 자세히 접근하여 알아봅니다. 아울러 유닉스(UNIX®) 환경에서 웹 혹은 애플리케이션 서버를 어떻게 만들어 관리할지 도움이 될 만한 팁을 살펴보겠습니다.

시작하기 전에

이 튜토리얼에서 기대하는 바와 이를 어떻게 하면 가장 잘 도출해낼 수 있을지 알아보자.

이 튜토리얼에 대해

그러면 자바(Java™) 2 플랫폼 엔터프라이즈 에디션(J2EE™) 애플리케이션 개발, 테스팅, 배치(deploy), 튜닝을 수행하기 위해 완벽한 기능을 갖춘 애플리케이션 서버를 설치하고 싶은 것인가? 아니면 단지 새로운 걸 배워보고 싶은 상태이고 여러분 스스로의 애플리케이션 서버 환경은 확립하기로 결정한 상태인 것인가? 어디서 시작하고 싶은가?

동기가 어떻든 간에 이 튜토리얼을 읽고 있다면 웹 사이트가 어찌 돌아가는지 그리고 브라우저에서의 애플리케이션 접근에 대한 최소한의 공통 분모(도메인, 코드, 웹 브라우저, 데이터베이스 등)로 무엇이 필요할지 정도는 기본적으로 익숙해야 한다. 기본 사항을 숙지하고 있고 웹 혹은 애플리케이션 서버에 필요한 내용을 알며, 유닉스 서버에 접근할 수 있고, 웹 서버 관리에 대해 한 두세 개 정도 배울 마음만 갖고 있다면 이 튜토리얼은 여러분을 위한 것이다.


위로


목적

이 튜토리얼은 다음 내용에 대해 담고 있다.

  • 아파치 톰캣과 유닉스에 대한 소개뿐 아니라 시작하기 위해 필요한 것들에 대한 소개
  • 엔터프라이즈 웹 아키텍처 대 독립형(stand-alone) 웹 아키텍처에 대한 비교
  • 아무것도 설정되어 있지 않은 유닉스 서버에 웹 혹은 애플리케이션 서버 설치 준비
  • 톰캣 웹 서버 설치와 시작 방법에 대한 상세한 단계별 지시
  • 톰캣 웹 애플리케이션 매니저(Tomcat Web Application Manager) 접근 설정 정보
  • 예제 애플리케이션 배치에 대한 지시 사항
  • 추가적인 내용

슬슬 곰팡이가 피는 거 같다... 긁어내자. 잽싸게 초보 유닉스 관리자로서 거듭나도록 갈고 닦을 때다.


위로


준비할 것들

이 튜토리얼에서는 기호에 맞게 기본 유닉스 운영체제가 이미 설치되었다고 가정하고 있다. 튜토리얼에서 예제를 구동하려면 톰캣 버전 6가 설치되어 구동되어야 한다.


위로


시스템 요구 사항

서버에는 적어도 가용한 하드디스크 용량이 10GB는 되어야 하고 최소 512MB의 램이 남아 있어야 한다. 시작할 수 있으려면 유닉스 서버에는 다음과 같은 추가 도구가 설치되어 있어야 할 필요가 있다.

  • 웹 브라우저: 어떤 브라우저라도 관계 없다.
  • 자바 2 표준 에디션 런타임 환경(JRE) 릴리스 버전 5.0 이상: 아파치 톰캣 버전 6에서는 JRE를 필요로 한다.
  • C 컴파일러: 안타깝지만 솔라리스나 IBM® AIX®의 기본 설치본에는 이런 컴파일러가 딸려오질 않는다. 좀 더 자세한 정보를 보려면 GNU GCC 관련 글에 대한 링크를 보기 바란다.
  • 파일 추출 도구: 서버에서 파일을 적절히 추출하려면 gunzip, tar, bzcat, 그리고 가능하다면 GNU maketar(gmake, gtar로서 GNU 사이트에서 다운로드 가능)가 필요하다.

    서버에서 도구들이 제대로 동작하는지 체크해 보려면 다음 명령어를 실행해본다.

    cd /usr
    find . –name *.tar (repeat for *make, *zip, etc.)
    

  • 톰캣 코드: 먼저 아파치 다운로드 사이트에서 톰캣 버전 6 코드를 다운로드해 둔다. 그러고 나서 여러분 서버에 다운로드한 tar.gz 파일을 저장한다.
Posted by 1010
60.Unix2008. 12. 16. 15:20
반응형
Solaris Operating System

How to Quickly Install the Solaris 10 10/08 OS on x86 Systems

How to Quickly Install the Solaris 10 10/08 OS on x86 Systems

This How to Guide instructs users unfamiliar with Solaris 10 installation on how to install the Solaris 10 OS on a Sun supported x86 system. This step-by-step guide, complete with screen shots, takes users through the installation process, in 22 simple steps. Novice users should be able to complete a Solaris 10 10/08 Operating System installation on a standalone x86 system using the instructions in this guide.

1030KPDF[3.8MB]
Table of Contents


Installation Assumptions

This guide makes several assumptions, including:
  • The system is an x86 system
  • The system is compatible with the Solaris 10 OS and is listed on the Solaris Hardware Compatibility List (HCL).
  • The system has a graphical interface

While this guide is most appropriate for a stand-alone system that does not have a network connection, it can also be used as a step-by-step installation procedure for networked systems—systems with an IP address that are connected to a network infrastructure—assuming network configuration information is available.

If problems arise during the installation process that are not discussed in this guide, refer to the Solaris 10 OS Installation Guide: Basic Installations for more information. This guide is part of the Solaris 10 Release and Installation Collection located on the Sun Web site at http://docs.sun.com/app/docs/prod/solaris.10.

Back To Top


Check the Hardware Compatibility List

The first step before the installation process is to verify that the system to be installed is on the hardware compatibility list located at: http://www.sun.com/bigadmin/hcl/.
Note: The term "x86" refers to the "family" of 32-bit x86-compatible architecture and 64-bit AMD64 and Intel EM64T.

Back To Top


Basic System Requirements

Verify the computer system meets the following requirements.
NOTE: The requirements below are recommended minimums.

While it is possible to install the Solaris OS on a system with less disk capacity and CPU speed, it is not recommended.
  • Minimum 512 MB of physical RAM
  • Minimum 10 GB of available hard drive space
  • Minimum 400 MHz CPU speed
  • DVD or CD-ROM drive/li>
  • Attached monitor or integrated display
For more information on Solaris System requirements, visit http://www.sun.com/solaris/specs.jsp. For a detailed list of 3rd-party applications available on Solaris 10, visit http://www.sun.com/partners/10moves/solutions.html.  


Obtaining Media for the x86 Platform

The Solaris 10 OS 10/08 release is available via download from the Sun Web site.

  1. Go to http://www.sun.com/solaris/ to obtain information about the Solaris 10 OS.
  2. Go to http://www.sun.com/solaris/get.jsp to begin the download process.
  3. Choose Solaris 10 on the list of available downloads.
  4. Click on the appropriate media format (Solaris for x64/x86 systems).
  5. Register at the Sun Download Center, if you have not already done so.
  6. Answer the short questionnaire.
  7. Read and accept the license agreement.
  8. Download and burn the CDs or DVDs.

    See the Solaris 10 Self Help FAQs located at http://www.sun.com/solaris/self_help.jsp for additional guidance, instruction, and tips on downloading the Solaris 10 OS or burning installation CD and DVD media.

    Back To Top


    Power Up and Media Boot

    The following procedure can be used whether another operating system is already running on the system, or for installation on a new system.

    1. Power up the system and insert the first installation CD or DVD into the drive tray.
    2. Restart the system.
    3. If the system appears to be booting from the hard disk, and the Solaris OS installer does not start, power cycle the system (power cycle is shutting the power on the system and then restarting the system). As the system begins to boot, enter setup mode. Typically, the system displays a message indicating which key (such as "Enter F2 to enter setup"). The key to press varies by manufacturer; the ESC and F12 keys are other common options. If you miss the message, simply restart the system a couple of times until you are able to view it.
    4. Once in setup mode, specify the boot device for the system. This example specifies the CD or DVD drive as the boot device. To do so, find the list that describes boot order and re-order as needed to ensure the CD or DVD drive appears first on the list. The system should then boot from the CD or DVD drive to start the install process, displaying a message resembling the one below:

      Loading stage 2....

      GNU GRUB version 0.95 ( xxK lower /
      xxK upper memory)

    Back To Top


    Installing the Solaris 10 10/08 Operating System

    The Solaris 10 10/08 Operating System install and boot process is based on the GNU GRUB loader. Therefore, the messages displayed throughout this process are unique to the GRUB loader and are different than in prior Solaris installations.

    Identifying the Console

    The next step in the installation process is to select the type of console for the hardware version on which the Solaris OS is being installed. Use the arrow keys to select the version of the Solaris OS that matches the hardware configuration. For most x86 systems, this is the default selection.

    [Two serial console options are available in the event a headless rack-mounted system is in use and a serial port is needed as an interface to a serial console. For older x86 systems, such as the Sun Fire" LX50, Sun Fire" V60x, or Sun Fire" V65x servers, select Solaris Serial Console ttyb.]

    Edit functions include using the arrow key to select or highlight an entry, the e key to edit a command, or the c key for a command line. Pressing the ENTER key, boot the version of operating system selected. The highlighted entry boots in 60 seconds even if a key is not pressed.

    NOTE: Prompts do not appear during the boot process. If a selection is not made, the screen times out and the system automatically boots the Solaris OS.

    Solaris
    Solaris Serial Console ttya (headless and rack-mounted systems only)
    Solaris Serial Console ttyb (for1x50, v60x and v65x)


    Selecting the Type of Installation

    After the ENTER key is pressed, or the counter times out, a series of dots will run on the screen, then six installation options are presented. Select an option using the arrow keys or space bar as appropriate, or let the counter time out to automatically select the default installation method:

    SunOS Release 5.10 version generic_120012-12 32-bit
    Copyright 1983-2005 Sun Microsystems, Inc. All rights reserved.
    Use is subject to license terms.
    Configuring devices.

      1. Solaris Interactive (default)
      2. Custom JumpStart
      3. Solaris Interactive Text (Desktop session)
      4. Solaris Interactive Text (console session)
      5. Apply driver updates
      6. Single user shell
    Automatically continuing in xx seconds

    (timeout)


    When the first option is selected, or the counter times out, the following output is displayed. Keep in mind that the hardware information displayed, such as "nge0", may differ from the exact data displayed below and that each step can take up to a couple of minutes to complete:

    Solaris Interactive

    Using install cd in /dev/dsk/c1t0d0p0
    Using RPC Bootparams for network configuration information.
    Attempting to configure interface nge0...
    Skipped interface nge0
    Setting up Java. Please wait...
    Extracting windowing system. Please wait...
    Beginning system identification...
    Searching for configuration files(s)...
    Search complete.
    Discovering additional network configuration...

    Starting Solaris Interactive (graphical user interface) Installation.

       You must respond to the first question within 30 seconds or the installer
       proceeds in a non-window environment (console mode).

       If the screen becomes blank or unreadable the installer proceeds in
       console mode.

       If the screen does not properly revert to console mode, restart the
       installation and make the following selection:

       Solaris Interactive Text (Console session)

    Press ENTER to continue.

    When the ENTER key is pressed, the system switches to graphics mode. If you are able to see the graphics window, press ENTER. If not, the system will time out and will continue the installation in Text (Console) Mode. Roll your mouse over the gray window and press ENTER:

    start

    System Configuration

    A series of screens guide you through the Solaris OS configuration process.
    NOTE: The graphical screens require a mouse to be rolled over the window in order to answer questions posed throughout the configuration process.

    1. After you press ENTER, the system configuration process will start through a series of windows. Please roll the mouse over the appropriate window and make your selections.
    2. Select a language for the system:

      Select Language

    3. A new window, the Solaris Install Console, appears in the bottom-right corner. This window is used to display pertinent installation messages. Another window appears in which the Solaris OS installation questions should be answered:

      Solaris Install Console

    4. The Welcome screen appears. Click Next to continue the installation process. Keep in mind the installation program checks the configuration entered. If the configuration information supplied is incorrect, the system will ask for the correct information to be re-entered on the appropriate screens:

      Welcome

    5. The Network Connectivity window appears:

      Network Connectivity
      x networked
        non-networked

    6. The Host Name window appears. Type in the name for the system and follow the guidelines on the screen, then click on the Next button:

      Host Name

    7. The NFSv4 Domain Name window appears. Let the system use the default option and click on the Next button:

      Domain Name

    8. The Time Zone window appears. Next, set the time zone for the system. This example sets the time zone by specifying the geographic region. Select "Geographic" and click Next:

      TimeZone

    9. Next, select the continent and country. Detailed information on the exact location is requested. For example, selecting "Americas" results in a screen that lists all time zones in the "Americas". Select the appropriate time zone and click Next:

      Continent and Country

    10. Next, set the date and time and click Next. A date and time is automatically displayed. If correct, click Next. If adjustments are needed, make corrections in the text boxes and click Next:

      Date and Time

    11. The Root Password window appears. Set the root password. Note the password typed remains invisible. Re-enter the password in the second box and click Next:

      Root Password

    12. The Remote Services window appears. In this window, you can choose a "Secure by default" Solaris installation, but afterwards individual services should be enabled. If you are unsure of your type of installation, follow the default, "Yes" to enable all remote services:

      Enabling Remote Services

    13. The Confirmation window appears. Please verify that your information is correct and then click the Next button, if any information is incorrect, click the Back button and fix it:

      Confirm Information

    14. The Solaris installation window appears. From here Solaris will start the installation process based on your preferences:

      Welcome

    15. The Installer options window appears. This option only applies in case you want to do some post-install customizations, for this installation process let the system go with the default options. "Yes" on automatic reboot, and "Yes" on Ejection of the install media:

      Installer Options

      15a. A pop-up window will appear to remind you to physically remove the CD/DVD. Click on the OK button to continue:

      Installer Options 2

    16. The Media window will appear. Unless you are using different media than a CD/DVD, this question does not apply to your case, please use the default CD/DVD and click the Next button:

      Specify Media

    17. The System initialization window will appear with a progress bar, and after a few seconds it will disappear indicating that the system is was initialized:

      Initalizing

    18. The License window appears. Please read the Solaris License Agreement, and if you agree, click on the Accept checkbox, then click on the Next button:

      License

    19. The Type of Install window appears. Advanced users may want to customize the installation, if not, leave the default and click on the Next button:


      Select Type of Install

    20. The confirmation window appears. On this window, you can see a more technical description of how Solaris will be installed on your system. Click on the Install Now button:

      Ready to Install

    21. The Install Progress window appears. Now just wait for a few minutes while Solaris installs on your system. After the installation is completed, remember to eject the CD/DVD. The system will reboot automatically and will start on Solaris:

      Installing...

    22. For Localization, please review the Solaris 10 10/08 installation guide that can be found at: http://docs.sun.com/app/docs/prod/solaris.10

    Back To Top


    For More Information

    For more information regarding the Solaris 10 OS, visit sun.com/solaris.

    Manuals
    Sun Documentation
    Big Admin System Administration Portal
    Sun BluePrint Articles
    Configuring JumpStart Servers to Provision Sun x86 Systems
    Performing Network Installations Without a Local Boot Server
    Configuring Multiboot Environments on Sun x64 Systems with AMD Processors
    Related Web Sites
    Solaris Laptop List (x86)
    Solaris Hardware Compatibility List
    Solaris 10 System Requirements
    Solaris 10 11/06 OS Features Comparison Chart
    Next Steps to Solaris 10 Adoption
    Get hands on experience with Solaris 10 using "Solaris 10 How To Guides"
    Get trained on Solaris 10—free!
    Count on Sun's full enterprise support—whenever you're ready. Get a support contract.
    Participate in the OpenSolaris community
Posted by 1010
60.Unix2008. 12. 16. 14:08
반응형

출처 : http://blog.naver.com/cgshome/120002699779

- OS 버전의 확인
# uname -a
SunOS sonamu 5.8 Generic_108528-15 sun4u sparc SUNW,Ultra-1

- 솔라리스 정보
솔라리스 9
http://kr.sun.com/products/software/os_platforms/solaris/index.html
솔라리스 8
http://kr.sun.com/products/software/os_platforms/solaris/8/index.html
전체 버전 간의 차이 비교
http://wwws.sun.com/software/solaris/fcc/fcc.html
솔라리스 x86(Intel) 하드웨어 호환 리스트(HCL)
http://www.sun.com/bigadmin/hcl/


6. SUN & Solaris 관련 사이트

1) 썬 관련 레퍼런스 (추천)
http://www.stokely.com/unix.sysadm.resources/faqs.sun.html

2) 썬 공식 도큐먼트
http://docs.sun.com
http://www.sun.com/bigadmin/ (BigAdmin System Administration Portal)

3) SUN관련 FAQ
http://www.science.uva.nl/pub/solaris/solaris2.html (Solaris2 FAQ)
http://www.mreriksson.net/faqs/solaris8/ (Ola Eriksson's FAQ for Sun Solaris )
http://wks.uts.ohio-state.edu/sun/faqs/s86faq.html ( Intel FAQ)
http://item-hunter.com/~chang/src/lecture/faq/sol2faq.html (한글)
http://hawk.com.kyungnam.ac.kr/~opti21/unix/faq/index.html (han.comp.sys.sun FAQ 한글)

4) Sun Managers Summaries & Archives Search
http://www.sunmanagers.org ( 공식 홈페이지)
http://www.sunmanagers.org/archives.html ( 아카이브 리스트)
http://www.latech.edu/sunman-search.html ( 아카이브 검색)
http://news.google.co.kr ( 모든 뉴스 그룹 검색)

5) 장비 관련
http://sunsolve.sun.com/handbook_pub/Systems/ ( SUN 시스템 핸드북)
http://sunsolve.sun.com/handbook_pub/Devices/ ( SUN 부붐별 핸드북)


2부. 솔라리스의 접근과 사용자 관리

1. 시스템의 접근

1) Consol로 직접 로그인과 telnet, rsh, ssh (Shell 사용), Xmanager(Windows 사용) 등의 원격 로그인
- telnet : 이 기종간의 시스템 접근 가능 ( Port 23)
- rsh : Unix 기종간의 시스템 접근 가능
- ssh: Unix 기종간의 시스템 접근 가능 (보안쉘, Port 22)
http://www.openssl.org
http://www.openssh.org

2) 시스템 사용자: root와 일반 사용자
root: 슈퍼유저, 시스템 어드민, 초기 설치 시 패스워드 결정, 모든 권한, 기본쉘은 /sbin/sh
일반유저: 일반사용자.

3) 관련 파일
/etc/passwd 파일
user1:x:102:10:User Account 1: /export/home/user1:/bin/ksh
/etc/shadow 파일
user01:haN3NqcDfof.2:::::::
/etc/group 파일
other::1:user01,user02

4) 사용자 관리
/usr/bin/passwd 명령 : 자신의 패스워드 변경 (일반 유저), 다른 사용자의 패스워드 변경(root)
* 패스워드 생성 규칙(일반유저)
- 6~8 문자
- 두 개의 알파벳과 하나의 특수문자 또는 숫자 포함
- 로긴 이름과 다르게
- 변경 전 패스워드와 다르게
- 공백을 포함할 수 있다.

/usr/sbin/groupadd 명령 : 그룹을 생성 ( GID는 100 ~ 60000 번까지)
ex) # groupadd -g 100 class1

/usr/sbin/useradd 명령 : 유저를 생성 ( UID는 100 ~ 60000 번까지)
ex) # useradd -u 501 -g 100 -d /export/home/user01 -m -c "User Account 1" -s /bin/ksh user01

/usr/sbin/groupdel 명령 : 그룹을 제거
ex) # groupdel class1

/usr/sbin/userdel 명령: 유저를 제거
ex) # userdel [-r] user01

/usr/sbin/usermod, /usr/sbin/groupmod 는 수정 시 사용

* 어드민 GUI 툴 : 사용자, 그룹, 호스트, 프린터, 직렬포트, 소프트웨어, 14(sysadmin) 그룹은 사용가능.
/usr/bin/admintool


3부. 사용자 기본 명령

사용자 기본명령은 다음을 참고한다.
http://www.gohtml.pe.kr/lec/unix1.html
http://unix.co.kr/data/solaris/?p=16
http://whoami21.com/~kimlee/telnet1.htm
http://www.hwaseong.ms.kr/unix1.htm

1. 정보 출력

1) 시스템 이름 및 OS버전 확인
$ uname -a
$ cat /etc/release (=> OS의 릴리즈 확인)

2) 현재 로그인한 사용자 정보
$ who (/var/adm/utmpx)

3) 최근 로긴했던 사용자 정보 + 재 부팅 정보
$ last (/var/adm/wtmpx)
$ last user01
$ last reboot

4) 프로세스 정보
$ ps -ef | grep netscape
$ pgrep netscape (solaris 8부터)

5) 날짜 및 시간 출력
$ date
$ cal

6) 맨 페이지
$ man man
$ man -k calendar
cf. # catman -w (관리자 root가 실행)
$ man -s5 man (5 section manual)

- Section Definition -
관련 파일: /usr/share/man/man.cf, /usr/share/man/entities/*
1: User Commands
1M: System Administration Commands
2: System Calls
3: Basic Library Functions
4: File Formats
5: Standards, Environments and Macros
6: Demos
7: Device and Network Interfaces
9: Device Driver Interfaces

- 맨페이지 위치
/usr/share/man/
/usr/openwin/man/
/usr/dt/man

- 맨페이지 추가
# vi /etc/profile
...
MANPATH=/usr/share/man:/usr/openwin/man:/usr/dt/man:<추가할 맨페이지 디렉토리>
export MANPATH

2. 파일과 디렉토리 접근

주의 - 파일과 디렉토리, 명령 등은 모두 대소문자를 구별한다.

1) 패스이름
- 절대경로(Absolute Path Name) : root(/)를 기준으로 기술, /usr/local/src/file1
- 상대경로(Relative Path Name) : 현재 디렉터리를 기준으로 .또는 ..으로 기술, dir1/subdir1/file2

2) 관련 명령어
- ls(list) : 파일 또는 디렉터리의 리스트를 출력
- pwd(print working directory) : 현재 작업 디렉터리의 위치를 출력
- cd(change directory) : 작업 디렉토리를 변경

3. 파일과 디렉토리를 다루는 명령

- file : 파일 타입을 확인 (text, data, executable or binary)
- cat(catenate) : 주로 짧은 text파일을 볼 때
- more : 주로 긴 text파일을 볼 때
- strings: 바이너리 파일의 문자열만 보고자 할 때
- head: text파일의 머리부분(디폴트 10줄)만 보고자 할 때
- tail: text파일의 끝부분(디폴트 10줄)만 보고자 할 때 (tail -f /var/log/messages)
- wc(word count) : text파일의 라인 수, 단어 수, 문자 수를 알고자 할 때 ( wc file1)
- touch : 빈 파일을 생성할 때
- tee : 화면 출력과 파일 저장을 동시에 하고자 할 때 (ls -lR | tee logfile | more)
- mkdir : 디렉토리를 생성할 때
- rmdir : 빈 디렉토리를 제거할 때
- rm -r : 디렉토리를 제거할 때
- cp : 파일을 복사할 때
- cp -r : 디렉토리를 복사할 때
- mv : 파일 또는 디렉토리를 이름변경 또는 옮길 때

4. 파일과 텍스트 검색

- find : 파일 또는 디렉토리를 찾을 때
$ find / -name core
$ find ~ -name core -exec rm {} \;
$ find . -mtime +90
$ find ~ -size +57
$ find /usr -name '*tif'
- cmp, diff : 두 파일의 차이를 비교할 때
- sort : 파일의 내용 또는 리스트를 정렬할 때
$ ls -l | sort
$ du -ks /etc/* | sort -nr
- grep : 파일의 특정 문자열이 있는 라인을 출력
$ grep user01 /etc/passwd
$ ps -ef | grep ksh

5. 파일의 보안

$ ls -l
-rw-r--r-- 1 borisu staff 8239 2002년 8월 29일 backup.txt
-rw-r--r-- 1 borisu staff 2361 2002년 9월 3일 memo.txt
drwx------ 5 borisu staff 512 5월 20일 11:55 shell/
-rw-r--r-- 1 borisu staff 1660 4월 25일 01:37 ssh-setup.sh

File Type: -, f , d, c, b
Permission: read(r:4), write(w:2), execute(x:1)
User, Group, Others

1) 퍼미션 설정
$ chmod u+x file1 (symbolic mode)
$ chmod a=rx file1 (symbolic mode)
$ chmod 644 file1 (octal mode)

2) 소유권 변경 (root)
# chown user01 file1 (파일 소유자 변경 시)
# chgrp class1 file1 (파일 그룹 소유자 변경 시)
# chown -R user01:class1 dir1 (디렉토리 변경 시)

3) umask : 기본 퍼미션 제한
$ umask (확인)
$ touch file1
$ mkdir dir1
$ umask 027 (재설정)
$ touch fie2
$ touch dir2

6. Visual Editor (VI)

유닉스의 기본 편집기는 vi가 있고, 그밖에 emacs 등이 있다. GUI로는 dtpad가 있다.

- vi의 세가지 모드
Command Mode (명령 모드)
Edit Mode (편집 모드)
Last Line Mode (마지막 명령 라인 모드)

- vi 레퍼런스 카드 및 메뉴얼
http://kldp.org/응용_프로그램/에디터/Vi/


7. Archiving User Data
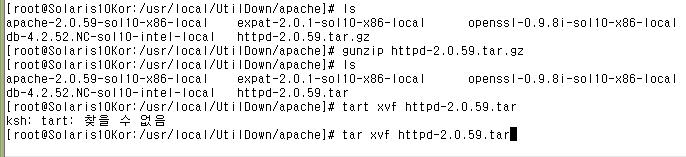
1) Archive 관련 명령

tar - Creates and extracts files from a tape device or file archive
compress, uncompress - Compress and uncompress a file
zcat - Uncompress a compressed file and sends the output to the screen without changing the compressed file.
gzip, gunzip - Compresses and uncompressed
gzcat - Uncompress a gzipped file and sends the output to the screen without changing the gzipped file
zip, unzip - Packages and compresses files and uncompressed files.
jar - Packages and comresses multiple files to a single archive file
cpio - Copies and extracts files fro a file archive or tape device.

[ tar ]

내용만 볼 때: tar tvf name.tar
풀 때 : tar xvf name.tar
만들 때 : tar cvf name.tar file1 file2 file3
tar cvf name.tar dir1

$ cd
$ mkdir testdir
$ cd testdir
$ cp /etc/profile file1
$ man ls | col -b > file2
$ tar cvf first.tar file1 file2
$ rm file? ; ls
$ tar tvf first.tar
$ tar xvf first.tar

$ cd ..
$ tar cvf second.tar testdir
$ rm -rf testdir
$ tar tvf second.tar
$ tar xvf second.tar

[ compress & uncompress ]

$ compress second.tar
$ ls
$ uncompress second.tar.Z
$ tar xvf second.tar

cf. zcat second.tar.Z | tar xvf -
cf. compress -dc second.tar.Z | tar xvf -
cf. uncompress -c second.tar.Z | tar xvf -

[ gzip ]

$ cd
$ cd ..
$ ls
$ tar cvf /var/tmp/myhome.tar user01
$ cd /var/tmp; ls
$ gzip myhome.tar
$ ls

$ gzip -d myhome.tar.gz
$ tar tvf myhome.tar
$ tar xvf myhome.tar

cf. gzcat myhome.tar.gz | tar xvf -
cf. gzip -dc myhome.tar.gz | tar xvf -
cf. gunzip -c myhome.tar.gz | tar xvf -
cf. gtar xvfz myhome.tar.gz

[ jar ]
$ jar cvf dir1.jar dir1
$ jar tvf dir1.jar
$ jar xvf dir1.jar

8. 원격지 접속

원격지 접속은 telnet, rlogin, ftp, ssh등이 있다.

1) telnet
원격 호스트의 user name과 password가 필요
$ telnet host1
...(접속해서 사용)
$ exit (로그 아웃)

2) rlogin

원격 호스트에서 허락된 호스트 또는 유저의 경우 패스워드가 필요 없다.
자세한 사용법은 다음을 참고한다.
http://nscp.upenn.edu/aix4.3html/cmds/aixcmds4/rlogin.htm

- 일반유저: /etc/hosts.equiv, $HOME/.rhosts
- root : /.rhosts
- 파일 형식 : 호스트 명 유저

$ rlogin host2
...(접속해서 사용)
$ exit (로그 아웃)

cf. rsh host1 hostname
cf. rcp file1 host1:/tmp

3) ssh (secure Shell)

명령어: ssh, scp, sftp
관련사이트:
http://www.openssl.org
http://www.openssh.org
관련 문서:
ssh howto
http://kldp.org/~eunjea/ssh/index.html
ssh install for solaris
http://www.sunfreeware.com/openssh.html

4) ftp

[ 접속 및 연결 끊기 ]

1) 일반 유저로 로긴
$ ftp server_name
또는
$ ftp
ftp> open server_name
ftp> user login_id
ftp> close
ftp> open new_server
ftp> quit

2) Anonymous 로긴
$ ftp server_name
Login: ftp ( or anonymous)
password: user01@suned.co.kr

[ 기본 설정 옵션 ]

ftp> hash (on/off: 전송상태를 표시)
ftp> ver (on/off: Verbose mode)
ftp> bin (Binary mode)
ftp> asc (ASCII mode)
ftp> prompt (on/off: 다중 파일 전송시 프롬프트 on/off)

[ 기본 명령 ]

ftp> cd (디렉토리를 옮길 때: REMOTE )
ftp> ls (디렉토리 내용을 볼 때: REMOTE )
ftp> pwd (현재 디렉토리 위치 확인: REMOTE)

ftp> lcd (디렉토리를 옮길 때: LOCAL )
ftp> !ls (디렉토리 내용을 볼 때: LOCAL )
ftp> !pwd (현재 디렉토리 위치 확인: LOCAL)
ftp> ! (Shell로 잠시 빠져나감: LOCAL)

[ 파일 전송 ]

ftp> get remote_file [local_file] (받을 때)
ftp> mget file1 file2 file3 file4 (여러 파일을 받을 때)

ftp> put local_file [remote_file] (올릴 때)
ftp> mput file1 file2 file3 file4 (여러 파일을 받을 때)

[ 기타 명령어 ]

ftp> del file_name (파일 지우기: REMOTE)
ftp> mkdir dir_name (디렉토리 만들기: REMOTE)
ftp> help (도움말 보기: REMOTE)
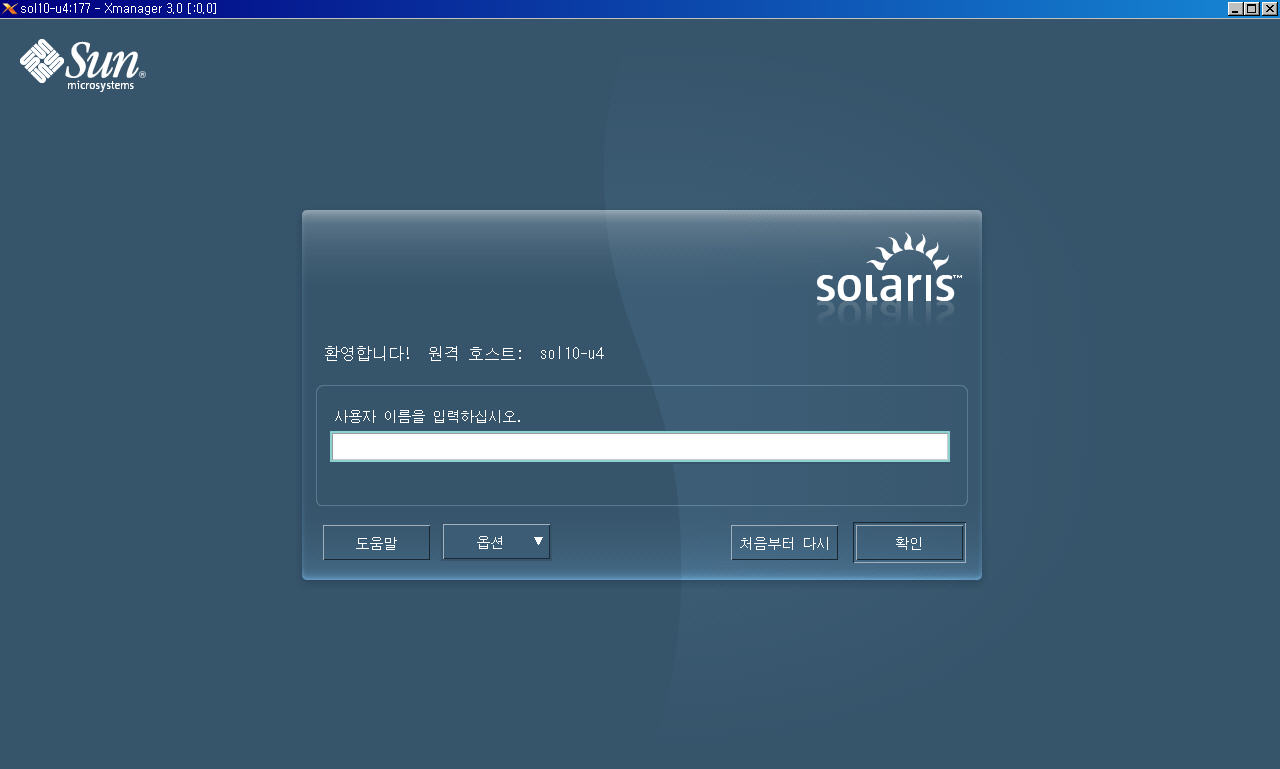
5) X 서버로의 접근
윈도우용 Client프로그램으로는 Xmanager가 유명하다. 다음 문서를 참조한다.
- 사용법
http://compedu.inue.ac.kr/~chlee56/wowlinux/xmanager.htm
- 다운로드
http://netsarang.co.kr/download/download.html

9. 시스템 프로세스

process : 프로그램이 메모리에 올라와 동작하고 있는 상태.
PID : 프로세스의 고유 ID (커널이 관리)
Daemon: 백그라운드로 실행, 부팅 시 동작, 서버 프로세스

1) 프로세스 정보
$ ps -ef | more
UID PID PPID C STIME TTY TIME CMD
root 0 0 0 4월 25 ? 0:00 sched
root 1 0 0 4월 25 ? 0:05 /etc/init -
root 2 0 0 4월 25 ? 0:00 pageout
root 3 0 0 4월 25 ? 86:09 fsflush
root 279 1 0 4월 25 ? 0:00 /usr/lib/saf/sac -t 300
root 204 1 0 4월 25 ? 0:00 /usr/lib/utmpd
root 134 1 0 4월 25 ? 0:02 /usr/sbin/rpcbind
$ ps -ef | grep lp
$ pgrep -l lp (solaris 8부터)

2)프로세스 종료

- 시그널 정의
$ man -s 3HEAD signal

Name Value Default Event
SIGHUP 1 Exit Hangup (see termio(7I))
SIGINT 2 Exit Interrupt (see termio(7I))
SIGKILL 9 Exit Killed
SIGTERM 15 Exit Terminated (==> Control + C)

- 프로세스 종료
$ kill [-signal] PID ...
$ kill <PID>
$ kill -9 <PID>
$ kill -KILL <PID>
$ pgrep -l mail
215 sendmail
12047 dtmail
$ kill 12047
$ pkill -KILL 프로세스 이름

- 자신이 사용하는 워크스테이션이 윈도우 hang시 처리요령
다른 시스템에서 다음과 같이 한다.
$ telnet (또는 rlogin) host1
$ pkill -9 <자신의 쉘이름, ex) ksh>
또는
$ pkill -KILL <자신의 쉘이름 ex) ksh>

3) 잡 제어 ( Job Control )
여러 개의 작업을 수행하고 이를 제어할 수 있다. 단 본쉘(sh)는 불가

$ find . -name core > list & ( Job을 background로 실행)
$ jobs ( Job을 확인)
[1] = running find . -name core > list &
$ fg %1 ( 백그라운드 잡을 포그라운드로)
Control + Z ( 포그라운드 잡을 중지)
$ jobs ( job을 확인)
$ bg %1 (중지된 잡을 백그라운드로 실행)
$ kill %1 (잡을 종료)


10. 쉘 (Shell)

명령해석기, 사용자 인터프리터라고도 한다. 쉘 각각의 자세한 문서는 다음을 참고한다.
http://dir.yahoo.com/Computers_and_Internet/Software/Operating_Systems/UNIX/Shells/


Shell 종류 Shell 프로그램 위치 프롬프트 프롬프트 변수 쉘초기화 파일
Bourn Shell /bin/sh, /sbin/sh #, $ PS1 /etc/profile, $HOME/.profile
Korn Shell /bin/ksh #, $ PS1 /etc/profile, $HOME/.profile, $HOME/.kshrc
C Shell /bin/csh hostname#, hostname% prompt /etc/.login, $HOME/.cshrc, $HOME/.login


- 현재 사용쉘 확인
$ ps
$ echo $SHELL
- 기타 쉘
bash, tcsh, zsh, ssh
- 관련 디렉토리
/etc/skell : 샘플 초기화 파일 위치

1) 입출력의 전환
$ mailx user1 < ~/myfile ( 입력의 방향을 파일로부터 )
$ ps -ef > file_list (출력의 방향을 파일로 전환)
$ cat /etc/passwd >> file_list (출력의 방향을 파일로 전환, append)
$ ls /var /no 1> dat 2>&1

2) 파이프 (프로세스 간 통신)
$ who | wc -l
$ ls -F /etc | grep "/"
$ head -10 file1 | tail -3 | lp
$ ps -ef | tail +2 | wc -l

3) Meta Character
- Backslashes (\)
- Dollar signs ($)
- Back quotation marks (` `)
- quotation marks (' ')
- double quotation marks (" ")

$ rm \*


$ echo '$SHELL'
$ echo "$SHELL"
$ echo "\$SHELL"

$ echo date
$ echo `date`

11. Korn Shell Features

1) Aliases
alias aliasname="command"
ex)
$ alias h=history
$ alias c=clear
$ alias home='cd;ls'
$ alias ls='ls -F'
$ alias copy="cp -r"

2) Command line Editing
- Command line 편집 기능
$ set -o vi
$ [esc] + k (=> vi command mode )

3) History
- 128개를 유지 ( 변수 HISTSIZE -> .kshrc)
- $HOME/.sh_history (변수 HISTFILE -> .kshrc)
ex)
$ history ( 최근 16개 명령을 list)
$ history 23 (23 ~ 최근명령)
$ history -10 (최근 명령 10개)
cf)
$ r ( 가장 최근 명령 실행)
$ r p ( p로 시작된 가장 최근 명령어 실행)
$ r 23 ( 히스토리가 23번인 명령어 실행)

4) Ignore Control-d (ignoreeof)
- Control-d의 기능: 1) EOF, 2) EXIT
ex)
$ ^d
$ set -o ignoreeof (=>설정 eof:on, exit:off)
$ ^d
$ set +o ignoreeof (=>해제 eof:on, exit:on)

5) .profile과 분리된 초기화 파일 (.kshrc)
- $HOME/.kshrc (C쉘: $HOME/.cshrc)
- 환경변수는 .profile에 기록
- 기타변수 및 콘쉘 제공 기능 등은 .kshrc에 기록
ex)
$ . ~/.kshrc ( 재 초기화 )

6) Job Control
ex)
$ find / -name core -exec rm {} \;
^Z (=> suspend)
[1] + stop ... (=> [1]은 잡번호)
$ bg %1 ( 1번 잡을 백그라운드로 실행)
$ jobs ( 잡 확인)
$ fg %1 ( 1번 잡을 포그라운드로 실행)
$ ^+C ( 포그라운드 잡을 종료)
$ jobs

7) 덮어쓰기 방지 (noclobber)
ex)
$ touch testfile
$ cat /etc/passwd > testfile
$ cat testfile
$ cat /etc/profile > testfile
$ cat testfile
$ set -o noclobber
$ cat /etc/hosts > testfile ( => 경고메시지가 떨어짐)

12. Korn Shell Initialization

- Korn Shell 초기화 순서

(1) /etc/profile
(2) $HOME/.profile
(3) $HOME/.kshrc


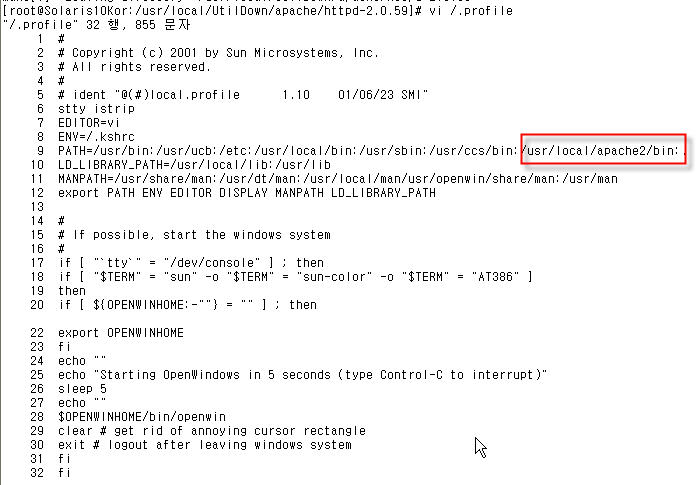
1) $HOME/.profile 설정하기

$ vi ~/.profile

stty cs8 erase '^H' -istrip ( -> 터미널 설정 )

PATH=$PATH:/usr/local/bin:/usr/ccs/bin:/usr/ucb (-> Path 설정)
EXINIT="set ai nu ts=3 showmode" (-> vi 환경설정)
ENV="$HOME/.kshrc" ( -> .kshrc 확장쉘 변수 설정)
LPDEST="lp1" (-> Default Printer Set )
EDITOR="vi" ( -> Default Editor Set )

export PATH EXINIT ENV LPDEST EDITOR ( 전역변수 선언 )

$ . ~/.profile ( .profile 재 초기화)


2) $HOME/.kshrc 설정하기

$ vi ~/.kshrc

HOSTNAME=`uname -n`
PS1='[$LOGNAME@$HOSTNAME:$PWD]$ ' (-> 프롬프트 변경)

export PS1 HOSTNAME (-> 전역변수 선언)

## My Alias Def (-> 엘리어스 설정 )
alias ls='ls -F'
alias rm='rm -i'
alias mv='mv -i'
alias cp='cp -i'
alias home='cd;ls'
alias c=clear
alias h=history
alias d=date

## Other ksh feature set
set -o noclobber
set -o vi
set -o ignoreeof

$ . ~/.kshrc (-> .kshrc 재 초기화)


13. 쉘 프로그래밍

- 쉘 프로그래밍 강좌

http://kldp.org/KoreanDoc/Shell_Programming-KLDP
http://myhome.naver.com/yskim511/21.htm

4부. 시스템 어드민

1. UNIX 파일의 종류와 특성

- 파일은 파일이름, inode, data block으로 구성되어 있다.
- 파일의 종류는 ls -l , ls -F, file 등의 명령어로 확인할 수 있다.

1) 파일의 종류
-: Regular File (Ordinary File) : vi, ed, cp, mv, cat, touch, cc 등에 의해 생성
d: Directory File : mkdir, cp -r 등에 의해 생성
c,b: Special File ( 디바이스 파일) : 장치 파일이며 drvconfig, devfsadm등에 의해 생성
brw-r----- 1 root sys 32, 0 2000년 7월 4일 /devices/sbus@1f,0/SUNW,fas@e,8800000/sd@0,0:a
crw-r----- 1 root sys 32, 0 2000년 7월 4일 /devices/sbus@1f,0/SUNW,fas@e,8800000/sd@0,0:a
l: Symbolic Link File: 심볼릭 링크 파일
lrwxrwxrwx 1 root root 12 2000년 7월 4일 /etc/hosts -> ./inet/hosts

$ ln -s file1 file2 (심볼릭 링크)
$ ln file2 file3 (하드 링크)
$ rm file1 (원본을 제거함)
$ cat file2 file3 ( file2는 볼 수 없음)

- 링크란 어떤 파일의 또 다른 이름이다.
- 하드링크는 같은 inode를 심볼릭 링크는 다른 inode를 갖는다.
- 하드링크는 디렉토리를 링크할 수 없다.
- 하드링크는 서로 다른 파일시스템 간에 링크할 수 없다.
- 하드링크는 원본파일의 데이터와 같은 데이터를 공유하며, 심볼릭 링크는 원본의 PATH값을 데이터로 갖는다.

- 심볼릭 링크의 예
/etc/hosts -> /etc/inet/hosts
/bin -> /usr/sbin
- 하드링크의 예
/etc/init.d/* -> /etc/rc#.d/*

2) inode
모든 파일은 하나의 inode를 가지며 이것은 해당 파일에 대한 정보를 가진다. inode table은 inode들로 구성되어 있으며
하나의 inode는 ls-l정보, 데이터블록 포인터, shadow inode 포인터로 이루어져 있다. 포인터들이 가리킬 수 있는 데이터 블록의
사이즈는 최대 1T까지 가능하다.

- 파일과 파일시스템의 최대 사이즈
solaris 2.6 이전 : 2G (파일), 1TB (파일 시스템)
solaris 2.6부터 : 2G이상 1TB (파일), 1TB (파일 시스템)

파일의 경우 실재로는 866G까지 가능하며, 파일 시스템의 1T이상은 Virtual Volume(Meta Device, Veritas Volume Manager)을 구성해야 한다.


2. Boot PROM (Programmable Read Only Memory)

- PROM 관련 문서
Frequently Asked Questions about Sun NVRAM/hostid
http://www.squirrel.com/squirrel/sun-nvram-hostid.faq.html
Sun Flash PROM Guide for Workstations and Workgroup Servers - Standalone Version
http://www.sun.com/products-n-solutions/hardware/docs/pdf/802-3233-23.pdf
Updating the Flash PROM on the Ultra 1, Ultra 2, Ultra 450, and Sun Enterprise 450 Systems
http://docs.sun.com/db/doc/816-2583-10/6m8u2cukc?a=view
Updating the Flash PROM on the Sun Enterprise 3x00, 4x00, 5x00, and 6x00 Systems
http://docs.sun.com/db/doc/816-2583-10/6m8u2cukk?a=view


1) PROM이 하는 역할
- Test the system hardware (POST: Power on Self Test)
- Boot the operating system

[ POST ]
- Initialize the system
- Probes Memory and the CPU
- Probes devices, interprets their devices and build a dev tree
- Install the console

2) PROM으로 가는 방법
- # halt
- # init 0
- # /usr/sbin/shutdown -y -g0 -i0
- Stop + A ( 부팅 시 바로 누르거나 시스템 hang시에만 적용)

3) PROM에서의 얻을 수 있는 정보
OK banner ( 시스템 모델명, 메모리, hostid, Ethernet Addr, Boot PROM 버전 )
OK probe-scsi ( 연결된 SCSI 장치들의 정보 확인)

4) PROM 버전
1.x : Original Sparc Boot PROM
2.x : Open Boot PROM (OBP) => sparc 시리즈 (sparc4,5,10,20...등)
3.x : Open Boot PROM with Flash Update (Flash PROM) => ultra sparc 시리즈

5) PROM에서 사용되는 명령어
OK help (도움말)
OK probe-scsi (스카시 장비 체크)
OK prebe-ide ( IDE장비 체크)
OK devalias (PROM에 설정되어 있는 장비의 물리적 장치명과 별명)
OK show-devs ( PROM에 설정되어 있는 물리적 장치의 트리구조 보기)
OK printenv (PROM에 설정되어 있는 부트 파라미터의 기본 값을 확인)
OK setenv <parameter_name> <value>
OK reset ( setenv에 의해 변경된 파라미터 값들을 재 저장하는 명령)
OK set-default <parameter_name> ( 지정한 파라미터 값을 초기화)
OK set-defaults ( 지정한 모든 파라미터 값들을 초기화 => STOP + N)

6) PROM의 부트 명령어
OK boot [ device name ] -[option]

OK boot [disk, net, cdrom] (=> default는 disk)
OK boot -s (싱글유저로 부팅)
OK boot -a (Interactive 모드로 부팅)
OK boot -r (Reconfiguration Boot => 장치를 추가했을 때)

7) OS의 PROM관련 시스템 명령어
# eeprom (확인)
# eeprom boot-device ( 확인)
# eeprom auto-boot?=false (설정)
# eeprom 'auto-boot?=false' (csh의 경우)


3. 부트 프로세스 (Boot Process)

1) 부팅의 단계는 다음과 같다.

(1) 부트 PROM 단계
- PROM이 POST(Power On Self Test)를 실행
- 부트 디바이스를 결정
- 부트 프로그램인 bootblk를 로드

(2) 부트 프로그램 단계
- bootblk는 두 번째 부트 프로그램인 ufsboot를 로드
- ufsboot는 커널을 로드( 32bit, 64bit kernel)

(3) 커널 초기화 단계
- 커널(/kernel/unix, /usr/kernel, /platform/`uname -m`/kernel)은 자신을 초기화하고 모듈을 로드 한다.
- Configuration 파일인 /etc/system을 읽는다.

(4) init 단계
- 커널이 /sbin/init을 실행한다.
- init은 /etc/initab을 읽는다.
- 필요한 데몬을 실행한다.


2) 32 또는 64 bit 커널의 확인 및 변경
64bit의 경우 OS는 Solaris7부터, 시스템 아키텍처는 sun4u(ultra sparc) 이상에서이다.

- 확인하기
# isainfo -kv
32-bit sparc kernel modules (=> 32일 경우)
64-bit sparc kernel modules (=> 64일 경우)

- 64bit -> 32bit
OK boot kernel/unix
- 32bit -> 64bit
OK boot kernel/sparcv9/unix

cf. 64bit 커널 지정하기
# vi /platform/sun4u/boot.conf
...
ALLOW_64BIT_KERNEL_ULTRASPARC_1_CPU=true

3) 커널 파라미터 수정
보다 자세한 사항은 다음을 참조한다.
- Solaris Tunable Parameters Reference Manual
http://docs.sun.com/db/doc/816-0607

i) 최대 사용자수 지정( maxusers)
set maxusers=100

ii) 최대 프로세스 개수 지정 (max_nprocs)
set max_nprocs=100

iii) 가상 단말기 개수 지정 ( pt_cnt)
- 리부팅시에는 반드시 reconfiguration boot
set pt_cnt=128
set npty=128

iiii) 최대 파일 디스크립트 개수 지정하기 (rlim_fd_cur)
- 하나의 프로세스가 동시에 오픈할 수 있는 최대 파일 개수
- # ulimit descriptors 512
- # ulimit -n 512
set rlim_fd_max=1500
set rlim_fd_cur=128

iiiii) 최대 UFS inode수 지정( ufs_ninode)
- 시스템에서 파일을 오픈 하면 하나의 파일에 대하여
하나의 ufs_ninode를 가지게 된다.
set ufs_ninode=10000

[ How to Setup Kernel Parameter ]

i) backup /etc/system file
# cp /etc/system /etc/system.org

ii) Edit /etc/system file
# vi /etc/system
... (다음을 추가)
set pt_max_pty=10

iii) Reconfiguration Boot
# reboot -- -r

iiii) 윈도우에서 터미널을 여러 개 띄워 max값을 확인

[ How to recover /etc/system File ]

i) Edit /etc/system file
# vi /etc/system
... (다음을 추가)
exclude: drv/dad

ii) reboot
# reboot

iii) Boots the system interactively
OK boot -a
...
Enter filename of kernel (kernel/unix): <Enter>
Enter default directory for modules (kernel, /usr/kernel): <Enter>
Enter name of system file (etc/system): /etc/system.org
Enter default root file system type (ufs): <Enter>
Enter physical name of root device: <Enter>

iiii) Recover /etc/system file
# cp /etc/system.org /etc/system
# init 6


4. init 단계

kernel은 init을 실행하고 init은 /etc/inittab파일을 일고 초기화 하며 해당 설정대로 관련 명령을
수행한다. 시스템 운영에 필요한 데몬 들을 실행하고 동작레벨(Run Level)을 관리하는 것이 주 역할이다.

1) /etc/inittab 파일
ap::sysinit:/sbin/autopush -f /etc/iu.ap (*)
ap::sysinit:/sbin/soconfig -f /etc/sock2path (*)
fs::sysinit:/sbin/rcS sysinit >/dev/msglog 2<>/dev/msglog </dev/console (*)
is:3:initdefault: (*)
p3:s1234:powerfail:/usr/sbin/shutdown -y -i5 -g0 >/dev/msglog 2<>/dev/msglog (*)
sS:s:wait:/sbin/rcS >/dev/msglog 2<>/dev/msglog </dev/console (*)
s0:0:wait:/sbin/rc0 >/dev/msglog 2<>/dev/msglog </dev/console
s1:1:respawn:/sbin/rc1 >/dev/msglog 2<>/dev/msglog </dev/console
s2:23:wait:/sbin/rc2 >/dev/msglog 2<>/dev/msglog </dev/console (*)
s3:3:wait:/sbin/rc3 >/dev/msglog 2<>/dev/msglog </dev/console (*)
s5:5:wait:/sbin/rc5 >/dev/msglog 2<>/dev/msglog </dev/console
s6:6:wait:/sbin/rc6 >/dev/msglog 2<>/dev/msglog </dev/console
fw:0:wait:/sbin/uadmin 2 0 >/dev/msglog 2<>/dev/msglog </dev/console
of:5:wait:/sbin/uadmin 2 6 >/dev/msglog 2<>/dev/msglog </dev/console
rb:6:wait:/sbin/uadmin 2 1 >/dev/msglog 2<>/dev/msglog </dev/console
sc:234:respawn:/usr/lib/saf/sac -t 300 (*)
co:234:respawn:/usr/lib/saf/ttymon -g -h -p "`uname -n` console login: " -T sun -d /dev/console -l console -m ldterm,ttcompat (*)

2) Run Level
0 : PROM monitor level. 부트 PROM의 OK 프롬프트 상태로 시스템을 종료하기 위한 Level이다. (==> halt, init 0, shutdown -i0)
s,S : Single User(관리자) 상태로서 마운트된 모든 파일 시스템을 접근할 수 있다.
1 : Single User(관리자) 상태로서 사용 가능한 모든 파일 시스템을 접근할 수 있다.
2 : 다중 사용자 레벨 (Multi User Level)
3 : 다중 사용자 레벨 (Multi User Level) with NFS(Network File Service)
4 : User Define Level (사용되지 않음)
5 : Shutdown(0) and power off (==> poweroff , init 5, shutdown -i5 )
6 : Shutdown(0) and reboot (==> reboot, init 6, shutdown -i6)

3) 각 Run Level별 데몬 프로세스의 실행
init --> /sbin/rc# --> /etc/rc#.d/{S##스크립트, K##스크립트} --> 데몬 실행
root(관리자) --> /etc/init.d/스크립트 --> 데몬 종료, 재실행

/etc/init.d/스크립트 ==> /etc/rc#.d/{S##스크립트, K##스크립트}는 하드링크 됨. 관련 파일 검색은 다음과 같다.
# ls -i /etc/init.d/nfs.server
28562 /etc/init.d/nfs.server*
# find /etc -inum 28562
/etc/init.d/nfs.server
/etc/rc0.d/K28nfs.server
/etc/rc1.d/K28nfs.server
/etc/rc2.d/K28nfs.server
/etc/rc3.d/s15nfs.server
/etc/rcS.d/K28nfs.server

4) RC 스크립트 추가하기

(1) Edit banner script in /etc/init.d
# cd /etc/init.d
# cp lp banner
# vi banner
#!/bin/sh
#
# Boot Process test script
#

case "$1" in
'start')
[ -f /usr/bin/banner ] && /usr/bin/banner "SYSTEM UP"
/usr/bin/audioplay /usr/demo/SOUND/sounds/rooster.au
;;
'stop')
[ -f /usr/bin/banner ] && /usr/bin/banner "SYSTEM DOWN"
/usr/bin/audioplay /usr/demo/SOUND/sounds/flush.au
;;
'*')
echo "Usage: $0 { start | stop }"
exit 1
esac
exit 0

(2) Test script
# chmod 744 banner
# chown root:sys /etc/init.d/banner
# ./banner start
# ./banner stop

(3) link to /etc/rc2.d
# cd /etc/rc2.d
# ln /etc/init.d/banner S22banner

(4) link to /etc/rcS.d
# cd /etc/rcS.d
# ln /etc/init.d/banner K99banner

(5) link to /etc/rc0.d
# cd /etc/rc0.d
# ln /etc/init.d/banner K99banner

(6) Test init state
# init s
...
# init 6
...
# halt


5. Device Configuration

1) 장치 명
- Logical Device Name ( 관리자)
- Physical Device Name ( kernel, system )
- Instance Name (kernel이 부팅 시 빠른 참조를 위해)

2) Logical Device Name
/dev/[r]dsk/c#t#t#d#s#
c# : Controller Number
t# : Target Number
d# : Disk Number
s# : Slice or partition number (0-7)
예) /dev/dsk/c0t0d0s0(raw device) /dev/rdsk/c0t3d0s (block device)

3) Physical Device Name
# ls -lL /dev/dsk/c0t0d0s0
brw-r----- 1 root sys 32, 0 2000년 7월 4일 /devices/sbus@1f,0/SUNW,fas@e,8800000/sd@0,0:a
# ls -lL /dev/rdsk/c0t0d0s0
crw-r----- 1 root sys 32, 0 2000년 7월 4일 /devices/sbus@1f,0/SUNW,fas@e,8800000/sd@0,0:a

4) Instance Name
시스템 커널에 의해 부여된 Physical Device Name의 축약된 이름이다.
# cat /etc/path_to_inst
"/sbus@1f,0" 0 "sbus"
"/sbus@1f,0/SUNW,fas@e,8800000" 0 "fas"
"/sbus@1f,0/SUNW,fas@e,8800000/sd@f,0" 14 "sd"
"/sbus@1f,0/SUNW,fas@e,8800000/st@6,0" 6 "st"
"/sbus@1f,0/SUNW,fas@e,8800000/sd@d,0" 12 "sd"
"/sbus@1f,0/SUNW,fas@e,8800000/st@4,0" 4 "st"
"/sbus@1f,0/SUNW,fas@e,8800000/sd@e,0" 13 "sd"
"/sbus@1f,0/SUNW,fas@e,8800000/st@5,0" 5 "st"
"/sbus@1f,0/SUNW,fas@e,8800000/sd@b,0" 10 "sd"
"/sbus@1f,0/SUNW,fas@e,8800000/st@2,0" 2 "st"
"/sbus@1f,0/SUNW,fas@e,8800000/sd@c,0" 11 "sd"
"/sbus@1f,0/SUNW,fas@e,8800000/st@3,0" 3 "st"
"/sbus@1f,0/SUNW,fas@e,8800000/st@0,0" 0 "st"
"/sbus@1f,0/SUNW,fas@e,8800000/sd@a,0" 9 "sd"
"/sbus@1f,0/SUNW,fas@e,8800000/st@1,0" 1 "st"
"/sbus@1f,0/SUNW,fas@e,8800000/sd@6,0" 6 "sd"
"/sbus@1f,0/SUNW,fas@e,8800000/sd@4,0" 4 "sd"
"/sbus@1f,0/SUNW,fas@e,8800000/sd@5,0" 5 "sd"
"/sbus@1f,0/SUNW,fas@e,8800000/sd@2,0" 2 "sd"
"/sbus@1f,0/SUNW,fas@e,8800000/sd@3,0" 3 "sd"
"/sbus@1f,0/SUNW,fas@e,8800000/sd@0,0" 0 "sd"
"/sbus@1f,0/SUNW,fas@e,8800000/sd@1,0" 1 "sd"
"/sbus@1f,0/SUNW,fas@e,8800000/sd@8,0" 7 "sd"
"/sbus@1f,0/SUNW,fas@e,8800000/sd@9,0" 8 "sd"
"/sbus@1f,0/sbusmem@2,0" 2 "sbusmem"
"/sbus@1f,0/sbusmem@3,0" 3 "sbusmem"
"/sbus@1f,0/sbusmem@0,0" 0 "sbusmem"
...

5) 디바이스의 재구성

장치를 새로 장착하고 /devices 및 /dev의 장치파일을 재구성하기 위한 명령어는 다음과 같다.
- (재)부팅이 필요
i) # reboot -- -r
ii) OK boot -r
iii) # touch /reconfigure
# reboot ( or init 6)
- (재)부팅이 불필요
i) # drvconfig -i sd ( Solaris 2.6부터 )
# disks (tapes, ports, devlinks)
ii) # devfsadm -c disk [ -c tape -c audio ]


6) 장치 추가 용례
- reconfigure file 생성
# touch /reconfigure
- 시스템의 정지
# init 5
- 시스템의 전원을 끈다
- 시스템에 새로운 디바이스를 연결한다.
- 외장형일 경우 외장 디바이스의 전원을 켠다.
- 시스템의 전원을 켠다.
- 부팅 후 추가된 장치의 Reconfiguration을 확인한다.

7) 장치의 연결확인
- PROM 단계에서
OK probe-scsi
- OS에서
# prtconf | grep -v not
# format (디스크의 경우, 확인만 하고 Control + d )
Searching for disks...done


AVAILABLE DISK SELECTIONS:
0. c0t0d0 <SUN2.1G cyl 2733 alt 2 hd 19 sec 80>
/sbus@1f,0/SUNW,fas@e,8800000/sd@0,0
1. c0t1d0 <IBM-DCAS-32160W-S65A cyl 8186 alt 2 hd 3 sec 171>
/sbus@1f,0/SUNW,fas@e,8800000/sd@1,0
Specify disk (enter its number):


6. DISK, SLICE, FORMAT

1) Disk Label (VTOC: Volume Table Of Contents)
- 디스크의 파티션 테이블 (Partition Table)
- 디스크 디바이스를 구별하는 볼륨명(volume name)
- Optional Partition Tag (각 파티션의 표준 마운트 포인트 이름으로 디스크 라벨에서만 사용되고 OS에서는 사용되지 않는 제한된 값)
- Optional Partition Flag (각 파티션이 Writable이지 Mountable인지를 결정하는 값으로 디스크 라벨에서만 사용되고 OS에서는 사용되지
않는 제한된 값)

VTOC의 정보확인은 prtvtoc로 변경(파티션)은 format을 이용한다

# prtvtoc /dev/rdsk/c0t3d0s2 (=> VTOC 정보 확인)
# format

2) 파티션 정하기
솔라리스에서는 하드디스크의 파티션을 하기 위해 format이라는 utility를 사용한다.
솔라리스에서는 하나의 디스크에 최대 8개의 파티션 까지 나눌 수 있으며 2번은 전체를 나타낸다. 따라서 실제 파티션 수는 7개이다.
디스크를 추가하고 파티션을 하기 위한 자세한 사용법은 다음을 참조한다.
http://www.ussg.iu.edu/usail/peripherals/disks/adding/solaris.html
http://docs.sun.com/db/doc/805-7228/6j6q7uet8

# format (==> 포맷하고자 하는 디스크 번호를 선택)
AVAILABLE DISK SELECTIONS:
0. c0t0d0 <SUN2.1G cyl 2733 alt 2 hd 19 sec 80>
/sbus@1f,0/SUNW,fas@e,8800000/sd@0,0
1. c0t1d0 <IBM-DCAS-32160W-S65A cyl 8186 alt 2 hd 3 sec 171>
/sbus@1f,0/SUNW,fas@e,8800000/sd@1,0
Specify disk (enter its number):

주의사항 1) 슬라이스 2번은 디스크 전체를 의미하므로 절대 수정하지 않는다.
주의사항 2) 파티션은 실린더 단위로 구성되는데 Offset이 정확히 일치해야 한다.
주의사항 3) 레이블 저장 명령 ( label)을 수행하지 않는다면 메모리에서만 변경되므로 디스크에는 영향을 주지 않는다.

[ 하드 디스크 추가하기 ]

# init 5
(디스크 연결하고 파워를 켠다)
OK probe-scsi
OK boot -r
# prtconf | grep -v not
# format (추가된 디스크를 선택하여 파티션 한다.)
# newfs /dev/rdsk/c0t1d0s6 (각 파티션을 파일시스템으로 만든다.)
# fsck /dev/rdsk/c0t1d0s6 (파일시스템을 체크한다.)
# mkdir /data (마운트할 디렉토리를 생성한다)
# mount /dev/dsk/c0t1d0s6 /data (마운트 한다)
# df -k 또는 mount (마운트 정보를 확인한다.)
# vi /etc/vfstab (해당 파티션의 정보를 추가하여 부팅 시 마운트 되도록 한다.)


7. Solaris 파일 시스템

1) 파일 시스템의 종류
- Disk Based File System : ufs(Unix File System), hsfs(High Sierra File System), pcfs(PC File System), udfs(Universal disk Format File System:sol7)
- Distributed File System: nfs ( Network File System)
- Pseudo File System: tmpfs(Temporary File System), swapfs(Swap File System), fdfs(File Descriptor File System), procfs(Process File System)

2) UFS의 파일 시스템 구조
- label(VTOC)(1 sector)
- Boot Bolck(15 sectors) : bootblk
- SuperBlock(16 sectors)
. 파일시스템 사이즈
. 레이블(파일 시스템명과 볼륨명)
. 파일 시스템의 Logical block 의 사이즈
. 마지막으로 업데이트된 날짜와 시간
. 실린더 그룹의 사이즈
. 실린더 그룹 안의 데이터 블록의 number의 fragment의 사이즈
. 데이터 블록의 요약 정보
. 파일 시스템 상태 값 (clean, stable, active, logging or unknown)
. 마지막 마운트 포인트의 경로명
- First Cylinder Group (보통 그룹당 16개의 실린더)
|__ backup Super Block
|__ Cylinder Group Block
| . inode 수
| . 실린더 그룹에서의 데이터 블록 수
| . 디렉터리의 수
| . free block의 map
| . 실린더 그룹에서 free block, free_inode, free fregment의 수
| . 사용된 inode의 map
|__ inode table
|__ Data Block(한 블록당 8K bytes, 1K는 fregment라 함)
- Second Cylinder Group
....

3) 파일 시스템의 생성
# newfs /dev/rdsk/c0t0d0s0
newfs: /dev/rdsk/c0t0d0s0 last mounted as /images
newfs: construct a new file system /dev/rdsk/c0t0d0s0: (y/n)? y
/dev/rdsk/c0t0d0s0: 4199508 sectors in 6603 cylinders of 4 tracks, 159 sectors
2050.5MB in 104 cyl groups (64 c/g, 19.88MB/g, 3392 i/g)
super-block backups (for fsck -F ufs -o b=#) at:
32, 40896, 81760, 122624, 162848, 203712, 244576, 285440, 325664, 366528,
407392, 448256, 488480, 529344, 570208, 611072, 651296, 692160, 733024,
773888, 814112, 854976, 895840, 936704, 976928, 1017792, 1058656, 1099520,
1139744, 1180608, 1221472, 1262336, 1302560, 1343424, 1384288, 1425152,
1465376, 1506240, 1547104, 1587968, 1628192, 1669056, 1709920, 1750784,
1791008, 1831872, 1872736, 1913600, 1953824, 1994688, 2035552, 2076416,
2116640, 2157504, 2198368, 2239232, 2279456, 2320320, 2361184, 2402048,
2442272, 2483136, 2524000, 2564864, 2605088, 2645952, 2686816, 2727680,
2767904, 2808768, 2849632, 2890496, 2930720, 2971584, 3012448, 3053312,
3093536, 3134400, 3175264, 3216128, 3256352, 3297216, 3338080, 3378944,
3419168, 3460032, 3500896, 3541760, 3581984, 3622848, 3663712, 3704576,
3744800, 3785664, 3826528, 3867392, 3907616, 3948480, 3989344, 4030208,
4070432, 4111296, 4152160, 4193024,

# newfs -m 1 /dev/rdsk/c0t0d0s0 ( Minfree 값을 조정, default는 10%)
# fstyp -v /dev/rdsk/c0t0d0s0 | grep minfree (기존의 minfree값을 확인)
# tunefs -m 2 /dev/rdsk/c0t0d0s0 ( newfs 이후 다시 재조정)


8. 파일 시스템 마운트 (File System Mount)

파일시스템을 사용하기 위해서는 트리구조의 임의 디렉토리(Mount Point)에 연결시켜야 하는데, 이를 마운트(mount)라 하며
마운트를 해제하는 것을 언마운트(unmount)라 한다.
마운트 포인트(mount point)는 빈 디렉터리로 파일 시스템을 연결할 포인트를 의미한다.

1) 마운트 정보
# mount
/ on /dev/dsk/c0t0d0s0 read/write/setuid/intr/largefiles/onerror=panic/dev=800000 on 금 4월 25 14:18:36 2003
/usr on /dev/dsk/c0t0d0s5 read/write/setuid/intr/largefiles/onerror=panic/dev=800005 on 금 4월 25 14:18:36 2003
/proc on /proc read/write/setuid/dev=3b00000 on 금 4월 25 14:18:35 2003
/dev/fd on fd read/write/setuid/dev=3bc0000 on 금 4월 25 14:18:37 2003
...

==> /etc/mnttab 을 참조함(마운트, 언마운트시 자동 업데이트. No Admin)

2) 마운트(Mount)
마운트는 mount 명령어를 이용하거나, 부팅 시 /etc/vfstab 파일 정보를 읽고 자동으로 마운트되는 두 가지 경우가 있다.

- 수동 마운트
# mount /dev/dsk/c0t3d0s7 /dir1
# mount -o ro /dev/dsk/c0t3d0s6 /dir2
# mount -o ro,nosuid,nolargefiles /dev/dsk/c0t0d0s5 /dir3
# mount -o ro,bg,soft host1:/usr/local /usr/local

- 자동 마운트
# mkdir /newdir
# mount /dev/dsk/c0t1d0s4 /newdir
# vi /etc/vfstab (엔트리를 추가)
# umount /newdir (테스트)
# mount /newdir (테스트)

cf. # mount /dir1 (=> /etc/vfstab에 이미 등록되어 있는 경우)
cf. # mountall [-r|-l] (=> /etc/vfstab에 "mount at boot" 값이 yes인 것만)

[ /etc/vfstab 파일 ]
#device device mount FS fsck mount mount
#to mount to fsck point type pass at boot options
#
#/dev/dsk/c1d0s2 /dev/rdsk/c1d0s2 /usr ufs 1 yes -
fd - /dev/fd fd - no -
/proc - /proc proc - no -
/dev/dsk/c0t0d0s1 - - swap - no -
/dev/dsk/c0t0d0s0 /dev/rdsk/c0t0d0s0 / ufs 1 no -
/dev/dsk/c0t0d0s5 /dev/rdsk/c0t0d0s5 /usr ufs 1 no -
/dev/dsk/c0t0d0s6 /dev/rdsk/c0t0d0s6 /var ufs 1 no -
/dev/dsk/c0t1d0s0 /dev/rdsk/c0t1d0s0 /usr/local ufs 2 yes -
/dev/dsk/c0t1d0s1 /dev/rdsk/c0t1d0s1 /export/home ufs 2 yes nosuid,rq
swap - /tmp tmpfs - yes -

3) 언마운트
# umount /dir1
# umount /dev/dsk/c0t3d0s7

cf. # umountall [-r|-l] (=> /, /usr, /var, /var/run, /proc, /dev/fd, /tmp 는 제외)

[ umount 되지 않은 경우 조치 사항 ]
- 자신 또는 다른 사용자가 해당 파일시스템을 사용하고 있다면, 모든 사용을 중지하고 작업 디렉터리도 다른 곳으로 이동한다.
- 특정 프로세스가 해당 파일시스템을 사용하는 경우 이를 종료한다.
# fuser -u /export/home
/export/home: 4006c(root) 6399c(user01)
# fuser -u -k /export/home
/export/home: 4006c(root)Killed 6399c(user01)Killed
또는
# umount -f /export/home ( Solaris 8 부터)

4) 플로피 디스크와 CDROM 마운트
솔라리스에서는 volume Management를 제공하며, 쉽게 사용할 수 있도록 자동으로 마운트하여 서비스 한다.

[ Volume Management ]
- 서비스 데몬 : /usr/sbin/vold
- 서비스 데몬 제어 스크립트 : /etc/init.d/volmgt {stop|start}
- 설정 파일 : /etc/vold.conf, /etc/rmmount.conf ( 특별히 설정을 할 필요는 없다)
- 플로피 마운트 포인트 : /floppy/floppy0
- CDROM 마운트 포인트 : /cdrom/cdrom0

[ 플로피의 마운트 ]
플로피를 삽입한다.
# volcheck
# mount (마운트 확인)
# cd /floppy/floppy0 (필요한 작업 수행)
# cd /
# eject floppy
# mount (언마운트 확인)

cf. 수동마운트
# /etc/init.d/volmgt stop
# pkill -9 vold
# mount -F pcfs /dev/diskette /mnt (=> msdos file system)
# mount /dev/diskette /mnt (=> ufs file system)

cf. 플로피 포맷
# fdformat -d /dev/rdiskette (msdos 포맷)
# newfs /dev/rdiskette (ufs포맷)

[ CDROM 마운트 ]
CDROM을 삽입한다.
# mount (마운트 확인)
# cd /cdrom/cdrom0 (필요한 작업 수행)
# cd /
# eject cdrom
# mount (언마운트 확인)

cf. 수동마운트
# /etc/init.d/volmgt stop
# pkill -9 vold ( vold가 종료되지 않는 경우에만)
# mount -F hsfs -o ro /dev/dsk/c0t2d0s0 /mnt

cf. CDROM이 빠져 나오지 않거나 마운트, 언마운트가 되지 않는 경우 조치사항
# ps -ef | grep vold (데몬을 확인)
# /etc/init.d/volmgt stop
# /etc/init.d/volmgt start
... (해결이 안되면)
# pkill -9 vold
# ps -ef | grep vold (vold 프로세스가 확실히 종료했는지 확인)
# /etc/init.d/volmgt start
# ps -ef | grep vold (vold가 새로 동작하였는지 확인)

[ ISO 9660 파일 시스템 마운트 ]

- ISO 파일 생성하기
# mkisofs -o test.iso /etc/init.d
# ls -l test.iso

- 루프 백 디바이스 설정하기
# lofiadm
Block Device File
# lofiadm -a /usr/local/test.iso
/dev/lofi/1
# lofiadm /dev/lofi/1
/usr/local/test.iso

- 마운트
# mount -F hsfs -o ro /dev/lofi/1 /mnt
# ls /mnt
(사용한 후)
# umount /mnt
# lofiadm
# lofiadm -d /dev/lofi/1

5) 파일 시스템을 정의하는 파일
mount 명령을 수행할 때 특별히 파일시스템 타입을 명시하지 안는 경우 로컬파일 시스템은 /etc/vfstab, /etc/default/fs순이며
원격파일 시스템은 /etc/vfstab, /etc/dfs/fstypes이다.

/etc/vfstab
ex) /dev/dsk/c0t0d0s5 /dev/rdsk/c0t0d0s5 /usr ufs 1 no -
/etc/default/fs
ex) LOCAL=ufs
/etc/dfs/fstypes
ex) nfs NFS Utilities
autofs AUTOFS Utilities
cachefs CACHEFS Utilities


9. 파일 시스템 관리

시스템의 부적절한 중지(정전, 비정상 종료 등..)로 인해 파일 시스템이 손상될 경우 fsck 유틸을 이용하여 복구해 주어야 한다.
fsck는 superblock, inode, indirect block, data block 을 검사하고 치료한다.

- Superblock 검사
파일 시스템 사이즈, inode number, free block count, free inode count
- inode 검사
format and type, link count, duplicate block, bad block number, inode size
- Indirect block 검사
블록이 다른 inode에 의해 이미 점유되어 있는 것
블록의 수가 파일 시스템의 범위에 어긋난 것
- data block 검사
평범한 data block
심볼릭 링크 data block
디렉토리 data block

1) fsck (file system check ) 명령의 수행 순서
- Phase 1 : Check Blocks and Sized
- Phase 2 : Check Pathnames
- Phase 3 : Check Connectivity
- Phase 4 : Check Reference Counts
- Phase 5 : Check Cyl groups

주의사항) 마운트 되어 사용하고 있는 파일 시스템은 fsck를 쓸 수 없다. 언마운트하거나 싱글유저 모드에서 처리한다.

2) fsck 명령 사용법
fsck [ -F FSType] [-V] [-m] [special] /dev/rdsk/장치 명

# umount /export/home
# fsck -V /export/home (실행하지는 않고 실행 명령어를 보여줌)
fsck -F ufs /dev/rdsk/c0t0d0s7 ( => /etc/vfstab을 참조한다.)
# fsck /dev/rdsk/c0t0d0s6

cf. SuperBlock 이 손상되어 복구되지 않는 경우
# newfs -N /dev/rdsk/c0t3d0s7 (=> 백업 수퍼블럭 번호를 확인)
/dev/rdsk/c0t3d0s7: 4199508 sectors in 6603 cylinders of 4 tracks, 159 sectors
2050.5MB in 104 cyl groups (64 c/g, 19.88MB/g, 3392 i/g)
super-block backups (for fsck -F ufs -o b=#) at:
32, 40896, 81760, 122624, 162848, 203712, 244576, 285440, 325664, 366528,
407392, 448256, 488480, 529344, 570208, 611072, 651296, 692160, 733024,
773888, 814112, 854976, 895840, 936704, 976928, 1017792, 1058656, 1099520,
1139744, 1180608, 1221472, 1262336, 1302560, 1343424, 1384288, 1425152,
1465376, 1506240, 1547104, 1587968, 1628192, 1669056, 1709920, 1750784,
1791008, 1831872, 1872736, 1913600, 1953824, 1994688, 2035552, 2076416,

# fsck -F ufs -o b=40896 /dev/rdsk/c0t3d0s7 (=> 파일 시스템 체크 )

3) 디스크 사용 관리
- df 명령 : 마운트된 각 파일 시스템의 사용에 관한 정보를 보여주는 명령어
# df -k (Kb 단위로 보여줌)
# df -n (파일 시스템의 유형을 보여줌)
# df -k -F ufs ( ufs 파일 시스템만 보여줌)

- du 명령 : 파일과 디렉터리에 대한 사용 정보를 보여주는 명령어
# du -k . (현재 디렉터리 이하의 사용량)
# du -ks /etc ( /etc 전체의 사이즈)

- quot 명령 : 각 파일시스템에 대한 유저별의 사용량을 보여줌
# quot -a ( 모든 파일시스템을 Kb 단위로 보여줌)
# quot -af ( 디스크 사용량과 함께 파일 수도 보여줌)

4) quota 에 대한 설정
사용자들에 제한된 용량만 사용할 수 있도록 설정하고 관리할 수 있다.
자세한 설정 방법은 다음을 참고한다.
http://docs.sun.com/db/doc/805-7229/6j6q8svfc?a=view
http://www.unix.co.kr/data/solaris/?p=sa13
http://www.jic.co.kr/ypct110.htm

5) swap의 추가
# swap -l (현재 설정된 스왑 정보를 출력)
# mkdir /files (추가할 swap파일이 위치할 디렉토리 생성)
# mkfile 24m /files/swapfile (스왑을 위한 덩어리 파일 생성)
# swap -a /files/swapfile (스왑을 추가, 주의: 절대경로로 써야 한다.)
# swap -l (확인)
# vi /etc/vfstab (부팅 시 자동으로 마운트 되도록 수정)
/files/swapfile - - swap - no -

# swap -d /files/swapfile ( 제거할 경우 )
# rm /files/swapfile
# vi /etc/vfstab (추가된 스왑 설정 라인을 제거)
# swap -l (확인)

10. 솔라리스 설치 (Solaris Installation)

* 솔라리스 9 소개
http://kr.sun.com/products/software/os_platforms/solaris/index.html
* 솔라리스 8 소개
http://kr.sun.com/products/software/os_platforms/solaris/8/index.html
* 전체 버전 간의 차이 비교
http://wwws.sun.com/software/solaris/fcc/fcc.html
* Solaris 9 Installation Guide
http://docs.sun.com/db/doc/806-5205
* Solaris 8 (SPARC Platform Edition) Installation Guide
http://docs.sun.com/db/doc/806-0955
* Solaris for Intel 설치(한글)
http://myhome.naver.com/yasicom/solaris.htm


1) 솔라리스 8 설치 전 준비 사항
설치에 필요한 최소한의 CD (국제판)
- Solaris 8 Installation CD
- Solaris 8 Software 1/2 CD
- Solaris 8 Software 2/2 CD
- Solaris 8 Language CD

2) 하드웨어 요구사항
- Sparc Base 또는 Intel Based 시스템
- 64 MB 메모리
- 2.1 GB 디스크 스페이스
- CD-ROM 드라이브

3) Solaris 8 설치 전 정보 수집
- 호스트 이름
- IP 주소
- 네이밍 서비스(DNS, NIS, NIS+, 없음)의 유형 및 구성 정보
- subnet mask
- root password
- 소프트웨어 그룹
Entire Distribution(2.1G 권장) + OEM, Entire Distribution(1.9G 권장), Developer(1.5G 권장), End User(1.2G 권장), Core(718M 권장)
- OS를 설치할 디스크 설정 및 파티션 설정

4) 설치 방법
- WebStart Installation ( Install CD)
- JumpStart Installation ( from Jumpstart Server System)
- Interactive Installation ( Software 1/2 CD)

5) 설치 순서
CDROM 넣고
# shutdown -i0 -y -g0 ( init 0 또는 Stop + A)
OK set-defaults
OK boot cdrom
- 시스템 식별
- 디스크 선택 및 파티션 설정
- 소프트웨어 그룹 설정
- 설치 후 재부팅
- Software 2/2 CD, Language CD 차례로 설치

6) 설치 시 유의사항
- 32Bit, 64Bit Kernel 선택 ( OS install 후 확인은 isainfo -kv)
- 설치 후 소프트웨어 그룹 유형확인 ( # cat /var/sadm/system/admin/CLUSTER )
SUNWCXall(Entire +OEM), SUNWCall(Entire), SUNWCprog(Developer), SUNWCuser(End User), SUNWCreq(Core)
- 파티션 권장사항 ( / 100M, /usr 500M~1G, /var 128M이상, swap 메모리2~3배, /opt 400M이상, /export/home 필요한 만큼)


11. 패키지 관리

1) 패키지 정보
# pkginfo | more (전체 보기)
# pkginfo | grep SUNWman (특정 패키지 설치여부)
# pkginfo -l SUNWman (특정 패키지의 자세한 정보)
# pkginfo -d /cdrom/solarisxxx/Solaris_8/Product | more (CDROM 내의 패키지 정보)
# pkginfo -d /cdrom/solarisxxx/Solaris_8/Product -l SUNWaudio (CDROM 내의 특정 패키지 정보)
# pkginfo | wc -l ( 설치된 총 패키지 수)

# grep /usr/bin/audioplay /var/sadm/install/contents (audioplay 의 패키지 이름 알아내기1)
# pkgchk -l -p /usr/bin/audioplay (audioplay의 패키지 이름 알아내기2)

# pkgchk SUNWaudio ( 설치 성공 여부 확인, 성공 시 메시지 없음)
# pkgchk -v SUNWaudio (특정 패키지에 대한 자세한 설치 위치)
# pkgchk -p /etc/passwd (특정 파일에 대한 초기 패키지 설치후의 변경 정보)

2) 패키지 추가
# pkgadd -d /cdrom/solxxxx/Solaris_8/Product SUNWaudio
# pkgadd -d /cdrom/solxxxx/Solaris_8/Product -s spool SUNWaudio ( /var/spool/pkg에 패키지 스풀)
# pkgadd -d /cdrom/solxxxx/Solaris_8/Product -s /export/pkgs SUNWaudio ( /export/pkgs에 패키지 스풀)
* GUI의 어드민 툴(admintool)을 이용하여 설치할 수도 있다.(cf. sysadmin(14) 가능)

3) 패키지 제거
# pkgrm SUNWaudio
# pkgrm -s spool SUNWaudio (/var/spool/pkg 의 스풀 패키지 제거)
# pkgrm -s /export/pkgs SUNWaudio (/export/pkgs의 스풀 패키지 제거)
* GUI의 어드민 툴(admintool)을 이용하여 제거할 수도 있다.(cf. sysadmin(14) 가능)

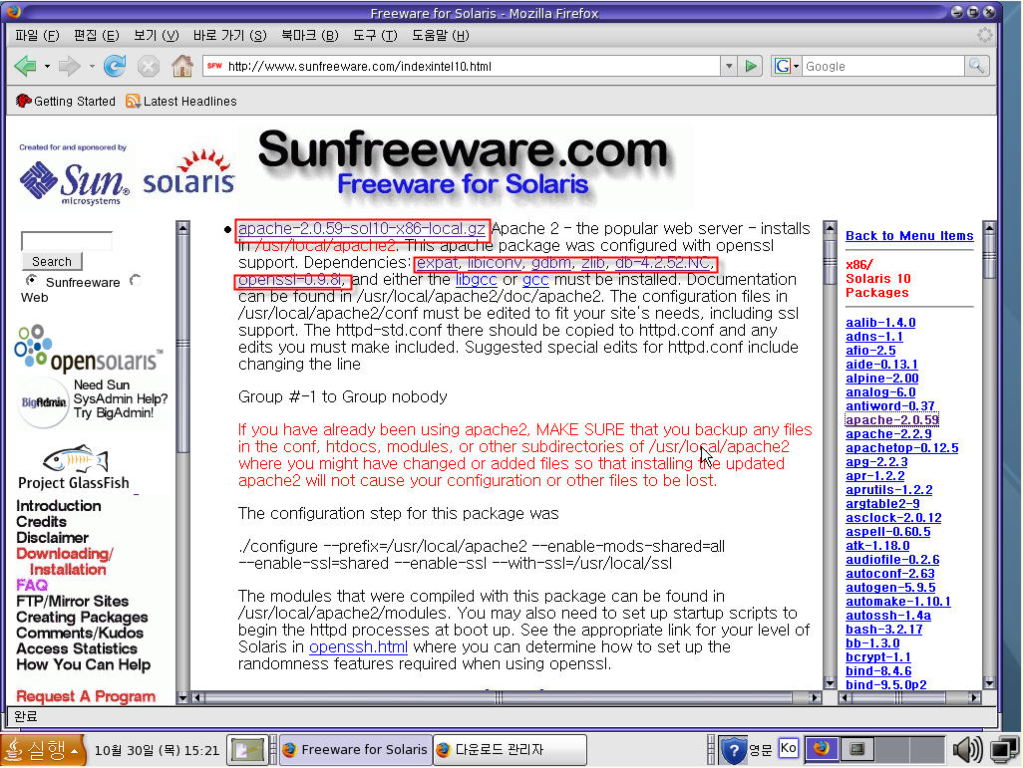
4) 기타 Freeware 패키지 활용
http://www.sunfreeware.com 에서 다양한 무료 패키지를 제공한다.

- 업데이트 및 설치를 위한 편리한 pkg-get 툴도 제공한다. 자세한 정보는 아래 참조.
http://www.sunfreeware.com/pkg-get.html
- 패키지를 직접 제작하고 싶을 경우에는 다음을 참조한다.
http://www.sunfreeware.com/pkgadd.html


12. 패치 관리

패치에 관한 다양한 정보와 패치 파일은 아래 사이트를 참조한다.
http://sunsolve.sun.com
ftp://sunsolve.sun.com/pub/patches

패치를 관리하거나 설치하기 위해서는 패치 번호를 먼저 파악해야 하고, 이는 Solaris#.PatchReport를 다운 받아 확인한다.
OS설치 후 반드시 Recommended Patch및 최신 보안 패치를 해 주어야 한다. 패치번호는 다음과 같이 구성되어있다.
109320-02 (패치번호-revision number)

1) 패치 정보
# showrev -p (시스템에 설치된 패치 정보 보기)
# patchadd -p (Solaris 2.6부터, Shell script)
# showrev -p | grep 109320
# patchadd -p | grep 109320

2) 초기 설치해야 할 패치와 참고 문서
Solaris8.PatchReport : Solaris8의 모든 recommended 패치 정보
8_Recommended.zip : Solaris8의 모든 recommended 패치 파일들
8_Recommended.README : Solaris8의 모든 recommended 패치 설치 방법과 설명

3) 패치 정보 및 저장 디렉토리
/var/sadm/patch

4) 패치 설치
# /usr/bin/unzip 109320-03.zip ( Solaris 7부터)
# /usr/bin/zcat 104040-01.tar.Z | tar xvf - (Solaris2.6)

# more 109320-03/README (반드시 관련 README를 읽어본다.)
# patchadd 109320-03 (패치를 수행)
# showrev -p | grep 109320 (설치 여부를 확인)

# patchrm 109320-03 (패치를 제거)
# showrev -p | grep 109320 (제거 여부를 확인)

- 주의사항 : Solaris2.6이전은 패치 디렉토리 내의 스크립트를 이용한다.
[설치 시]
# cd 109320
# ./installpatch .
[제거시]
# cd /var/sadm/patch/109320
# ./backoutpatch 109320

5) 패치 정보의 관리
http://sunsolve.sun.com의 Patch Portal에는 패치를 체계적이고 편리하게 다룰 수 있는 Patch finder, Patch Pro, Patch Check등을
제공한다.

6) 패치 에러 코드 정리
0 No error
1 Usage error
2 Attempt to apply a patch that's already been applied
3 Effective UID is not root
4 Attempt to save original files failed
5 pkgadd failed
6 Patch is obsoleted
7 Invalid package directory
8 Attempting to patch a package that is not installed
9 Cannot access /usr/sbin/pkgadd (client problem)
10 Package validation errors
11 Error adding patch to root template
12 Patch script terminated due to signal
13 Symbolic link included in patch
14 NOT USED
15 The prepatch script had a return code other than 0.
16 The postpatch script had a return code other than 0.
17 Mismatch of the -d option between a previous patch install and the current one.
18 Not enough space in the file systems that are targets of the patch.
19 $SOFTINFO/INST_RELEASE file not found
20 A direct instance patch was required but not found
21 The required patches have not been installed on the manager
22 A progressive instance patch was required but not found
23 A restricted patch is already applied to the package
24 An incompatible patch is applied
25 A required patch is not applied
26 The user specified backout data can't be found
27 The relative directory supplied can't be found
28 A pkginfo file is corrupt or missing
29 Bad patch ID format
30 Dryrun failure(s)
31 Path given for -C option is invalid
32 Must be running Solaris 2.6 or greater
33 Bad formatted patch file or patch file not found
34 The appropriate kernel jumbo patch needs to be installed

13. 백업

백업에 대한 자세한 문서는 다음을 참조한다.
http://docs.sun.com/db/doc/805-7228/6j6q7uf0u?a=view

- Full dump : 파티션 전체를 백업
- Incremental dump: 전체 백업 후 변경된 것만 백업
- 선택적 backup: 특정 파일이나 디렉토리를 백업
- Multivolume Backup : 여러 의 미디어를 이용한 백업

1) 백업 디바이스 종류
1/2-inch reel tape(140MB)
2.5-Gbyte 1/4 inch Cartridge(QIC) tape (2.5GB)
DDS3 4mm cartridge tape (DAT) (12-24GB)
14-Gbyte 8-mm cartridge tape (14GB)
DLT 7000 1/2-inch cartridge tape (35~70GB)

cf. /dev/rmt/xyn
x: 장치 번호 (0,1,2...)
y; 밀도 (h, m, l, c, u)
n: rewind 여부

2) mt 명령어 (tape을 제어하기 위해 사용)

# mt -f /dev/rmt/0 status (-> backup device의 상태를 표시 )
# mt -f /dev/rmt/0n eom (-> tape의 맨 끝으로 이동 )
# mt -f /dev/rmt/0 rewind (-> tape를 제일 처음으로 되감는다. )
# mt -f /dev/rmt/0n fsf [count] (-> count 개수 만큼 파일 뒤로 건너 띈다. )
# mt -f /dev/rmt/0n nfsf [count] ( -> count+1 개수 만큼 파일 뒤로 건너 띈다. )
# mt -f /dev/rmt/0n bsf [count] (-> count 개수 만큼 파일 앞으로 건너 띈다. )
# mt -f /dev/rmt/0n nbsf [count] (-> count+1 개수 만큼 파일 앞으로 건너 띈다. )
# mt -f /dev/rmt/0 erase (-> tape의 모든 내용을 지운다. tape나 device에 따라 다르나 시간이 많이 걸린다. )
# mt -f /dev/rmt/0 offline (-> tape가 eject 된다. )


3) tar, dd 명령어

# tar tvf /dev/rmt/0 ( -> tape의 내용을 확인함 )
# tar xvf /dev/rmt/0 ( -> tape에있는 내용을 Hard disk로 내림 )
# tar cvf /dev/rmt/0 /etc/hosts (-> Hard disk에있는 file 이나 directory를 tape로 받음 )
# tar cvfb - backup_dir | rsh host dd of=/dev/rmt/0 (-> remote host에있는 drive로 backup 받기)
# rsh -n host_name dd if=/dev/rmt/0 |tar xvBfb - restore_dir ( -> remote host에있는 drive로 backup 내리기 )


4) cpio 명령어

* 현재 디렉토리의 내용을 tape로 backup
# find . -print | cpio -ovcB > /dev/rmt/0
* tape에서 file을 extract
# cpio -ivcB /var/tmp/space < /dev/rmt/0
* 최근 일주일 내에 수정된 file을 tape로 받는다
# find . -mtime -7 -print | cpio -ovcB > /dev/rmt/0n
# find . -name 'file*' -print | cpio -ovcB > file.list
# cpio -ivt < file.list


5) ufsdump, ufsrestore 명령어

* /export/home이 /dev/rdsk/c0t0d0s3이라 가정

- dump할 파일 또는 파일시스템 용량확인
# df -k /export/home
# ufsdump 0S /export/home [ Mega ==> # / (1024 x 1024) ]

- Full Dump
# umount /export/home
# fsck /export/home
# ufsdump 0uf /dev/rmt/0 /export/home

- Incremental Dump
# umount /export/home
# fsck /export/home
# ufsdump 3uf /dev/rmt/0 /export/home
# cat /etc/dumpdates

- ufsrestore
# mount /export/home
# cd /export/home
# ufsrestore tvf /dev/rmt/0 (내용을 확인)
# ufsrestore rvf /dev/rmt/0 (내용을 모두 복구)
# ls /export/home ( Check filesystem restore)

# cd /var/tmp
# ufsrestore ivf /dev/rmt/0 (interactive로 일부만 복구)

- remove restoresymtable file
# rm /export/home/restoresymtable


14. 로그 관찰 및 성능 측정

1) 로그 분석

- /etc/syslog.conf (syslog 데몬 설정파일)
- /var/adm/sulog ( => su 관련 로그)
- /var/adm/messages ( => system 중요 로그 파일)
- /var/adm/loginlog (=> 로긴 관련 로그)
- /var/sadm/* (=> 패키지 관련 로그)

로그는 다음 문서를 참조한다.
http://www.certcc.or.kr/paper/tr2001/tr2001-05/unix_log_analysis.pdf (유닉스 로그 분석 1)
http://www.certcc.or.kr/paper/tr2001/tr2001-07/Unix_log_analysis_II.pdf (유닉스 로그 분석 2)

2) 시스템 퍼포먼스 관리

- System Administration Guide, Volume 2 >> 33. Managing System Performance Topics
http://docs.sun.com/db/doc/805-7229/6j6q8svgf?a=view
- SUN PERFORMANCE
http://www.sun.com/sun-on-net/performance.html
- Solaris Tunable Parameters Reference Manual
http://docs.sun.com/db/doc/816-0607
- 썬 시스템 메모리 정보 (Sun UNIX memconf utility)
http://www.4schmidts.com/memconf.html
- Unix and Windows NT System Tools
http://webperso.easyconnect.fr/sgarnaud/unixtools/index.html


5부. 네트웍 어드민

1. Network Setup

1) /etc/hostname.<Interface> 에 호스트 이름을 기록
ex) host1

2) /etc/hosts 파일에 ip설정
ex) 192.168.1.20 host1 loghost

3) /etc/defaultrouter 에 gw ip 설정
ex) 203.234.247.254

4) Netmask 설정
ex) 203.234.247.0 255.255.255.0

5) /etc/resolv.conf 에 DNS서버 등록
ex) domain ns.hananet.net
nameserver xxx.xxx.xxx.xxx

6) /etc/resolv.conf 에 dns 문자를 추가
....
hosts files dns ( ==> dns 추가)

7) 재부팅
# reboot

cf. 재부팅 없이 IP 변경
# ifconfig -a
# ifconfig hme0 down
# ifconfig hme0 203.234.247.30 net mask 255.255.255.0 broadcast + up (=> 설정)
# ifconfig hme0 (=> 확인)
# route add default 203.234.247.254 1 (=> 기본 게이트웨이 설정)

cf. 호스트 이름 변경
다음 6개 파일을 수정한다.
/etc/hosts
/etc/hostname.<interface>
/etc/nodename
/etc/net/*/hosts (3개)

cf. Network Interface Name
Lance Ethernet(10M Ethernet) : le
Fast Ethernet 1.0 : be
Fast Ethernet 2.0 이상 : hme
Quad Ethernet : qe
Quad FastEthernet 1.0 : hme
Quad FastEthernet 2.0 이상 : qfe
Gigabit Ethernet : vge
ATM 1.0 : sa
ATM 2.0 이상 : ba
FDDI : nf
Token Ring : tr


2. TCP/IP Network Layer

이론에 관한 문서는 다음을 참조한다.
- Introduction to TCP/IP
http://www.yale.edu/pclt/COMM/TCPIP.HTM
- SolarisTM 2.x - Tuning Your TCP/IP Stack and More
http://www.sean.de/Solaris/soltune.html
- TCP/IP 프로토콜
http://jkkang.net/unix/netprg/chap1/net1_2.html
- RFC 문서
ftp://ftp.isi.edu/in-notes/rfc793.txt

1) ifconfig
# ifconfig -a (모든 Network Interface 설정 정보 출력)

# ifconfig hme0 down (=> Interface disable)
# ifconfig hme0 up (=> Interface enable)

# ifconfig hme0 unplumb (=> Interface close)
# ifconfig hme0 plumb (=> Interface open)

# ifconfig hme0 203.234.247.30 netmask 255.255.255.0 broadcast + up (=> 설정)

2) rlogin, rsh, rcp

명령어: rlogin, rsh, rcp
설정파일(user): /etc/hosts.equiv, $HOME/.rhosts
설정파일(root): /.rhosts
서버호스트: sun01
클라이언트: sun02

- 서버 쪽 관리자가 설정
sun01# vi /etc/hosts ( 허락할 클라이언트 호스트 등록)
sun01# echo "sun02 user01" > /etc/hosts.equiv ( 허락할 호스트 및 유저등록)
sun01# chmod 600 /etc/hosts.equiv

- 클라이언트 관리자가 설정
sun02# vi /etc/hosts ( 접근할 서버 호스트 등록)

- test (클라이언트에서)
sun02# su - user01
sun02$ rlogin sun01
sun01$ hostname
sun01$ exit

- 서버 쪽 일반유저가 허락할 때
sun01# rm /etc/hosts.equiv
sun01# su - user01
sun01$ echo "sun02 user01" > $HOME/.rhosts
sun01$ chmod 600 $HOME/.rhosts

- Test (클라이언트에서)
sun02# su - user01
sun02$ rlogin sun01
sun01$ hostname
sun01$ exit

- 기타 r계열 명령어
sun02# su - user01
sun02$ hostname
sun02$ rsh sun01 hostname
sun02$ rcp /etc/profile sun01:a.txt
sun02$ rsh sun01 ls (a.txt가 복사되었는지 확인)

3) 기타 네트웍 명령어
# ping google.co.kr
# ping -s google.co.kr
# rusers (Local Network 사용자 정보, cf who)
# rusers -l hostA ( hostA에 대해 로긴한 사용자 정보)

4) 기타 Freeware
nmap(Port Scanning), traceroute(trace rote inform), nslookup(DNS info), dig(DNS info) ...

3. FTP Server

- 일반적으로 inetd에 의한 중재 방식과 standalone방식이 있다.
- anonymous ftp서비스를 위해서는 맨 페이지나 다음 사이트를 참고한다.
How to Set up a Secure Anonymous FTP Site
http://secinf.net/unix_security/How_to_Set_up_a_Secure_Anonymous_FTP_Site.html
- 보다 많은 설정과 기능을 제공하는 wu-fptd나 proftpd로 대체할 수 있다. (패키지는 www.sunfreeware.com)
WU-FTPD Development Group (http://www.wu-ftpd.org/)
The ProFTPD Project (http://www.proftpd.net/)
vsftpd (http://vsftpd.beasts.org/)

/usr/sbin/inetd (/etc/inetd.conf) ---> /usr/sbin/in.ftpd

4. Telnet Server

- 요즘은 보안 때문에 telnet 보다는 Secure Shell(ssh)을 사용하는 것이 일반적이다.


5. NFS (Network File System)

NFS는 썬에서 개발한 분산 환경 파일시스템으로서 원격지에서 공유한 일부를 로컬에서 쉽게 연결해서 쓸 수 있는 공유파일시스템이다.
자세한 문서는 다음을 참고한다.
- NFS FAQ
http://www.ebsinc.com/solaris/network/nfs.html
- Chapter 29 Solaris NFS Environment
http://docs.sun.com/db/doc/806-0916/6ja8539fd?a=view

1) NFS의 장점
- 여러 대의 컴퓨터가 모두 같은 자료에 접근하여 같은 파일을 사용할 수 있다.
- 데이터의 중복을 줄이고 관리를 최소화할 수 있다.
- 서로 다른 환경을 지원한다.
- 시스템 관리 오버헤드를 줄인다.

2) NFS Server
- 관련 파일
/etc/dfs/dfstab

Posted by 1010
60.Unix2008. 12. 16. 14:05
반응형

*** 조재구 강사님의 다음OS SCHOOL에서 퍼온 글입니다. ***


현재 모니터의 해상도를 바꿔 주는 방법입니다.
이 방법은 m64B 라는 그래픽 카드의 설정 방법입니다.

1. m64 그래픽 카드가 존재 하는지 확인 합니다.

[/]# prtconf | grep  -i  m64
SUNW,
m64B, instance #0        <==  이시스템은 m64B 그래픽 카드를 인식하고 있습니다.

2. 카드가 존재하면 커널 모듈이 있는지 확인합니다.
[/]# modinfo | grep m64
51  1027acd1  b6b8  202  1  m64 (m64.c 8.20 Jul 30 2001 12:11:41)

3. 아래의 명령으로 현재 카드에 설정 정보를 확인 합니다.
[/]# m64config  -dev  /dev/fb  -propt

--- OpenWindows Configuration for /dev/fb ---
OWconfig: machine
Video Mode: not set          <==  화면크기정보를 보여줌
Depth: not set                   <==  화면의 색상 (8bit or 24bit)

4. 현재 시스템이 사용할 수 있는 크기와 Hz 확인합니다.
(%%참고로 아래 출력된 결과물은 < 가로픽셀X세로픽셀Xhz >로 표시 됨 )

[/]# m64config -dev /dev/fb  -res \?
Valid values for  -res  option are:
720x400x70 [2]
720x400x85
640x480x60
640x480x67 [2]
640x480x72
640x480x75
800x600x56
800x600x60
800x600x72
800x600x75
832x624x75 [2]
1024x768x87 [2]
1024x768x60
1024x768x70
1024x768x75
1280x1024x75
1024x768x85 [1]
800x600x85 [1]
640x480x85 [1]
1280x1024x60 [1]
1152x900x66
1152x900x76
1280x1024x67
1600x1280x76 [1]
1920x1080x72 [1]
1280x800x76 [1]
1440x900x76 [1]
1600x1000x66 [1]
1600x1000x76 [1]
1920x1200x70 [1]
1280x1024x85 [1]
1280x1024x76 [3]
1152x864x75 [1]
1600x1200x75 [1]
1600x1200x60 [1]
1024x768x85 [1]
800x600x75
640x480x85 [1]
vga
svga
1152
1280
800x600
1024x768
1280x1024
1152x900
1600x1280 [1]
1920x1080 [1]
1600x1000 [1]
1920x1200 [1]
1600x1200 [1]

Notes:
[1] monitor does not support this resolution.
[2] card does not support this resolution.
[3] current resolution.

(% 바로 위의 출력내용중에
[1] 이면 설정할 모드는 모니터에서 지원하지 않음.
[2] 이면 m64B 카드(비디오 카드) 에서 지원하지 않음.
[3] 현재 설정되어 있는 모드임
아무런 내용이 없으면 설정이 가능한 모드임 )


==> 위의 출력된 내용에서 현재 시스템에 설정되어있는 정보는 1280x1024x76
이며 해상도를  800X600X75 로 바꿔봅니다.

5. 해상도를 설정 합니다.

[/]# m64config  -dev  /dev/fb  -res  800x600x75

6. 시스템을 rebooting 합니다.

[/]# reboot

7. 시스템이 부팅후 정상적으로 설정 되었는지 확인 합니다.

[/]# m64config -dev /dev/fb -propt
--- OpenWindows Configuration for /dev/fb ---
OWconfig: machine
Video Mode: 800x600x75
Depth: not set

---------------------- 해상도 변경법 2번째 글 -------------------------------------
1. VGA 카드 종류 확인
# prtconf -F
/SUNW,ffb@2,0:ffb0

2. vga 카드 관련 명령어 확인
# ls -l /usr/sbin/*config
lrwxrwxrwx 1 root root 9 2002년 8월 29일 /usr/sbin/GFXconfig -> pgxconfig*
-r-sr-xr-x 1 root bin 61508 1999년 12월 9일 /usr/sbin/afbconfig*
-r-xr-xr-x 1 root bin 27928 2000년 1월 6일 /usr/sbin/auditconfig*
-r-xr-xr-x 1 root bin 18968 2000년 3월 30일 /usr/sbin/bdconfig*
-r-xr-xr-x 1 root bin 184 2001년 5월 25일 /usr/sbin/dhcpconfig*
-rwxr-xr-x 7 root sys 71064 2001년 9월 13일 /usr/sbin/drvconfig*
-r-xr-xr-x 1 root bin 13552 2001년 6월 28일 /usr/sbin/fbconfig*
-r-sr-xr-x 1 root bin 58980 1999년 12월 9일 /usr/sbin/ffbconfig*
-r-r-sr-xr-x 1 root bin 28832 2001년 8월 15일 /usr/sbin/m64config*
-r-sr-xr-x 1 root bin 89780 2001년 8월 15일 /usr/sbin/pgxconfig*
-> 뭐 대충 보면 pgxconfig 라든지 m64config ffbconfig 등과 같은 명령이 그래픽 관련 명령입니다.
-> 여기서 ffb 그래픽 카드 사용하므로 ffbconfig 명령을 사용해야 합니다.
-> 보통은 m64config 를 사용하더군요

3. 현재 해상도 확인
# ffbconfig -prconf
--- Hardware Configuration for /dev/fbs/ffb0 ---
Type: double-buffered FFB2+ with Z-buffer
Board: rev 2 (Horizontal)
PROM Information: @(#)ffb2p.fth 2.9 98/07/14
FBC: version 0x3241906d
DAC: Brooktree 9070, version 1 (Pac2)
3DRAM: Mitsubishi 130b, version 2
EDID Data: Not Available
Monitor Sense ID: 7 (Unknown monitor type, defaulting to Sun 19" monitor)
Monitor possible resolution: 1152x900x66
Current resolution setting: 1152x900x66

현재 1152x900x66 으로 설정되어 있습니다.

4. 해상도 변경
# ffbconfig -res 1024x768x60
#

5. 적용하기
방법1) CDE 환경을 로그 아웃하고 재로그인 한다
방법2) /etc/init.d/dtlogin 을 재시작한다(stop/start)

5. 해상도 변경시 주의점
- 위에서 보다시피 possible resolution 이 1152x900x66 으로 한정되어 있는데..
그 이상의 해상도로 설정하면 화면자체가 안나올수 있습니다.
- 일반적으로 가능한 해상도 안에서 변경하면 정상적으로 나옵니다.
- 해상도 설정시에 아무런 메시지가 없으면 정상적으로 적용 가능한거고
지원하지 않으면 강제로 설정하겠느냐는 메시지가 나옵니다.
(별로 권장하지 않습니다)

6. 해상도 변경후 장애처리 방법
- 해상도 변경후 화면이 안먹으면 콘솔로 로그인을 할수가 없습니다.
- 이때는 telnet으로 로그인해서 m64config or ffbconfig 명령으로 해상도를 재설정하고
/etc/init.d/dtlogin 을 재시작하면 정상적으로 되돌아옵니다

Posted by 1010