jQuery UI Datepicker is a great control. The default behavior of the control shows dates along with Month and Year. But today for my requirement, I need to show only Month and Year as dropdown (with no dates). So when datepicker control is opened there should be only Month and Year dropdown. This was a bit challenging but after sometime I was able to achieve this.
How to do it?
First of all, hide the calendar area with dates. This can be done by setting "display:none" to ".ui-datepicker-calendar" CSS class. This class is responsible for styling the Date part area of the Calendar.
1
.ui-datepicker-calendar {
2
display: none;
3
}
Now,
Set changeMonth and changeYear to true so that Month and Year appear as Dropdown.
Set date format to "MM yy".
jQuery DatePicker has "onClose" event, which is called when Datepicker gets closed. So using this event, fetch the selected Month and Year and setDate of Datepicker.
jQuery DatePicker also has "beforeShow" event, which is called before the datepicker is displayed. So this event will be used to Show the previously selected Month and Year as selected. If you don't use this event, then datepicker will always show the current month and current year, irrespective of your previous selection.
권고사항 : 아래 글을 보시기 전에 권고드립니다. 아래는 발번역과 오역 그리고 미처 다 한글화가 되어있지 않습니다. 의미도 모른채 번역된 부분이 많기 때문에 다 건너띠고 아래쪽 예제만 보시길 강력히 권고 드립니다. 나빠진 정신건강에 대해 책임(?)지지 않습니다. ^^;;;;
jQuery.ajax( url [, settings] )Returns : jqXHR
개요 : 비동기 HTTP (Ajax) 요청을 수행합니다.
jQuery.ajax( url [, settings] )
url 요청을 보낼 URL 문자열
settings key/value 쌍으로 구성된 Ajax 요청 설정값. 모든 값들은 생략이 가능한 옵션값 임. 기본적인 설정값을 $.ajaxSetup() 에 정의할 수 있음. 모든 세팅에 대한 내용이 궁금하시면 jQuery.ajax( settings ) 을 참고하세요.
jQuery.ajax( settings )
settings key/value 쌍으로 구성된 Ajax 요청 설정값. 모든 값들은 생략이 가능한 옵션값 임. 기본적인 설정값을 $.ajaxSetup() 에 정의할 수 있음.
기본으로 사용하면, 모든 요청은 비동기방식으로 동작합니다. 만일 동기방식으로 사용하려면 이 값을 false로 세팅하세요. 크로스도메인(2개의 도메인 사이의 정보교환)과 dataType: "jsonp" 인 경우는 동기방식이 지원되지 않습니다. 동기방식은 요청이 처리될 때까지 브라우져가 일시적인 잠금상태가 됩니다.
요청이 완료되었을 때 호출되는 함수입니다. 요청에 대한 응답이 success 나 error 가 반환된 후 실행됩니다. 이 함수는 2개의 인자를 갖습니다. jqXHR 객체와 요청에 대한 상태값("success", "notmodified", "error", "timeout", "abort", "parsererror")으로 구성되어 있습니다. 더 자세한 내용은Ajax Event를 참고하십시오.
서버에 데이터를 보낼 때 사용되는 content-type 입니다. 기본값은 "application/x-www-form-urlencoded" 입니다. 명시적으로 바꾸려면 $.ajax() 함수안에서 content-type을 세팅해 줘야 합니다. 서버로 데이터를 보낼 때는 언제나 UTF-8 charset를 사용합니다. 따라서 서버 사이드 프로그램 시 그에 맞게 디코딩을 하여 사용해야 합니다.
This object will be made the context of all Ajax-related callbacks. By default, the context is an object that represents the ajax settings used in the call ($.ajaxSettings merged with the settings passed to $.ajax). For example, specifying a DOM element as the context will make that the context for the complete callback of a request, like so:
서버로 보낼 데이터입니다. GET 요청 형태의 query 스트링으로 변환되어 보내집니다. GET 요청 파라미터에 자동으로 추가됩니다. 이런 자동 추가를 방지하기 원하면 processData 옵션을 보시기 바랍니다. 이 객체는 key/value의 쌍으로 이루어져 있습니다. 만일 value가 배열이라면, jQuery는 같은 key로 여러 value를 직렬화 구성을 하게 됩니다. 아래쪽에 추가적인 설명이 있습니다.
Default: Intelligent Guess (xml, json, script, or html)
서버에서 응답 받을 때는 데이터의 타입을 jQuery가 추정하여 처리합니다. 만일 인자를 아무것도 적지 않으면 응답 메시지의 MIME type을 기초로하여 처리하게 되는 것입니다. MIME type이 XML 이며 yield XML을 생성하고, 1.4 JSON은 JavaScript 객체를 생성, 1.4 script라면 script를 실행하고, 그 외 다른 것들은 문자열을 리턴합니다.
"xml": jQuery가 XML 문서를 반환합니다.
"html": 평문 HTML 을 반환합니다.
"script": JavaScript를 실행하고 평문 텍스트를 리턴합니다. 쿼리 스트링에 "_=[TIMESTAMP]" 를 추가하면 캐싱을 방지할 수 있습니다. 이런 방식은cache 옵션을 true로 바꾸는 역할을 합니다.
"json": JSON을 JavaScript 객체형태로 반환합니다. jQuery 1.4에서 JSON 데이터는 엄격한 방식으로 파싱되었습니다. 형식에 맞지않는 JSON 데이터는 요청이 거부되고 error을 발생시켰습니다. JSON 포맷에 대해 궁금하시면 json.org 을 방문해 보세요.
"jsonp": JSONP 를 사용하여 JSON 블럭을 로드합니다. 쿼리 스트링에 "_=[TIMESTAMP]" 를 추가하면 캐싱을 방지할 수 있습니다. 이런 방식은 cache옵션을 true로 바꾸는 역할을 합니다.
"text": 평문 텍스트 문자열을 반환합니다.
multiple, 공백 구분 값(space-separated values): jQuery 1.5에서, dataType을 변환할 수 있게 되었습니다. 예를들어 응답받은 text 를 XML 로 변화하고 싶으면, "text xml"이라고 사용하면 됩니다.
요청(request)이 실패하면 호출됩니다. 이 함수는 3개의 인자를 통해 데이터를 받을 수 있습니다. jqXHR 객체는 발생한 에러 타입과 추가적인 예외 사항을 담고 있습니다. 두번째 인자에는 "timeout", "error", "abort", "parsererror" 와 같은 상황을 담고 있습니다. 세번째 인자에는 HTTP 에러가 담겨 있는데, "Not Found" 나 "Internal Server Error." 같은 것 들입니다. Note: cross-domain 스크립트나 JSONP 요청에 대해서는 이 함수를 사용할 수 없습니다.
마지막 request 이후 response가 변경되었을 경우에만 request가 성공하도록 허용하는 값입니다. 이것은 마지막 수정 정보를 헤더에서 체크하는 것입니다. 기본값은 false 이며 이 옵션이 무시됩니다. 즉, 언제나 request에 대한 응답을 체크하는 것입니다. jQuery 1.4 부터는 수정되지 않은 데이터를 알아내기 위한 'etag' 를 체크할 수 있습니다.
Default: 현재 프로토콜을 유지 depends on current location protocol
jQuery에서 인식하지 못하더라도 현재 환경이 "local(예, filesystem)" 로 인식할 수 있도록 허용합니다.(이건 무슨 의미인지 모르겠네요.) 다음 file, *-extension, widget 프로토콜 들은 현재 local로 인식합니다. 만일 isLocal 세팅을 변경을 원하시면 $.ajaxSetup() 함수에서 하실 것을 권장드립니다.
jsonp 요청에 사용한 콜백 함수명을 오버라이드 합니다. 이 값은 url에 포함된 쿼리 스트링의 부분인 'callback=?' 문자열 중 'callback' 을 대신하여 사용됩니다. 예를 들면 {jsonp:'onJSONPLoad'} 라고 세팅하면 서버에 'onJSONPLoad=?' 처럼 전달되게 되는 것입니다. jQuery 1.5 부터는 jsonp 옵션을false 로 세팅하여 URL에 "?callback" 이 추가되는 것을 방지하거나 "=?" 을 변조되는 시도를 방지할 수 있습니다. 이러한 경우 명시적으로jsonpCallback 세팅값을 이용하여야 합니다. 예를 들어, { jsonp: false, jsonpCallback: "callbackName" } 와 같이 사용합니다.
JSONP 요청 시 콜백 함수명을 지정합니다. 지정하지 않으면 jQuery에서 임의적으로 부여하게 됩니다. 요청(request)에 대해 쉽게 핸들링 할 수 있도록 유니크한 이름이 부여됩니다. 콜백 이름을 당신이 지정할 수도 있습니다. jQuery 1.5부터 함수명을 세팅할 수 있게 되어습니다.
By default, data passed in to the data option as an object (technically, anything other than a string) will be processed and transformed into a query string, fitting to the default content-type "application/x-www-form-urlencoded". If you want to send a DOMDocument, or other non-processed data, set this option to false.
Only for requests with "jsonp" or "script" dataType and "GET" type. Forces the request to be interpreted as a certain charset. Only needed for charset differences between the remote and local content.
요청이 성공했을 때 호출됩니다. 이 함수는 3개의 인자를 전달합니다. data 인자는 서버에서 전달된 데이터를, 두번째는 데이터의 타입을, 마지막으로 jqXHR(jquery 가 변형한 XMLHttpRequest 객체)를 전달하게 됩니다. jQuery 1.5 부터, success 시 함수 배열을 전달 받을 수 있습니다.
jQuery 1.5 부터 withCredentials 속성은 네이티브 XHR 에서 전달하지 못합니다.
$.ajax() 함수는 jQuery에서 사용되는 모든 Ajax 의 근간입니다. 종종 이 함수를 직접 호출하지 않아도 쉽게 사용할 수 있는 함수들이 있습니다.$.get() 이나 .load() 같은 함수들이 그것들입니다. 만일 세팅값을 변경할 필요가 있을 경우에도 $.ajax() 함수에서 유연하게 변경할 수 있습니다.
$.ajax();
Note: 기본 세팅값을 전역적으로 관리하려면 $.ajaxSetup() 함수를 이용해야 합니다.
위의 옵션값을 아무것도 없이 사용하면 현재 페이지에서 응답 결과를 제어하지 못합니다. 이게 가능하려면 콜백 함수를 지정해야 합니다.
The jqXHR Object
jQuery XMLHttpRequest (jqXHR) 객체는 $.ajax() 함수에서 반환됩니다. jQuery 1.5 부터 브라우저의 네이티브 XMLHttpRequest 객체의 상위집합 입니다. 예를 들어, 이 객체는 responseText 과 responseXML 속성을 포함하고 있을 뿐만 아니라 getResponseHeader() 함수도 포함하고 있습니다. 전송 메카니즘이 XMLHttpRequest 가 아닌 다른 것일 경우( JSONP 요청에 대한 script 태그 같은) jqXHR 객체는 네이티브 XHR 기능을 이용하게 됩니다.
jQuery 1.5.1부터, jqXHR 객체는 overrideMimeType() 함수를 사용하게 됩니다. (이것은 jQuery 1.4.x 에서는 사용되었지만, jQuery 1.5 에서 일시적으로 삭제되었음). .overrideMimeType() 함수는 method may be used in the beforeSend() 콜백 함수에서 사용될 수 있습니다. 예를 들어, 응답의 content-type header 를 수정하기 위해서 아래와 같이 사용할 수 있습니다.:
$.ajax({
  url: "http://fiddle.jshell.net/favicon.png",
  beforeSend: function ( xhr ) {
    xhr.overrideMimeType("text/plain; charset=x-user-defined");
  }
}).done(function ( data ) {
  if( console && console.log ) {
    console.log("Sample of data:", data.slice(0, 100));
  }
});
$.ajax() 에서 반환된 jqXHR 객체는 jQuery 1.5 의 약속된 인터페이스를 구현하여 모든 속성, 메소드, 동작들을 제공하고 있습니다.(더 많은 정보를 원하시면 Deferred object 를 참고). 편의성과 일관성을 위해 $.ajax() 함수에서 사용될 콜백 함수들로 jqXHR 객체는 .error(), .success(), .complete()와 같은 함수들을 사용할 수 있습니다. 이들 함수들은 $.ajax() 요청이 종료되었을 때 호출되고 모두 같은 인자를 전달받게 됩니다. 이것은 단일 요청에서 여러 콜백 함수를 지정할 수도 있고 요청이 완료된 후에도 콜백 함수를 지정할 수 있습니다.
Notice:jqXHR.success(), jqXHR.error(), jqXHR.complete() 콜백 사용은 1.8 버전부터 사용이 중지됩니다. 이런 사용을 제거하거나 jqXHR.done(),jqXHR.fail(), jqXHR.always() 함수들로 대체하십시오.
// Assign handlers immediately after making the request,
// and remember the jqxhr object for this request
var jqxhr = $.ajax( "example.php" )
    .done(function() { alert("success"); })
    .fail(function() { alert("error"); })
    .always(function() { alert("complete"); });

// perform other work here ...

// Set another completion function for the request above
jqxhr.always(function() { alert("second complete"); });
For backward compatibility with XMLHttpRequest 이전 버젼과의 호환성을 위해, jqXHR 객체는 아래와 같은 속성과 메소드들을 제공합니다.
readyState
status
statusText
responseXML or responseText
setRequestHeader(name, value)
getAllResponseHeaders()
getResponseHeader()
abort()
하지만 onreadystatechange 매커니즘은 제공되지 않기 때문에 success, error, complete, statusCode 이 상황들을 모두 커버 해야할 필요성이 있습니다.
Callback Function Queues
beforeSend, error, dataFilter, success, complete 옵션들 모두는 적절한 시간에 호출할 수 있는 콜백 함수를 가질 수 있습니다.
jQuery 1.5부터, error (fail), success (done), complete (always) 콜백 함수들은 큐에서 선입선출(first-in, first-out) 방식으로 제어할 수 있습니다. 이 의미는 콜백 함수마다 처리 로직을 수행할 수 있다는 뜻입니다. Deferred object methods 를 참고하여 $.ajax() 함수에서 콜백 시의 내부처리에 대해 알아볼 수 있습니다.
모든 콜백 함수의 this 키워드는 $.ajax 에서 전달된 context 의 객체들을 가르킵니다. 만일 context 가 지정되지 않았다면 this는 Ajax 세팅 자체를 지칭하게 됩니다.
JSONP 나 cross-domain 의 GET 요청 같은 XHR을 사용하지 않는 Ajax 방식을 사용할 경우에 XMLHttpRequest 나 textStatus 파리미터들은 undefined값을 가지게 됩니다.
아래는 $.ajax()에서 콜백 시 발생하는 훅(hook - I/O 시 정의된 상수값들 정도로 생각하면 됨) 값들 입니다.
beforeSendjqXHR 객체와 파라미터 settings 맵을 받습니다.
error 요청이 실패했을 경우 순서대로 등록됩니다. error 타입 문자열과 exception 객체로 구성된 jqXHR 들을 받습니다. 몇몇 Some 내장 error들은 exception 객체에 "abort", "timeout", "No Transport"와 같은 문자열이 넘어옵니다.
dataFilter 성공적으로 응답이 되었을 경우 즉시 호출됩니다. 반환된 데이터와 dataType 을 받을 수 있고 success 쪽으로 변경된 데이터를 전달해야 합니다.
success 요청이 성공하면 요청된 순서에 따라 호출됩니다. 반환된 데이터와 성공 코드를 포함한 문자열 그리고 jqXHR 객체를 받을 수 있습니다.
complete 요청이 실패하거나 성공에 관계없이 요청이 종료되면 순서에 따라 발생합니다. 성공 또는 실패에 대한 코드를 담은 jqXHR 객체를 받습니다.
예를 들어, HTML 이 반환되고 이것을 사용하고 싶다면 success 핸들러를 사용해야 합니다.
$.ajax() 함수는 검색한 데이터에 대한 정보를 제공하는 서버에 의존합니다. 만일 서버에서 XML 데이터가 제공되었다면, 일반적인 XML 메소드나 jQuery의ㅣ 선택자(selector)들을 사용하여 제어할 수 있습니다. 만일 위의 예제와 같이 HTML 같은 것이라면 데이터를 text 처럼 취급할 수도 있습니다.
별개의 다른 데이터를 dataType 옵션을 이용하여 다룰 수 있습니다. dataType 으로는 xmlhtml, json, jsonp, script, text.
text 나 xml 타입은 jqXHR 객체의 속성인 responseText 나 responseXML 을 통해 success 핸들러에서 간단하게 받을 수 있습니다.
Note: 웹 서버에서 사용한 MIME 타입과 데이터 요청 시의 dataType 값이 같은지 확인해야 합니다. 특히 XML 은 서버에서 text/xml 또는application/xml 로 반환했는지 확인하고 그에 맞춰 사용해야 합니다.
만일 html 을 지정하는 경우, HTML 이 반환 되기 전에 내부의 JavaScript 는 실행이 된 후 반환이 됩니다. 비슷하게 script 를 정의했다면, 서버에서 반환될 때 인라인 JavaScript 는 실행이 되고 반환되게 됩니다.
json 타입은 The json JavaScript 객체로 가져온 데이터 파일을 분석하고 결과 데이터로 만들어진 객체를 반환합니다. 이렇게 하기 위해서는, 브라우저가 지원한다면 jQuery.parseJSON() 을 사용하거나, 지원하지 않는다면 Functionconstructor 을 사용해야 합니다. 형식에 맞지 않는(Malformed) JSON 데이터는 에러가 발생하게 되는데 더 많은 정보는 json.org에서 보실 수 있습니다. JSON 데이터는 구조화된 데이터의 이동에 편리합니다. JavaScript 로 처리하기에 간결하고 쉽습니다. 만일 외부 서버에서 가져와야 하는 데이터라면, jsonp 타입을 대신 사용할 수 있습니다.
이 jsonp 타입은 URL 쿼리스트링에 callback=? 이라는 문자열이 추가됩니다. 서버는 유효한 형태의 JSONP 반환 데이터를 콜백(callback) 이름을 사용하여 반환하게 됩니다. $.ajax() 의 옵션인 callback 이외에 다른 파라미터를 지정하여 사용할 수 있습니다.
Note: JSONP 는 확장된 JSON 포맷입니다.
script 나 jsonp 데이터 타입이 사용 가능한 원격 서버에서 데이터를 가져왔을 때, error 콜백과 글로벌 이벤트는 발생하지 않습니다.
Sending Data to the Server
기본적으로, Ajax는 GET HTTP 방식입니다. POST 방식이 필요할 경우, type 옵션값을 이용하면 됩니다. POST 데이터가 서버로 전송될 경우 W3C XMLHTTPRequest 표준인 UTF-8 캐릭터셋을 이용하게 됩니다.
data 옵션값은 key1=value1&key2=value2 형태의 쿼리 스트링을 사용할 수 있습니다. 또한 {key1: 'value1', key2: 'value2'} 형태도 사용이 가능합니다. 만일 후자의 형태를 사용할 경우, 데이터를 보내기 전에 jQuery.param()을 사용하여 데이터를 가공해야 합니다. 이 과정은 processData 을 false로 세팅하면 해결할 수 있습니다. 이 과정을 수행하면 서버로 XML 데이터를 보낼 때 contentType 타입이 application/x-www-form-urlencoded 로 변경되는 것을 방지할 수 있습니다. (음, 이 부부은 사실 명확치 않네요. 좀더 공부가 필요합니다. ㅜㅜ)
Advanced Options
global 옵션으로 .ajaxSend(), .ajaxError() 그리고 이 함수로 인해 호출되는 함수들의 실행을 제어할 수 있습니다. cross-domain 스크립트와 JSONP 가 사용될 경우에는 자동으로 false 로 세팅됩니다. 더 자세한 내용은 함수들의 사용법을 살펴 보십시오.
만일 서버가 HTTP 인증을 요구한다면 username 과 password 옵션을 사용할 수 있습니다.
Ajax 사용 시 시간제한을 두어 사용자에게 그 내용을 제공하는 것이 좋습니다. 요청시간은 $.ajaxSetup() 에서 timeout 옵션값을 조절하는 것이 좋습니다.
기본적으로 지속적인 요청에 대해 브라우저는 캐시에 있는 결과를 사용하려 합니다. 이런 부분을 해결하기 위해 cache 옵션을 false로 세팅하시기 바랍니다. 또한 결과가 마지막 요청 후에 변경되지 않았다면 ifModified을 true로 세팅하면 false를 반환받을 수 있습니다.
scriptCharset 옵션은 <script> 태그의 캐릭터셋을 명시적으로 설정할 수 있습니다. 만약 서버와 스크립트의 캐릭터 셋이 다를 경우 아주 유용한 옵션입니다.
Ajax 의 기본은 "비동기(asynchronous)" 입니다. async 옵션은 기본적으로 $.ajax() 에서 true 로 세팅되어 있습니다. 이 옵션을 false 로 바꾸면 동기식으로 전환됩니다.
$.ajax() 함수는 XMLHttpRequest 객체를 반환합니다. 일반적으로 jQuery는 내부적으로 이 객체를 처리합니다. 사용자 정의 함수에서는 xhr 의 옵션을 이용해서 가공을 할 수 있습니다. 반환된 객체는 대체로 삭제되지만 저수준 인터페이스에서는 요청에 대한 조작을 위해 사용할 수도 있습니다. 특히,.abort() 를 호출하면 객체가 완성되기 전에 요청을 중단할 수 있습니다.
jQuery 1.5부터, jQuery의 Ajax 는 더 유연하게 사용할 수 있도록 확장된 사전필터(prefilters), 컨버터(converters), 변환(transports)이 포함되어 있습니다. 이런 이점에 대해 더 많은 정보를 얻으시려면 Extending Ajax 페이지를 살펴 보십시오.
Additional Notes:
보안 문제로 인해 대부분의 "Ajax" 요청은 제한이 있습니다. 도메인, 서브 도메인, 프로토콜이 다른 상황에서의 조회는 사용하지 못합니다. Script 와 JSONP 요청은 이런 제약에서 자유롭습니다.
조금 쉬어가면서 작성했지만, 역시 역부족이네요. 사실 너무 길어서 필요한 것만 할까 생각했지만 그래도 처음부터 발번역을 했습니다. 나중에 개정판(?)이 될지는 모르겠지만 아마 고쳐야 할 부분이 너무 많습니다. 맨위에서 권고 드렸듯이 예제만 보는 것이 정신건강에 좋을 듯합니다. ^^;;;;;
This document describes dynatree version: $Version:$. Document revision: $Revision:$. A current version may be found at the project site http://wwwendt.de/tech/dynatree/index.html.
Dynatree is a dynamic JavaScript tree view control with support for checkboxes, drag'n'drop, and lazy loading.
Optimized for large dynamic trees (DOM elements are only created when really needed).
Programmable through a rich object oriented interface.
Support for lazy loading and Ajax.
Checkboxes and hierarchical selection.
Supports drag and drop.
Support for persistence.
Keyboard aware.
Initializes from HTML code, JSON, or JavaScript objects.
Implemented as a jQuery plugin. (Note: this doesn't mean that you have to use jQuery for your whole site.)
Dynatree runs best, when the HTML document is rendered in a strict mode like <!DOCTYPE html PUBLIC "-//W3C//DTD HTML 4.01//EN" "http://www.w3.org/TR/html4/strict.dtd">. Avoid the quirks mode.
You can download the current dynatree package at http://code.google.com/p/dynatree/downloads. It contains everything needed including the source, some documentation and examples. jQuery is already included, but you can check the jQuery site for the latest versions of jquery.js and ui.core.js.
2 Examples
This documentation contains script examples and links. See also the Example Browser for some more advanced live demos.
Using the [View source code] link in the Example Browser is probably the best way to learn about Dynatree.
<!-- Add code to initialize the tree when the document is loaded: --> <scripttype="text/javascript"> $(function(){ // Attach the dynatree widget to an existing <div id="tree"> element // and pass the tree options as an argument to the dynatree() function: $("#tree").dynatree({ onActivate:function(node){ // A DynaTreeNode object is passed to the activation handler // Note: we also get this event, if persistence is on, and the page is reloaded. alert("You activated "+ node.data.title); }, persist:true, children:[// Pass an array of nodes. {title:"Item 1"}, {title:"Folder 2", isFolder:true, children:[ {title:"Sub-item 2.1"}, {title:"Sub-item 2.2"} ] }, {title:"Item 3"} ] }); }); </script> </head> <body> <!-- Add a <div> element where the tree should appear: --> <divid="tree"></div> </body> </html>
The dynatree widget is then attached to an empty <div > element with a given ID of 'tree'. This id can have any value, it only has to match the jQuery selector, in our case '#tree'. Options are passed to the dynatree() function as a dictionary in curly braces:
            $("#tree").dynatree({
                […]
            });
4.1 Tree options
Tree options are passed as plain JavaScript objects in curly braces, e.g. { … }.
The following script shows the available options. All options have a reasonable default, so we may only have to pass the onActivate handler.
$("#tree").dynatree({ title:"Dynatree",// Tree's name (only used for debug outpu) minExpandLevel:1,// 1: root node is not collapsible imagePath:null,// Path to a folder containing icons. Defaults to 'skin/' subdirectory. children:null,// Init tree structure from this object array. initId:null,// Init tree structure from a <ul> element with this ID. initAjax:null,// Ajax options used to initialize the tree strucuture. autoFocus:true,// Set focus to first child, when expanding or lazy-loading. keyboard:true,// Support keyboard navigation. persist:false,// Persist expand-status to a cookie autoCollapse:false,// Automatically collapse all siblings, when a node is expanded. clickFolderMode:3,// 1:activate, 2:expand, 3:activate and expand activeVisible:true,// Make sure, active nodes are visible (expanded). checkbox:false,// Show checkboxes. selectMode:2,// 1:single, 2:multi, 3:multi-hier fx:null,// Animations, e.g. null or { height: "toggle", duration: 200 } noLink:false,// Use <span> instead of <a> tags for all nodes // Low level event handlers: onEvent(dtnode, event): return false, to stop default processing onClick:null,// null: generate focus, expand, activate, select events. onDblClick:null,// (No default actions.) onKeydown:null,// null: generate keyboard navigation (focus, expand, activate). onKeypress:null,// (No default actions.) onFocus:null,// null: set focus to node. onBlur:null,// null: remove focus from node.
// Pre-event handlers onQueryEvent(flag, dtnode): return false, to stop processing onQueryActivate:null,// Callback(flag, dtnode) before a node is (de)activated. onQuerySelect:null,// Callback(flag, dtnode) before a node is (de)selected. onQueryExpand:null,// Callback(flag, dtnode) before a node is expanded/collpsed.
// High level event handlers onPostInit:null,// Callback(isReloading, isError) when tree was (re)loaded. onActivate:null,// Callback(dtnode) when a node is activated. onDeactivate:null,// Callback(dtnode) when a node is deactivated. onSelect:null,// Callback(flag, dtnode) when a node is (de)selected. onExpand:null,// Callback(flag, dtnode) when a node is expanded/collapsed. onLazyRead:null,// Callback(dtnode) when a lazy node is expanded for the first time. onCustomRender:null,// Callback(dtnode) before a node is rendered. Return a HTML string to override. onCreate:null,// Callback(dtnode, nodeSpan) after a node was rendered for the first time. onRender:null,// Callback(dtnode, nodeSpan) after a node was rendered. postProcess:null,// Callback(data, dataType) before an Ajax result is passed to dynatree.
// Drag'n'drop support dnd:{ // Make tree nodes draggable: onDragStart:null,// Callback(sourceNode), return true, to enable dnd onDragStop:null,// Callback(sourceNode) // Make tree nodes accept draggables autoExpandMS:1000,// Expand nodes after n milliseconds of hovering. preventVoidMoves:true,// Prevent dropping nodes 'before self', etc. revert:false,// true: slide helper back to source if drop is rejected onDragEnter:null,// Callback(targetNode, sourceNode, ui, draggable) onDragOver:null,// Callback(targetNode, sourceNode, hitMode) onDrop:null,// Callback(targetNode, sourceNode, hitMode, ui, draggable) onDragLeave:null// Callback(targetNode, sourceNode) }, ajaxDefaults:{// Used by initAjax option cache:false,// false: Append random '_' argument to the request url to prevent caching. timeout:0,// >0: Make sure we get an ajax error for invalid URLs dataType:"json"// Expect json format and pass json object to callbacks. }, strings:{ loading:"Loading…", loadError:"Load error!" }, generateIds:false,// Generate id attributes like <span id='dynatree-id-KEY'> idPrefix:"dynatree-id-",// Used to generate node id's like <span id="dynatree-id-<key>">. keyPathSeparator:"/",// Used by node.getKeyPath() and tree.loadKeyPath(). cookieId:"dynatree",// Choose a more unique name, to allow multiple trees. cookie:{ expires:null// Days or Date; null: session cookie }, // Class names used, when rendering the HTML markup. // Note: // These settings only apply on initialisation. // If only single entries are passed for options.classNames, all other // values are still set to default. classNames:{ container:"dynatree-container", node:"dynatree-node", folder:"dynatree-folder",
Type: dictionary, default: $.ui.dynatree.defaults.classNames. Override class names, that are used, when rendering the HTML markup. Typically this will require some customization of the CSS file too. Note: class names are applied on initialisation only. Example:
$("#tree1").dynatree({ checkbox:true, // Override class name for checkbox icon: classNames:{checkbox:"dynatree-radio"}, [...]
opts.clickFolderMode
Type: integer, default: 3. Define, how a mouse click will change a folder status.
Single-clicking a folder title (or pressing the [enter] or [space] key) will activate it. In this mode documents and folders behave the same.
Single-clicking a folder title expands the node. The folder cannot be activated.
Single-clicking a folder title will activate and expand it.
opts.persist
Type: boolean, default: false. True: the tree's expansion, activation, focus and selection state is saved to a session cookie, so reloading the page will restore the status. Notes: this may not work with lazy nodes. See cookie option.
4.2 Initializing the tree structure
A tree structure is made of nodes. Every node may in turn contain a list child nodes. A dynatree always has exactly one root node, and all top level nodes of our tree are created as direct descendants. The root node is usually hidden, so we only see the nodes that we have added.
Dynatree can read it's structure from different sources:
If the children option is passed, it will be used.
Otherwise, if the initAjax option is passed, it will be used.
Otherwise, if the initId option is passed, it will be used.
Otherwise, if the the container <div> element contains a <ul> element, it will be used.
Otherwise, the tree is left empty. But we may choose to do so, if we want to modify the tree programmatically.
Methods 1-3 expect a list of node options, as described in the following sections.
4.2.1 Node options
Node options are defined as plain JavaScript objects in curly braces, e.g. { … }. Most of the time we pass a list of node options like this children: [ { … }, { … }, … ].
The follwing snippet shows the attributes that can be used to define a tree node. There are reasonable default values for all options, so we may only have to pass a title.
children:[ { title:null,// (required) Displayed name of the node (html is allowed here) key:null,// May be used with activate(), select(), find(), ... isFolder:false,// Use a folder icon. Also the node is expandable but not selectable. isLazy:false,// Call onLazyRead(), when the node is expanded for the first time to allow for delayed creation of children. tooltip:null,// Show this popup text. href:null,// Added to the generated <a> tag. icon:null,// Use a custom image (filename relative to tree.options.imagePath). 'null' for default icon, 'false' for no icon. addClass:null,// Class name added to the node's span tag. noLink:false,// Use <span> instead of <a> tag for this node activate:false,// Initial active status. focus:false,// Initial focused status. expand:false,// Initial expanded status. select:false,// Initial selected status. hideCheckbox:false,// Suppress checkbox display for this node. unselectable:false,// Prevent selection. // The following attributes are only valid if passed to some functions: children:null// Array of child nodes. // NOTE: we can also add custom attributes here. // This may then also be used in the onActivate(), onSelect() or onLazyTree() callbacks. }, […] ]
The node options are also passed to the event handlers and can be accessed like this:
If set to true, the node will be initially activated.
data.addClass
Class name that is added to the node's <span> element. Example:
{ title:"Pretty node", addClass:"customClass1"}
or
<lidata="addClass: 'customClass1'">Pretty node
can be styled using css as
span.customClass1 a { background-color: maroon; color: yellow;}
data.children
Array of node options, that are used to generate child nodes. This option is only valid when passed to certain functions, like DynTreeNode.addChild().
data.expand
If set to true, the node will be initially expanded.
data.focus
If set to true, the node will be initially focused.
data.hideCheckbox
Suppress display of checkbox icon. It is still possible to (de)select the node using the API, keyboard or initialization data. (The selection state may be visualized by a CSS style.) See also unselectable.
data.href
Contains the link URL, if the tree was initialized from a <ul> tag:
Optional name of an image file relative to the image directory. If null specified, a default image is used depending on the node type (folder or document). This is the default. If false specified, no image is displayed.
Enables delayed loading of the node contents. When a lazy node is expanded for the first time, the onLazyRead() callback is called.
data.key
Uniquely identifies this node. It is optional, but we need it for some functions like tree.activateKey(). If specified, the node's element id is generated by prepending a prefix like this: dynatree-id-1234. If not specified, a random key id is generated.
data.select
If set to true, the node will be initially selected.
data.target
See data.href.
data.title
Type: string, default: "". Displayed name of the node (html markup is allowed here).
data.tooltip
Optional string to display in a popup window when the cursor hovers over the node.
data.unselectable
Prevent (de)selection of this node using API, mouse, and keyboard. It is still possible, to (de)select this node in the initialization data or indirectly (in multi-hier mode). See also hideCheckbox.
To override the node attribute defaults, modify the structure before initializing dynatree:
<scripttype="text/javascript"> $.ui.dynatree.nodedatadefaults["icon"] = false; // Turn off icons by default
When a node is of type folder, it get's a special folder icon and class name. We usually use them to hold child nodes. Also, folders can be expanded by clicking the title text (this behavior can be controlled using the clickFolderMode option).
Non-folders ('documents') may also contain child nodes. Clicking on a child node activates it, so we have to click the small [+] icon in front to expand such a document node.
4.2.3 Initializing the tree structure from an object array
In the quick example above we have already seen how a tree is initialized by passing a node array with the children option.
4.2.4 Initializing the tree structure from an Ajax response
Instead of passing an array of data objects, we can pass a url in the initAjax option that will be used to contact an Ajax web service.
$("#tree").dynatree({ initAjax:{url:"/ajaxTree", data:{key:"root",// Optional arguments to append to the url mode:"all" } }, […] });
The web service is expected to return a valid JSON node list, formatted like this: [ { ... }, { ... }, ... ].
Because the data request is performed asynchronously, the document will load faster. Dynatree will display a spinning wheel, while waiting for the request to complete.
4.2.5 Initializing the tree structure from a <ul> element
If the container <div> contains a <ul> element, the node titles are read from the <li> tags. If the title contains html markup, it may be better to wrap it inside a span element.
All other node options are specified in the data attribute of a <li> element. For example
<lidata="url: 'http://jquery.com'">jQuery home <lidata="url: 'http://example.com', addClass: 'customClass1'">Example page
Note that the data attribute is not valid in <li> elements in some doctypes (HTML 4.01 transitional and Strict and XHTML 1.0 Strict). Validators will complain about this. Also, if the id attribute is used to pass a key, it should be alphanumeric and start with a letter to be compliant. (This doesn't seem to affect the functionality however.)
Nested <ul> elements are used to build a hierarchical tree structure. After the <ul> element was parsed, it is removed from the DOM tree.
Note that <a> elements are recognized: <li><a href='URL' target='TARGET'>TITLE</a> will result in node.data.title = TITLE node.data.href = URL node.data.target = TARGET
<head> <!-- Include the required JavaScript libraries: --> <scriptsrc='jquery/jquery.js'type="text/javascript"></script> <scriptsrc='jquery/jquery-ui.custom.js'type="text/javascript"></script>
<!-- Add code to initialize the tree when the document is loaded: --> <scripttype="text/javascript"> $(function(){ $("#tree").dynatree({ onActivate:function(node){ alert("You activated "+ node); } }); }); </script> </head> <body> <!-- Add a <div> element where the tree should appear: --> <divid="tree"> <ul> <liid="key1"title="Look, a tool tip!">item1 with key and tooltip <liid="key2"class="selected">item2: selected on init <liid="key3"class="folder">Folder with some children <ul> <liid="key3.1">Sub-item 3.1 <liid="key3.2">Sub-item 3.2 </ul>
<liid="key4"class="expanded">Document with some children (expanded on init) <ul> <liid="key4.1">Sub-item 4.1 <liid="key4.2">Sub-item 4.2 </ul>
$(function(){ // Initialize the tree in the onload event $("#tree").dynatree({ onActivate:function(node){ alert("You activated "+ node); } }); // Now get the root node object var rootNode = $("#tree").dynatree("getRoot"); // Call the DynaTreeNode.addChild() member function and pass options for the new node var childNode = rootNode.addChild({ title:"Child node 1", tooltip:"This child node was added programmatically.", isFolder:true }); // childNode.addChild({ title:"Document using a custom icon", icon:"customdoc1.gif" }); });
5 Handling events
When a user clicks a node, we want to react in some way. So at least we want to implement an onActivate handler.
All event handlers are passed an instance of DynaTreeNode as argument. this refers to the Dynatree object. The node options can be accessed like this:
The this context is set to the tree object. Use tree.isUserEvent(), tree.isInitializing(), and tree.isReloading() to determine who generated this event.
opts.onActivate(node)
Called when a node was activated.
onActivate:function(node){ if(node.tree.isUserEvent()){ [...]// Do something after user activated the node (using mouse or keyboard) } }
opts.onBlur(node)
Called when a node lost the focus.
opts.onClick(node, event)
Called when a node was clicked. Use node.getEventTargetType(event) to check which area was clicked. Return false to prevent default processing (setting focus, activate the node, expand folders, etc.).
Called after a node's HTML tag was created, i.e. when a node becomes visible for the first time. This callback may be used to bind events or widgets for nodes that are created lazily or programatically.
(Note that the use of jQuery live events may often be a more efficient solution.) See also opts.onRender.
opts.onCustomRender(node)
Called before a node's title HTML tag will be created. This happens when a node becomes visible for the first time. This callback may return a string that will be used instead of the default HTML markup.
Called when a node was double clicked. Use node.getEventTargetType(event) to check which area was clicked. Return false to prevent default processing (currently none).
opts.onDeactivate(node)
Called when a node was deactivated.
opts.onExpand(flag, node)
Called when a node was expanded/collapsed.
opts.onFocus(node)
Called when a node receives the focus.
opts.onKeydown(node, event)
Called on keydown events. Return false to prevent default processing (generate keyboard navigation, focus, expand, activate, etc.).
opts.onKeypress(node, event)
Called on keypress events. Return false to prevent default processing (currently none).
opts.onLazyRead(node)
Called when a lazy node is expanded for the first time.
This function must be defined to enable dropping of items on the tree.
opts.dnd.onDragStop(sourceNode)
ajaxOptions.success(node)
(Passed as argument to node.appendAjax(...).) Called after nodes have been created and the waiting icon was removed. 'this' is the options for this Ajax request
The following example handles an activation event by opening a url in a new window. This assumes, that we have defined an additional custom attribute named 'url' in the node options, like so:
<ul> <lidata="url: 'http://jquery.com'">jQuery home <lidata="url: 'http://docs.jquery.com'">jQuery docs
$("#tree").dynatree({ […] onSelect:function(flag, node){ if(! flag ) alert("You deselected node with title "+ node.data.title); var selectedNodes = node.tree.getSelectedNodes(); var selectedKeys = $.map(selectedNodes,function(node){ return node.data.key; }); alert("Selected keys: "+ selectedKeys.join(", ")); }, […] });
5.4 Handling focus changes
If we use the cursor keys to walk the tree nodes, the focus changes to the next node, but the active node remains the same unless we use [Space] or [Enter]. Also, when we click on a folder node it is only focused, but not activated.
The following example writes the title of the currently focused node to the <span id='echoFocused'> element:
5.5 Loading child nodes on demand ('lazy loading')
Dynatree supports delayed loading of tree nodes, which means we read the child nodes only when their parent is expanded.
Because the data request is performed asynchronously, the browser will not block and is still responsive. Dynatree will display a spinning wheel, while waiting for the request to complete.
To make this happen, we have to
Mark some or all nodes as lazy, by setting the isLazy option to true.
Implement a backend web service that delivers a JSON formatted node list.
Implement the onLazyRead callback to send an Ajax request, create the child nodes, and set the 'ok' status.
Typically we would implement onLazyRead by calling the node.appendAjax() function. It expects one option object argument, as described in the documentation for the jQuery.ajax() command.
These options are set by default: cache: false and dataType: "json".
Note that the success and error options are implemented differently from the jQuery standard: They pass different arguments and are called after the Dynatree default processing took place. This makes it easy to use the success callback to apply any custom postprocessing, for example activating a node or binding events.
$("#tree").dynatree({ […] onLazyRead:function(node){ node.appendAjax({url:"/sendData", data:{"key": node.data.key,// Optional url arguments "mode":"all" }, // (Optional) use JSONP to allow cross-site-requests // (must be supported by the server): // dataType: "jsonp", success:function(node){ // Called after nodes have been created and the waiting icon was removed. // 'this' is the options for this Ajax request }, error:function(node,XMLHttpRequest, textStatus, errorThrown){ // Called on error, after error icon was created. }, cache:false// Append random '_' argument to url to prevent caching. }); }, […] });
The web service is expected to return a valid JSON node list, formatted like this: [ { "title": "Node1", "isLazy": true, "key": "BC13B21636CD6D5C", … }, { … }, … ] See Node options for a list of supported attributes.
When the response was received, appendAjax() appends the child nodes and calls node.setLazyNodeStatus(DTNodeStatus_Ok) to remove the wait icon.
Note that initAjax is simply a special case, where the tree's root node is loaded on startup. See Initializing the structure from an Ajax response for a sample to initialize the whole tree with an Ajax request.
This sample code (written in Python) shows how a server could create a response:
# Build node list as JSON formatted string: res ='[' res +='{ "title": "Node 1", "key": "k1", "isLazy": true },' res +='{ "title": "Node 2", "key": "k2", "isLazy": true },' res +='{ "title": "Node 3", "key": "k3", "isLazy": true }'# no trailing "," at the last line res +=']'
# Add support for the JSONP protocol: # This means, if the request URL contains an argument '?callback=xxx', # wrap the result as 'xxx(result)' if"callback"in argDict: res = argDict["callback"]+"("+ res +")"
# Make sure, content type is JSON: start_response("200 OK",[("Content-Type","application/json")])
# Return result (the square brackets are Python / WSGI specific): return[ res ]
See dynatree_server.py for a sample implementation of a web server that handles this (~150 lines of Python code). When this server is running, you can try this live example of a lazy tree.
5.5.1 Loading custom formats
If we need more control, or if the server cannot provide JSON in Dynatree's native format, we could also use jQuery.ajax() to fetch the data, then transform it and callnode.addChild():
$("#tree").dynatree({ […] onLazyRead:function(node){ $.ajax({ url:[…], success:function(data, textStatus){ // In this sample we assume that the server returns JSON like // { "status": "...", "result": [ {...}, {...}, ...]} if(data.status =="ok"){ // Convert the response to a native Dynatree JavaScipt object. var list = data.result; res =[]; for(var i=0, l=list.length; i<l; i++){ var e = list[i]; res.push({title:""+ i +": "+ e.fcurr +"-"+ e.tcurr +":"+ e.ukurs, icon:false}); } // PWS status OK node.setLazyNodeStatus(DTNodeStatus_Ok); node.addChild(res); }else{ // Server returned an error condition: set node status accordingly node.setLazyNodeStatus(DTNodeStatus_Error,{ tooltip: data.faultDetails, info: data.faultString }); } } }); […] });
6 Drag'n'drop
Drag and drop functionality is enabled by defining the appropriate callbacks:
$("#tree").dynatree({ [...] dnd:{ onDragStart:function(node){ /** This function MUST be defined to enable dragging for the tree. * Return false to cancel dragging of node. */ logMsg("tree.onDragStart(%o)", node); returntrue; }, onDrop:function(node, sourceNode, hitMode, ui, draggable){ /** This function MUST be defined to enable dropping of items on * the tree. */ logMsg("tree.onDrop(%o, %o, %s)", node, sourceNode, hitMode); sourceNode.move(node, hitMode); } } });
There are a lot more callbacks that can be used to fine tune the behaviour. Check the source code in the samples in the Example Browser to learn more.
7 Persistence
When initializing a tree in persist mode, we first check, if persistence cookies already exist. If not, we assume first-time initializing, read the status from the tree source, and store it into new cookies.
Otherwise we assume re-loading, ignore the source node attributes and override them using the cookie info.
In either case, the 'active', 'expand' and 'select' status of a node is read from the data or restored from the cookies. However, no onQueryActivate, onActivate, onExpand, onSelect, etc. events are fired. (The only event that may be fired is onFocus.) In order to generate these events on reload, we may use the callback function onPostInit() and tree.reactivate().
$("#tree").dynatree({ […] onPostInit:function(isReloading, isError){ // 'this' is the current tree // isReloading is true, if status was read from existing cookies // isError is only used in Ajax mode // Fire an onActivate() event for the currently active node this.reactivate(); }, onActivate:function(node){ // Use status functions to find out about the calling context var isInitializing = node.tree.isInitializing();// Tree loading phase var isReloading = node.tree.isReloading();// Loading phase, and reading status from cookies var isUserEvent = node.tree.isUserEvent();// Event was triggered by mouse or keyboard
$("#echoActive").text(node.data.title); },
7.1 Persistence for lazy trees
The problem with restoring the status of a lazy tree is, that the currently active or selected nodes may not be part of the tree, when it is freshly re-loaded.
The basic idea is to leave it up to the backend web service to deliver not only the top-level nodes, but also all nodes that are required to display the current status.
For example, it may be neccessary to render 3 parent nodes, if the active node is at level # 4. The backend may also deliver all child nodes of expanded parents. Or in selectMode 3 (hierarchical) we may want to send all nodes, that are partly selected.
initAjax (and appendAjax) have 3 options, that make it easy to pass persistence information to the web service.
See dynatree_server.py for a sample implementation of a web server that handles this (~150 lines of Python code). When this server is running, you can try this live example of a lazy tree.
$("#tree").dynatree({ […] initAjax:{url:"/ajaxTree", data:{key: key, mode: mode, filter: filter }, addActiveKey:true,// add &activeKey= parameter to URL addFocusedKey:true,// add &focusedKey= parameter to URL addExpandedKeyList:true// add &expandedKeyList= parameter to URL }, onPostInit:function(isReloading, isError){ // In lazy mode, this will be called *after* the initAjax request returned. // 'this' is the current tree // isReloading is set, if status was read from existing cookies // isError is set, if Ajax failed // Fire an onActivate() event for the currently active node this.reactivate(); }, onActivate:function(node){ // Use status functions to find out about the calling context var isUserEvent = node.tree.isUserEvent();// Event was triggered by mouse or keyboard
$("#echoActive").text(node.data.title); },
8 Programming dynatree
The dynatree widget provides a set of plugin methods, that can be called directly. For example
$("#tree").dynatree("disable");
However this plugin implementation is based on a class called DynaTree that holds a set of DynaTreeNode objects. These classes expose methods that can be accessed for enhanced functionality. For example:
// Get the DynaTree object instance:
var tree = $("#tree").dynatree("getTree");
// Use it's class methods:
tree.activateKey("key1234");
// Get a DynaTreeNode object instance:
var node = tree.getNodeByKey("key7654");
var rootNode = $("#tree").dynatree("getRoot");
// and use it
node.toggleExpand();
8.1 Dynatree Plugin methods
Besides the constructor, that is called like this:
$("#tree").dynatree({
    […]
});
The following methods are globally available from the ui.dynatree namespace:
$.ui.dynatree.getNode(el)
Return a DynaTreeNode object for a given DOM element. `el` may be a DOM element or a jQuery object. Example:
$("#tree a").hover(function(){ var node = $.ui.dynatree.getNode(this); logMsg("Hover in %s", node); },function(){ [...] });
Return the DynaTreeNode object that is currently active. (May be null.)
$("#tree").dynatree("getSelectedNodes")
Return an array of DynaTreeNode objects that are currently selected. (May be empty: [ ].)
8.2 DynaTree class members
tree.activateKey(key)
Activate and focus node with a given key and fire focus and activate events. If activeVisible option is set, all parents will be expanded as necessary. If key is null, the current activation is removed. Return the active DynaTreeNode.
tree.count()
Return the number of nodes.
tree.disable()
Disable input for the tree and display gray. This is a shortcut for $("#tree").dynatreee("disable").
tree.enable()
Complement to tree.disable().
tree.enableUpdate(enable)
Turn rendering on or off and return the previous mode. Disabling update may speedup processing, when adding lots of nodes. Don't forget to turn rendering back on, after applying the changes:
var prevMode = tree.enableUpdate(false);
[...]
tree.enableUpdate(prevMode);
tree.getActiveNode()
Return the currently active DynaTreeNode or null.
tree.getNodeByKey(key)
Return DynaTreeNode with a given key or 'null' if not found.
tree.getPersistData()
Return cookie persistence info as dictionary. There is also a global function available: $.ui.dynatree.getPersistData(cookieId, cookieOpts).
tree.getRoot()
Return the invisible root DynaTreeNode object. All visible toplevel nodes are children of this system node.
tree.getSelectedNodes(stopOnParents)
Return a list of currently selected DynaTreeNodes (may be an empty array). If stopOnParents is set to true, children of selected nodes are skipped. This may be convenient in selectMode:3 (multi-hier).
tree.initialize()
Constructor (internal use).
tree.isInitializing()
Return true, if the tree is in the init phase. Use this function in an event handler, to check if the event was fired during a page reload, when the cookie persistence is applied.
tree.isReloading()
Return true, if the tree is in the init phase and persistence is on, and the current status was read from existing cookies. Use this function in an event handler, to check if the event was fired during a page reload, when the cookie persistence is applied.
tree.isUserEvent()
Return true, if the tree is processing a user event. Use this function in an event handler, to check if the event was fired in response to a mouse click or key stroke. Otherwise, the the event was generated by an API call or during initialization.
tree.loadKeyPath(keyPath, callback)
Make sure that a node with a given ID is loaded, by traversing - and loading - its parents. This method is ment for lazy hierarchies. A callback is executed for every node as we go.
tree.loadKeyPath("/_3/_23/_26/_27",function(node, status){ if(status =="loaded"){ // 'node' is a parent that was just traversed. // If we call expand() here, then all nodes will be expanded // as we go node.expand(); }elseif(status =="ok"){ // 'node' is the end node of our path. // If we call activate() or makeVisible() here, then the // whole branch will be exoanded now node.activate(); }elseif(status =="notfound"){ var seg = arguments[2], isEndNode = arguments[3]; } });
tree.logDebug(msg), logInfo(msg), logWarning(msg)
(Internal use).
tree.reactivate(setFocus)
Fire onQueryActivate and onActivate events for the currently active node (if there is one). This may be useful when processing an onPostInit callback.
tree.redraw()
Render all visible nodes. See node.render() for details.
tree.reload()
Reload the the tree. For lazy trees this is done, by re-submitting the Ajax request that was defined in the initAjax option. This will not work, if the tree was loaded from an embedded <UL> element, because these elements are removed after they have been rendered.
tree.renderInvisibleNodes()
Force immediate HTML creation for all nodes, even if inside collapsed branches. This may be useful, if we want to bind events or otherwise must access these HTML elements. It will however degrade performance, especially on large trees! See node.render() for details.
tree.selectKey(key, flag)
Select or deselect node with a given key and fire focus and select events. Return the selected DynaTreeNode.
tree.serializeArray(stopOnParents)
Return selected nodes as array of {name: 'TreeName', value: 'NodeKey'} objects, where name is the 'name' attribute of the tree's <div> element. This format is compatible with jQuery's serializeArray() function and may be used in $.post() calls. See also the 'form' sample in the Example Browser.
tree.toDict(includeRoot)
Convert the tree into a JavaScript object. If 'includeRoot' is false or omitted, the result is an array of node dcts. See node.toDict() for details.
tree.visit(fn, includeRoot)
Call fn(node) for all nodes. Stop iteration, if fn() returns false. Stop iteration of the current branch, if fn() returns 'skip'.
8.3 DynaTreeNode class members
Attribute 'data'
Use this attribute to access all node options that were passed to create this node. For example node.data.title or node.data.tooltip. See also Node options.
node.activate()
Activate this node - according to flag - and fire a onActivate event. If activeVisible option is set, all parents will be expanded as necessary. Focus is not set.
node.activateSilently()
Same as activate(), but does not fire events.
node.addChild(nodeData[, beforeNode])
Append a new child node. nodeData may be a node data object as defined in Node options, or an array thereof. Also objects and arrays of type DynaTreeNode are allowed. Example:
var node = $("#tree").dynatree("getTree").getNodeByKey("1234"); node.addChild({title:"New Node", key:"3333"});
Since the nodeData may be a nested data structure, it is possible to create a deep hierarchy with one call. The optional argument beforeNode specifies a child DynaTreeNode that the new node will be inserted before. (If this parameter is null or omitted, the new node will be appended.)
node.appendAjax(ajaxOptions)
Accepts a standard jQuery Ajax option object. An asynchronous request is started, so this function returns immediately. While loading, a spinning wheel is displayed. On error, a red icon is shown. The request handler must return a JSON object, formatted like the data's children object. Use the setLazyNodeStatus() function to display the result. See Loading child nodes on demand ('lazy loading') for details.
node.countChildren()
Return the number of descendant nodes, i.e. direct and indirect children.
node.deactivate()
Deactivate this node and fire an onDeactivate event.
node.expand(flag)
Expand or collapse this node - according to flag.
node.focus()
Set focus to this node. Parent nodes are expanded, if this is necessary to make it visible.
node.getChildren()
Return list of child nodes or null. For lazy nodes that have not yet been loaded, undefined is is returned.
node.getEventTargetType(event)
Return the part of a node, that a click event occurred on. Possible values: 'prefix' 'expander', 'checkbox', 'icon', 'title'. null is returned else. Note: there is no check, if the event was fired on this node.
node.getLevel()
Return the depth (i.e. number of parent nodes). 0 is returned for the root node.
node.getNextSibling()
Return the successor node or null.
node.getParent()
Return the parent node or null.
node.getPrevSibling()
Return the predecessor node or null.
node.hasChildren()
Return true if node has child nodes. Return false if node is a leaf, i.e. has no child nodes. Return undefined if this is a lazy node, that was not yet successfully loaded. A test for 'node is surely empty' would be coded like
if(node.hasChildren()===false)...
node.isActive()
Return true, if this node is activated. Only one tree node may be active at any time.
node.isChildOf(otherNode)
Return true, if this node is a direct child of otherNode.
node.isDescendantOf(otherNode)
Return true, if this node is a descendent (direct or indirect child) of otherNode.
node.isExpanded()
Return true, if the node is expanded.
node.isFirstSibling()
Return true, if this node is the first of all children of the current parent.
node.isFocused()
Return true, if this node is has the focus.
node.isLastSibling()
Return true, if this node is the last of all children of the current parent.
node.isLazy()
Return true, if the node is lazy (loaded or not).
node.isLoading()
Return true, if the node is lazy and currently loading (i.e. an Ajax request is active).
node.isSelected()
Return true, if the node is selected.
node.isStatusNode()
Return true, if this is an temporary status node. Status nodes are created while loading lazy data, to display a throbber or error condition.
node.isVisible()
Return true, if the node is visible, i.e. all parents are expanded.
node.makeVisible()
Expand all parents as neccessary, to make this node visible.
node.move(targetNode, mode)
Move this node to targetNode. Possible mode:
child: append this node as last child of targetNode. This is the default. To be compatble with the D'n'd hitMode, we also accept 'over'.
before: add this node as sibling before targetNode.
after: add this node as sibling after targetNode.
node.reload(force)
Deprecated. Use reloadChildren() instead.
node.reloadChildren(callback)
Discard and reload all children of a lazy node by triggering the onLazyRead event. if callback is passed, it is called after the Ajax request was executed. Example
node.reloadChildren(function(node, isOk){ if(!isOk) alert("Node "+ node +" could not be reloaded."); });
node.remove()
Remove this node and descendents from tree.
node.removeChildren()
Remove all child nodes and descendents.
node.render(useEffects, includeInvisible)
Redraw this node with current attributes. All HTML markup is updated and class names are added according to current status. If this node is expanded, markup for children is recursively generated as well.
useEffects: (default: false) Set to false to prevent animated expand effects, which would be applied asynchronously.
includeInvisible: (default: false) Force HTML creation for all descendants, even if inside a collapsed branch. This may be useful, if we want to bind events or otherwise access these HTML elements. It will however degrade performance, especially on large trees.
Most of the time, there is no need to call this explicitly, since it is internally called on state changes.
node.resetLazy()
Remove all children from a lazy node and make sure it is collapsed. The node will be re-loaded when expanded the next time.
node.scheduleAction(mode, ms)
Schedule a delayed action. Possible mode:
expand: Expand this node after ms microseconds.
activate: Activate this node after ms microseconds.
cancel: cancel pending action, if any was scheduled.
node.select(flag)
Select or deselect this node - according to flag - and fire an onSelect event.
node.setLazyNodeStatus(status)
Display a dummy child node, to provide feedback, when loading a lazy node's content. Possible status:
DTNodeStatus_Loading: show a spinning wheel, with 'loading...' message.
DTNodeStatus_Error: show an error icon and message.
DTNodeStatus_Ok: Remove the status node.
Messages may be customized using the strings.loading and strings.loadError options.
node.setTitle(title)
Change current node title and redraw.
node.sortChildren(cmp, deep)
Sort child list by title. cmd: optional compare function. If ommitted sorting is done by node titles. deep: optional: pass true to sort all descendant nodes. Example
// Custom compare function (optional) that sorts case insensitive var cmp =function(a, b){ a = a.data.title.toLowerCase(); b = b.data.title.toLowerCase(); return a > b ?1: a < b ?-1:0; }; node.sortChildren(cmp,false);
node.toDict(recursive, callback)
Convert the node into a JavaScript object. recursive: set to true, to include child nodes. callback: (optional) function to allow modifications. Example
var cb = node.toDict(true,function(dict){ dict.title ="Copy of "+ dict.title; delete dict.key;// prevent duplicate keys });
node.toggleExpand()
Toggle expansion state. Expanding a lazy node, fires a onLazyRead event.
node.toggleSelect()
Toggle selection state.
node.visit(fn, includeSelf)
Call fn(node) for all child nodes. Stop iteration, if fn() returns false. Stop iteration of the current branch, if fn() returns the string 'skip'.
node.visitParents(fn, includeSelf)
Call fn(node) for all parent nodes. Stop iteration, if fn(node) returns false.
8.4 Programming examples
The follwing code snippets should give an idea on how to use the API.
8.4.1 Example: Select a node with key '1234'
$("#tree").dynatree("getTree").selectKey("1234");
// or another way:
$("#tree").dynatree("getTree").getNodeByKey("1234").select();
// .. or yet another way (if 'generateIds' option was enabled):
$("#dynatree-id-1234").prop("dtnode").select();
8.4.3 Example: Retrieve a node using for a DOM element or jQuery object
$(".dynatree-partsel").each(function(){
    var node = $.ui.dynatree.getNode(this);
    [...]
});
8.4.4 Example: Rename the active node
var node = $("#tree").dynatree("getActiveNode"); node.data.title ="My new title"; node.render();
8.4.5 Example: Add a child to the active node
var node = $("#tree").dynatree("getActiveNode"); var childNode = node.addChild({ title:"My new node", tooltip:"This folder and all child nodes were added programmatically." });
Note: instead of passing a single child object, we could also pass an array of such objects. Also, the children may again contain children attributes, thus defining a sub tree.
8.4.6 Example: Add a hover handler and find the hovered node from any sub element
// Bind hover events to the tree's <a> tags: $("#tree a").hover(function(){ var node = $.ui.dynatree.getNode(this); logMsg("Hover in %s", node); },function(){ var node = $.ui.dynatree.getNode(this); logMsg("Hover out %s", node); });
8.4.8 Example: Save current tree status to the backend
// Get a JavaScript object copy of the tree
var dict = $("#tree").dynatree("getTree").toDict();
// ... then use Ajax to send this to your server...
8.4.9 Example: activate a node depending on URL
This sample shows how to parse the page URL and activate a node accordingly: http://server/_test-194.html?activate=_11
// Add a helper function to parse the URL function getURLParameter(name){ return unescape( (RegExp(name +'='+'(.+?)(&|$)').exec(location.search)||[,null])[1] ); } // Evaluate the URL after the tree was loaded $(function(){ $("#tree").dynatree({ [...] onPostInit:function(isReloading, isError){ var key = getURLParameter("activate"); if( key ){ this.activateKey(key); } },
9 Theming and translation
The tree's fonts, colors, and icons are defined using CSS, so changing the appearance is simply a matter of including a custom stylesheet or by replacing icons.gif with another version.
<scriptsrc="../jquery/jquery.js"type="text/javascript"></script> <scriptsrc="../jquery/jquery-ui.custom.js"type="text/javascript"></script> <scriptsrc="../src/jquery.dynatree.js"type="text/javascript"></script> <!-- Include the basic stylesheet: --> <linkhref="../src/skin-vista/ui.dynatree.css"rel="stylesheet"type="text/css"> <!-- Override CSS with a custom stylesheet : --> <linkhref="skin-custom/custom.css"rel="stylesheet"type="text/css">
$("#tree").dynatree({ […] strings:{ loading:"Daten werden geladen…", loadError:"Fehler beim Laden!" }, });
10 Feedback, version history, credits and known issues
10.1 Credits
I am using the planize plugin by Nicolas Perriault for the table of contents. I am using prettify.js by Mike Samuel for syntax highlighting in the of source code samples.
10.2 Feedback and support
First of all: this is work in progress. Any kind of feedback is very welcome :-)
A discussion forum is in place to ask questions or discuss features.
Use the Issue Tracker to get a list of known bugs, or vote for a feature. Please make sure you searched the group and issue tracker, before adding a new request.
# update-alternatives --config java 3 개의 프로그램이 'java'를 제공합니다. 선택 명령 ----------------------------------------------- *+ 1 /usr/lib/jvm/jre-1.6.0-openjdk/bin/java 2 /usr/lib/jvm/jre-1.5.0-gcj/bin/java
자동적으로 설치된 openjdk가 자리잡고 있다.
그러므로, 위에 설치한 버전을 config에 추가하고 선택해주어야 한다.
우선 config에 추가
#update-alternatives --install "/usr/bin/java" "java" "/usr/local/jdk1.6.0_31/bin/java" <= 새로 설치한 path
그럼 추가가 됐는지 볼까요?
# update-alternatives --config java 3 개의 프로그램이 'java'를 제공합니다. 선택 명령 ----------------------------------------------- *+ 1 /usr/lib/jvm/jre-1.6.0-openjdk/bin/java 2 /usr/lib/jvm/jre-1.5.0-gcj/bin/java 3 /usr/local/jdk1.6.0_31/bin/java
현재 선택[+]을 유지하려면 엔터키를 누르고, 아니면 선택 번호를 입력하십시오 :
3)에 추가가됐네요! 그럼 3을 입력하고 엔터키...
# update-alternatives --config java
3 개의 프로그램이 'java'를 제공합니다. 선택 명령 ----------------------------------------------- * 1 /usr/lib/jvm/jre-1.6.0-openjdk/bin/java 2 /usr/lib/jvm/jre-1.5.0-gcj/bin/java +3 /usr/local/jdk1.6.0_31/bin/java
3이 선택된 것을 알 수 있습니다.
그리고 버전을 출력하면,
#java -version
Java version "1.6.0_31" Java(TM) SE Runtime Environment (build 1.6.0_31-b04) Java HotSpot(TM) Server VM (build 20.6-b01, mixed mode)
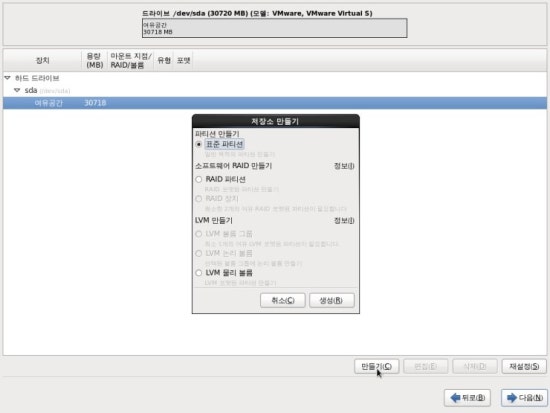
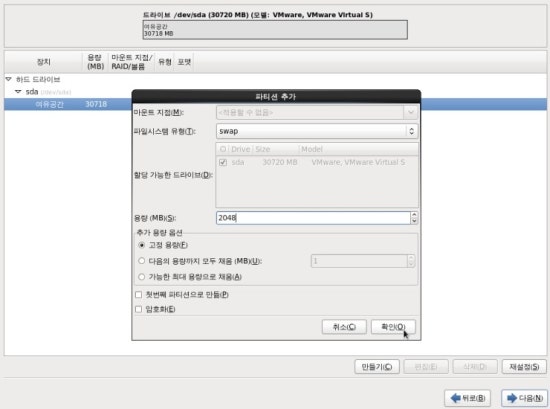
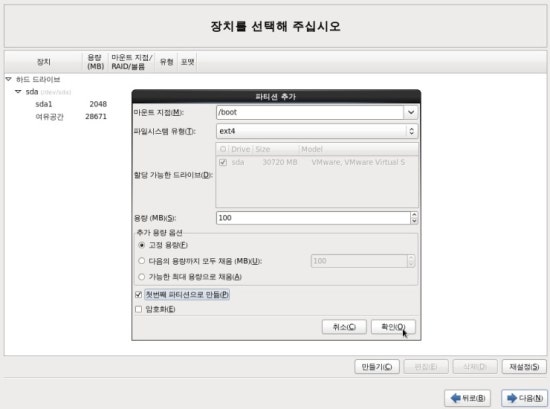
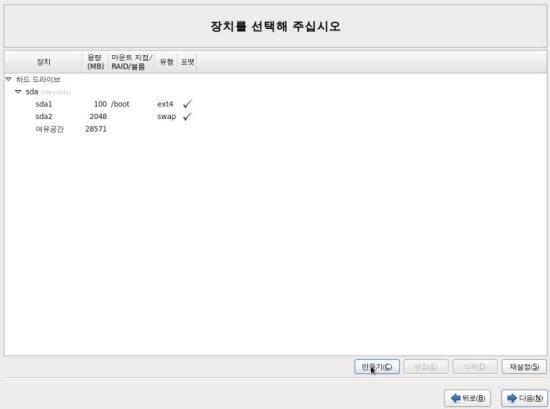
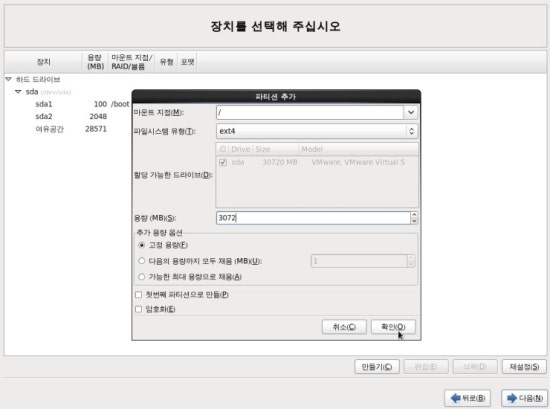
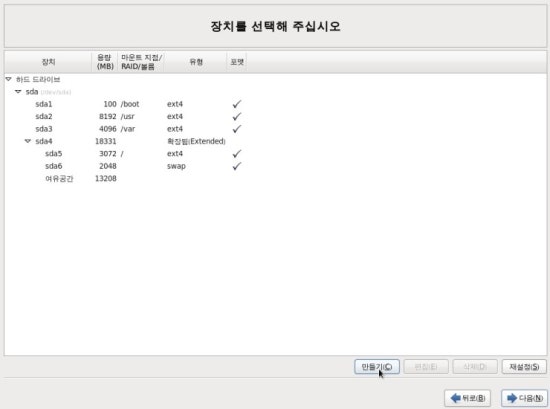
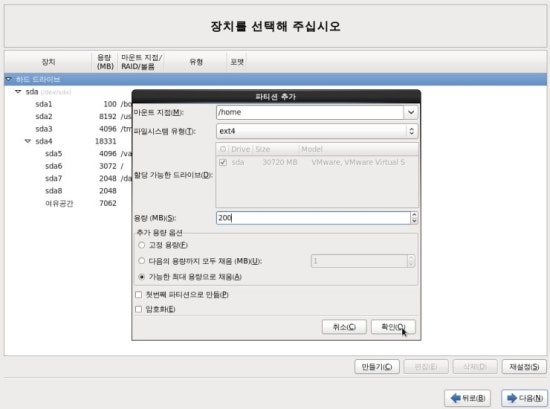
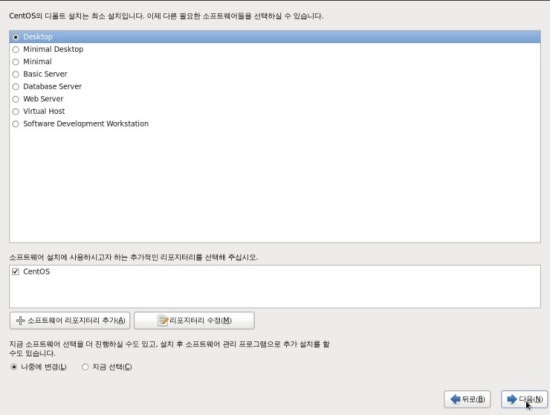
가장 먼저 할 일은 ISO 이미지를 다운 받는 것이다. CentOS 공식 홈페이지에서 다운로드가 가능 하며 Mirror 사이트에 한국 서버를 이용하면 빠른 속도로 다운이 가능하다.
ISO 이미지 파일이 여러가지가 있는데 Full Version은 Torrent로 DVD 1to2 를 다운받아야 하고 8G USB 메모리 스틱을 요구하기 때문에 간단하게 설치하고자 한다면 MInimal이 편하다. Full Version이 정말 필요한데 메모리스틱 용량이 적다면 Net Install 이미지를 다운 받아 설치하면 된다.
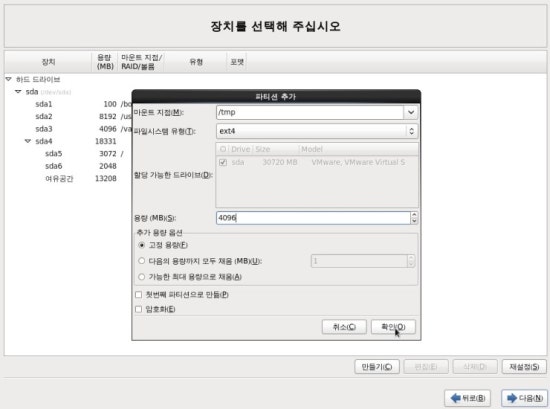
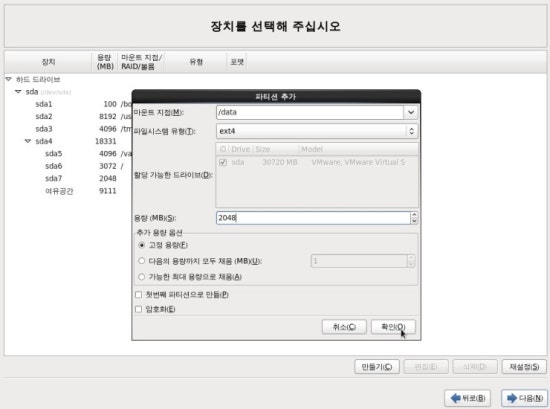
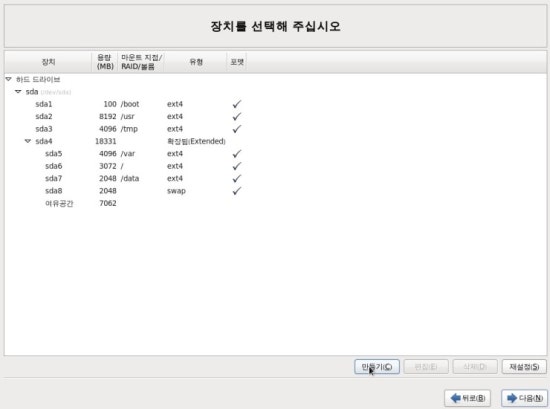
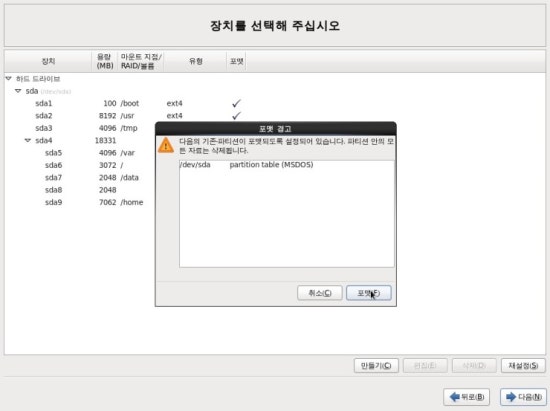
여기서는 Minimal 로 설치를 진행 할 예정이다. (아무리 생각해도 가장 편한 것 같다.)
300(여러 선택항목): 서버가 요청에 따라 여러 조치를 선택할 수 있다. 서버가 사용자 에이전트에 따라 수행할 작업을 선택하거나, 요청자가 선택할 수 있는 작업 목록을 제공한다.
301(영구 이동): 요청한 페이지를 새 위치로 영구적으로 이동했다. GET 또는 HEAD 요청에 대한 응답으로 이 응답을 표시하면 요청자가 자동으로 새 위치로 전달된다.
302(임시 이동): 현재 서버가 다른 위치의 페이지로 요청에 응답하고 있지만 요청자는 향후 요청 시 원래 위치를 계속 사용해야 한다.
303(기타 위치 보기): 요청자가 다른 위치에 별도의 GET 요청을 하여 응답을 검색할 경우 서버는 이 코드를 표시한다. HEAD 요청 이외의 모든 요청을 다른 위치로 자동으로 전달한다.
304(수정되지 않음): 마지막 요청 이후 요청한 페이지는 수정되지 않았다. 서버가 이 응답을 표시하면 페이지의 콘텐츠를 표시하지 않는다. 요청자가 마지막으로 페이지를 요청한 후 페이지가 변경되지 않으면 이 응답(If-Modified-Since HTTP 헤더라고 함)을 표시하도록 서버를 구성해야 한다.
305(프록시 사용): 요청자는 프록시를 사용하여 요청한 페이지만 액세스할 수 있다. 서버가 이 응답을 표시하면 요청자가 사용할 프록시를 가리키는 것이기도 하다.
307(임시 리다이렉션): 현재 서버가 다른 위치의 페이지로 요청에 응답하고 있지만 요청자는 향후 요청 시 원래 위치를 계속 사용해야 한다.
404(찾을 수 없음): 서버가 요청한 페이지를 찾을 수 없다. 예를 들어 서버에 존재하지 않는 페이지에 대한 요청이 있을 경우 서버는 이 코드를 제공한다.
405(허용되지 않는 방법): 요청에 지정된 방법을 사용할 수 없다.
406(허용되지 않음): 요청한 페이지가 요청한 콘텐츠 특성으로 응답할 수 없다.
407(프록시 인증 필요): 이 상태 코드는 401(권한 없음)과 비슷하지만 요청자가 프록시를 사용하여 인증해야 한다. 서버가 이 응답을 표시하면 요청자가 사용할 프록시를 가리키는 것이기도 한다.
408(요청 시간초과): 서버의 요청 대기가 시간을 초과하였다.
409(충돌): 서버가 요청을 수행하는 중에 충돌이 발생했다. 서버는 응답할 때 충돌에 대한 정보를 포함해야 한다. 서버는 PUT 요청과 충돌하는 PUT 요청에 대한 응답으로 이 코드를 요청 간 차이점 목록과 함께 표시해야 한다.
410(사라짐): 서버는 요청한 리소스가 영구적으로 삭제되었을 때 이 응답을 표시한다. 404(찾을 수 없음) 코드와 비슷하며 이전에 있었지만 더 이상 존재하지 않는 리소스에 대해 404 대신 사용하기도 한다. 리소스가 영구적으로 이동된 경우 301을 사용하여 리소스의 새 위치를 지정해야 한다.
411(길이 필요): 서버는 유효한 콘텐츠 길이 헤더 입력란 없이는 요청을 수락하지 않는다.
412(사전조건 실패): 서버가 요청자가 요청 시 부과한 사전조건을 만족하지 않는다.
413(요청 속성이 너무 큼): 요청이 너무 커서 서버가 처리할 수 없다.
414(요청 URI가 너무 긺): 요청 URI(일반적으로 URL)가 너무 길어 서버가 처리할 수 없다.
415(지원되지 않는 미디어 유형): 요청이 요청한 페이지에서 지원하지 않는 형식으로 되어 있다.
416(처리할 수 없는 요청범위): 요청이 페이지에서 처리할 수 없는 범위에 해당되는 경우 서버는 이 상태 코드를 표시한다.
Eclipse를 사용하다 보면 이런저런 이유로 속도가 느려지는 경험을 다 한 두번씩은 해봣을 것이다.
SVN repository에서 업데이트를 하는경우 build 작업하는 경우, 서버를 띄워서 작업을 하고 있는데 eclipse가 사용하는 메모리가 과도하게 늘어나서 문제가 생기는 경우 등등...
확실한 해결책은 아니겠지만, 나름대로 쾌적한(?) 환경에서 eclipse를 사용할 수 있도록 도와주는 방법을 몇가지 소개해본다.
1. Close Project
여러개의 project를 동시에 작업하는 경우에는 svn에서 update만 받아도 관련된 모든 project가 다시 빌드 작업을 진행해버려 그동안은 넋놓고 멍하니 기다리거나 작업의 리듬이 깨져버리는 경우가 많았다. 간혹 elcipse를 다시 재시작 해야하는 경우에도 재시작하는 시간이 너무 오래걸려 재시작을 고민해야 하는 경우도 종종 있었다.
이런 경우에는 해당 project를 닫아버리는게 큰도움이 되는데, 이건 아주 간단하게 바로 작업에 사용할 project가 아니라면 Package Explorer에서 해당 프로젝트의 컨텍스트 메뉴에서 "Close Project"를 해버리면 된다. 작업할 때에는 다시 컨텍스트 메뉴에서 "Open Proejct"를 하면 된다.
2. Spelling 검사 끄기
필요한 경우도 있겠지만, 대다수의 경우에는 철자검사를 할필요는 없을것 같다. 철자검사를 해제하면 에디터상에서 철자에 대한 검사를 실행하지 않기 때문에 조금은 더 빠르게 작업을 할수 있다.
Window > Preferences > General > Editors > Text Editors > Spelling 에서 Enable spell checking 체크박스를 해제하면 된다.
3. Startup and Shutdown
Eclipse plug-in을 이것저것 설치해서 사용하다보면 시작시에 불필요한 작업이 많아진다. 꼭 그런것은 아니지만 시작시에 plug-in의 업데이트를 확인한다거나 plug-in의 특정 모듈을 activate 한더거나 등등.
작업에 꼭 필요하지 않다고 생각되는 것들은 시작 항목에서 빼버리게 되면 그만큼 eclipse의 시작 실행속도가 빨라지게 된다. 이 항목에서는 또한 eclipse 종료시에 대한 설정도 할수 있다.
Window > Preferences > General > Startup and Shutdown > Plug-ins activated on startup 에서 사용하지 않을 항목에 대해 체크박스를 해제하면 된다.
4. Eclipse status memory monitor
Eclipse는 JRE 위에서 실행되는 java 프로그램이라서 eclipse를 실행한 후에 일정 기간이 지나게 되면 Gabarge Collection을 하게 된다. 더군다나 eclipse는 많은 메모리를 사용하는 것으로 악명(?)이 높기 때문에 GC가 제때 수행되지 않거나 주기가 길어지는 경우 프로그램을 실행할 메모리 자체가 줄어들어 작업 자체가 힘들어진다.
이럴 경우 Eclipse status memory monitor plug-in을 사용해 메모리가 모자르다 싶으면 바로 GC를 강제로 수행해 메모리를 확보할 수 있다. 또한 현재 Eclipse가 사용하고 있는 메모리의 상태를 직접 확인할 수 있으므로 아무런 이유없이 eclipse가 느려지는 답답함을 해소(?)할 수도 있다.
보통 view 작업을 진행하다 보면, 여러가지 코드가 한 파일에 뒤섞이게 된다. JSP 파일안에 html, css, javascript, java 등의 코드들이 뒤섞에 있다보면 validation이 크게 의미가 없게 되는 경우가 있는데 이럴 경우에는 굳이 validation을 할필요가 없어지게 된다. Validation은 에디터상에서 말그대로 문법에 대한 오류를 실시간으로 검사해 알려주는 것이기 때문에 validation만 해제해도 eclipse 작업속도에 그 만큼의 영향을 미치게 된다.
Window > Preferences > General > Validation > Validator 항목에서 문법검사를 하지 않을 항목에 대해 체크를 해제하면 된다.
jQuery Mobile provides a set of touch-friendly UI widgets and an AJAX-powered navigation system to support animated page transitions. Building your first jQuery Mobile page is easy, here's how:
Create a basic page template
Pop open your favorite text editor, paste in the page template below, save and open in a browser. You are now a mobile developer!
Here's what's in the template. In the head, a meta viewport tag sets the screen width to the pixel width of the device and references to jQuery, jQuery Mobile and the mobile theme stylesheet from the CDN add all the styles and scripts. jQuery Mobile 1.1 works with both 1.6.4 and 1.7.1 versions of jQuery core.
In the body, a div with a data-role of page is the wrapper used to delineate a page, and the header bar (data-role="header") and content region (data-role="content") are added inside to create a basic page (these are both optional). These data- attributes are HTML5 attributes are used throughout jQuery Mobile to transform basic markup into an enhanced and styled widget.
Inside your content container, you can add any standard HTML elements - headings, lists, paragraphs, etc. You can write your own custom styles to create custom layouts by adding an additional stylesheet to the head after the jQuery Mobile stylesheet.
Make a listview
jQuery Mobile includes a diverse set of common listviews that are coded as lists with a data-role="listview" added. Here is a simple linked list that has a role of listview. We're going to make this look like an inset module by adding a data-inset="true" and add a dynamic search filter with the data-filter="true" attributes.
The framework contains a full set of form elements that automatically are enhanced into touch-friendly styled widgets. Here's a slider made with the new HTML5 input type of range, no data-role needed. Be sure to wrap these in a form element and always properly associate a label to every form element.
There are a few ways to make buttons, but lets turn a link into a button so it's easy to click. Just start with a link and add a data-role="button" attribute to it. You can add an icon with the data-icon attribute and optionally set its position with the data-iconpos attribute.
jQuery Mobile has a robust theme framework that supports up to 26 sets of toolbar, content and button colors, called a "swatch". Just add a data-theme="e" attribute to any of the widgets on this page: page, header, list, input for the slider, or button to turn it yellow. Try different swatch letters in default theme from a-e to mix and match swatches.
Cool party trick: add the theme swatch to the page and see how all the widgets inside the content will automatically inherit the theme (headers don't inherit, they default to swatch A).
More of a developer? Great, forget everything we just covered (kidding). If you don't want to use the data- attribute configuration system, you can take full control of everything and call plugins directly because these are all just standard jQuery plugins built with the UI widget factory. Be sure to dig into global configuration, events, and methods. Then read up on scripting pages, generating dynamic pages, and building PhoneGap apps.
그러면 이렇게 Hello World가 나올 겁니다. Ext.create()는 Ext.ClassManager.instantiate를 간단히 사용하기 위해 만든 겁니다. Ext.create()대신 Ext.ClassManager.instantiate를 넣으셔도 결과는 똑 같습니다. instantiate(String name, Mixed args) 가 신택스 입니다.
Tutorial 첫 시간은 여기까지 하겠습니다. 앞으로 Sencha Touch에서 공식적으로 제공하는 Tutorial을 기반으로 글을 정리해 나가겠습니다.
Sencha Touch는 아이폰, 안드로이드, 블랙베리 등 다양한 모바일 디바이스의 웹 앱 개발을 지원하는 자바스크립트 프레임워크이다. 자바스크립트 프레임워크라는 말에 촛점을 맞출 필요가 있는 이유는 Sencha Touch는 거의 대부분의 코드를 Javascript로 생성하기 때문이다. Appspresso(앱스프레소)를 이용해서 하이브리드 앱을 개발하는 방법에 대해서 포스팅하는 가운데 UI javascript 프레임워크 선정할때 후보로 Sencha Touch와 JQuery Mobile, JTouch 를 생각했는데 가장 네이티브 앱에 가까운 다양한 UI 제공과 MVC 프로그래밍을 할 수 있게 설계되어 있는 아키텍처 때문에 Sencha를 HTML5 를 이용한 하이브리드 앱 개발의 UI 프레임워크로 결정했다. (HTML5 기반 앱을 만들기위해서 미리 구입한 Sencha Touch 책이 있기 때문이기도 했는데 현재 판매되고 있는 것은 Sencha Touch 1.x 기반의 책들이다. Sencha Touch 2와 Sencha Touch 1은 구조 자체가 달라졌기 때문에 이전 책을 구입하면 조금 당항할 수도 있다. 물론 Sencha 공식 사이트에서 migration 정보를 문서로 제공하고 있지만 처음부터 Sencha Touch 2로 시작하는 것을 추천하고 싶다.) 하이브리드 앱 개발하는 과정에서 UI 프로그래밍은 필수 조건이다. 그래서 Appspresso에 관련된 포스팅에 연결해서 연재하려고 하다가 Sencha 자체만해도 내용이 방대하고 어렵기 때문에 Sencha라는 카테고리로 분리해서 작성하려고 한다. (참고로 jQuery 정로도 생각하면 정말 이해하는데 어려움을 겪을수 있다.)
다운로드 홈페이지에 접속해보면 하나는 오픈 소스 버젼으로 현재 1.1.1버젼이고 또 하나는 개발자 버젼으로 2.0.0 버젼입니다.
센차터치 구성 및 폴더의 구조
압축파일의 압축을 풀면 여러가지 폴더와 파일이 나옵니다. 핵심 라이브러리와 도움말, 예제 애플리케이션, 기타 리소스가 모두 포함되어 있습니다.
몇가지 파일과 폴더의 내용을 살펴보겠습니다.
센차터치 핵심 라이브러리.
센차터치 애플리케이션 개발을 위해서는 반드시 포함해야 할 파일입니다.
sencha-touch.js
Sencha Touch 코어가 구현된 자바스크립트 파일입니다. 바로 루트(root)폴더에 있으며 압축된 버젼입니다. 개발시에는 sencha-touch-debug.js 를 참조하는것이 좋습니다. 이는 압축되지 안아서 참고할 수 있습니다.
sencha-tou.css
센차터치 애플리케이션 외형을 정의하는 css 파일입니다. 이 파일 역시 핵심 라이브러리로 모든 애플리케이션에서 반드시 포함해야 하는 파일입니다. 이 파일은 resources/css 폴더에 있습니다.
doc 폴더.
Sencha Touch API Documentation , 즉 API 설명서를 그대로 옮겨놓은 것입니다. 다음의 사이트에서도 동일한 내용을 볼 수 있습니다. http://docs.sencha.com/touch/1-1/ 센차터치는 다른 프레임워크에 비해 API 가 방대하고 복잡해서 설명서를 참조할 일이 많습니다. API 문서에서는 센차터치의 각종 컴포넌트와 관련한 상세한 설명을 볼 수 있으며, 클래스의 계층구조와 메서드(함수), 매개변수 등의 정보를 얻을 수 있습니다.
examples 폴더.
센차터치로 개발한 실제 동작하는 예제 애플리케이션을 모아 놓은 폴더입니다. UI 구성, Ajax 상호작용, 애니메이션, 터치 이벤트, 멀티미디어 구현 등 센차터치가 제공하는 기능을 이용한 실제 구현 사례가 포함되어 있으며, 루트에 있는 index.html 를 실행하면 전체 예제에 대한 바로가기를 확인 할 수 있습니다. 온라인에서도 제공되는데 아래의 URL에서 확인할 수 있습니다. http://dev.sencha.com/deploy/touch/examples/
examples 폴더는 아래처럼 에제별로 분리되어 있습니다. 각 폴더마다 하나의 기능을 수행하는 에제 파일이 들어 있습니다.
resource 폴더.
이 폴더에는 앞서 설명한 sencha-touch.css 파일을 비롯해 테마 관련 파일과 이미지 파일, Sass 기반의 스타일 정의 파일이 존재합니다.


 Tutorial-UsingDebugMobi.pdf


 sencha-touch.css


