|
|
|
|
|
|
| top |
|
 |
Data Sources |
Documented by Sanda Zaharia |
|
|
Description / Goal |
|
How to fill reports using data source objects. |
|
Since |
|
0.1.0 |
|
Other Samples |
|
|
|
|
Data Sources
Data sources are structured data containers used when filling generated reports. Compiled JasperReport objects are now prepared to encapsulate their dynamic part of data within the generated report template.
The filling process relies on expression evaluations, variable calculations and successive iterations through the records of the supplied data source object. Every report section is filled step-by-step.
Usually, data are loaded into data source objects. The engine expects to receive either a JRDataSource object as the data source of the report that it has to fill, or a java.sql.Connection when the report data is found in a relational database.
The JRDataSource interface is very simple. Only two methods should implemented here:
public boolean next() throws JRException;
- - called on the data source object by the reporting engine when iterating through the data at report-filling time
public Object getFieldValue(JRField jrField) throws JRException;
- - provides the value for each report field in the current data source record
It is important to notice that the only way to retrieve data from the data source is by using the report fields. As a structured object, a data source object is more like a table with columns and rows containing data in the table cells. The rows of this table are the records through which the reporting engine iterates when filling the report and each column should be mapped to a report field, so that we can make use of the data source content in the report expressions. There are several default implementations of the JRDataSource interface, depending on the way the records in the data source are acquired.
Rewindable Data Sources
The JRRewindableDataSource is an extension of the JRDataSource interface, to which it adds the possibility of moving the record pointer back before the first virtual record. It adds only one method, called moveFirst(), to the interface.
Rewindable data sources are useful when working with subreports placed inside a band that is not allowed to split due to the isSplitAllowed="false" setting and there is not enough space on the current page for the subreport to be rendered.
All built-in data source implementations listed below are rewindable except for the JRResultSetDataSource, which does not support moving the record pointer back. This is a problem only if this data source is used to manually wrap a java.sql.ResultSet before passing it to the subreport. It is not a problem if the SQL query resides in the subreport template because the engine will reexecute it when restarting the subreport on the next page.
Data Source Implementations
- JDBC data sources: the JRResultSetDataSource class
- - Wraps a
java.sql.ResultSet object. Represents the most commonly used data source implementations when report data are extracted from a relational database. If a java.sql.Connection is passed to the engine instead, it executes first the related query and stores the returned java.sql.ResultSet object in a JRResultSetDataSource instance.
- JavaBean data sources: JRBeanArrayDataSource and JRBeanCollectionDataSource
- - Represent implementations that can wrap collections or arrays of JavaBean objects. Each object inside the array or the collection will be seen as one record in this type of data source. The mapping between a particular JavaBean property and the corresponding report field is made by naming conventions. The name of the report field must be the same as the name of the JavaBean property as specified by the JavaBeans specifications.
- Map-based data sources: JRMapArrayDataSource and JRMapCollectionDataSource
- - These implementations are useful if the parent application already stores the reporting data available in-memory as
java.util.Map objects. Each Map object in the wrapped array or collection is considered a virtual record in the data source, and the value of each report field is extracted from the map using the report field name as the key
- TableModel data sources: the JRTableModelDataSource class
- - Wraps a
javax.swing.table.TableModel object. Columns in the wrapped TableModel object can be accessed either by their names or by their 0-based indexes.
- XML data sources: the JRXmlDataSource class
- - A data source implementation based on DOM, which uses XPath expressions to select data from the XML document. Records in the XML data source are represented by node elements selected through the XPath expression. Field values are retrieved from each record using the XPath expression provided by the field description (
<fieldDescription> element in JRXML).
- CSV data sources: the JRCsvDataSource class
- - Represents an implementation for data sources which retrieve their data from structured text files, usually CSVs. Field values are retrieved using their column index.
- XLS data sources: the JRXlsDataSource class
- - Represents an implementation for data sources which retrieve their data from Excel documents (workbooks). Report-field mapping for this data source implementation is also based on the field column index.
- Empty data sources: the JREmptyDataSource class
- - Simulates a data source with a given number of virtual empty records inside. It is is used by the UI tools to offer basic report preview functionality, or in special report templates, or for testing and debugging purposes.
Data Source Providers
When creating a report template using GUI tools, a special tool for customizing the report's data source is needed. The JasperReports library comes with the JRDataSourceProvider interface that allows to create and dispose of data source objects. This is the standard way to plug custom data sources into a design tool.
A custom implementation of this interface should implement the following methods that allow creating and disposing of data source objects and also methods for listing the available report fields inside the data source if possible:
public boolean supportsGetFieldsOperation();
public JRField[] getFields(JasperReport report) throws JRException, UnsupportedOperationException;
public JRDataSource create(JasperReport report) throws JRException;
public void dispose(JRDataSource dataSource) throws JRException; |
|
| top |
|
|
Custom Data Source |
Documented by Sanda Zaharia |
|
|
Description / Goal |
|
How to implement a custom data source from scratch. |
|
Since |
|
0.1.0 |
|
|
Custom Data Sources
The datasource sample shows how to implement some of the data sources enumerated in the Data Source Implementations section. Using the same report template, it could be filled with data provided by any of these data sources, depending on the fill argument used with the ant command:
- if the argument is
fill1 then data will be extracted from the CustomDataSource object.
- if the argument is
fill2 then data will be extracted from the CustomTableModel object.
- if the argument is
fill3 then data will be extracted from the CustomBeanFactory object as JavaBean array.
- if the argument is
fill4 then data will be extracted from the CustomBeanFactory object as JavaBean Collection. When the argument is fill1 the data source is created from scratch. It contains an array of Object arrays, representing records of data, and a record index: private Object[][] data =
{
{"Berne", new Integer(22), "Bill Ott", "250 - 20th Ave."},
{"Berne", new Integer(9), "James Schneider", "277 Seventh Av."},
{"Boston", new Integer(32), "Michael Ott", "339 College Av."},
{"Boston", new Integer(23), "Julia Heiniger", "358 College Av."},
{"Chicago", new Integer(39), "Mary Karsen", "202 College Av."},
{"Chicago", new Integer(35), "George Karsen", "412 College Av."},
{"Chicago", new Integer(11), "Julia White", "412 Upland Pl."},
{"Dallas", new Integer(47), "Janet Fuller", "445 Upland Pl."},
{"Dallas", new Integer(43), "Susanne Smith", "2 Upland Pl."},
{"Dallas", new Integer(40), "Susanne Miller", "440 - 20th Ave."},
{"Dallas", new Integer(36), "John Steel", "276 Upland Pl."},
{"Dallas", new Integer(37), "Michael Clancy", "19 Seventh Av."},
{"Dallas", new Integer(19), "Susanne Heiniger", "86 - 20th Ave."},
{"Dallas", new Integer(10), "Anne Fuller", "135 Upland Pl."},
{"Dallas", new Integer(4), "Sylvia Ringer", "365 College Av."},
{"Dallas", new Integer(0), "Laura Steel", "429 Seventh Av."},
{"Lyon", new Integer(38), "Andrew Heiniger", "347 College Av."},
{"Lyon", new Integer(28), "Susanne White", "74 - 20th Ave."},
{"Lyon", new Integer(17), "Laura Ott", "443 Seventh Av."},
{"Lyon", new Integer(2), "Anne Miller", "20 Upland Pl."},
{"New York", new Integer(46), "Andrew May", "172 Seventh Av."},
{"New York", new Integer(44), "Sylvia Ott", "361 College Av."},
{"New York", new Integer(41), "Bill King", "546 College Av."},
{"Oslo", new Integer(45), "Janet May", "396 Seventh Av."},
{"Oslo", new Integer(42), "Robert Ott", "503 Seventh Av."},
{"Paris", new Integer(25), "Sylvia Steel", "269 College Av."},
{"Paris", new Integer(18), "Sylvia Fuller", "158 - 20th Ave."},
{"Paris", new Integer(5), "Laura Miller", "294 Seventh Av."},
{"San Francisco", new Integer(48), "Robert White", "549 Seventh Av."},
{"San Francisco", new Integer(7), "James Peterson", "231 Upland Pl."}
};
private int index = -1;
The next() and getFieldValue(JRField) are implemented in order to make possible iteration through data records and field values retrieving for a given record. Field names are assumed to be: the_city, id, name and street, in this order (see the /src/CustomDataSource.java source file). public boolean next() throws JRException
{
index++;
return (index < data.length);
}
public Object getFieldValue(JRField field) throws JRException
{
Object value = null;
String fieldName = field.getName();
if ("the_city".equals(fieldName))
{
value = data[index][0];
}
else if ("id".equals(fieldName))
{
value = data[index][1];
}
else if ("name".equals(fieldName))
{
value = data[index][2];
}
else if ("street".equals(fieldName))
{
value = data[index][3];
}
return value;
}
At fill time a CustomDataSource object is passed as argument to the fillReportToFile() method in the JasperFillManager class (see the the /src/DataSourceApp.java file): Let's take a look at related methods in the /src/DataSourceApp.java file: public void fill1() throws JRException
{
long start = System.currentTimeMillis();
//Preparing parameters
Map parameters = new HashMap();
parameters.put("ReportTitle", "Address Report");
parameters.put("DataFile", "CustomDataSource.java");
JasperFillManager.fillReportToFile("build/reports/DataSourceReport.jasper",
parameters, new CustomDataSource());
System.err.println("Filling time : " + (System.currentTimeMillis() - start));
}
In order to figure out more on custom data sources behavior, just test this sample by running from the command line the ant clean javac compile fill1 view command. It will generate the sample report in the /build/reports directory, filling it with data extracted from the CustomDataSource object. |
|
| top |
|
|
JavaBean Data Sources |
Documented by Sanda Zaharia |
|
|
Description / Goal |
|
How to fill reports with collections or arrays of JavaBean objects. |
|
Since |
|
0.1.0 |
|
|
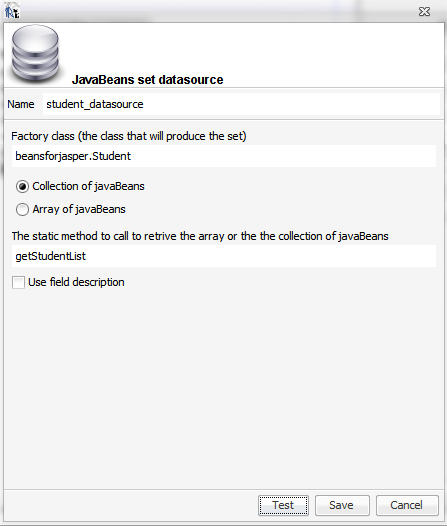
JavaBean Data Sources
There are two data source implementations that can wrap collections or arrays of JavaBean objects. Both implementations rely on Java reflection to retrieve report field data from the JavaBean objects wrapped inside the data sources. These data sources can be used to generate reports using data already available in-memory in the form of EJBs, Hibernate, JDO objects, or even POJOs.
The JRBeanArrayDataSource is for wrapping an array of JavaBean objects to use for filling a report with data, and the JRBeanCollectionDataSource is for wrapping a collection of JavaBeans. Each object inside the array or the collection will be seen as one record in this type of data source.
The mapping between a particular JavaBean property and the corresponding report field is made by naming conventions. The name of the report field must be the same as the name of the JavaBean property as specified by the JavaBeans specifications. For instance, to retrieve the value of a report field named address, the program will try to call through reflection a method called getAddress() on the current JavaBean object.
Nested JavaBeans properties can be also accessed in a JavaBean data source. For example, if the current JavaBean object inside the data source is of type Product and contains nested supplier information accessible by calling the getSupplier() method, which returns a Supplier object. In this case, to access the address property inside the Supplier object, a report field named supplier.address is required.
For backward-compatibility reasons, the current implementations still look into the field’s description first, to locate the the JavaBean property. If there is no description, then the report field name is used instead. If this default behavior is not desirable, especially if the field description is already used for other purposes, you can use special data source constructors that receive a flag called isUseFieldDescription to suppress this behavior.
A special field mapping can be used to access the current JavaBean object itself. Thus, when a field uses _THIS as description or name, the data source will return the current JavaBean object as field value.
JavaBean Data Sources Example
In our concrete example a factory class is used to provide JavaBean data sources either as JavaBean arrays or as JavaBean collections. The JavaBean is defined in the /src/CustomBean.java file. It contains 4 accessible properties, and a supplementary getMe() method which returns a reference to the object itself: public class CustomBean
{
private String city;
private Integer id;
private String name;
private String street;
public CustomBean(
String pcity,
Integer pid,
String pname,
String pstreet
)
{
city = pcity;
id = pid;
name = pname;
street = pstreet;
}
public CustomBean getMe()
{
return this;
}
public String getCity()
{
return city;
}
public Integer getId()
{
return id;
}
public String getName()
{
return name;
}
public String getStreet()
{
return street;
}
}
Note that one of the CustomBean properties is named city. In the report template there is no corresponding field named city. A field named the_city exists instead. In this case, the field mapping is done through the <fieldDescription/> as described in the JavaBean Data Sources section. The CustomBean object is reffered to as me, with the associated getter getMe() method:
<field name="the_city" class="java.lang.String">

<fieldDescription><![CDATA[me.city]]></fieldDescription>

</field>
The factory class is defined in the /src/CustomBeanFactory.java file. It contains an array of CustomBean objects and two getter methods: public class CustomBeanFactory
{
private static CustomBean[] data =
{
new CustomBean("Berne", new Integer(9), "James Schneider", "277 Seventh Av."),
new CustomBean("Berne", new Integer(22), "Bill Ott", "250 - 20th Ave."),
new CustomBean("Boston", new Integer(23), "Julia Heiniger", "358 College Av."),
new CustomBean("Boston", new Integer(32), "Michael Ott", "339 College Av."),
new CustomBean("Chicago", new Integer(39), "Mary Karsen", "202 College Av."),
new CustomBean("Chicago", new Integer(35), "George Karsen", "412 College Av."),
new CustomBean("Chicago", new Integer(11), "Julia White", "412 Upland Pl."),
new CustomBean("Dallas", new Integer(47), "Janet Fuller", "445 Upland Pl."),
new CustomBean("Dallas", new Integer(43), "Susanne Smith", "2 Upland Pl."),
new CustomBean("Dallas", new Integer(40), "Susanne Miller", "440 - 20th Ave."),
new CustomBean("Dallas", new Integer(36), "John Steel", "276 Upland Pl."),
new CustomBean("Dallas", new Integer(37), "Michael Clancy", "19 Seventh Av."),
new CustomBean("Dallas", new Integer(19), "Susanne Heiniger", "86 - 20th Ave."),
new CustomBean("Dallas", new Integer(10), "Anne Fuller", "135 Upland Pl."),
new CustomBean("Dallas", new Integer(4), "Sylvia Ringer", "365 College Av."),
new CustomBean("Dallas", new Integer(0), "Laura Steel", "429 Seventh Av."),
new CustomBean("Lyon", new Integer(38), "Andrew Heiniger", "347 College Av."),
new CustomBean("Lyon", new Integer(28), "Susanne White", "74 - 20th Ave."),
new CustomBean("Lyon", new Integer(17), "Laura Ott", "443 Seventh Av."),
new CustomBean("Lyon", new Integer(2), "Anne Miller", "20 Upland Pl."),
new CustomBean("New York", new Integer(46), "Andrew May", "172 Seventh Av."),
new CustomBean("New York", new Integer(44), "Sylvia Ott", "361 College Av."),
new CustomBean("New York", new Integer(41), "Bill King", "546 College Av."),
new CustomBean("Oslo", new Integer(45), "Janet May", "396 Seventh Av."),
new CustomBean("Oslo", new Integer(42), "Robert Ott", "503 Seventh Av."),
new CustomBean("Paris", new Integer(25), "Sylvia Steel", "269 College Av."),
new CustomBean("Paris", new Integer(18), "Sylvia Fuller", "158 - 20th Ave."),
new CustomBean("Paris", new Integer(5), "Laura Miller", "294 Seventh Av."),
new CustomBean("San Francisco", new Integer(48), "Robert White", "549 Seventh Av."),
new CustomBean("San Francisco", new Integer(7), "James Peterson", "231 Upland Pl.")
};
public static Object[] getBeanArray()
{
return data;
}
public static Collection getBeanCollection()
{
return Arrays.asList(data);
}
}
Using the same report template, it could be filled with data provided either as CustomBean array or as CustomBean Collection, depending on the fill argument used with the ant command:
- if the argument is
fill3 then data will be extracted as JavaBean array, using the getBeanArray() method. At fill time, a JRBeanArrayDataSource object is passed as argument to the fillReportToFile() method in the JasperFillManager class.
- if the argument is
fill4 then data will be extracted as JavaBean Collection (java.util.List), using the getBeanCollection() method. At fill time, a JRBeanCollectionDataSource object is passed as argument to the fillReportToFile() method in the JasperFillManager class. Let's take a look at related report filling methods in the /src/DataSourceApp.java file: public void fill3() throws JRException
{
long start = System.currentTimeMillis();
//Preparing parameters
Map parameters = new HashMap();
parameters.put("ReportTitle", "Address Report");
parameters.put("DataFile", "CustomBeanFactory.java - Bean Array");
JasperFillManager.fillReportToFile("build/reports/DataSourceReport.jasper",
parameters, new JRBeanArrayDataSource(CustomBeanFactory.getBeanArray()));
System.err.println("Filling time : " + (System.currentTimeMillis() - start));
}
public void fill4() throws JRException
{
long start = System.currentTimeMillis();
//Preparing parameters
Map parameters = new HashMap();
parameters.put("ReportTitle", "Address Report");
parameters.put("DataFile", "CustomBeanFactory.java - Bean Collection");
JasperFillManager.fillReportToFile("build/reports/DataSourceReport.jasper",
parameters, new JRBeanCollectionDataSource(CustomBeanFactory.getBeanCollection()));
System.err.println("Filling time : " + (System.currentTimeMillis() - start));
}
In order to figure out more on JavaBean data sources behavior, just test this sample by running from the command line the ant clean javac compile fill3 view command and then ant clean javac compile fill4 view. It will generate the sample report filling it with data extracted from a JRBeanArrayDataSource data source, and then the same report will be generated with data extracted from a JRBeanCollectionDataSource data source. |
|
| top |
|
|
TableModel Data Source |
Documented by Sanda Zaharia |
|
|
Description / Goal |
|
How to wrap a custom TableModel implementation into a report data source. |
|
Since |
|
0.3.3 |
|
|
TableModel Data Sources
In some Swing-based desktop client applications, the reporting data might already be available in the form of a javax.swing.table.TableModel implementation used for rendering javax.swing.JTable components on various forms. JasperReports can generate reports using this kind of data if a given TableModel object is wrapped in a JRTableModelDataSource instance before being passed as the data source for the report-filling process.
There are two ways to use this type of data source. Normally, to retrieve data from it, one must declare a report field for each column in the TableModel object bearing the same name as the column it maps. Sometimes it is not possible or desirable to use the column name, however, because the report field name and columns could still be bound to report fields using their zero-based index instead of their names.
For instance, if is known that a particular column is the third column in the table model object (index=2), then one could name the corresponding field "COLUMN_2" and use the column data without problems.
An example of TableModel data source implementation is provided in the following section.
TableModel Data Source Example
In our example the TableModel data source is implemented in the /src/CustomTableModel.java file. It contains an array of column names and an array of Object arrays, representing records of data in the data source. Column names are identical to their related field names in the report template: the_city, id, name and street. Methods required by the javax.swing.table.AbstractTableModel parent class are also implemented. public class CustomTableModel extends AbstractTableModel
{
private String[] columnNames = {"the_city", "id", "name", "street"};
private Object[][] data =
{
{"Berne", new Integer(22), "Bill Ott", "250 - 20th Ave."},
{"Berne", new Integer(9), "James Schneider", "277 Seventh Av."},
{"Boston", new Integer(32), "Michael Ott", "339 College Av."},
{"Boston", new Integer(23), "Julia Heiniger", "358 College Av."},
{"Chicago", new Integer(39), "Mary Karsen", "202 College Av."},
{"Chicago", new Integer(35), "George Karsen", "412 College Av."},
{"Chicago", new Integer(11), "Julia White", "412 Upland Pl."},
{"Dallas", new Integer(47), "Janet Fuller", "445 Upland Pl."},
{"Dallas", new Integer(43), "Susanne Smith", "2 Upland Pl."},
{"Dallas", new Integer(40), "Susanne Miller", "440 - 20th Ave."},
{"Dallas", new Integer(36), "John Steel", "276 Upland Pl."},
{"Dallas", new Integer(37), "Michael Clancy", "19 Seventh Av."},
{"Dallas", new Integer(19), "Susanne Heiniger", "86 - 20th Ave."},
{"Dallas", new Integer(10), "Anne Fuller", "135 Upland Pl."},
{"Dallas", new Integer(4), "Sylvia Ringer", "365 College Av."},
{"Dallas", new Integer(0), "Laura Steel", "429 Seventh Av."},
{"Lyon", new Integer(38), "Andrew Heiniger", "347 College Av."},
{"Lyon", new Integer(28), "Susanne White", "74 - 20th Ave."},
{"Lyon", new Integer(17), "Laura Ott", "443 Seventh Av."},
{"Lyon", new Integer(2), "Anne Miller", "20 Upland Pl."},
{"New York", new Integer(46), "Andrew May", "172 Seventh Av."},
{"New York", new Integer(44), "Sylvia Ott", "361 College Av."},
{"New York", new Integer(41), "Bill King", "546 College Av."},
{"Oslo", new Integer(45), "Janet May", "396 Seventh Av."},
{"Oslo", new Integer(42), "Robert Ott", "503 Seventh Av."},
{"Paris", new Integer(25), "Sylvia Steel", "269 College Av."},
{"Paris", new Integer(18), "Sylvia Fuller", "158 - 20th Ave."},
{"Paris", new Integer(5), "Laura Miller", "294 Seventh Av."},
{"San Francisco", new Integer(48), "Robert White", "549 Seventh Av."},
{"San Francisco", new Integer(7), "James Peterson", "231 Upland Pl."}
};
public CustomTableModel()
{
}
public int getColumnCount()
{
return this.columnNames.length;
}
public String getColumnName(int columnIndex)
{
return this.columnNames[columnIndex];
}
public int getRowCount()
{
return this.data.length;
}
public Object getValueAt(int rowIndex, int columnIndex)
{
return this.data[rowIndex][columnIndex];
}
}
When the ant command is used with the fill2 argument, at fill time a JRTableModelDataSource object is passed as argument to the fillReportToFile() method in the JasperFillManager class (see the /src/DataSourceApp.java file): public void fill2() throws JRException
{
long start = System.currentTimeMillis();
//Preparing parameters
Map parameters = new HashMap();
parameters.put("ReportTitle", "Address Report");
parameters.put("DataFile", "CustomTableModel.java");
JasperFillManager.fillReportToFile("build/reports/DataSourceReport.jasper",
parameters, new JRTableModelDataSource(new CustomTableModel()));
System.err.println("Filling time : " + (System.currentTimeMillis() - start));
}
Running the Sample
Running the sample requires the Apache Ant library. Make sure that ant is already installed on your system (version 1.5 or later).
In a command prompt/terminal window set the current folder to demo/samples/datasource within the JasperReports source project and run the > ant test view command.
It will generate all supported document types containing the sample report in the demo/samples/datasource/build/reports directory.
Then the report will open in the JasperReports internal viewer. |
|


 spring.zip

 jreports.pdf


 to "run" a report.