'04.Anddoid'에 해당되는 글 49건

  1. 2010.11.26 Android 애플리케이션을 위한 Java 기술
  2. 2010.11.19 http://www.android-themes.com/Android_Games/
  3. 2010.10.18 안드로이드 UI 디자인 패턴
  4. 2010.10.18 안드로이드 UI 개발 노하우 및 트렌드 분석
  5. 2010.09.24 GET방식의 RESTful 웹서비스 구현하기 2
  6. 2010.09.24 [Android] 웹서버에서 이미지 파싱해오기 간단예제 ! 2
  7. 2010.09.24 Ejb, Android and Web Services
  8. 2010.09.24 How-to: Pure Html Android Application
  9. 2010.09.24 How-to: Android as a RESTful Client
  10. 2010.08.16 android listView sample 2
  11. 2010.08.15 Android custom Dialog
  12. 2010.08.15 Android Selected State ListView Example
  13. 2010.08.15 Custom ListView items and adapters
  14. 2010.08.12 #11. List 집중공략! - (3) Custom ArrayAdapter를 이용한 ListView
  15. 2010.08.04 android 모토로라 개발툴 다운받기
  16. 2010.08.04 [기타강좌] 버튼 눌렀을 때와 땟을때의 이미지 처리 방법
  17. 2010.07.30 논리 DB 설계
  18. 2010.07.30 안드로이드 아파치 서버 & 클라이언트 Socket 통신에 대한 기초적 방법 1
  19. 2010.07.30 [android-beginners] Sockets with Android.
  20. 2010.07.30 [펌] 안드로이드 소켓통신
  21. 2010.07.30 안드로이드 서버와 소켓통신
  22. 2010.07.30 Android에서의 TCP/IP 통신
  23. 2010.07.30 Android에서 HttpClient를 이용한 서버와의 통신
  24. 2010.07.27 android 웹서비스 구현하기 참조
  25. 2010.07.27 android 웹서비스 구현 참조
  26. 2010.07.05 [유아독종님강좌] 구글 GMail 계정을 이용해 안드로이드에서 메일 보내기
  27. 2010.07.05 Android Cloud to Device Messaging Framework
  28. 2010.07.05 안드로이드(android) 다이얼로그 종류별 구현 방법
  29. 2010.06.25 GoogleTalkConnection을 확장한 GoogleTalkClient 제작!
  30. 2010.06.25 ListView에 동적으로 아이템 추가시 스크롤 문제!
04.Anddoid2010. 11. 26. 16:41
반응형

시작

이 기사에서는 까다로운 상황을 처리하는 데 필요한 Android SDK 도구 중 일부에 대해 다룬다. Android 애플리케이션을 개발하려면 JDK(Java Development Kit)가 필요한 최신 Android SDK가 필요하다. 필자는 Android 2.2 및 JDK 1.6.0_17을 사용했다(이러한 도구에 대한 링크는 참고자료 참조). 실제 장치는 없어도 된다. 이 기사에 있는 모든 코드는 SDK와 함께 제공되는 Android 에뮬레이터에서 정상적으로 실행된다. 이 기사에서는 기본적인 Android 개발에 대해서는 설명하지 않기 때문에 사용자는 Android 프로그래밍에 익숙해야 한다. 하지만 Java 프로그래밍 언어에 대한 지식이 있으면 이 기사의 내용을 이해할 수 있을 것이다.


동시성 및 네트워킹

자주 사용하는 약어

  • API: Application Programming Interface
  • SQL: Structured Query Language
  • SDK: Software Developer Kit
  • UI: User Interface
  • XML: Extensible Markup Language

Android 애플리케이션의 가장 일반적인 태스크 중 하나는 네트워크를 통해 데이터를 검색하거나 원격 서버로 전송하는 것이다. 이 조작을 수행하면 사용자에게 표시하기 원하는 일부 새로운 데이터가 생성되는 경우가 자주 있다. 이는 사용자 인터페이스를 수정해야 한다는 것을 의미한다. 대부분의 개발자는 사용자가 기본 UI 스레드에서 네트워크(특히 네트워크 연결 속도가 매우 느린 휴대전화)를 통해 데이터에 액세스하는 것과 같은 잠재적인 장기 실행 태스크를 수행해서는 안 된다는 것을 알고 있다. 이러한 장기 실행 태스크를 수행하면 해당 태스크가 완료될 때까지 애플리케이션이 멈춘다. 실제로 이 태스크를 수행하는 데 5초 넘게 걸리는 경우 Android 운영 체제는 그림 1에 있는 악명 높은 Application Not Responding 대화 상자를 표시한다.


그림 1. Android의 악명 높은 Application Not Responding 대화 상자
Android의 악명 높은 Application Not Responding 대화 상자 화면 캡처

사용자의 네트워크 연결 속도가 얼마나 느릴지는 알 수 없다. 모험을 피하기 위해서는 이러한 태스크를 다른 스레드에서 수행해야 하거나 최소한 기본 UI 스레드에서는 수행해서는 안 된다. 대부분은 아니더라도 다수의 Android 애플리케이션은 복수의 스레드를 처리해야 하기 때문에 동시성을 처리해야 한다. 애플리케이션에는 데이터를 로컬로 유지해야 할 경우가 있는데 이 경우 Android의 로컬 데이터베이스가 매력적인 옵션이다. 이러한 세 가지 시나리오(다른 스레드, 동시성 및 로컬로 데이터 유지) 모두에는 Java 환경에서 이러한 사항을 수행하는 일부 표준 방식이 있다. 하지만 이 기사에서 알 수 있듯이 Android는 일부 다른 옵션을 제공한다. 이러한 각각의 옵션과 이러한 옵션의 장단점에 대해 살펴본다.


Android 네트워크

Java 프로그래밍에서 네트워크를 통해 호출을 작성하는 것은 간단하다. 익숙한 java.net 패키지에는 이를 수행하는 데 필요한 몇 가지 클래스가 포함되어 있다. 이러한 클래스는 대부분 Android에도 있으며 다른 Java 애플리케이션에서와 같이 실제로 java.net.URLjava.net.URLConnection과 같은 클래스를 사용할 수 있다. 하지만 Android에는 Apache HttpClient 라이브러리가 포함되어 있다. 이 방식은 Android에서 네트워킹을 수행하기 위해 선호되는 방법이다. 일반적인 Java 클래스를 사용하는 경우라도 Android의 구현에서는 계속 HttpClient를 사용한다. Listing 1에서는 이 필수 라이브러리의 사용 예를 보여 준다. (모든 소스 코드는 다운로드를 참조한다.)


Listing 1. Android에서 Http Client 라이브러리 사용하기
private ArrayList<Stock> fetchStockData(Stock[] oldStocks) 
    throws ClientProtocolException, IOException{
    StringBuilder sb = new StringBuilder();
    for (Stock stock : oldStocks){
        sb.append(stock.getSymbol());
        sb.append('+');
    }
    sb.deleteCharAt(sb.length() - 1);
    String urlStr = 
        "http://finance.yahoo.com/d/quotes.csv?f=sb2n&s=" + 
                sb.toString();
    HttpClient client = new DefaultHttpClient();
    HttpGet request = new HttpGet(urlStr.toString());
    HttpResponse response = client.execute(request);
    BufferedReader reader = new BufferedReader(
            new InputStreamReader(response.getEntity().getContent()));
    String line = reader.readLine();
    int i = 0;
    ArrayList<Stock> newStocks = new ArrayList<Stock>(oldStocks.length);
    while (line != null){
        String[] values = line.split(",");
        Stock stock = new Stock(oldStocks[i], oldStocks[i].getId());
        stock.setCurrentPrice(Double.parseDouble(values[1]));
        stock.setName(values[2]);
        newStocks.add(stock);
        line = reader.readLine();
        i++;
    }
    return newStocks;
}

이 코드는 Stock 오브젝트의 배열을 포함한다. 이러한 오브젝트는 사용자가 소유하는 주식에 대한 정보(예: 종목 기호, 주가 등)와 이 주식에 대해 사용자가 지불한 금액과 같은 보다 개인적인 정보를 함께 보유하는 기본적인 데이터 구조 오브젝트이다. HttpClient 클래스를 사용하여 Yahoo Finance에서 동적 데이터(예: 주식의 현재 가격)를 검색한다. HttpClientHttpUriRequest를 사용하며 이 경우에서 사용자는 HttpUriRequest의 서브클래스인 HttpGet을 사용한다. 이와 비슷하게 데이터를 원격 서버에 게시해야 하는 경우를 위한 HttpPost 클래스가 있다. 클라이언트로부터 HttpResponse를 수신하면 응답의 기본 InputStream에 액세스하여 버퍼링한 후 구문 분석하여 주식 데이터를 얻을 수 있다.

네트워크를 통해 데이터를 검색하는 방법을 살펴봤으니 이제는 이 데이터를 사용하여 멀티스레딩을 통해 Android UI를 효율적으로 업데이트하는 방법을 살펴본다.


Android 동시성의 실제

Listing 1에 있는 코드를 애플리케이션의 기본 UI 스레드에서 실행하는 경우 사용자 네트워크의 속도에 따라 Application Not Responding 대화 상자가 나타날 수 있다. 따라서 스레드를 파생(spawn)시켜 이 데이터를 페치해야 한다. Listing 2에서는 이를 수행하는 한 가지 방법을 보여 준다.


Listing 2. 기본 멀티스레딩(작동하지 않으므로 수행하지 않음)
private void refreshStockData(){
    Runnable task = new Runnable(){
        public void run() {
            try {
                ArrayList<Stock> newStocks = 
                    fetchStockData(stocks.toArray(
                                  new Stock[stocks.size()]));
                for (int i=0;i<stocks.size();i++){
                    Stock s = stocks.get(i);
                    s.setCurrentPrice(
                                  newStocks.get(i).getCurrentPrice());
                    s.setName(newStocks.get(i).getName());
                    refresh();
                }
            } catch (Exception e) {
                Log.e("StockPortfolioViewStocks", 
                            "Exception getting stock data", e);
            }
        }
    };
    Thread t = new Thread(task);
    t.start();
}

Listing 2의 캡션은 기본 코드임을 나타내고 있으며 실제로도 그렇다. 이 간단한 예제에서는 Listing 1fetchStockData 메소드를 Runnable 오브젝트에서 랩핑한 후 새 스레드에서 실행하여 호출한다. 이 새 스레드에서는 둘러싸는 Activity(UI를 작성하는 클래스)의 멤버 변수인 stocks에 액세스한다. 이름이 나타내듯 이는 Stock 오브젝트의 데이터 구조이다(이 예에서는 java.util.ArrayList). 달리 말하면 두 개의 스레드(기본 UI 스레드와 파생(spawn)된 스레드(Listing 2에 있는 코드에서 호출됨) 사이에서 데이터를 공유한다. 파생(spawn)된 스레드에서 공유 데이터를 수정하면 Activity 오브젝트에 대한 refresh 메소드를 호출하여 UI를 업데이트한다.

Java Swing 애플리케이션을 프로그래밍한 경우에는 이와 같은 패턴을 따랐을 것이다. 하지만 Android에서는 이 패턴이 작동하지 않는다. 파생(spawn)된 스레드는 UI를 전혀 수정할 수 없다. 그렇다면 UI를 멈추지 않고 데이터가 수신되면 UI를 수정할 수 있는 방식으로 데이터를 검색하려면 어떻게 해야 하는가? android.os.Handler 클래스를 사용하면 스레드 사이에서 조정하고 통신할 수 있다. Listing 3에서는 Handler를 사용하는 업데이트된 refreshStockData 메소드를 보여 준다.


Listing 3. Handler를 사용하여 실제로 작동하는 멀티스레딩
private void refreshStockData(){
    final ArrayList<Stock> localStocks = 
          new ArrayList<Stock>(stocks.size());
    for (Stock stock : stocks){
        localStocks.add(new Stock(stock, stock.getId()));
    }
    final Handler handler = new Handler(){
        @Override
        public void handleMessage(Message msg) {
            for (int i=0;i<stocks.size();i++){
                stocks.set(i, localStocks.get(i));
            }
            refresh();
        }
    };
    Runnable task = new Runnable(){
        public void run() {
            try {
                ArrayList<Stock> newStocks = 
                    fetchStockData(localStocks.toArray(
                                  new Stock[localStocks.size()]));
                for (int i=0;i<localStocks.size();i++){
                    Stock ns = newStocks.get(i);
                    Stock ls = localStocks.get(i);
                    ls.setName(ns.getName());
                    ls.setCurrentPrice(ns.getCurrentPrice());
                }
                handler.sendEmptyMessage(RESULT_OK);
            } catch (Exception e) {
                Log.e("StockPortfolioViewStocks", 
                            "Exception getting stock data", e);
            } 
        }
    };
    Thread dataThread = new Thread(task);
    dataThread.start();
}

Listing 2에 있는 코드와 Listing 3에 있는 코드 사이에는 두 가지 주요 차이점이 있다. 두드러진 차이점은 Handler의 존재 여부이다. 두 번째 차이점은 파생(spawn)된 스레드에서 UI를 수정하지 않는다는 것이다. 대신 메시지를 Handler에 전송하면 Handler가 UI를 수정한다. 또한 이전과 같이 스레드에서 stocks 멤버 변수를 수정하지 않는다는 것에 유의한다. 대신 데이터의 로컬 사본을 수정한다. 이는 반드시 필요한 것은 아니지만 이 방법이 더 안전하다.

Listing 3에서는 동시 프로그래밍에서 매우 일반적인 패턴으로 판명된 방식인 데이터를 복사한 후 일부 장기 태스크를 수행하는 새 스레드에 전달하고 결과 데이터를 다시 기본 UI 스레드에 전달한 후 해당 데이터로 기본 UI 스레드를 업데이트하는 방식을 보여 준다. Handlers는 Android에서 이를 위한 기본 통신 메커니즘이며 이 패턴의 구현을 더 용이하게 만든다. 하지만 Listing 3에는 여전히 상용구 코드가 상당히 포함되어 있다. 다행히도 Android는 이 상용구 코드 대부분을 캡슐화하여 제거할 수 있는 방법을 제공한다. Listing 4에서 이 방법을 보여 준다.


Listing 4. AsyncTask를 사용한 편리한 멀티스레딩
private void refreshStockData() {
    new AsyncTask<Stock, Void, ArrayList<Stock>>(){
        @Override
        protected void onPostExecute(ArrayList<Stock> result) {
            ViewStocks.this.stocks = result;
            refresh();
        }

        @Override
        protected ArrayList<Stock> doInBackground(Stock... stocks){
            try {
                return fetchStockData(stocks);
            } catch (Exception e) {
                Log.e("StockPortfolioViewStocks", "Exception getting stock data", e);
            }
            return null;
        }
    }.execute(stocks.toArray(new Stock[stocks.size()]));
}

여기서 알 수 있듯이 Listing 4에는 Listing 3보다 훨씬 적은 상용구가 포함되어 있다. 사용자는 스레드 또는 Handlers를 작성하지 않는다. AsyncTask를 사용하여 모두를 캡슐화한다. AsyncTask를 작성하려면 doInBackground 메소드를 구현해야 한다. 이 메소드는 항상 별도의 스레드에서 실행되므로 자유롭게 장기 실행 태스크를 호출할 수 있다. 입력 유형은 작성되는 AsyncTask의 유형 매개변수에서 제공된다. 이 경우에는 첫 번째 유형 매개변수가 Stock이었기 때문에 doInBackground에는 Stock 오브젝트의 배열이 전달된다. 마찬가지로 ArrayList<Stock>AsyncTask의 세 번째 유형 매개변수이기 때문에 리턴된다. 이 예제에서 필자는 onPostExecute 메소드도 대체하도록 선택했다. 이 메소드는 doInBackground에서 다시 제공되는 데이터에 대해 수행해야 할 사항이 있는 경우 구현할 선택적 메소드이다. 이 메소드는 항상 기본 UI 스레드에서 실행되므로 UI를 수정하는 데 아주 적합하다.

AsyncTask를 사용하면 멀티스레드 코드를 매우 단순화할 수 있다. AsyncTask는 개발 경로에서 다수의 동시성 위험을 제거한다. 하지만 AsyncTask 오브젝트에 있는 doInBackground 메소드가 실행되는 동안 장치에서 방향이 변경되면 발생하는 문제와 같은 AsyncTask의 일부 잠재적 문제점을 여전히 찾을 수 있다. 이와 같은 경우를 처리하는 방법에 대한 일부 기술은 참고자료에 있는 링크를 참조한다.

이제 Android가 데이터베이스에 대한 일반적인 Java 작업 방식과 상당한 차이를 보이는 또다른 일반적인 태스크에 대해 살펴본다.


Android 데이터베이스 연결

Android의 한 가지 매우 유용한 기능은 로컬 관계형 데이터베이스가 있다는 것이다. 물론 데이터를 로컬 파일에 저장할 수 있지만 RDBMS(Relational Database Management System)를 사용하여 데이터를 저장하는 것이 더 유용한 경우가 자주 발생한다. Android는 Android와 같은 임베디드 시스템에 최적화된 유명한 SQLite 데이터베이스를 제공한다. 이 데이터베이스는 Android의 많은 핵심 애플리케이션에서 사용한다. 예를 들어, 사용자 주소록이 SQLite 데이터베이스에 저장된다. Android의 Java 구현을 고려하면 JDBC를 사용하여 이러한 데이터베이스에 액세스할 수 있을 것으로 예상할 수 있다. 놀랍게도 Android에는 JDBC API의 대부분을 구성하는 java.sqljavax.sql 패키지도 포함되어 있다. 하지만 로컬 Android 데이터베이스에 대해 작업하는 경우에는 이것이 아무 쓸모가 없는 것으로 판명되었다. 대신 android.databaseandroid.database.sqlite 패키지를 사용한다. Listing 5에서는 이러한 클래스를 사용하여 데이터를 저장하고 검색하는 예제를 보여 준다.


Listing 5. Android를 사용한 데이터베이스 액세스
public class StocksDb {
    private static final String DB_NAME = "stocks.db";
    private static final int DB_VERSION = 1;
    private static final String TABLE_NAME = "stock";
    private static final String CREATE_TABLE = "CREATE TABLE " + 
        TABLE_NAME + " (id INTEGER PRIMARY KEY, symbol TEXT, max_price DECIMAL(8,2), " +
            "min_price DECIMAL(8,2), price_paid DECIMAL(8,2), " +
            "quantity INTEGER)";
    private static final String INSERT_SQL = "INSERT INTO " + TABLE_NAME +
            " (symbol, max_price, min_price, price_paid, quantity) " +
            "VALUES (?,?,?,?,?)";
    private static final String READ_SQL = "SELECT id, symbol, max_price, " +
            "min_price, price_paid, quantity FROM " + TABLE_NAME;
    private final Context context;
    private final SQLiteOpenHelper helper;
    private final SQLiteStatement stmt;
    private final SQLiteDatabase db;
    public StocksDb(Context context){
        this.context = context;
        helper = new SQLiteOpenHelper(context, DB_NAME, null, 
                DB_VERSION){
            @Override
            public void onCreate(SQLiteDatabase db) {
                db.execSQL(CREATE_TABLE);
            }

            @Override
            public void onUpgrade(SQLiteDatabase db, int oldVersion, 
                    int newVersion) {
                throw new UnsupportedOperationException();
            }
        };
        db = helper.getWritableDatabase();
        stmt = db.compileStatement(INSERT_SQL);
    }
    public Stock addStock(Stock stock){
        stmt.bindString(1, stock.getSymbol());
        stmt.bindDouble(2, stock.getMaxPrice());
        stmt.bindDouble(3, stock.getMinPrice());
        stmt.bindDouble(4, stock.getPricePaid());
        stmt.bindLong(5, stock.getQuantity());
        int id = (int) stmt.executeInsert();
        return new Stock (stock, id);
    }
    public ArrayList<Stock> getStocks() {
        Cursor results = db.rawQuery(READ_SQL, null);
        ArrayList<Stock> stocks = 
                 new ArrayList<Stock>(results.getCount());
        if (results.moveToFirst()){
            int idCol = results.getColumnIndex("id");
            int symbolCol = results.getColumnIndex("symbol");
            int maxCol = results.getColumnIndex("max_price");
            int minCol = results.getColumnIndex("min_price");
            int priceCol = results.getColumnIndex("price_paid");
            int quanitytCol = results.getColumnIndex("quantity");
            do {
                Stock stock = new Stock(results.getString(symbolCol), 
                        results.getDouble(priceCol), 
                        results.getInt(quanitytCol), 
                                    results.getInt(idCol));
                stock.setMaxPrice(results.getDouble(maxCol));
                stock.setMinPrice(results.getDouble(minCol));
                stocks.add(stock);
            } while (results.moveToNext());
        }
        if (!results.isClosed()){
            results.close();
        }
        return stocks;
    }
    public void close(){
        helper.close();
    }    
}

Listing 5에 있는 클래스는 주식 정보를 저장하는 데 사용된 SQLite 데이터베이스를 완전히 캡슐화한다. 애플리케이션에서 사용될 뿐만 아니라 애플리케이션에서 작성하기도 하는 임베디드 데이터베이스에 대해 작업하기 때문에 데이터베이스를 작성하는 데 필요한 코드를 제공해야 한다. Android는 이를 위해 SQLiteOpenHelper라는 유용한 추상 헬퍼 클래스를 제공한다. 이를 구현하려면 이 추상 클래스를 확장한 후 코드를 제공하여 onCreate 메소드에서 데이터베이스를 작성한다. 이 헬퍼의 인스턴스가 확보되면 임의의 SQL문을 실행하는 데 사용할 수 있는 SQLiteDatabase의 인스턴스를 얻을 수 있다.

데이터베이스 클래스에는 몇 가지 편의 메소드가 포함되어 있다. 첫 번째는 새 주식을 데이터베이스에 저장하는 데 사용되는 addStock이다. SQLiteStatement 인스턴스를 사용한다는 것에 주목한다. 이 인스턴스는 java.sql.PreparedStatement와 비슷하다. addStock이 호출될 때마다 재사용할 수 있도록 클래스의 생성자에서 이 인스턴스가 컴파일되는 방식에 유의한다. 각각의 addStock 호출 시 SQLiteStatement의 변수(INSERT_SQL 문자열에 있는 물음표)는 addStock에 전달된 데이터에 바인드된다. 이것 역시 JDBC에서 익숙한 PreparedStatement와 매우 비슷하다.

다른 편의 메소드는 getStocks이다. 이름이 나타내듯이 이 메소드는 데이터베이스에서 모든 주식을 검색한다. JDBC에서와 마찬가지로 여기서도 SQL 문자열을 사용한다는 것에 다시 한번 주목한다. SQLiteDatabase 클래스에서 rawQuery 메소드를 사용하여 이를 수행한다. 이 클래스에는 SQL을 직접 사용하지 않고 데이터베이스를 쿼리할 수 있는 몇 가지 쿼리 메소드도 포함되어 있다. 이러한 다양한 메소드는 모두 java.sql.ResultSet와 매우 비슷한 Cursor 오브젝트를 리턴한다. 쿼리에서 리턴되는 데이터 행 위로 Cursor를 이동할 수 있다. 각각의 행에서 getInt, getString 및 기타 메소드를 사용하여 쿼리하는 데이터베이스 테이블의 다양한 열과 연관된 값을 검색할 수 있다. 역시 이것도 ResultSet와 매우 비슷하다. ResultSet와 비슷하므로 작업을 완료한 경우에는 Cursor를 닫는 것이 중요하다. Cursors를 닫지 않으면 빠르게 메모리 부족이 발생하여 애플리케이션에 오류가 발생할 수 있다.

로컬 데이터베이스를 쿼리하면 프로세스의 속도가 저하될 수 있으며 데이터 행의 수가 많거나 여러 테이블을 결합하는 복합 쿼리를 실행해야 하는 경우에는 특히 더 그렇다. 데이터베이스 쿼리 또는 삽입에 5초 이상 소요되어 Application Not Responding 대화 상자가 표시될 가능성은 없지만 코드가 데이터를 읽고 쓰는 중에 UI를 잠재적으로 멈출 수 있기 때문에 권장되지 않는다. 따라서 이러한 상황을 예방하는 가장 쉬운 방법은 AsyncTask를 사용하는 것이다. Listing 6에서는 이러한 예제를 보여 준다.


Listing 6. 별도의 스레드에 있는 데이터베이스에 삽입하기
Button button = (Button) findViewById(R.id.btn);
button.setOnClickListener(new OnClickListener(){
    public void onClick(View v) {
        String symbol = symbolIn.getText().toString();
        symbolIn.setText("");
        double max = Double.parseDouble(maxIn.getText().toString());
        maxIn.setText("");
        double min = Double.parseDouble(minIn.getText().toString());
        minIn.setText("");
        double pricePaid = 
                Double.parseDouble(priceIn.getText().toString());
        priceIn.setText("");
        int quantity = Integer.parseInt(quantIn.getText().toString());
        quantIn.setText("");
        Stock stock = new Stock(symbol, pricePaid, quantity);
        stock.setMaxPrice(max);
        stock.setMinPrice(min);
        new AsyncTask<Stock,Void,Stock>(){
            @Override
            protected Stock doInBackground(Stock... newStocks) {
                // There can be only one!
                return db.addStock(newStocks[0]);
            }
            @Override
            protected void onPostExecute(Stock s){
                addStockAndRefresh(s);
            }
        }.execute(stock);
    }
});

단추의 이벤트 리스너를 작성하는 것으로 시작한다. 사용자가 단추를 클릭하면 다양한 위젯(정확하게는 EditText 위젯)에서 주식 데이터를 읽고 새 Stock 오브젝트를 채운다. AsyncTask를 작성하고 doInBackground 메소드를 통해 Listing 5addStock 메소드를 호출한다. 따라서 기본 UI 스레드가 아니라 백그라운드 스레드에서 addStock이 실행된다. 완료되면 새 Stock 오브젝트를 데이터베이스에서 기본 UI 스레드에서 실행되는 addStockAndRefresh 메소드로 전달한다.


결론

이 기사에서는 Android가 Java 환경에 있는 많은 API의 서브세트만 지원하면서도 기능 면에서 전혀 부족하지 않다는 것을 보여줬다. 네트워킹과 같은 일부 경우에는 익숙한 API를 완전히 구현하지만 더 편리한 방법도 제공한다. 동시성의 경우에서 Android는 따라야 하는 API 및 규칙을 추가한다. 마지막으로 데이터베이스 액세스의 경우 Android는 데이터베이스에 액세스하는 완전히 다른 방법을 제공한다(익숙한 개념이 다수 포함되어 있음). 이들은 표준 Java 기술과 Android의 Java 기술 사이의 임의의 차이점에 그치지 않고 Android 개발의 기본적인 빌딩 블록을 형성한다.


Posted by 1010
04.Anddoid2010. 11. 19. 13:35
반응형
Posted by 1010
04.Anddoid/UI2010. 10. 18. 11:16
반응형

안드로이드 UI 디자인 패턴

이 세션에서는 안드로이드 UX팀이 훌륭한 안드로이드 어플리케이션을 작성하기 위해 사용할수 있는 패턴의 유형을 보여줄 것이다. 인터엑티브한 Titlebar, 빠른 주소록, Bottom bar 와 같은 google I/O에서만 볼수 있는 몇가지 새로운 패턴들을 어떡해 사용하는지를 살펴 볼 것이다.

참가자 요구사항 : 자바에 능숙하고 안드로이드 기본 개념을 명확히 이해해야 한다.

첨부파일 (1)

Posted by 1010
04.Anddoid/UI2010. 10. 18. 11:15
반응형
Posted by 1010
04.Anddoid2010. 9. 24. 16:50
반응형
Posted by 1010
04.Anddoid2010. 9. 24. 16:37
반응형
안녕하세요 오늘은 웹서버에서 이미지를 파싱해보려고합니다.
아주간단한 예제입니다.
필요하신분들은 참고하세요 :D


그냥 실행해보시면 퍼미션에러가 납니다. 꼭 AndroidManifest.xml 파일에다가 다음내용을 추가해주세요 !!
  1. <uses-permission 
  2.     android:name="android.permission.INTERNET"/> 


아주 미약한 실력이지만 주석달아놨습니다.
실수가 있을수있으니 실수가 있다면 태클 걸어주시기 바랍니다.

WebImageParse.java 소스입니다.
  1. package com.j0ker.parsing;  
  2.  
  3. import java.io.IOException;  
  4. import java.io.InputStream;  
  5. import java.net.HttpURLConnection;  
  6. import java.net.MalformedURLException;  
  7. import java.net.URL;  
  8. import java.util.HashMap;  
  9. import java.util.Map;  
  10. import java.util.Random;  
  11.  
  12. import android.app.Activity;  
  13. import android.os.Bundle;  
  14. import android.graphics.Bitmap;  
  15. import android.graphics.BitmapFactory;  
  16. import android.util.Log;  
  17. import android.view.View;  
  18. import android.widget.Button;  
  19. import android.widget.EditText;  
  20. import android.widget.ImageView;  
  21.  
  22.  
  23. public class WebImageParse extends Activity   
  24. {  
  25.     ImageView imView;  
  26.     String imageUrl = "http://j0ker.dothome.co.kr/"; // 이미지를 파싱해올 URL  
  27.     Random r; // 사진을 랜덤으로 불러오기위한 랜덤변수   
  28.       
  29.     /** Called when the activity is first created. */ 
  30.     @Override 
  31.     public void onCreate(Bundle savedInstanceState)   
  32.     {  
  33.         super.onCreate(savedInstanceState);  
  34.         setContentView(R.layout.main);  
  35.         r = new Random(); // 랜덤을 초기화 합니다.   
  36.           
  37.           
  38.         Button bt3 = (Button)findViewById(R.id.get_imagebt); // 버튼을 연결시켜줍니다.  
  39.         bt3.setOnClickListener(getImgListener); // 버튼에  클릭이벤트를 감지할 리스너를 설치해줍니다.  
  40.         imView = (ImageView)findViewById(R.id.imview); // 이미지를 읽어들일 이미지뷰를 연결해줍니다.  
  41.           
  42.     }  
  43.       
  44.     // 클릭이벤트가 발생했을경우 의 처리를 해주는 함수입니다.  
  45.     View.OnClickListener getImgListener = new View.OnClickListener()   
  46.     {  
  47.           
  48.         @Override 
  49.         public void onClick(View v) // 클릭이 일어났을경우    
  50.         {  
  51.             // TODO Auto-generated method stub  
  52.             int i = r.nextInt()%4+1; // i 에 랜덤한 숫자를 생성시켜줍니다.   
  53.             downloadFile(imageUrl+i+".png"); // 해당파일을 다운로드 합니다.   
  54.             Log.i("im url",imageUrl+i+".png"); // 디버깅을 위한 Log를 설정해줍니다.   
  55.         }  
  56.     };  
  57.       
  58.       
  59.     Bitmap bmImg; // 비트맵을처리할 변수를 생성합니다.  
  60.      // 이미지를 다운로드하는 함수입니다. 파라미터는 String형  
  61.     // fileUrl 이 들어갑니다.   
  62.     void downloadFile(String fileUrl)   
  63.     {  
  64.         URL myFileUrl = null; // URL 타입의 myFileUrl을  NULL로 초기화 시켜줍니다.   
  65.           
  66.         try 
  67.         {  
  68.             myFileUrl = new URL(fileUrl); //  파라미터로 넘어온 Url을 myFileUrl에 대입합니다.  
  69.               
  70.         }  
  71.         catch(MalformedURLException e) // 예외처리를 해줍니다.  
  72.         {  
  73.             // Todo Auto-generated catch block  
  74.             e.printStackTrace();  
  75.         }  
  76.         try 
  77.         {  
  78.             // 실질적인 통신이 이루어지는 부분입니다.  
  79.             // myFileUrl 로 접속을 시도합니다.   
  80.             HttpURLConnection conn = (HttpURLConnection)myFileUrl.openConnection();  
  81.             conn.setDoInput(true);  
  82.             conn.connect();  
  83.             int length = conn.getContentLength(); // 받아온 컨텐츠의 길이를 length 변수에 저장합니다.  
  84.             InputStream is = conn.getInputStream(); // InputStream is 변수에 받아온 InputStream을 저장합니다.  
  85.               
  86.             bmImg = BitmapFactory.decodeStream(is); // 받아온 이미지를 bmImg에 넣어둡니다.  
  87.             imView.setImageBitmap(bmImg); // imView에 이미지를 셋팅합니다.  
  88.         }  
  89.         catch(IOException e) // 예외처리를 해줍니다.  
  90.         {  
  91.             e.printStackTrace();   
  92.         }  
  93.     }  
  94. }  


Main.xml 내용입니다.
  1. <?xml version="1.0" encoding="utf-8"?> 
  2. <LinearLayout xmlns:android="http://schemas.android.com/apk/res/android" 
  3.     android:orientation="vertical" 
  4.     android:layout_width="fill_parent" 
  5.     android:layout_height="fill_parent" 
  6.     > 
  7.       
  8.    <TextView   
  9.         android:layout_width="fill_parent" 
  10.         android:layout_height="wrap_content" 
  11.         android:text="간단한 이미지파싱예제입니다. !"/> 
  12.       
  13.    <Button   
  14.         android:id="@+id/get_imagebt" 
  15.         android:layout_width="wrap_content" 
  16.         android:layout_height="wrap_content" 
  17.         android:text="Get an image" 
  18.         android:layout_gravity="center" 
  19.     />    
  20.       
  21.     <ImageView   
  22.         android:id="@+id/imview" 
  23.         android:layout_width="wrap_content" 
  24.         android:layout_height="wrap_content" 
  25.         android:layout_gravity="center" 
  26.      />    
  27.  </LinearLayout> 


Posted by 1010
04.Anddoid2010. 9. 24. 16:29
반응형

This week, I tried to build a simple system where I combine EJB and Android technologies. The idea was simple, I would have an EJB application at server-side which has an Entity Bean to fetch some data and using a Session Bean I would forward this data to a Dynamic Web Application (a Local JSP Client). And another Remote Android Client would show this data too.

To begin my experiment, I first installed JBoss5 Application Server, XDoclet, Eclipse Java EE and its related plugins.

After lots of experiments and trying to follow this tutorial, I was able to create an Dynamic Web Project having a JSP which gets it data from an EJB Project’s Session Bean. Before I began to connect a database to this EJB Project using an Entity Bean, I tried to bind a Remote Android Client to this EJB. But, unfortunately there was no sources for this at web and I couldn’t get it done myself. Also from what I read at blogs, It seems that it’ll be wise to use Web Service approach instead of EJB.

So, I tried to implement a Web Service using my EJB Project. But, it was also another mystery for me. There is no good documentation/tutorial about how to create anything using Eclipse. Using Murat’s previous notes, I tried to generate my EJB based Web Service but, It was also another failure. So I simply create a regular Web Service using regular Java Classes.

But there is also a problem about Web Service approach. Android SDK doesn’t support a high level remote protocol like SOAP. To have SOAP support, we must use kSoap2 engine, which I had no time to look up.

This week was most of a failure for me, next week I’m planning to reach my regular Web services using Android with kSoap2.

Posted by 1010
04.Anddoid2010. 9. 24. 16:28
반응형

How-to: Pure Html Android Application

Cansin

In this tutorial I’ll talk about creating an Android application which will get all it’s data from Http requests. To develop the application, I used WebView and WebViewClient classes of the Webkit.

This is rather a straight forward tutorial. To show a WebView in our application we need to add a WebView to our /res/layout/main.xml file. Simply add the following element under <LinearLayout> tag.

<WebView
    android:id="@+id/webView"
    android:layout_width="fill_parent"
    android:layout_height="fill_parent"
/>

Then we need to access this WebView at our onCreate method and make necessary manipulations. We can get our view by R.findViewById(R.id.webview). To have a native look, we disabled some functionalities of WebView object.

The important part of our code is to listen URL loadings. By default, when you click a HTML link in a WebView, page is loaded at Browser. We want to override this behavior so that when we click a link it will be loaded at our WebView. It’s pretty simple actually. All we have to do is to set a WebViewClient object to our WebView and implement its shouldOverrideUrlLoading(WebView,String) method. We can even send Get request by doing so. Actually we can’t add any get request to our url. If we try to use loadUrl function to do this, we’ll loose our previous post/get objects which are sent to the url. But if you don’t have any previous request objects, it’s safe to use loadUrl to manipulate it.

So here is the source code of the tutorial. Hope, it’ll be useful.

P.s: Don’t forget to add following field to AndroidManifest.xml to have an internet connection.

<uses-permission android:name="android.permission.INTERNET"></uses-permission>
package praeda.muzikmekan;
 
import android.app.Activity;
import android.os.Bundle;
import android.util.Log;
import android.webkit.WebView;
import android.webkit.WebViewClient;
 
public class Index extends Activity {
    /** Called when the activity is first created. */
    @Override
    public void onCreate(Bundle savedInstanceState) {
        super.onCreate(savedInstanceState);
        setContentView(R.layout.main);
 
        WebView web = (WebView) findViewById(R.id.webView);
        web.getSettings().setJavaScriptEnabled(true); 
        web.getSettings().setJavaScriptCanOpenWindowsAutomatically(false);
        web.getSettings().setPluginsEnabled(false);
        web.getSettings().setSupportMultipleWindows(false);
        web.getSettings().setSupportZoom(false);
        web.setVerticalScrollBarEnabled(false);
        web.setHorizontalScrollBarEnabled(false);
 
        //Our application's main page will be loaded
        web.loadUrl("http://senior.ceng.metu.edu.tr/2009/praeda/");
 
        web.setWebViewClient(new WebViewClient() {
            @Override public boolean shouldOverrideUrlLoading(WebView view, String url) {
                return false;
            }
        });
    }
}

출처: http://senior.ceng.metu.edu.tr/2009/praeda/2009/01/11/how-to-pure-html-android-application/
Posted by 1010
04.Anddoid2010. 9. 24. 16:27
반응형

How-to: Android as a RESTful Client

Cansin

This is a how-to focused on creating a RESTful java object at Android. I’ve used HTTPClient, HTTPEntry, HTTPGet, HTTPResponse, JSONArray and JSONObject classes. I think it’ll be useful if we need to use a web-service from client application.

I’ve implemented a simple Java Object called RestClient which connects to a given Rest-JSON service. After connection, this object prints response content. Using this content, a JSONObject created. Then, RestClient prints the JSONObject’s content, parses all values of this object and prints them as well. And as a last job, RestClient pushes a sample value to the JSONObject.

I’ve uploaded RestClient. Hope it’ll be useful.

P.s: To get access to internet at Android, following field must be included to AndroidManifest.xml file of the project.

<uses-permission android:name="android.permission.INTERNET"></uses-permission>
package praeda.muzikmekan;
 
import java.io.BufferedReader;
import java.io.IOException;
import java.io.InputStream;
import java.io.InputStreamReader;
 
import org.apache.http.HttpEntity;
import org.apache.http.HttpResponse;
import org.apache.http.client.ClientProtocolException;
import org.apache.http.client.HttpClient;
import org.apache.http.client.methods.HttpGet;
import org.apache.http.impl.client.DefaultHttpClient;
import org.json.JSONArray;
import org.json.JSONException;
import org.json.JSONObject;
 
import android.util.Log;
 
public class RestClient {
 
    private static String convertStreamToString(InputStream is) {
        /*
         * To convert the InputStream to String we use the BufferedReader.readLine()
         * method. We iterate until the BufferedReader return null which means
         * there's no more data to read. Each line will appended to a StringBuilder
         * and returned as String.
         */
        BufferedReader reader = new BufferedReader(new InputStreamReader(is));
        StringBuilder sb = new StringBuilder();
 
        String line = null;
        try {
            while ((line = reader.readLine()) != null) {
                sb.append(line + "\n");
            }
        } catch (IOException e) {
            e.printStackTrace();
        } finally {
            try {
                is.close();
            } catch (IOException e) {
                e.printStackTrace();
            }
        }
        return sb.toString();
    }
 
    /* This is a test function which will connects to a given
     * rest service and prints it's response to Android Log with
     * labels "Praeda".
     */
    public static void connect(String url)
    {
 
        HttpClient httpclient = new DefaultHttpClient();
 
        // Prepare a request object
        HttpGet httpget = new HttpGet(url); 
 
        // Execute the request
        HttpResponse response;
        try {
            response = httpclient.execute(httpget);
            // Examine the response status
            Log.i("Praeda",response.getStatusLine().toString());
 
            // Get hold of the response entity
            HttpEntity entity = response.getEntity();
            // If the response does not enclose an entity, there is no need
            // to worry about connection release
 
            if (entity != null) {
 
                // A Simple JSON Response Read
                InputStream instream = entity.getContent();
                String result= convertStreamToString(instream);
                Log.i("Praeda",result);
 
                // A Simple JSONObject Creation
                JSONObject json=new JSONObject(result);
                Log.i("Praeda","<jsonobject>\n"+json.toString()+"\n</jsonobject>");
 
                // A Simple JSONObject Parsing
                JSONArray nameArray=json.names();
                JSONArray valArray=json.toJSONArray(nameArray);
                for(int i=0;i<valArray.length();i++)
                {
                    Log.i("Praeda","<jsonname"+i+">\n"+nameArray.getString(i)+"\n</jsonname"+i+">\n"
                            +"<jsonvalue"+i+">\n"+valArray.getString(i)+"\n</jsonvalue"+i+">");
                }
 
                // A Simple JSONObject Value Pushing
                json.put("sample key", "sample value");
                Log.i("Praeda","<jsonobject>\n"+json.toString()+"\n</jsonobject>");
 
                // Closing the input stream will trigger connection release
                instream.close();
            }
 
 
        } catch (ClientProtocolException e) {
            // TODO Auto-generated catch block
            e.printStackTrace();
        } catch (IOException e) {
            // TODO Auto-generated catch block
            e.printStackTrace();
        } catch (JSONException e) {
            // TODO Auto-generated catch block
            e.printStackTrace();
        }
    }
 
}

출처 : http://senior.ceng.metu.edu.tr/2009/praeda/2009/01/11/a-simple-restful-client-at-android/
Posted by 1010
04.Anddoid/listView2010. 8. 16. 17:31
반응형
Posted by 1010
04.Anddoid/dialog2010. 8. 15. 02:32
반응형

Android provides a AlertDialog class that ease the building of Dialog windows throught it’s Builder inner class. However, it’s not possible to customize these AlertDialog windows. To give AlertDialog windows a custom Look and Feel, a solution is to create application specific AlertDialog and AlertDialog.Builder class.

Android default Dialog

Defining the Look And Feel

What we want is to turn the default AlertDialog Look and Feel into this custom Look and Feel :

Custom Android Dialog

The dialog will support the following features :

  1. Specify title from resource or String
  2. Specify content from resource, String or custom layout
  3. Set positive and negative buttons and associated listeners

Writing layout, style and theme

The dialog will use a custom layout to render it’s content. The layout defines the ids that will be used to access the title TextView, the dialog message or custom content and the buttons bar.

<?xml version="1.0" encoding="utf-8"?>
<LinearLayout xmlns:android="http://schemas.android.com/apk/res/android"
    android:orientation="vertical"
    android:layout_width="fill_parent"
    android:minWidth="280dip"
    android:layout_height="wrap_content">
 
    <LinearLayout 
        android:orientation="vertical"
        android:background="@drawable/header"
        android:layout_width="fill_parent"
        android:layout_height="wrap_content">
 
        <TextView
            style="@style/DialogText.Title"
            android:id="@+id/title"
            android:paddingRight="8dip"
            android:paddingLeft="8dip"
            android:background="@drawable/title"
            android:layout_width="wrap_content"
            android:layout_height="wrap_content"/>
 
    </LinearLayout>
 
    <LinearLayout 
        android:id="@+id/content"
        android:orientation="vertical"
        android:background="@drawable/center"
        android:layout_width="fill_parent"
        android:layout_height="wrap_content">
 
        <TextView
            style="@style/DialogText"
            android:id="@+id/message"
            android:padding="5dip"
            android:layout_width="fill_parent"
            android:layout_height="wrap_content"/>
 
    </LinearLayout>
 
    <LinearLayout 
        android:orientation="horizontal"
        android:background="@drawable/footer"
        android:layout_width="fill_parent"
        android:layout_height="wrap_content">
 
        <Button 
            android:id="@+id/positiveButton"
            android:layout_marginTop="3dip"
            android:layout_width="0dip"
            android:layout_weight="1"
            android:layout_height="wrap_content"
            android:singleLine="true"/>
 
        <Button 
            android:id="@+id/negativeButton"
            android:layout_marginTop="3dip"
            android:layout_width="0dip"
            android:layout_weight="1"
            android:layout_height="wrap_content"
            android:singleLine="true"/>
 
    </LinearLayout>
 
</LinearLayout>

The root LinearLayout’s width is set to fill_parent with a minimum of 280dip so that the dialog width will always be 87,5% of the screen width.

A custom Theme should be used to declare the dialog as floating and using a custom background and a custom title view :

<?xml version="1.0" encoding="utf-8"?>
<resources>
 
    <style name="Dialog" parent="android:style/Theme.Dialog">
        <item name="android:windowBackground">@null</item>
        <item name="android:windowNoTitle">true</item>
        <item name="android:windowIsFloating">true</item>
    </style>
 
</resources>

Then we need to define the appearence of our dialog title and message :

<?xml version="1.0" encoding="utf-8"?>
<resources>
 
    <style name="DialogText">
        <item name="android:textColor">#FF000000</item>
        <item name="android:textSize">12sp</item>
    </style>
 
    <style name="DialogText.Title">
        <item name="android:textSize">16sp</item>
        <item name="android:textStyle">bold</item>
    </style>
 
</resources>

Writing the Dialog and Builder class

It’s preferable for our custom Builder to have the same methods that we have in the AletDialog.Builder class.

package net.androgames.blog.sample.customdialog.dialog;
 
import net.androgames.blog.sample.customdialog.R;
import android.app.Dialog;
import android.content.Context;
import android.content.DialogInterface;
import android.view.LayoutInflater;
import android.view.View;
import android.view.ViewGroup.LayoutParams;
import android.widget.Button;
import android.widget.LinearLayout;
import android.widget.TextView;
 
/**
 * 
 * Create custom Dialog windows for your application
 * Custom dialogs rely on custom layouts wich allow you to 
 * create and use your own look & feel.
 * 
 * Under GPL v3 : http://www.gnu.org/licenses/gpl-3.0.html
 * 
 * @author antoine vianey
 *
 */
public class CustomDialog extends Dialog {
 
    public CustomDialog(Context context, int theme) {
        super(context, theme);
    }
 
    public CustomDialog(Context context) {
        super(context);
    }
 
    /**
     * Helper class for creating a custom dialog
     */
    public static class Builder {
 
        private Context context;
        private String title;
        private String message;
        private String positiveButtonText;
        private String negativeButtonText;
        private View contentView;
 
        private DialogInterface.OnClickListener 
                        positiveButtonClickListener,
                        negativeButtonClickListener;
 
        public Builder(Context context) {
            this.context = context;
        }
 
        /**
         * Set the Dialog message from String
         * @param title
         * @return
         */
        public Builder setMessage(String message) {
            this.message = message;
            return this;
        }
 
        /**
         * Set the Dialog message from resource
         * @param title
         * @return
         */
        public Builder setMessage(int message) {
            this.message = (String) context.getText(message);
            return this;
        }
 
        /**
         * Set the Dialog title from resource
         * @param title
         * @return
         */
        public Builder setTitle(int title) {
            this.title = (String) context.getText(title);
            return this;
        }
 
        /**
         * Set the Dialog title from String
         * @param title
         * @return
         */
        public Builder setTitle(String title) {
            this.title = title;
            return this;
        }
 
        /**
         * Set a custom content view for the Dialog.
         * If a message is set, the contentView is not
         * added to the Dialog...
         * @param v
         * @return
         */
        public Builder setContentView(View v) {
            this.contentView = v;
            return this;
        }
 
        /**
         * Set the positive button resource and it's listener
         * @param positiveButtonText
         * @param listener
         * @return
         */
        public Builder setPositiveButton(int positiveButtonText,
                DialogInterface.OnClickListener listener) {
            this.positiveButtonText = (String) context
                    .getText(positiveButtonText);
            this.positiveButtonClickListener = listener;
            return this;
        }
 
        /**
         * Set the positive button text and it's listener
         * @param positiveButtonText
         * @param listener
         * @return
         */
        public Builder setPositiveButton(String positiveButtonText,
                DialogInterface.OnClickListener listener) {
            this.positiveButtonText = positiveButtonText;
            this.positiveButtonClickListener = listener;
            return this;
        }
 
        /**
         * Set the negative button resource and it's listener
         * @param negativeButtonText
         * @param listener
         * @return
         */
        public Builder setNegativeButton(int negativeButtonText,
                DialogInterface.OnClickListener listener) {
            this.negativeButtonText = (String) context
                    .getText(negativeButtonText);
            this.negativeButtonClickListener = listener;
            return this;
        }
 
        /**
         * Set the negative button text and it's listener
         * @param negativeButtonText
         * @param listener
         * @return
         */
        public Builder setNegativeButton(String negativeButtonText,
                DialogInterface.OnClickListener listener) {
            this.negativeButtonText = negativeButtonText;
            this.negativeButtonClickListener = listener;
            return this;
        }
 
        /**
         * Create the custom dialog
         */
        public CustomDialog create() {
            LayoutInflater inflater = (LayoutInflater) context
                    .getSystemService(Context.LAYOUT_INFLATER_SERVICE);
            // instantiate the dialog with the custom Theme
            final CustomDialog dialog = new CustomDialog(context, 
            		R.style.Dialog);
            View layout = inflater.inflate(R.layout.dialog, null);
            dialog.addContentView(layout, new LayoutParams(
                    LayoutParams.FILL_PARENT, LayoutParams.WRAP_CONTENT));
            // set the dialog title
            ((TextView) layout.findViewById(R.id.title)).setText(title);
            // set the confirm button
            if (positiveButtonText != null) {
                ((Button) layout.findViewById(R.id.positiveButton))
                        .setText(positiveButtonText);
                if (positiveButtonClickListener != null) {
                    ((Button) layout.findViewById(R.id.positiveButton))
                            .setOnClickListener(new View.OnClickListener() {
                                public void onClick(View v) {
                                    positiveButtonClickListener.onClick(
                                    		dialog, 
                                            DialogInterface.BUTTON_POSITIVE);
                                }
                            });
                }
            } else {
                // if no confirm button just set the visibility to GONE
                layout.findViewById(R.id.positiveButton).setVisibility(
                        View.GONE);
            }
            // set the cancel button
            if (negativeButtonText != null) {
                ((Button) layout.findViewById(R.id.negativeButton))
                        .setText(negativeButtonText);
                if (negativeButtonClickListener != null) {
                    ((Button) layout.findViewById(R.id.negativeButton))
                            .setOnClickListener(new View.OnClickListener() {
                                public void onClick(View v) {
                                    positiveButtonClickListener.onClick(
                                    		dialog, 
                                            DialogInterface.BUTTON_NEGATIVE);
                                }
                            });
                }
            } else {
                // if no confirm button just set the visibility to GONE
                layout.findViewById(R.id.negativeButton).setVisibility(
                        View.GONE);
            }
            // set the content message
            if (message != null) {
                ((TextView) layout.findViewById(
                		R.id.message)).setText(message);
            } else if (contentView != null) {
                // if no message set
                // add the contentView to the dialog body
                ((LinearLayout) layout.findViewById(R.id.content))
                        .removeAllViews();
                ((LinearLayout) layout.findViewById(R.id.content))
                        .addView(contentView, 
                                new LayoutParams(
                                        LayoutParams.WRAP_CONTENT, 
                                        LayoutParams.WRAP_CONTENT));
            }
            dialog.setContentView(layout);
            return dialog;
        }
 
    }
 
}

Using the custom Builder

Using the custom Builder is just as simple as using the default AlertDialog.Builder :

/**
 * Build the desired Dialog
 * CUSTOM or DEFAULT
 */
@Override
public Dialog onCreateDialog(int dialogId) {
    Dialog dialog = null;
    switch (dialogId) {
        case CUSTOM_DIALOG :
            CustomDialog.Builder customBuilder = new
                CustomDialog.Builder(CustomDialogActivity.this);
            customBuilder.setTitle("Custom title")
                .setMessage("Custom body")
                .setNegativeButton("Cancel", 
                        new DialogInterface.OnClickListener() {
                    public void onClick(DialogInterface dialog, int which) {
                        CustomDialogActivity.this
                        .dismissDialog(CUSTOM_DIALOG);
                    }
                })
                .setPositiveButton("Confirm", 
                        new DialogInterface.OnClickListener() {
                    public void onClick(DialogInterface dialog, int which) {
                        dialog.dismiss();
                    }
                });
            dialog = customBuilder.create();
            break;
        case DEFAULT_DIALOG :
            AlertDialog.Builder alertBuilder = new
                AlertDialog.Builder(CustomDialogActivity.this);
            alertBuilder.setTitle("Default title")
                .setMessage("Default body")
                .setNegativeButton("Cancel", 
                		new DialogInterface.OnClickListener() {
                    public void onClick(DialogInterface dialog, int which) {
                        dialog.dismiss();
                    }
                })
                .setPositiveButton("Confirm", 
                		new DialogInterface.OnClickListener() {
                    public void onClick(DialogInterface dialog, int which) {
                        CustomDialogActivity.this
                        .dismissDialog(DEFAULT_DIALOG);
                    }
                });
            dialog = alertBuilder.create();
            break;
    }
    return dialog;
}

You can browse the full source code of the Eclipse project here : SampleCustomDialog

Enjoy !

Posted by 1010
04.Anddoid/listView2010. 8. 15. 01:00
반응형

Sometimes we need to maintain the selected position in a list. This example was taken from a real-world, off-road application where users interact with the application in a bumpy environment and need a fool proof way of changing the sort order of items in a list. When an item is clicked in the list and that row becomes the selected row as indicated by a different background color. The user can then change the position of the selected row using the Move Up and Move Down buttons on the screen.

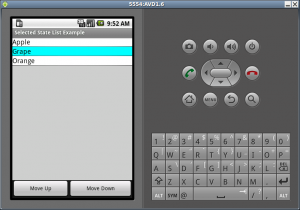
Here’s a screen-shot of this example running in the emulator.

Android Selected State List Example

Android Selected State List Example

Keeping State

Where do we keep the selected state if the view component doesn’t support this? I considered extending data objects to maintain selected state but that would only pollute data objects with view-only state information. Another thought was to extend List and keep the state there. But that would mean shoehorning view-only state info into already stable and settled Lists used throughout the application. In the end, it was decided that a custom ArrayAdapter, SelectedAdapter, was the best place to keep this state. We only care about the selected state during the lifespan of the ListView, no reason to lug around extra baggage. This turned out to be a very simple solution.

The Activity class for this example loads the view and has event handlers for list item selection and the Move Up and Move Down buttons.

package com.bestsiteinthemultiverse.selected;

import java.util.ArrayList;
import android.app.Activity;
import android.os.Bundle;
import android.view.View;
import android.widget.AdapterView;
import android.widget.Button;
import android.widget.ListView;
import android.widget.AdapterView.OnItemClickListener;

public class SelectedActivity extends Activity {

	private SelectedAdapter selectedAdapter;
	private ArrayList list;

	@Override
	protected void onCreate(Bundle savedInstanceState) {
		super.onCreate(savedInstanceState);
		setContentView(R.layout.selected_example);

		// populate the model - a simple a list
		list = new ArrayList();
		list.add("Apple");
		list.add("Orange");
		list.add("Grape");

		// create our SelectedAdapter
		selectedAdapter = new SelectedAdapter(this,0,list);
		selectedAdapter.setNotifyOnChange(true);

        ListView listview = (ListView) findViewById(R.id.listExample);
        listview.setAdapter(selectedAdapter);

        listview.setOnItemClickListener(new OnItemClickListener() {
			@Override
			public void onItemClick(AdapterView arg0, View view,
                                           int position, long id) {
				// user clicked a list item, make it "selected"
				selectedAdapter.setSelectedPosition(position);
			}
        });

        // move up event handler
        Button btnMoveUp = (Button) findViewById(R.id.btnMoveUp);
        btnMoveUp.setOnClickListener(new View.OnClickListener() {
           public void onClick(View arg0) {
        	   moveUp();
           }
        });

        // move down event handler
        Button btnMoveDown = (Button) findViewById(R.id.btnMoveDown);
        btnMoveDown.setOnClickListener(new View.OnClickListener() {
           public void onClick(View arg0) {
        	   moveDown();
           }
        });
	}

	// Move selected item "up" in the ViewList.
	private void moveUp(){
    	int selectedPos = selectedAdapter.getSelectedPosition();
    	if (selectedPos > 0 ){
    		String str = list.remove(selectedPos);
    		list.add(selectedPos-1, str);
    		// set selected position in the adapter
    		selectedAdapter.setSelectedPosition(selectedPos-1);
    	}
	}

	// Move selected item "down" in the ViewList.
	private void moveDown(){
    	int selectedPos = selectedAdapter.getSelectedPosition();
    	if (selectedPos < list.size()-1 ){
    		String str = list.remove(selectedPos);
    		list.add(selectedPos+1, str);
    		// set selected position in the adapter
    		selectedAdapter.setSelectedPosition(selectedPos+1);
    	}
	}

}

The SelectedAdapter class used in this example does three things: it extends ArrayAdapter, maintains the selected state and loads a custom row view. If that row is the selected row, a background color is applied to indicate the selected state. If you need to use something other than .toString() to describe your objects, call your method in the overridden getView(). Another thing to notice is the reference for convertView is reused from call-to-call. This saves the expense of inflating the layout every time getView() is called.

package com.bestsiteinthemultiverse.selected;

	import java.util.List;
	import android.content.Context;
	import android.graphics.Color;
	import android.view.LayoutInflater;
	import android.view.View;
	import android.view.ViewGroup;
	import android.widget.ArrayAdapter;
	import android.widget.TextView;

	public class SelectedAdapter extends ArrayAdapter{

		// used to keep selected position in ListView
		private int selectedPos = -1;	// init value for not-selected

		public SelectedAdapter(Context context, int textViewResourceId,
                           List objects) {
			super(context, textViewResourceId, objects);
		}

		public void setSelectedPosition(int pos){
			selectedPos = pos;
			// inform the view of this change
			notifyDataSetChanged();
		}

		public int getSelectedPosition(){
			return selectedPos;
		}

		@Override
		public View getView(int position, View convertView, ViewGroup parent) {
		    View v = convertView;

		    // only inflate the view if it's null
		    if (v == null) {
		        LayoutInflater vi
                            = (LayoutInflater)this.getContext().getSystemService(Context.LAYOUT_INFLATER_SERVICE);
		        v = vi.inflate(R.layout.selected_row, null);
		    }

		    // get text view
	        TextView label = (TextView)v.findViewById(R.id.txtExample);

	        // change the row color based on selected state
	        if(selectedPos == position){
	        	label.setBackgroundColor(Color.CYAN);
	        }else{
	        	label.setBackgroundColor(Color.WHITE);
	        }

	        label.setText(this.getItem(position).toString());
	        /*
	        // to use something other than .toString()
	        MyClass myobj = (MyClass)this.getItem(position);
	        label.setText(myobj.myReturnsString());
	        */
	        return(v);
		}
	}

The layout xml used for the row view.


    <?xml version="1.0" encoding="utf-8"?> <TextView android:id="@+id/txtExample" xmlns:android="http://schemas.android.com/apk/res/android" android:layout_width="fill_parent" android:layout_height="wrap_content" android:textSize="18sp" android:textColor="#000000" android:background="#FF0000" />
Posted by 1010
04.Anddoid/listView2010. 8. 15. 01:00
반응형

Android Series: Custom ListView items and adapters

Posted by admin | Posted in Mobile Development | Posted on 20-05-2009

84

This is a short tutorial on how to populate your android list view, with data downloaded from the internet or other sources, using ArrayAdapter. ListView items view is declared in a separate XML file and displayed using custom adapter class.
First things first, so go ahead and create a new project using Eclipse equipped with ADT plugin.
The project described below assumes you have a list of objects created, this can be either downloaded from the internet as XML and parsed to create ArrayList of your custom objects or anything you imagine. I will not go into details on this tutorial how to create such an ArrayList but your imagination is the limit. Parsing XML downloaded from the net will be covered in the next tutorial coming up soon.


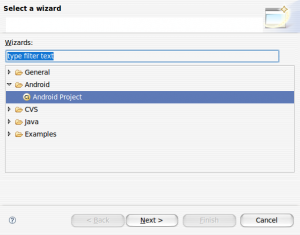
Click File -> New -> Project and select the ‘Android Project’ wizard:

android11

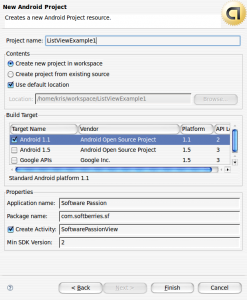
Click next and fill out the next screen with the following values:

android21

Once you have filled out all the necessary data you can click finish.
Your new project has just been created. Now lets modify it a bit to display our custom made list.
Open up SoftwarePassionView.java in the eclipse editor and change the class file to the following:

1. Define necessary member variables we will use later in our class

private ProgressDialog m_ProgressDialog = null;
    private ArrayList<Order> m_orders = null;
    private OrderAdapter m_adapter;
    private Runnable viewOrders;

m_ProgressDialog is a small pop up displaying information that your data is being downloaded or retrieved other way.
m_orders is an ArrayList which will hold our data downloaded from the internet or acquired other way
m_adapter is our custom class extending ArrayAdapter
viewOrders is a runnable for downloading data from the internet in a separate thread

To import whatever you can at this point click Ctrl+Shit+O, some classes like Order or OrderAdapter are not created yet but don’t worry we will come to that point soon.
Another important note at this point is that your SoftwarePassoinView should extend ListActivity instead of simple Activity.
Your class should look more or less something like this now:

package com.softberries.lve;

import java.util.ArrayList;
import android.app.ListActivity;
import android.app.ProgressDialog;
import android.os.Bundle;

public class SoftwarePassionView extends ListActivity{
   
    private ProgressDialog m_ProgressDialog = null;
    private ArrayList<Order> m_orders = null;
    private OrderAdapter m_adapter;
    private Runnable viewOrders;
   
    /** Called when the activity is first created. */
    @Override
    public void onCreate(Bundle savedInstanceState) {
        super.onCreate(savedInstanceState);
        setContentView(R.layout.main);
    }
}

Now lets create our simple Order class holding single order.
Right click on the project and and select ‘New’ -> ‘Class’, name it order and open it up in the editor.
The source code for our orders looks like this:

package com.softberries.lve;

public class Order {
   
    private String orderName;
    private String orderStatus;
   
    public String getOrderName() {
        return orderName;
    }
    public void setOrderName(String orderName) {
        this.orderName = orderName;
    }
    public String getOrderStatus() {
        return orderStatus;
    }
    public void setOrderStatus(String orderStatus) {
        this.orderStatus = orderStatus;
    }
}

The Order class is very simple and contains only 2 strings with getters and setter generated for them
Now lets change our main.xml file to hold our custom list items:

<?xml version="1.0" encoding="utf-8"?>
<LinearLayout xmlns:android="http://schemas.android.com/apk/res/android"
   android:orientation="vertical"
   android:layout_width="fill_parent"
   android:layout_height="fill_parent"
   >
<ListView
    android:id="@+id/android:list"
    android:layout_width="fill_parent"
    android:layout_height="fill_parent"
    />
<TextView
    android:id="@+id/android:empty"
    android:layout_width="fill_parent"
    android:layout_height="fill_parent"
    android:text="@string/main_no_items"/>
</LinearLayout>

This layout will display our list items if any and if the list is empty it will display ‘No orders to display’ string defined in string.xml resource file.

<?xml version="1.0" encoding="utf-8"?>
<resources>
    <string name="hello">Hello World, SoftwarePassionView!</string>
    <string name="app_name">Software Passion</string>
    <string name="main_no_items">No orders to display</string>
</resources>


Our list item (single row on the list) have a custom layout as well, defined in row.xml file:

<?xml version="1.0" encoding="utf-8"?>
<LinearLayout xmlns:android="http://schemas.android.com/apk/res/android"
    android:layout_width="fill_parent"
    android:layout_height="?android:attr/listPreferredItemHeight"
    android:padding="6dip">
    <ImageView
        android:id="@+id/icon"
        android:layout_width="wrap_content"
        android:layout_height="fill_parent"
        android:layout_marginRight="6dip"
        android:src="@drawable/icon" />
    <LinearLayout
        android:orientation="vertical"
        android:layout_width="0dip"
        android:layout_weight="1"
        android:layout_height="fill_parent">
        <TextView
            android:id="@+id/toptext"
            android:layout_width="fill_parent"
            android:layout_height="0dip"
            android:layout_weight="1"
            android:gravity="center_vertical"
        />
        <TextView
            android:layout_width="fill_parent"
            android:layout_height="0dip"
            android:layout_weight="1"
            android:id="@+id/bottomtext"
            android:singleLine="true"
            android:ellipsize="marquee"
        />
    </LinearLayout>
</LinearLayout>

Single row example has been borrowed from the romain Guy website here

Ok, so we have all our layouts defined in the res folder under layout. Now its time to go back to our code and create our custom OrderAdapter class which will manage our list of orders:

private class OrderAdapter extends ArrayAdapter<Order> {

        private ArrayList<Order> items;

        public OrderAdapter(Context context, int textViewResourceId, ArrayList<Order> items) {
                super(context, textViewResourceId, items);
                this.items = items;
        }

        @Override
        public View getView(int position, View convertView, ViewGroup parent) {
                View v = convertView;
                if (v == null) {
                    LayoutInflater vi = (LayoutInflater)getSystemService(Context.LAYOUT_INFLATER_SERVICE);
                    v = vi.inflate(R.layout.row, null);
                }
                Order o = items.get(position);
                if (o != null) {
                        TextView tt = (TextView) v.findViewById(R.id.toptext);
                        TextView bt = (TextView) v.findViewById(R.id.bottomtext);
                        if (tt != null) {
                              tt.setText("Name: "+o.getOrderName());                            }
                        if(bt != null){
                              bt.setText("Status: "+ o.getOrderStatus());
                        }
                }
                return v;
        }
}

This is a private class and should be added to our SoftwarePassionView. This is extended ListAdapter which inside overriden getView method returns our row with assigned string values to the textfields defined in row.xml.

A huge part of our application is already done. Now we have to add some modifications to the onCreate method to initialize everything properly and add a method retrieving our orders from somewhere, lets start with the latter:

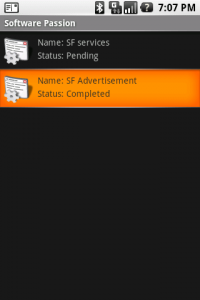
private void getOrders(){
          try{
              m_orders = new ArrayList<Order>();
              Order o1 = new Order();
              o1.setOrderName("SF services");
              o1.setOrderStatus("Pending");
              Order o2 = new Order();
              o2.setOrderName("SF Advertisement");
              o2.setOrderStatus("Completed");
              m_orders.add(o1);
              m_orders.add(o2);
                 Thread.sleep(2000);
              Log.i("ARRAY", ""+ m_orders.size());
            } catch (Exception e) {
              Log.e("BACKGROUND_PROC", e.getMessage());
            }
            runOnUiThread(returnRes);
        }


Instead of creating our simple orders in the method above you could of course download them from somewhere and assign the result to the m_orders array list. The method runOnUIThread is a utility method for running tasks back on the main UI thread after the job is done on the separate thread created for long running tasks. We will call our getOrders method from a separate thread.

The returnRes runnable adds newly retrieved Order object to our custom Adapter and notifies it of the data change:

private Runnable returnRes = new Runnable() {

            @Override
            public void run() {
                if(m_orders != null && m_orders.size() > 0){
                    m_adapter.notifyDataSetChanged();
                    for(int i=0;i<m_orders.size();i++)
                    m_adapter.add(m_orders.get(i));
                }
                m_ProgressDialog.dismiss();
                m_adapter.notifyDataSetChanged();
            }
          };

Now lets move to our overriden onCreate method. We will initialize here all the member variables as well as start a new thread retrieving our orders:

@Override
    public void onCreate(Bundle savedInstanceState) {
        super.onCreate(savedInstanceState);
        setContentView(R.layout.main);
        m_orders = new ArrayList<Order>();
        this.m_adapter = new OrderAdapter(this, R.layout.row, m_orders);
                setListAdapter(this.m_adapter);
       
        viewOrders = new Runnable(){
            @Override
            public void run() {
                getOrders();
            }
        };
    Thread thread =  new Thread(null, viewOrders, "MagentoBackground");
        thread.start();
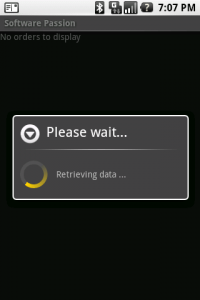
        m_ProgressDialog = ProgressDialog.show(SoftwarePassionView.this,    
              "Please wait...", "Retrieving data ...", true);
    }

After initialization, we start new thread using the viewOrders runnable and show the progress dialog which we close once the orders are retrieved.
Now you should be able to run your application. After the application starts it spawns new thread and displays the loader:

screen_load screen1

And thats it. You can add an Item Click Listener to your list to start new activities etc.
Full source code for the SoftwarePassionView below:

package com.softberries.lve;

import java.util.ArrayList;
import android.app.ListActivity;
import android.app.ProgressDialog;
import android.content.Context;
import android.os.Bundle;
import android.util.Log;
import android.view.LayoutInflater;
import android.view.View;
import android.view.ViewGroup;
import android.widget.ArrayAdapter;
import android.widget.TextView;

public class SoftwarePassionView extends ListActivity{
   
    private ProgressDialog m_ProgressDialog = null;
    private ArrayList<Order> m_orders = null;
    private OrderAdapter m_adapter;
    private Runnable viewOrders;
   
    @Override
    public void onCreate(Bundle savedInstanceState) {
        super.onCreate(savedInstanceState);
        setContentView(R.layout.main);
        m_orders = new ArrayList<Order>();
        this.m_adapter = new OrderAdapter(this, R.layout.row, m_orders);
        setListAdapter(this.m_adapter);
       
        viewOrders = new Runnable(){
            @Override
            public void run() {
                getOrders();
            }
        };
        Thread thread =  new Thread(null, viewOrders, "MagentoBackground");
        thread.start();
        m_ProgressDialog = ProgressDialog.show(SoftwarePassionView.this,    
              "Please wait...", "Retrieving data ...", true);
    }
    private Runnable returnRes = new Runnable() {

        @Override
        public void run() {
            if(m_orders != null && m_orders.size() > 0){
                m_adapter.notifyDataSetChanged();
                for(int i=0;i<m_orders.size();i++)
                m_adapter.add(m_orders.get(i));
            }
            m_ProgressDialog.dismiss();
            m_adapter.notifyDataSetChanged();
        }
    };
    private void getOrders(){
          try{
              m_orders = new ArrayList<Order>();
              Order o1 = new Order();
              o1.setOrderName("SF services");
              o1.setOrderStatus("Pending");
              Order o2 = new Order();
              o2.setOrderName("SF Advertisement");
              o2.setOrderStatus("Completed");
              m_orders.add(o1);
              m_orders.add(o2);
              Thread.sleep(5000);
              Log.i("ARRAY", ""+ m_orders.size());
            } catch (Exception e) {
              Log.e("BACKGROUND_PROC", e.getMessage());
            }
            runOnUiThread(returnRes);
        }
    private class OrderAdapter extends ArrayAdapter<Order> {

        private ArrayList<Order> items;

        public OrderAdapter(Context context, int textViewResourceId, ArrayList<Order> items) {
                super(context, textViewResourceId, items);
                this.items = items;
        }
        @Override
        public View getView(int position, View convertView, ViewGroup parent) {
                View v = convertView;
                if (v == null) {
                    LayoutInflater vi = (LayoutInflater)getSystemService(Context.LAYOUT_INFLATER_SERVICE);
                    v = vi.inflate(R.layout.row, null);
                }
                Order o = items.get(position);
                if (o != null) {
                        TextView tt = (TextView) v.findViewById(R.id.toptext);
                        TextView bt = (TextView) v.findViewById(R.id.bottomtext);
                        if (tt != null) {
                              tt.setText("Name: "+o.getOrderName());                            }
                        if(bt != null){
                              bt.setText("Status: "+ o.getOrderStatus());
                        }
                }
                return v;
        }
}
}


Enjoy!

Posted by 1010
04.Anddoid2010. 8. 12. 17:51
반응형


강좌 작성환경
SDK Version : Android SDK 1.5, release 2
ADT Version : 0.9.1

추후 SDK업데이트로 인해 글의 내용과 실제 내용간 차이가 있을 수 있습니다.

이번 강좌에서는 리스트뷰에 사용자가 원하는 레이아웃대로 항목을 표시하도록 만들어보겠습니다.

지난 강좌 (2009/06/04 - [안드로이드 이야기/안드로이드 입문] - #11. List 집중공략! - (1) 기본 다지기) 에서 설명했듯이, ListView는 ListView 하나로 이루어지는 것이 아니라 리스트뷰에 표시할 항목을 담고 있는 리스트 객체, 리스트 객체의 데이터를 리스트뷰에서 표시할 수 있게 해주는 어댑터, 최종적으로 화면에 리스트를 표시해 주는 리스트뷰(ListView)로 구성됩니다.

이 세 구성요소 중 가장 중요한 역할을 하는 것은 단연 어댑터(Adapter)라고 할 수 있습니다.
어댑터는 리스트 객체를 리스트뷰에서 표시해주는 기능, 즉 리스트 객체의 내용과 리스트 항목의 레이아웃을 연결시켜주는 역할을 합니다. 따라서, 어댑터가 없다면 일단 리스트 객체의 데이터를 리스트뷰에 표시하는 것은 불가능합니다.

그럼, 지난 강좌에서 썼던 ArrayAdapter를 한번 살펴볼까요?

1.ArrayAdapter<String> aa = new ArrayAdapter<String>(this,
2.                android.R.layout.simple_list_item_1, list);


ArrayAdapter의 생성자에서 두번째 인자, android.R.layout.simple_list_item_1은 리스트에서 각 항목을 표시할 레이아웃을 뜻합니다. 이 레이아웃은 리스트 한 줄에 한 줄의 텍스트만이 표시되도록 되어있죠.

하지만, 리스트에 표시할 항목이 하나가 아닌 여러 가지가 있는 경우가 있습니다. 당장 연락처 어플리케이션이나 설정 어플리케이션을 봐도 리스트 항목 하나에 텍스트 하나만 표시되지는 않죠. 그래소, 이번 강좌에서는 리스트 항목 하나에 두 줄의 텍스트, 그리고 하나는 큰 텍스트, 하나는 작은 텍스트로 표시되도록 만들어 볼 것입니다.

이렇게, 리스트에 사용자가 원하는 레이아웃을 표시하기 위해서는 사용자 정의 어댑터를 만들어야 합니다. ArrayAdapter는 한 줄에 하나의 텍스트만을 표시하도록 코딩되어있으므로, 우리는 이와는 달리 두 줄로, 텍스트 두 개가 표시되게끔 어댑터를 만들어야겠지요?


이번 강좌에서는 위 스크린샷처럼 두 개의 텍스트를 표시하고, 위에는 이름, 아래는 전화번호를 표시하는 어댑터를 만들어보도록 하겠습니다.

이를 구현하기 위해 이름과 전화번호 데이터를 각각 String 형식으로 저장하고 있는 Person 클래스를 만들었으며, 이 객체의 저장은 ArrayList를 이용하였습니다. 새로 만들 어댑터의 이름은 PersonAdapter로 지정하였습니다.

일단, 전체 소스 코드와 레이아웃을 살펴보도록 하겠습니다.

[소스코드 : ListExample.java]

01.package com.androidhuman.ListExample;
02.  
03.import java.util.ArrayList;
04.import android.app.ListActivity;
05.import android.content.Context;
06.import android.os.Bundle;
07.import android.view.LayoutInflater;
08.import android.view.View;
09.import android.view.ViewGroup;
10.import android.widget.ArrayAdapter;
11.import android.widget.TextView;
12.  
13.public class ListExample extends ListActivity{ // ListActivity를 상속받습니다.
14.         
15.          
16.    @Override
17.    public void onCreate(Bundle savedInstanceState) {
18.        super.onCreate(savedInstanceState);
19.        setContentView(R.layout.main);
20.        ArrayList<Person> m_orders = new ArrayList<Person>();
21.          
22.        Person p1 = new Person("안드로이드", "011-123-4567"); // 리스트에 추가할 객체입니다.
23.        Person p2 = new Person("구글", "02-123-4567"); // 리스트에 추가할 객체입니다.
24.          
25.        m_orders.add(p1); // 리스트에 객체를 추가합니다.
26.        m_orders.add(p2); // 리스트에 객체를 추가합니다.
27.          
28.        PersonAdapter m_adapter = new PersonAdapter(this, R.layout.row, m_orders); // 어댑터를 생성합니다.
29.        setListAdapter(m_adapter); // 
30.                  
31.    }
32.      
33.    private class PersonAdapter extends ArrayAdapter<Person> {
34.  
35.        private ArrayList<Person> items;
36.  
37.        public PersonAdapter(Context context, int textViewResourceId, ArrayList<Person> items) {
38.                super(context, textViewResourceId, items);
39.                this.items = items;
40.        }
41.        @Override
42.        public View getView(int position, View convertView, ViewGroup parent) {
43.                View v = convertView;
44.                if (v == null) {
45.                    LayoutInflater vi = (LayoutInflater)getSystemService(Context.LAYOUT_INFLATER_SERVICE);
46.                    v = vi.inflate(R.layout.row, null);
47.                }
48.                Person p = items.get(position);
49.                if (p != null) {
50.                        TextView tt = (TextView) v.findViewById(R.id.toptext);
51.                        TextView bt = (TextView) v.findViewById(R.id.bottomtext);
52.                        if (tt != null){
53.                            tt.setText(p.getName());                            
54.                        }
55.                        if(bt != null){
56.                                bt.setText("전화번호: "+ p.getNumber());
57.                        }
58.                }
59.                return v;
60.        }
61.}
62.    class Person {
63.          
64.        private String Name;
65.        private String Number;
66.          
67.        public Person(String _Name, String _Number){
68.            this.Name = _Name;
69.            this.Number = _Number;
70.        }
71.          
72.        public String getName() {
73.            return Name;
74.        }
75.  
76.        public String getNumber() {
77.            return Number;
78.        }
79.  
80.    }
81.}

[ 레이아웃 : main.xml / 액티비티의 레이아웃 ]

01.<?xml version="1.0" encoding="utf-8"?>
02.<LinearLayout xmlns:android="http://schemas.android.com/apk/res/android"
03.   android:orientation="vertical"
04.   android:layout_width="fill_parent"
05.   android:layout_height="fill_parent"
06.   >
07.<ListView
08.    android:id="@+id/android:list"
09.    android:layout_width="fill_parent"
10.    android:layout_height="fill_parent"
11.    />
12.<TextView
13.    android:id="@+id/android:empty"
14.    android:layout_width="fill_parent"
15.    android:layout_height="fill_parent"
16.    android:text="tets"/>
17.</LinearLayout>


[레이아웃 : row.xml / 리스트 항목의 레이아웃 ]

01.<?xml version="1.0" encoding="utf-8"?>
02.<LinearLayout xmlns:android="http://schemas.android.com/apk/res/android"
03.    android:layout_width="fill_parent"
04.    android:layout_height="wrap_content"
05.    android:padding="6dip" android:orientation="vertical">
06.        <TextView
07.            android:id="@+id/toptext"
08.            android:layout_width="fill_parent"
09.            android:gravity="center_vertical"
10.        android:layout_height="wrap_content" android:textSize="20px"/>
11.        <TextView
12.            android:layout_width="fill_parent"
13.            android:id="@+id/bottomtext"
14.            android:singleLine="true"
15.            android:ellipsize="marquee"
16.        android:layout_height="wrap_content"/>
17.      
18.</LinearLayout>


우선, 이름과 전화번호 데이터를 저장할 수 있는 객체인 Person 클래스부터 살펴보겠습니다. 아주 간단~한 구조로 이루어져 있습니다.


01.class Person {
02.      
03.    private String Name;
04.    private String Number;
05.      
06.    public Person(String _Name, String _Number){
07.        this.Name = _Name;
08.        this.Number = _Number;
09.    }
10.      
11.    public String getName() {
12.        return Name;
13.    }
14.    public String getNumber() {
15.        return Number;
16.    }
17.}

Person 클래스 내에는 각각 이름(Name)과 전화번호(Number)를 저장하는 String형 변수가 2개 있고, 생성자를 통해 각각의 값을 초기화시키며 getName()메소드와 getNumber()를 통해 각각의 데이터를 반환하는 구조입니다.

그럼, 이번 강좌의 핵심인 어댑터, PersonAdapter를 보도록 하겠습니다.

01.private class PersonAdapter extends ArrayAdapter<Person> {
02.  
03.        private ArrayList<Person> items;
04.  
05.        public PersonAdapter(Context context, int textViewResourceId, ArrayList<Person> items) {
06.                super(context, textViewResourceId, items);
07.                this.items = items;
08.        }
09.        @Override
10.        public View getView(int position, View convertView, ViewGroup parent) {
11.                View v = convertView;
12.                if (v == null) {
13.                    LayoutInflater vi = (LayoutInflater)getSystemService(Context.LAYOUT_INFLATER_SERVICE);
14.                    v = vi.inflate(R.layout.row, null);
15.                }
16.                Person p = items.get(position);
17.                if (p != null) {
18.                        TextView tt = (TextView) v.findViewById(R.id.toptext);
19.                        TextView bt = (TextView) v.findViewById(R.id.bottomtext);
20.                        if (tt != null){
21.                            tt.setText(p.getName());                            
22.                        }
23.                        if(bt != null){
24.                                bt.setText("전화번호: "+ p.getNumber());
25.                        }
26.                }
27.                return v;
28.        }
29.}


PersonAdapter 클래스는 ArrayAdapter 클래스를 상속하여, ArrayList의 데이터를 받아와 이를 ListView에 표시되게 해 줍니다. ArrayAdapter 클래스가 하나의 TextView만을 제공했던 것과 달리, PersonAdapter는 우리가 이 강좌에서 사용하는 Person 객체에 맞게끔 구현되어 있습니다.

그럼, PersonAdapter의 코드를 차근차근 보도록 하죠.
1.private class PersonAdapter extends ArrayAdapter<Person> {
2.    private ArrayList<Person> items;
3.    public PersonAdapter(Context context, int textViewResourceId, ArrayList<Person> items) {
4.            super(context, textViewResourceId, items);
5.            this.items = items;
6.    }

일단, PersonAdapter 클래스 내부에 우리가 리스트에 표시할 항목을 저장할 리스트객체 (ArrayList items)가 보이네요. 이는 PersonAdapter 생성자를 통해 넘어온 리스트객체의 데이터를 저장하는 역할을 합니다. 생성자 내부에서는 생성자의 인자로 넘어온 리스트 객체(ArrayList items)를 PersonAdapter 내부의 리스트 객체 (this.items)로 연결시켜주는 모습을 확인할 수 있습니다.

01.@Override
02.        public View getView(int position, View convertView, ViewGroup parent) {
03.                View v = convertView;
04.                if (v == null) {
05.                    LayoutInflater vi = (LayoutInflater)getSystemService(Context.LAYOUT_INFLATER_SERVICE);
06.                    v = vi.inflate(R.layout.row, null);
07.                }
08.                Person p = items.get(position);
09.                if (p != null) {
10.                        TextView tt = (TextView) v.findViewById(R.id.toptext);
11.                        TextView bt = (TextView) v.findViewById(R.id.bottomtext);
12.                        if (tt != null){
13.                            tt.setText(p.getName());                            
14.                        }
15.                        if(bt != null){
16.                                bt.setText("전화번호: "+ p.getNumber());
17.                        }
18.                }
19.                return v;


getView()메소드는 PersonAdapter 클래스의 핵심이라 할 수 있습니다. 우리가 원하는 기능 (리스트 항목에 두 줄의 텍스트가 표시되도록..) 을 이곳에서 구현하고 있거든요. 우선, getView()메소드의 API부터 보도록 하죠,


public abstract View getView (int position, View convertView, ViewGroup parent)
Get a View that displays the data at the specified position in the data set. You can either create a View manually or inflate it from an XML layout file. When the View is inflated, the parent View (GridView, ListView...) will apply default layout parameters unless you use inflate(int, android.view.ViewGroup, boolean) to specify a root view and to prevent attachment to the root.

Parameters
position
  The position of the item within the adapter's data set of the item whose view we want.
convertView  The old view to reuse, if possible.
Note: You should check that this view is non-null and of an appropriate type before using. If it is not possible to convert this view to display the correct data, this method can create a new view.
parent  The parent that this view will eventually be attached to

Returns
A View corresponding to the data at the specified position.


getView()메소드는 리스트 전체의 레이아웃을 책임지는(?) 것이 아니라, 리스트 각 항목에 대한 레이아웃만을 책임집니다. API에서도 position; 리스트 항목의 인덱스를 받아 그에 해당하는 레이아웃을 출력해주는 것을 볼 수 있습니다.


그럼, 각 항목에 대한 레이아웃은 어떻게 지정해줄까요?
아래의 코드에서 확인해보죠.

1.View v = convertView;
2.                if (v == null) {
3.                    LayoutInflater vi = (LayoutInflater)getSystemService(Context.LAYOUT_INFLATER_SERVICE);
4.                    v = vi.inflate(R.layout.row, null);
5.                }


화면의 구성 단위인 View에 우리가 원하는 레이아웃을 적용시켜주기 위해 LayoutInflater를 사용하였습니다. LayoutInflater에 시스템 서비스를 받아온 후, inflate()메소드를 통해 레이아웃을 적용시켜주면 됩니다. inflate()메소드에 대한 API는 여기를 참조하세요.

01.Person p = items.get(position);
02.                if (p != null) {
03.                        TextView tt = (TextView) v.findViewById(R.id.toptext);
04.                        TextView bt = (TextView) v.findViewById(R.id.bottomtext);
05.                        if (tt != null){
06.                            tt.setText(p.getName());                            
07.                        }
08.                        if(bt != null){
09.                                bt.setText("전화번호: "+ p.getNumber());
10.                        }
11.                }
12.                return v;

이 부분부터는 실질적으로 Person 객체 내의 데이터를 화면에 표시해주는 역할을 해주고 있습니다.
아까 Person객체를 저장하고 있는 ArrayList를 PersonAdapter 내의 리스트에 저장했는데, 이 List로부터 리스트의 해당 인덱스의 데이터를 받아오게 됩니다. 그리고, 이 데이터가 null(데이터 없음) 이 아니라면, 우리가 지금까지 해왔던 방법과 똑같이 findViewById()메소드를 통해 레이아웃 객체를 참조하여 데이터를 화면에 표시해주게 됩니다.
데이터와 레이아웃을 연결해주는 작업이 끝나면, 최종적으로 작업이 완료된 View를 반환하여 화면에 표시하도록 합니다.


휴...
지금까지 그 어떤 강좌보다도 공부할 때에도 애를 많이 먹었고, 강좌 쓰는 시간도 많이 걸렸네요.
하지만, 그만큼 더 이것저것 많이 알게 된 계기가 되지 않않나 싶습니다 ^^;;

위의 방법을 사용해서 리스트에 이미지가 나오게도 할 수 있으니, 응용해서 한번 연습해보세요~ ㅎㅎ
다음 강좌는 일단 데이터베이스(SQLite)를 다루는 것을 목표로.... 서서히 공부해야나가야겠습니다 :)

p.s 강좌 소스 코드 첨부합니다.
Posted by 1010
04.Anddoid2010. 8. 4. 17:17
반응형


모토로라 개발툴 다운받기

주요 기능

Version 1.1

Complete Development Package

통합 개발 패키지:
한 번의 인스톨로 이클립스 3.5와 안드로이드 개발 툴(ADT)이 통합된 개발 환경을 설치할 수 있으며 최신 안드로이드 SDK의 자동 다운로드와 설정을 할 수 있다.


Code Snippets
예제 코드: 제공되는 템플릿을 통해서 안정적이고 더 나은 성능의 어플리케이션을 작성할 수 있도록 자주 사용되는 코드를 제공한다.


Application Creation Wizards
어플 리케이션 생성 위자드: 기본 안드로이드 클래스를 쉽게 생성할 수 있다. 예를 들어, 브로드캐스트 리시버, 콘텐트 프로바이더, 서비스, 액티비티


Database Management
데이 터베이스 관리: 핸드셋과 에뮬레이트에서 SQLite 데이터베이스를 볼 수 있는 뷰와 에디트 기능 제공


Localization Files Editor
로컬라이제이션 파일 에디터:
지역화된 파일들을 쉽게 생성하고 관리할 수 있는 기능 제공


Handset Emulators
핸드 셋 에뮬레이터: IDE와 타겟 변경 없이 MOTODEV 스튜디오에서 통합된 안드로이드 에뮬레이터 상의 테스트 지원. 향후에는 모토로라만의 핸드셋 에뮬레이터 사용 가능


Virtual Developer Lab
가상 개발자 랩: 원격으로 호스팅된 핸드셋에서 어플리케이션 실행


Deploy Packages

디플로이 패키지:
어플리케이션을 타겟 핸드셋이나 에뮬레이터로 로딩 지원(불편한 커맨드 라인이 아닌 쉬운 인터페이스 제공)


Application Signing
어플 리케이션 인증: 어플리케이션 인증 기능 제공


Marketing Integration
마켓 통합: MOTODEV 스튜디오 내에서 안드로이드 어플리케이션 마켓 접속 가능


Target Motorola Handsets
타겟 모토로라 핸드셋: 모토로라 안드로이드 핸드셋에 연결된 상태에서 어플리케이션 디버그 및 실행 지원


Context-Sensitive Help and Integrated Documentation
컨텍 스트 중심의 도움말 및 통합된 문서: 유저 가이드 및 트러블슈팅 팁들 참고 가능

Posted by 1010
04.Anddoid2010. 8. 4. 14:13
반응형
개발 Q&A에서 가끔 보던 질문이고 저 또한 질문 했던 내용 입니다.

이미지 버튼을 사용시 버튼을 클릭했을때와 땟을때의 처리를 해결 못해서 기본 안드로이드 버튼만
사용중이었습니다.

해결을 하려고 setBackgroundResource도 생각했었습니다만...

setBackgroundResource를 사용했을경우에는 버튼을 클릭했을경우엔 이미지가 바뀌지만
땟을경우에 그이미지가 그대로 남아있어서 스레드를 돌릴까도 생각도 했었는데요...

몇주전까지만해도 구글링을 해서도 찾지 못했던 내용 이었는데 오늘 그 해답을 찾았습니다 ㅠ.ㅠ

다른 api내용 찾다가 우연히 발견하게 되었습니다.

res/layout/main.xml
<?xml version="1.0" encoding="utf-8"?>
<LinearLayout android:gravity="center" xmlns:android="http://schemas.android.com/apk/res/android"
    android:orientation="vertical" android:layout_width="fill_parent"
    android:layout_height="fill_parent">
    <TextView android:layout_width="wrap_content"
        android:layout_height="wrap_content" android:text="@string/hello" />

    <ImageButton android:id="@+id/imgBtn"
    android:background="@+drawable/playbutton_click"
        android:layout_width="wrap_content"
        android:layout_height="wrap_content">
    </ImageButton>
</LinearLayout>


res/drawable/playbutton_click.xml
<?xml version="1.0" encoding="utf-8"?>
<selector xmlns:android="http://schemas.android.com/apk/res/android">
    <item android:state_focused="false" android:state_pressed="true"
        android:drawable="@drawable/btn1" />
    <item android:drawable="@drawable/btn" />
</selector>

drawable의폴더에는
버튼이 눌러졌을때의이미지와 버튼을 땟을때의 이미지파일이 존재하여야 합니다.


이렇게 간단하게 해결될 문제였답니다 ㅠ.ㅠ

많이 허접한 내용이지만 아직도 해결 못하신분들을위해 적어 봤습니다.
Posted by 1010
04.Anddoid2010. 7. 30. 15:33
반응형
  1. 이하는 물리설계 전 업무분석 및 현업화의 회의를 통해 도출해야 하는 내용들이다.
  2. 경고

    1. 어플리케이션을 반드시 고려해서 설계를 진행해야 한다.

      1. PK는 단순히 DB상에서의 의미만이 아니다. 어플리케이션의 Map이나 List의 index 및 복합키 객체를 고려해야 한다.
      2. DB컬럼터입, 관계정의, 정규화 등은 모두 Class 기준으로 생성하는게 무난하다.
    2. 코드성 데이터 파악 및 이력/상속/identity/캐싱 등을 미리 고려하여 설계해야 한다.

      1. 이들은 DB만을 봤을때 크게 고려하지 않아도 되지만 어플리케이션과는 밀접한 관계가 있다.
  3. Entity 타입과  Value타입의 구분

    1. 일반적으로 RDB에서 지원하는 타입(VChar, CLob 등)이 Vaue타입이며 Entity타입은 테이블이 된다.
    2. 하지만 ORM의 도움으로 이러한 관계를 적절히 조절 / 매핑할 수 있다. (DB만 잘 알아는것 가지고는 DB설계를 잘할 수 없다!)

      1. 예를 들자면 컴포지션 타입이 있다.  이는 DB전문가가 생각해 낼 수 없는 영역이다.
  4. 디자인 패턴

    1. 롤 모델 (Pair키)

      1. 기업 + 롤을 identity하게 연결해서 거래처 라는 롤 모델을 만든다.
      2. 기업은 고객/구매자 라는 2가지 룰을 가지며 고로 거래처는 2가지 형태가 나온다.
      3. 롤은 방대하고 갱신 가능할때만 DB에서 관리한다.
      4. 명시적인 pair키를 가지기 때문에 자료를 분명하게 나타낼수는 있지만 어플에서 관리하기가 짜증난다.
    2. 거래 모델

      1. 위의 롤 모델인 거래처를 non-Identity하게 2개 묶어서 "거래"를 만든다.
      2. 이는 N:N매핑에서 브릿지 역활을 한다.
  5. 키 설정

    1. 특별한 이유가 없다면 인조키 사용을 강력하게 권장한다.

      1. We recommend that identifiers be 'synthetic', that is, generated with no business meaning. (자세한 내용은 Hibernate-ORM 분서 참조)
      2. 경험상 자연키는 항상 말썽을 일으킨다.

        1. 자연키는 유지보수와 스키마 개선이 훨씬 힘들다.
      3. PK는 바뀔수 있는것이 되면 골치아파진다. SID같은걸 PK로 두지 말자.. 가상키가 많이 사용되는 이유중 하나이다.
      4. 가상키는 만병통치약이 아니다.. 하지만 효과는 탁월하다.
      5. 인조키다 유리할때는?

        1. 후보키(PK의 개념)가 너무 많을때, 후보키가 없거나 있더라도 확장성을 고려할 때.
        2. 후보키의 길이가 클때, 후보키가 너무 많은 수의 애트리뷰트들과 관계를 맺을 때.
        3. Hibernate등을 사용할때.
      6. 인조키의 단점은?

        1. 자연키는 그 자체로도 강력한 무결성을 보장한다. 하지만 인조키는 이들 키값들이 중복되어도 오류를 내지 않고 insert된다.
    2. 그러나 이 인조키는 Unique한 속성을 보장해주지 못함으로 나머지 대리키들에 유니크 인덱스를 주어 사실상의 키 기능을 하게 한다.
    3. 원래 개념상에서 PK와 UID(Unique ID)는 다른 개념이다. 하지만 개념만 다를뿐 실제는 같기 때문에 현업의 ERD에서(ER-Win 등의 툴 포함) UID를 PK로 표기한다.
  6. 정규화 어느것이효율적?

    1. 정규화 : 해당 파트 참고.

    2. java객체가 필요한 만큼만 정규화하라. 자동으로 정규화가 될것이다.

    3. 가볍고 많은 row 보다 무겁고 적은 row가 훨씬 다루기 쉽다.(좋은건 아니다.) 명심할것!

    4. 정규형에 해당되지 않는 "계산된 값"등은 추가하지 말것!

      1. 통계형 컬럼은 특이한 경우(계산에 시간이 오래 걸림)를 제외하면 생성하지 않는다. 실시간 계산한다.

        1. ex) 자식 컬럼들의 합계 컬럼
        2. ex) 차액(A컬럼-B컬럼 하면 단순 계산되어지는) 컬럼 등
      2. "넣을땐 힘들어도 뺄때는 편하다." 라는건 나중에 생각해도 늦지않다. (이는 다분히 SQL중심적인 사고이다. 과연 편할까?)
  7. 이력 테이블 설정

    1. 반드시 현업과 상의 및 증거를 남길것!

      1. 이력 테이블 , 기간과 데이터 범위도 포함
      2. 이력의 의도 파악

        1. 이력 내용을 조회가 가능해야 한지?
        2. 특점 이력시점으로 롤백이 가능해야 하는지?
    2. 이력 유형

      1. 스냅샷 방식 (Backup테이블 방식)

        1. 변경된 데이터가 비지니스 로직에 사용되지 않을때 사용.

          1. 웬만하면 무조건 이방법을 사용할것!!
        2. 기존 로직에서 간단히 백업로직 추가 가능 (날자 , 일련번호 등 추가)
        3. 장점 : 다른 기능을 손볼 필요 없이 생성 가능 , 예정에 없었지만 이력을 남겨야 할때 유용. 대량의 데이터에 유용.
        4. 단점 : 기존 기능과는 연계성이 떨어짐. 이력을 볼려면 별도의 API를 구축해야함.

          1. ex) 이력서 제출시 개인정보를  함께 제출한다. 도중에 개인정보가 변경등록했음에도 불구하고
            이력서를 읽으면 예전의 개인정보가 나타나야하는 경우. 이러한 경우는 사용할 수 없다.
        5. 스냅샷 종류

          1. 데이터 전체를 전부 복사 (이게 일반적)
          2. 컬럼마다 테이블을 만들어서 변경시 복사
          3. 하나의 컬럼에 String 방식으로 변경분을 나열해서 기재.
      2. 상태 코드 방식

        1. 변경된 데이터가 비지니스 로직에 사용됨.
        2. 일반적인 방법으로 삭제 or 변경시 delete가 아닌 state를 변경
        3. 수정 이력의 필요시 상위Key를 생성해서 변경 이전과의 관계를 유지함.  (A -> B로 수정됨을 알림)
        4. 장점 : 복잡하지만 변경된 객체(과거이력)도 여전히 기존 로직API로 참조 가능.
        5. 단점 : select 등의 모든 로직에 추가 where 조건이 들어가야 함. 실수 유발 가능.
      3. 문자열 방식

        1. 이력시 이력 실적테이블에 물질정보가 들어가야 한다면 -> 물질정보의 PK를 가지는 대신 물질정보 자체의 정보를 복사 / 입력한다.
        2. 이력 데이터가 롤백되지 않는, 읽기 전용이며 데이터의 크기가 크지 않을 때 사용.
        3. 역시나 비추천 방법.
      4. 참고

        1. 일반적으로 이력사항만 조회해야 한다면 스냅샷이 좋다. ㅠ
      5. 테이블 동기화 설정

        1. 실서버, 연계서버 또는 OLAP등의 도입으로 적절한 동기화를 해야 한다면 다음을 고려하자. (대부분 해당될것이다.)

        2. 상태코드 방식 : 부모 테이블마다 Update시각의 표시 => 주기적으로 배치를 돌면서 update된것만을 동기화 할 수 있다.

          1. 이는 Java 기본객체 상속으로 간단히 해결 가능하다.

        3. 백업테이블 방식 => 삭제의 경우 변경적재가 불가능 함으로 특정 테이블에 삭제 이력을 남기자. 이것을 참고해 동기화!

          1. GenericDao사용으로 간간히 해결 가능하다.

        4. SQL생성 => merge SQL을 자동생성해주는 Generator를 사용할것! 단순 복사는 PL/SQL의 효용성이 높다.

  8. Identity / NonIdentity

    1. Identity : 부모키가 자식테이블의 주키로 전이된다.  자식 테이블은 구분자로 사용될 추가 키를 가져야 한다.

      1. 강한 관계(종속관계)를 나타낸다. 부모가 없이 자식은 있을 수 없다.

      2. 자식 객체가 부모객체에 종속되며 자식을 필터링 해서 읽을 일(자식의 크기가 크지않다.)이 없다.

        1. 즉 자식이 로드되면 전량 로드된다. 자식은 독립적으로 로드될 수 없다.

      3. @CollectionOfElements로 매핑하며 타겟은 @Embeded가 된다.

      4. ex) 장바구니 객체의 자식인 ITEM 객체.

    2. NonIdentity : 부모기가 자식 테이블의 FK로 전이된다. 자식테이블의 주키는 부모키와 상관없다.

      1. 약한 관계를 나타낸다.

      2. 자식 객체가 필터링 되어 부분만(페이징 처리) 읽어야 할 수 있다.

      3. 부모와 별도로 자식이 로드 가능하다.

      4. @OneToMany로 매핑된다. 타겟은 부모와 동등한 @Entity이다.

      5. ex) 사용자 객체의 자식인 사용자 로그인(대량의 데이터) 정보.

  9. 데이터베이스 상속 설정

    1. 반드시 Java class기준으로 상속할것 .

      1. 개별 트랜잭션이 어떠한 유형을 가지냐는 보통 Table보다는 class로 알 수 있다.
      2. List<T> 의 seq는 자바와 동일하게 0부터 시작하게 설정하자. ( null초기화가 0이 안되도록 주의! 래퍼클래스 사용할것. )
    2. OneToOne Type (슈퍼타입이 개별 테이블 유지)

      1. 개별로 테이블로 트랜잭션이 형성됨

      2. 확장성이 우수하나 별개의 조인 형성

    3. Plus Type (슈퍼 + 서브를 묶어서 하나의 테이블)

      1. 하나의 도메인으로 트랜잭션이 형성됨 (추천)

      2. 데이터 베이스 다형성( Interface)

        1. Java에서 Interface를 사용하는 도메인에 해당함. (슈퍼클래스를 extend함과 동시에 interface를 구현)

          1. ex) 다양한 종류의 실적은 하나의 Interface를 구현함. 징수부과는 Interface만을 사용하며 어떤 종류의 부과금인지 알지 못해도 됨.

        2. 구현체 도메인을 부모 자식으로 나눌때 부모 테이블은 1개의 키(1개의 sequence)를 가지는 테이블로 구성한다.

          1. 이렇게 구성하면 Interface에서 도메인 Entity로의 Fk설정이 가능하다..

          2. SQL에서 각종 통계 내기 편하다.

    4. Single Type (모든 도메인을 하나의 테이블로.. ㄷㄷ)

      1. 모든 도메인의 전방위에 걸쳐 트랜잭션이 형성됨
  10. 캐싱 http://erwins.springnote.com/pages/5002681


    출처 : http://erwins.springnote.com/pages/2856434

Posted by 1010
04.Anddoid2010. 7. 30. 15:30
반응형

서버와 클라이언트의 소켓(Soket) 통신에 대해 알아보도록 합시다.

이것인 기존의 JAVA 통신에 대한 방법만 잘 알고있다면 무난히 가능한 부분입니다.

실제로 서버는 안드로이드를 통해서 돌리는 것이 아닌, 기존의 자바 프로그래밍을 이용하게됩니다.

물론 클라이언트는 안드로이브 영역이기때문에 안드로이드로 개발을 해야합니다.

*이 방법은 아파치 서버를 이용한 방법입니다.

아래는 Server 및 Client에 가장 우선적으로 필요한 api입니다.

//아래는 Server 부분

import java.io.BufferedReader;

import java.io.BufferedWriter;

import java.io.InputStreamReader;

import java.io.OutputStreamWriter;

import java.io.PrintWriter;

import java.net.ServerSocket

import java.net.Socket;

//아래는 Client 부분

import java.io.BufferedInputStream;

import java.io.BufferedReader;

import java.io.BufferedWriter;

import java.io.IOException;

import java.io.InputStream;

import java.io.InputStreamReader;

import java.io.OutputStreamWriter;

import java.io.PrintWriter;

import java.net.Socket;

import java.net.URL;

import java.net.URLConnection;


 현재 보이는 임포트문에서 java.net에 해당하는 부분이 실제 접속이 가능하게 해주는 api입니다. 위의 java.io는 데이터 전송하는 부분에 있어서 필요한 핵심입니다.

아래 보이는것 은 닷컴 레퍼런스에서 발췌한 소스입니다.


TCP SERVER 부분입니다.

import java.io.BufferedReader;

import java.io.BufferedWriter;

import java.io.InputStreamReader;

import java.io.OutputStreamWriter;

import java.io.PrintWriter;

import java.net.ServerSocket;

import java.net.Socket; 


public class TCPServer implements Runnable {

    public static final int ServerPort = 9999; //소켓포트설정

    public static final String ServerIP = "xxx.xxx.xxx.xxxx"; //연결될 서버IP


    @Override

    public void run() {

        // TODO Auto-generated method stub

        try {

            System.out.println("S: Connecting...");

            ServerSocket serverSocket = new ServerSocket(ServerPort);


            while (true) {

                Socket client = serverSocket.accept();

                System.out.println("S: Receiving...");


                try {

                    BufferedReader in = new BufferedReader(

                    new InputStreamReader(client.getInputStream()));

                    String str = in.readLine();

                    System.out.println("S: Received: '" + str + "'");

                    PrintWriter out = new PrintWriter(new BufferedWriter(

                    new OutputStreamWriter(client.getOutputStream())),true);

                    out.println("Server Received " + str);

                } catch (Exception e) {

                    System.out.println("S: Error");

                    e.printStackTrace();

                } finally {

                    client.close();

                    System.out.println("S: Done.");

                }

            }

        } catch (Exception e) {

            System.out.println("S: Error");

            e.printStackTrace();

        }

    }


    public static void main(String[] args) {

        // TODO Auto-generated method stub

        Thread desktopServerThread = new Thread(new TCPServer());

        desktopServerThread.start();

    }

}


설명:

1. 자신의 port를 설정해서 socket을 엽니다.

2. 클라이언트에서 오는 정보를 받기 위해 accept()를 통해서 대기합니다.

3. 데이터가 왔다는 것이 감지되면 Reader를 통해 Stream정보를 읽어냅니다.

3. 받은 Stream정보를 다시 클라이언트로 돌려보냅니다.

위의 소스는 하나의 Client와 Connent를 통해 데이터를 주고 받는 형태입니다.


다음 보게 될 것은 닷컴레퍼런스에서 발췌한

이제 볼 부분은 안드로이드 TCP Client 부분입니다.

다음부분이 필수적으로 import가 되어있어야합니다.


package socket.client;


import java.io.BufferedInputStream;

import java.io.BufferedReader;

import java.io.BufferedWriter;

import java.io.IOException;

import java.io.InputStream;

import java.io.InputStreamReader;

import java.io.OutputStreamWriter;

import java.io.PrintWriter;

import java.net.Socket;

import java.net.URL;

import java.net.URLConnection;


import org.apache.http.util.ByteArrayBuffer;

import android.app.Activity;

import android.os.Bundle;

import android.os.Handler;

import android.util.Log;

import android.view.View;

import android.view.View.OnClickListener;

import android.widget.Button;

import android.widget.EditText;

import android.widget.TextView;

import android.widget.Toast;


public class NewClient extends Activity {

    private String html = "";

    private Handler mHandler;


    private Socket socket;

    private String name;

    private BufferedReader networkReader;

    private BufferedWriter networkWriter;

    private String ip = "xxx.xxx.xxx.xxx"; // SERVER IP를 잡습니다.

    private int port = 9999; // PORT를 설정합니다.


    @Override

    protected void onStop() {

        // TODO Auto-generated method stub

        super.onStop();

        try {

            socket.close();

        } catch (IOException e) {

            // TODO Auto-generated catch block

            e.printStackTrace();

        }

    }


    public void onCreate(Bundle savedInstanceState) {

        super.onCreate(savedInstanceState);

        setContentView(R.layout.main);

        mHandler = new Handler();


        try {

            setSocket(ip, port);

        } catch (IOException e1) {

            // TODO Auto-generated catch block

            e1.printStackTrace();

        }


        checkUpdate.start();


        final EditText et = (EditText) findViewById(R.id.EditText01);

        Button btn = (Button) findViewById(R.id.Button01);

        final TextView tv = (TextView) findViewById(R.id.TextView01);


        btn.setOnClickListener(new OnClickListener() {

            public void onClick(View v) {

                if (et.getText().toString() != null

                        || !et.getText().toString().equals("")) {


                    PrintWriter out = new PrintWriter(networkWriter, true);

                    String return_msg = et.getText().toString();

                    out.println(return_msg);

                }

            }

        });

    }


    private Thread checkUpdate = new Thread() {

        public void run() {

            try {

                String line;

                Log.w("ChattingStart", "Start Thread");

                while (true) {


                    Log.w("Chatting is running", "chatting is running");

                    line = networkReader.readLine();

                    html = line;

                    mHandler.post(showUpdate);

                }


            } catch (Exception e) {

            }

        }

    };


    private Runnable showUpdate = new Runnable() {

        public void run() {

            Toast.makeText(NewClient.this, "Coming word: " + html,

                    Toast.LENGTH_SHORT).show();

        }

    };


    public void setSocket(String ip, int port) throws IOException {

        try {

            socket = new Socket(ip, port);

            networkWriter =

new BufferedWriter(new OutputStreamWriter(socket.getOutputStream()));

            networkReader =

new BufferedReader(new InputStreamReader(socket.getInputStream()));


        } catch (IOException e) {

            System.out.println(e);

            e.printStackTrace();

        }

    }

}


설명:

1. onCreate()로 되면 서버에 연결하도록 합니다.

2. textbox에 문자를 넣고 버튼을 누르면 서버로 데이터를 전송합니다.

3. 서버에 오는 데이터를 받기위해 while을 합니다.

4.받은 정보를 Toast를 이용해 표시합니다.


다음은 이어서

XML 소스입니다.

<?xml version="1.0" encoding="utf-8"?>

<LinearLayout xmlns:android="http://schemas.android.com/apk/res/android"

    android:orientation="vertical"

    android:layout_width="fill_parent"

    android:layout_height="fill_parent" >

    <TextView android:id="@+id/TextView01"

    android:layout_height="wrap_content"

    android:layout_width="fill_parent"/>

    <EditText android:id="@+id/EditText01"

    android:layout_height="wrap_content"

    android:layout_width="fill_parent"/>

    <Button android:id="@+id/Button01"

    android:layout_width="wrap_content"

    android:layout_height="wrap_content"

    android:text="Send"/>

    <TextView android:id="@+id/chatting"

    android:layout_height="wrap_content"

    android:layout_width="fill_parent"/>   

</LinearLayout>


설명 :

간단하게 EditText를 이용해서 거기에 들어간 문자열을 버튼을 통해 서버로 전송시키는 기능이 구현되어있습니다.


다음은 이어서

AndroidManifest.xml 소스입니다.

<?xml version="1.0" encoding="utf-8"?>

<manifest xmlns:android="http://schemas.android.com/apk/res/android"

package="socket.client"

  android:versionCode="1"

  android:versionName="1.0">

  <application android:icon="@drawable/icon" android:label="@string/app_name">

      <activity android:name=".NewClient"

        android:label="@string/app_name">

    <intent-filter>

      <action android:name="android.intent.action.MAIN" />

      <category android:name="android.intent.category.LAUNCHER" />

    </intent-filter>

  </activity>

  </application>

  <uses-permission android:name="android.permission.INTERNET" /> //필수 선언

</manifest>


설명:

가장 핵심이 되는 부분은

정리를 해보면 인터넷을 사용하기 위해서 다음이 꼭 추가되어야 한다는 사실입니다.


<uses-permission android:name="android.permission.INTERNET" />


이렇게 하면 기본적인 통신이 가능하게 됩니다. 물론 테스트를 할려면 완성된 서버와 통신하기위한 안드로이드 에뮬레이터및 안드로이드 OS가 탑제된 폰이 필요합니다.

실제 구동여부는 서버의 미완성으로 확인을 못했지만 교과서 적으로 쓰이는 방법이기 때문에 소스를 분석하고 정리해서 올려봅니다. 많은 도움이 되었으면 좋겠습니다.


출처 : http://arkroid.tistory.com/34

Posted by 1010
04.Anddoid2010. 7. 30. 14:29
반응형

[android-beginners] Sockets with Android.

Android_n00b
Fri, 02 Oct 2009 08:59:43 -0700

Hi
I'm implementing a program which uses sockets to communicate between
the client and server. I am getting this to work fine with just a
message. However, I want to have an EditText field in my application,
which when I hit a 'Send' button, sends the text from the field to my
server and logs it. I am trying to implement this, but my program
always crashes. Any help would be appreciated. Here is my code:

Android Client:
public class SocketTest extends Activity {
    /** Called when the activity is first created. */
    @Override
    public void onCreate(Bundle savedInstanceState) {
        super.onCreate(savedInstanceState);
        setContentView(R.layout.main);
        Thread sThread = new Thread(new TCPServer());
        Thread cThread = new Thread(new TCPClient());
        sThread.start();
        try {
               Thread.sleep(1000);
          } catch (InterruptedException e) { }

          cThread.start();
    }
}

TCP Server:
public class TCPServer implements Runnable{

    public static final String SERVERIP = "127.0.0.1";
    public static final int SERVERPORT = 8888;
    public void run() {
         try {
              Log.d("TCP", "S: Connecting...");

              ServerSocket serverSocket = new ServerSocket
(SERVERPORT);
              while (true) {
                 Socket client = serverSocket.accept();
                 Log.d("TCP", "S: Receiving...");
                 try {
                      BufferedReader in = new BufferedReader(new
InputStreamReader(client.getInputStream()));
                      String str = in.readLine();
                      Log.d("TCP", "S: Received: '" + str + "'");
                    } catch(Exception e) {
                        Log.e("TCP", "S: Error", e);
                    } finally {
                         client.close();
                         Log.d("TCP", "S: Done.");
                    }

              }

         } catch (Exception e) {
           Log.e("TCP", "S: Error", e);
         }
    }
}

TCP Client:
 public class TCPClient extends Activity implements Runnable {

    final EditText msg = (EditText) findViewById(R.id.message);
    final Button sendButton = (Button) findViewById(R.id.sendserver);

    public void run() {
        sendButton.setOnClickListener(new OnClickListener() {

                        @Override
                        public void onClick(View v) {
                                // TODO Auto-generated method stub
                                try {

                                   InetAddress serverAddr = 
InetAddress.getLocalHost();
                                   Log.d("TCP", "C: Connecting...");
                                   Socket socket = new Socket(serverAddr,
TCPServer.SERVERPORT);
                                   String message = msg.toString();
                                       try {
                                        Log.d("TCP", "C: Sending: '" + message 
+ "'");
                                        PrintWriter out = new PrintWriter( new
BufferedWriter( new OutputStreamWriter(socket.getOutputStream
())),true);

                                        out.println(message);
                                        Log.d("TCP", "C: Sent.");
                                          Log.d("TCP", "C: Done.");

                                     } catch(Exception e) {
                                         Log.e("TCP", "S: Error", e);
                                        } finally {
                                          socket.close();
                                        }
                                 } catch (Exception e) {
                                      Log.e("TCP", "C: Error", e);
                                 }
                        }
                }) ;

    }
}
--~--~---------~--~----~------------~-------~--~----~
You received this message because you are subscribed to the Google
Groups "Android Beginners" group.
To post to this group, send email to android-beginners@googlegroups.com
To unsubscribe from this group, send email to
android-beginners-unsubscr...@googlegroups.com
For more options, visit this group at
http://groups.google.com/group/android-beginners?hl=en
-~----------~----~----~----~------~----~------~--~---
Posted by 1010
04.Anddoid2010. 7. 30. 14:21
반응형
출처는 명확하지 않음-_-;; 원작성자 분에게는 죄송합니다;
앞의 2009/03/10 - [Computer Science/Android] - [펌]Android에서의 TCP/IP 통신 글의 코드와 매우 유사하긴 하지만.. 뭔가 더 간단하고 예제는 많을 수록 좋으므로;(-_-)

SocketTest.java

Java:

public class SocketTest extends Activity {
    /** Called when the activity is first created. */
    @Override
    public void onCreate(Bundle icicle) {
        super.onCreate(icicle);
        setContentView(R.layout.main);
       
        Thread sThread = new Thread(new TCPServer());
        Thread cThread = new Thread(new TCPClient());
       
        sThread.start();
        try {
               Thread.sleep(1000);
          } catch (InterruptedException e) { }
       
          cThread.start();
    }
}


TCPServer.java

Java:

public class TCPServer implements Runnable{
     
    public static final String SERVERIP = "127.0.0.1";
    public static final int SERVERPORT = 4444;
         
    public void run() {
         try {
              Log.d("TCP", "S: Connecting...");
             
              ServerSocket serverSocket = new ServerSocket(SERVERPORT);
              while (true) {
                 Socket client = serverSocket.accept();
                 Log.d("TCP", "S: Receiving...");
                 try {
                      BufferedReader in = new BufferedReader(new InputStreamReader(client.getInputStream()));
                      String str = in.readLine();
                      Log.d("TCP", "S: Received: '" + str + "'");
                    } catch(Exception e) {
                        Log.e("TCP", "S: Error", e);
                    } finally {
                         client.close();
                         Log.d("TCP", "S: Done.");
                    }

              }
             
         } catch (Exception e) {
           Log.e("TCP", "S: Error", e);
         }
    }
}


TCPClient.java

Java:

public class TCPClient implements Runnable {

     
    public void run() {
         try {
           
           InetAddress serverAddr = InetAddress.getByName(UDPServer.SERVERIP);
           
           Log.d("TCP", "C: Connecting...");
           Socket socket = new Socket(serverAddr, TCPServer.SERVERPORT);
           String message = "Hello from Client";
               try {
                Log.d("TCP", "C: Sending: '" + message + "'");
                PrintWriter out = new PrintWriter( new BufferedWriter( new OutputStreamWriter(socket.getOutputStream())),true);
               
                out.println(message);
                Log.d("TCP", "C: Sent.");
                  Log.d("TCP", "C: Done.");
               
             } catch(Exception e) {
                 Log.e("TCP", "S: Error", e);
                } finally {
                  socket.close();
                }
         } catch (Exception e) {
              Log.e("TCP", "C: Error", e);
         }
    }
}


AndroidManifest.xml

XML:

<?xml version="1.0" encoding="utf-8"?>
<manifest xmlns:android="http://schemas.android.com/apk/res/android"
    package="com.e2esp.socket.test">

    <application android:icon="@drawable/icon">
        <activity class=".SocketTest" android:label="@string/app_name">
            <intent-filter>
                <action android:value="android.intent.action.MAIN" />
                <category android:value="android.intent.category.LAUNCHER" />
            </intent-filter>
        </activity>
    </application>
</manifest>


출처 : http://plucky.tistory.com/13
Posted by 1010
04.Anddoid2010. 7. 30. 14:19
반응형

소스는 humaneer.net 의 도움을 99.99999999999% 이상 받았습니다.. 운영자님께 감솨.. (__)


웹서버 구성하고 안드로이드로 서버쪽 데이터 전송하는 방법말고 어떤게 있나 찾던 중.. 위 블로그 통해 tcp 소켓통신으로 서버와 데이터 주고 받을 수 있음을 알았다..(흠.. 구글링은 역쉬...라는 감탄..)


소스는 위 블로그 링크 참조..


main.xm


Activity 클레스


Server쪽 클레스


결과는..


 이상 오늘 깨작거린 내용..


내일은...

1. 클라이언트에서 입력받은 값을 서버로 전송.

2. 서버쪽 DB접속해 입력데이터에 적합한 Resultset을 클라이언트에 전송

3. 클라이언트는 서버에서 받은 Resultset을 리스트 형태로 뿌려...

마치 조회조건으로 검색후 결과를 화면에 뿌린것 같은.. 그런걸 해봐야겠음..


출처 : http://motpool.textcube.com/17

Posted by 1010
04.Anddoid2010. 7. 30. 14:17
반응형
안드로이드 에뮬레이터와 데스크탑 서버간 TCP/IP통신을 하는 간단한 코드이다.
보통 이런 테스트는 loopback을 이용하면 되지 않을까? 라고 착각하는 사람들이 굉장히 많을 것이다.
그래서 서버의 주소를 getLocalHost()를 통해 가져오게 되면 완전 삽질이다.
왜냐? 안드로이드 에뮬레이터의 localhost는 안드로이드 에뮬레이터의 네트웍이지 데스크탑의 네트웍이 아니기 때문이다. 따라서 아래의 소스코드는 일단 네트웍이 돌아가는 컴퓨터에서만 작동이 가능하다.


- Android Client의 메인부분
01.package android.SocketTest;
02.import android.app.Activity;
03.import android.os.Bundle;
04.  
05.public class SocketTest extends Activity {
06.  
07.    @Override
08.    public void onCreate(Bundle icicle) {
09.        super.onCreate(icicle);
10.        setContentView(R.layout.main);
11.        Thread cThread = new Thread(new TCPClient());
12.        cThread.start();
13.    }
14.}


- Client의 실제코드

01.package android.SocketTest;
02.  
03.import java.io.BufferedWriter;
04.import java.io.OutputStreamWriter;
05.import java.io.PrintWriter;
06.import java.net.InetAddress;
07.import java.net.Socket;
08.  
09.import android.TCPDesktopServer.TCPDesktopServer;
10.import android.util.Log;
11.  
12.public class TCPClient implements Runnable {
13.    public void run() {
14.         try {
15.             // 서버의 주소를 로컬호스트라고 127.0.0.1로 하는 삽질은 하지말것 -_-;
16.             InetAddress serverAddr = InetAddress.getByName(TCPDesktopServer.SERVERIP);
17.       
18.             Log.d("TCP", "C: Connecting...");
19.             Socket socket = new Socket(serverAddr, 4444);
20.               
21.             String message = "Hello from Client";
22.             try {
23.                 Log.d("TCP", "C: Sending: '" + message + "'");
24.                 PrintWriter out = new PrintWriter( new BufferedWriter( new OutputStreamWriter(socket.getOutputStream())),true);
25.                   
26.                 out.println(message);
27.                 Log.d("TCP", "C: Sent.");
28.                 Log.d("TCP", "C: Done.");
29.                   
30.             } catch(Exception e) {
31.                 Log.e("TCP", "S: Error", e);
32.              } finally {
33.                socket.close();
34.              }
35.         } catch (Exception e) {
36.              Log.e("TCP", "C: Error", e);
37.         }
38.    }
39.}


- 데스크탑 서버 코드
01.package android.TCPDesktopServer;
02.import java.io.BufferedReader;
03.import java.io.InputStreamReader;
04.import java.net.ServerSocket;
05.import java.net.Socket;
06.  
07.public class TCPDesktopServer implements Runnable{
08.    public static final int SERVERPORT = 4444;
09.    public static final String SERVERIP = "192.168.0.16";
10.      
11.    public void run() {
12.        try {
13.            System.out.println("S: Connecting...");
14.            ServerSocket serverSocket = new ServerSocket(SERVERPORT);
15.  
16.            while (true) {
17.                Socket client = serverSocket.accept();
18.                System.out.println("S: Receiving...");
19.  
20.                try {
21.                    BufferedReader in = new BufferedReader(new InputStreamReader(client.getInputStream()));
22.                    String str = in.readLine();
23.                    System.out.println("S: Received: '" + str + "'");
24.                } catch(Exception e) {
25.                    System.out.println("S: Error");
26.                    e.printStackTrace();
27.                } finally {
28.                    client.close();
29.                    System.out.println("S: Done.");
30.                }
31.            }
32.  
33.        } catch (Exception e) {
34.            System.out.println("S: Error");
35.            e.printStackTrace();
36.        }
37.    }
38.  
39.    public static void main (String a[]) {
40.        Thread desktopServerThread = new Thread(new TCPDesktopServer());
41.        desktopServerThread.start();
42.    }
43.}
Posted by 1010
04.Anddoid2010. 7. 30. 14:17
반응형


Unblocking Android RetuarantFinder 에서는 서버에 xml 파일을 요청하여 받은 그 파일을 SAX를 이용하여 Parsing 하는 방법을 제공하고 있다.


그러나 서버에서 xml 파일을 가져오는 방법이 단순히 URL Class를 생성하여 파서에서 InputStream을 읽어 파싱하는 방식으로 하기 때문에

URL url = new URL(this.query);
xr.parse(new InputSource(url.openStream()));
http Connection 시 좀더 세밀한 동작을 하거나 제한을 둘때에는 (예를 들면 일정시간 정도 서버로 부터 응답이 없을 경우에는 Timeout Exception 발생하는 경우) 이러한 방법으로는 해결할 수가 없다.

대안으로는HttpClient를 이용하여 해결 할 수가 있다.
관련 Site는

http://hc.apache.org/httpcomponents-client/tutorial/html/ 를 참조하면 되는 데

목차를 보면

○ Http Request
○ Http Reponse
○ Http Entity
○ Http Content
○ Exception Handling
○ Http Parameter Setting
○ Connection Manager
○ Cookie
○ Http Authentication

으로 되어 있다.
내 생각에는 실제로 사용하려면 HttpClient를 사용해야 되지 않을까 하는 생각이 든다.
어쩌든 내 경우에는 Http Paramter를 Setting하여 Timeout을 주고자 하는 목적이기
때문에 HttpClient를 생성하고 Setting하고 실행하여 InputStream을 가져오는 로직으로 수정하여다. (아래 Flow 참조)


SAX Paser 정의 및 Parsing을 위한 Handler Setting

   public ArrayList<MCTH> getReviews() {
        long startTime = System.currentTimeMillis();
        ArrayList<MCTH> results = null;    
           
            SAXParserFactory spf = SAXParserFactory.newInstance();
            SAXParser sp;
   try {
    sp = spf.newSAXParser();
             XMLReader xr = sp.getXMLReader();

             mcthHandler handler = new mcthHandler();
             xr.setContentHandler(handler);

             //xr.parse(new InputSource(url.openStream()));
             xr.parse(new InputSource(getInputStreamFromURI()));
             // after parsed, get record
             results = handler.getReviews();        
   
   } catch (ParserConfigurationException e) {
    // TODO Auto-generated catch block
    e.printStackTrace();
   } catch (SAXException e) {
    // TODO Auto-generated catch block
    e.printStackTrace();
   } catch (IOException e) {
    // TODO Auto-generated catch block
    e.printStackTrace();
   }  

        long duration = System.currentTimeMillis() - startTime;
        Log.v(TAG," call and parse duration - " + duration);
        return results;
    }


  HttpClient를 이용하여 서버로 부터 XML 파일의 InputStream을 가져오는 부분
  public InputStream getInputStreamFromURI() {
     InputStream result = null;
     URI uri = null;    
       
  try {
     uri = URIUtils.createURI(URI_SCHEME, URI_HOST, URI_PORT, URI_PATH, URIQuery, null);       
        
         // Http parameter setting
         HttpParams hp = new BasicHttpParams();
         // Http Timeout
         HttpConnectionParams.setConnectionTimeout(hp,10000);
        
         // Create an instance of HttpClient.
         HttpClient hc = new DefaultHttpClient(hp);
        
         // Socket Timeout
         HttpConnectionParams.setSoTimeout(hp,10000);
        
         // Create a method instance.
         HttpGet hm = new HttpGet(uri);
        
         Log.v(TAG,"URI ==> " + hm.getURI());
        
         // Create an instance HttpResponse
         HttpResponse hr = null;
        
         //Execute the request
         hr = hc.execute(hm);
                  
        // Examine the response status
            Log.i(TAG,"hc ===> " + hr.getStatusLine().toString());
           
            // Get hold of the response entity
            HttpEntity he = hr.getEntity();
        
            if (he != null)
            {
             result = he.getContent();    
             Log.v(TAG,"xml file size is " + Long.toString(he.getContentLength()));
            }     
           
  } catch (URISyntaxException e1) {
   // TODO Auto-generated catch block
   Log.v(TAG,"getInputStreamFromURI URISyntaxException");
   e1.printStackTrace();
  } catch (ClientProtocolException e) {
   // TODO Auto-generated catch block
   Log.v(TAG,"getInputStreamFromURI ClientProtocolException");
   e.printStackTrace();
  } catch (IOException e) {
   // TODO Auto-generated catch block
   Log.v(TAG,"getInputStreamFromURI IOException" + e.getMessage());
   e.printStackTrace();
  }             
     return result;    
   }


출처 : http://blog.naver.com/kippee/130068924726


Posted by 1010
04.Anddoid2010. 7. 27. 18:04
반응형
http://www.ibm.com/developerworks/kr/library/tutorial/j-dw-java-rest-i.html
RESTful한 웹 서비스 만들기

http://www.ibm.com/developerworks/kr/library/ws-pojo-springcxf2/index.html
스프링과 아파치 CXF를 이용해 POJO 웹 서비스를 디자인하고 구현하기, Part 2: RESTful 웹 서비스 만들기

http://www.ibm.com/developerworks/kr/library/j-jws12.html
Java 웹 서비스: CXF 소개

http://www.ibm.com/developerworks/kr/library/j-jws9.html
Java 웹 서비스: Metro 소개

http://www.ibm.com/developerworks/kr/library/tutorial/ws-dw-ws-eclipse-javase1.html
Eclipse와 Java SE 6을 사용하여 독립형 웹 서비스 개발하기, Part 1: 웹 서비스 서버 애플리케이션

http://www.ibm.com/developerworks/kr/library/tutorial/x-dw-x-restatompp.html
REST 서비스 작성하기

http://www.ibm.com/developerworks/kr/library/ws-soa-axis2-1/index.html
Axis2에서의 SOA 개발, Part 1: Axis2 기초 이해하기 (한글)

http://www.ibm.com/developerworks/kr/library/ws-wsajax2/index.html
Ajax로 SOAP 웹 서비스 호출하기, Part 2: 웹 서비스 클라이언트 확장하기 (한글)

http://www.ibm.com/developerworks/kr/library/ws-wsajax/index.html
Ajax로 SOAP 웹 서비스 호출하기, Part 1: 웹 서비스 클라이언트 구현하기 (한글)

http://www.ibm.com/developerworks/kr/library/wa-ajaxarch/index.html
Ajax와 REST, Part 1 (한글)

http://www.ibm.com/developerworks/kr/library/ws-soaphandler/index.html
SOAP/HTTP 웹 서비스를 위해 신뢰성 있는 클라이언트 구현하기

http://www.ibm.com/developerworks/kr/library/ws-sqzsoap.html
SOAP 압축하기 (한글)

http://www.ibm.com/developerworks/kr/library/ws-dw-ws-understand-web-services1.html
웹 서비스 이해하기, Part 1: SOAP

http://www.ibm.com/developerworks/kr/library/ws-whichwsdl/index.html
WSDL 고르기 (한글)

http://www.ibm.com/developerworks/kr/library/x-tippass.html
Tip: 웹 서비스에 파일 전달하기

http://www.ibm.com/developerworks/kr/library/ws-security.html
WS-Security 구현

http://www.ibm.com/developerworks/kr/library/ws-soapenc/index.html
SOAP 인코딩이 웹 서비스 퍼포먼스에 미치는 영향

http://www.ibm.com/developerworks/kr/library/ws-sec1.html
웹 서비스 보안, Part I
2010/06/23 20:15 2010/06/23 20:15
Posted by 1010
04.Anddoid2010. 7. 27. 17:50
반응형

웹 서비스의 정의

웹 서비스 (일반적으로 서비스 라 불리는) 는 개방형 프로그램적 인터페이스를 갖는 약간의 컨텐트, 또는 약간의 프로세스, 또는 둘 다로 구성되어 있습니다. 간단한 사례: 통화 변환기, 주식 시세, 사전. 보다 복잡한 사례: 여행 입안자, 조달 워크플로우 시스템. 서비스는 다음과 같은 특징을 갖고 있습니다:

  • 특정 작업을 수행하고 표준 사양으로 컴파일하는 인터넷-기반 애플리케이션.
  • XML 및 XML 메시징을 통해 표현되면서 액세스되는 실행 파일.
  • 분산 컴퓨팅 환경에서 동적으로 퍼블리싱 (publishing), 디스커버리 (discovery) 그리고 호출 등이 가능합니다.
  • 플랫폼 및 언어에 독립적입니다.

웹 서비스는 메시징 프로토콜, 프로그래밍 표준, 네트워크 등록 그리고 디스커버리 기능 등을 통해 모든 웹-연결 장비에서 액세스할 수 있는 소프트웨어 컴포넌트로서 비연속 (discrete) 비즈니스 프로세스를 캡슐화합니다:

  • WSDL (Web Services Description Language) 에서 기능 및 속성을 내보이고 기술을 합니다.
  • 애플리케이션 및 다른 서비스들이 UDDI (Universal Description, Discovery, and Integration) 레지스트리를 사용하여 웹 상에 그것을 위치시키게 해줍니다.
  • 원격 애플리케이션 및 서비스들이 SOAP (Simple Object Access Protocol) 와 같은 표준 인터넷 프로토콜을 사용하여 그것을 호출할 수 있게 해줍니다.
  • 동일한 프로토콜 상에서 요청 애플리케이션에게 응답을 반환합니다.

일반적으로, 웹 서비스는 세 가지 특징을 갖고 있습니다:

  • EJBs, PL/SQL 프로시저, 다른 웹/데이타베이스 컨텐트 또는 애플리케이션 등과 같은 한 개 이상의 정보 소스를 캡슐화합니다.
  • 이벤트, 변형, 그리고 조건부 로직 등을 처리할 수 있는 실행 플로우를 갖고 있습니다
  • 일정한 XML 인터페이스를 통해 액세스가 가능합니다.

다음은 웹 서비스에 대한 디스커버리 및 액세스의 고급 프로토콜 예입니다. 작업은 다음과 같이 진행됩니다:

  1. 웹 서비스 개발자는 서비스를 생성한 후 그것을 서버로 배포합니다. 서비스의 위치는 엔드포인트 (endpoint) 라고 불립니다. 개발의 일부로서 또는 개발 툴을 통해 WSDL 의 형태로 서비스 기술 (description) 이 생성됩니다.
  2. 엔드포인트와 WSDL 위치 등을 포함하는 웹 서비스 정보는 선택적으로 UDDI 디렉토리에 퍼블리싱될 수 있습니다.
  3. 웹 서비스 클라이언트는 WSDL 사양 기반의 툴을 통해 구축되거나 생성될 수 있습니다. 클라이언트는 SOAP 메시지를 엔드포인트로 보내고, 응답을 처리합니다.

웹 서비스 기반구조의 두 가지 주요 부분은 웹 서비스의 기술 언어인 WSDL; 그리고 웹 서비스의 통신 프로토콜인 SAOP 입니다.


WSDL 의 정의

Web Services Description Language (WSDL) 는 웹 서비스 인터페이스와 위치의 구문 (syntax) 을 기술하는 XML 언어입니다. WSDL 사양 은 그것을 “네트워크 서비스를 문서-중심 또는 프로시저-중심 정보를 포함하는 메시지에서 동작하는 일련의 엔드포인트로 기술하기 위한 XML 포맷” 이라고 부릅니다. 그 컨텍스트를 통해, 아래 다이어그램은 WSDL 문서에 나타나는 요소들을 설명하면서 그것들이 어떻게 관련되었는지를 보여주고 있습니다.

WSDL element hierarchy.

프로그래머 또는 자동화된 개발 툴은 서비스를 기술하는 WSDL 파일들을 생성할 수 있고, 인터넷 상에서 기술을 할 수도 있습니다. 클라이언트-사이드 프로그래머와 개발 툴은 사용 가능한 웹 서비스 정보를 얻을 수 있고, 또한 사용 가능한 서비스에 액세스하는 프록시 또는 프로그램 템플릿 등을 구축하고 생성하는 퍼블리싱된 WSDL 기술을 사용할 수도 있습니다.

WSDL 문서는 다음 테이블에서 기술된 바와 같이 유형, 메시지, portypes 바인딩, 그리고 서비스 요소 등을 포함하는 정의 요소를 보유하고 있습니다.

정의

한 개 이상의 서비스를 정의합니다. 정의 요소는 다음 속성들을 지원합니다:

  • 이름은 선택 사항입니다.
  • targetNamespace 는 이 서비스에 대한 정보의 논리적 네임스페이스 (namespace) 입니다. WSDL 문서는 다른 WSDL 문서를 임포트할 수 있고, targetNamespace 를 고유 값으로 설정하는 것은 네임스페이스가 손상되지 않는다는 것을 보증합니다.
  • Xmlns 는 WSDL 문서의 디폴트 네임스페이스 이고, http://schemas.xmlsoap.org/wsdl/ 로 설정이 됩니다. <definitions>, <types> 그리고 <message> 등과 같은 모든 WSDL 요소들은 네임스페이스에 속하게 됩니다.
  • xmlns:xsd xmlns:soap 는 데이타 유형과 SOAP-특정 정보의 지정을 위해 사용되는 표준 네임스페이스 정의입니다.
  • xmlns:tns this namespace 를 나타냅니다. "this namespace" (tns) 접두사는 현재 문서를 언급하기 위한 규약으로 사용됩니다.
유형 WSDL 문서에서 사용하는 복합 데이타 유형의 정보를 제공합니다. 간단한 유형이 사용될 때에는 WSDL 문서가 이 섹션을 필요로 하지 않습니다.
메시지 통신되는 데이타의 추상적 정의.
운영 서비스가 지원하는 작업의 추상적 기술.
portType 한 개 이상의 엔드포인트가 지원하는 작업들의 추상적 집합.
바인딩 작업과 메시지를 위한 명확한 프로토콜과 데이타 포맷 사양을 지정하여 작업이 호출되는 방식을 기술합니다.
포트 단일 통신 엔드포인트를 정의하면서, 단일 엔드포인트를 바인딩을 위한 주소로 지정합니다.
서비스 바인딩의 포트 주소를 지정합니다. 서비스는 네트워크 엔드포인트 또는 포트의 모음입니다.

다음 목록은 BC4J-VSM 가 사용하는 Credit Card Web Service 의 WSDL 코드를 보여주고 있습니다.

<?xml version = '1.0' encoding = 'UTF-8'?>
<!--Generated by the Oracle9i JDeveloper Web Services WSDL Generator-->
<!--Date Created: Fri Oct 25 15:05:09 IST 2002-->
<definitions
name="oracle.otnsamples.vsm.services.CreditCardServiceWS"
targetNamespace="http://oracle/otnsamples/vsm/services/CreditCardServiceWS.wsdl"
xmlns="http://schemas.xmlsoap.org/wsdl/"
xmlns:xsd="http://www.w3.org/2001/XMLSchema"
xmlns:soap="http://schemas.xmlsoap.org/wsdl/soap/"
xmlns:tns="http://oracle/otnsamples/vsm/services/CreditCardServiceWS.wsdl"
xmlns:ns1="http://oracle.otnsamples.vsm.services/ICreditCardServiceWS.xsd">
<types>
<schema
targetNamespace="http://oracle.otnsamples.vsm.services/ICreditCardServiceWS.xsd"
xmlns="http://www.w3.org/2001/XMLSchema"
xmlns:SOAP-ENC="http://schemas.xmlsoap.org/soap/encoding/"/>
</types>
<message name="validateCard0Request">
<part name="provider" type="xsd:string"/>
<part name="ccNum" type="xsd:string"/>
</message>
<message name="validateCard0Response">
<part name="return" type="xsd:string"/>
</message>
<portType name="CreditCardServiceWSPortType">
<operation name="validateCard">
<input name="validateCard0Request" message="tns:validateCard0Request"/>
<output name="validateCard0Response" message="tns:validateCard0Response"/>
</operation>
</portType>
<binding name="CreditCardServiceWSBinding" type="tns:CreditCardServiceWSPortType">
<soap:binding style="rpc" transport="http://schemas.xmlsoap.org/soap/http"/>
<operation name="validateCard">
<soap:operation soapAction="" style="rpc"/>
<input name="validateCard0Request">
<soap:body use="encoded" namespace="oracle.otnsamples.vsm.services.CreditCardServiceWS" encodingStyle="http://schemas.xmlsoap.org/soap/encoding/"/>
</input>
<output name="validateCard0Response">
<soap:body use="encoded" namespace="oracle.otnsamples.vsm.services.CreditCardServiceWS" encodingStyle="http://schemas.xmlsoap.org/soap/encoding/"/>
</output>
</operation>
</binding>
<service name="oracle.otnsamples.vsm.services.CreditCardServiceWS">
<port name="CreditCardServiceWSPort" binding="tns:CreditCardServiceWSBinding">
<soap:address location="http://localhost:8888/VSM-BC4J-VSM-BC4J-context-root/ oracle.otnsamples.vsm.services.CreditCardServiceWS"/>
</port>
</service>
</definitions>


SOAP 의 정의

Simple Object Access Protocol (SOAP) 는 분산 환경에서 정보를 교환하기 위한 경량의 XML-기반 프로토콜로서, 다음과 같은 정보 교환의 유형들을 지원하고 있습니다:

  • 엔드포인트가 프로시저-지향 메시지를 받은 다음, 상호 관련된 응답 메시지로 대답하는 곳에서 요청-응답 프로세싱을 허용하는 Remote Procedure Call style (RPC)
  • 메시지가 전송은 되지만 전송자가 즉각적인 응답은 기대하거나 기다리지 않는 곳에서 비즈니스 또는 다른 유형의 문서들을 교환할 필요가 있는 구성 및 애플리케이션들을 지원하는 메시지-지향 정보 교환.

SOAP 는 다음과 같은 특징을 갖고 있습니다:

  • 프로토콜 독립성
  • 언어 독립성
  • 플랫폼 및 운영 체제 독립성
  • (멀티파트 MIME 구조를 사용하여) 첨부를 통합하는 SOAP XML 메시지 지원

SOAP 메시지는 두 개의 데이타 구조, SOAP 헤더, SOAP 본문 그리고 그것들을 정의하기 위해 사용되는 이름 공간의 정보 등을 포함하는 SOAP 봉투 (envelope) 로 구성되어 있습니다. 헤더는 선택 사항입니다; 그것이 나타날 때에는 SOAP 본문에서 정의한 요청 정보를 전달하게 됩니다. 예를 들면, 헤더는 트랜잭션, 보안, 컨텍스트 또는 사용자 프로파일 정보 등을 포함할 수 있습니다. 본문은 웹 서비스 요청을 포함하거나 요청을 XML 포맷으로 응답을 합니다. 다음 그림은 SOAP 메시지의 고급 구조를 나타내고 있습니다.

SOAP message structure.

SOAP 메시지가 웹 서비스 요청 및 응답의 전달을 위해 사용될 때에는 사용 가능한 웹 서비스의 WSDL 정의를 따를 수 있고, WSDL 은 웹 서비스 액세스를 위해 사용되는 SOAP 메시지, SOAP 메시지가 교환 가능한 프로토콜, 그리고 이 웹 서비스를 액세스할 수 있는 인터넷 장소 등을 정의할 수 있습니다. WSDL 디스크립터 (descriptor) 는 UDDI 또는 다른 디렉토리 서비스 내에 위치하면서, 구성 또는 SOAP 요청의 본문과 같이 다른 수단을 통해 제공될 수도 있습니다.

SOAP 사양은 요청 및 응답을 암호화하는 표준 방식을 제공하고 있습니다. 그리고, XML 스키마를 사용하여 메시지 페이로드 (payload) 의 구조 및 데이타 유형도 기술하고 있습니다. 다음은 웹 서비스의 메시지 및 응답을 위하여 SOAP 이 사용되고 있는 방식입니다:

  • 서비스 응답은 다시 SOAP 프로토콜을 사용하여 SOAP 서버로 반환이 되고, 이 메시지는 원래 SOAP 클라이언트에게 반환이 됩니다.

SOAP 은 XML 에 대한 산업 투자의 활용 방법을 제공하고 있습니다. 그리고, 일반적으로 SOAP 가 HTTP 와 SMTP 등과 같이 “방화벽에 친숙한” 프로토콜에 대하여 정의되어 있기 때문에, 방화벽 기술에 대한 산업 투자도 잘 활용할 수 있습니다. 또한 산업계는 SOAP 을 웹 서비스의 필수 요소로 정의하여 다른 전략 보다도 웹 서비스의 볼륨 생산을 적절히 사용하고 있습니다.


출처: http://blog.naver.com/kjs_3047/50003016500

Posted by 1010
04.Anddoid2010. 7. 5. 15:45
반응형

구글의 GMail POP3, IMAP, SMTP 를 지원한다. POP3 가 된다는 말은 클라이언트에서

메일을 읽어올수 있으며, SMTP 를 사용하여 메일을 보낼수 있다. 그래서 아래에 설명될

안드로이드에서 메일을 보내기는 GMail SMTP 를 이용해 보내는 예제이다.


전제조건이 있다. 먼저 GMail 계정이 있어야 한다. 가입하고 등록된 계정으로 테스트

하도록 한다. 그리고 메일보내기 기능은 안드로이드 SDK 로는 해결이 안되므로 필요한

3가지 jar 파일이 필요하다.


1. 자바메일을 보내기 위한 jar 다운로드와 패스설정


위에서 말했듯이 기본적으로 제공되는 jar 에서는 메일 보내기를 할수 없다.

그래서 다음 3가지를 다운받아야 한다.


Download them from :

http://javamail-android.googlecode.com/files/mail.jar

http://javamail-android.googlecode.com/files/activation.jar

http://javamail-android.googlecode.com/files/additionnal.jar


다운받은 파일을 프로젝트내에 적당한 폴더를 만들고 복사한다.

그리고 Build path 를 걸어주기 위해 eclipse > Preferences > Java Build Path  화면으로

이동한다. Libraries 탭을 클릭해서 화면을 열고 다운받아 복사한 폴더에 있는 3 가지 jar

링크하면 된다. path 를 걸어 주는 방법은 몇가지가 있다. 간단하게 Add External JARS…

메뉴를 통해 바로 파일을 선택하고 링크하는 방법이 있다.


설정이 끝나고 나서 왼쪽 Explorer 창을 보게 되면 Referenced Libraries 폴더가 생긴 것을

볼수 있다. 이것은 외부 라이브러리를 참조하려고 위와 같이 패스를 설정하면 자동으로

생기게 된다. 기본 구글 API 로 해결하지 못하는 기능이나 개발 패키지를 jar로 묶어

사용하고자 할 때 유용하게 쓰일수 있다.  


Build path 를 설정하는 방법은 이외에도 Add Library.. 버튼을 클릭해 사용자 정의

라이브러리를 등록할수도 있다.


2. AndroidManifest.xml permission 등록


인터넷사용을 위한 permission android.permission.INTERNET 을 등록한다.

<uses-permission android:name="android.permission.INTERNET" ></uses-permission>


3. 간략한 소스 분석


메일 소스는 gamil smtp를 이용해 보내기 때문에 gmail 로그인 계정이 필요하다. 이것을

넣는 소스가 있다. 상속받은 javax.mail.Authenticator 클래스의 함수를 오버로딩해서

유저와 패스워드를 셋팅하고 넘겨준다.


protected PasswordAuthentication getPasswordAuthentication() { 

        return new PasswordAuthentication(user, password); 

}


클래스는 2개이며 Activity 화면을 구현한 것과 메일 보내기 기능만 있는 클래스 하나다.

일반 java 메일 보내기와 거의 동일하므로 소스 분석하는 일은 그렇게 어렵지 않을 것이다.

아직 다양하게 방법들을 테스트 해보지 않았다. 내가 당장 하고 싶은건 이미지 파일을 동봉해서

보내는 것인데 아직 구현하지 못했다.


환경설정을 위한 정보는 Properties 클래스를 사용하였다. 그리고 그 Properties session

에 저장하고 공통적으로 사용한다.

Properties props = new Properties(); 

props.setProperty("mail.transport.protocol", "smtp"); 

props.setProperty("mail.host", mailhost); 

props.put("mail.smtp.auth", "true"); 

props.put("mail.smtp.port", "465"); 

props.put("mail.smtp.socketFactory.port", "465");


4. 결과 확인


Activity
를 실행하고 화면에서 메일 보내기를 클릭한다. 그러면 설정해 놓은 GMail 계정으로

메일을 보냈다.


메일 사이트로 가 결과를 확인한다.


4. 전체 소스

<<<   GMailSender.class >>>>

package com.success.sample;

import java.io.ByteArrayInputStream; 
import java.io.IOException; 
import java.io.InputStream; 
import java.io.OutputStream; 
import java.security.Security; 
import java.util.Properties; 
 
import javax.activation.DataHandler; 
import javax.activation.DataSource; 
import javax.mail.Message; 
import javax.mail.PasswordAuthentication; 
import javax.mail.Session; 
import javax.mail.Transport; 
import javax.mail.internet.InternetAddress; 
import javax.mail.internet.MimeMessage; 
 
public class GMailSender extends javax.mail.Authenticator { 
    private String mailhost = "smtp.gmail.com"; 
    private String user; 
    private String password; 
    private Session session; 
 
    public GMailSender(String user, String password) { 
        this.user = user; 
        this.password = password; 
 
        Properties props = new Properties(); 
        props.setProperty("mail.transport.protocol", "smtp"); 
        props.setProperty("mail.host", mailhost); 
        props.put("mail.smtp.auth", "true"); 
        props.put("mail.smtp.port", "465"); 
        props.put("mail.smtp.socketFactory.port", "465"); 
        props.put("mail.smtp.socketFactory.class", 
                "javax.net.ssl.SSLSocketFactory"); 
        props.put("mail.smtp.socketFactory.fallback", "false"); 
        props.setProperty("mail.smtp.quitwait", "false"); 
 
        session = Session.getDefaultInstance(props, this); 
    } 
 
    /* (non-Javadoc)
     * @see javax.mail.Authenticator#getPasswordAuthentication()
     */
    protected PasswordAuthentication getPasswordAuthentication() { 
        return new PasswordAuthentication(user, password); 
    } 
 
    public synchronized void sendMail(String subject, String body, String sender, String recipients) throws Exception { 
        MimeMessage message = new MimeMessage(session); 
        DataHandler handler = new DataHandler(new ByteArrayDataSource(body.getBytes(), "text/plain")); 
        message.setSender(new InternetAddress(sender)); 
        message.setSubject(subject); 
        message.setDataHandler(handler); 
        if (recipients.indexOf(',') > 0) 
            message.setRecipients(Message.RecipientType.TO, InternetAddress.parse(recipients)); 
        else 
            message.setRecipient(Message.RecipientType.TO, new InternetAddress(recipients)); 
        Transport.send(message); 
    } 
 
    public class ByteArrayDataSource implements DataSource { 
        private byte[] data; 
        private String type; 
 
        public ByteArrayDataSource(byte[] data, String type) { 
            super(); 
            this.data = data; 
            this.type = type; 
        } 
 
        public ByteArrayDataSource(byte[] data) { 
            super(); 
            this.data = data; 
        } 
 
        public void setType(String type) { 
            this.type = type; 
        } 
 
        public String getContentType() { 
            if (type == null) 
                return "application/octet-stream"; 
            else 
                return type; 
        } 
 
        public InputStream getInputStream() throws IOException { 
            return new ByteArrayInputStream(data); 
        } 
 
        public String getName() { 
            return "ByteArrayDataSource"; 
        } 
 
        public OutputStream getOutputStream() throws IOException { 
            throw new IOException("Not Supported"); 
        } 
    } 
}

<<<   MailSend.class >>>>

package com.success.sample;

import android.app.Activity;
import android.os.Bundle;
import android.util.Log;
import android.view.View;
import android.widget.Button;

import com.success.R;
 
public class SendMail extends Activity { 
    /**
     * Called with the activity is first created.
     */ 
    @Override 
    public void onCreate(Bundle icicle) { 
        super.onCreate(icicle); 
        setContentView(R.layout.send_mail); 
        final Button send = (Button) this.findViewById(R.id.send); 
         
        send.setOnClickListener(new View.OnClickListener() { 
            public void onClick(View view) { 
            GMailSender sender = new GMailSender("id@gmail.com","storm200"); // SUBSTITUTE HERE                   
                try { 
                    sender.sendMail( 
                            "메일제목 !!",   //subject.getText().toString(),  
                            "메일 본문입니다..~~ ",           //body.getText().toString(),  
                            "id@gmail.com",          //from.getText().toString(), 
                            "id@naver.com"            //to.getText().toString() 
                            ); 
                } catch (Exception e) { 
                    Log.e("SendMail", e.getMessage(), e); 
                } 
            } 
        }); 
    } 
}

<<<< send_mail.xml >>>>

<?xml version="1.0" encoding="utf-8"?> 
<LinearLayout xmlns:android="http://schemas.android.com/apk/res/android"
    android:orientation="vertical" 
    android:layout_width="fill_parent" 
    android:layout_height="fill_parent"  > 
 <TextView   
     android:layout_width="fill_parent"  
     android:layout_height="wrap_content"  
     android:text="안녕하세요 "/>        
     <Button 
        android:id="@+id/send"       
        android:layout_width="wrap_content" 
        android:layout_height="wrap_content" 
        android:layout_gravity="center_horizontal"   
        android:text="메일 보내기" /> 

</LinearLayout>  

Posted by 1010
04.Anddoid2010. 7. 5. 15:43
반응형

Android Cloud to Device Messaging Framework

Android Cloud to Device Messaging (C2DM) is a service that helps developers send data from servers to their applications on Android devices. The service provides a simple, lightweight mechanism that servers can use to tell mobile applications to contact the server directly, to fetch updated application or user data. The C2DM service handles all aspects of queueing of messages and delivery to the target application running on the target device.

Note: Android C2DM will ultimately be available to all developers. However, it is currently launched in Labs, and not universally available. If you're interested in using C2DM with your Android applications, go to the signup page to request access. Google will contact you when you've been granted access.

Contents

  1. Introduction
  2. Architectural Overview
    1. Lifecycle Flow
    2. What Does the User See?
  3. Writing Android Applications that use C2DM
    1. Creating the Manifest
    2. Registering for C2DM
    3. Unregistering from C2DM
    4. Handling Registration Results
    5. Handling Received Data
    6. Developing and Testing Your Applications
  4. Role of the Third-Party Application Server
    1. How the Application Server Sends Messages
  5. Examples
  6. Limitations

Introduction

Here are the primary characteristics of Android Cloud to Device Messaging (C2DM):

  • It allows third-party application servers to send lightweight messages to their Android applications. The messaging service is not designed for sending a lot of user content via the messages. Rather, it should be used to tell the application that there is new data on the server, so that the application can fetch it.
  • C2DM makes no guarantees about delivery or the order of messages. So, for example, while you might use this feature to tell an instant messaging application that the user has new messages, you probably would not use it to pass the actual messages.
  • An application on an Android device doesn’t need to be running to receive messages. The system will wake up the application via Intent broadcast when the the message arrives, as long as the application is set up with the proper broadcast receiver and permissions.
  • It does not provide any built-in user interface or other handling for message data. C2DM simply passes raw message data received straight to the application, which has full control of how to handle it. For example, the application might post a notification, display a custom user interface, or silently sync data.
  • It requires devices running Android 2.2 or higher that also have the Market application installed. However, you are not limited to deploying your applications through Market.
  • It uses an existing connection for Google services. This requires users to set up their Google account on their mobile devices.

Architectural Overview

This section gives an overview of how C2DM works.

This table summarizes the key terms and concepts involved in C2DM. It is divided into these categories:

  • Components — The physical entities that play a role in C2DM.
  • Credentials — The IDs and tokens that are used in different stages of C2DM to ensure that all parties have been authenticated, and that the message is going to the correct place.
Components
Mobile Device The device that is running an Android application that uses C2DM. This must be a 2.2 Android device that has Market installed, and it must have at least one logged in Google account.
Third-Party Application Server An application server that developers set up as part of implementing C2DM in their applications. The third-party application server sends data to an Android application on the device via the C2DM server.
C2DM Servers The Google servers involved in taking messages from the third-party application server and sending them to the device.
Credentials
Sender ID An email account associated with the application's developer. The sender ID is used in the registration process to identify a Android application that is permitted to send messages to the device. This ID is typically role-based rather than being a personal account—- for example, my-app@gmail.com.
Application ID The application that is registering to receive messages. The application is identified by the package name from the manifest. This ensures that the messages are targeted to the correct application.
Registration ID An ID issued by the C2DM servers to the Android application that allows it to receive messages. Once the application has the registration ID, it sends it to the third-party application server, which uses it to identify each device that has registered to receive messages for a given application. In other words, a registration ID is tied to a particular application running on a particular device.
Google User Account For C2DM to work, the mobile device must include at least one logged in Google account.
Sender Auth Token A ClientLogin Auth token that is saved on the third-party application server that gives the application server authorized access to Google services. The token is included in the header of POST requests that send messages. For more discussion of ClientLogin Auth tokens, see ClientLogin for Installed Applications.

Lifecycle Flow

Here are the primary processes involved in cloud-to-device messaging:

  • Enabling C2DM. An Android application running on a mobile device registers to receive messages.
  • Sending a message. A third-party application server sends messages to the device.
  • Receiving a message. An Android application receives a message from a C2DM server.

These processes are described in more detail below.

Enabling C2DM

This is the sequence of events that occurs when an Android application running on a mobile device registers to receive messages:

  1. The first time the application needs to use the messaging service, it fires off a registration Intent to a C2DM server.

    This registration Intent (com.google.android.c2dm.intent.REGISTER) includes the sender ID (that is, the account authorized to send messages to the application, which is typically the email address of an account set up by the application's developer), and the application ID.

  2. If the registration is successful, the C2DM server broadcasts a REGISTRATION Intent which gives the application a registration ID.

    The application should store this ID for later use. Note that Google may periodically refresh the registration ID, so you should design your application with the understanding that the REGISTRATION Intent may be called multiple times. Your application needs to be able to respond accordingly.

  3. To complete the registration, the application sends the registration ID to the application server. The application server typically stores the registration ID in a database.

The registration ID lasts until the application explicitly unregisters itself, or until Google refreshes the registration ID for your application.

Sending a Message

For an application server to send a message, the following things must be in place:

  • The application has a registration ID that allows it to receive messages for a particular device.
  • The third-party application server has stored the registration ID.

There is one more thing that needs to be in place for the application server to send messages: a ClientLogin authorization token. This is something that the developer must have already set up on the application server for the application (for more discussion, see Role of the Third-Party Application Server). Now it will get used to send messages to the device.

The ClientLogin token authorizes the application server to send messages to a particular Android application. An application server has one ClientLogin token for a particular 3rd party app, and multiple registration IDs. Each registration ID represents a particular device that has registered to use the messaging service for a particular 3rd party app.

Here is the sequence of events that occurs when the application server sends a message:

  1. The application server sends a message to C2DM servers.
  2. Google enqueues and stores the message in case the device is inactive.
  3. When the device is online, Google sends the message to the device.
  4. On the device, the system broadcasts the message to the specified application via Intent broadcast with proper permissions, so that only the targeted application gets the message. This wakes the application up. The application does not need to be running beforehand to receive the message.
  5. The application processes the message. If the application is doing non-trivial processing, you may want to grab a wake lock and do any processing in a Service.

An application can unregister C2DM if it no longer wants to receive messages.

Receiving a Message

This is the sequence of events that occurs when an Android application running on a mobile device receives a message:

  1. The system receives the incoming message and extracts the raw key/value pairs from the message payload.
  2. The system passes the key/value pairs to the targeted Android application in a com.google.android.c2dm.intent.RECEIVE Intent as a set of extras.
  3. The Android application extracts the raw data from the RECEIVE Intent by key and processes the data.

What Does the User See?

When mobile device users install an applications that include C2DM, they will get a permission from Android Market informing them that the application includes C2DM. They must approve the use of this feature to install the application. Depending on the implementation of the application, it may offer users the option of unregistering to receive messages. Uninstalling the application also has the effect of unregistering.

Writing Android Applications that Use C2DM

To write Android applications that use C2DM, you must have an application server that can perform the tasks described in Role of the Third-Party Application Server. This section describes the steps you take to create a client application that uses C2DM.

Remember that there is no user interface associated with the C2DM Framework. However you choose to process messages in your application is up to you.

There are two primary steps involved in writing a client application:

  • Creating a manifest that contains the permissions the application needs to use C2DM.
  • Implementing your Java code. To use C2DM, this implementation must include:
    • Code to start and stop the registration service.
    • Receivers for com.google.android.c2dm.intent.C2D_MESSAGE and com.google.android.c2dm.intent.REGISTRATION.

Creating the Manifest

Every application must have an AndroidManifest.xml file (with precisely that name) in its root directory. The manifest presents essential information about the application to the Android system, information the system must have before it can run any of the application's code (for more discussion of the manifest file, see the Android Developers Guide). To use the C2DM feature, the manifest must include the following:

  • com.google.android.c2dm.permission.RECEIVE states that the application has permission register and receive messages.
  • android.permission.INTERNET states that the application has permission to send the receiver key to the 3rd party server.
  • applicationPackage + ".permission.C2D_MESSAGE prevents other applications from registering and receiving the application's messages.
  • Receivers for com.google.android.c2dm.intent.RECEIVE and com.google.android.c2dm.intent.REGISTRATION, with the category set as applicationPackage. The receiver should require the com.google.android.c2dm.SEND permission, so that only the C2DM Framework can send it the message. Note that both registration and the receiving of messages are implemented as Intents.
  • If the C2DM feature is critical to the application's function, be sure to set android:minSdkVersion="8" in the manifest. This ensures that the application cannot be installed in an environment in which it could not run properly.

Received C2D_MESSAGE Intents have all key/value pairs sent by the 3rd party server as extras. One special key is collapse_key, which is specified by the sender to allow handling of messages waiting for an off-line device.

Here is an example of a manifest that supports C2DM:

<manifest package="com.example.myapp" ...> 
 
<!-- Only this application can receive the messages and registration result -->  
<permission android:name="com.example.myapp.permission.C2D_MESSAGE" android:protectionLevel="signature" /> 
<uses-permission android:name="com.example.myapp.permission.C2D_MESSAGE" /> 
 
<!-- This app has permission to register and receive message --> 
<uses-permission android:name="com.google.android.c2dm.permission.RECEIVE" /> 
 
<!-- Send the registration id to the server --> 
<uses-permission android:name="android.permission.INTERNET" /> 
 
<!-- Only C2DM servers can send messages for the app. If permission is not set - any other app can generate it -->  
<receiver android:name=".C2DMReceiver" android:permission="com.google.android.c2dm.permission.SEND"> 
    <!-- Receive the actual message --> 
    <intent-filter> 
        <action android:name="com.google.android.c2dm.intent.RECEIVE" /> 
        <category android:name="com.example.myapp" /> 
    </intent-filter> 
    <!-- Receive the registration id --> 
    <intent-filter> 
        <action android:name="com.google.android.c2dm.intent.REGISTRATION" /> 
        <category android:name="com.example.myapp" /> 
    </intent-filter> 
</receiver>

Registering for C2DM

An Android application needs to register with C2DM servers before receiving any message. To register it needs to send an Intent (com.google.android.c2dm.intent.REGISTER), with 2 extra parameters:

  • sender is the ID of the account authorized to send messages to the application, typically the email address of an account set up by the application's developer.
  • app is the application's ID, set with a PendingIntent to allow the registration service to extract application information.

For example:

Intent registrationIntent = new Intent("com.google.android.c2dm.intent.REGISTER"); 
registrationIntent.putExtra("app", PendingIntent.getBroadcast(this, 0, new Intent(), 0); // boilerplate 
registrationIntent.putExtra("sender", emailOfSender); 
startService(registrationIntent);

Registration is not complete until the application sends the registration ID to the third-party application server. The application server uses the registration ID to send messages that are targeted to the application running on that particular device.

Unregistering from C2DM

To unregister from C2DM:

Intent unregIntent = new Intent("com.google.android.c2dm.intent.UNREGISTER"); 
unregIntent.putExtra("app", PendingIntent.getBroadcast(this, 0, new Intent(), 0)); 
startService(unregIntent);

Handling Registration Results

As discussed in Creating the Manifest, the manifest defines a receiver for com.google.android.c2dm.intent.REGISTRATION. It also defines a receiver for com.google.android.c2dm.intent.RECEIVE. Note that both registration and the receiving of messages are implemented as Intents.

The main use of REGISTRATION is to allow the application to receive the registration ID. The Intent can be sent at any time. Google may periodically refresh the receiver ID. An application receiving this Intent with a registration_id parameter must ensure that the third-party application server receives the registration ID. It may do so by saving the registration ID and sending it to the server. If the network is down or there are errors, the application should retry sending the registration ID when the network is up again or the next time it starts. An application should keep track of its registration status and attempt to register again if the process is not fully completed.

The REGISTRATION Intent is generated with an error parameter if the registration couldn't be completed. If that happens, the application should try again later with exponential back off. When the application unregisters, the REGISTRATION Intent will be sent with an unregistered extra parameter.

Here are the possible error codes for the REGISTRATION Intent:

Error Code Description
SERVICE_NOT_AVAILABLE The device can't read the response, or there was a 500/503 from the server that can be retried later. The application should use exponential back off and retry.
ACCOUNT_MISSING There is no Google account on the phone. The application should ask the user to open the account manager and add a Google account. Fix on the device side.
AUTHENTICATION_FAILED Bad password. The application should ask the user to enter his/her password, and let user retry manually later. Fix on the device side.
TOO_MANY_REGISTRATIONS The user has too many applications registered. The application should tell the user to uninstall some other applications, let user retry manually. Fix on the device side.
INVALID_SENDER The sender account is not recognized.
PHONE_REGISTRATION_ERROR Incorrect phone registration with Google. This phone doesn't currently support C2DM.

The application receives a REGISTRATION Intent broadcast whenever the application server attempts to send a message to it. But registration IDs can be nonexistent or invalid for a variety of reasons:

  • If an application is running for the first time, it has no registration ID yet.
  • If the application unregistered, it has no registration ID.
  • The C2DM server periodically refreshes registration IDs.

An application must be prepared to handle every case. For example:

public void onReceive(Context context, Intent intent) { 
    if (intent.getAction().equals("com.google.android.c2dm.intent.REGISTRATION")) { 
        handleRegistration(context, intent); 
    } else if (intent.getAction().equals("com.google.android.c2dm.intent.RECEIVE")) { 
        handleMessage(context, intent); 
     } 
 } 
 
private void handleRegistration(Context context, Intent intent) { 
    String registration = intent.getStringExtra("registration_id");  
    if (intent.getStringExtra("error") != null) { 
        // Registration failed, should try again later. 
    } else if (intent.getStringExtra("unregistered") != null) { 
        // unregistration done, new messages from the authorized sender will be rejected 
    } else if (registration != null) { 
       // Send the registration ID to the 3rd party site that is sending the messages. 
       // This should be done in a separate thread. 
       // When done, remember that all registration is done.  
    } 
}

Handling Received Data

When the C2DM server receives a message from the third-party application server, C2DM extracts the raw key/value pairs from the message payload and passes them to the Android application in the com.google.android.c2dm.intent.RECEIVE Intent as a set of extras. The application extracts the data by key and processes it, whatever that means for that application.

Here is an example:

protected void onReceive(Context context, Intent intent) { 
    String accountName = intent.getExtras().getString(Config.C2DM_ACCOUNT_EXTRA); 
    String message = intent.getExtras().getString(Config.C2DM_MESSAGE_EXTRA); 
    if (Config.C2DM_MESSAGE_SYNC.equals(message)) { 
        if (accountName != null) { 
            if (Log.isLoggable(TAG, Log.DEBUG)) { 
                Log.d(TAG, "Messaging request received for account " + accountName); 
            } 
             
            ContentResolver.requestSync( 
                new Account(accountName, SyncAdapter.GOOGLE_ACCOUNT_TYPE), 
                JumpNoteContract.AUTHORITY, new Bundle()); 
        } 
    } 
}

Developing and Testing Your Applications

Here are some guidelines for developing and testing an Android application that uses the C2DM feature:

  • To develop and test your C2DM applications, you need to run and debug the applications on an Android 2.2 system image that includes the necessary underlying Google services.
  • To develop and debug on an actual device, you need a device running an Android 2.2 system image that includes the Market application.
  • To develop and test on the Android Emulator, you need to download the Android 2.2 version of the Google APIs Add-On into your SDK using the Android SDK and AVD Manager. Specifically, you need to download the component named "Google APIs by Google Inc, Android API 8". Then, you need to set up an AVD that uses that system image.
  • If the C2DM feature is critical to the application's function, be sure to set android:minSdkVersion="8" in the manifest. This ensures that the application cannot be installed in an environment in which it could not run properly.

Role of the Third-Party Application Server

Before you can write client applications that use the C2DM feature, you must have an HTTPS application server that meets the following criteria:

  • Able to communicate with your client.
  • Able to fire off HTTP requests to the C2DM server.
  • Able to handle requests and queue data as needed. For example, it should be able to perform exponential back off.
  • Able to store the ClientLogin Auth token and client registration IDs. The ClientLogin Auth token is included in the header of POST requests that send messages. For more discussion of this topic, see ClientLogin for Installed Applications. The server should store the token and have a policy to refresh it periodically.

How the Application Server Sends Messages

This section describes how the third-party application server sends messages to a 3rd party client application running on a mobile device.

Before the third-party application server can send a message to an application, it must have received a registration ID from it.

To send a message, the application server issues a POST request to https://android.apis.google.com/c2dm/send that includes the following:

Field Description
registration_id The registration ID retrieved from the Android application on the phone. Required.
collapse_key An arbitrary string that is used to collapse a group of like messages when the device is offline, so that only the last message gets sent to the client. This is intended to avoid sending too many messages to the phone when it comes back online. Note that since there is no guarantee of the order in which messages get sent, the "last" message may not actually be the last message sent by the application server. Required.
data.<key> Payload data, expressed as key-value pairs. If present, it will be included in the Intent as application data, with the <key>. There is no limit on the number of key/value pairs, though there is a limit on the total size of the message. Optional.
delay_while_idle If included, indicates that the message should not be sent immediately if the device is idle. The server will wait for the device to become active, and then only the last message for each collapse_key value will be sent. Optional.
Authorization: GoogleLogin auth=[AUTH_TOKEN] Header with a ClientLogin Auth token. The cookie must be associated with the ac2dm service. Required.

This table lists the possible response codes:

Response Description
200

Includes body containing:

  • id=[ID of sent message]
  • Error=[error code]
    • QuotaExceeded — Too many messages sent by the sender. Retry after a while.
    • DeviceQuotaExceeded — Too many messages sent by the sender to a specific device. Retry after a while.
    • InvalidRegistration — Missing or bad registration_id. Sender should stop sending messages to this device.
    • NotRegistered — The registration_id is no longer valid, for example user has uninstalled the application or turned off notifications. Sender should stop sending messages to this device.
    • MessageTooBig — The payload of the message is too big, see the limitations. Reduce the size of the message.
    • MissingCollapseKey — Collapse key is required. Include collapse key in the request.
503 Indicates that the server is temporarily unavailable (i.e., because of timeouts, etc ). Sender must retry later, honoring any Retry-After header included in the response. Application servers must implement exponential back off. Senders that create problems risk being blacklisted.
401 Indicates that the ClientLogin AUTH_TOKEN used to validate the sender is invalid.

Examples

Here are a few complete examples to get you started:

  • JumpNote. JumpNote is a sample two-way notes application, with auto-sync. JumpNote shows how to use the Android Cloud to Device Messaging Framework, as well as the Android Sync framework. JumpNote runs on top of Google App Engine, and it uses GWT for the web user interface.
  • Google Chrome to Phone Extension. "Chrome to Phone" lets users send content from the Chrome browser to their mobile device.

To view the source code, open the Source tab and click Browse. From there, you can navigate through the source tree.

Limitations

C2DM imposes the following limitations:

  • The message size limit is 1024 bytes.
  • Google limits the number of messages a sender sends in aggregate, and the number of messages a sender sends to a specific device
Posted by 1010
04.Anddoid2010. 7. 5. 15:39
반응형

안드로이드(android) 다이얼로그 종류별 구현 방법


개발환경 : JDK 1.5, eclipse-galileo, android GoogleAPI 2.1, window XP


(1) 여러 개의 멀티선택 옵션으로 표현해 주기


다중선택을 위한 다이얼로그 창을 띄운다. 리스트에는 제목과 radio button

이 있다. AlertDialog.Builder 클래스로 구현하며 리스트중 특정행을 클릭했을 때

이벤트는 setSingleChoiceItems 에 등록한다. Ok 버튼클릭 이벤트는

setPositiveButton , Cancel 버튼클릭 이벤트는 setNegativeButton 에 등록하고

기능을 구현하면 된다.


01 private void DialogSelectOption() {
02     final String items[] = { "item1", "item2", "item3" };
03     AlertDialog.Builder ab = new AlertDialog.Builder(DialogSample.this);
04     ab.setTitle("Title");
05     ab.setSingleChoiceItems(items, 0,
06         new DialogInterface.OnClickListener() {
07         public void onClick(DialogInterface dialog, int whichButton) {
08             // 각 리스트를 선택했을때 
09         }
10         }).setPositiveButton("Ok",
11         new DialogInterface.OnClickListener() {
12         public void onClick(DialogInterface dialog, int whichButton) {
13             // OK 버튼 클릭시 , 여기서 선택한 값을 메인 Activity 로 넘기면 된다.
14         }
15         }).setNegativeButton("Cancel",
16         new DialogInterface.OnClickListener() {
17         public void onClick(DialogInterface dialog, int whichButton) {
18             // Cancel 버튼 클릭시
19         }
20         });
21     ab.show();
22 }


(2) html 로 구현한 text 넣기


다이얼로그 창을 띄울 때 공지나 경고성 창이라면 내용이 들어갈것이다. 이 내용을

HTML 태그를 적용해 넣을 수가 있다. 색깔은 제대로 바뀌는 것 같은데 <strong>, <b>

등 글자에 대한 bold 처리가 한거나 안한거나 똑같이 보여서 제대로 표현되는지는

좀더 테스트 해봐야할것같다.


1 private void DialogHtmlView(){
2 AlertDialog.Builder ab=new AlertDialog.Builder(DialogSample.this);
3     ab.setMessage(Html.fromHtml("<STRONG><FONT color=#ff0000> " +
4         "Html 표현여부 " +"</FONT></STRONG><BR>HTML 이 제대로 표현되는지 본다."));
5         ab.setPositiveButton("ok", null);
6         ab.show();
7 }


(3) 프로그레시브(Progress) 다이얼로그 구현


안드로이드에서 프로그레시브바를 구현할수 있다. 이것을 구현하기 위한 클래스는

ProgressDialog 를 사용해야 한다. 다이얼로그 창의 중지는 ProgressDialog

dismiss 를 쓰면된다.


1 private void DialogProgress(){
2        ProgressDialog dialog = ProgressDialog.show(DialogSample.this, "",
3                         "잠시만 기다려 주세요 ...", true);
4       // 창을 내린다.
5       // dialog.dismiss();
6 }

aaa


(4) Radio 버튼을 포함한 다중선택 다이얼로그 창


1번 예제와 비슷하게 Radio 버튼이 추가되어있는 다중선택 다이얼로그 창이다.

차이가 있다면 창 타이틀에 setIcon 을 써서 아이콘을 집어넣은것과

선택한 행 번호를 알아와 Toast 로 화면에 문자열을 표시해주는 내용이다.

창을 닫고 싶다면 onclick 함수에 넘어온 DialogInterface 객체로 cancel 함수를

호출해 닫으면 된다.


01 private void DialogRadio(){
02 final CharSequence[] PhoneModels = {"iPhone", "Nokia", "Android"};
03         AlertDialog.Builder alt_bld = new AlertDialog.Builder(this);
04         alt_bld.setIcon(R.drawable.icon);
05         alt_bld.setTitle("Select a Phone Model");
06         alt_bld.setSingleChoiceItems(PhoneModels, -1, new DialogInterface.OnClickListener() {
07             public void onClick(DialogInterface dialog, int item) {
08                 Toast.makeText(getApplicationContext(), "Phone Model = "+PhoneModels[item], Toast.LENGTH_SHORT).show();
09                 // dialog.cancel();
10             }
11         });
12         AlertDialog alert = alt_bld.create();
13         alert.show();
14 }


(5) 선택에 따른 로직구현을 위한 다이얼로그 창 구현


예를 들어 Yes/No 중 하나를 선택함으로서 특정 기능을 구현해주고자 할 때

쓰일만한 예제이다. 샘플에서는 Yes/No 일때를 구분하여 코드를 구현할수

있도록 나누어져 있다. 우리가 흔히 보는 대표적인 다이얼로그 창일것이다.


01 private void DialogSimple(){
02     AlertDialog.Builder alt_bld = new AlertDialog.Builder(this);
03     alt_bld.setMessage("Do you want to close this window ?").setCancelable(
04         false).setPositiveButton("Yes",
05         new DialogInterface.OnClickListener() {
06         public void onClick(DialogInterface dialog, int id) {
07             // Action for 'Yes' Button
08         }
09         }).setNegativeButton("No",
10         new DialogInterface.OnClickListener() {
11         public void onClick(DialogInterface dialog, int id) {
12             // Action for 'NO' Button
13             dialog.cancel();
14         }
15         });
16     AlertDialog alert = alt_bld.create();
17     // Title for AlertDialog
18     alert.setTitle("Title");
19     // Icon for AlertDialog
20     alert.setIcon(R.drawable.icon);
21     alert.show();
22 }


(6) Time Picker 시간선택 컨트롤을 다이얼로그에 구현


Time Picker 컨트롤을 다이얼로그 창에 구현한 예제이다. 그리고 다이얼로그에

구현되어있는 Time Picker 에서 선택한 값을 부모 화면에서 받아 그 값을 Toast

로 보여준다


01 private void DialogTimePicker(){
02     TimePickerDialog.OnTimeSetListener mTimeSetListener = 
03     new TimePickerDialog.OnTimeSetListener() {
04         public void onTimeSet(TimePicker view, int hourOfDay, int minute) {
05             Toast.makeText(DialogSample.this,
06             "Time is=" + hourOfDay + ":" + minute, Toast.LENGTH_SHORT)
07             .show();
08         }
09     };
10     TimePickerDialog alert = new TimePickerDialog(this
11 mTimeSetListener, 0, 0, false);
12     alert.show();
13 }


(7) Date Picker 날짜선택 컨트롤을 다이얼로그에 구현


Date Picker 컨트롤을 다이얼로그 창에 구현한 예제이다. 그리고 다이얼로그에

구현되어있는 Date Picker 에서 선택한 값을 부모 화면에서 받아 그 값을 Toast

로 보여준다. 창을 띄우기 전에 현재 날짜정보를 넘겨주고 Date Picker 에서는

그것을 받아 표시해 준다.


01 private void DialogDatePicker(){
02     Calendar c = Calendar.getInstance();
03     int cyear = c.get(Calendar.YEAR);
04     int cmonth = c.get(Calendar.MONTH);
05     int cday = c.get(Calendar.DAY_OF_MONTH);
06       
07     DatePickerDialog.OnDateSetListener mDateSetListener = 
08     new DatePickerDialog.OnDateSetListener() {
09     // onDateSet method
10     public void onDateSet(DatePicker view, int year, int monthOfYear, int dayOfMonth) {
11          String date_selected = String.valueOf(monthOfYear+1)+
12                 " /"+String.valueOf(dayOfMonth)+" /"+String.valueOf(year);
13          Toast.makeText(DialogSample.this
14         "Selected Date is ="+date_selected, Toast.LENGTH_SHORT).show();
15     }
16      };
17      DatePickerDialog alert = new DatePickerDialog(this,  mDateSetListener,  
18      cyear, cmonth, cday);
19      alert.show();
20 }


(8) 전체 소스


001 import java.util.ArrayList;
002 import java.util.Calendar;
003 import java.util.HashMap;
004 import java.util.List;
005 import java.util.Map;
006   
007 import android.app.AlertDialog;
008 import android.app.DatePickerDialog;
009 import android.app.ListActivity;
010 import android.app.ProgressDialog;
011 import android.app.TimePickerDialog;
012 import android.content.DialogInterface;
013 import android.os.Bundle;
014 import android.text.Html;
015 import android.util.Log;
016 import android.view.View;
017 import android.widget.DatePicker;
018 import android.widget.ListView;
019 import android.widget.SimpleAdapter;
020 import android.widget.TimePicker;
021 import android.widget.Toast;
022   
023 import com.sample.R;
024   
025 public class DialogSample extends ListActivity {
026   
027     private String[] mMenuText;
028     private String[] mMenuSummary;
029   
030     private String keyName = "name";
031     private String keyDesc = "desc";
032     private String TAG;
033       
034     /** Called when the activity is first created. */
035     @Override
036     public void onCreate(Bundle savedInstanceState) {
037         super.onCreate(savedInstanceState);
038         TAG = getClass().getName();
039   
040         int length = 7;
041         mMenuText = new String[length];
042         mMenuSummary = new String[length];
043   
044         mMenuText[0] = "다중선택 새창";
045         mMenuSummary[0] = "다중선택을 할수 있는 Alert 예제구현이다.";
046         mMenuText[1] = "HTML 적용 새창";
047         mMenuSummary[1] = "Text 에 HTML 을 적용하는 Alert 예제구현이다.";
048         mMenuText[2] = "프로그레시브바 새창";
049         mMenuSummary[2] = "진행중을 나타내는 프로그레시브바 Alert 예제구현다.";
050         mMenuText[3] = "Radio 버튼 새창";
051         mMenuSummary[3] = "Radio 버튼이 들어간 새창 이며 선택하면 창이 닫힌다. ";
052         mMenuText[4] = "Simple Dialog";
053         mMenuSummary[4] = "선택에 따른 로직구현을 위한 다이얼로그 창 구현";
054         mMenuText[5] = "Time Picker";
055         mMenuSummary[5] = "Time Picker 시간선택 컨트롤을 다이얼로그에 구현";
056         mMenuText[6] = "Date Picker";
057         mMenuSummary[6] = "Date Picker 날짜선택 컨트롤을 다이얼로그에 구현";
058   
059         setListAdapter(new SimpleAdapter(this, getListValues(),
060                 android.R.layout.simple_list_item_2, new String[] { keyName,
061                         keyDesc }, new int[] { android.R.id.text1,
062                         android.R.id.text2 }));
063     }
064   
065     private List<MAP<STRING, String>> getListValues() {
066         List<MAP<STRING, String>> values = new ArrayList<MAP<STRING, String>>();
067         int length = mMenuText.length;
068         for (int i = 0; i < length; i++) {
069             Map<STRING, String> v = new HashMap<STRING, String>();
070             v.put(keyName, mMenuText[i]);
071             v.put(keyDesc, mMenuSummary[i]);
072             values.add(v);
073         }
074         return values;
075     }
076   
077     @Override
078     protected void onListItemClick(ListView l, View v, int position, long id) {
079         super.onListItemClick(l, v, position, id);
080         Log.d(TAG, "id : " + id + ", position : " + position);
081         switch (position) {
082         case 0:
083             // 다중선택 옵션창 
084             this.DialogSelectOption();
085             break;
086         case 1:
087             // HTML 구현 
088             this.DialogHtmlView();
089             break;
090         case 2:
091             // 프로그레시브바 구현
092             this.DialogProgress();
093             break;
094         case 3:
095             //  Radio 버튼이 추가된 다중선택 창
096             this.DialogRadio();
097             break;
098         case 4:
099             // 가장 일반적인 Yes/NO기능구현 Dialog
100             this.DialogSimple();
101             break;
102         case 5:
103             this.DialogTimePicker();
104             break;
105         case 6:
106             // 날짜 선택 Dialog 구현 
107             this.DialogDatePicker();
108             break;
109         default:
110             break;
111         }
112     }
113   
114     private void DialogSelectOption() {
115         final String items[] = { "item1", "item2", "item3" };
116         AlertDialog.Builder ab = new AlertDialog.Builder(DialogSample.this);
117         ab.setTitle("Title");
118         ab.setSingleChoiceItems(items, 0,
119             new DialogInterface.OnClickListener() {
120                 public void onClick(DialogInterface dialog, int whichButton) {
121                     // 각 리스트를 선택했을때 
122                 }
123             }).setPositiveButton("Ok",
124             new DialogInterface.OnClickListener() {
125                 public void onClick(DialogInterface dialog, int whichButton) {
126                     // OK 버튼 클릭시 , 여기서 선택한 값을 메인 Activity 로 넘기면 된다.
127                 }
128             }).setNegativeButton("Cancel",
129             new DialogInterface.OnClickListener() {
130                 public void onClick(DialogInterface dialog, int whichButton) {
131                     // Cancel 버튼 클릭시
132                 }
133             });
134         ab.show();
135     }
136       
137     private void DialogHtmlView(){
138         AlertDialog.Builder ab=new AlertDialog.Builder(DialogSample.this);
139         ab.setMessage(Html.fromHtml("<STRONG><FONT color=#ff0000> " +
140                 "Html 표현여부 " +"</FONT></STRONG><BR>
141 HTML 이 제대로 표현되는지 본다."));
142             ab.setPositiveButton("ok", null);
143             ab.show();
144     }
145       
146     private void DialogProgress(){
147         ProgressDialog dialog = ProgressDialog.show(DialogSample.this, "",
148                                 "잠시만 기다려 주세요 ...", true);
149                 
150         // 창을 내린다.
151         // dialog.dismiss();
152     }
153       
154     private void DialogRadio(){
155         final CharSequence[] PhoneModels = {"iPhone", "Nokia", "Android"};
156         AlertDialog.Builder alt_bld = new AlertDialog.Builder(this);
157         alt_bld.setIcon(R.drawable.icon);
158         alt_bld.setTitle("Select a Phone Model");
159         alt_bld.setSingleChoiceItems(PhoneModels, -1, new DialogInterface.OnClickListener() {
160             public void onClick(DialogInterface dialog, int item) {
161                 Toast.makeText(getApplicationContext(), "Phone Model = "+PhoneModels[item], Toast.LENGTH_SHORT).show();
162                 dialog.cancel();
163             }
164         });
165         AlertDialog alert = alt_bld.create();
166         alert.show();
167     }
168       
169     private void DialogSimple(){
170         AlertDialog.Builder alt_bld = new AlertDialog.Builder(this);
171         alt_bld.setMessage("Do you want to close this window ?").setCancelable(
172                 false).setPositiveButton("Yes",
173                 new DialogInterface.OnClickListener() {
174                     public void onClick(DialogInterface dialog, int id) {
175                         // Action for 'Yes' Button
176                     }
177                 }).setNegativeButton("No",
178                 new DialogInterface.OnClickListener() {
179                     public void onClick(DialogInterface dialog, int id) {
180                         // Action for 'NO' Button
181                         dialog.cancel();
182                     }
183                 });
184         AlertDialog alert = alt_bld.create();
185         // Title for AlertDialog
186         alert.setTitle("Title");
187         // Icon for AlertDialog
188         alert.setIcon(R.drawable.icon);
189         alert.show();
190     }
191       
192     private void DialogTimePicker(){
193         TimePickerDialog.OnTimeSetListener mTimeSetListener = 
194             new TimePickerDialog.OnTimeSetListener() {
195                 public void onTimeSet(TimePicker view, int hourOfDay, int minute) {
196                     Toast.makeText(DialogSample.this,
197                         "Time is=" + hourOfDay + ":" + minute, Toast.LENGTH_SHORT)
198                         .show();
199                 }
200         };
201         TimePickerDialog alert = new TimePickerDialog(this, mTimeSetListener, 0, 0, false);
202         alert.show();
203     }
204       
205     private void DialogDatePicker(){
206         Calendar c = Calendar.getInstance();
207         int cyear = c.get(Calendar.YEAR);
208         int cmonth = c.get(Calendar.MONTH);
209         int cday = c.get(Calendar.DAY_OF_MONTH);
210           
211         DatePickerDialog.OnDateSetListener mDateSetListener = 
212             new DatePickerDialog.OnDateSetListener() {
213                 // onDateSet method
214                 public void onDateSet(DatePicker view, int year, int monthOfYear, int dayOfMonth) {
215                     String date_selected = String.valueOf(monthOfYear+1)+
216                         " /"+String.valueOf(dayOfMonth)+" /"+String.valueOf(year);
217                     Toast.makeText(DialogSample.this
218                             "Selected Date is ="+date_selected, Toast.LENGTH_SHORT).show();
219                 }
220         };
221         DatePickerDialog alert = new DatePickerDialog(this,  mDateSetListener,  cyear, cmonth, cday);
222         alert.show();
223     }
224   
225 }


package com.DialogSample;

import java.util.ArrayList;
import java.util.Calendar;
import java.util.HashMap;
import java.util.List;
import java.util.Map;

import android.app.AlertDialog;
import android.app.DatePickerDialog;
import android.app.ListActivity;
import android.app.ProgressDialog;
import android.app.TimePickerDialog;
import android.content.DialogInterface;
import android.os.Bundle;
import android.text.Html;
import android.util.Log;
import android.view.View;
import android.widget.DatePicker;
import android.widget.ListView;
import android.widget.SimpleAdapter;
import android.widget.TimePicker;
import android.widget.Toast;

public class DialogSample extends ListActivity {

 private String[] mMenuText;
 private String[] mMenuSummary;

 private String keyName = "name";
 private String keyDesc = "desc";
 private String TAG;

 /** Called when the activity is first created. */
 @Override
 public void onCreate(Bundle savedInstanceState) {
  super.onCreate(savedInstanceState);
  TAG = getClass().getName();

  int length = 7;
  mMenuText = new String[length];
  mMenuSummary = new String[length];

  mMenuText[0] = "다중선택 새창";
  mMenuSummary[0] = "다중선택을 할수 있는 Alert 예제구현이다.";
  mMenuText[1] = "HTML 적용 새창";
  mMenuSummary[1] = "Text 에 HTML 을 적용하는 Alert 예제구현이다.";
  mMenuText[2] = "프로그레시브바 새창";
  mMenuSummary[2] = "진행중을 나타내는 프로그레시브바 Alert 예제구현다.";
  mMenuText[3] = "Radio 버튼 새창";
  mMenuSummary[3] = "Radio 버튼이 들어간 새창 이며 선택하면 창이 닫힌다. ";
  mMenuText[4] = "Simple Dialog";
  mMenuSummary[4] = "선택에 따른 로직구현을 위한 다이얼로그 창 구현";
  mMenuText[5] = "Time Picker";
  mMenuSummary[5] = "Time Picker 시간선택 컨트롤을 다이얼로그에 구현";
  mMenuText[6] = "Date Picker";
  mMenuSummary[6] = "Date Picker 날짜선택 컨트롤을 다이얼로그에 구현";

  setListAdapter(new SimpleAdapter(this, getListValues(), android.R.layout.simple_list_item_2, new String[] {
    keyName, keyDesc }, new int[] { android.R.id.text1, android.R.id.text2 }));
 }

 private List<Map<String, String>> getListValues() {
  List<Map<String, String>> values = new ArrayList<Map<String, String>>();
  int length = mMenuText.length;
  for (int i = 0; i < length; i++) {
   Map<String, String> v = new HashMap<String, String>();
   v.put(keyName, mMenuText[i]);
   v.put(keyDesc, mMenuSummary[i]);
   values.add(v);
  }
  return values;
 }

 @Override
 protected void onListItemClick(ListView l, View v, int position, long id) {
  super.onListItemClick(l, v, position, id);
  Log.d(TAG, "id : " + id + ", position : " + position);
  switch (position) {
  case 0:
   // 다중선택 옵션창
   this.DialogSelectOption();
   break;
  case 1:
   // HTML 구현
   this.DialogHtmlView();
   break;
  case 2:
   // 프로그레시브바 구현
   this.DialogProgress();
   break;
  case 3:
   // Radio 버튼이 추가된 다중선택 창
   this.DialogRadio();
   break;
  case 4:
   // 가장 일반적인 Yes/NO기능구현 Dialog
   this.DialogSimple();
   break;
  case 5:
   this.DialogTimePicker();
   break;
  case 6:
   // 날짜 선택 Dialog 구현
   this.DialogDatePicker();
   break;
  default:
   break;
  }
 }

 private void DialogSelectOption() {
  final String items[] = { "item1", "item2", "item3" };
  AlertDialog.Builder ab = new AlertDialog.Builder(DialogSample.this);
  ab.setTitle("Title");
  ab.setSingleChoiceItems(items, 0, new DialogInterface.OnClickListener() {
   public void onClick(DialogInterface dialog, int whichButton) {
    // 각 리스트를 선택했을때
   }
  }).setPositiveButton("Ok", new DialogInterface.OnClickListener() {
   public void onClick(DialogInterface dialog, int whichButton) {
    // OK 버튼 클릭시 , 여기서 선택한 값을 메인 Activity 로 넘기면 된다.
   }
  }).setNegativeButton("Cancel", new DialogInterface.OnClickListener() {
   public void onClick(DialogInterface dialog, int whichButton) {
    // Cancel 버튼 클릭시
   }
  });
  ab.show();
 }

 private void DialogHtmlView() {
  AlertDialog.Builder ab = new AlertDialog.Builder(DialogSample.this);
  ab.setMessage(Html.fromHtml("<STRONG><FONT color=#ff0000> " + "Html 표현여부 "
    + "</FONT></STRONG><BR>  HTML 이 제대로 표현되는지 본다."));
  ab.setPositiveButton("ok", null);
  ab.show();
 }

 private void DialogProgress() {
  ProgressDialog dialog = ProgressDialog.show(DialogSample.this, "", "잠시만 기다려 주세요 ...", true);

  // 창을 내린다.
  dialog.dismiss();
 }

 private void DialogRadio() {
  final CharSequence[] PhoneModels = { "iPhone", "Nokia", "Android" };
  AlertDialog.Builder alt_bld = new AlertDialog.Builder(this);
  alt_bld.setIcon(R.drawable.icon);
  alt_bld.setTitle("Select a Phone Model");
  alt_bld.setSingleChoiceItems(PhoneModels, -1, new DialogInterface.OnClickListener() {
   public void onClick(DialogInterface dialog, int item) {
    Toast.makeText(getApplicationContext(), "Phone Model = " + PhoneModels[item],
      Toast.LENGTH_SHORT).show();
    dialog.cancel();
   }
  });
  AlertDialog alert = alt_bld.create();
  alert.show();
 }

 private void DialogSimple() {
  AlertDialog.Builder alt_bld = new AlertDialog.Builder(this);
  alt_bld.setMessage("Do you want to close this window ?").setCancelable(false).setPositiveButton("Yes",
    new DialogInterface.OnClickListener() {
     public void onClick(DialogInterface dialog, int id) {
      // Action for 'Yes' Button
     }
    }).setNegativeButton("No", new DialogInterface.OnClickListener() {
   public void onClick(DialogInterface dialog, int id) {
    // Action for 'NO' Button
    dialog.cancel();
   }
  });
  AlertDialog alert = alt_bld.create();
  // Title for AlertDialog
  alert.setTitle("Title");
  // Icon for AlertDialog
  alert.setIcon(R.drawable.icon);
  alert.show();
 }

 private void DialogTimePicker() {
  TimePickerDialog.OnTimeSetListener mTimeSetListener = new TimePickerDialog.OnTimeSetListener() {
   public void onTimeSet(TimePicker view, int hourOfDay, int minute) {
    Toast.makeText(DialogSample.this, "Time is=" + hourOfDay + ":" + minute, Toast.LENGTH_SHORT)
      .show();
   }
  };
  TimePickerDialog alert = new TimePickerDialog(this, mTimeSetListener, 0, 0, false);
  alert.show();
 }

 private void DialogDatePicker() {
  Calendar c = Calendar.getInstance();
  int cyear = c.get(Calendar.YEAR);
  int cmonth = c.get(Calendar.MONTH);
  int cday = c.get(Calendar.DAY_OF_MONTH);

  DatePickerDialog.OnDateSetListener mDateSetListener = new DatePickerDialog.OnDateSetListener() {
   // onDateSet method
   public void onDateSet(DatePicker view, int year, int monthOfYear, int dayOfMonth) {
    String date_selected = String.valueOf(monthOfYear + 1) + " /" + String.valueOf(dayOfMonth)
      + " /" + String.valueOf(year);
    Toast.makeText(DialogSample.this, "Selected Date is =" + date_selected, Toast.LENGTH_SHORT)
      .show();
   }
  };
  DatePickerDialog alert = new DatePickerDialog(this, mDateSetListener, cyear, cmonth, cday);
  alert.show();
 }

}


Posted by 1010
04.Anddoid2010. 6. 25. 14:37
반응형
저번에 XMPPConnection를 상속받아서 GoogleTalkConnection을 만들어보왔는데 그모든기능을 하나의 객체안에서 쓰기 편하게 하기 위해서 GoogleTalkClient를 제작을 해보았다. 코드는 아직 초보라서 잘하지는 못했지만 간단한 기능은 제공한다고 생각해서 올려본다.
 

* GoogleTalkConnection 소스를 보실려면 여기 ▶ XMPPConnection 소스보기

001 import org.jivesoftware.smack.*;
002 import org.jivesoftware.smack.filter.PacketFilter;
003   
004 /**
005  * @author GoogleTalk Client 프로그램으로서 XMPP통신으로 채팅을 지원하는 객체
006  * smack.jar 파일이 잇어야함!
007  * has-a : GoogleTalkConnection, MessageListener;
008  *  
009  */
010 public class GoogleTalkClient {
011       
012     private final GoogleTalkConnection connection;
013     private final String username;
014     private final String password;
015     private String recipientsName;
016     private MessageListener listener = null;
017       
018     /**
019      * GoogleTalkClient 생성자!
020      * @param username 접속자의 Gmail 주소 입니다.
021      * @param password Gmail의 비밀번호 입니다.
022      * @throws XMPPException 접속과 로그인에서의 예외처리입니다.
023      */
024     public GoogleTalkClient(String username, String password) throws XMPPException {
025          connection = new GoogleTalkConnection();
026          connection.login(username, password);
027          this.username = username;
028          this.password = password;
029     }
030       
031     /**
032      * public void open() throws XMPPException {
033      
034      * XMPPConnection 의 접속및 로그인을 합니다. 
035      * @throws XMPPException
036      */
037     public void open() throws XMPPException {
038         if (isConnected()) {
039             connection.connect();
040             connection.login(username, password);
041         }
042     }
043       
044     /**
045      * public void close(){ 
046      
047      * 커넥션 접속 해제를 합니다.
048      */
049     public void close() {
050         if (!isConnected()){
051             connection.disconnect();
052         }
053     }
054       
055     /**
056      * public boolean isConnected()
057      
058      * 커넥션의 접속된 정보를 표현합니다.
059      * @return 커넥션접속정보!
060      */
061     public boolean isConnected() {
062         return connection.isConnected();
063     }
064       
065     /**
066      * public void addMessageListener(MessageListener listener)
067      
068      * 상대방의 보낸메세지를 담당하는 MessageLisener 추가 메서드
069      * @param listener MessageListener
070      */
071     public void addMessageListener(MessageListener listener) {
072         this.listener = listener;
073     }
074       
075     /**
076      * public void addWriterListener(PackteListener listener)
077      
078      * 내가 보낸메세지를 담당하는 추가메서드
079      * @param listener PacketListener
080      */
081     public void addWriterListener(PacketListener listener) {
082         addWriterListener(listener, null);
083     }
084       
085     /**
086      * public void addWriterListener(PacketListener listener, PacketFilter filter) {
087      
088      * 내가 보낸메세지를 담당하는 추가메서드
089      * @param listener PacketListener
090      * @param filter PacketFilter
091      */
092     public void addWriterListener(PacketListener listener, PacketFilter filter) {
093         connection.addPacketWriterListener(listener, filter);
094     }
095       
096     /**
097      * public String getUserName(){
098      
099      * 사용자의 gmail 주소를 리턴합니다.
100      * @return 사용자의 gmail 주소
101      */
102     public String getUserName() {
103         return username;
104     }
105       
106     /**
107      * public String getPassWord(){ 
108      
109      * 사용자의 비밀번호를 리턴합니다.  
110      * @return 사용자의 비밀번호 리턴
111      */
112     public String getPassWord(){
113         return password;
114     }
115       
116     /**
117      * public void setRecipientsName(String name) {
118      
119      * 받는사람의 Gmail 주소를 등록한다.
120      * @param 받는사람
121      */
122     public void setRecipientsName(String name) {
123         this.recipientsName = name;
124     }
125       
126     /**
127      * public String getRecipientsName(){
128      
129      * 받는사람의 Gmail 주소를 리턴합니다.
130      * @return 받는사람
131      */
132     public String getRecipientsName() {
133         return recipientsName;
134     }
135       
136     /**
137      * public void sendMessage(String message) throws XMPPException {
138      
139      * setRecipientsName을 통해 미리 등록이 되있어야만 쪽지를 보낼수있다. 
140      * @param message 보낼 쪽지를 의미 합니다.
141      * @throws XMPPException 
142      */
143     public void sendMessage(String message) throws XMPPException {
144         sendMessage(recipientsName, message);
145     }
146       
147     /**
148      * public void sendMessage(String to, String message) throws XMPPException {
149      
150      * 상대방에게 메세지를 보냅니다.
151      
152      * @param to 상대방의 Gmail 아이디 입니다.
153      * @param message  상대방에게 보낼 메세지입니다.
154      * @throws XMPPException XMPPException입니다.
155      */
156     public void sendMessage(String to, String message) throws XMPPException {
157         Chat chat = connection.getChatManager().createChat(to, this.listener);
158         chat.sendMessage(message);
159     }
Posted by 1010
04.Anddoid2010. 6. 25. 14:35
반응형
안드로이드에서 자주 사용하는 기법인 ListView에 동적으로 아이템을 추가시 새로추가된 아이템으로 스크롤이 이동이 되지 않는 현상에 대해서 간단하게 알아보겠습니다.

일단 간단한 상황을 예를 들어서 풀어보도록 하겠습니다.

상황 : 현재의 Activity는 ListView와 EditText로 구성이 되어있고 EditText에 내용을 입력하고 Enter키를 입력시 ListView에 동적으로 추가된다.

위의 상황을 코드로 표현을 해보겠습니다.

01 public class TranscriptDemo extends ListActivity implements OnKeyListener {
02     private ArrayAdapter<STRING> adapter;
03     private ArrayList<STRING> list = new ArrayList<STRING>();
04     private EditText editText;
05        
06     public void onCreate(Bundle bundle){
07         super.onCreate(bundle);
08         setContentView(R.layout.transcript);
09           
10         editText = (EditText)findViewById(R.id.EditText01);
11         editText.setOnKeyListener(this);
12         adapter = new ArrayAdapter<STRING>(this, android.R.layout.simple_list_item_1, list);
13         setListAdapter(adapter);
14     }
15   
16     @Override
17     public boolean onKey(View v, int keyCode, KeyEvent event) {
18         if (event.getAction() == KeyEvent.ACTION_DOWN) {
19             switch (keyCode) {
20                 case KeyEvent.KEYCODE_ENTER:
21                     setText();
22                     return true;
23             }
24         }
25         return false;
26     }
27       
28     private void setText() { 
29         adapter.add(editText.getText().toString());
30         editText.setText(null);
31     }
32 }

코드를 정상적으로 작성을 하였으면 밑에 화면과 같이 정상적으로 동작이 됩니다.


하지만 여기서 문제가 있는게 위와같이 게속 아이템을 등록을 한다면 스크롤바가 생기게 될텐데 그 포커스가 밑에 그림과 같이 처음의 포커스에 맞춰져 잇다는점 입니다.


이 문제를 해결하기 위해서 저는 예전에 새로운 아이템을 추가할 시에 마지막 아이템을 선택 하기 조건을 줬습니다.

1 getListView().setSelection(list.size() - 1);

하지만 안드로이드 내에서 ListView에 제공하는 속성인 android:transcriptMode를 이용하여 더욱더 간단하게 처리를 할수 있습니다.
android:transcriptMode에 대해서 알아보자.

android:transcriptMode ?


Sets the transcript mode for the list. In transcript mode, the list scrolls to the bottom to make new items visible when they are added.

Must be one of the following constant values.


 Constant  Value  Description
 disabled  0  Disables transcript mode. This is the default value.
 normal  1  The list will automatically scroll to the bottom when a data set change notification is received and only if the last item is already visible on screen.
 alwaysScroll  2  The list will automatically scroll to the bottom, no matter what items are currently visible.

위에 자료는 안드로이드 API에 있는 내용이다. 간단하게 설명을하자면
transcriptMode 속성은 3가지의 값을 정의해줄수 있고 각각의 설명은 아래와 같다.  

1. disabled : 스크롤이 되지 않음
2. nomal : 현재의 포커스에서 추가된만큼의 포커스가 이동
3. alwaysScroll : 마지막에 추가된곳으로 포커스 이동

제가 만들프로그램은 마지막에 추가된곳으로 포커스가 이동을 해야하기 때문에 alwaysScroll을 줘야한다.

1 getListView().setTranscriptMode(ListView.TRANSCRIPT_MODE_ALWAYS_SCROLL);

위와같이 Java단에서 설정을 해줘도 되고 xml에서 설정을 해줘도 된다.
설정이 올바르게 끝났으면 정상적으로 밑에 화면과 같이 작동을 할것이다.


출처 : http://dmh11.tistory.com/entry/ListView에-동적으로-아이템-추가시-스크롤-문제
Posted by 1010