'분류 전체보기'에 해당되는 글 2491건

  1. 2009.01.19 JSP 페이지 이동 4가지 방법 및 특성
  2. 2009.01.19 동적 서블릿 이미지 메이킹을 마음대로!
  3. 2009.01.19 썸네일 이미지 만들기
  4. 2009.01.19 웹관련 Tool들...
  5. 2009.01.19 Eclipse 3.4 + DWR 테스트 환경 설정.
  6. 2009.01.19 JSTL (JSP Standard Tag Library)
  7. 2009.01.19 jstl/el db접속 간단예제 2
  8. 2009.01.19 jstl 문법정리 2
  9. 2009.01.19 JSTL과 Velocity를 활용한 UI 레이어 구현 방법
  10. 2009.01.15 Struts2 첨부터 시작해보기...
  11. 2009.01.15 Concurrent Versions System (cvs) 1
  12. 2009.01.15 Eclipse 3.2.2 download...
  13. 2009.01.15 Apache Struts 2 Documentation
  14. 2009.01.15 windows 7 설치 후...
  15. 2009.01.14 iBATIS
  16. 2009.01.14 Struts2 맛보기!
  17. 2009.01.14 JAVA를 이용한 JSP페이지에서 날짜 구하기 및 계산
  18. 2009.01.14 [java]Calendar 클래스 이용 날짜계산...
  19. 2009.01.09 naver blog 에서 tistory 로 게시물
  20. 2009.01.08 [ExtJs] 튜토리얼 1
  21. 2009.01.08 Ext 2.0 Tutorial Introduction
  22. 2009.01.08 ExtJS 개발하기 위해 선행되는 지식들 :: Scripter/EXTJS 1
  23. 2009.01.08 ExtJs 공식 블로그에 Intergrating Google Maps API With ExtJS 라는 글이 포스팅
  24. 2009.01.08 PostBooks ERP, accounting, CRM by xTuple
  25. 2009.01.08 Customizing Openbravo ERP look and feel
  26. 2009.01.08 Openbravo ERP installation
  27. 2009.01.08 소스 ERP 솔루션
  28. 2009.01.06 Process Explorer v11.31
  29. 2009.01.06 Windows 2003 서버의 터미널서버 접속 라이센스가 없다고 나올때
  30. 2009.01.05 터미널 서비스 클라이언트의 라이센스 만료시 대처방법
05.JSP2009. 1. 19. 13:42
반응형

먼저 다음 페이지 이동 특성들을 미리 알아볼 필요가 있습니다

JSP에서는 페이지 이동시 다음 4가지 정도의 방법이 있습니다


JavaScript를 이용

window.open, location.href, location.replace 등을 이용할수 있습니다


login_process.jsp

<% if (a == null) { %>

      <script>location.href = "admin.jsp"; </script>

<% } else { %>

      <script>alert('권한이 없어요!'); window.history.back(); </script>

<% } %>


특징적인부분은 브라우져의 주소창이 변경되며

(이말은 즉슨 클라이언트가 다시 admin.jsp를 서버에 요청한다는 말입니다)

login_process.jsp 에서 jsp가 다 실행되고 브라우져에 out put된 html 및 javascript들만으로

실행된 코드들이라는 것입니다


response.sendRedirect를 이용

login_process.jsp

<% if (a == null) {

          response.sendRedirect("admin.jsp");

     } else {

          response.sendRedirect("login.jsp");

     }


     a = "test 입니다";

     System.out.println(a);

%>


이 코드에서 a가 출력될까요 안될까요?

출력 됩니다.

sendRedirect가 되더라도 밑에 jsp 코드들은 모두 실행 된다는 말입니다

response.sendRedirect는 기본적으로 모든 로직들을 다 처리한 후 코드 맨 마지막 부분에

사용하는 것이 올바른 방법입니다

만약 그렇지 못한 경우는 response.sendRedirect 다음 바로 return; 이라는 코드를 집어 넣어야 합니다


response.sendRedirect은 HTTP 헤더정보를 변경하여 redirect시키기 때문에 역시 브라우져의 주소창이 변경되며 sendRedirect가 실행되기전 html이나 javascript로 out put되는 코드들은 모두 실행되지 않습니다.


forward 이용

jsp 태그의 <jsp:forward> 나 servlet의 RequestDispatcher.forward 를 이용할수 있습니다


login_process.jsp

<% if (a == null) { %>

          <jsp:forward page="admin.jsp"/>

<% } else { %>

          <jsp:forward page="login.jsp"/>

<% }


     a = "test 입니다";

     System.out.println(a);

%>


그럼 위의 코드의 경우 a가 출력 될까요 안될까요?

정답은 출력 안됩니다. 바로 forward 되어 버립니다.

클라이언트로 응답주지 않고 바로 서버측에서 admin.jsp로 이동하기 때문에

주소창이 바뀌지 않고 그로인해 브라우져에 출력되는 응답속도 또한 사용자가 보기에는

응답이 빠른 장점이 있습니다


하지만 forward 이후 JSP 코드들이 실행되지 않는것 사실이지만 만약 finally절이 있는경우

finally절은 실행 됨으로 확실히 알아둡시다.


meta 태그 이용

마지막으로 meta 태그를 이용할 수도 있습니다.


<META http-equiv=refresh content="0;url=admin.jsp">


즉 요약하자면..

페이지 이동 방법이 여러가지가 있습니다.

그 특성들을 잘 알고 올바르게 사용하여야 합니다.

Posted by 1010
01.JAVA/Java2009. 1. 19. 13:39
반응형
동적 서블릿 이미지 메이킹을 마음대로!

난이도 : 초급

Dan Becker
소프트웨어 개발자, IBM Software Group
2002년 11 월

웹 사이트를 코딩하고 지원하거나 인터넷에 페이지를 갖고 있다면 독자들의 필요를 충족시키는 이미지를 제공하는 것이 얼마나 어려운 일인지 알 것이다. JavaServer Pages (JSP) 태그를 이용하여 이미지 관리를 시도해보자.

세상을 지배하라! 그렇지 않다면, 적어도 이미지라도 지배하라!
사이트 개발자 또는 페이지 작성자로서 다양한 선호를 만족시키는 것은 어려운 일이라는 것을 안다. 이를 수작업으로 수행하기 위해서는 사이트의 이미지 하나하나를 웹 사이트가 지원하는 이미지 사이즈로 변환해야한다. 그런다음 사이트의 각 페이지에 이미지 태그를 조정하여 각각의 태그가 이미지 사이즈를 적절하게 반영할 수 있도록 해야한다. 이미지를 변경하지 않고서는 HTML img 태그의 넓이와 높이를 간단히 변경시킬 수 없다. 이는 저대역 사용자들은 큰 이미지를 다운로드하여 클라이언트 측에서 리사이징을 해야한다는 것을 뜻한다. 이러한 종류의 이미지 관리는 성가실 뿐 아니라 에러를 양산해낸다. 그리고 대부분의 웹 사이트가 다양한 이미지 사이즈를 제공하지 않는 이유를 쉽게 알 수 있다.

문제는 기술의 문제가 아니다. 자바 프로그래밍으로 이미지를 다양한 사이즈나 포맷으로 변환하기는 쉽다. 서비스만의 문제 또한 아니다. 웹 서비스를 사용하여 각자의 필요에 맞춰 페이지를 커스터마이징하는 것이 일반적이기 때문이다. 문제는 전개와 관리가 쉽도록 기술과 서비스를 조합하는 일이다.

이 글은 JavaServer Pages (JSP) 태그를 사용하는 솔루션으로 이미지를 관리하는 방법을 다룬다. 예를들어 HTML에서 이미지 태그를 코딩하고 다양한 버전의 이미지 사이즈를 갖추는 대신 다음과 같이 하는것이다:


<img src="images/LazyDog.jpg" width="800" height="600" >

사용자의 선호에 맞춰 이미지를 자동으로 사이징하는 태그를 갖추는 것이 합리적이다:


<util:imagesizer src="images/LazyDog.jpg"/>

사용자가 다양한 사이즈 중에서 선택하고 선호도에 따라 사이트상의 모든 이미지가 바뀌도록 하는 것이 가능하다. 그림 1의 샘플 이미지를 보자. 또한 넓이와 높이 속성을 삽입하고 태그를 수동으로 편집하는 일 따위는 하지 않아도 된다.

그림 1. 이미지 선택이 있는 JSP 페이지

한번도 JSP 커스텀 태그를 본 적이 없다면 예제에서 신택스를 연구해보자. JSP 커스텀 태그를 HTML 태그와 비교해보자:

JSP 페이지가 커스텀 image-sizer 태그를 사용할 때, 태그의 자바 구현은 이미지 파일을 찾아 적절한 사이즈로 변환하고 이 이미지를 독자에게 제공한다. 태그는 퍼블리싱하기 전에 이미지 변환 부터 사이트 매니저를 저장한다. 또한 웹 페이지 작성 작업을 단순화한다. 단지 하나의 페이지가 많은 이미지 사이즈 선택을 핸들하는데 필요하기 때문이다. 무엇보다도, 중요한 것은 각자의 사이트 이미지에 이러한 유연성을 제공한다면 인기있는 사이트가 될 것이다.

웹 서버
이제는, 클라이언트(웹 브라우저를 이용하는 독자)가 JSP 페이지를 제공하는 사이트를 방문할 때 그 배후에 어떤일이 벌어지는지 알아보자. 세 개의 인터랙션이 이루어진다. (그림 2):

그림 2. 웹 클라이언트와 서버 간 인터랙션

첫 번째 경우, 브라우저가 HTML 파일이나 이미지 파일 같은 정적 문서를 요청한다고 가정해보자. 서버는 파일 공간에 리소스를 위치시키고 브라우저에 파일을 제공한다. 문서를 요청하고 요청에 응답하는 것은 HTTP에 정의되어 있는데 이것은 인터넷 상에서 클라이언트-서버 인터랙션의 기초가 된다. 웹 서버는 요청을 완벽하게 핸들하고 웹 애플리케이션 서버나 서블릿 콘테이너와 인터랙션 할 필요가 없다.

두 번째 경우 브라우저가 자바 서블릿을 포함하는 웹 리소스를 요청한다고 가정해보자. 자바 서블릿은 웹 서버가 자바 프로그래밍 언어를 사용하여 서버상에서 태스크를 수행하도록 한다. 서블릿들은 효율적이어서 CGI와 서버측 JavaScript 같은 오래된 기술보다 메모리와 프로세싱 파워를 덜 사용한다. 서블릿은 IBM WebSphere Application Server과 Apache Tomcat 같은 웹 서버에서 다른 기술들에 비해 이동성이 강하고, 다양한 플랫폼 상에서 같은 서블릿을 구동할 수 있는 서블릿 콘데이너를 지원한다. 마지막으로, 자바언어 고유의 안정성으로 인해 잘못된 서블릿이 웹 서버에 영향을 주는 경우도 드물다. 웹 서버는 적절한 서블릿을 찾아 필요할 경우 서블릿 소스 코드를 컴파일하고 서블릿 프로세싱 결과를 요청자에게 리턴한다. 자주 요청되는 서블릿은 서버 메모리에 캐싱된다. (그림 2).

세 번째 경우, 브라우저가 JSP 페이지를 포함하는 웹 페이지를 요청한다는 것을 가정해보자. JSP 페이지는 정보를 디스플레이 하는 작업을 쉽게 하고 동적 콘텐트를 정적 페이지와 분리하는 것을 돕는다. 웹 페이지 디자이너는 HTML 라이브러리에 있는 다른 태그인 것 처럼 하여 JSP 태그를 사용한다. JSP 프로그래머는 JSP 프로그래밍 스팩에 따라 태그를 구현한다.

이번에는 이미지-사이징 JSP 태그를 구현하고 JSP 코드를 작성하는 방법을 알아보자. 웹 콘테이너의 관점에서 볼 때 JSP 페이지는 자바 서블릿과 밀접하게 관련되어 있다. 텍스트 기반 JSP 페이지는 웹 콘테이너에 의해 자바 구현으로 변환된다. 웹 콘테이너는 자바 구현을 찾아 자바 서블릿 같은 구현을 처리하고 코드를 구동하여 프로세싱 결과를 클라이언트에 리턴한다. 많은 레이어와 리다이렉트가 있는 듯이 보이지만 디스패칭은 빠르고 사용자에게도 투명하다. 서블릿과 마찬가지로 자주 요청되는 JSP 페이지는 서버 메모리에 캐싱된다.

JSP 커스텀 태그 작성하기
웹 서비스가 JSP 페이지 요청을 어떻게 처리하는지 보았다. 이제는 JSP 커스텀 태그를 어떻게 구현하는지 보자. JSP 태그는 Java Standard Template Library(JSTL) 같은 표준 라이브러리와 일명 커스텀 태그라고 하는 스스로 작성한 라이브러리에도 해당된다는 것을 명심하라. 일반적으로 커스텀 태그는 특정 문제 도메인을 다룬다. 이 글에서는 이미지를 관리하는 방법을 다루겠다. 현재 Java 2 Extended Edition (J2EE) Versions 1.2와 1.3은 JSP Version 1.2를 사용한다. 현재 Sun은 JSP 스팩 2.0 버전을 발표했다. 이 새로운 스팩은 커스텀 태그를 구현하는 방식에 있어서 큰 변화가 없다.

표준과 커스텀 태그 라이브러리를 taglib 디렉티브를 통해 JSP 페이지로 반입할 수 있다:


<%@ taglib uri='imagesizer.tld' prefix='util' %>

이 디렉티브는 태그 라이브러리 디스크립터 파일의 위치를 명명한다. 여기서는 imagesizer.tld로 명명되었다. 그리고 사용된 프리픽스는 util로 명명되었다. 태그 예제에서 보았듯이 프리픽스와 이름으로 태그를 사용할 수 있다:


<util:imagesizer src="images/LazyDog.jpg"/>

태그 라이브러리 디스크립터는 웹 콘데이너에게 사용가능한 태그가 무엇인지 그들이 어떻게 작용하는지를 설명한다. Listing 1은 그 예제이다. 이 파일은 XML 포맷으로 되어있고 읽기 쉽다. 하지만 IBM WebSphere Studio Application Developer 같은 애플리케이션 개발 플랫폼은 필드를 채우고 파일을 검사하는 것을 돕는다. 가장 중요한 정보는 태그 엘리먼트이다. 이것은 JSP 커스텀 태그의 이름과 태그를 구현하는 자바 클래스를 정의한다. 또한 태그가 받아들이는 모든 속성과 바디 콘텐트를 보여준다.

Listing 1. Tag Library Descriptor (TLD) 발췌

<taglib >
  <tlibversion> 1.0 </tlibversion>
  <jspversion> 1.1 </jspversion>
  <tag>
    <name>imagesizer</name>
    <tagclass>tags.ImageSizerTag</tagclass>
    <bodycontent>empty</bodycontent>
    <attribute>
      <name>src</name>
      <required>required</required>
    </attribute>
    <attribute>
      <name>alt</name>
    </attribute>
    <attribute>
      <name>quality</name>
    </attribute>
  </tag>
</taglib>

이 예제에서 태그는 src 속성이 요구하는 세 개의 속성을 갖고 있다. alt 속성은 HTML img alt 속성을 모방한 것이다. 이 JSP 태그를 확장하여 다른 이미지 속성을 포함시켜도 된다.

JSP 커스텀 태그를 작성하는 다음 단계는 태그 용 자바 코드를 구현하는 것이다. 이 글에서 imagesizer 태그는 tags.ImageSizerTag 자바 클래스에서 구현된다. J2EE 커스텀 태그 지원 대부분은 javax.servlet.jsp.tagext 패키지에 위치해있다. imagesizer 클래스는 표준 TagSupport를 확장한다. 이것은 바디 없이 태그를 구현한다. 이것의 자손 클래스는 BodyTagSupport인데 이것은 바디가 있는 태그를 구현한다. 두 클래스 모두 Tag 인터페이스를 구현한다. doStartTagdoEndTag 메소드는 태그가 처음 읽혀지고 태그가 웹 컨테이너에 의해 완전히 읽혀진 후에 호출된다. ImageSizer 태그는 doEndTag 만 구현한다.

TagSupport 클래스에서 PageContext 클래스는 JSP 페이지와 관련된 중요한 정보에 액세스 하도록 한다. 예를들어, PageContextHttpRequestHttpResponse 객체에 액세스를 가능하게 한다. 이러한 객체들은 값을 읽고 응답을 작성하는데 필수적이다. 요청은, 사용자 선택을 트래킹하고 페이지에서 페이지로 값을 수행할 경우 HttpSession로 액세스를 허용한다. PageContextServletContext로 액세스를 허용하는데 이것은 서블릿 경로, 이름, 기타정보를 위치시키는데 도움이 된다. ImageSizer 코드(Listing 2)에서, PageContext 객체에 대한 레퍼런스와 정보가 있다. 그림 3은 이들 클래스들의 관계이다. 다른 표준 클래스 다이어그램 처럼 실선으로 된 박스는 클래스를 나타내고 점선 박스는 인터페이스를 나타낸다. 상속은 파생된 클래스나 인터페이스부터 부모까지 선으로 이어져있다.

Listing 2. ImageSizerTag doEndTag 구현

// Implement the tag once the complete tag has been read.
public int doEndTag() throws JspException {

  // Move request data to session.
  int outputSize = 0;
  String sizeVal = request.getParameter( REQUESTSIZEKEY );
  if ( sizeVal != null ) {
    session.setAttribute( REQUESTSIZEKEY, sizeVal );
    sizeVal = (String) session.getAttribute( REQUESTSIZEKEY );
    if ( sizeVal != null ) {
      outputSize = Integer.parseInt( sizeVal );
    }
  }
  
  // Get specified image locally.
  String contextPath = getContextPath( request );
  Image image = Toolkit.getDefaultToolkit().getImage(contextPath + src );
  ImageSizer.waitForImage( image );
  int imageWidth = image.getWidth( null );
  int imageHeight = image.getHeight( null );

  if (( imageWidth > 0 ) && ( imageHeight > 0 )) {
    if (( outputSize > 0 ) && ( outputSize != imageWidth )) {
      // Convert image to new size.
      Image outputImage = ImageSizer.setSize( image, outputSize, -1 );
      ImageSizer.waitForImage( outputImage );
      int outputWidth = outputImage.getWidth( null );
      int outputHeight = outputImage.getHeight( null );
 
      if ( outputWidth > 0 && outputHeight > 0 ) {
        // Change image file name to xxxx.size.jpg
        String originalSrc = src;
        int lastDot = src.lastIndexOf( '.' );
        if ( lastDot > -1 ) {
          src = src.substring( 0, lastDot + 1 );
        }
        setSrc( src + outputSize + ".jpg" );

        // Write new size image to JPEG file.
        File file = new File( contextPath + src );
        if ( !file.exists() ) {
          out.println( "" );
          FileOutputStream fos = new FileOutputStream( contextPath + src );
          ImageSizer.encodeJPEG( fos, outputImage, quality );
          fos.close( ) ;
        }
        
        imageWidth = outputWidth;
        imageHeight = outputHeight;
      }
    } // if outputSize
  } // if image found

  // Produce output tag.
  out.print( "<img src=\"" + src + "\"" );
  // Add alt text, if any
  if ((alt != null ) && ( alt.length() > 0 )) {
    out.print( " alt=\"" + alt + "\"" );
  }
  
  // Add proper width, height.
  out.print( " width=\"" + imageWidth + "\" height=\"" + 
    imageHeight + "\"" );
  out.println( ">" );

  return EVAL_PAGE;
} // doEndTag

그림 3. javax.servlet.jsp.tagext 클래스

ImageSizerTag 클래스의 doEndTag 메소드는 Listing 2에 나와있다. 이것은 JSP 커스텀 태그를 구현하는데 필요한 거의 모든 자바 코드라고 볼 수 있다. 큰 블록이지만 메소드를 완벽하게 보는데 도움이 된다. 우선 모든 HTTP 요청 매개변수는 HTTP 세션에 저장된다. 이것은 이미지 사이즈에 대한 사용자 선택 같은 속성을 가져다가 세션에 저장하여 페이지에 따라 사용자가 이를 따르도록 한다. 이 태그의 기능을 확장하기 위해서 이것을 확장하여 쿠키에 선택을 저장하여 사용자가 다음에 이 사이트를 방문할 때 선택을 사용하도록 할 수 있다.

이미지 사이징
지금까지 JSP 태그를 작성하는 단계를 검토했다. ImageSizerTag 클래스는 이미지를 자동으로 리사이징하여 사용자 선택에 맞춘다. 이번에는 ImageSizer 클래스를 사용하여 JPEG 파일로서 이미지를 리사이징하고 저장하는 구체적인 방법을 설명하겠다. 자바 코드로 이미지를 리사이징 할 때 java.awt.Image 클래스의 getScaledInstance 메소드를 사용할 때 쉬워진다. 이 메소드를 새로운 넓이와 높이로 하거나 형태 비율을 보존하기위해 -1에서 1까지의 매개변수 값을 제공한다. 그리고 나서 새롭게 리사이징된 이미지를 얻는다. 하지만 모든 자바 이미지는 즉시 사용할 수 있는 것은 아니다. 따라서 java.awt.MediaTracker 를 사용하여 이미지가 완전히 로딩될 때까지 기다려야한다. ImageSizerwaitForImage 메소드는 이 코드를 캡슐화한다.

이 예제에서 가장 어려운 디자인 포인트는 이미지 저장 방법을 결정하는 일이다. 자바 프로그래밍에는 이미지 인코딩과 저장에 많은 선택권이 있어 비교를 해야한다.

Listing 3의 경우 com.sun.image.codec 패키지를 사용했는데 IBM WebSphere와 Apache Tomcat 같은 J2EE 1.2 와 1.3 웹 서버 콘테이너에서 사용할 수 있기 때문이다. 인코더는 단순하며 100% 순수한 자바 코드이지만 com.sun 패키지에 있다. 장기적인 시각으로 볼 때 Java Image I/O 패키지는 보완해야 할 사항이 많이있다. 이미지 변형 기능과 많은 파일 포맷을 저장하는 기능이 훌륭하다. Java Image I/O 패키지는 Java 2 version 1.4 이전까지는 표준이 아니다.

어떤 이미징 패키지를 사용할 것인가에 대해 결정이 끝났다면 JPEG 파일을 저장하는 코드는 간단하다. ImageSizerencodeJPEG 메소드는 다음 절차를 캡슐화한다:

  1. java.awt.image.BufferedImage 객체-자바 Image 자손-는 리사이징된 아웃풋 이미지에서 만들어진다. 주석은 로고, watermark, 타임스탬프, 이미지 저작권 정보를 추가할 때 코드에 주석이 달린다.

  2. Image에서 BufferedImage로 변환한 후에, 아웃풋 스트림에 JPEGImageEncoder 객체를 만들어라. 아웃풋 인코딩 평가는 0.0 (최악)부터 1.0 (최고) 까지 이다. 0.75는 디폴트이지만 0.95는 좀더 자세한 이미지와 함께 큰 파일 사이즈로 만들어진다.

  3. 이미지는 아웃풋 스트림으로 인코딩되고 스트림은 모든 정보가 이미지 파일에 나타나도록 플러쉬된다.
Listing 3. ImageSizer encodeJPEG 구현

// Encodes the given image at the given
// quality to the output stream.
public static void encodeJPEG
  ( OutputStream outputStream,
  Image outputImage, float outputQuality )
  throws java.io.IOException {

  // Get a buffered image from the image.
  BufferedImage bi = new BufferedImage
    ( outputWidth, outputHeight,
      BufferedImage.TYPE_INT_RGB );
  Graphics2D biContext =
    bi.createGraphics( );
  biContext.drawImage
    ( outputImage, 0, 0, null );
  // Additional drawing code, such as
  // watermarks or logos can be placed here.

  // com.sun.image.codec.jpeg package
  // is included in Sun and IBM sdk 1.3.
  JPEGImageEncoder encoder =
    JPEGCodec.createJPEGEncoder
    ( outputStream );
  // The default quality is 0.75.
  JPEGEncodeParam jep =
    JPEGCodec.getDefaultJPEGEncodeParam
    ( bi );
  jep.setQuality( outputQuality, true );
  encoder.encode( bi, jep );
  outputStream.flush();
} // encodeImage

여기까지는 이미지를 리사이징하고 저장하는데 필요한 모든 단계이다.

WebSphere또는 Tomcat에서 패키징 및 전개
이번에는 Application Server version 4.0이나 Apache Tomcat version 4.0에서 ImageSizer JSP 태그의 패키지 및 전개 방법을 설명하겠다. 그림 4는 Application Developer 이다. 왼쪽 칼럼의 상단에 있는 Navigator는 웹 애플리케이션의 디렉토리 구조를 나타내고 JSP 태그가 J2EE 스팩에 따라 어떻게 패키지되어야 하는지를 보여준다. J2EE 스팩에 필요하기 때문이 이 디렉토리 구조는 모든 웹 애플리케이션에 일반적이다. 일단 구조가 저장되면 Web Archive (WAR) 파일이 되고 WebSphere, Tomcat, 기타 웹 콘테이너에 쉽게 전송된다. Application Developer 같은 좋은 개발 환경은 다음의 스팩을 따르고 훌륭한 애플리케이션을 만들어낸다.

그림 4. WebSphere Studio Application Developer에서 ImageSizer 패키징

ImageSizer 프로젝트에는 소스 코드용 디렉토리가 있다. 최종 WAR 파일에 이 디렉토리를 추가할 것인지의 여부는 개발자가 선택하기 나름이다. webApplication 디렉토리에는 실제 프로그램 코드가 포함되어 있다. 예제 프로젝트에는 PickASize.jsp이라고 하는 테스트 JSP 페이지와 LazyDog.jpg 이라고 하는 테스트 이미지가 포함되어 있다. 일반적으로 이들은 ImageSizer 커스텀 태그의 라이브러리 버전에 포함되지 않는다. 이 태그의 구현은 WEB-INF 디렉토리에 있다. 자바 클래스는 WEB-INF/classes에 있고 Tag Library Descriptor 파일은 WEB-INF/tlds에 있다. 이들은 모든 웹 애플리케이션에 적용되는 표준 디렉토리 위치이다. 이 트리에 있는 다른 파일들은 서버 옵션 설정에 도움을 주지만 그렇지 않더라도 WAR 파일에 필수적인 것은 아니다. Application Developer나 Java SDK를 사용하여 이 애플리케이션 용 WAR 파일을 만들어보라.

To m c a t 에 웹 애플리케이션을 설치하려면 ROOT/webapps 디렉토리에 파일을 놓고 서버가 WAR 파일을 디렉토리 구조로 확장하도록 해야한다. Application Server의 경우, Administrators Console의 웹 애플리케이션 마법사(Web Application wizard)를 사용하여 애플리케이션을 설치할 수 있다. 전개한 후에, http://yourhostname:port/ImageSizer/PickASize.jsp를 방문하여 JSP 페이지를 구동해보라.

결론
지금까지 이미지 사이징을 자동으로 관리하는 JSP 커스텀 태그를 만들었다. 커스텀 태그는 이미지 리사이징 작업에 도움이 되고 웹 사이트를 방문하는 사용자들이 선택을 할 수 있도록 한다. 예제 태그를 확장하여 모든 종류의 이미지 조작을 할 수 있다. 저작권 텍스트, 타임스탬프, 로고, 워터 마크 등이 그것이다. Application Server나 Apache Tomcat에 이를 전개하고 이미지 기반 JSP 페이지를 작성하거나 예제를 사용하여 코드를 실험할 수 있다. 이 글이 JSP 태그에 대해 실질적인 팁을 주었기를 바라며 각자의 필요에 맞춰 기능을 확장해보기를 바란다.


출처 : http://www-128.ibm.com/developerworks/kr/library/j-jspdwj/index.html


참고자료

Posted by 1010
01.JAVA/Java2009. 1. 19. 13:38
반응형

썸네일 이미지 만들기

Java SDK1.4부터 Image I/O API가 추가되었다.


############################################
# 이미지 파일 읽어오기
############################################


javax.imageio.ImageIO 클래스가 제공하는 read()메소드를 이용한다.

BufferedImage read(File input)
BufferedImage read(InputStream input)
BufferedImage read(URL input)

File file = new File("c:\\image\\good.gif")
BufferedImage image = imageIO.read(file)

FileInputStream input = new FileInputStream("c:\\image\\good.gif")
BufferedImage image = imageIO.read(input)

URL logUrl = new URL("http://www.xxx.com/main/xxx.gif")
BufferedImage logoImage = imageIO.read(logUrl)


############################################
# 썸네일 이미지 만들기
############################################


1. ImageIO.read()메소드를 이용하여 BufferedImage에 저장한다.(원본)
2. 변경할 크기를 갖는 새로운 BufferedImage 객체를 생성한다.
3. 대상 BufferedImage객체의 createGraphics()메소드를 호출하여 대상 BufferedImage에 그림을 그릴 수 있는 Graphics2D 객체를 구한다.
4. Graphics2D 객체를 사용하여 원본 BufferedImage를 대상 BufferedImage에 그린다. 이때 크기를 조절한다.


BufferedImage srcimg = imageIO.read(imgFile);
BufferedImage destimg = new BufferedImage(w, h, BufferedImage.TYPE_3BYTE_BGR);
Graphics2D g = srcImg.createGraphics();
g.drawimage(srcImg, 0, 0, width, height, null);


###########################################
# BufferedImage를 파일로 저장하기
###########################################


imageIO.write()메소드를 통해서 BufferedImage를 출력할 수 있다.

write(RenderedImage im, String formatName, File output)
write(RenderedImage im, String formatName, OutputStream output)

formatName : PNG png, jpeg JPEG jpg JPG


###########################################
# 이미지크기를 변경
###########################################


boolean isResult = false;

FileInputStream srcls = null;
srcls = new FileInputStream("c:\\sample.gif");

BufferedImage srcimg = ImageIO.read(srcls);
BufferedImage destimg = new BufferedImage(30, 30, BufferedImage.TYPE_3BYTE_BGR);
Graphics2D g = destimg.createGraphics();
g.drawImage(srcimg, 0, 0, 30, 30, null);

File dest = new File("c:\\thum2_sample.jpg");
isResult = ImageIO.write(destimg, "jpg", dest);

if (isResult)
{
 out.println("Image변환 성공");
}

Posted by 1010
98..Etc/Etc...2009. 1. 19. 11:04
반응형

Phoenix/Tools

From OWASP

Jump to: navigation, search

Please send comments or questions to the Phoenix-OWASP mailing-list.

LiveCDs

Monday, January 29, 2007 4:02 PM 828569600 AOC_Labrat-ALPHA-0010.iso - http://www.packetfocus.com/hackos/
DVL (Damn Vulnerable Linux) - http://www.damnvulnerablelinux.org/

Test sites / testing grounds

SPI Dynamics (live) - http://zero.webappsecurity.com/
Cenzic (live) - http://crackme.cenzic.com/
Watchfire (live) - http://demo.testfire.net/
Acunetix (live) - http://testphp.acunetix.com/ http://testasp.acunetix.com http://testaspnet.acunetix.com
WebMaven / Buggy Bank (includes live testsite) - http://www.mavensecurity.com/webmaven
Foundstone SASS tools - http://www.foundstone.com/index.htm?subnav=resources/navigation.htm&subcontent=/resources/s3i_tools.htm
OWASP WebGoat - http://www.owasp.org/index.php/OWASP_WebGoat_Project
OWASP SiteGenerator - http://www.owasp.org/index.php/Owasp_SiteGenerator
Stanford SecuriBench - http://suif.stanford.edu/~livshits/securibench/
SecuriBench Micro - http://suif.stanford.edu/~livshits/work/securibench-micro/

HTTP proxying / editing

WebScarab - http://www.owasp.org/index.php/Category:OWASP_WebScarab_Project
Burp - http://www.portswigger.net/
Paros - http://www.parosproxy.org/
Fiddler - http://www.fiddlertool.com/
Web Proxy Editor - http://www.microsoft.com/mspress/companion/0-7356-2187-X/
Pantera - http://www.owasp.org/index.php/Category:OWASP_Pantera_Web_Assessment_Studio_Project
Suru - http://www.sensepost.com/research/suru/
httpedit (curses-based) - http://www.neutralbit.com/en/rd/httpedit/
Charles - http://www.xk72.com/charles/
Odysseus - http://www.bindshell.net/tools/odysseus
Burp, Paros, and WebScarab for Mac OS X - http://www.corsaire.com/downloads/
Web-application scanning tool from `Network Security Tools'/O'Reilly - http://examples.oreilly.com/networkst/
JS Commander - http://jscmd.rubyforge.org/
Ratproxy - http://code.google.com/p/ratproxy/

RSnake's XSS cheat sheet based-tools, webapp fuzzing, and encoding tools

Wfuzz - http://www.edge-security.com/wfuzz.php
ProxMon - http://www.isecpartners.com/proxmon.html
Wapiti - http://wapiti.sourceforge.net/
Grabber - http://rgaucher.info/beta/grabber/
XSSScan - http://darkcode.ath.cx/scanners/XSSscan.py
CAL9000 - http://www.owasp.org/index.php/Category:OWASP_CAL9000_Project
HTMangLe - http://www.fishnetsecurity.com/Tools/HTMangLe/publish.htm
JBroFuzz - http://sourceforge.net/projects/jbrofuzz
XSSFuzz - http://ha.ckers.org/blog/20060921/xssfuzz-released/
WhiteAcid's XSS Assistant - http://www.whiteacid.org/greasemonkey/
Overlong UTF - http://www.microsoft.com/mspress/companion/0-7356-2187-X/
[TGZ] MielieTool (SensePost Research) - http://packetstormsecurity.org/UNIX/utilities/mielietools-v1.0.tgz
RegFuzzer: test your regular expression filter - http://rgaucher.info/b/index.php/post/2007/05/26/RegFuzzer%3A-Test-your-regular-expression-filter
screamingCobra - http://www.dachb0den.com/projects/screamingcobra.html
SPIKE and SPIKE Proxy - http://immunitysec.com/resources-freesoftware.shtml
RFuzz - http://rfuzz.rubyforge.org/
WebFuzz - http://www.codebreakers-journal.com/index.php?option=com_content&task=view&id=112&Itemid=99999999
TestMaker - http://www.pushtotest.com/Docs/downloads/features.html
ASP Auditor - http://michaeldaw.org/projects/asp-auditor-v2/
WSTool - http://wstool.sourceforge.net/
Web Hack Control Center (WHCC) - http://ussysadmin.com/whcc/
Web Text Converter - http://www.microsoft.com/mspress/companion/0-7356-2187-X/
HackBar (Firefox Add-on) - https://addons.mozilla.org/firefox/3899/
Net-Force Tools (NF-Tools, Firefox Add-on) - http://www.net-force.nl/library/downloads/
PostIntercepter (Greasemonkey script) - http://userscripts.org/scripts/show/743

HTTP general testing / fingerprinting

Wbox: HTTP testing tool - http://hping.org/wbox/
ht://Check - http://htcheck.sourceforge.net/
Mumsie - http://www.lurhq.com/tools/mumsie.html
WebInject - http://www.webinject.org/
Torture.pl Home Page - http://stein.cshl.org/~lstein/torture/
JoeDog's Seige - http://www.joedog.org/JoeDog/Siege/
OPEN-LABS: metoscan (http method testing) - http://www.open-labs.org/
Load-balancing detector - http://ge.mine.nu/lbd.html
HMAP - http://ujeni.murkyroc.com/hmap/
Net-Square: httprint - http://net-square.com/httprint/
Wpoison: http stress testing - http://wpoison.sourceforge.net/
Net-square: MSNPawn - http://net-square.com/msnpawn/index.shtml
hcraft: HTTP Vuln Request Crafter - http://druid.caughq.org/projects/hcraft/
rfp.labs: LibWhisker - http://www.wiretrip.net/rfp/lw.asp
Nikto - http://www.cirt.net/code/nikto.shtml
twill - http://twill.idyll.org/
DirBuster - http://www.owasp.org/index.php/Category:OWASP_DirBuster_Project
[ZIP] DFF Scanner - http://security-net.biz/files/dff/DFF.zip
[ZIP] The Elza project - http://packetstormsecurity.org/web/elza-1.4.7-beta.zip http://www.stoev.org/elza.html
HackerFox and Hacking Addons Bundled: Portable Firefox with web hacking addons bundled - http://sf.net/projects/hackfox

Browser-based HTTP tampering / editing / replaying

TamperIE - http://www.bayden.com/Other/
isr-form - http://www.infobyte.com.ar/developments.html
Modify Headers (Firefox Add-on) - http://modifyheaders.mozdev.org/
Tamper Data (Firefox Add-on) - http://tamperdata.mozdev.org/
UrlParams (Firefox Add-on) - https://addons.mozilla.org/en-US/firefox/addon/1290/
TestGen4Web (Firefox Add-on) - https://addons.mozilla.org/en-US/firefox/addon/1385/
DOM Inspector / Inspect This (Firefox Add-on) - https://addons.mozilla.org/en-US/firefox/addon/1806/ https://addons.mozilla.org/en-US/firefox/addon/1913/
LiveHTTPHeaders / Header Monitor (Firefox Add-on) - http://livehttpheaders.mozdev.org/ https://addons.mozilla.org/en-US/firefox/addon/575/

Cookie editing / poisoning

[TGZ] stompy: session id tool - http://lcamtuf.coredump.cx/stompy.tgz
Add'N Edit Cookies (AnEC, Firefox Add-on) - http://addneditcookies.mozdev.org/
CookieCuller (Firefox Add-on) - http://cookieculler.mozdev.org/
CookiePie (Firefox Add-on) - http://www.nektra.com/oss/firefox/extensions/cookiepie/
CookieSpy - http://www.codeproject.com/shell/cookiespy.asp
Cookies Explorer - http://www.dutchduck.com/Features/Cookies.aspx

Ajax and XHR scanning

Sahi - http://sahi.co.in/
scRUBYt - http://scrubyt.org/
jQuery - http://jquery.com/
jquery-include - http://www.gnucitizen.org/projects/jquery-include
Sprajax - http://www.denimgroup.com/sprajax.html
Watir - http://wtr.rubyforge.org/
Watij - http://watij.com/
Watin - http://watin.sourceforge.net/
RBNarcissus - http://idontsmoke.co.uk/2005/rbnarcissus/
SpiderTest (Spider Fuzz plugin) - http://blog.caboo.se/articles/2007/2/21/the-fabulous-spider-fuzz-plugin
Javascript Inline Debugger (jasildbg) - http://jasildbg.googlepages.com/
Firebug Lite - http://www.getfirebug.com/lite.html
firewaitr - http://code.google.com/p/firewatir/

RSS extensions and caching

LiveLines (Firefox Add-on) - https://addons.mozilla.org/en-US/firefox/addon/324/
rss-cache - http://www.dubfire.net/chris/projects/rss-cache/

SQL injection scanning

0x90.org: home of Absinthe, Mezcal, etc - http://0x90.org/releases.php
SQLiX - http://www.owasp.org/index.php/Category:OWASP_SQLiX_Project
sqlninja: a SQL Server injection and takover tool - http://sqlninja.sourceforge.net/
JustinClarke's SQL Brute - http://www.justinclarke.com/archives/2006/03/sqlbrute.html
BobCat - http://www.northern-monkee.co.uk/projects/bobcat/bobcat.html
sqlmap - http://sqlmap.sourceforge.net/
Scully: SQL Server DB Front-End and Brute-Forcer - http://www.sensepost.com/research/scully/
FG-Injector - http://www.flowgate.net/?lang=en&seccion=herramientas
PRIAMOS - http://www.priamos-project.com/

Web application security malware, backdoors, and evil code

W3AF: Web Application Attack and Audit Framework - http://w3af.sourceforge.net/
Jikto - http://busin3ss.name/jikto-in-the-wild/
XSS Shell - http://ferruh.mavituna.com/article/?1338
XSS-Proxy - http://xss-proxy.sourceforge.net
AttackAPI - http://www.gnucitizen.org/projects/attackapi/
FFsniFF - http://azurit.elbiahosting.sk/ffsniff/
HoneyBlog's web-based junkyard - http://honeyblog.org/junkyard/web-based/
BeEF - http://www.bindshell.net/tools/beef/
Firefox Extension Scanner (FEX) - http://www.gnucitizen.org/projects/fex/
What is my IP address? - http://reglos.de/myaddress/
xRumer: blogspam automation tool - http://www.botmaster.net/movies/XFull.htm
SpyJax - http://www.merchantos.com/makebeta/tools/spyjax/
Greasecarnaval - http://www.gnucitizen.org/projects/greasecarnaval
Technika - http://www.gnucitizen.org/projects/technika/
Load-AttackAPI bookmarklet - http://www.gnucitizen.org/projects/load-attackapi-bookmarklet
MD's Projects: JS port scanner, pinger, backdoors, etc - http://michaeldaw.org/my-projects/

Web application services that aid in web application security assessment

Netcraft - http://www.netcraft.net
AboutURL - http://www.abouturl.com/
The Scrutinizer - http://www.scrutinizethis.com/
net.toolkit - http://clez.net/
ServerSniff - http://www.serversniff.net/
Online Microsoft script decoder - http://www.greymagic.com/security/tools/decoder/
Webmaster-Toolkit - http://www.webmaster-toolkit.com/
myIPNeighbbors, et al - http://digg.com/security/MyIPNeighbors_Find_Out_Who_Else_is_Hosted_on_Your_Site_s_IP_Address
PHP charset encoding - http://h4k.in/encoding
data: URL testcases - http://h4k.in/dataurl

Browser-based security fuzzing / checking

Zalewski's MangleMe - http://lcamtuf.coredump.cx/mangleme/mangle.cgi
hdm's tools: Hamachi, CSSDIE, DOM-Hanoi, AxMan - http://metasploit.com/users/hdm/tools/
Peach Fuzzer Framework - http://peachfuzz.sourceforge.net/
TagBruteForcer - http://research.eeye.com/html/tools/RT20060801-3.html
PROTOS Test-Suite: c05-http-reply - http://www.ee.oulu.fi/research/ouspg/protos/testing/c05/http-reply/index.html
COMRaider - http://labs.idefense.com
bcheck - http://bcheck.scanit.be/bcheck/
Stop-Phishing: Projects page - http://www.indiana.edu/~phishing/?projects
LinkScanner - http://linkscanner.explabs.com/linkscanner/default.asp
BrowserCheck - http://www.heise-security.co.uk/services/browsercheck/
Cross-browser Exploit Tests - http://www.jungsonnstudios.com/cool.php
Stealing information using DNS pinning demo - http://www.jumperz.net/index.php?i=2&a=1&b=7
Javascript Website Login Checker - http://ha.ckers.org/weird/javascript-website-login-checker.html
Mozilla Activex - http://www.iol.ie/~locka/mozilla/mozilla.htm
Jungsonn's Black Dragon Project - http://blackdragon.jungsonnstudios.com/
Mr. T (Master Recon Tool, includes Read Firefox Settings PoC) - http://ha.ckers.org/mr-t/
Vulnerable Adobe Plugin Detection For UXSS PoC - http://www.0x000000.com/?i=324
About Flash: is your flash up-to-date? - http://www.macromedia.com/software/flash/about/
Test your installation of Java software - http://java.com/en/download/installed.jsp?detect=jre&try=1
WebPageFingerprint - Light-weight Greasemonkey Fuzzer - http://userscripts.org/scripts/show/30285

PHP static analysis and file inclusion scanning

PHP-SAT.org: Static analysis for PHP - http://www.program-transformation.org/PHP/
Unl0ck Research Team: tool for searching in google for include bugs - http://unl0ck.net/tools.php
FIS: File Inclusion Scanner - http://www.segfault.gr/index.php?cat_id=3&cont_id=25
PHPSecAudit - http://developer.spikesource.com/projects/phpsecaudit

PHP Defensive Tools

PHPInfoSec - Check phpinfo configuration for security - http://phpsec.org/projects/phpsecinfo/

A Greasemonkey Replacement can be found at http://yehg.net/lab/#tools.greasemonkey


Php-Brute-Force-Attack Detector - Detect your web servers being scanned by brute force tools such as WFuzz, OWASP DirBuster and vulnerability scanners such as Nessus, Nikto, Acunetix ..etc. http://yehg.net/lab/pr0js/files.php/php_brute_force_detect.zip


PHP-Login-Info-Checker - Strictly enforce admins/users to select stronger passwords. It tests cracking passwords against 4 rules. It has also built-in smoke test page via url loginfo_checker.php?testlic

http://yehg.net/lab/pr0js/files.php/loginfo_checkerv0.1.zip

http://yehg.net/lab/pr0js/files.php/phploginfo_checker_demo.zip


php-DDOS-Shield - A tricky script to prevent idiot distributed bots which discontinue their flooding attacks by identifying HTTP 503 header code. http://code.google.com/p/ddos-shield/


PHPMySpamFIGHTER - http://yehg.net/lab/pr0js/files.php/phpmyspamfighter.zip http://yehg.net/lab/pr0js/files.php/phpMySpamFighter_demo.rar

Web Application Firewall (WAF) and Intrusion Detection (APIDS) rules and resources

APIDS on Wikipedia - http://en.wikipedia.org/wiki/APIDS
PHP Intrusion Detection System (PHP-IDS) - http://php-ids.org/ http://code.google.com/p/phpids/
dotnetids - http://code.google.com/p/dotnetids/
Secure Science InterScout - http://www.securescience.com/home/newsandevents/news/interscout1.0.html
Remo: whitelist rule editor for mod_security - http://remo.netnea.com/
GotRoot: ModSecuirty rules - http://www.gotroot.com/tiki-index.php?page=mod_security+rules
The Web Security Gateway (WSGW) - http://wsgw.sourceforge.net/
mod_security rules generator - http://noeljackson.com/tools/modsecurity/
Mod_Anti_Tamper - http://www.wisec.it/projects.php?id=3
[TGZ] Automatic Rules Generation for Mod_Security - http://www.wisec.it/rdr.php?fn=/Projects/Rule-o-matic.tgz
AQTRONIX WebKnight - http://www.aqtronix.com/?PageID=99
Akismet: blog spam defense - http://akismet.com/
Samoa: Formal tools for securing web services - http://research.microsoft.com/projects/samoa/

Web services enumeration / scanning / fuzzing

WebServiceStudio2.0 - http://www.codeplex.com/WebserviceStudio
Net-square: wsChess - http://net-square.com/wschess/index.shtml
WSFuzzer - http://www.owasp.org/index.php/Category:OWASP_WSFuzzer_Project
SIFT: web method search tool - http://www.sift.com.au/73/171/sift-web-method-search-tool.htm
iSecPartners: WSMap, WSBang, etc - http://www.isecpartners.com/tools.html

Web application non-specific static source-code analysis

Pixy: a static analysis tool for detecting XSS vulnerabilities - http://www.seclab.tuwien.ac.at/projects/pixy/
Brixoft.Net: Source Edit - http://www.brixoft.net/prodinfo.asp?id=1
Security compass web application auditing tools (SWAAT) - http://www.owasp.org/index.php/Category:OWASP_SWAAT_Project
An even more complete list here - http://www.cs.cmu.edu/~aldrich/courses/654/tools/
A nice list that claims some demos available - http://www.cs.cmu.edu/~aldrich/courses/413/tools.html
A smaller, but also good list - http://spinroot.com/static/

Static analysis for C/C++ (CGI, ISAPI, etc) in web applications

RATS - http://www.securesoftware.com/resources/download_rats.html
ITS4 - http://www.cigital.com/its4/
FlawFinder - http://www.dwheeler.com/flawfinder/
Splint - http://www.splint.org/
Uno - http://spinroot.com/uno/
BOON (Buffer Overrun detectiON) - http://www.cs.berkeley.edu/~daw/boon/ http://boon.sourceforge.net
Valgrind - http://www.valgrind.org/

Java static analysis, security frameworks, and web application security tools

LAPSE - http://suif.stanford.edu/~livshits/work/lapse/
HDIV Struts - http://hdiv.org/
Orizon - http://sourceforge.net/projects/orizon/
FindBugs: Find bugs in Java programs - http://findbugs.sourceforge.net/
PMD - http://pmd.sourceforge.net/
CUTE: A Concolic Unit Testing Engine for C and Java - http://osl.cs.uiuc.edu/~ksen/cute/
EMMA - http://emma.sourceforge.net/
JLint - http://jlint.sourceforge.net/
Java PathFinder - http://javapathfinder.sourceforge.net/
Fujaba: Move between UML and Java source code - http://wwwcs.uni-paderborn.de/cs/fujaba/
Checkstyle - http://checkstyle.sourceforge.net/
Cookie Revolver Security Framework - http://sourceforge.net/projects/cookie-revolver
tinapoc - http://sourceforge.net/projects/tinapoc
jarsigner - http://java.sun.com/j2se/1.5.0/docs/tooldocs/solaris/jarsigner.html
Solex - http://solex.sourceforge.net/
Java Explorer - http://metal.hurlant.com/jexplore/
HTTPClient - http://www.innovation.ch/java/HTTPClient/
another HttpClient - http://jakarta.apache.org/commons/httpclient/
a list of code coverage and analysis tools for Java - http://mythinkpond.blogspot.com/2007/06/java-foss-freeopen-source-software.html

Microsoft .NET static analysis and security framework tools, mostly for ASP.NET and ASP.NET AJAX, but also C# and VB.NET

Threat modeling

Microsoft Threat Analysis and Modeling Tool v2.1 (TAM) - http://www.microsoft.com/downloads/details.aspx?FamilyID=59888078-9daf-4e96-b7d1-944703479451&displaylang=en
Amenaza: Attack Tree Modeling (SecurITree) - http://www.amenaza.com/software.php
Octotrike - http://www.octotrike.org/

Add-ons for Firefox that help with general web application security

Web Developer Toolbar - https://addons.mozilla.org/firefox/60/
Plain Old Webserver (POW) - https://addons.mozilla.org/firefox/3002/
XML Developer Toolbar - https://addons.mozilla.org/firefox/2897/
Public Fox - https://addons.mozilla.org/firefox/3911/
XForms Buddy - http://beaufour.dk/index.php?sec=misc&pagename=xforms
MR Tech Local Install - http://www.mrtech.com/extensions/local_install/
Nightly Tester Tools - http://users.blueprintit.co.uk/~dave/web/firefox/buildid/index.html
IE Tab - https://addons.mozilla.org/firefox/1419/
User-Agent Switcher - https://addons.mozilla.org/firefox/59/
ServerSwitcher - https://addons.mozilla.org/firefox/2409/
HeaderMonitor - https://addons.mozilla.org/firefox/575/
RefControl - https://addons.mozilla.org/firefox/953/
refspoof - https://addons.mozilla.org/firefox/667/
No-Referrer - https://addons.mozilla.org/firefox/1999/
LocationBar^2 - https://addons.mozilla.org/firefox/4014/
SpiderZilla - http://spiderzilla.mozdev.org/
Slogger - https://addons.mozilla.org/en-US/firefox/addon/143
Fire Encrypter - https://addons.mozilla.org/firefox/3208/

Add-ons for Firefox that help with Javascript and Ajax web application security

Selenium IDE - http://www.openqa.org/selenium-ide/
Firebug - http://www.joehewitt.com/software/firebug/
Venkman - http://www.mozilla.org/projects/venkman/
Chickenfoot - http://groups.csail.mit.edu/uid/chickenfoot/
Greasemonkey - http://www.greasespot.net/
Greasemonkey compiler - http://www.letitblog.com/greasemonkey-compiler/
User script compiler - http://arantius.com/misc/greasemonkey/script-compiler
Extension Developer's Extension (Firefox Add-on) - http://ted.mielczarek.org/code/mozilla/extensiondev/
Smart Middle Click (Firefox Add-on) - https://addons.mozilla.org/en-US/firefox/addon/3885/

Bookmarklets that aid in web application security

RSnake's security bookmarklets - http://ha.ckers.org/bookmarklets.html
BMlets - http://optools.awardspace.com/bmlet.html
Huge list of bookmarklets - http://www.squarefree.com/bookmarklets/
Blummy: consists of small widgets, called blummlets, which make use of Javascript to provide rich functionality - http://www.blummy.com/
Bookmarklets every blogger should have - http://www.micropersuasion.com/2005/10/bookmarklets_ev.html
Flat Bookmark Editing (Firefox Add-on) - http://n01se.net/chouser/proj/mozhack/
OpenBook and Update Bookmark (Firefox Add-ons) - http://www.chuonthis.com/extensions/

SSL certificate checking / scanning

[ZIP] THCSSLCheck - http://thc.org/root/tools/THCSSLCheck.zip
[ZIP] Foundstone SSLDigger - http://www.foundstone.com/us/resources/termsofuse.asp?file=ssldigger.zip
Cert Viewer Plus (Firefox Add-on) - https://addons.mozilla.org/firefox/1964/

Honeyclients, Web Application, and Web Proxy honeypots

Honeyclient Project: an open-source honeyclient - http://www.honeyclient.org/trac/
HoneyC: the low-interaction honeyclient - http://honeyc.sourceforge.net/
Capture: a high-interaction honeyclient - http://capture-hpc.sourceforge.net/
Google Hack Honeypot - http://ghh.sourceforge.net/
PHP.Hop - PHP Honeynet Project - http://www.rstack.org/phphop/
SpyBye - http://www.monkey.org/~provos/spybye/
Honeytokens - http://www.securityfocus.com/infocus/1713

Blackhat SEO and maybe some whitehat SEO

SearchStatus (Firefox Add-on) - http://www.quirk.biz/searchstatus/
SEO for Firefox (Firefox Add-on) - http://tools.seobook.com/firefox/seo-for-firefox.html
SEOQuake (Firefox Add-on) - http://www.seoquake.com/

Footprinting for web application security

Evolution - http://www.paterva.com/evolution-e.html
GooSweep - http://www.mcgrewsecurity.com/projects/goosweep/
Aura: Google API Utility Tools - http://www.sensepost.com/research/aura/
Edge-Security tools - http://www.edge-security.com/soft.php
Fierce Domain Scanner - http://ha.ckers.org/fierce/
Googlegath - http://www.nothink.org/perl/googlegath/
Advanced Dork (Firefox Add-on) - https://addons.mozilla.org/firefox/2144/
Passive Cache (Firefox Add-on) - https://addons.mozilla.org/firefox/977/
CacheOut! (Firefox Add-on) - https://addons.mozilla.org/en-US/firefox/addon/1453/
BugMeNot Extension (Firefox Add-on) - http://roachfiend.com/archives/2005/02/07/bugmenot/
TrashMail.net Extension (Firefox Add-on) - https://addons.mozilla.org/en-US/firefox/addon/1813/
DiggiDig (Firefox Add-on) - https://addons.mozilla.org/en-US/firefox/addon/2819/
Digger (Firefox Add-on) - https://addons.mozilla.org/en-US/firefox/addon/1467/

Database security assessment

Scuba by Imperva Database Vulnerability Scanner - http://www.imperva.com/scuba/

Browser Defenses

DieHard - http://www.diehard-software.org/
LocalRodeo (Firefox Add-on) - http://databasement.net/labs/localrodeo/
NoMoXSS - http://www.seclab.tuwien.ac.at/projects/jstaint/
Request Rodeo - http://savannah.nongnu.org/projects/requestrodeo
FlashBlock (Firefox Add-on) - http://flashblock.mozdev.org/
CookieSafe (Firefox Add-on) - https://addons.mozilla.org/en-US/firefox/addon/2497
NoScript (Firefox Add-on) - http://www.noscript.net/
FormFox (Firefox Add-on) - https://addons.mozilla.org/en-US/firefox/addon/1579/
Adblock (Firefox Add-on) - http://adblock.mozdev.org/
httpOnly in Firefox (Firefox Add-on) - http://blog.php-security.org/archives/40-httpOnly-Cookies-in-Firefox-2.0.html
SafeCache (Firefox Add-on) - http://www.safecache.com/
SafeHistory (Firefox Add-on) - http://www.safehistory.com/
PrefBar (Firefox Add-on) - http://prefbar.mozdev.org/
All-in-One Sidebar (Firefox Add-on) - https://addons.mozilla.org/en-US/firefox/addon/1027/
QArchive.org web file checker (Firefox Add-on) - https://addons.mozilla.org/firefox/4115/
Update Notified (Firefox Add-on) - https://addons.mozilla.org/en-US/firefox/addon/2098/
FireKeeper - http://firekeeper.mozdev.org/
Greasemonkey: XSS Malware Script Detector - http://yehg.net/lab/#tools.greasemonkey

Browser Privacy

TrackMeNot (Firefox Add-on) - https://addons.mozilla.org/firefox/3173/
Privacy Bird - http://www.privacybird.com/

Application and protocol fuzzing (random instead of targeted)

Sulley - http://fuzzing.org/
taof: The Art of Fuzzing - http://sourceforge.net/projects/taof/
zzuf: multipurpose fuzzer - http://sam.zoy.org/zzuf/
autodafé: an act of software torture - http://autodafe.sourceforge.net/
EFS and GPF: Evolutionary Fuzzing System - http://www.appliedsec.com/resources.html

Posted by 1010
56. Eclipse Etc.../Eclipse2009. 1. 19. 11:03
반응형
지난 글을 통해 Eclipse 3.4 + WTP + Tomcat 5.5 를 이용한 간단한 개발 환경을 꾸려보았다. 이제 그 환경에 DWR이 가능하도록 수정해보자.

  일단 Eclipse 3.4 와 Tomcat에 대한 연동은 지난 글을 참조하기 바라며 바로 설치에 들어가보도록 하자.

1. 먼저 dwr.jar 를 다운 받아야 한다. 이 글을 쓰는 시점의 Stable Release 2.0.5 이다.(http://directwebremoting.org/dwr/download)

2. 2.0.5 버전에서는 추가적으로 Apache Common-Loggings 가 필요하다. 다운로드 받도록 하자.(http://commons.apache.org/downloads/download_logging.cgi)

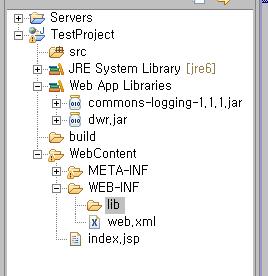
3. 다운로드 받은 dwr.jar 와 다운로드 받은 common-loggings-version.jar(다운로드 받은 Zip 파일의 압축을 풀면 있다.)를 복사하여 해당 프로젝트(프로젝트명을 TestProject라 하자)의 /TestProject/WebContent/WEB-INF/lib 에 복사하도록 한다. 그리고 프로젝트 Root에서 F5 키를 누르면 프로젝트가 Refresh 되면서 해당 jar 파일들을 build path에 포함시키게 되며, 원래 없던 Web App Libraries 라는 디렉토리가 생성된다.


  4. 이제 /TestProject/WebContent/WEB-INF/web.xml 을 아래 내용을 추가한다.

	<servlet>
	  <servlet-name>dwr-invoker</servlet-name>
	  <servlet-class>org.directwebremoting.servlet.DwrServlet</servlet-class>
	  <init-param>
	     <param-name>debug</param-name>
	     <param-value>true</param-value>
	  </init-param>
	</servlet>
	<servlet-mapping>
	  <servlet-name>dwr-invoker</servlet-name>
	  <url-pattern>/dwr/*</url-pattern>
	</servlet-mapping>

  5. /TestProject/WebContent/WEB-INF/ 에 dwr.xml 이란 파일을 추가시키고 아래 내용을 입력한다.

<!DOCTYPE dwr PUBLIC
    "-//GetAhead Limited//DTD Direct Web Remoting 2.0//EN"
    "http://getahead.org/dwr/dwr20.dtd">
<dwr>
  <allow>
    <create creator="new" javascript="Hello">
      <param name="class" value="dwrtest.HelloName"/>
    </create>
  </allow>
</dwr>

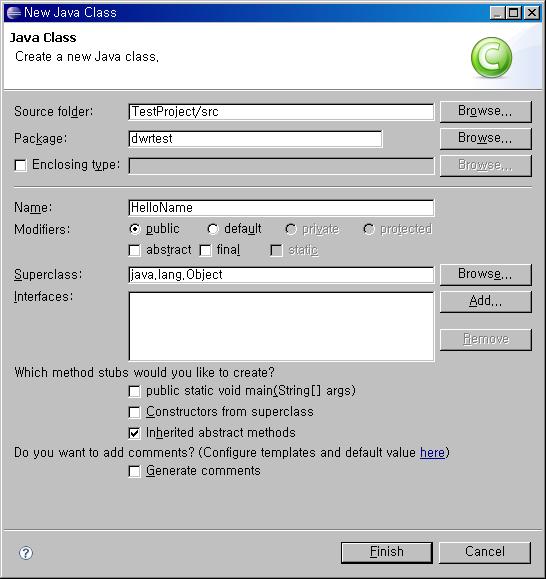
  6. /TestProject/src 에서 오른쪽 클릭하고, New > Class 를 선택하여 새로운 클래스를 추가한다.
       - Package 에 dwrtest 라고 적어준다.
       - Name 에 HelloName 이라고 적어준다.
     그리고 Finish 버튼을 누른다.


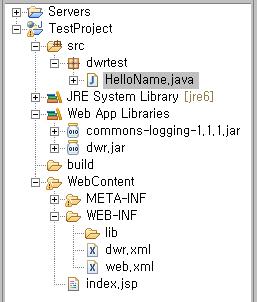
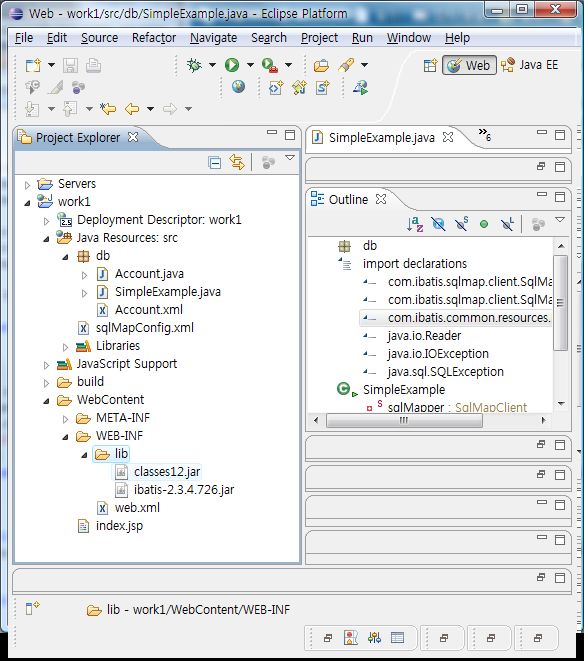
  7. 그럼 perspective 가 아래 그림과 같이 될 것이다.


  8. HelloName.java 를 아래와 같이 작성한다.

package dwrtest;

public class HelloName {
	public String getHelloName(String name){
		if(name == null || name.trim().length() < 1){
			return "Hello~! John Doe.";
		}

		return "Hello~! " + name + ".";
	}

}

  9. /TestProject/WebContent/index.jsp 를 아래와 같이 수정한다.

<html>
<head>
<title>DWR Test</title>
<script type="text/javascript" src='http://localhost:8081/dwr/interface/Hello.js'></script>
<script type="text/javascript" src='http://localhost:8081/dwr/engine.js'></script>
<script type="text/javascript">
	function update() {
	  var name = document.getElementById("myname").value;
	  Hello.getHelloName(name, loadinfo);
	}

	function loadinfo(data) {
		document.getElementById("replytext").innerText = data;
	}
</script>
</head>
<body>
<p>
  Name:
  <input type="text" id="myname"/>
  <input value="Send" type="button" onclick="update()"/>
  <br/>
  Reply: <span id="replytext"></span>
</p>
</body>
</html>

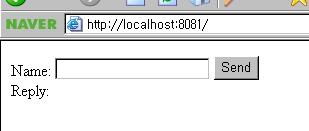
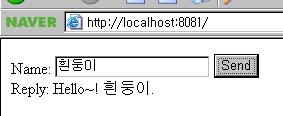
  10. 이제 모든 준비가 끝났다. 서버를 Start(혹은 Restart) 시킨다. 웹브라우져를 띄우고, 주소창에 자신의 환경에 맞게 적절히 입력한다. 그럼 아래와 같은 모습이 나타날 것이다.


  11. Name 에 적당한 값을 입력하고 Send 버튼을 눌러보자. 그럼 아까 작성해둔 HelloName 클래스의 getHelloName() 메소드가 호출되어 넘어온 값이 Reply 부분에 표시될 것이다.


  어떻게 이러한 작동이 이루어지는지 살펴보도록 하자.

  먼저 web.xml 에 추가된 내용을 살펴보도록 하자.

	<servlet>
	  <servlet-name>dwr-invoker</servlet-name>
	  <servlet-class>org.directwebremoting.servlet.DwrServlet</servlet-class>
	  <init-param>
	     <param-name>debug</param-name>
	     <param-value>true</param-value>
	  </init-param>
	</servlet>
	<servlet-mapping>
	  <servlet-name>dwr-invoker</servlet-name>
	  <url-pattern>/dwr/*</url-pattern>
	</servlet-mapping>

  이는 uri 가 "/dwr/" 로 들어오는 것에 대한 모든 처리는 org.directwebremoting.servlet.DwrServlet 에서 하겠다는 의미이다. 이는 일반적인 Servlet이나 JSP 개발환경에서 이용 가능한 설정이다. DWR 은 일반적인 환경 이외에도 Struts 나 Spring 등 여러가지 Framwork 와도 연동이 가능하며 이때 사용되는 <servlet-class>의 값은 조금 다르다. 가령 Spring의 경우 <servlet-class> 값으로 org.directwebremoting.spring.DwrSpringServlet 가 들어간다. 이런 외부 Framework 와의 연동은 다음시간에 알아보도록 하겠다.

  다음으로 dwr.xml 에 대해 알아보도록 하자.

<!DOCTYPE dwr PUBLIC
    "-//GetAhead Limited//DTD Direct Web Remoting 2.0//EN"
    "http://getahead.org/dwr/dwr20.dtd">
<dwr>
  <allow>
    <create creator="new" javascript="Hello">
      <param name="class" value="dwrtest.HelloName"/>
    </create>
  </allow>
</dwr>

  dwr tag 는 가장 상위 tag 로 ROOT 역할을 한다. allow tag 는 DWR 클래스 를 생성(create)하고, 매핑(convert)하며 전역 필터(grobal filter)를 사용 가능하게 한다. - 여기서는 create 에 대해서만 설명하며, 다른부분에 대해서는 다음기회에 설명하도록 한다.

  create tag 는 실행을 하고자하는 클래스를 정의할때 사용한다. create tag 는 아래와 같은 형식으로 사용된다.

<create creator="..." javascript="..." scope="...">
     <param name="..." value="..."/>
     <auth method="..." role="..."/>
     <exclude method="..."/>
     <include method="..."/>
</create>

  위 형식중 대부분은 선택사항으로 꼭 필요한 부분은 creator 와 javascript 속성이다.
 
  예제에서 creator 속성에 설정된 "new" 라는 값은 클래스의 생성자를 사용하기 위한 값이다. 이 creator 속성은 default 생성자를 사용하여 클래스의 인스턴스를 생성한다. 이를 사용하면 매번 해당 클래스가 호출 될 때마다 인스턴스를 생성한다. - creator 에는 여러가지 설정 값이 존재하지만 이는 다음번에 dwr.xml 대한 상세 설명을 할때 하기로 하고, 여기서는 테스트로 사용한 new 에 대해서만 알아보자.

  javascript 속성은 생성된 인스턴스를 브라우져상에서 사용하기 위해 설정하는 id 값이라 보면 된다. 단, JavaScript 에 예약어로 등록되어 있는 단어들은 피하도록 해야 한다. 이 예제에서는 javascript 속성값으로 Hello 를 지정하였고, 앞서 소스에서 보았듯 index.jsp 에서 Hello 를 사용한다.

  param tag 는 위에서 creator 속성에 new 를 사용하므로서 생성하게될 클래스를 지정하게 된다. 즉, 원격 호출을 통해 사용하게될 클래스를 지정한다. 예제에서는 dwrtest.HelloName 이라는 클래스를 사용한다고 표기했다.

  include 와 exclude 는 해당 클래스의 메소드에 대한 접근성에 대한 설정으로, 이 예제에서 보듯 include와 exclude 를 지정하지 않으면 해당 클래스에 public으로 선언된 모든 메소드에 대한 접근이 가능하다. 하지만 include 를  사용하면 include 로 사용하겠다고 표시한 메소드만 접근가능하고, 나머지는 접근 할 수 없으며, 반다로 exclude 를 사용하면 exclude 로 표시한 메소드만 제외한 나머지 public 메소드에 대한 접근이 가능하다. auth 속성은 J2EE에서 role 을 통한 접근 제한시 사용된다.

  결론적으로 dwr.xml 에서의 정의를 통해 dwrtest.HelloName 란 클래스를 Hello 란 인스턴스명으로 접근하여 사용하겠다는 정의이다.

  dwrtest.HelloName 클래스에 대한 별도 설명은 안하도록 하겠다 소스에서 보듯 getHelloName 이란 메소드에서 간단히 넘겨받은 이름 앞에 Hello 란 String 을 붙여 넘기는 간단한 메소드를 포함한 클래스이다.

  그럼 이제 index.jsp 에 대해 알아보자.

<script type="text/javascript" src='http://localhost:8081/dwr/interface/Hello.js'></script>
<script type="text/javascript" src='http://localhost:8081/dwr/engine.js'></script>

  이 부분은 앞서 설정된 DWR의 연장으로 http://localhost:8081 은 현재 웹에 대한 URL 부분이며 /dwr 은 앞서 web.xml 통해 설정한 uri-pattern 이다. 
  
  engine.js 는 DWR을 사용하기 위한 기본 js 파일로 꼭 포함시켜야 하는 부분이며, 눈여겨 봐야할 부분은 /interface/Hello.js 이다. /interface/Hello 를 통해 앞서 dwr.xml 에 지정한 Hello 가 인스턴스명인 클래스를 사용한다는 의미이다. 즉, 이 부분이 포함되어야 JavaScript 상에서 Hello 를 통해 클래스의 메소드 호출이 가능해지게 된다.

<script type="text/javascript">
	function update() {
	  var name = document.getElementById("myname").value;
	  Hello.getHelloName(name, loadinfo);
	}

	function loadinfo(data) {
		document.getElementById("replytext").innerText = data;
	}
</script>
...
<p>
  Name:
  <input type="text" id="myname"/>
  <input value="Send" type="button" onclick="update()"/>
  <br/>
  Reply: <span id="replytext"></span>
</p>
 
  위에서 보듯 HTML 의 내용은 간단하다. myname 이란 text 에 이름을 적고 Send 버튼을 클릭하면 update()란 JavaScript 함수가 호출된다.

  update() 함수를 보면 해당 함수가 호출되면 myname의 값을 가져와 Hello 클래스의 getHelloName 이라는 메소드로 값을 넘기며 getHelloName 의 두번째 인자인 loadinfo 는 getHelloName 메소드 호출을 끝내고 리턴되는 값을 넘겨받을 함수인 콜백함수(Callback Function)의 이름이다.

  loadinfo() 함수는 getHelloName 메소드의 리턴값을 data라는 인자로 넘겨받아 replaytext 라는 곳에 표시한다.

  이로서 DWR의 Eclipse 를 이용한 설정 방법과 간단한 데모를 살펴 보았으며, 그에 대한 간단한 설명을 해보았다. DWR은 생각보다 간단한 설정으로 사용가능 함을 알 수 있었다.

  다음 시간에는 web.xml 과 dwr.xml 의 설정에 대한 세부사항을 알아보도록 하겠다.
Posted by 1010
05.JSP2009. 1. 19. 10:28
반응형

JSTL (JSP Standard Tag Library)


http://jakarta.apache.org/site/downloads/downloads_taglibs-standard.cgi


1. 위 사이트에서 JSTL 을 다운 받습니다.

2. 압축을 풀고 lib 디렉토리 안의 jstl.jarstandard.jar 를 복사합니다.

3. Tomcat 의 디렉토리 내의 common\lib 안에 복사 해놓고 쓰면 됩니다.

<%@ taglib prefix="c" uri="java.sun.com/jsp/jstl/core" %> 와 같이 선언하면 됩니다.


기본적인 기능

<%@ taglib prefix="c" uri="java.sun.com/jsp/jstl/core" %>


XML 처리

<%@ taglib prefix="x" uri="java.sun.com/jsp/jstl/xml" %>


국제화와 형식화

<%@ taglib prefix="fmt" uri="java.sun.com/jsp/jstl/fmt" %>


데이터베이스 작업

<%@ taglib prefix="sql" uri="java.sun.com/jsp/jstl/sql" %>


JSTL 설치

  • 톰캣 설치기 설치 옵션에서 Examples를 선택하면 설치되는 예제 애플리케이션에 들어있음
  • 위치 : webapps/jsp-examples/WEB-INF/lib/jstl.jsr
  • 위의 파일을 WEB-INF/lib 디렉토리에 복사


스크립팅 없이 루핑 돌리기

<c:forEach>

  1. <%@ taglib prefix="c" uri="http://java.sun.com/jsp/jstl/core" %>
  2. <c:forEach var="movie" items="${movieList}" varStatus="movieLoopCount" >
  3. <tr>

  4. <td>${movie} </td>

  5. <td>${movieLoopCount.count}</td>

  6. </tr>

  7. </c:forEach>

var : 컬렉션에 있는 각각 항목을 나타내는 변수로, 한번 회전할 때마다 값이 바뀝니다.

items : 루핑을 돌 실제 데이터(배열, 컬렉션, 맵 또는 콤마 분리 문자열)

varStatus : 루핑 횟수 알기


배열을 불러올때는 ${param.movieList} 가 아닌 ${paramValues.movieList}로 items에 저장해야 한다.


<c:forEach>안에 <c:forEach>품기

  1. <%@ taglib prefix="c" uri="http://java.sun.com/jsp/jstl/core" %>
  2. <c:forEach var="listElement" items="${movies}" varStatus="movieLoopCount" >
  3. <c:forEach var="movie" items="${listElement}">
  4. <tr>

  5. <td>${movie} </td>

  6. <td>${movieLoopCount.count}</td>

  7. </tr>

  8. </c:forEach> 
  9. </c:forEach>

속성 : begin, end, step


조건문

<c:if>

  1. <c:if test="${userType eq 'member'}:>
  2. <jsp:include page="inputComments.jsp" />

  3. </c:if>

<c:choose>, <c:when>, <c:otherwise>

  1.  <c:choose>
  2. <c:when test="${userPref == 'preformance'}">

  3. go 1

  4. </c:when>

  5. <c:when test="${userPref == 'preformance'}">

  6. go 2

  7. </c:when>

  8. <c:otherwise>

  9. go 3

  10. </c:otherwise>

  11. </c:choose>


속성 입력

<c:set>

  1. <c:set var="userLevel" scope="session" value="Cowboy" />
  2. <c:set var="userLevel" value="${person.dog}" />
  3. <c:set var="userLevel" scope="session">
  4. Sheriff, Bartender, Cowgirl

  5. </c:set>
  1. var : session 생존범위에 "userLevel" 이란 이름의 속성이 없으면 <c:set> 태그는 하나를 새로 만듭니다.
  2. scope : 옵션값
  3. value : 꼭 문자열일 필요는 없습
  4. 기타 : value가 널 인경우 변수는 제거됩니다.

빈과 맵에 <c:set> 태그 사용하기

 <c:set> 태그는 빈 프로퍼티와 맵 값 두 가지 경우에만 동작합니다.

리스트나 배열에 값을 추가하기 위해서 사용할 수 없슴

  1. <c:set target="${petMap} property="dogName" value="Clover" />
  2. // target은 널이어서는 안 됩니다.
  3. // target이 맵인 경우 dogName은 키 이름이 됩니다
  4. // target이 빈인 경우 dogName은 프로퍼티 이름이 됩니다.
  5. <c:set target="${person}" property="name" >
  6. // target 속성에 id 이름을 기입하면 안됩니다.
  7. ${foo.name}

  8. // 몸체 안에는 문자열 또는 표현식이 들어갈 수 있습니다.

  9. </c:set>

 target 속성에는 객체(Object)가 들어가야 합니다. 빈이나 맵의 "id" 이르을 쓰면 안됩니다.


scope 속성을 명기하지 않으면?

컨테이너는

  1. page 
  2. request 
  3. session 
  4. application(context) 

순으로 찾음, 못 찾을 경우 page 생존범위로 해서 하나를 새로 만듬


<c:remove> 로 속성 제거하기

  1. <c:remove var="userStatus" scope="request" /> 
  2. // var 속성에는 문자열을 넣어야함. 표현식을 넣으면 안됨


<c:import> 로 컨텐츠 포함

  1. <c:import url="http://www.lazyartist.co.kr"/>

요청이 들어오는 시점에 url 속성에 명기한 파일을 현재 컨텐츠에 포함합니다.

<c:import>는 외부 자원도 포함할 수 있습니다.


<c:param> 으로 포함될 파일 동적 변화 시키기

  1. <c:import url="header.jsp">
  2. <c:param name="subTitle" value="we take the String" />

  3. </c:import>

 포함될 파일에

  1. ${param.subTitle} 


<c:url>로 url 재작성

  1. <a href="<c:url value='/imputComments.jsp' />
  2. // value에 들어있는 상대경로 뒤에 jsessionid를 추가합니다.(쿠키를 사용하지 못 하는 경우)

url 인코딩

  1. <c:url value='/imputComments.jsp' var="inputURL" />
  2. <c:param name="firstName" value="${first}" />

  3. <c:param name="lastName" value="${last}" />

  4. // param 태그를 사용합으로써 url인코딩까지 해준다.(공백에 +를 넣어줌)

  5. </c:url>


  6. <a href="${inputURL}">


오류 페이지 설정

오류 페이지에서만 쓸 수 있는 객체 : exception

  1. <%@ page isErrorPage="true" %>
  2. ${pageContext.exception}

오류 발생 후 오류 페이지로 이동하지 않고 자체 페이지에서 해결하기 : <c:catch>

  1. <c:catch>
  2. <% int x = 10/0; %>

  3. // 에러가 발생하면 다음을 실행하지 않고 </c:catch>로 곧장 이동한다.

  4. </c:catch>

exception을 속성으로 만들어 에러 메시지 읽기
  1. <c:catch var="myException">
  2. ...

  3. </c:catch>
  4. ${myException.message}
  5. // 타입이 Throwable이니 message프로퍼티가 있음 


JSTL API

코어(Core) 라이브러리

  • 일반적인 것

    • <c:out> 
    • <c:set> 
    • <c:remove> 
    • <c:catch> 
  • 조건

    • <c:if> 
    • <c:choose> 
    • <c:when> 
    • <c:otherwise> 
  • URL 관련

    • <c:import> 
    • <c:url> 
    • <c:redirect> 
    • <c:param> 
  • 반복

    • <c:forEach> 
    • <c:forEachToken> 

 포맷팅 라이브러리

  • 국제화

    • <fmt:message> 
    • <fmt:setLocale> 
    • <fmt:bundle> 
    • <fmt:setBundle> 
    • <fmt:param> 
    • <fmt:requestEncoding> 
  • 포맷팅

    • <fmt:timeZone> 
    • <fmt:setTimeZone> 
    • <fmt:formatNumber> 
    • <fmt:parseNumber> 
    • <fmt:parseData> 

SQL 라이브러리

  • 데이터베이스 접근

    • <sql:query> 
    • <sql:update> 
    • <sql:setDataSource> 
    • <sql:param> 
    • <sql:dataParam> 

XML 라이브러리

  • 코어 xml 액션

    • <x:parse> 
    • <x:out> 
    • <x:set> 
  • xml 흐름 제어

    • <x:if> 
    • <x:choose> 
    • <x:when> 
    • <x:otherwise> 
    • <x:forEach> 
  • 변환 액션

    • <x:transform> 
    • <x:param>
Posted by 1010
05.JSP2009. 1. 19. 10:26
반응형
  1. <%@ page language="java" contentType="text/html; charset=EUC-KR" 
  2.     pageEncoding="EUC-KR"%> 
  3.       
  4. <%@ taglib prefix="c" uri="http://java.sun.com/jsp/jstl/core" %> 
  5. <%@ taglib prefix="sql" uri="http://java.sun.com/jsp/jstl/sql" %> 
  6.  
  7. <html><head><title>Insert title here</title></head> 
  8. <body> 
  9. <center> 
  10. ***상품자료***<br/> 
  11. <sql:setDataSource var="ds" url="jdbc:oracle:thin:@localhost:1521:java" 
  12.                             driver="oracle.jdbc.driver.OracleDriver" 
  13.                             user="scott" password="tiger"/> 
  14.  
  15. <sql:query var="rs" dataSource="${ds}"> 
  16.     select * from sangdata where code >= ? and code <= ?  
  17.     <sql:param value="${2}" /> 
  18.     <sql:param value="${100}" /> 
  19. </sql:query> 
  20.  
  21. <table align="center" border="1"> 
  22.     <tr> 
  23.         <th>코드</th><th>수량</th><th>단가</th><th>금액</th> 
  24.     </tr> 
  25.     <c:forEach var="r" items="${rs.rows}"> 
  26.     <tr> 
  27.          <td><c:out value="${r.code}" /></td> 
  28.         <td><c:out value="${r.sang}" /></td> 
  29.         <td><c:out value="${r.su}" /></td> 
  30.         <td><c:out value="${r.dan}" /></td> 
  31.         <c:set var="tot" value="${r.su * r.dan}"></c:set> 
  32.         <td><c:out value="${tot}" /></td> 
  33.     </tr> 
  34.     </c:forEach> 
  35. </table> 
  36. </center></body> 
  37. </html> 
Posted by 1010
05.JSP2009. 1. 19. 10:11
반응형
변수의 선언

<c:set var="t" value="hello"/>

<c_rt:set var="color" value="<%=abc%>"/>
  => 이 경우 c_rt 대신 c 를 사용하면 <%= %>을 포함한 문자열로 인식해 버린다.

<c:set var="hit" value="1" scope="session"/>
  => session 스코프 내에서 살아있는 변수가 된다.


<c:set value="value" target="target" property="propertyName"/>
  => 속성 value로 target객체의 프로퍼티 값을 정한다.

<c:set target="target" property="propertyName">
    body content
</c:set>
  => body 값으로 target객체의 프로퍼티 값을 정한다.

  => Scope : page | request | session | application


* 변수의 제거

<c:remove var="name" scope="session"/>


* forEach 예문 (보통의 for문 & 개선된 루프)

<c:forEach items="${pageScope }" var="h">
 <c:out value="${h }"/>
</c:forEach>
  => 위의 예문은 pageScope EL내장객체의 모든 요소를 루프를 통해 뽑아내어 출력하는 문장이다.


<c:forEach var="h" items="${header}">
 <c:out value="${h.key}:${h.value }"/><br>
</c:forEach>
  => 위의 예문은 header 내장객체의 모든 요소를  key와  value로 구분하여 출력하는 문장이다.


<c:forEach var="one" begin="1" end="10" step="1">
 <c:out value="${one}"/>
</c:forEach>
 => 위의 예문은 반복할 횟수를 직접 지정하여 루프를 돌리는 문장이다. (var, step은 생략가능)


<c:forEach items="${color }" varStatus="i">
 <c:out value="${i.count }"/>
 <c:out value="${color[i.index] }"/><br/>
</c:forEach>
  => 위의 예문은 카운트숫자 i 를 설정하여 for 문을 돌리는 문장이다.


* forTokens 예문 (StringTokenizer)

<c:forTokens var="one" items="서울|인천,대구,부산,찍고" delims="," varStatus="sts">
 <c:out value="${sts.count }:${one}"/>&middot;
</c:forTokens>
  => forTokens 역시 begin, step, end 를 지정할 수 있고, varStatus는 생략가능하다.


* IF 예문


<c:if test="${empty hit }">
 <c:set var="hit" value="1" scope="session"/>
 세션에 값을 저장하였습니다.
</c:if>
  => empty는 NULL을 판별하는 EL연산자이다.
  => hit 이라는 변수가 NULL 이면 session 스코프에 1이라는 값으로 hit 변수를 생성하는 코드.
  => empty hit 대신에 empty sessionScope.hit 으로 해도 동일한 결과를 얻을 수 있다.


* <c:out> - System.out.println()

1. body가 없는 경우
   <c:out value="value"  [escapeXml="{true|false}"]  [default="기본값"] />

2. body가 있는 경우
   <c:out value="value"  [escapeXml="{true|false}"] >
      기본값
   </c:out>

  => escapeXml 속성은 값 중에 포함된 < > & ' " 문자들을 각각 &lt;  &gt;  &amp;  &#039;  &#034; 로 출력한다.
      생략할 경우 true가 기본값이다.
  => NULL 값의 처리에 대해서 JSP에서는 "null" 문자열로 출력되었던 것에 비해 JSTL의 스펙에서는 빈문자열("")
      또는 기본값으로 처리한다고 명시되어 있다.


* <c:catch/> : Try~Catch

<c:catch var="errmsg">
line1
<%=1/0 %> => 에러가 나는 코드
line2
</c:catch>
<c:out value="${errmsg }"/>

  => 시작 catch 태그에 변수를 선언하면 그 변수에 Exception의 내용이 들어가게 된다.


* <c:choose/>, <c:when test=""/>, <c:otherwise/> : IF~ELSE, SWITCH

<c:
choose>
 <c:
when test="${empty param.name}">
  <form>
   이름을 적어주세요
   <input type="text" name="name">
   <input type="submit" value="확인">
  </form>  
 </c:
when>
 <c:
when test="${param.name=='admin' }">
  안녕하세요 관리자님.
 </c:
when>
 <c:
otherwise>
  안녕하세요. <c:out value="${param.name}"/>님.
 </c:
otherwise>
</c:
choose>


* <c:import/>

   - 웹어플리케이션 내부의 자원접근은 물론이고,
http, ftp 같은 외부에 있는 자원도 가져와서 페이지
    내에 귀속
시킨다.  자유롭게 가공할 수도 있고, 편집도 가능하다.
   - 스트림으로 받아와서 파일로 저장하거나, DB에 입력할 수도 있도록 되어 있다.


<c:set var="url" value="
http://www.google.co.kr"/>
<c:import url="${url}" var="u"/>
=> URL에 해당하는 페이지에 있는 모든 요소를 변수에 할당함.
<c:out value="${url }"/> 가져옵니다.

<base href="<c:out value='${url }'/>"> => base 태그는 해당 URL을 기반으로 상대경로화 하므로 이미지가
                                                            깨지지 않도록 만들어 준다.

 <c:out value="${u }" escapeXml="false"/> => 위에서 만든 변수를 출력하면 모든 코드가 출력된다.
</base>                                                      escapeXml="false" 로 해야 화면이 제대로 보인다.


* <c:url/> : request.getContextPath()

<img src="<c:url value="/images/winter.jpg"/>">
 => 이렇게 c:url 태그의 value로 넣어주는 것 만으로, 현재 컨텍스트의 경로를 갖다가 붙여서 새 문자열을 만든다.
 => context 속성을 지정해 줄 수도 있는데, context 속성을 지정해 주었을 경우에, context, value 는 "/"로 시작
      해야 한다.


* <c:redirect/> : request.sendRedirect()

<c:redirect url="jstlcore01.jsp">
 <c:param name="number" value="300"/>
</c:redirect>
 => url에 해당하는 페이지로 리다이렉션 하면서 파라미터를 가지고 간다. body 없이 사용 가능하다.
 => c:url 과 마찬가지로 context 속성을 지정하면, value와 context는 "/"로 시작해야 한다.


* <c:param/>

<c:import url="http://bruce.com">
   <c:param name="action" value="register"/>
</c:import>

 => 위 태그는 다음과 같은 쓸 수 있다.

<c:import url=http://bruce.com?action=register>


* EL연산자간의 우선순위

1. []
2. ()
3. - (단항)  not  !  empty
4. *  /  div  %  mod
5. +  - (이항)
6. <  >  <=  =>  lt  gt  le  ge
7. ==  !=  eq  ne
8. &&  and
9. ||  or

Posted by 1010
05.JSP2009. 1. 19. 10:10
반응형
오픈 소스 스터디
Added by 박재성, last edited by Jang Jooran on 4월 03, 2006  (view change)
Labels:
(None)

JSTL과 Velocity를 활용한 UI 레이어 구현 방법

Table of Contents

JSTL

소개

  • J2EE 소형 클라이언트 기술인 JSP(JavaServer Pages)가 지난 몇 년 동안 널리 일반화되면서 독립적인 개발자들은 많은 사용자 정
    의 JSP 태그 라이브러리를 만들었습니다. 이러한 태그 라이브러리는 대부분 서로 다른 목표를 달성하도록 작성되었지만 반복, 조건 등의 일
    반적인 작업을 위한 유사한 솔루션을 제공하는 경향이 있습니다.
    유사하고 일반적이 문제점을 해결하는 독립적인 태그 라이브러리에 대한 필요성을 줄이기 위해 Java Community Process(JSR 52)의 지
    원하에 JSTL(JavaServer Pages Standard Tag Library)이 개발되었습니다. JSTL은 이러한 일반 기능을 처리하는 하나의 표준 솔루션
    을 제공합니다. (말그대로 표준태그라이브러리)
  • JSTL의 주요 강점 중 하나는 서블릿 컨텍스트에 저장된 데이타 같은 애플리케이션 데이타를 액세스 및 조작하는 쉬운 방법을 제공하는 간
    단한 EL을 사용할 수 있다는 것입니다.

EL 에 대하여

설치 방법

  • http://cvs.apache.org/builds/jakarta-taglibs/nightly/ 에서 다운
    \jakarta-taglibs-20051024\jakarta-taglibs\standard\lib
    에서 jstl 과 standard 파일 을 이 두개의 jar 파일을 우리의 웹애플리케이션의 /WEB-INF/lib 폴더에 넣습니다
    그 다음 tld 폴더의 tld 파일을 /WEB-INF/lib/tld 폴더 아래 넣습니다.
  • web.xml 에
     
        <!-- jstl 1.2 taglig -->
         <taglib>
           <taglib-uri>jstl-c</taglib-uri>
           <taglib-location>/WEB-INF/tlds/jstl/c.tld</taglib-location>
        </taglib>
        <taglib>
           <taglib-uri>jstl-fmt</taglib-uri>
           <taglib-location>/WEB-INF/tlds/jstl/fmt.tld</taglib-location>
        </taglib>
        <taglib>
          <taglib-uri>jstl-fn</taglib-uri>
          <taglib-location>/WEB-INF/tlds/jstl/fn.tld</taglib-location>
        </taglib>
        

    를 추가한다.

  • jsp 에 추가
     
         <%@ taglib uri="jstl-c" prefix="c" %>
        <%@ taglib uri="jstl-fmt" prefix="fmt" %>
        <%@ taglib uri="jstl-fn" prefix="fn" %>
         

사용 예(기본 문법)

Area Subfunction Prefix Description
Core Variable support c 변수지원
Core Flow control c 흐름제어
Core URL management c URL 처리
Core Miscellaneous c  
XML Core x XML 코어
XML Flow control x 흐름 제어
XML Transformation x XML 변환
I18n Locale fmt 지역
I18n Message formatting fmt 메시지 형식
I18n Number and date formatting fmt 숫자 및 날짜 형식
Database SQL sql SQL
Functions Collection length fn 콜렉션 처리
Functions String manipulation fn String 처리

http://java.sun.com/products/jsp/jstl/1.1/docs/tlddocs/index.html 참고

  • 변수지원태그
    set: <c:set var="varName" scope="session" value="someValue">
    var속성은 값을 지정할 변수의 이름
    <c:set t a r g e t ="" property="userName" value="someValue">
    target : 빈 프로퍼티나 맵 값을 설정한다.(Object)
    var와 target을 동시에 사용할 수 없다.
    scope속성은 변수가 위치하는 영역(page,request,session,application)
    value :저장하는 값
    remove :<c:remove var="varName" scope="session">
    var :삭제할 변수의 이름
    scope 속성은 삭제할 변수의 영역
    out : <c:out value="">
    value속성은 출력하려는 값
    catch : <c:catch var="">
    </c:catch>
    예외사항이 한번이라도 발생시 </c:catch>로 점프
    var에 정의 된 객체를 페이지 생존범위에 자동으로 묶어 나중에 var에 정의된 변수이름을 사용할 수 있다.
    예외 발생시
    : var 속성 사용시 exception 객체를 설정.
    <c:catch> 문 밖으로 제어가 떨어진다
 
    <c:set var="num1" value="${20}" />
	<c:set var="num2">
		10.5
	</c:set>
	
	<c:set var="today" value="<%= new java.util.Date()%>" /><br>

	변수 num1 = ${num1} <br>
	변수 num2 = ${num2} <br>
	num1 + num2 = ${num1+num2}<br>
	오늘은 ${today}입니다.
	
	<c:remove var="num1" scope="page" />
	
	<p>
	삭제한 후의  num1=${num1} <br>
	삭제한 후의 num1 + num2 = ${num1 + num2}
   
 
       <c:catch var="myException">
     	It's catch
         <% int x = 10/0; %>
         실행안됨.
       </c:catch>
       <c:if test="${myException != null}">
           발생된 예외는 : ${myException.message} <br>
       </c:if>
     
  • URL 관련
    import : <c:import url=""/>
    url속성에 명기한 파일을 현재 컨텐츠에 포함
    param : <c:param name="" value=""/>
    <jsp:param />과 같은 역할
    url : <c:url value="" var=""/>
    value에 들어있는 상대 경로 뒤에 jsessionid를 추가한다.(쿠키를 사용 못하는 경우)
    var : 옵션 속성으로 url을 참조하기 위해쓴다.
    redirect :<c:redirect url="' context=""/>
    context : url경로의 이름
 
    <c:import url="Header.jsp" >
	<c:param name="subTitle" value="This is subTitle"/>
    </c:import>
   
  • 흐름제어 태그
    if : <c:if test="조건"> </c:if>
    test속성의 값에는 "조건"이 오는데 이 조건문의 결과값이 true 면 처리
     
       <c:if test="true">
         무조건 수행<br>
        </c:if>
    
        <c:if test="${param.name == 'bk'}">
          name 파라미터의 값이 ${param.name}입니다 <br>
        </c:if>
    
        <c:if test="${param.name eq 'bk'}">
          name 파라미터의 값이 ${param.name}입니다 <br>
        </c:if>
    
        <c:if test="${18 < param.age}">
    	 당신의 나이는 18세 이상입니다.
        </c:if>   
       

    choose,when,otherwise : <c:choose>
    <c:when test="조건">
    </c:when>
    <c:otherwise>
    </c:otherwise>
    </c:choose>
    choose 태그는 자바의 switch 문과 if-else 의 혼합한 형태, 다수의 조건문을 하나의 블록에서 수행하고자 할때 사용
    -> switch문과의 차이점은 중간에 빠져 나가지 못한다는 것이다.
    -> when 의 어느 하나에도 실행되지 않을때 otherwise 실행
    -> otherswise 태그가 반드시 있어야 하는것은 아니다.

 
     <c:choose>
       <c:when test="${param.name == 'bk' }">
	<li>당신의 이름은 ${param.name}입니다.
     </c:when>
     <c:when test="${param.age > 18 }">
	<li>당신은 18세 이상입니다.
     </c:when>

     <c:otherwise>
	<li> 당신은 'bk'가 아니고 18세 이상이 아닙니다.
     </c:otherwise>
     </c:choose> 
    

forEach : <c:forEach var="변수" items="아이템" begin="시작값" end="끝값" step="증가값">
</c:forEach>
item 속성에 올수 있는 것들로는 Map,배열,Collection 이 있다.
varStatus는 javax.servlet.jsp.jstl.core.LoopTagStatus 객체 인스턴스변수를 만들며 count라는 프로퍼티가 있어 몇번의 회전인지 알 수있다.

 
       <c:forEach var="i" begin="1" end="9">
	<li>4 *${i} = ${4 *i}
       </c:forEach>

       <h4>int 형 배열</h4>

       <c:forEach var="i" items="${intArray}" begin="2" end="4">
	[${i}]
       </c:forEach>

       <h4>Map</h4>
       <c:forEach var="i" items="${map}">
	  ${i.key} = ${i.value}<br>
       </c:forEach>

       <c:forEach var="member" items="${memberList}" varStatus="memberLoopCount">
	  회원 $(memberLoopCount.count} : ${member} <br>
       </c:forEach>
     

forTokens : <c:forTockens var="token" items="문자열" delins="구분자">
</c:forTockens>
forTokens 태그는 StringTokenizer 와 같은 기능을 제공한다.

 
       <c:forTokens var="token" items="빨강색, 주황색, 노란색, 초록색, 파랑색, 남색, 보라색" delims=",">
     	${token}<br>
       </c:forTokens>
     
  • 숫자 및 날짜 지원 형식
    The JSTL formatting actions allow various data elements in a JSP page, such as numbers,dates and times
    to be formatted and parsed in a locale-sensitive or customized manner.

formatNumber : 숫자 형식을 표현


      number  : <fmt:formatNumber value="9876543.61" type="number"/>
      currency: <fmt:formatNumber value="9876543.61" type="currency"/>
      percent : <fmt:formatNumber type="percent">9876543.61</fmt:formatNumber>

      pattern=".000"    :<fmt:formatNumber value="9876543.61" pattern=".000" />
      pattern="#,#00.0#":<fmt:formatNumber value="9876543.612345" pattern="#,#00.0#"/>
    

parseNumber : 정해진 패턴을 문자열에서 수치를 파싱해내는 태그
formatDate :날짜 형식을 표현

 
      <jsp:useBean id="now" class="java.util.Date"/>
	
         <c:out value="${now}"/>
           date: <fmt:formatDate value="${now}" type="date"/>
           time: <fmt:formatDate value="${now}" type="time"/>
           both: <fmt:formatDate value="${now}" type="both"/>

           default:<fmt:formatDate value="${now}"
                        type="both" dateStyle="default" timeStyle="default"/>
           short  :<fmt:formatDate value="${now}"
                        type="both" dateStyle="short"   timeStyle="short"  />
           medium :<fmt:formatDate value="${now}"
                        type="both" dateStyle="medium"  timeStyle="medium" />
           long   :<fmt:formatDate value="${now}"
                        type="both" dateStyle="long"    timeStyle="long"   />
           full   :<fmt:formatDate value="${now}"
                        type="both" dateStyle="full"    timeStyle="full"   />

          pattern="yyyy년MM월dd일 HH시mm분ss초"
             <fmt:formatDate value="${now}" type="both"
                             pattern="yyyy년MM월dd일 HH시mm분ss초"/>
            
         <fmt:formatDate value="${now}" pattern="yyyy/MM/dd" />

parseDate :정해진 패턴의 문자열에서 날짜를 파싱해내는 태그
timeZone : <fmt:timeZone value=""/>

setTimeZone : <fmt:timeZone value="" var="" scope=""/>

  • 국제화
    message <fmt:message
    setLocale <fmt:setLocale
    bundle <fmt:bundle
    setBundle <fmt:setBundle
    param <fmt:param
    requestEncoding <fmt:requestEncoding
  • SQL
    <sql:query sql="sqlQuery" var="varName" [scope="{page|request|session|application}"]
    [dataSource="dataSource"] [maxRows="maxRows"] [startRow="startRow"]>
    <sql:param>
    </sql:query>
         <sql:query var="customers" dataSource="${dataSource}">
          SELECT * FROM customers
          WHERE country ='China'
          ORDER BY lastname
         </sql:query>
         
         <table>
          <c:forEach var="row" items="">
             <tr>
               <td><c:out value="${row.lastName}"/></td>
               <td><c:out value="${row.firstName}"/></td>
               <td><c:out value="${row.address}"/></td>
             </tr>
          </c:forEach>
         </table>
       

<sql:update>
<sql:setDataSource>
<sql:param>
<sql:dateParam>

  • XML 코어
    <x:parse>
    <x:out>
    <x:set>
  • 흐름제어
    <x:if>
    <x:choose>
    <x:when>
    <x:otherwise>
    <x:forEach>
  • XML 변환
    <x:transform>
    <x:param>
  • function
    contains
    containsIgnoreCase
    endsWith
    escapeXml
    indexOf
    join
    length
    replace
    split
    startsWith
    substring
    substringAfter
    substringBefore
    toLowerCase
    toUpperCase
    trim
         <c:if test="${fn:contains(name, searchString)}">
         <c:if test="${fn:containsIgnoreCase(name, searchString)}">
         <c:if test="${fn:endsWith(filename, ".txt")}">
         ${fn:escapeXml(param:info)}
         ${fn:indexOf(name, "-")}
         ${fn:join(array, ";")} 
         You have ${fn:length(shoppingCart.products)} in your shopping cart.
         ${fn:replace(text, "-", "•")}
         ${fn:split(customerNames, ";")}
         <c:if test="${fn:startsWith(product.id, "100-")}">
         P.O. Box: ${fn:substring(zip, 6, -1)}
         P.O. Box: ${fn:substringAfter(zip, "-")}
         Zip (without P.O. Box): ${fn:substringBefore(zip, "-")}
         Product name: ${fn.toLowerCase(product.name)}
         Product name: ${fn.UpperCase(product.name)}
         Name: ${fn.trim(name)}
       

Velocity

Velocity

소개

  • 벨로시티란 자바 기반의 템플릿 엔진입니다.
    벨로시티를 활용하면 간단하면서도 강력한 템플릿 언어를 통하여 자바 코드에 정의된 객체를 액세스할 수 있습니다.
    벨로시티를 웹 개발에 사용하면, 웹 디자이너는 자바 프로그래머와 병렬로 작업을 할 수 있으며 MVC(모델-뷰-컨트롤러) 모델에 따라 웹 사이트를 개발할 수 있습니다. 더 자세히 설명하면 웹 페이지 디자이너의 경우 보기 좋은 사이트를 만드는 데만 집중하면 되고, 프로그래머는 잘 동작하는 코드를 만드는 데만 집중하면 된다는 뜻입니다.
    벨로시티는 웹 페이지와 자바 코드를 분리하여, 장기적인 측면에서 볼 때 웹 사이트를 손쉽게 유지보수할 수 있도록 하고, 자바 서버 페이지 (JSP) 또는 PHP를 대체할 수 있는 방안을 제시합니다. 벨로시티의 쓰임새는 웹 사이트에 국한되지 않습니다. 예를 들면, 템플릿으로부터 SQL이나 포스트스크립트, 또는 XML(XML 변환에 대해서는 벨로시티 툴 중 하나인 아나키아(Anakia)를 참조)문서를 생성하는 데 쓰일 수 있습니다. 벨로시티는 스탠드얼론 유틸리티처럼 사용하여 소스 코드나 리포트를 생성할 수도 있고, 다른 시스템의 컴포넌트로 통합할 수도 있습니다. 또한 벨로시티는 터빈 (또다른 자카르타 서브 프로젝트 중 하나) 웹 애플리케이션 프레임웍에 템플릿 서비스를 제공합니다. 벨로시티와 터빈을 조합하면 진정한 MVC 모델에 따라 웹 애플리케이션을 개발할 수 있습니다

설치 방법

  • web.xml 수정
     
       <servlet>
         <servlet-name>velocity</servlet-name>
            <servlet-class>org.apache.velocity.tools.view.servlet.VelocityViewServlet
         </servlet-class>
         <init-param>
            <param-name>org.apache.velocity.toolbox</param-name>
            <param-value>/WEB-INF/velocity-toolbox.xml</param-value>
         </init-param>
         <init-param>
            <param-name>org.apache.velocity.properties</param-name>
            <param-value>/WEB-INF/velocity.properties</param-value>
           </init-param>
         <load-on-startup>10</load-on-startup>
       </servlet>
       <servlet-mapping>
          <servlet-name>velocity</servlet-name>
          <url-pattern>*.vm</url-pattern>
       </servlet-mapping>
     
  • 파일 생성
    velocity.properties 파일
    velocity-toolbox.xml 을 생성 한 후 web_inf/lib 아래 둡니다.
    velocity-toolbox.xml
    <tool>
       <key>date</key>
       <scope>application</scope>
       <class>org.apache.velocity.tools.generic.DateTool</class>
     </tool>
    
      <tool>
      <key>math</key>
      <scope>application</scope>
      <class>org.apache.velocity.tools.generic.MathTool</class>
    </tool>
     ...
    

사용 예(기본 문법)

Velocity Template Language(VTL) 은 Template 에서 사용되는 Velocity 고유의 언어를 의미합니다.

  • References(참조형)
    Variables(변수) - 다음과 같이 $를 먼저 쓰고 그 뒤에 식별자를 적어주는 방식으로 사용
    ex) $foo
    Property(특성) - $ 다음에 식별자를 쓰고, 마침표(.)후에 다시 식별자의 형태로 사용
    ex) $foo.name
    Method(메소드) - $다음에 식별자를 쓰고 마침표 후에 호출할 메소드의 이름을 적는다
    ex)$foo.getName()
  • Directive(지시형)
    #set - reference 의 값을 설정한다.
    #if/elseif/else - 조건문 제어
    #foreach ---- 제어
    #include - velocity 로 파싱되지 않는 파일의 출력
    #parse -velocity 로 파싱된 파일 출력
    #stop -template 엔진의 정지
    #macro - 반복적으로 사용할 vm정의
  • Comment (주석)
      ## - 한줄짜리 주석
      #* ... *# 여러줄 짜리 주석
      
     ##This is an example velocity template
     #set($this = "Velocity")
       $this is great! But It's so hard.

     #foreach($name in $list)
       $name is great!
     #end

     #set($condition = true)
     #if ($condition)
        The condition is true!
     #else
       The condition is false
     #end
  

http://jakarta.apache.org/velocity/docs/vtl-reference-guide.html

Tool box 에 대해

VelocityTools is a collection of Velocity subprojects with a common goal of creating tools and infrastructure for building both web and non-web applications using the Velocity template engine.

  • Generic Tool (http://jakarta.apache.org/velocity/tools/generic/)
    *DateTool : A tool for manipulating and formatting dates
    *MathTool :A tool for performing floating point math.
    *NumberTool :A tool for formatting numbers
    *IteratorTool :A convenience tool to use with #foreach loops. It wraps a list to let the designer specify a
    condition to terminate the loop, and reuse the same list in different loops.
    *RenderTool:A tool to evaluate and render arbitrary strings of VTL (Velocity Template Language).
          Example uses:
      $date                         -> Oct 19, 2003 9:54:50 PM
      $date.long                    -> October 19, 2003 9:54:50 PM PDT
      $date.medium_time             -> 9:54:50 PM
      $date.full_date               -> Sunday, October 19, 2003
      $date.get('default','short')  -> Oct 19, 2003 9:54 PM
      $date.get('yyyy-M-d H:m:s')   -> 2003-10-19 21:54:50
     
      $myDate                        -> Tue Oct 07 03:14:50 PDT 2003
      $date.format('medium',$myDate) -> Oct 7, 2003 3:14:50 AM 


  • VelocityView (http://jakarta.apache.org/velocity/tools/view/)

JSTL 과 Velocity

같은 로직에 대해 두가지를 사용하여 각각 구현

다양한 View Technology에 대한 실행 속도 비교.

현재 개발중 우리들이 많이 사용하는 View 기술들을 이용하여 실행속도를 비교해 보면 다음 그래프와 같다.

이 그래프는 100명의 동시 접속자에 대한 테스트를 진행한 결과이다. 이 그래프는 Expert One-on-One J2EE Design and Development 책의 Chapter 15의 Web-Tier Performance Issues에서 인용하였다.

위와 같이 테스트를 진행한 결과 JSP는 초당 54페이지, Velocity는 초당 112페이지, XMLC는 초당 128 페이지, XSLT는 6,7페이지를 서비스하였다. 이 부분에서 눈여겨 볼 부분은 Velocity에 대한 결과라할 수 있다. 국내에서는 아직까지 많이 사용되지 않는 기술이지만 위의 실행 결과를 보면 사용할만한 가치가 있다는 것을 확인할 수 있다.

참고문헌

문서에 대하여

최초작성자 : 박재성
최초작성일 : 2005년 10월 15일
버전 : 1.0
문서이력 :

  • 2005년 10월 15일 박재성 문서 최초 생성 : 강좌 문서 템플릿 및 JSP와 Velocity에 대한 속도 비교문서 추가

velocity 좋군요..

Posted by Anonymous at 9월 23, 2005 10:15

몰라서리.. test

Posted by 장회수 at 10월 18, 2005 19:25

언니~~ 기대 만땅~~ ^^

Posted by Jang Jooran at 11월 01, 2005 12:29

me too

Posted by 박재성 at 11월 01, 2005 12:30

아니 저사람은 누군데...
왜 하필... 내 발표자료에 이런짓을 자꾸 하는 거져... ㅠㅠ
속상하게... –

  • 수영 -
Posted by Anonymous at 1월 09, 2006 08:38
Site running on a free Atlassian Confluence Open Source Project License granted to JavaJiGi Project. Evaluate Confluence today.
Powered by Atlassian Confluence, the Enterprise Wiki. (Version: 2.3.1 Build:#643 1월 22, 2007) - Bug/feature request - Contact Administrators
Posted by 1010
51.Struts22009. 1. 15. 13:15
반응형

Tutorials

  • 작성자 : 고덕한
  • 최종수정날짜 : 2007년 8월 23일

이 프레임워크 문서는 웹 개발자들을 위해서 작성되어졌습니다. 그리고 자바 웹 어플리케이션 개발을 할 수 있는 지식이 있다는 가정하에 작성되어 졌습니다. 만약에 좀 더 자세한 내용을 알고 싶으시면 아래 문서를 참고하시기 바랍니다.

Key Technologies Primers

Primers

이 문서에서는 Apache Struts 싸이트에 있는 문서를 기반으로 한글로 다시 작성하여 올립니다. 일부 내용은 번역이 이루어지거나 혹은 나름대로 이해하고 문서를 작성하여 올리겠습니다. 가능한한 원문에 가깝도록 내용을 구성하겠습니다.

국내 자바 개발자들이 Struts 2 Framework 를 익히고, 개발하는데 서로의 노하우를 공유할 수 있도록 게시판을 만들어 질답 및 팁을 여러사람이 볼 수 있도록 하였습니다.

Speciality

  • 사용자 정의 Plugin 들로 어플리케이션 확장하기
  • CRUD 작성
  • JasperReport Tutorial
  • Portlet Tutorial(WebWork 2.2)

예제(Examples)

Framework 에는 여러가지의 예제들을 포함하고 있다.

  • Blank : 처음 프로젝트를 만들어서 실행해 볼 수 있는 아무 내용이 없는 어플리케이션
  • Showcase : 간단한 예제
  • MailReader : 실제로 작성하여 테스트해볼 수 있는 가장 좋은 예제
  • Portlet :
  • Other Examples :

Books

Other Resources

Community Wiki

Next(다음) :


Guides

  • 작성자 : 고덕한
  • 최종수정날짜 : 2007년 8월 23일

Struts 2 Framework 의 핵심적인 내용을 다루고 있습니다. 이 문서들을 이해하시면 Struts 2 Framework 를 이해하는데 많은 도움이 될 것입니다.

1. Core Developers Guide

Request 가 진행됨에 있어서 Struts 2 Framework 에서 주요 세가지 타입(Actions, Interceptors, and Results)을 사용합니다. 이러한 설정은 XML 문서로 설정하거나 Java5 의 Annotation 으로 설정 가능합니다.

1.2 Overview
1.3 Configuration
1.3.2 Annotation
1.3.5 Wildcard Mappings
1.3.6 Performance Tuning
1.3.7 Application Servers
1.4 Localization
1.4.1 Localization
1.5 Validation
1.5.1 Validation
1.6 Type Conversion
1.6.1 Type Conversion
1.7 Interceptors
1.7.1 Interceptors
1.7.2 Writing Interceptors
1.8 Actions
1.8.1 Action Chaning
1.9 Results
1.9.1 Result Types
1.9.2 DispatcherListener
1.9.3 PreResultListener
1.10 Portlets
1.10.1 tutorial
1.10.2 configuration
1.11 FAQs

2. Tag Ddevelopers Guide

여러가지 view technologies, 즉 JSP, Freemarker, Velocity 등의 View Layer 를 제공합니다.

2.1 Struts Tags
2.1.1 Generic Tags
2.1.2 UI Tags
2.1.3 Themes and Templates
2.1.4 Tag Reference
2.1.5 Ajax Tags
  • Ajax and JavaScript Recipes
2.2 OGNL
2.3 Tag Syntax
2.4 JSP
2.4.1 specific tag
2.5 Freemarker
2.5.1 specific tag
2.6 Velocity
2.6.1 specific tag

3. Plugin Developers Guide

Apache Struts 2 provides a simple plugin architecture so that developers can extend the framework just by adding a JAR to the application's classpath. Since plugins are contained in a JAR, they are easy to share with others. Several plugins are bundled with the framework, and others are available from third-party sources.

  • Writing Plugins
3.1 Bundled Plugins
3.1.1 Codebehind Plugin
3.1.2 Config Browser Plugin
3.1.3 JssperReports Plugin
3.1.4 JFreeChart Plugin
3.1.5 JSF Plugin
3.1.6 Plexus Plugin
3.1.7 SiteGraph Plugin
3.1.8 Sitemesh Plugin
3.1.9 Spring Plugin
3.1.10 Struts 1 Plugin
3.1.11 Tiles Plugin
4.1.3 Action Proxy & ActionProxy Factory
4.1.4 Configuration Provider & Configuration

5. Migration Guide

Release Notes 2.1.x
  • Release Notes 2.1.0
Release Notes 2.0.x
  • Release Notes 2.0.9
  • Release Notes 2.0.8
  • Release Notes 2.0.7
  • Release Notes 2.0.6
  • Release Notes 2.0.5
  • Release Notes 2.0.4
  • Release Notes 2.0.3
  • Release Notes 2.0.2
  • Release Notes 2.0.1
  • Release Notes 2.0.0
Struts 1 to Struts 2
  • Comparing Struts 1 and 2
  • Struts 1 Solutions
  • Migration Strategies
  • Migration Tools
Tutorials
  • Migration to Struts 2
  • Migrating Application to Struts 2
Roadmap
  • Roadmap FAQ
  • A History of Struts 2
  • Struts Reloaded
WebWork 2.2 to Struts 2
  • Key Changes From WebWork 2
  • WebWork 2 Migration Strategies

6. Contributors Guide

Source
  • Building the Framework from Source
  • Creating and Signing a Distribution
  • Requirements and Use Cases
  • Precise Error Reporting
  • Obtaining and IDEA license
  • How to Write Doc Comments for the Javadoc Tool(Sun)
Documentation
Core Guide TODOs
  • Creating Resources
  • Writing Validators
  • Writing Type Converters
  • Actions
  • Writing Actions
  • Writing Results
Tools
Licensing and Copyright

Next(다음) :

Posted by 1010
98..Etc/cvs2009. 1. 15. 13:08
반응형

1.      CVS?

소프트웨어를 개발하는 과정에서 프로그래머는 다양한 버전의 소스코드를 관리해야할 필요가 있다. 예를 들어 버전 1.1 나왔다고 하더라도 이전의 버전의 소스 코드를 가지고 있어야 한다.

이유는 소프트웨어의 기능 향상을 위해 소스 코드를 변경하거나 추가하는 과정은 항상 버그가 끼어들 위험을 동반하여, 현재 버전과 이전의 버전들 간의 비교나 이전 버전들 사이의 비교가 버그를 잡는데 있어서 반드시 필요하기 때문이다.

CVS 개발 소프트웨어에 대한 버전을 관리하는 툴이다.


CVS 아래의 개발자가 요구하는 사항에 대해 정보를 제공한다.

n    누가 코드를 수정했는가

n    언제 수정되었는가

n    동일시간에 벌어진 변화는 무엇인가

n    수정되었는가(CVS 코멘트를 달수있는 기능을 가지고 있다)


1.1. CVS 용어정리

n    repository : 소스가 저장되는

n    module : repository내에 존재하는 디렉토리 계층.

n    import : 전체 디렉토리 구조를 전송함으로써 저장소에 새로운 모듈을 생성.

n    export : repository에서 모듈을 가지고 오는 .

( export 모듈은 cvs 제어를 받지 않는다.)

n    checkout : repository에서 모듈을 가지고 오며, cvs 버전관리를 받는다

n    update : 저장소로부터 다른 개발자들의 수정사항을 얻는

n    commit : add delete, 자신이 변경한 부분을 repository 반영하는 .

n    conflict : Race Condition(동시수정) 발생하였을 때를 말한다.

소스에 표시가 되므로 conflict 제거하고 테스트를 돌려 이상이

없음을 확인한 다시 commit 해야 한다.

n    tag : 개발상의 특정 시점을 나타내는 파일들의 집합에 주어지는 문자열(명칭).

n    release : 전체 프로젝트 버전

n    revision : 개의 파일에 대한 버전명칭


1.2. CVS 기본컨셉

n    revision number

각각의 파일들은 자신의 revision 번호를 가지며, 번호들은 파일이 수정될때마다

증가된 값을 가진다.

프로그램을 개발하다 보면 하나의 중심되는 개발 흐름이 있고, 이와는 별도로 작은 부분에 대한 개발 흐름이 존재한다.

n    main trunk : 중심되는 개발 흐름

n    branch

main trunk와는 다른 작은 부분에 대한 개발흐름

뻗어나온 main trunk의 revision번호에 숫자를 두자리 덧붙여서 사용

2.     CVS SERVER

2.1. 설치전 요구사항

n    하드디스크의 파일시스템이 NTFS인지 확인한다.

(Windows NT, Windows  2000 Windows XP에서만 가능)

n    CVSNT 설치할 PC Administrator 로그인 되어있어야 한다.

n    최신의 cvsNT 서버 인스톨을 다운로드 받는다. (http://www.cvsnt.org/)

n    프로젝트의 내용이 담길 디렉토리 (ex: c:\thursday)

CVS서버내부적으로 사용하는 임시디렉토리(ex: c:\cvstemp)가진 디렉토리를 만든다.


2.2.   설치 설정

1. CVSNT설치후, CVS NT 실행시킨다.

2. 서비스가 동작중인지 확인하고,동작중이면 stop 버튼을 눌러서 서비스를 멈춘다.


3. Repositories" 탭에서 "prefix" 옵션을 선택한후,

"..." 적혀있는 버튼을 눌러 내용을 앞서 생성시킨 "c:/thursday"으로 설정한다.


Ø      주의사항: 모든 repository 지정한 하나의 디렉토리 하위에 생성되어야한다.

(There is only one setting for Repository Prefix on CVSNT. )


4. Add 버튼을 선택하여 저장소(repository) 추가한다.

(같은 서버내에 여러개의 저장소를 생성할 있다.)


5. Advanced 탭으로 가서 모든 채크박스를 채크상태로 설정한후,

temp 디렉토리를 설정한다.


6. 설정들을 저장한후, cvs service 시작한다.


7.  설치 확인

: path c:program files/cvsnt 확인한다.


8. 서버에 사용자 추가하기

Ø      cvs server에 접속하기 위한 초기설정

Ø      set cvsroot=:ntserver:<computer name>:/<cvsroot name>

Ø      set cvsroot=:sspi:<computer name>:/<cvsroot name>  -방화벽존재-

Ø      NT 계정으로 사용자를 하나 추가

Ø      cvs passwd -a <user>

Ø      cvs passwd -a r <user> <id>

Ø       

Ø       

Ø       

Ø       

Ø       

Ø       

Ø       

Ø       

Ø       

Ø       

Ø       

Ø       

Ø       


Ø     

Ø     

Ø     

9. 사용자가 정상적으로 추가되었는지 테스트

Ø      사용자정보보기( repository마다 존재)

:  Path: \root\repository_name\CVSROOT\passwd file 확인

ex) C:\Thursday\test\CVSROOT

Ø       

Ø       

Ø       

Ø       

Ø       


Ø     

Ø     

Ø      CVS Client User Login

ü        set cvsroot=:pserver:trickster@127.0.0.1:/test

: server ip 프로토콜, repository, userID  CVS서버에 접속한다.

ü        cvs login : cvs 로그인 명령어

ü        cvs ls l R : repository내의 파일과 디렉토리를 보여주는 명령어

Ø       

Ø       

Ø       

Ø       

Ø       

Ø       

Ø       

Ø       

Ø       

Ø       

Ø       

Ø       

Ø       

Ø       

Ø       

Ø       

Ø       


3.     CVS CLIENT (JB9)


3.1.CVS CLIENT TOOL 용어정리

n    Workspace : 개발자의 작업공간(JBuilder Project 단위)

n    Checkout (pull): 저장소(repository)에서 모듈가지고오기

n    Add : 모듈에 파일추가

n    Remove : 저장소에 있는 파일삭제

n    Update : 저장소에 있는 내용을 내작업공간에 반영

n    Commit : 내작업공간의 내용을 저장소에 반영

n    Merge : cvs 파일에 대한 lock기능이 없기 때문에,

저장소에서의 변화된 부분과 자신의 작업공간에서의 변화된부분을 합병시킨다.

3.2.CVS PROJECT 생성

3.2.1.         Repository Project 생성 (저장소로 project올리기)


1. Server Repository project 생성

:Team/select Project VCS  à  Team/Place Project into CVS


Ø      Connect type

ü  A Local connection : 로그인필요없음

ü  A PServer connection : 서버이름과 서버의 사용자아이디필요

ü  An Ext : 서버이름과 서버의 사용자아이디, ssh 필요


2. Local Repository project 생성

:Team/Create Local Repository


3.2.2.         WorkSpace Project 생성 (저장소에서project받기)


Ø      방법1: Pull Project from CVS(File/New)

Ø       

Ø       

Ø       

Ø       

Ø       

Ø       

Ø       

Ø       

Ø       

Ø       


Ø      방법2: Pull Project in CVS(Team/)

Ø       

Ø       

Ø       

Ø       

Ø       

Ø       


Ø       (방법1 & 2 ) 공통 프레임

Ø       

Ø       

Ø       

Ø       

Ø       

Ø       

Ø       

Ø       

Ø       

Ø       

Ø       

Ø       


Ø      가지고 오는 방식

Ø      Checkout : jbuilder cvs 버전관리를 받는다.

Ø      Export : 버전관리를 받지않는다.(일반 다운로드와 같은 형태)

3.3.Builder 9 CVS 기능

3.3.1.            전체구조


3.3.2.         기본기능

n     SECTION 1

l       Configure CVS : cvs server 접속한 기본설정 정보를 보여준다.

l       Update “file” : repository 있는 file내용을 workspace 반영한다.

l       Commint “file” : file내용을 repository 반영한다.

l       Status for “file”: file 현재 상태를 보여준다

l       Add…: workspace file 추가한다.

l       Remove “file”: workspace file 삭제한다.

l       Revert “file” : 가장최근에 commit file상태로 전환한다.


n     SECTION 2

l       Update Project  : repository내의 전체모듈(project) workspace 반영한다.

l       Status Browser : workspace내의 모든 파일들의 상태를 보여줌

l       Commit Browser : repository내의 모듈과 workspace 비교하여, 파일의

변경 상황을 알려 변경된 파일을 CVS 서버에 올릴 것인지 CVS 서버로부터 받아올

것인지 등을 결정한다


3.3.3.         CVS ADMINISTRATION


n    Jb9 추가된 기능이며, tag branch 버전관리를 돕는다.

n    Cvs 버전관리는 revision, label(tag) branch 정보로 이루어진다.

Ø      Revision :

파일의 버전명칭: 각각의 파일들은 자신의 revision 번호를 가지며,

번호들은 파일이 수정될 때마다 증가된 값을 가진다.

Ø      Label(Tag) :

파일의 현재 버전에 tag 붙여 표시해두어, 사용한다.

책의 주요부분에 포스트 잇으로 표시해두는 개념과 흡사하다.

Ø      Branch :

중심되는 개발 흐름이외의 다른 작은 부분에 대한 개발흐름


Ø      Example :

ü        main revision : 1.3 -> 1.4 -> … -> 1.7

ü        branch :

revision 1.4에서 brch(브랜치태그)를 붙인다.

Brch 버전흐름 1.4.2.1-> .. -> 1.4.2.5

ü        label(tag) : prg5 , prg6

ü        label 붙여줌으로써 좀더 편하게

이전의 상태을 찾을수있게 해준다.

ü        Branch main revision, 또다른 branch에서

확장가능하며, 여러흐름의 개발을 하게 도와준다.


Ø      JB 9기능

ü        Create version label: 현재 revision(파일의 버전) 라벨 붙이기

 Workspace안의 모든 파일에 적용된다.

ü        Delete version label : 붙여논 라벨 지우기

ü        Move version label : file 내용을 선택한 라벨의 상태로 되돌림

ü        Update special : 날짜, branch, main revision, label 선택하여

     workspace 내용을 선택한 상태로 되돌림

ü        Merge : Update special 흡사하나, merge 경우

    선택된 버전의 상태와 현재의 내용과 합한다.

ü        Create Branch : branch 생성


3.3.4.         LABEL(TAG) 관리


Ø      Revision 1.6까지 버전업되는 과정에 Label ap1, ap2, ap3 생성후,

파일내용을 ap1 상태로 되돌림


Ø      Untitled1.java 버전 history들과 label들의 정보


Ø      Update special(jb9 cvs tool) 통해 변화된 소스내용

: 현재 파일내용(= revision 1.6 )에서 label ap1선택시

:  Revision1.6 -> Revision1.2


Ø      JB 9 admin tool 사용법

: Label(tag) 생성 & Update special : LABEL scan하여 선택


3.3.5.         Branch 관리

Label 같은 방식으로 update merge기능을 사용할 있다.

Main Trunk 버전을 늘리지 않고, Branch 버전을 계속 늘리고 싶다면

(ex) 1.4.1 -> 1.4.2 -> …), update special 통해 확장하고자 하는 branch 선택하여, 현재 workspace상태를 바꿔주어야 한다.


3.3.6.         CVS WATCH

많은 버전관리 시스템과 달리 CVS 파일 잠금을 지원하지 않기 때문에

CVS 파일에 대해서 여러명이 연속적으로 편집하는 것을 막지 않는다.

파일들이 감시되고 있으면, 개발자는 편집을 위해서 cvs edit 사용하고, 편집한 파일을 릴리스하기 위해서는 cvs unedit 사용해야한다.

감시되지 않는 파일들은 CVS에게 알리지 않고 편집할 있다.


1. CVS Edit(편집모드)


감시되고있는 파일은 read-only permision 바뀌기 때문에, 파일내용을 편집할수 없다.

따라서 read-write기능을 가지게 하려면, 다른 사람들에게 감시되고 있는 파일을 편집하겠다는 계획을 알려야 한다. cvs edit 통해 수행된다.


2. CVS Unedit(편집불가 모드)


Cvs edit 명령이 수행된 , 변화된 모든 부분을 없앤다.(CVS edit수행되기전 상태로 돌린다)

Unedit상태가 되면, 수정할수없게 된다.(jbuilder에서는 키보드의 키액션 자체가 일어나지 않음)


참조 싸이트 ----------------------------------------------------------------------------------------------------------------------

http://www.cvshome.org/docs/blandy.html

http://www.hta-bi.bfh.ch/Resources/Computing/SunGroup/Info/QuickRef/

VersionControl/doc/cvs_toc.html

http://kldp.org/KoreanDoc/html/CVS_Tutorial-KLDP/x45.html#AEN50

http://www.cvsnt.org/wiki/InstallationTips#head-311175d88e243efa70a083a2089337a7b53ddd77

http://www.redwiki.net/wiki/moin.cgi/WinCVS_20_2d_20Daily_20Use_20Guide

http://turing.korea.ac.kr/~iamone/cvs/x28.html

http://docs.kde.org/en/3.1/kdesdk/cervisia/watches.html

http://durak.org/cvswebsites/doc/cvs_92.php#SEC92

Posted by 1010
98..Etc/Etc...2009. 1. 15. 11:42
반응형
 

Maintenance Build: 3.2.2
February 12, 2007. These downloads are provided under the Eclipse Foundation Software User Agreement.

Eclipse 3.2.2 readme

To view the build notes for this build click here.
To view the test results for this build click here.
To view the map file entries for this build click here.

Performance results now available

You can also download builds via anonymous ftp at download.eclipse.org.

Click here for instructions on how to verify the integrity of your downloads.

Eclipse SDK

The Eclipse SDK includes the Eclipse Platform, Java development tools, and Plug-in Development Environment, including source and both user and programmer documentation. If you aren't sure which download you want... then you probably want this one.
Eclipse does not include a Java runtime environment (JRE). You will need a 1.4.2 level or higher Java runtime or Java development kit (JDK) installed on your machine in order to run Eclipse. Click here if you need help finding a Java runtime.

Status
Platform Download Size
Windows (Supported Versions) 121 MB (md5)
Linux (x86/GTK 2) (Supported Versions) 119 MB (md5)
Linux (x86_64/GTK 2) (Supported Versions) 119 MB (md5)
Linux (PPC/GTK 2) (Supported Versions) 118 MB (md5)
Linux (x86/Motif) (Supported Versions) 120 MB (md5)
Solaris 8 (SPARC/GTK 2) 121 MB (md5)
AIX (PPC/Motif) 121 MB (md5)
HP-UX (HP9000/Motif) 121 MB (md5)
Mac OSX (Mac/Carbon) (Supported Versions) 118 MB (md5)
Source Build (Source in .zip) (instructions) 78 MB (md5)
Source Build (Source fetched via CVS) (instructions) 22 MB (md5)

JUnit Plugin Tests and Automated Testing Framework

These drops contain the framework and JUnit test plugins used to run JUnit plug-in tests from the command line. Click here for more information and installation instructions. Includes both source code and binary.

Status
Platform Download Size
All 0 MB (md5)
All 82 MB (md5)
 
Example Plug-ins

To install the examples, first make sure you have exited your Eclipse program. Then download the zip file containing the examples and extract the contents of the zip file to the same directory you used for your SDK installation. For example, if you installed the Eclipse Project SDK on d:\eclipse-sdk then extract the contents of the examples zip file to d:\eclipse-sdk. Start Eclipse. The example plug-ins will be installed. For information on what the examples do and how to run them, look in the "Examples Guide" section of the "Platform Plug-in Developer Guide", by selecting Help Contents from the Help menu, and choosing "Platform Plug-in Developer Guide" book from the combo box.

Status
Platform Download Size
Windows (Supported Versions) 3 MB (md5)
All Other Platforms 3 MB (md5)
 
RCP Runtime Binary

These drops contain the Eclipse Rich Client Platform base plug-ins and do not contain source or programmer documentation. These downloads are meant to be used as target platforms when developing RCP applications, and are not executable, stand-alone applications.

Status
Platform Download Size
Windows (Supported Versions) 9 MB (md5)
Linux (x86/GTK 2) (Supported Versions) 10 MB (md5)
Linux (x86_64/GTK 2) (Supported Versions) 10 MB (md5)
Linux (PPC/GTK 2) (Supported Versions) 9 MB (md5)
Linux (x86/Motif) (Supported Versions) 11 MB (md5)
Solaris 8 (SPARC/GTK 2) 9 MB (md5)
Solaris 8 (SPARC/Motif) 9 MB (md5)
AIX (PPC/Motif) 9 MB (md5)
HP-UX (HP9000/Motif) 9 MB (md5)
Mac OSX (Mac/Carbon) (Supported Versions) 9 MB (md5)
 
RCP SDK

These drops consist of the Eclipse Rich Client Platform base plug-ins and their source and the RCP delta pack. The delta pack contains all the platform specific resources from RCP and the platform and is used for cross-platform exports of RCP applications.

Status
Platform Download Size
Windows (Supported Versions) 17 MB (md5)
Linux (x86/GTK 2) (Supported Versions) 17 MB (md5)
Linux (x86_64/GTK 2) (Supported Versions) 17 MB (md5)
Linux (PPC/GTK 2) (Supported Versions) 16 MB (md5)
Linux (x86/Motif) (Supported Versions) 18 MB (md5)
Solaris 8 (SPARC/GTK 2) 17 MB (md5)
Solaris 8 (SPARC/Motif) 16 MB (md5)
AIX (PPC/Motif) 17 MB (md5)
HP-UX (HP9000/Motif) 17 MB (md5)
Mac OSX (Mac/Carbon) (Supported Versions) 16 MB (md5)
RCP delta pack 28 MB (md5)
 
com.ibm.icu.base binary and source Plug-ins

This plugin is a replacement plugin for the com.ibm.icu plugin. If the size of your application overrides the need to adopt ICU4J, use this plugin *in place of* the ICU4J plugin (com.ibm.icu). To install and use this plugin:
1. Extract the zip at the root of your Eclipse install directory
2. In the \eclipse\plugins directory, delete com.ibm.icu_<version>.jar and the directory com.ibm.icu.source_<version>
3. In \eclipse\features\org.eclipse.rcp_<version>\feature.xml, replace the id of the com.ibm.icu plugin entry with com.ibm.icu.base.

Status
Platform Download Size
All 0 MB (md5)
 
Platform Runtime Binary

These drops contain only the Eclipse Platform with user documentation and no source and no programmer documentation. The Java development tools and Plug-in Development Environment are NOT included. You can use these drops to help you package your tool plug-ins for redistribution when you don't want to ship the entire SDK.

Status
Platform Download Size
Windows (Supported Versions) 34 MB (md5)
Linux (x86/GTK 2) (Supported Versions) 34 MB (md5)
Linux (x86_64/GTK 2) (Supported Versions) 34 MB (md5)
Linux (PPC/GTK 2) (Supported Versions) 34 MB (md5)
Linux (x86/Motif) (Supported Versions) 36 MB (md5)
Solaris 8 (SPARC/GTK 2) 34 MB (md5)
AIX (PPC/Motif) 34 MB (md5)
HP-UX (HP9000/Motif) 34 MB (md5)
Mac OSX (Mac/Carbon) (Supported Versions) 34 MB (md5)
 
Platform SDK

These drops contain the Eclipse Platform Runtime binary with associated source and programmer documentation.

Status
Platform Download Size
Windows (Supported Versions) 77 MB (md5)
Linux (x86/GTK 2) (Supported Versions) 76 MB (md5)
Linux (x86_64 64/GTK 2) (Supported Versions) 76 MB (md5)
Linux (PPC/GTK 2) (Supported Versions) 75 MB (md5)
Linux (x86/Motif) (Supported Versions) 77 MB (md5)
Solaris 8 (SPARC/GTK 2) 77 MB (md5)
AIX (PPC/Motif) 77 MB (md5)
HP-UX (HP9000/Motif) 77 MB (md5)
Mac OSX (Mac/Carbon) (Supported Versions) 75 MB (md5)
 
JDT Runtime Binary

These drops contain the Java development tools plug-ins only, with user documentation and no source and no programmer documentation. The Eclipse platform and Plug-in development environment are NOT included. You can combine this with the Platform Runtime Binary if your tools rely on the JDT being present.

Status
Platform Download Size
All 20 MB (md5)
Mac OSX (Mac/Carbon) 20 MB (md5)
 
JDT SDK

These drops contain the JDT Runtime binary with associated source and programmer documentation.

Status
Platform Download Size
All 34 MB (md5)
Mac OSX (Mac/Carbon) 34 MB (md5)
 
JDT Core Batch Compiler

These drops contain the standalone batch java compiler, Ant compiler adapter and associated source. The batch compiler and Ant adapter (ecj.jar) are extracted from the org.eclipse.jdt.core plug-in as a 1.2MB download. For examples of usage, please refer to this help section: JDT Plug-in Developer Guide>Programmer's Guide>JDT Core>Compiling Java code.

Status
Platform Download Size
All 1 MB (md5)
All 1 MB (md5)
 
PDE Runtime Binary

These drops contain the Plug-in Development Enviroment plug-ins only, with user documentation. The Eclipse platform and Java development tools are NOT included. You can combine this with the Platform and JDT Runtime Binary or SDK if your tools rely on the PDE being present.

Status
Platform Download Size
All 6 MB (md5)
 
PDE SDK
These drops contain the PDE Runtime Binary with associated source.
Status
Platform Download Size
All 8 MB (md5)
 
FTP and WebDAV Support

These drops contain the FTP and WebDAV target management support plug-ins. You can combine this with the Platform Runtime Binary or Eclipse SDK. Includes both source code and binary.

Status
Platform Download Size
All 1 MB (md5)
 
SWT Binary and Source

These drops contain the SWT libraries and source for standalone SWT application development. For examples of standalone SWT applications refer to the snippets section of the SWT Component page.

To run a standalone SWT application, add the swt jar(s) to the classpath and add the directory/folder for the SWT JNI library to the java.library.path. For example, if you extract the download below to C:\SWT you would launch the HelloWorld application with the following command:

 java -classpath C:\SWT\swt.jar;C:\MyApp\helloworld.jar -Djava.library.path=C:\SWT 
HelloWorld 
Status
Platform Download Size
Windows (Supported Versions) 2 MB (md5)
Windows CE (ARM PocketPC) (Instructions) 1 MB (md5)
Windows CE (ARM PocketPC, J2ME profile) (Instructions) 1 MB (md5)
Linux (x86/GTK 2) (Supported Versions) 2 MB (md5)
Linux (x86_64/GTK 2) (Instructions) 2 MB (md5)
Linux (PPC/GTK 2) (Supported Versions) 2 MB (md5)
Linux (x86/Motif) (Supported Versions) 3 MB (md5)
Solaris 8 (SPARC/GTK 2) 2 MB (md5)
Solaris 8 (SPARC/Motif) 2 MB (md5)
QNX (x86/Photon) 2 MB (md5)
AIX (PPC/Motif) 2 MB (md5)
HP-UX (HP9000/Motif) 2 MB (md5)
Mac OSX (Mac/Carbon) (Supported Versions) 2 MB (md5)
 
org.eclipse.releng.tools plug-in

This plug-in provides features that will help with the Eclipse development process. Installing the plug-in will add the following actions. To install simply unzip the file into your plugins directory and restart Eclipse. Please use the Release feature of this plug-in to do your build submissions.

  1. Release to the Team menu. This action will Tag selected projects with the specified version and update the appropriate loaded *.map files with the version. The user must have the *.map files loaded in their workspace and the use must commit the map file changes to the repository when done.
  2. Load Map Projects to the Team menu. Select one or more *.map file and this action will load the projects listed in the *.map file into your workspace. Naturally the versions specified in the *.map file will be loaded.
  3. Tag Map Projects to the Team menu. Select one or more *Map files and this action will tag the projects listed in the *Map files with a tag you specify.
  4. Compare with Released to the Compare menu. Compare the selected projects with the versions referenced in the currently loaded map files.
  5. Replace with Released to the Replace menu. Replace the selected projects with the versions referenced in the currently loaded map files.
  6. Fix Copyright to the Resource Perspective Projects context menu. Select one or more projects in the Resource Perspective. This action will sanity check the copyright notices in all the *.java and *.properties files. Copyrights will be updated automatically where the tool deems appropriate. A copyright.log file will be written to the workspace directory noting odd conflicts that need to be looked at. You need to commit the changes yourself. This is the tool that was used to do the 2.1 Copyright pass.
Status
Platform Download Size
All 0 MB (md5)


Posted by 1010
51.Struts22009. 1. 15. 09:40
반응형
Added by Ted Husted, last edited by Dave Newton on Feb 16, 2008  (view change) show comment

AJAX is an acronym for Asynchronous JavaScript and XML. Essentially, a JavaScript can make a HTTP request and update portions of a page directly, without going through a conventional POST or GET and refreshing the entire page. Better yet, a page can contain several JavaScripts making simultaneous (asynchronous) requests.

The key point is that when a script makes an "Ajax request" (XHR), the server doesn't know it came from a script, and handles it like any other request. One reason Ajax is so successful is that it works just fine with existing server technologies, including Struts.

It's not the Ajax request that is different, but the Ajax response. Instead of returning an entire page for the browser to display (or redisplay), an Ajax response will just return a portion of a page. The response can take the form of XML, or HTML, or plain text, another script, or whatever else the calling script may want.

Both Struts 1 and Struts 2 can return any type of response. We are not limited to forwarding to a server page. In Struts 1, you can just do something like:

Struts 1 Action fragment
response.setContentType("text/html");
    PrintWriter out = response.getWriter();
    out.println("Hello World!  This is an AJAX response from a Struts Action.");
    out.flush();
    return null;

In Struts 2, we can do the same thing with a Stream result.

Struts 2 Stream result Action
package actions;

import java.io.InputStream;
import java.io.StringBufferInputStream;
import com.opensymphony.xwork2.ActionSupport;

public class TextResult extends ActionSupport  {
    private InputStream inputStream;
    public InputStream getInputStream() {
        return inputStream;
    }

    public String execute() throws Exception {
        inputStream = new StringBufferInputStream("Hello World! This is a text string response from a Struts 2 Action.");
        return SUCCESS;
    }
}
Struts 2 Configuring the TextResult Action
<action name="text-result" class="actions.TextResult">
 <result type="stream">
    <param name="contentType">text/html</param>
    <param name="inputName">inputStream</param>
  </result>
</action>

Struts 2 can also return a JSON (JavaScript Object Notation) response, using a plugin.

On the client side, there are two basic strategies, which can be mixed and matched.

First, you can use some type of JSP tag. Here, you don't have to know very much at all about Ajax or JavaScript. The taglib does all the work, and you just have to figure out how to use the taglib. The standard Struts 2 taglib includes several Ajax JSP tags, and many third-party libraries are available, including:

Alternatively, you can use a plain-old Ajax widget on a plain-old HTML page, using libraries like Dojo, JQuery, or YUI, and the StreamResult or the JSON Plugin. Here, the sky's the limit, but you actually have to learn something about JavaScript as a language.

Ajax Plugins

While Struts works fine with Ajax out-of-the-box, for added value, several Ajax-centric plugins are available.

Ajax Tag Plugins

Other Ajax Plugins

  • Ajax File Upload - With the Ajax File Upload Plugin we can upload a file to the server and asynchronously monitor its progress.
  • GWT - The Google Web Toolkit Plugin exposes Struts 2 actions to the GWT RPC mechanism.
  • JSON - The JSON Plugin serializes Actions properties into JSON, making it easy to respond to JavaScript requests.

See the Struts Plugin Repository for a complete list of Struts 2 plugins.

Ajax Results with JSP

While server pages are most often used to generate HTML, we can use server pages to create other types of data streams. Here's an example:

book.jsp
<%@ page import="java.util.Iterator,
		 java.util.List,
		 com.esolaria.dojoex.Book,
		 com.esolaria.dojoex.BookManager" %>
<%
	String bookIdStr = request.getParameter("bookId");
	int bookId = (bookIdStr == null || "".equals(bookIdStr.trim())) 
		? 0 : Integer.parseInt(bookIdStr);
	Book book = BookManager.getBook(bookId);
	if (book != null) {
		out.println(book.toJSONString());
		System.out.println("itis: " + book.toJSONString());
	}
%>

In the code example, we use System.out.println to return a JSON data stream as the response. For more about this technique, see the article Using Dojo and JSON to Build Ajax Applications.

Next: Dependency Injection

Posted by 1010
98..Etc/Etc...2009. 1. 15. 02:10
반응형

원도우 미디어 센터..

사용자 삽입 이미지

dir / ls 도 같은 결과가 나온다.

사용자 삽입 이미지

원도우 미디어 플레이어 인터페이스 좋고,

사용자 삽입 이미지
사용자 삽입 이미지


원도우 7 깔고 나면 인터넷익스플러 8이 설치된다. 역쉬 베타 버전이다. 음~ 크롬같다고 할까
좀더 써보고 리뷰를 다시 써야 겠다.
사용자 삽입 이미지
원도우 7 설치시 자동으로 모든 하드웨어를 자동으로 잡아주고 인식해 준다.
설치 시간도 매우 단축되었고, 설치시 나오던 이미지나 설명같은 문구는 찾아보기 힘들고
단지 프로세스바를 통한 진행 상황정도만 나온다..

사용자 삽입 이미지
사용자 삽입 이미지
사용자 삽입 이미지
Posted by 1010
54.iBATIS, MyBatis/iBatis2009. 1. 14. 14:57
반응형
1. 우선 iBATIS 를 다운받습니다.

2. 다운을 풀고, /lib 폴더에 ibatis-2.3.4.726 를 톰캣의 lib폴더나 프로젝트의 web-inf/lib 폴더에 넣습니다.
- /현제프로젝트/WebContent/WEB-INF/lib/
- /톰캣/lib/   (톰캣6버전)

두폴더중 편한곳에다가 jar파일을 저장합니다.


3. example 폴더를 타고 들어가보면 sqlMapConfi.xml 파일이 있습니다. 이파일을 복사해서 붙여넣기 하셔도되고
src폴더에서 새로 xml 파일을 만드셔도 됩니다.

sqlMapClient.xml

<?xml version="1.0" encoding="UTF-8" ?>

<!DOCTYPE sqlMapConfig      
    PUBLIC "-//ibatis.apache.org//DTD SQL Map Config 2.0//EN"      
    "http://ibatis.apache.org/dtd/sql-map-config-2.dtd">

<sqlMapConfig>

  <!-- Configure a built-in transaction manager.  If you're using an
       app server, you probably want to use its transaction manager
       and a managed datasource -->
  <transactionManager type="JDBC" commitRequired="false">
    <dataSource type="SIMPLE">
      <property name="JDBC.Driver" value="org.hsqldb.jdbcDriver"/>
      <property name="JDBC.ConnectionURL" value="jdbc:oracle:thin:@192.168.10.103:1521:db"/>
      <property name="JDBC.Username" value="ahm"/>
      <property name="JDBC.Password" value="ahm"/>
    </dataSource>
  </transactionManager>

  <!-- List the SQL Map XML files. They can be loaded from the
       classpath, as they are here (com.domain.data...) -->
  <sqlMap resource="db/Account.xml"/>
  <!-- List more here...
  <sqlMap resource="com/mydomain/data/Order.xml"/>
  <sqlMap resource="com/mydomain/data/Documents.xml"/>
  -->

</sqlMapConfig>

빨간부분으로 표시된부분이 제가 수정한 부분입니다. db정보는 propertie로 빼서 관리하는방법도 있으나,
우선은 이렇게 하도록 하겠습니다.

4. 자바빈즈를 생성합니다.

db라는 패키지를 만들고 그 밑에 Acount.java 파일을 생성합니다. 결과를 담아올 빈즈입니다.
Account.java

package
 db;

public class Account {
 private int id;

  public int getId() {
   return id;
 }

  public void setId(int id) {
   this.id = id;
 }
}

5. XML을 생성합니다.

우리가 사용할 쿼리를 작성하는 XML입니다.
Account.xml

<?xml version="1.0" encoding="UTF-8" ?>
<!DOCTYPE sqlMap      
    PUBLIC "-//ibatis.apache.org//DTD SQL Map 2.0//EN"      
    "http://ibatis.apache.org/dtd/sql-map-2.dtd">
<sqlMap namespace="Account">
  <!-- Select with no parameters using the result map for Account class. -->
  <select id="getAcount" resultClass="db.Acount">  다음값을 이용하여 쿼리와 맵핑합니다.
    select id from ACCOUNT where name=#value#
  </select>
</sqlMap>

6. 이제 쿼리를 실행할 JAVA를 작성한다.

SimpleExample.java

package db;

import com.ibatis.sqlmap.client.SqlMapClient;
import com.ibatis.sqlmap.client.SqlMapClientBuilder;
import com.ibatis.common.resources.Resources;

import java.io.Reader;
import java.io.IOException;
import java.sql.SQLException;

public class SimpleExample {

  private static SqlMapClient sqlMapper;

  static {
   try {
     Reader reader = Resources.getResourceAsReader("SqlMapConfig.xml");
     sqlMapper = SqlMapClientBuilder.buildSqlMapClient(reader);
     reader.close();
   } catch (IOException e) {
     // Fail fast.
     throw new RuntimeException("Something bad happened while building the SqlMapClient instance." + e, e);
   }
 }

  public static Account getAcount() throws SQLException {
   return (Account)sqlMapper.queryForObject("getAcount","ahm");
   // 이부분에서 쿼리를 실행한다. queryForObject는 한개의 데이터를 가져올떄 사용하는 메소드이다.
 }
 
 public static void main(String[] args){
   
   try {
   Account temp = getAcount();    
   System.out.println(temp.getId());
 } catch (SQLException e) {
   // TODO Auto-generated catch block
   e.printStackTrace();
 }
 }
}

물론 이 java파일을 실행하기 전에는 DB에 TABLE과 데이터가 준비되어있어야겠다.

현제 이클립스내에 폴더구조이다.


이미지와 같이 , iBATIS 를 설정하는 설정파일인 sqlMapConfig.xml 파일과
               실제 SQL이 담겨져 있는 Account.xml 파일
               결과를 담아올 객체인   Account.java 파일
               이러한 과정을 호출하는 SimpleExample.java 파일
               그리고 WEB-INF/lib 에 ibatis-**.jar 파일 등을 해당폴더에 넣고 위에 순서대로 따라한다면
               DB에서 요청사항을 무난히 가져올수 있을것이다.

다음엔 좀더 세부적인 설정사항이라던지 자세한 정보를 보여드리겠습니다.
Posted by 바보기자


가장 간단히 설명하면, JAVA에서 DB관련 작업을 편하게 해주는 프레임웍정도라고 할까?

iBATIS in action에서 iBATIS는 "SQL 실행 결과를 자바빈즈 혹은 Map 객체에 매핑해주는 퍼시스턴스 솔루션으로 SQL을 소스 코드가 아닌 XML로 따로 분리해 관리하여 지겨운 SQL 문자열 더하기에서 해방시켜 줍니다. 또한 XML에서 동적 SQL 요소를 사용하여 쿼리 문장을 프로그래밍 코딩 없이 자유롭게 변환할 수 있게 해줍니다. 이러한 접근방식으로 인해 iBATIS를 사용하면 JDBC를 사용할 때보다 약 60% 정도의 코드만으로 프로그램 작성이 가능하다" 라고 한다.

말로만 하면 뭔소리인지 모르겠으니 간단한 예제 정도를 들어보자.

- 일반적인 JDBC 예제
import javax.naming.*;
import javax.sql.*;
import java.sql.*;

public class Employee {
 public Account getAccount(int id) throws SQLException, NamingException{
   Account account = null;
   
   String sql = "select * from employee where id= ?";
   
   Connection conn      = null;
   PreparedStatement ps = null;
   ResultSet rs       = null;
   
   try {      
     Context ctx = new InitialContext();
     DataSource ds =
             (DataSource)ctx.lookup(
                "java:comp/env/jdbc/TestDB");
     conn = ds.getConnection();
     ps = conn.prepareStatement(sql);
     ps.setInt(1, id);
     rs = ps.executeQuery();
     
     while( rs.next()){
       account = new Account();
       account.setId(rs.getInt("ID"));        
     }
   } finally {
     try {
       if ( rs != null ) rs.close();
     } finally {
       try {
         if (ps != null) ps.close();
       } finally {
         if (conn != null) ps.close();
       }
     }
   }
   return account;  
 }
}   

뭐다들 아시겠지만 간단히 쿼리를 날려서 Acount 객체에 담아가지고 오는 소스이다. 대충봐도 무척이나 길다,
이걸 iBATIS를 이용해서 처리하는 예를 보자,

- iBATIS 를 이용한 예
acount.xml
<select id="getAcount" resultClass="Acount" parameterClass="java.lang.Integer">

   select * from employee where id= #id#
</select>

java
Acount act = (Acount) sqlMap.queryForObject("getAcount",new Integer(5));
 
보면 알겠지만 상단에 쿼리를 닮고있는 xml과 아래 간단히 크 쿼리를 실행시키는 java 한줄정도?이다.
사실 iBATIS를 설정하는 config파일과 sqlMap객체를 불러오는 부분이 있긴하지만, 무척이나 좋아보이도록,
이것만 쓰겠다. -_-;;

iBATIS 의 목표와 특징은 몇마디로 짧게정의하다면,

쉽고, 간단하고, 의존성이 적은 프레임웍이라는 것이다.
sql문과 java코드와의 분리만으로도 java개발자는 쿼리문을 신경쓰지 않아도 된다. sql문이 변경되더라도,
파라미터 값만 변경되지 않는다면, java소스에서는 수정할 부분이 없다.

~ 이론적인 면은 대충 접어두고 실전으로 넘어가자(사실 나도잘몰라서;;ㅈㅅ)

다음 포스트는 실제로 이클립스에서 오라클 디비와 연동하겠습니다.

beans.tistory.com

2008/11/13 - [W_@Second_Position/ω FrameWork_iBATIS] - iBATIS환경을 이해할 수 있도록 흐름도를 한번 그려 보자!

Posted by 바보기자

출처 : http://webprogrammer.tistory.com/595

iBATIS환경을 이해할 수 있도록 흐름도를 한번 그려 보자!

이미지를 클릭하면 원본을 보실 수 있습니다.


위의 그림에서 알 수 있듯이 sqlMapConfig.xml문서가 바로 환경 설정 파일임을 알 수 있을 것이다.

이것은 load시 한번만 인식 되는데 그 부분이 바로 앞의 모든 예제들에서 클라이언트 부분에 다음과 같은 코드가 된다.


      Reader reader = Resources.getResourceAsReader("ex2/sqlMapConfig.xml");


이때 transationManager요소와 sqlMap요소들을 인식하여  RDBMS와 SQL문을 관리하는 xml문서들이 인식된다.그리고


     SqlMapClient sqlMapper = SqlmapClientBuilder.buildSqlmapClient(reader);


문장으로 인해 인식된 SQL문들을 관리하는 xml요소들이 모두 sqlMapper로 하나의 객체에 id가 키값이 되어 Map구조로

담겨져 관리된다. qureryForList()와 같은 메서드를 통하여 지정된 id를 사용하면 테이블에 있는 자원들을 Emp.xml에 정의된

resultMap이나 지정된 객체로 쉽게 받는다.


특징
iBATIS Hibernate JPA
간단함
가장 좋음
좋음 좋음
완벽한 객체 관계 매핑 평균 가장 좋음 가장 좋음
데이터 모델 변경시 융통성 좋음 평균 평균
복잡성
가장 좋음 평균 평균
SQL에 대한 의존성 좋음 평균 평균
성능 가장 좋음 가장 좋음 N/A *
다른 관계 데이터베이스에 대한 이식성 평균 가장 좋음 N/A *
자바가 아닌 다른 플랫폼에 대한 이식성 가장 좋음 좋음 지원하지 않음
커뮤니티 지원과 문서화 평균 좋음 좋음
<표:http://blog.openframework.or.kr/50에서 펌>
Posted by 1010
51.Struts22009. 1. 14. 14:44
반응형

Struts2 맛보기!


개인적으로 Struts2 시작하는 입장에서 확실히 해야 것은 ,  Struts2 기존 Struts 다르다는 관점입니다 . 완전히 다르다고 생각하고 공부를 하는 편이 나을리라 생각하면 싶다 . 기본적인 형태는 Struts1 Webwork 병합된 모양이라고는 하지만 이게 그리 중요한 것은 아니다 . Struts1 몰랐어도 , Webwork 써봤어도 지금부터 하면 되기 때문이다 .


스트러츠 2 하는 일이 뭘까 ? 흔히 MVC 원활하게 만들어준다고 이야기 한다 . 간단히 이야기 하면 웹은 기본적으로 사용자 입력을 받고 이에 대한 응답을 해주는데 , 작업을 깔끔하게 하는데 도움을 준다는 이야기다 . 안타까운 점은 개인적으로 스트러츠 1 이것을 해주리라 하고 나왔는데 , 다루게 되면 정글을 헤메는 느낌을 주곤 했다는 점이다 . 그러한 면에서는 스트러츠 2 프로젝트를 마치고 느낌은 그런 점이 없어질 같다는 느낌이다 . 그럼 어떻게 도와줄까 ? 부분은 MVC 깔끔하게 처리할 있는 환경과 규칙을 제공해준다 . 여기서 확실히 짚고 넘어가야 점은 환경과 규칙을 주기 때문에 이를 적절히 활용하지 않으면 우리는 다시 지저분한 정글을 누빌 밖에 없다는 점이다 .


모든 웹은 단순하다 . 사용자는 특정 action 취하기 위해서 우리가 제공하는 service 접근한다 . 그리고 우리가 제공하는 service 사용자 요청에 따라서 적절한 행동 취하고 그에 걸맞는 result 반환해 준다 . 이게 바로 웹이다 .


여기서 action은 모든 동작을 의미한다. 물론 사용자가 직접적으로 하는 action이 아닌 action도 다 action이다. 즉 시스템이 외부 요소들에 제공하는 모든 action은 action인 것이다. 그리고 요청에 따른 적절한 행동은 흔히 이야기하는 비지니스 로직과 연관된 부분이다. 그리고 마지막으로 result는 모든 결과물이다. 모든 결과물이라고 하면 단순한 jsp 페이지가 될 수도 있고, 사용자가 다운로드 받을 수 있도록 해주는 stream일 수도 있으며, 또 다른 action으로 연계하는 동작이 될 수 있다. 그런데, 여기서 스트러츠2에서 배우고 익혀야할 부분은 커스텀 태그다. 이제 지겹지 않는가 <%를 열자 마자 %>로 닫아야 하는 단순 작업이.


서론이 길었다. 이제 서론이 아닌 실전이다. 당연히 스트러츠2를 하기 위해서는 다운을 받아야 한다. 다운로드 주소는 다음과 같다.


http://apache.tt.co.kr/struts/examples/struts2-blank-2.0.11.war


현재로서는 위 주소에서 blank application을 얻을 수 있다. 해당 주소가 안 살아 있으면, struts2사이트 찾아가서 최신 blank application을 받도록 하자.


그리고 eclipse WTP를 다운 받아서 설치하자. WTP에서 "Dynamic Web Project"를 하나 만들어서 아까 받은 blank application 내부 "WEB-INF/lib" 하단에 있는 파일들을 가져다가 아까 만든 프로젝트 하단 WEB-INF/lib 하단에 복사하자. 잘 되었으면 아래와 같은 형태가 되어 있어야 한다.


아 위에 있는 pages 폴더는 테스트 페이지를 위치시키려 임의로 만든 폴더이니, 신경을 쓰지 않아도 됩니다. 이 상태에서 web.xml에 다가 이 web-app는 스트러츠2로 돌 수 있도록 설정해주도록 합니다.


다른 것 보다 위 파일 같이 <filter>항목과 <filter-mapping> 항목을 추가 합니다. 이게 의미하는 것은 우리가 만든 서비스에 요청 들어오는 것들을 스트러츠2가 우선 검사해서 필요에 따라서 처리한다는 이야기 입니다. 이에 대한 세부 내용을 알고 싶으면, FilterDispatcher에 대해서 알아보면 여러 정보를 접할 수 있을 것 입니다.


이제 사용자가 우리가 만든 시스템에 action을 취한다고 생각하고 이에 따라서 처리를 해봅시다. "ThinkFree"라고 찍힌 화면을 보고자 하는 경우를 가정하고 작업을 합시다. 이거 단순하죠. thinkfree.jsp를 만들고 그 안에 ThinkFree라고 적고 해당 페이지로 바로 사용자가 접근하면 되는 거죠. 그래도 스트러츠2 세계관을 이해하기 위해서 일부러 좀 더 어렵게 가봅시다.


아까 이야기 했죠. 모든 웹은 action에서 시작된다고. 그럼 우리는 왠지 그 action에 따른 행동을 어딘가에 적어서 컴퓨터가 알게 해주어야 겠다는 생각이 들지 않나요? 이를 위해서 아래 그림과 같이 classes 하단에 컴파일되어 들어갈 수 있도록 src 하단에 struts.xml을 만듭니다. (이는 시간 절약을 위해서 WTP에서 작업하는 기준으로 이야기하는 것이니 적절히 자신 상황에 맞춰서 작업하시면 됩니다. 무조건 돌릴 때에는 WEB-INF/classes 하단에 struts.xml이 위치하면 아무 문제 없습니다.)


이제 해당 파일을 열어서 다음과 같이 적어 줍니다.


사용자가 hello_thinkfree라는 action을 취하면 그 결과로 ThinkFree라고 적힌 thinkfree.jsp를 보여주라고 컴퓨터에게 이야기 해 준거지요. 음 스트러츠2 기본 확장자가 action이니깐 잘 구동 되는지 확인해보기 위해서 아래와 같이 주소 입력해서 확인해 봅니다.


이거 봤으면 이제 스트러츠2 좀 해봤다고 이야기 할 수 있습니다. ^^ 우선 아까 웹이 해주는 역할에 있어서 빠진 부분이 있죠. 바로 " 사용자 요청에 따라서 적절한 행동 취하고 "라는 부분입니다. 음 사용자가 자신의 이름을 명시해주면, 그 이름을 반영해서 "ThinkFree loves xxx"라고 처리를 해준다고 생각해 봅시다. 음 그럼 시스템은 우선 사용자에게서 이름을 받아야 겠네요. 그 이름에 대한 지칭자를 "name"이라고 하고 그 값을 준다고 생각합시다. Form 만들고 하는거 귀찮으니깐 사용자가 바로 GET 방식으로 호출을 한다고 합시다. 그럼 사용자는 다음 주소와 같이 호출을 할 것입니다.


http://localhost:8080/struts-test/hello_thinkfree.action?name=Web


그럼 이제 이 요청에 따라서 적절한 행동을 시스템이 하도록 해줍시다. 우선 HelloThinkFree 클래스를 아무 위치에 만듭니다. 그리고 아래 그림과 같이 public String execute() 함수를 정의합니다. 우리는 이 함수에서 기본 동작을 정의할 것입니다.


여기서 해당 함수가 반환하는 success라고 하는 것은 행동 결과가 어떤 상태라는 결과 상태를 명시하는 것으로 이해하시면 될 것 입니다. 그럼 이제 사용자가 입력한 값을 받도록 해야 합니다. 아무 생각없이 사용자가 주는 변수 이름을 기본으로 적당히 내부에 변수 선언합니다. name이라는 변수이름 이름을 주니깐 아래와 같이 private String name; 이라고 지정하고 이 변수에 getter, setter를 지정합니다.


음 이제 사용자가 볼 메세지를 만들어야 할 것입니다. 음 우선 사용자가 보는 화면이 이제 좀 조작된 것이니깐 message라는 변수를 String 형으로 만들고, 해당 값을 화면에서 가져가서 볼 수 있도록 getter, setter를 만듭니다.


아 그러고 보니 이 hello_thinkfree 액션을 통해 전달된 값이 위 클래스에서 처리된다고 컴퓨터에게 이야기 해주는 것을 잊어버렸군요. 이를 위해서 아래와 같이 struts.xml을 수정합니다.


이제 그러면 마지막으로 이렇게 처리된 결과를 적절히 화면에서 뿌려 주어야 겠죠. 화면에서야 아까 설정한 message만 화면에 뿌려 주면 됩니다. 우선 무조건 아래와 같이 해당 페이지에 써봅시다. 우선 struts2에서 제공해주는 tag를 쓰겠다고 선언을 합니다. 그 뒤에는 아까 결과로 얻은 message를 가져다가 뿌려주겠다고 s:property 태그와 뿌릴 변수 이름을 적어 둡니다.


이제 다 했습니다. 이제 제대로 되는지 테스트 해봅시다.


지금까지 한 것을 보면 참 간단합니다. 사실 워낙 간단한 예제니깐 당연히 간단하겠죠. 그럼 이제 정리해 봅시다. 우리는 다음과 같이 해서 간단한 action을 취하는 서비스를 만들었습니다.


  1. 시스템이 제공할 action을 나름 생각합니다.

  2. 정리된 action을 적절히 이름 지어서 struts.xml에 정의합니다.

  3. 그리고 사용자가 주는 정보들 이름들과 같은 이름을 가진 내부 변수를 가진 POJO를 만듭니다.

  4. 해당 POJO 클래스를 아까 정의한 struts.xml에 기록합니다.

  5. 이에 시스템이 최종적으로 내놓을 정보를 담은 변수들을 그 POJO에 정의하고, execute 함수를 정의해서 적절히 처리합니다.

  6. 최종 result로 나올 page를 정의한 jsp 페이지에서 tag-lib를 정의한 다음에 그에 적절히 tag를 사용해서 결과로 나온 정보들을 화면에 뿌려줍니다.


지금까지 한 것을 정상적으로 수행했다면, 이제 스트러츠2가 어떤 것인지 대충 감을 잡아갈 수 있을 것 입니다. 아마 기존에 스트러츠1을 사용했던 분은 왠지 깔끔하게 느껴지리라 생각합니다. 그럼 여기서 이만 줄이겠습니다.

출처 : http://docs.thinkfree.com/docs/view.php?dsn=842331

Posted by 1010
05.JSP2009. 1. 14. 11:09
반응형
JAVA를 이용한 JSP페이지에서 날짜 구하기 및 계산
<%@ page language="java"
import="java.util.*,
java.text.SimpleDateFormat"
contentType="text/html;charset=EUC-KR"%>

<%
Calendar cal = Calendar.getInstance();
Date currentTime=cal.getTime();
SimpleDateFormat formatter=new SimpleDateFormat("yyyy-MM-dd-E");
String sTimestr=formatter.format(currentTime);
out.print("현재 날짜 : "+sTimestr);
%>

------------------ 결과물 ------------------
현재 날짜 : 2006-10-25-수
-------------------------------------------


날짜 계산하기(5일전의 날짜 가져오기)
<%@ page language="java"
import="java.util.*,
java.text.SimpleDateFormat"
contentType="text/html;charset=EUC-KR"%>

<%
Calendar cal = Calendar.getInstance();
cal.add(Calendar.DATE,-5); //현재 날짜에서 오일전의 날짜 가져오기
Date currentTime=cal.getTime();
SimpleDateFormat formatter=new SimpleDateFormat("yyyy-MM-dd-E");
String sTimestr=formatter.format(currentTime);
out.print("계산 날짜 : "+sTimestr);
%>
------------------ 결과물 ------------------
현재 날짜 : 2006-10-20-금
-------------------------------------------
Posted by 1010
01.JAVA/Java2009. 1. 14. 11:07
반응형
달빼기, 달더하기(?)
특정일에 이상한 날짜가 들어가서 페이지 에러가 난다는 제보...
페이지를 확인해 보니
검색기간을 기본세팅해줘야 하는데 메소드가 아주 지저분했었다.

3월달보다 작거나 같으면 연도를 빼주고,
31일이 안되는 날은 30일이나 28일로 만들고...
Date 클래스를 많이 안써본 관계로
당연히 오라클의 add_months() 같은 메소드가 있을것이라 생각했는데
getXXX, setXXX 메소드의 집합만이...OTL

다행히 Calendar 클래스가 있었고
이용해서 대강 만들어서 수정했다.


java.util.Calendar cal = new java.util.GregorianCalendar(); 
// 생성자가Calendar()가 아니고 GregorianCalendar()...이유는 검색^^
cal.setTime(today);
// void setTime(Date)
cal.add(Calendar.MONTH, -3);
// void add(int Field, int amount)...Field는 Calendar클래스 내의 Field
tempDay = cal.getTime();
// Date getTime()
Posted by 1010
반응형
실행환경

MS Windows 계열 운영체제, MS .Net Framework 2.0
.Net Framework 2.0 다운로드

■ 관련링크

 - Naver2Tistory 매뉴얼


▷ 최신버전

    2007.12.13 (버전 0.9.11.0) : Jeidee.Naver2Tistory.exe

Posted by 1010
반응형

[ExtJs] 튜토리얼 1

  2008/07/17 16:44:31 초급 프로젝트 만들기

 1단계 :

extjs001.jpg다음과 같이 ExtJS 라이브러리를 사용할 때는


[파일명].css -> 디자인 정의

[파일명].html -> ExtJs 라이브러리를 사용하기 위해 스크립트로 선언해줘야 한다.

[파일명].js  -> 실제 구동되는 내용이 들어간다.


세개의 파일을 만드는게 기본 구조이다.


본 화면은 Aptana 스튜디오 화면이다. 개발을 할때는 FireFox에 FireBug 플러그인을 설치하여

콘솔로 테스트를 해보는걸 권장한다.


2단계 :

테스트용이기 때문에 applayout.js 에는 아무 내용이 들어있지 않다. 콘솔 테스트 시에는 FireBug를 이용한다.

FireBug를 실행할 때는 FireFox 에서 F12 키를 눌러주면 된다.

테스트 서버 URL : http://aha.chonbuk.ac.kr/extJsTest/widget/applayout.html

  1. applayout.css
  2. body {
       font-family:verdana,tahoma,helvetica;
       padding:0px;
       padding-top:0px;
       font-size:13px;
       background-color:#fff !important;
    }

  1.  applayout.html
  2. <!DOCTYPE HTML PUBLIC "-//W3C//DTD HTML 4.01//EN" "http://www.w3.org/TR/html4/strict.dtd">
    <html>
     <head>
      <meta http-equiv="Content-Type" content="text/html; charset=iso-8859-1" />
      <title>Untitled Document</title>
     
      <link rel="stylesheet" type="text/css" href="lib/ext/resources/css/ext-all.css" />
  3.   <!-- GC -->
      <!-- LIBS -->    
         <script type="text/javascript" src="lib/ext/adapter/yui/yui-utilities.js"></script>
         <script type="text/javascript" src="lib/ext/adapter/yui/ext-yui-adapter.js"></script>
      <!-- ENDLIBS -->
         <script type="text/javascript" src="lib/ext/ext-all-debug.js"></script>
     
      <!-- Common Styles for the examples -->
      <link rel="stylesheet" type="text/css" href="applayout.css" />
     </head>
     <body>
     </body>
    </html>

3단계:

FireFox에서 FireBug의 콘솔을 이용하여 테스트를 해볼 수 있다.

  1. Ext.get(document.body).update('<div id="test">테스트</div>'); <- body 태그 안에 내용을 갱신한다.

extjs002.jpg 


4단계: 작업 패널을 만들어 본다.

  1. Ext.get(document.body).update('<div id="test">테스트</div>');
  2. new Ext.Panel({              //<- 다음과 같이 윈도우 하나를 띄워준다.
       renderTo: 'test',            //<- 윈도우를 그릴 레이어 id 를 적어준다.
       width: '200px',               //<- 윈도우의 가로 사이즈를 나타낸다.
       title: 'My Title',               //<- 프레임 타이틀 이름을 표시한다.
       html: 'My HTML content'   //<- 실제적인 컨텐츠가 들어가는 부분이다.
    });

 extjs003.jpg


5단계 : 작업 패널의 확장 속성을 주어보자!

파란색 상자로 쳐진 부분이 새로 추가한 내용이다. 작업화면에 다음과 같이 확장 가능한 화면이 표시된다.

 extjs004(1).jpg


6단계 : API 에서 필요로 하는 탭 기능으로 워크 스페이스 구현할 예제를 한번 만들어보았다

다음과 같이 Ext.TabPanel() 을 이용하면 다음과 같은 화면이 그려지게 된다. 생각보다 깔끔하게 잘 나온다.

extjs005.jpg 


7단계 : 탭패널을 이용하여 워크스페이스 만들어보기

extjs006.jpg 탭 워크스페이스 예제의 구성 파일은다음과 같다

loripsum.html : 새로운 탭이 만들어질때 씌여지는 컨텐츠가 들어간다. 우선 아무 내용이나 집어넣었다.

sample0.html, sample1.html : 탭뷰가 갱신되는걸 표시하기 위한 컨텐츠, 우선 아무 내용이나

tab_actions.js : 탭 워크스페이스를 구현하는 자바스크립트 소스

tabLayout.html : 탭 워크스페이스의 레이아웃


 탭 워크스페이스를 구현한 그림이다.

워크스페이스를 갱신하면 원래 있던 내용이 바뀐다.

새로운 워크스페이스를 추가하면 탭 워크스페이스가 늘어난다.

테스트 URL : http://aha.chonbuk.ac.kr/extJsTest/widget/tabLayout.html


extjs007(1).jpg 

  1. tabLayout.html
  2. <html>
    <head>
     <meta http-equiv="Content-Type" content="text/html; charset=utf-8" />
     <title>TabPanel Tutorial</title>
     <!-- Ext CSS and Libs -->
     <link rel="stylesheet" type="text/css" href="lib/ext/resources/css/ext-all.css" />
     <script type="text/javascript" src="lib/ext/adapter/ext/ext-base.js"></script>
     <script type="text/javascript" src="lib/ext/ext-all.js"></script>
     
     <!-- Custom CSS and Libs -->
     <script type="text/javascript" src="./tab_actions.js"></script>
     <link rel="stylesheet" type="text/css" href="shared/share.css" />
     <style>
     #actions li {
      margin:.3em;
     }
     #actions li a {
      color:#666688;
      text-decoration:none;
     }
     </style>
    </head>
    <body>
  3. <ul id="actions" class="x-hidden">
     <li>
      <a id="use" href="#">워크스페이스 갱신</a>
     </li>
     <li>
      <a id="create" href="#">새로운 워크스페이스 추가</a>
     </li>
    </ul>
     
    <div id="tabs"></div>
    </body>
    </html>

  1. tab_action.js
  2.  Ext.onReady(function(){
          // Menu containing actions
           var tabActions = new Ext.Panel({
            frame:true,
            title: '워크스페이스 관리',
            collapsible:true,
            contentEl:'actions',    
            titleCollapse: true
        });
     
        // Parent Panel to hold actions menu
        var actionPanel = new Ext.Panel({
            id:'action-panel',
            region:'east',                     //<-자바의 레이아웃 구분과 같다. north, west, east, south, center
            split:true,
            collapsible: true,
            collapseMode: 'mini',
            width:200,
            minWidth: 150,
            border: false,
            baseCls:'x-plain',
            items: [tabActions]         //<-앞 서 만든 워크스페이스 관리 프레임을 패널에 집어 넣는다.
        });
     
        // Main (Tabbed) Panel
        var tabPanel = new Ext.TabPanel({
            region:'center',
            deferredRender:false,
            autoScroll: true,
  3.         enableTabScroll:true,     // <- 탭 이 화면에 다 표시 안될경우 좌우 스크롤 할 수 있게 해준다.
            margins:'0 4 4 0',
            activeTab:0,
            items:[{
                id:'tab1',
                contentEl:'tabs',
                title: '워크스페이스',
                closable:true,
                autoScroll:true
            }]
        });
       
        // Configure viewport
        viewport = new Ext.Viewport({
               layout:'border',
               items:[actionPanel,tabPanel]
        });
       
         // Adds tab to center panel
        function addTab(tabTitle, targetUrl){
            tabPanel.add({
                  title: tabTitle,
                  iconCls: 'tabs',
                  autoLoad: {url: targetUrl, callback: this.initSearch, scope: this},
                  closable:true
           }).show();
        }
     
        // Update the contents of a tab if it exists, otherwise create a new one
        function updateTab(tabId,title, url) {
         var tab = tabPanel.getItem(tabId);
         if(tab){
          tab.getUpdater().update(url);
          tab.setTitle(title);
         }else{
          tab = addTab(title,url);
         }
         tabPanel.setActiveTab(tab);
        }
     
        // Map link ids to functions
        var count = 0;
        var tabcount = 0;
        var actions = {
         'create' : function(){
          addTab('새 워크스페이스'+tabcount,'loripsum.html');
          tabcount++;
         },
         'use' : function(){
          // Toggle between sample pages
          updateTab('tab1','워크스페이스 갱신 ' + count + ' 회','sample'+(count%2)+'.html');
          count++;      
         }
        };
     
        function doAction(e, t){
         e.stopEvent();
         actions[t.id]();
        }
     
        // This must come after the viewport setup, so the body has been initialized
       
        actionPanel.body.on('mousedown', doAction, null, {delegate:'a'});          
    });


Posted by 1010
반응형
[Source Link] 
Author: Brian Moeskau (변역:김재형)
Published: Novermber 1, 2007
Ext Version: 2.0
Last Modified: 2008.2.17 14:55
Summary: 2008.10.9 16:40 (Roundworld)


ExtStart.js

Ext.onReady(function(){
    alert("Congratulations! You have Ext configured correctly!");
});

Ext.onReady는 반드시 가장 처음으로 호출되는 메소드입니다. 모든 DOM의 로딩이 완료되어야 이 메소드가 자동으로 호출되므로 이 메소드 내부의 코드는 페이지 내 모든 엘리먼트에 접근이 가능합니다.


- Element: Ext 심장

var myDiv = document.getElementById('myDiv');

이 코드는 잘 실행되긴 하지만 여기서 반환되는 객체는(DOM node) 쓰기 쉽지는 않고 기능이 강력하지 않습니다. 반환된 node를 유용하게 사용하려면 많은 추가코드를 작성해야 합니다. 게다기 브라우저 별 호환성에 대해서도 고려를 해야하므로 짜증 만땅이라 할 수 있지요. (변역이 참 재밌습니다.)

이제 Ext.Element 객체를 살펴봅시다. 정말 Ext의 심장과도 같은 이 객체는 엘리먼트에 접근하거나 기능을 실행할고 할때 필요합니다.  Element API는 Ext 라이브러리에 입문하려고 할때 기초가 되며 여러분이 Ext에서 오직 하나의 클래스만 배울 시간만 가지고 있다면 Element를 선택하세요!

앞의 예제 코드에 대응되는 Ext Element로 ID를 얻어내는 코드는 아래와 같습니다.

Ext.onReady(function() {
    var myDiv = Ext.get('myDiv');
});

이제 Element 객체로 다시 돌아가서... 왜 흥미를 가져야 할까요?

1.Element 클래스는 대부분의 기존 DOM 매소드와 프로퍼티를 포함하고 있는데, 이로 인해 편리성, 통합성, 브라우저간 호환성이 있는 DOM 인터페이스를 얻게 됩니다.

2.Element.get() 메소드는 내부 캐쉬를 사용하며 따라서 동일한 객체를 반복해서 호출할 때 겁나(^^) 빠른 속도를 얻어 올수 있습니다.

3.브라우저간 호환성 문제가 없는 Element 메소드들을 통해서 DOM 노드에 대한 대부분의 작업이 수행됩니다.


- DOM node들 선택하기

종종 DOM 노드를 ID로 선택하는게 불가능 하거나 비효율적일 경우가 있습니다. 엘리먼트에 ID가 설정되어 있지 않거나 설정된 ID를 모를때, 혹은 ID로 참조할 요소가 너무 많을 경우에는 여러분은 엘리먼트에 설정된 어떤 프로퍼티 값이나 설정된 CSS 클래스명으로 선택한다던가하는 먼가 다른 방법이 필요할 겁니다. 이런 경우를 위해서 Ext에서는 DomQuery라고 불리는 극악 강력한(--;) DOM 선택 라이브러리를 제공합니다.

// Hightlights every paragraph
Ext.select('p').hightlight();   

예제는 Element.select를 아주 손쉽게 사용하는 방법을 보여줍니다. 여기서 반환되는 객체는 CompositeElement로 Element 인터페이스를 통하여 내부 엘리먼트에 접근할 수 있게 해줍니다. 이것은 반복문과 개별접근이 없이 Element.select로 손쉽게 모든 엘리먼트의 인스턴스를 리턴 받을수 있게 해줍니다.

DomQuery는 W3C CSS3 DOM selector의 기본 Xpath 그리고, HTML 프로퍼티를 포함하는 폭넓은 선택 옵션을 지원합니다.


- 이벤트 응답

지금까지 예제에서는 우리가 작성한 코드는 모두 onReady 함수 내에 직접 작성되었습니다. 이것이 뜻하는 바는 이것들은 항상 페이지의 로드가 완료된 즉시 실행이 된다는 것입니다. 이것은 우리에게 많은 제어권을 주지 못합니다. 여러분은 제어를 위해 코드가 특정 상황 혹은 이벤트에 응답하게끔 하고 싶을 겁니다. 이것을 하려면 이벤트 처리를 하는 함수를 이벤트 핸들러로 정의 해야합니다.

간단한 예제부터 시작하면 ExtStart.js를 열어서 아래와 같이 수정합니다.

Ext.onReady(function() {
    Ext.get('myButton').on('click', function() {
        alert("You clicked the button");
    });
});

코드는 아직까지 페이지가 로드 완료이후에 실행되지만 한가지 다른점은 함수내에 alert()이 선언되어 있는데 즉시 실행되지 않습니다. 이 부분은 버튼의 클릭 이벤트에 대한 "핸들러"로 지정되어 있기 때문입니다.

놀라지 마세요.(^^) Element.select는 같은 기능을 제공하지만 한번에 모든 요소 그룹을 가져올수 있습니다. 예를 들어, 우리 태스트 페이지 내에 모든 문단을 클릭 했을때 메시지를 보여주려면 다음과 같이 해봅시다.

Ext.onReady(function(){
    Ext.select('p').on('click',function(){
        alert("You clicked a paragraph");
    });
});

여기 두개의 예제 내에서 이벤트 처리함수는 함수명이 없이 단순히 인라인(inline)으로 선언되어 있습니다. 이러한 종류의 함수를 "익명함수(anonymous function)"라고 하는데 물론 이름이 있는 함수도 이벤트 처리용으로 할당 할 수 있습니다. 아래 예제 코드는 앞서의 예제와 동일한 기능을 수행합니다.

Ext.onReady(function(){
    var paragraphClicked = function(){
        alert("U clicked a paragraph");
    }
    Ext.select('p').on('click', paragraphClicked);
});

여기까지 우리는 이벤트가 발생되었을때 일반적인 처리를 하는 방법을 살펴 보았습니다. 하지만 이벤트가 발생한 엘리먼트 자체에 대한 어떤 액션을 실행하려고 할때, 해당 엘리먼트를 어떻게 알아 낼 수 있을까요?

물론 간단히 찾아 낼 수 있습니다.

Element.on 메소드는 이벤트 핸들링 함수에 3개의 완전 유용한 파라메터를 전달합니다.(여기서는 첫번째 1개만 살펴봅니다. 나머지는 API문서를 참조하세요.) 앞서 예제에서는 핸들링 함수에 파라메터가 생략되어 있습니다. 하지만 조금만 바꿔서 부가적인 기능을 추가시킬수 있습니다. 첫번째(가장 중요한) 파라메터는 발생된 이벤트입니다. 이것은 사실 Ext 이벤트 객체인데, 표준 브라우저 이벤트 보다 브라우저간 호환성이 있고 더욱 많은 정보를 제공합니다. 예를들어, 아래처럼 가단한 코드 추가만으로 이벤트의 traget으로 설정된 DOM 노드를 구할수 있습니다.

Ext.onReady(function() {
    var paragraphClicked = function(e){
        Ext.get(e.target).highlight();
    }
    Ext.select('p').on('click', paragraphClicked);
});

target이 DOM 노드라는 것을 기억하시고, 이제 이벤트가 발생된 엘리먼트를 구해서 원하는 액션을 수행할 수 있게 되었습니다. 예제를 실행해보면 모든 문단에 하이라이트가 되는 것을 볼수 있습니다.


- 위젯 사용하기

Ext는 지금까지 설명한 코어 자바스크립트 라이브러리 외에 추가적으로 풍부한 자바스크립트 UI위젯들을 제공합니다. 본 문서에서 설명하기에는 분량이 너무 많으므로 주로 사용되는 몇가지를 얼마나 쉽게 사용할수 있는지 알아보겠습니다.


1.MessageBox

지루한 "Hello World" 메시지 박스 띄우기 대신 다른것을 해 봅시다. 우리는 이전에 섹션에서는 각각 문단을 클릭했을때 하이라이트가 되는 코드를 작성했는데 이번에는 클릭했을때 나타나는 메시지 박스 안에 문장의 글이 보이게끔 수정해봅시다. 아래 paragraphClicked 함수를 고쳐봅시다.

Ext.get(e.target).highlight();

var paragraph = Ext.get(e.target);
paragraph.highlight();

Ext.MessageBox.show({
    title: 'Paragraph Clicked',
    msg: paragraph.dom.innerHTML,
    width: 400,
    buttons: Ext.MessageBox.OK,
    animEl: paragraph
});

여기서 다루어 볼만한 가치가 있는 몇가지 새로운 컵셉이 눈에 띠는군요. 첫라인에서 paragraph라는 이름으로 지역변수(전역변수 아닌가요? --;)를 생성 했으며 클릭이 발생한 DOM 노드의 엘리먼트 참조를 가지고 있게 했습니다.(이번에는 오직 <p> 태그들만 클릭 이벤트와 연계되므로 항상 입력되는 것을 알 수 있습니다.)

왜 이렇게 해야 할까요? 우리는 하이라이트 시키기 위한 엘리먼트의 참조가 필요하며 메시지박스를 위한 인자로 동일한 엘리먼트를 필요하기 때문입니다. 일반적으로 동일한 값 또는 객체 참조를 얻기 위해 동일한 함수를 여러번 호출하는 것은 나쁜습관(--;)이므로 지역 변수에 할당하여 재사용합니다. 이렇게 하면 우리는 착한 객체지향 개발자가 되는 겁니다!

이제 메시지박스호출 부분을 살펴봅시다. 또 다른 새로운 컨셉이 보이는데 단순히 메소드에 인자 리스트를 전달하는 것처럼 보이지만 자세히 살펴보면 매우 특이한 문법이 보일겁니다. 사실 MessageBox.show()에는 오직 하나의 인자만 전달되고 있는데 프로터피와 값의 집합을 담고 있는 객체 문자열(literal)입니다. 자바스크립트에서 객체 문자열은 이름/값 프로퍼티 리스트를 {}로 감싸서 언제든지 동적으로 생성시킬수 있습니다. 형식은 [프로퍼티 이름]:[프로퍼티 값] 으로 표기하며 이 패턴은 Ext 곳곳에서 널리 사용되기 때문에 금방 익술해질겁니다.

왜 객체 문자열(literal)을 사용하냐구요? 가장 큰 이유는 유연성입니다. 객체 문자열(literal)을 사용하면 아무때나 프로퍼티나 추가/삭제 되거나 순서가 변경되더라도 메소드의 시그니쳐(인자의 개수와 타입) 예를 들어 foo.action 이라는 가상의 메소드가 있다고 하고 네개의 옵션인자가 있다고 가정합니다. 그런데 오직 하나만 전달하는 상황이라면 코드를 다음과 같이 작성해야겠지요.

foo.action(null,null,null,'hello')

그러나 객체 문자열(literal)을 사용하게 된다면 다음과 같이 하면 됩니다.

foo.action(
    param4: 'hello'
})
 
무척 사용하기 쉽고 가독성도 더 좋습니다.


2.Grid

그리드는 Ext의 가장 인기있는 위젯 중 하나인데 사람들이 첫번째로 보고 싶어하는 것이기도 합니다. 자 이제 기초적인 그리드를 만들고 실행시키는 것이 얼마나 쉬운지 살펴보겠습니다. ExtStart.js 파일을 열어서 아래와 같이 코드를 수정해봅시다.

Ext.onReady(function() {
    var myData = [
                    ['Apple',29.89,0.24,0.81, '9/1 12:00am'],
                    ['Ext',83.81,0.28,0.34,'9/12 12:00am'],
                    ['Google',52.55,0.01,0.02,'7/4 1200am'],
                    ['Microsoft',52.55,0.01,0.02,'7/4 12:00am'],
                    ['Yahoo!',29.01,0.42,1.47,'5/22 12:00am']
    ];

    var myReader = new Ext.data.ArrayReader({}, [
                    {name: 'company'},
                    {name: 'price', type: 'float'},
                    {name: 'change', type: 'float'},
                    {name: 'pctChange', type: 'float'},
                    {name: 'lastChange', type: 'date', daeFormat: 'n/j h:ia'}
    ]);

    var grid = new Ext.grid.GridPanel({
                   store: new Ext.data.Store({
                            data: myData,
                            reader: myReader
                   }),
                   columns: [
                                 {header: "Company", width: 120, sortable: true, dataIndex: 'company'},
                                 {header: "Price", width: 90, sortable: true, dataIndex: 'price'},
                                 {header: "Change", width: 90, sortable: true, dataIndex: 'change'},
                                 {header: "% Change", width: 90, sortable: true, dataIndex: 'pctChange'},
                                 {header: "Last Updated", width:120, sortable: true, renderer: Ext.util.Format.dateRenderer('m/d/Y'), dataIndex: 'lastChange'}
                  ],
                  viewConfig: {
                                 forceFit: true
                  },
                  renderTo: 'content',
                  title: 'My First Grid',
                  width: 500,
                  frame: true
});

grid.getSelectionModel().selectFirstRow();                  
});                                

코드가 길어 보이지만 실제로는 오직 4 line Code 뿐입니다. (태스트 데이타를 제외하면 3 Line Code)!

1.첫라인은 그리드에 보여줄 태스트 데이타를 생성, 실제로는 DB에서 데이타를 가져오겠죠.
2.다음은 데이터 리더를 생성하였는데 그리드 내 데이터 스토어에 담기 위해 데이터를 어떻게 읽어 들이고 레코드로 변환할지 설정합니다. 다양한 데이터 타입을 위한 각각의 리더 클래스가 있습니다.
3.다음으로 그리드 위젯을 생성하는데 아래와 같은 설정 값들을 전달합니다.
- 새로운 데이타 스토어, 생성한 태스트 데이터와 리더가 설정되어 있습니다.
- Columns에 칼럼 모델 정의를 합니다.
- 추가옵션으로 그리드의 기능 설정을 할수 있습니다.
4.마지막으로 SelectionModel을 사용해 첫번째 행을 하이라이트 시킵니다.

무척 간단하지요? (--;;) 잘 되었다면 아래와 같이 보일 겁니다.


물론 이런 코드를 가지고 자세한 부분까지 이해할 수는 없습니다. 이 예제의 목적은 풍부하고 시각적으로 복잡한 사용자 인터페이스 컴포넌트를 최소한의 코드만으로 작성할 수 있다는 것을 보여주는데 있습니다.

자세한 내용은 독자들의 숙제로 남깁니다. 그리드를 배우는데 도움이 되는 많은 내용들이 interactive grid damosGridPanel API documentation 에 포함되어 있습니다.


3.그리고 다른 것들...

지금 우리가 살펴본 것은 빙산의 일각(--;)에 불가합니다. Ext에 있는 수십개의 UI위젯들이 있습니다. 자동 페이지 레이아웃, 탭, 메뉴, 다이어로그, 트리뷰 등등. interactive examples 에서 모두 살펴보시기 바랍니다.


- Ajax 사용하기

페이지를 만들고 자바스크립트로 상호작용하는 것을 알게 되었습니다. 이제 여러분은 서버의 데이터베이스에서 가져오거나 저장하는 것과 같은 원격 서버에서 데이터를 가져오는 방법을 알고 싶을 겁니다. 자바스크립트를 이용하며 비동기적으로 페이지 리로딩 없이 처리하는 방식은 Ajax 라고 알려져 있는데 Ext는 Ajax를 지원합니다. 예를 들어 사용자와의 상호작용을 처리하여 서버에 비동기로 전송하고 응답하는 UI의 엘리먼트를 갱신하는 것인데 여기에 택스트 입력 박스, 버트, 메시지를 표시하기 위한 div를 포함하고 있는 간단한 HTML 폼으로 구성된 예제를 살펴봅시다.

ExtStart.html
<div>
    Name: <input type="text" id="name" />
    <input type="button" id="okButton" value="OK" />
</div>
<div id="msg"></div>

ExtStart.js
Ext.onReady(function(){
    Ext.get('okButton').on('click', function() {
        var msg = Ext.get('msg');
        msg.load({
                        url: 'ajax-example.php', //<-- change if nessary
                        params: 'name=' + Ext.get('name').dom.value,
                        text: 'Updating...'
        });
        msg.show();
    });
});

아마도 일반적인 패턴은 지금과 비슷하게 시작할겁니다! 이 코드는 okButton을 Element 객체로 래핑시키고 버튼 클릭 이벤트를 처리하는 익명함수로 연결시키고 있습니다. 클릭 핸들러 내에서는 Updater라고 불리우는 특별한 내부 클래스를 사용하는데 이 클래스는 손쉽게 Ajax 응답을 주고 받고 다른 엘리먼트를 갱신합니다.

Updater는 직접 호출하거나 여기에서처럼 갱신을 원하는 Element(여기서는 'msg' div)에 Element.load를 사용하여 접근하게 되는데 Element.load가 호출되었을 때 서버 측의 응답이 자동으로 Element의 innerHTML로 변경됩니다. 그리고 서버에서 응답을 처리할 URL과 인자값(여기서는 'name'필드의 값을 전달) 그리고 요철 처리 중간에 엘리먼트의 innerHTML에 표시할 메시지를 전달하고, Msg div(디폴트 값이 hidden으로 되어있음)가 보이게하면 됩니다.

물론 Ext 내 다른 부분들처럼 Updater에 많은 옵션들이 제공 되고 있으며 이것으로 여러 다양한 상황에서 Ajax요청을 필요에 맞는 방식으로 처리할수 있습니다. (Ajax 직접 접근은 Ext.Ajax 클래스를 살펴보시기 바랍니다) 하지만 여기에서는 기본적인 예제와 실행을 보여드렸습니다.

Ajax 퍼즐의 마지막 조각은 요청과 페이지로 보내는 응답을 담당하는 웹서버측의 처리부분입니다. 이 부분은 서버페이지, 서블릿, HTTP 핸들러, 웹서비스, 펄 혹은 CGI 스크립트 외에 웹 서버 측에서 HTTP 요청을 처리할 수 있는 어떤 기술도 될수 있겠습니다.

결국 이런 다양함으로 인해 표준적인 예제를 제공할 방법이 없습니다. 그래서 주로 사용되는 몇가지 언어로 예제를 만들었는데 독자에게 도움이 되었으면 합니다. (이 코드는 단순히 'name' 필드로 전달되는 입력 값을 다시 클라이언트 측에 'from Server: '에 붙여서 전달하고 'msg' div에 기록됩니다.) PHP 예제는 'ajax-example.php'로 다운로드를 제공하고 있지만 여러분의 서버에 맞는 코드로 수정해서 사용하시기 바랍니다.

ajax-example.php
<?php
if
(isset($_POST['name'])){
    echo 'from Server: '.$_POST['name'];
}
?>

실전에서는 Ajax 처리를 할때는 정확한 처리와 서버에서 오는 데이터 구조를 다루기 위해 땜방코드(--;)를 필요로 합니다. 사람들이 주로 사용하는 몇가지 포맷이 있는데(대부분 JSON or XML) Ext가 서버측 언어에 중립적인 것처럼 Ajax처리를 위해 많은 특정 언어 기반의 라이브러리가 Ext와 잘 연동됩니다.

페이지로 오는 데이터의 구조가 올바르면 서버의 어떠한 동작 방식에도 신경쓰지 않습니다.(^^) 서버측 프레임워크와 툴에 대한 부가적인 정보를 얻고 싶으면 우리의 platfrom-specific resources 목록을 살펴보시기 바랍니다.


- What's Next?


이제 Ext가 무엇이고 어떤 것을 제공하는지 맛을 살짝 보았습니다. 다음 단계로 진입하기 위해 도움이 될 많은 자료가 여러분을 기다라고 있습니다.


#Next Topic: Basic Login
Posted by 1010
반응형
일반적인 JavaScript Learning Guide

참고사이트

  1. Mozilla Developer Center: Core JavaScript 1.5 Reference Manual
  2. Yahoo UI개발자인 Douglas Crockford's JavaScript
  3. Yahoo Developer Network : YUI Theater  ( 더글라스 크록포드의 동영상 강의 수록)
  4. Peter-Paul Koch의 QuirksMode
  5. http://home.cogeco.ca/~ve3ll/jstutor0.htm

그외 볼만한 사이트(Dead Trees)

  1. JavaScript: The Definitive Guide by David Flanagan
  2. Pro JavaScript Techniques by John Resig
  3. Ajax and REST Recipes by Christian Gross
  4. ppk on JavaScript by Peter-Paul Koch
  5. Professional JavaScript for Web Developers by Nicholas C. Zakas
  6. Ajax Patterns and Best Practices by Christian Gross
  7. Dynamic HTML by Danny Goodman
  8. Head First Design Patterns by Freeman & Freeman

OO JavaScript 참조사이트

  1. How to achieve private, public, and privileged members in JavaScript, by Dustin Diaz.
    : Method scoping에 대한 좋은 설명
  2. OOP in JS, Part 1 : Public/Private Variables and Methods, by Gavin Kistner.
    : Scoping 및 prototyping에 대한 샘플
  3. A JavaScript Module Pattern, by Eric Miraglia in YUI Blog.
    : 더글라스 크록포드가 얘기한 module pattern에 대한 설명
  4. Again with the Module Pattern - reveal something to the world, by Christian Heilmann.
    : 모듈패턴
  5. JavaScript for Object-Oriented Programmers (Appendix B of the book AJAX in Action).

DOM


그외 기술


Yahoo! User Interface Library (YUI)


Ext JS 은 yui-ext에서 부터 시작되었다. 아래 사이트에서 YUI에 대해서 좀 봐두는것도 좋을지도..

  1. YUI Library
  2. ydn-javascript: Yahoo! User Interface Library Group
  3. YUI Blog

JSON 관련


Platform-Specific Resources


ExtJS를 서버사이드 프레임웍으로 사용한 녀석들.....

PHP

대표적인 샘플코드는 모두 PHP코드로 되어 있는 걸 보면  PHP에서 개발하기 가장 쉬운것 같음.
ExtJS 내장 PHP프레임웍 :  Qcodo Development Framework

Java


Direct Web Remoting (DWR) : http://getahead.org/dwr

.NET


  • AjaxPro 는 .Net 을 이용한 서버사이드 Ajax
  • Jayrock  :  .Net에 JSON / JSON-RPC 를 이용 
  • Json.NET  : .Net에서 JSON을 쓰게 만들어주는 라이브러리 (PHP의 toJSON()이나, Struts의 JSON과 같은건가 보다... ㅡ.,ㅡ; ) 

Ruby on Rails

Ext plugin - ROR는 내장 플러그인으로 작동하므로 gem을 이용해 받으면 되겠다...  (찾기가 더 힘드네.. ㅡ.,ㅡ;)

IBM Lotus Notes/Domino


IBM's Lotus Notes/Domino : IBM 머찌다라는 말만..


통합개발툴(IDE)

Eclipse Based IDEs

Eclipse 은 오픈소스 통합개발툴 (among other things!)이다. ExtJS개발을 위해 이클립스를 사용하기 위해서는 먼저 자바스크립트 사용할수 있는 플러그인을 설치해야 한다.
아래의 플러그인을 추천한다.

  • Aptana - JavaScript, HTML, CSS, PHP languages, FTP/SFTP 지원, RIA/Web2.0등 Ajax 관련 프로젝트에 적합 (느리다는 단점이 있음.. ㅠ.,ㅠ)
  • Spket - JavaScript, XUL, SVG, Laszlo, Silverlight,등 각 모듈 라이브러리 지원(http://blog.naver.com/techbug/150024518549 )
  • JSEclipse - JavaScript

위에 열거된 플러그 인들은 각자 자바스크립트 에디터를 포함하고 있다.  자바스크립트를 열때 "Open with"로 열어서 사용하도록...플러그인을 선택할때는 코드 assist를 지원하는지 확인해 봐야 할듯


Aptana + Spket + ExtJS(강추..)
  • Aptana다운로드 http://www.aptana.com/download_all.php
  • Aptana > Help > Software Updates > Find andInstall > Search for new features to install > New remote site..> "http://www.spket.com/update/"
  • Spket설치 ( Spket IDE Tutorial )
    1. Window > Preferences > Spket > JavaScript Profiles > New > "ExtJS"
    2. "ExtJS" 선택하고  "Add Library"에서 "ExtJS"선택
    3.  "ExtJS" 선택하고 "Add File", 에서 "./ext-2.0/source" 디렉토리에서 "ext.jsb"를 선택
    4. ExtJS profile을 디폴트로 선택
    5. Aptana 플러그인을 새 시작
    6. 새로운 JS파일을 만들면 ExtJS의 Code completion options를 볼수 있다.

AptanaIDE

  • Aptana는 상당히 매력적인 플러그인다. 대부분의 Ajax Library를 제공한다.


다양한 디버깅툴

Firebug (FF에서 강추)


Firebug는 Firefox에 애드온되어 작용하는데 웹페이지의 내용(CSS,HTML,Javscript등)을 실시간으로 볼수있는 상당히 매력적인 도구이다.


Screencasts


Tutorials


다른 브라우저에서 Firebug console을 이용하기

HTTP Trafic Viewer


피들러는 서버와 PC사이의 HTTP 트래픽 로그를 볼수 있는 디버깅 프록시이다. IE전용이나 Firefox의 proxy고급옵션에서 사용할수 있으며 자신이 원하는대로 필터링 하여 사용할수 있다.

MS Script Editor


IE Web Developper

IE WebDeveloper는 인터넷 익스플로러 애드온 프로그램이다.

Testing Data Generator

SQL,CSV,xml, excel등 테스트 데이타를 생성해준다.

http://www.benjaminkeen.com/software/data_generator/

YSlow

YSlow는  rules for high performance web sites를 기반으로 현재 페이지의 속도를 분석해준다. YSlow 는 Firefox 애드온 프로그램으로 인기가 있다.Firebug web development tool.

  • Performance report card
  • HTTP/HTML summary
  • List of components in the page
  • Tools including JSLint

http://developer.yahoo.com/yslow/

DebugBar - IE 플러그인 (강추)


  • DOM Inspector,
  • HTTP Inspector
  • Javascript Inspector and Javascript Console
  • HTML Validator
  • And many more features

http://www.debugbar.com/?langage=en

-->


출처 : http://jaywill.springnote.com/pages/1601738

Posted by 1010
반응형
오늘자 ExtJs 공식 블로그에 Intergrating Google Maps API With ExtJS 라는 글이 포스팅 되었다.

ExtJS 의 Panel 을 확장해서 만든 GMapPanel 을 이용한 샘플이 공개 되었는데 Google Maps API를 이용했다.
재미있는것은 Google 의 StreetView 도 Panel 를 확장해서 구현했단는 것.

사용자 삽입 이미지

지난달 초에 ExtJS 의 Web Desktop 샘플코드를 이용해서 NaverMap API 를 적용한 코드를 작성한 바 있는데 이를 소개할까 한다.

데모보기
사용자 삽입 이미지


Source Code (일부)
MyDesktop.MapWindow = Ext.extend(Ext.app.Module, {
id: 'map-win',
init: function(){
this.launcher = {
text: 'Where we are ?',
iconCls: 'icon-map',
handler: this.createWindow,
scope: this
}
},
createWindow: function(){
var desktop = this.app.getDesktop();
var win = desktop.getWindow('map-win');
var mapObj = null;

function centerMap(){
if (mapObj != null) {
mapObj.setCenterAndZoom(new NPoint(316350, 550250), 2);
}
}

if (!win) {
win = desktop.createWindow({
id: 'map-win',
title: 'Where we are?',
width: 740,
height: 480,
minHeight: 400,
minWidth: 500,
iconCls: 'icon-map',
shim: false,
animCollapse: false,
constrainHeader: true,
layout: 'fit',
tbar: ['서울특별시 성동구 성수1가2동 리버하우스', '->',
{
xtype: 'button',
iconCls: 'map-init',
text: '초기화',
handler: centerMap,
scope: this
}],
listeners: {
beforeshow: function(){
if (mapObj == null) { //최초 생성
mapObj = new NMap(this.body.dom);
mapObj.enableWheelZoom();
centerMap();
var zoom = new NZoomControl();
if (Ext.isIE6) {
var cm = new NMark(
new NPoint(316325, 550245),
new NIcon('images/here.gif',
new NSize(68, 50),
new NSize(34, 48)
)

)
} else {
var cm = new NMark(
new NPoint(316325, 550245),
new NIcon(
'images/here.png',
new NSize(68, 50),
new NSize(34, 48)
)

)
}
NEvent.addListener(cm, 'click', function(){
var w = new Ext.Window({
animateTarget: win.getEl(),
modal: true,
iconCls: 'icon-map',
title: '리버하우스 B동 207호',
html: '<img src="images/riverhouse.jpg">',
width: 360,
autoHeight: true,
resizable: false,
stateful: false
});
w.show();
});

cm.show();
zoom.setAlign("right");
zoom.setValign("top");
mapObj.addControl(zoom);
mapObj.addOverlay(cm);

} else { //생성된 적이 있다면!!
if (this.animateTarget == null) { //Close 상태
this.taskButton = desktop.taskbar.addTaskButton(this);
centerMap();
}
this.animateTarget = this.taskButton.el;
}

},
beforeclose: function(){
this.backupTarget = this.animateTarget;
this.animateTarget = null;
this.fireEvent('close', this); //taskButton remove
this.hide();
return false;
},
bodyresize: function(){
if (this.rendered && mapObj != null) {
mapObj.resize();
}
},
scope: win
}
});
}
win.show();
}
});

Web Desktop 의 작동방식은 바탕화면의 아이콘이나 시작버튼의 메뉴를 클릭하게 되면 Window 를 생성해서 화면에 보여주게 되는데 이때의 Window 는 별도의 객체에 의해서 생성된다. App 라는 Class 인데 Factory 이자 Status 를 관리하는 Manager 역할도 한다.
NaverMap과 연동하기 위한 코드는 코드상의 볼드 처리된 부분이며 주의할 점은

1. NaverMap API 는 한번만 초기화 되어야 한다.
Web Desktop 은 생성된 Window가 Close 될때 Destroy 하게 설계가 되어있다. 하지만 NaverMap 은 별도로 destroy를 할 수 있는 방법을 제공하지 않는다.
  1. NMap 을 전역으로 사용하던가
  2. mapWindow 의 멤버로 이용하려면 close 할때 window 를 destroy 하지 말고 hide 하는 방식을 취해야 한다.
상단의 코드는 후자의 방식을 택하고 있고, 파란색 beforeclose 리스너에서 hide 를 호출하고 Desktop App Manager 에서는 윈도우가 닫힌 것으로 인식하게 끔 close 이벤트를 발생시키고 있다.

2. Window resize 를 고려해야 한다.
우선 NMap 을 생성할 때 사이즈에 관한 인자를 주지 않으면 자동으로 컨테이너 사이즈로 생성됨을 확인하였다.
Window resize 이벤트가 발생할 때 NMap 의 인스턴스의 resize() 를 호출하야 한다. (소스코드 보라색)

그러나
사실 Web Desktop 에서 급히 쓰기해서 NaverMap 과의 연동부분이 샘플코드에 인라인으로 코딩이 되었지만 ExtJS 공식블로그에서 소개한 바와 같이 Panel을 확장해서 새로운 클래스로 만드는 편이 재사용을 위해 100만배는 좋다.
Posted by 1010
98..Etc/ERP2009. 1. 8. 15:14
반응형

Thank you for choosing PostBooks, the free open source ERP, CRM and accounting package from xTuple.

Download xTuple-PostBooks-Installer-Windows-3.1.0.exe Notes Mirror

For Windows
Select a different platform? Windows, Mac OS

Not the file you are looking for? Browse all packages for this project.

Download Instructions
This file will install PostBooks version 3.1.0 for Windows.

The PostBooks installer is designed to make it easy for users to evaluate PostBooks --including both the graphical PostBooks client and the PostBooks database. The database comes pre-loaded with a small set of demo data which you can use for evaluation purposes. The database runs on PostgreSQL, which is also installed locally by the installer.

PLEASE NOTE: If you run the installer you will not need to do any other additional setup to evaluate the product. However, if you decide to adopt PostBooks in a production environment, we strongly recommend that you re-install PostgreSQL on a dedicated server machine. You may download PostgreSQL directly from http://www.postgresql.org, or contact xTuple sales for paid implementation support.

Once you have finished the installation, the following steps will get you started:

1. The database starts automatically
2. Open the xTuple folder where you installed it, and click the xTuple program icon to start the client
3. Enter username: admin, password: admin
4. You are now connected to the demo database

Once you have the application running you may want to visit http://wiki.xtuple.org/DemoGuide for a walk through of a sample business cycle in the PostBooks ERP environment.

Posted by 1010
98..Etc/ERP2009. 1. 8. 15:01
반응형

Customizing Openbravo ERP look and feel

Rating :
3.00/5
(1 votes cast)
You have to be registered to be able to vote

This document describes how to customize different aspects of Openbravo ERP look and feel.

Contents

[hide]

Skins

Openbravo user interface supports skins that make it possible to create a new look and feel beyond the skin that is provided by default. Openbravo skins are groups of images and Cascading Style Sheets (CSS) that can define the look of Openbravo per installation.

Directory layout

Openbravo skins are located in the directory web/skins/. Inside every directory skin there are four subdirectories:

  • Login contains styles used by the login window.
  • Main contains styles used by the main application window.
  • Menu contains styles used by menu windows.
  • Popup contains styles used by popup windows.

CSS element names describe the location of the objects named. For example, the label Login_ContentPane_ToolBar references the Toolbar object contained in the ContentPane for the Login Window.

Installation

  • Put the skin inside the AppsOpenbravo/web/skins folder.
    • To design a new one, copy-paste Default one into a new one inside the folder above and give that folder a name (eg. BlackSkin)
    • To install an existing one, unzip the file (you can download from our sourceforge area) into the folder above.
  • Within the command line, move to AppsOpenbravo folder and execute the 'ant compile -Dtab=xxx' and then 'ant war' and 'ant deploy' commands to deploy the new skin into your Tomcat installation.

To register a new skin you must:

  • Login as System Administrator.
  • Go to Application Dictionary || Reference
    • Look for the Skin_list reference.
    • Go to the List Reference tab and then click on the New record icon on the toolbar.
    • The name field contains the name of the skin and the search key field contains the name of the directory (eg. BlackSkin according to the folder name you used above) where the skin is located.

Once the skin has been registered you need select (apply) it:

  • Go to General Setup || Application || Session Information and select the proper skin name within the Theme listbox and press the Save preferences button.
  • Clear your browser cache and you should see the new skin.

Additional skins

At SourceForge download area there is a an openbravo-add-on section that contain some additional samples.

How to easily create a new skin

It is possible to easily create a different skin in 5 minutes.

Lets forget about changing icons and little images, this is a How-to change the main colours of the application as you can see in these screenshots.

my.php?image=blueskincv3.png
my.php?image=pinkskinxx0.png
my.php?image=redskincz5.png

The files that you must change are:

\web\skins\Blue\Popup\Client\Workflow\button.rollover.png
\web\skins\Blue\Popup\Client\Workflow\button.normal.png
\web\skins\Blue\Popup\Client\Workflow\button.pressed.png
\web\skins\Blue\Popup\NavBar\backgroundCenter.png
\web\skins\Blue\Popup\NavBar\backgroundLeft.png
\web\skins\Blue\Popup\NavBar\backgroundRight.png
\web\skins\Blue\Popup\NavBar\logoLeft.png
\web\skins\Blue\Popup\NavBar\logoRight.png
\web\skins\Blue\Menu\NavBar\backgroundCenter.png
\web\skins\Blue\Menu\NavBar\backgroundLeft.png
\web\skins\Blue\Menu\NavBar\backgroundRight.png
\web\skins\Blue\Menu\NavBar\logoLeft.png
\web\skins\Blue\Menu\NavBar\logoRight.png
\web\skins\Blue\Menu\ToolBar\backgroundCenter.png
\web\skins\Blue\Menu\ToolBar\backgroundLeft.png
\web\skins\Blue\Menu\ToolBar\backgroundRight.png
\web\skins\Blue\Main\Client\Button\iconOk.png
\web\skins\Blue\Main\Client\Button\buttonBody.disabled.png
\web\skins\Blue\Main\Client\Button\buttonBody.normal.png
\web\skins\Blue\Main\Client\Button\buttonBody.pressed.png
\web\skins\Blue\Main\Client\Button\buttonBody.rollover.png
\web\skins\Blue\Main\Client\Button\buttonLeft.disabled.png
\web\skins\Blue\Main\Client\Button\buttonLeft.normal.png
\web\skins\Blue\Main\Client\Button\buttonLeft.pressed.png
\web\skins\Blue\Main\Client\Button\buttonLeft.rollover.png
\web\skins\Blue\Main\Client\Button\buttonRight.disabled.png
\web\skins\Blue\Main\Client\Button\buttonRight.normal.png
\web\skins\Blue\Main\Client\Button\buttonRight.pressed.png
\web\skins\Blue\Main\Client\Button\buttonRight.rollover.png
\web\skins\Blue\Main\Client\FieldButton\fieldButton.normal.png
\web\skins\Blue\Main\Client\FieldButton\fieldButton.pressed.png
\web\skins\Blue\Main\Client\FieldButton\fieldButton.rollover.png
\web\skins\Blue\Main\LeftTabsBar\rightbutton.pressed.png
\web\skins\Blue\Main\LeftTabsBar\rightbutton.rollover.png
\web\skins\Blue\Main\LeftTabsBar\background.png
\web\skins\Blue\Main\LeftTabsBar\backgroundBody.png
\web\skins\Blue\Main\LeftTabsBar\backgroundBorder.png
\web\skins\Blue\Main\LeftTabsBar\backgroundTop.png
\web\skins\Blue\Main\LeftTabsBar\iconEditView.normal.png
\web\skins\Blue\Main\LeftTabsBar\iconEditView.rollover.png
\web\skins\Blue\Main\LeftTabsBar\leftbutton.normal.png
\web\skins\Blue\Main\LeftTabsBar\leftbutton.pressed.png
\web\skins\Blue\Main\LeftTabsBar\leftbutton.rollover.png
\web\skins\Blue\Main\LeftTabsBar\rightbutton.normal.png
\web\skins\Blue\Main\NavBar\backgroundCenter.png
\web\skins\Blue\Main\NavBar\backgroundLeft.png
\web\skins\Blue\Main\NavBar\backgroundRight.png
\web\skins\Blue\Main\NavBar\buttonRight.disabled.png
\web\skins\Blue\Main\NavBar\buttonRight.normal.png
\web\skins\Blue\Main\NavBar\buttonRight.pressed.png
\web\skins\Blue\Main\NavBar\buttonRight.rollover.png
\web\skins\Blue\Main\NavBar\iconAbout.disabled.png
\web\skins\Blue\Main\NavBar\iconAbout.normal.png
\web\skins\Blue\Main\NavBar\iconAbout.pressed.png
\web\skins\Blue\Main\NavBar\iconAbout.rollover.png
\web\skins\Blue\Main\NavBar\iconBack.disabled.png
\web\skins\Blue\Main\NavBar\iconBack.normal.png
\web\skins\Blue\Main\NavBar\iconBack.pressed.png
\web\skins\Blue\Main\NavBar\iconBack.rollover.png
\web\skins\Blue\Main\NavBar\iconHelp.disables.png
\web\skins\Blue\Main\NavBar\iconHelp.normal.png
\web\skins\Blue\Main\NavBar\iconHelp.pressed.png
\web\skins\Blue\Main\NavBar\iconHelp.rollover.png
\web\skins\Blue\Main\NavBar\iconRefresh.disabled.png
\web\skins\Blue\Main\NavBar\iconRefresh.normal.png
\web\skins\Blue\Main\NavBar\iconRefresh.pressed.png
\web\skins\Blue\Main\NavBar\iconRefresh.rollover.png
\web\skins\Blue\Main\NavBar\logoLeft.png
\web\skins\Blue\Main\NavBar\logoRight.png
\web\skins\Blue\Main\NavBar\popupSeparatorBar.png
\web\skins\Blue\Main\ToolBar\backgroundRight.png
\web\skins\Blue\Main\ToolBar\backgroundCenter.png
\web\skins\Blue\Main\ToolBar\backgroundLeft.png


The thing is that you have to apply a color effect (red/blue/green effect) to ALL of the files in that list.

Image:effect.PNG

The process is easy but long.

But if you use a batch converter (like advanced batch converter www.batchconverter.com) you can do all the changes automatically. You choose all the images, make the effect, and run the process. In a couple of seconds you will have your images in the desired colour.

Then make a copy of the /web/skin/Default folder and rename it to the name you want for the skin.

Put the modified images on this folder and just add the skin to Openbravo as explained before, in this page.

There are 3 colored skins ready for download at http://sourceforge.net/project/showfiles.php?group_id=162271&package_id=250125&release_id=549425

Customizing the logo

The instructions are only valid for the release 2.35 or higher. These instructions explain how to customize the "yourcompany", "yourit-service" and "sourceforge" logos which are in the login screen.

In the Login Screen there are three customizable logos:

  • Company
  • Support
  • SourceForge

Image:LoginLogos.png

The CSS that permits the change of any of this logo is /web/images/Logos.css

  • Login_Logo_SourceForge_Field: It permits to hide the SourceForge whole box uncommenting the property "display: none"
  • Login_Logo_xxxxxxx_Container_Cell: It permits the customization of the red bordered TD
  • Login_Logo_xxxxxxx_Container: It permits the customization of the blue bordered DIV
  • Login_Logo_xxxxxxx: It permits the customization of the yellow bordered IMG

Where xxxxxxx is Company, Support or Sourceforge

By default:

  • The Company Logo in the Login Screen is obtained from /web/images/CompanyLogo_big.png. It is managed by "Login_Logo_Company" of Logos.css. You can replace it with any other by directly replacing the file CompanyLogo_big.png or changing the "background: url()" property, but you have to take into account that the properties "width" and "height" need to be modified according to the new image.
  • The small Company Logo in the top of the menu is obtained from /web/images/CompanyLogo_small.png. It is managed by "Menu_NavBar_logo" of Logos.css. You can replace it with any other by directly replacing the file CompanyLogo_small.png or changing the "background: url()" property, but you have to take into account that the properties "width" and "height" need to be modified according to the new image. Here it is highly recommended that the target image height be 34px because a higher value will create an undesired effect on the other elements of the navigation bar.
  • The Support Logo in the Login Screen is obtained from /web/images/SupportLogo_big.png. It is managed by "Login_Logo_Support" of Logos.css. You can replace it with any other by directly replacing the file SupportLogo_big.png or changing the "background: url()" property, but you have to take into account that the properties "width" and "height" need to be modified according to the new image.
  • The SourceForge Logo in the Login Screen is obtained from http://sflogo.sourceforge.net/sflogo.php?group_id=162271&type=5. It is managed by "Login_Logo_Support" of Logos.css. You can replace it changing the "background: url()" property, but you have to take into account that the properties "width" and "height" need to be modified according to the new image. If your client does not have an Internet connection, you can replace the property to "background: url(SFLogo.png) no-repeat center center;" because SFLogo.png also exist in the distribution

There are two ways to change the logos.

  1. Modify the existing files keeping the original filename.
    • Save the existing logo files.
    • Modify the existing files without changing the dimensions. (However this can be a little restrictive)
    • Use the same file names as the original logos.
  2. Creating your own files and telling Openbravo to use them.
    • Look at the existing files to find out the height.
    • Create you own logo using the same height, but your own width. (Providing you use the same height the logo will fit into the existing layout)
    • Edit /web/images/Logos.css defining your filenames and adjust the dimensions.
Note: In a standard installation this file is: /opt/OpenbravoERP/AppsOpenbravo/web/images/Logos.css

Extract for Company logo on the login screen:


.Login_Logo_Company {
 width: 273px;
 height: 55px;
 margin-top: 3px;
 margin-bottom: 3px;
 background: url(AshleyLogo273x55.png) no-repeat center center;
}

Extract for the support logo on the login screen:


.Login_Logo_Support {
 width: 197px;
 height: 55px;
 margin-top: 3px;
 margin-bottom: 3px;
 background: url(ErinstarLogo197x55.png) no-repeat center center;
}

Extract for the nav bar logo that appears on every screen


.Menu_NavBar_logo {
 width: 190px;
 height: 34px;
 background: url(AshleyLogo190x34.png) no-repeat center center;
}

For both methods:

    • Recompile Openbravo and re-start tomcat to see the changes.

Customizing search and data entry windows

Right To Left languages

If a css line must be different when the language of the application is written from right to left (RTL languages), a tag like this must be added:

background-position: center right; /*~RTL   background-position: center left;  */

this way, the compilation process will write the line

background-position: center right;

in the ltr skin folder, and the line

background-position: center left;

in the rtl skin folder. This way, a fine tunning can be done in a skin to fit also the rtl languages.

If there exists already a comment related to Sprites in a css line of the class, then both rtl and ltr values must be defined. For example, for the original class

a.ButtonLink table.Button .Button_left, table.Button .Button_left {
 width: 35px;
 height: 26px;
 background-repeat: no-repeat;
 background-position: center right;
 background-image: url(Common/Button/buttonLeft.normal.png);  /** sprite-ref: xxspritexx_V; sprite-alignment: right; */
 text-align: right;
 vertical-align: top;
}

the rtl changes to apply will be:

a.ButtonLink table.Button .Button_left, table.Button .Button_left {
 width: 35px;
 height: 26px;
 background-repeat: no-repeat;
 background-position: center right; /*~RTL   background-position: center left; */
 background-image: url(Common/Button/buttonLeft.normal.png);  /** sprite-ref: xxspritexx_V; sprite-alignment-ltr: right; sprite-alignment-rtl: left; */
 text-align: right; /*~RTL   text-align: left; */
 vertical-align: top;
}


Customizing the application menu

Versions before 2.34

Log in the application and set your role to System Admin. Then go to General Setup > Application > Menu. Once you arrive to that window, you need to click on the "tree" button, and a new window with all the menus will pop up. Once there, you will notice 2 sides on the window. On the top side you will see the all the menus in a "tree" mode. On the down side you should see some checkboxes.

Image:menu3.png

The first thing you should do is to click on "take element", on the down side of the window. Then click the menu you want to move (the application dictionary in the example). Then click in the "Assign to" checkbox in the down side, and after that select again another menu on the top side. The last thing you need to do is to specify if you want the first menu to be under the secondly selected menu (same level) or if you want it to be inside the secondly selected menu (inside) to become a son of the first menu. Click on OK to the changes to take effect.

Image:menu4.png

In order to see the changes you just made, just log out-log in and there you go. You don not need to compile anything.

Image:Example.jpg

Versions 2.34 and above

Same as for previous versions, you must log in the application and set your role to System Admin. Then go to General Setup > Application > Menu. Once you arrive to that window, you need to click on the "tree" button, and a new window with all the menus will pop up.

Once there, with the drag and drop utility, just drag the menu you want to move, and drop it anywhere. You will see instantly the new position of the menu in that window.

Image:menu1.png

In order to see the changes you just made, just log out-log in and there you go. You don not need to compile anything.

Image:menu2.png

Retrieved from "http://wiki.openbravo.com/wiki/Customizing_Openbravo_ERP_look_and_feel"

This page has been accessed 24,024 times. This page was last modified 09:46, 27 November 2008. Content is available under Creative Commons Attribution-ShareAlike 2.5 Spain License.

Posted by 1010
98..Etc/ERP2009. 1. 8. 14:43
반응형

Openbravo ERP installation

Rating :
5.00/5
(3 votes cast)
You have to be registered to be able to vote

Contents

[hide]

Introduction

Important note: this document applies to versions 2.35 and 2.40 of Openbravo ERP

This article explains how to install Openbravo ERP.

Before getting started, please make sure that you have properly installed the Openbravo environment, i.e.:

Take a look at the specifications for the correct versions.

Important notes:

Openbravo ERP can be installed in two different ways:

License

Openbravo ERP is licensed under the Openbravo Public License Version 1.1:

The contents of this file are subject to the Openbravo Public License Version 1.1 (the "License"), being the Mozilla Public License version 1.1 with a permitted attribution clause; you may not use this file except in compliance with the License. You may obtain a copy of the License at http://www.openbravo.com/product/legal/license/.

Software distributed under the License is distributed on an "AS IS" basis, WITHOUT WARRANTY OF ANY KIND, either express or implied. See the License for the specific language governing rights and limitations under the License.

The Original Code is Openbravo ERP. The Initial Developer of the Original Code is Openbravo SL. All portions are Copyright (C) 2001-2008 Openbravo SL. All Rights Reserved.


Subversion source code

To be able to check out Openbravo ERP source code from Openbravo Subversion repository you need to install Subversion (SVN) version control system client.

Once Subversion client is installed, move to the directory where you want to check out last source code tag and type in command line:

svn co https://dev.openbravo.com/svn/openbravo/tags/r2.40 openbravo-240

Move to openbravo-240 directory and configure Openbravo.properties and log4j.lcf files using the graphical assistant (wizard) inside the config/setup-tool directory:

  • Linux: setup-properties-linux.bin
  • Windows: setup-properties-windows.exe

Note that these wizards can also be run in a text mode without a graphical system. This is autodetected.

Before starting with compilation, please check that Openbravo.properties and log4j.lcf files (inside config directory) have been properly configured. If not, edit them manually.

Create the database from *.xml files and install Openbravo ERP in a single step by typing in command line:

ant install.source

Finally, deploy openbravo.war file to Apache Tomcat context directory (usually webapps) by typing in command line:

ant deploy

If you are using PostgreSQL database, before Openbravo ERP can be accessed properly, it is necessary to clean up the database using the following command:

vacuumdb -f -z -h hostname -d dbname -U username

Replace hostname with the actual hostname of your DB server, dbname with the database name (by default openbravo), and username with the name of the DB user (by default tad).

Bitrock installer

Download the latest Openbravo ERP Installer.

  • If using Windows, double click on it.
  • If using Linux, make it executable and run it:
chmod +x OpenbravoERP_2.40-linux-installer.bin
./OpenbravoERP_2.40-linux-installer.bin

An installation assistant (wizard) pops-up:


Read and accept Openbravo Public License Version 1.1 before proceeding with the installation process.

By clicking on Forward button the terms and conditions of this license are agreed.


Indicate the directory where Openbravo ERP is going to be installed.

After clicking on Forward button, select also the directory for attachments.


Then choose the installation type:

  • A Complete installation including database and application.
  • A Distributed installation selecting only one of the components.


The Complete installation, offers two modes:

  • Standard: The database is created and the application is installed. This is the quickest installation and it is recommended for getting started with Openbravo ERP.
  • Development: The database is created, the application is compiled and the generated files installed. This installation is slower but it's recommended for developers.


Provide the directory where Java Development Kit (JDK) is installed.

If the JDK has been properly installed, installation directory should be recognized automatically.


Provide the full path of the Apache Ant binary.

If Apache Ant has been properly installed, the binary path should be recognized automatically.


Provide the directory where Apache Tomcat is installed.

If Apache Tomcat has been properly installed, installation directory should be recognized automatically.


Indicate which database you want to use.

Currently, Oracle and PostgreSQL are supported.


Provide the full path of the database binaries.

These binaries are psql, vacuumdb and pg_restore in PostgreSQL, and imp, sqlplus in Oracle's case.


Provide the database parameters that allow the installer to connect with the database. Your database must be running during this step since database credentials are verified. The following parameters are required:

  • Database host: The IP address or the host name where database service is running.
  • Database port: The port that database service is listening to (By default, 5432 in PostgreSQL and 1521 in Oracle).

After clicking on Forward button, if using an Oracle database, SID (Oracle System Identifier) and TNS (Transparent Network Substrate) will be required.


In the next window, if using PostgreSQL database.

Type twice the password for the postgres administrator user. If using Oracle database type twice the password for the system user. Actually, Openbravo ERP requires administrator privileges to create database elements.


If using PostgreSQL:

Specify the name of the database that will hold Openbravo ERP data model. Then type the database username and password that will contain Openbravo ERP database objects.


Give a context name to your application.

This will be used to access Openbravo ERP through Tomcat: http://<ip_address>:<port>/<context_name>


Next, select the preferred date and time format:


Finally, choose between having demo data (BigBazaar) or not:


Click Forward twice to go ahead with Openbravo ERP installation.

This process may take 10-30 minutes for the Standard mode and 30-90 minutes for the Development mode, depending on the processing capabilities of the machine where Openbravo ERP is being installed.


Running Openbravo ERP

In both cases, stop and start Tomcat service to finish installation process.

At this point, you should have inside Apache Tomcat webapps directory (C:\Apache Software Foundation\Tomcat5.5\webapps\ or C:\Tomcat5.5\webapps\ in Microsoft Windows and /var/lib/tomcat5.5/webapps/ in Linux):

  • your_context_name.war file.


If this is not the case:

  • Stop Tomcat service.
  • Copy your_context_name.war file from lib directory of the installation.
  • Paste it into Apache Tomcat webapps directory.
  • Start Tomcat service again.


Access Openbravo ERP via your web browser by typing the exact context URL, for instance, http://localhost:8180/openbravo/.

Check that your_context_name directory is created inside Apache Tomcat webapps directory.


Important notes: Error HTTP Status 404 - File not found page instead of Login page reveals a problem with the context URL. For both cases, please make sure that you correctly typed the URL. Write a URL in the form:

http://hostname:port/context_name

For example:

http://localhost:8080/openbravo


Type Openbravo in Username text box and openbravo in Password text box. Then click on Login button.


Congratulations! You are done with Openbravo ERP installation :)


Important note: Please notice that first log in is done with System Administrator role so you will not be able to see business options (message AccessTableNoView will display instead) but only administration tasks. In order to access business partners, products, sales and procurement orders and so on, change your role to BigBazaar Admin (or Openbravo Admin) by clicking on Openbravo link (left up) image:ChangeRole1.png and selecting it in Role information pop-up window. You can also set this role as default by checking Set as default check box.


Configurations after installation

After Openbravo ERP is properly installed and running, there are a few parameters that you can customize to adapt better Openbravo ERP to your country or region.


Installing a translation

It is always more fun to get Openbravo ERP translated into your language :)


Configuring the default date and time formats

To change the default Openbravo ERP date format launch the setup tool inside the config/setup-tool directory.

Once all the changes are done, recompile and deploy Openbravo ERP:

ant compile.complete
ant war
ant deploy

Configuring the default numbering format

You can modify the default numbering format by editing the Format.xml file inside config directory. You should have decimal="." grouping="," for every category. Once this is done you will have to restart Tomcat and the reports will show as you wish.


Known issues

Here is a list of common issues with Openbravo ERP installation. You could also find your problem at Openbravo environment installation issues.


Tomcat hot-deployment problem on Windows

There is a known issue with Tomcat working under Windows. Openbravo ERP does a hot-deploy of openbravo.war file to Tomcat but on Windows it often encounters file locking issues. Windows will not let Tomcat undeploy the old application because files are locked by the Operating System. Tomcat has mechanisms to allow avoiding locking. In Tomcat 5.5 and 6.0, this mechanism is disabled by default. To enable it edit %CATALINA_BASE%\conf\context.xml. Find the root <context> and add these two attributes:

<context antiJARLocking="true" antiResourceLocking="true" />


Jasper Reports Issue

When compiling the source code, the application server needs Internet connection in order to compile successfully the *.jrxml files. If not, the Jasper reports will not work on the application.

In Windows, firewalls could also block Jasper reports compilation so turn them off temporarily.

The header of these .jrxml files is like:

<?xml version="1.0" encoding="UTF-8"  ?>
<!DOCTYPE jasperReport PUBLIC "//JasperReports//DTD Report Design//EN" "http://jasperreports.sourceforge.net/dtds/jasperreport.dtd">

If the application server does not have Internet connection, you will have some errors while compiling the sources even if the build is successful. When you call one of these reports in the application, you will get something similar to this:

org.xml.sax.SAXParseException: Premature end of file.

If you edit all the jrxml files (up to 58) and delete the line where it calls the Internet connection,

<!DOCTYPE jasperReport PUBLIC "//JasperReports//DTD Report Design//EN" "http://jasperreports.sourceforge.net/dtds/jasperreport.dtd">

the compilation will report no errors, but the translation will be done badly, and when calling one of these reports in the application, you will get an error window:

Language "null" not supported by this report compiler. Expecting "java" instead.

So, the final solution for this issue is to replace the line

<!DOCTYPE jasperReport PUBLIC "//JasperReports//DTD Report Design//EN" "http://jasperreports.sourceforge.net/dtds/jasperreport.dtd">

by this one

<!DOCTYPE jasperReport PUBLIC "//JasperReports//DTD Report Design//EN" "/tmp/jasperreport.dtd">

in all 58 .jrxml files in order to avoid the contact with the previous URL, and so the compilation and the application reports will work well.


Unsatisfied Link Error executing a Jasper Report

In some Linux distributions there is a problem using Java SDK 1.5.0_13 or 1.5.0_15 and Tomcat running as a daemon [jsvc]. When a Jasper Report is launched an error appears indicating that it cannot find a library. The easiest way of fixing it is editing /etc/init.d/tomcat script and export the variable LD_LIBRARY_PATH to the path where the library (libawt.so) is located.

For example:

LD_LIBRARY_PATH=/usr/lib/jvm/java-1.5.0-sun-1.5.0.13/jre/lib/i386/
export LD_LIBRARY_PATH

In Ubuntu there is a shorter path which works on all subreleases of 1.5 (i.e. 1.5.0_13 and 1.5.0_15). It is using a symbolic link which automatically points to the correct directory:

LD_LIBRARY_PATH=/usr/lib/jvm/java-1.5.0-sun/jre/lib/i386/
export LD_LIBRARY_PATH


Jasper Reports environment variable

In some configurations to make the JasperReports work, you need to add to environment variable CATALINA_OPTS the parameter -Djava.awt.headless=true. The CATALINA_OPTS should look something similar to CATALINA_OPTS ="-server -Xms384M -Xmx512M -Djava.awt.headless=true"


Internet Explorer 6

The main problem is that IE6 does not support PNG with alpha channel. IE7 and Mozilla Firefox do.

First solution: replace PNG images with GIFs

  • It is not possible just to replace PNG images with GIFs, because PNG have for every pixel an alpha channel, but GIF don't. GIF supports only a subset of 256 colors, but that's not the biggest problem. With GIFs you just have the possibility to define a color as full transparent or not. That means that a gradient from black to transparent is impossible.

Second solution: avoid using transparencies

  • This implicates that overlaying images could not be used. For example an icon in the toolbar, has an a rounded rectangle background on hover and on press. The usage is easy now, because we can overlay these images with the icon. But without transparencies we would need 3 different icons. Three times the same with different backgrounds. That requires a lot of icons to be build.
  • The problem in this case is not only that we have to rebuild all icons with every possible backgrounds, the problem is also on the implementation side of reconstructing your structure of HTML and CSS.

Third solution: filters

We have tried several filter solutions but it can not be applied without a big change of css and html files.

So the only feasible solution would be build a new skin with gif images, loosing interface quality. You can find info about how to build a new skin.

You always also have the choice of install Mozilla Firefox or update to IE7 (if you are a Windows XP user).


Openbravo ERP FAQ

Openbravo's ERP Frequently Asked Questions (FAQ).

Summary

Openbravo ERP installation should not present any other special problem if Openbravo environment has been properly installed before.


Support

For any question or doubt regarding Openbravo ERP installation, post them in Openbravo Help forum or join #openbravo IRC channel in Freenode.

Retrieved from "http://wiki.openbravo.com/wiki/Openbravo_ERP_installation"

This page has been accessed 130,153 times. This page was last modified 15:42, 24 November 2008. Content is available under Creative Commons Attribution-ShareAlike 2.5 Spain License.


Category: Installation
Posted by 1010
98..Etc/ERP2009. 1. 8. 14:20
반응형

지속된 뒤로 물러나라 비용을 들이는 야기하고 미끄러지고 열심히이어라 해라 headquartered 가져라 가리키고 가진다 영향을 받는 서명해라 미뤄라 설명한다 비용을 들이고 가진다 담그는 중에(위)에(위)에 예를 들면 안에(위)에 안에 불확실하게 최근 재무 얼마나 극적으로 단지 그들의 이것들 시간 다수 조직 그것 어떤 것 소프트웨어 vendor 주식 warnings. 회사 Waldorf Germany 그것 위기 능력 계약 그 만큼 고객 그것 투자 hold.  이것 기업 응용 약간 주 일찍 있다.

대부분의 조직은 비용이 대개 ERP 솔루션을 실행하기에 매우 높고 지루하고 많은 시간과 넣을 많은 노력을 필요로 한다고 생각한다. 이들 시간에 most  조직은 어느 것이 있다 대체 소프트웨어 솔루션을 찾고 있을 수 있다:

  • 비용에(서)더 낮은
  • 여러 면에서 융통성이 있는
  • 큰 한 무리의 사용자를 가지기
  • 솔루션 공급자(위)에 부양 가족이지 않기

결점에 대응하기 위해 above 열려 있는 말한 소스 ERP 솔루션은 대답일 지도 모른다. 열려 있는 소스 ERP 솔루션을 가지고 회사가 솔루션을 다운로드할 수 있고 회사에게 맞는 비즈니스 요건에 따라 그것을 사용자의 요구에 맞출 수 있다. ’s 비즈니스 흐름과 과정. 대부분의 시간 이행과 이들 솔루션의 사용자는 유형의 ERP 솔루션이 아래에(서)나오는 모델을 인가하는 것에(게)유일하게 묶인다.

당신의 조직이 조직 안에서 비즈니스 과정에게 가장(잘)맞는 ERP 솔루션을 실행할 계획이라면 다음은 평가하고 실행하기에 좋고 입증한 열려 있는 6 (6)소스 ERP 솔루션이다:


Compiere은 기업 자원 기획(ERP)와 고객 관계 경영(자)(CRM)을 더 쉽게 만듬으로써 기업 응용의 경제학을 바꾸고 있다. 얻기 더 쉬운. 실행하기 더 쉬운. 퍼져 있기 더 쉬운. 변하기 더 쉬운.

Compiere은 다음 모듈과 능력을 지지한다:

  • 기준이 된 리포트 - 이 당신의 기업의 수행을 알리고 기준이 된 리포트와 통합된 보고 도구를 이용해서 관리한다.
  • 비즈니스 뷰는 최대한으로 활용된 보고 스키마를 통해 ecurely 액세스 비즈니스 데이터를 층지게 한다.
  • 셋째 파티 분석은 Compiere ERP와 CRM 데이터를 분석할 제3 보고와 분석 도구의 당신의 선택 se을 세공한다.
  • 물질적인 기획과 생산 스케줄링과 가게 바닥 실행 능력과 더불어 ontrol 제조 오퍼레이션을 생산하기.
  • 지불에 대한 획득으로부터 스텝 utomate을 사기.
  • 재료 경영(자)anage은 수입금과 선적과 이동과 당신의 창고와 공급자와 고객을 건너서 카운트를 요약하여 서술한다.
  • 오더 경영(자)이 인용문을 reate 책 오더가 재료를 관리하고 송장을 만들어 내고 현금을 모은다.
  • 세계적인 재무 ne 경영 시스템이 당신의 비즈니스 솔루션의 과정을 자동화하고 당신의 재무 기록을 관리한다.
  • 당신의 귀중한 고객 관계 경영(자)솔루션 매출 ontrol.
  • 안전한 웹 스토어 앞쪽을 달려라 그리고 전자 상거래가 reate.
  • 전체 서비스 배달 라이프 사이클 anage에 서비스한다.
  • 당신의 고객과의 상호작용의 360 도 뷰 고객 역사 ee.

Compiere은 현재 서비스 다수의 산업에(서)조직에 의하여 retail 즉 분배,재무 서비스,건강 관리,제조,출판사업을 이용하고 전문적이다. Compiere은 많은 성공 이야기를 가진다. 그들의 고객 중의 한사람은 2008의 as Compiere이 10,000 이상의 SKUs을 건너서,50 이상의 자회사와 채널 파트너를 통해 품목일람과 배열과 선적과 회계 과정을 관리할 수 있다고 말하였다.


Openbravo은 명확하게 솔루션 SME(midsize 회사에(게)작은 부분)을 위한 것인 공개자료 ERP이다. 웹에 기초를 둔 환경에(서)그것이 광범한 ERP의 부분이라고 생각된 많은 튼튼한 기능을 포함한다 개발된다: 획득과 창고 경영(자)와 프로젝트와 서비스 경영(자)와 생산 경영(자)와 재무 경영(자).

Openbravo ERP은 다음 모듈과 능력을 지지한다:

  • 재료의 빌,데이터 경영(자)-  제품,성분,고객,판매자,직원을 정복해라
  • 획득 경영(자)- 은 구매가 오더를 한다 제품 수입금과 송장 등록과 회계를 구매 기획으로 간주한다.
  • ��
  • 경영(자)-  프로젝트와 단계와 일과 자원과 예산과 비용과 비용을 계획하고 작성하는 관련된 산 물건 서비스한다.
  • 생산 경영(자)- 은 생산 계획,구조,BOM을 심는다. ’생산의 비용,제조 오더,일 리포트,일 발생,s,MRP,예방적인 유지보수 타입
  • 판매 경영(자)와 고객 관계 경영(자)CRM -  Prices,변화하는 양 판매 오더,레이트,선적 볼륨 할인,커미션,CRM 작성하기
  • ��
  • 비즈니스 지식(BI -  보고,다면적인 분석(OLAP))은 득점표의 무게를 쟀다.

최근에 Openbravo이 Category.  Openbravo이 기술 섹션에(서)나타나서 있는 혁신에(서)Volkswagen와 Acciona와 CINFA와 같은 다른 훌륭한 회사와 나란히 알아보아서 주요하다고 말한 스페인 비즈니스 잡지에 의하여 수여되었다.


xTuple PostBooks 판은 xTuple ERP 스위트를 얻어서 상에 따라 완전한 특별히 다루고 완전히 통합된 회계,ERP와 CRM 시스템이다.

C++을 위해 그것이 비즈니스와 산업의 범위를위해 파워와 융통성에(서)최종 단계를 제공한다 공개자료를 가지고 틀 PostgreSQL 데이터베이스와 공개자료 Qt을 세웠다. 그것은 다음 모듈을 포함한다:

  • 회계-전반적인 원장은 뱅크 화해,재무 보고를 믿을 만 하고 지급 가능하다고 생각한다.
  • 매출-주문 엔트리,판매 보고,인용문,선적
  • 보편적인 CRM - 주소록,사건 경영(자),기회 경영(자),일정 목록,프로젝트 경영(자)
  • -  구매주문서,받기,판매자 보고를 사기
  • 제품 정의-아이템,무한한 균일한 재료의 빌(BOM)
  • 다중 -  위치,다른 앞선 창고 특징을 요약하여 서술해라
  • 메이크가 오더를 하도록 제조 -  일 오더,강한 지원을 밝혀라
  • 열려 있는 OpenRPT - 소스 리포트 작가

모든 xTuple 제품처럼 PostBooks이 잘 윈도즈와 리눅스와 맥(위)에 동일하게 달리고 다중 세금 구조에 대한 지원과 multi-currency와 xTuple에 의하여 유지해 진 다국어 번역 팩 완전히 국제화된다. ’세계적인 s community.  PostBooks이 CPAL,OSI 보증된 공통적인 공공의 돌리기 라이센스 아래에(서)인가 받는다.

OpenERP은 열려 있는 소스 기업 경영(자)소프트웨어이다. 그것이 대부분의 기업 필요한 것과 과정을 덮고 통합한다: 서비스 경영(자),프로젝트 경영(자),회계,hr,매출,crm,구매,스톡,생산,마케팅 캠페인.

OpenERP 안에서 모듈이 요건에 따라 추가해 질 수 있다. 있다 사용가능한 모듈 중의 일부 추가한다:

  • 회계와 재무
  • 구매와 획득
  • 인력
  • 제조
  • 품목 콘트롤
  • 매출과 마케팅
  • 더 많은 사람(것) …

OpenERP이 현재 음식 산업과 같은 다수의 산업,뱅크와 보험,경매장,기타 등등   Metrexotic,이국적인 음식 효과적으로 그들의 판매 과정을 자동화하는 OpenERP일 필요성을 전문으로 하는 음식 산업 회사로부터 고객에 의해 사용되고 있다.


ERP5 커뮤니티는 당신의 비즈니스를 경영하는 데에 필요한 모든 특징을 제공한다. 문서관리나 인력 경영(자)이나 회계에(게)고객 관계 경영(자)으로부터 당신은 모든 것이 당신의 소규모 비즈니스를 다음 성공 이야기로 변화시키는 데에 필요한 것을 발견할 것이다.

,

ERP5 ’s 웹에 기초를 둔 플랫폼은 사용자와 관리자가 그것을 이용하고 웹 브라우저 소프트웨어를 통해 만들도록 허락한다. ERP5의 디자인 ’s 사용자 인터페이스는 이렇게 그것을 사용자 우호적인 ERP 시스템으로 만들어서 또한 독특하고 혁신적이다.

뚜렷한 ERP5 판은 ERP와 CRM와 대부분의 중소기업이 이익을 얻을 수 있는 km funtionalities을 제공한다. 그것이 사용자가 일과 ERP 시스템 안에서 스테이터스를 따라가도록 사용자 인터페이스를 최대한으로 활용해서 이동 전화를 통해 또한 ERP5 익스프레스에 접근할 수 있다.


opentaps은 당신의 기업을 위해 완전한 열려 있는 소스 플랫폼이다.   그것의 세련된 특징과 현대적인 건축은 이동하기 쉬운 상호 통신 능력과 built-in 비즈니스 지식 도구와 함께 완전한 ERP와 CRM 솔루션을 포함한다.  이 그것이 과정을 자동화할 수 있다 효율을 어떻게 향상시킬 수 있는지 보고 오늘 opentaps을 다운로드하고 당신의 전체 조직이 더 말쑥하게 그리고 더(잘)작용하도록 도와 준다.

다음은 opentaps 주요 모듈이다:

  • 온라인 스토어
  • CRM
  • 창고 응용
  • Financials
  • 구매
  • 관리상의 응용

당신은 유지하거나 퍼져 있는 데에 어려운 사내 솔루션을 위한 대체로서 또는 비싸고 구부러지지 않은 상업 ERP 솔루션에 대한 대안으로서 또는 당신의 독특한 비즈니스 모델과 과정을 세울 출발점으로서 opentaps을 이용할 수 있다.

JFire은 비즈니스 기업을 위해 새롭고 강력하고 자유로운 ERP와 CRM와 eBusiness와 SCM /SRM 솔루션이다.

JFire은 매우 포괄적이고 유연한 열려 있는 소스 ERP 솔루션이다. 그것이 사이즈 어떤 기업에게도 매우 강력한 분석과 보고와 주문형 옵션을 제공하도록 고안되었다. 이것은 세계적인 큰 사용자 베이스를 가지는 비즈니스와 multi-currency와 multi-language requirements.  JFire이 완전히 자유롭/열려 있을 뿐만 아니라 적은 회사를 지원하는 확장성이 큰 시스템과 함께 소스 소프트웨어가 최신 기술을 이용한다(J2EE 1.4,JDO 2.0이 RCP 3.3을 가린다)대단히 customizable이도록 고안된다 그리고 회사를 제공한다.

다음은 JFire이다. ’s 주요 모듈:

  • 회계
  • 융통성이 있는 가격 구성
  • CRM
  • 스토어 경영(자)
  • 외부의 지불과 배달과의 통합은 상호작용한다.
  • 보고

——————————끝 ———————————–

여기 당신은 평가하고 실행할 좋고 입증한 열려 있는   7 (7)소스 ERP 솔루션 간다. 즐겨라.

중간의 시장 1 개 회사가 공개자료로의 이동을 ERP으로 어떻게 만든 지를 알아내기 위해 공개자료 ERP의 해답 읽힙니까?

당신은 적당한 ERP 전략과 도구가 ERP 실행에 대한 굉장한 이점을 배달할 수 있다는 것을 알고 있었습니까? 이 자유로운 WHITEPAPER - 퍼포먼스 모니터로부터 어떻게 지를 알아내라: 빛의 속도에(서)ERP

또다른 whitepaper 당신이 ERP 개선에(서)주요 추세와 그들이 Forrester - 경쟁에 의하여 배달하는 이점을 배우도록 SMB ERP 고객을 위해 격화된다.

Posted by 1010
98..Etc/Etc...2009. 1. 6. 13:00
반응형

Process Explorer v11.31

By Mark Russinovich

Published: December 10, 2008

Introduction

Ever wondered which program has a particular file or directory open? Now you can find out. Process Explorer shows you information about which handles and DLLs processes have opened or loaded.

The Process Explorer display consists of two sub-windows. The top window always shows a list of the currently active processes, including the names of their owning accounts, whereas the information displayed in the bottom window depends on the mode that Process Explorer is in: if it is in handle mode you'll see the handles that the process selected in the top window has opened; if Process Explorer is in DLL mode you'll see the DLLs and memory-mapped files that the process has loaded. Process Explorer also has a powerful search capability that will quickly show you which processes have particular handles opened or DLLs loaded.

The unique capabilities of Process Explorer make it useful for tracking down DLL-version problems or handle leaks, and provide insight into the way Windows and applications work.


Download Process Explorer (1.6 MB)


Run Process Explorer now from Live.Sysinternals.com

Posted by 1010
98..Etc/Etc...2009. 1. 6. 09:22
반응형
 

윈도우 2003 서버는 설치될 때 기본으로 터미널 서비스를 어플리케이션 모드로 설치를 하는데 이렇게 되면 접속하는 장치당 최초 접속으로 부터 90일간의 사용기간을 주고 이 기간이 지나면 접속이 안되게 된다. 물론 돈을 주고 라이센스를 사야하는 경우가 발생하는 것이다. 라이센스 비용이 만만치 않으므로 서버 관리자만 서버를 리모트로 접속할 경우라면(대부분 이러한 경우일 것이다.) 터미널 서버 설치 모드를 관리자 모드로 바꾸어야 한다.

제어판>시스템>원격

에 들어가서 이 컴퓨터의 원격지원을 허용함을 체그하면 관리자 모드로 전환되고 2개의 관리자 세션은 라이센스 없이 영구히 사용할 수 있다. 접속할 사용자를 원격 사용자 그룹에 추가하는 것도 잊지 말자.

마이크로소프트가 터미널 서버 라이센스를 팔아먹고 싶어서 그러는지 2003은 설치시 물어 보지도 않고 어플리케이션 모드로 설치해 버리기 때문에 90일 후에 황당한 경우를 당하게 되고 이렇게 되면 관리자 모드가 뭔지 모른다면 그냥 돈을 내고 라이센스를 사게 되는 것을 유도 하는 것으로 보인다.

일단 접속이 안되는 상태로 되면 설정을 바꿀수가 없게 되는데 이럴때 IDC로 달려가지는 말고 서버에 접속한 적이 없는 다른 사람컴퓨터로 접속하면 일단 접속이 되므로 이를 이용하여 설정을 바꾸면 된다.

Posted by 1010
98..Etc/Etc...2009. 1. 5. 17:00
반응형

터미널 서비스 클라이언트의 라이센스 만료시 대처방법


1. 실행창에서 regedit 실행

2. HKEY_LOCAL_MACHINE\SOFTWARE\Microsoft\MSLicensing\HardwareID
로 이동

큰 이미지 보기

3. ClinetHWID의 값을 삭제합니다.

4. 동일한 tree내의 Store폴더 아래의 LICENSE000(폴더)의 키를 삭제


이렇게 한후, 연결을 하면, 터미널 서버로부터 2개월짜리의 임시라이센스를 가져와 레지스트리를 업그레이드합니다.

Posted by 1010